


Building new bike. Need instructions
 04-12-14, 07:16 AM
#1
Senior Member
Thread Starter

Join Date: Jun 2010
Posts: 803
Mentioned: 0 Post(s)
Tagged: 0 Thread(s)
Quoted: 23 Post(s)
Likes: 0
Liked 1 Time
in
1 Post
Building new bike. Need instructions
Finally all the parts have arrived and I am ready to build my new bike tomorrow.
I need to know in what order I put the parts and component on, something like step by step guide
This is my plan:
1. Headset bearings
1a. Protective film on chainstay drive side
1b. Bottom bracket
2. Brakes Front and Rear
3. Fork
3a. Handle bar, shifters, brake levers (TT)
3b. Crankset
4. FD and chain catcher
5. RD
6. Run cable housings (internal cables)
7. Wheels
8. Cables
9. Seatpost/Saddle
10. Adjust headset if needed
11. Adjust brakes
12. Adjust RD and FD
What do you think about my plan? What would you do differently and why?
Thanks!
 04-12-14, 07:22 AM
#2
Senior Member
Join Date: Aug 2005
Location: Pittsburgh, PA
Posts: 33,656
Bikes: '96 Litespeed Catalyst, '05 Litespeed Firenze, '06 Litespeed Tuscany, '20 Surly Midnight Special, All are 3x10. It is hilly around here!
Mentioned: 39 Post(s)
Tagged: 0 Thread(s)
Quoted: 2026 Post(s)
Likes: 0
Liked 1,096 Times
in
742 Posts
#6 : Unless you are certain the internal cables have guide tubes in the frame, I'd run the internal cable housings before installing the bottom bracket, fork or seatpost. You may have to get your fingers into the downtube, toptube or headtube to guide the housing and you want access to these tube ends. Also,#2 and #3 , why install the front brake before you install the fork?
04-12-14, 07:25 AM
#3

Senior Member
Join Date: Oct 2011
Location: Fairplay Co
Posts: 9,523
Bikes: Current 79 Nishiki Custum Sport, Jeunet 620, notable previous bikes P.K. Ripper loop tail, Kawahara Laser Lite, Paramount Track full chrome, Raliegh Internatioanl, Motobecan Super Mirage. 59 Crown royak 3 speed
Mentioned: 26 Post(s)
Tagged: 1 Thread(s)
Quoted: 790 Post(s)
Liked 1,769 Times
in
635 Posts
Your close eneugh on your order I would likely do the Headset fork first and the BB crank second so you have them to work with while doing the rest. Then you can pretty much through the stuff on there and get it done.
Last edited by zukahn1; 04-12-14 at 07:30 AM.
04-12-14, 07:33 AM
#5
Senior Member
Thread Starter
Join Date: Jun 2010
Posts: 803
Mentioned: 0 Post(s)
Tagged: 0 Thread(s)
Quoted: 23 Post(s)
Likes: 0
Liked 1 Time
in
1 Post
#6 : Unless you are certain the internal cables have guide tubes in the frame, I'd run the internal cable housings before installing the bottom bracket, fork or seatpost. You may have to get your fingers into the downtube, toptube or headtube to guide the housing and you want access to these tube ends. Also,#2 and #3 , why install the front brake before you install the fork?
I install the front brake on fork first, because it seems easier to do it on fork itself.
04-12-14, 07:38 AM
#6
Senior Member
Thread Starter
Join Date: Jun 2010
Posts: 803
Mentioned: 0 Post(s)
Tagged: 0 Thread(s)
Quoted: 23 Post(s)
Likes: 0
Liked 1 Time
in
1 Post
 it is fun. BTW this is my first bike I am assembling myself, though I took apart and put back the bike I already have.
Internal cables are not that bad. I have a frame where cable housings themselves run inside the wide plastic tubes. I tried to slip one of them, and it works ok.
This is how it looks:
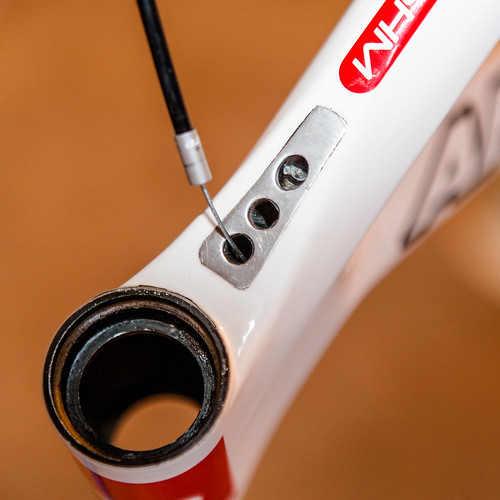 XK8V6974 by Genna B, on Flickr
04-12-14, 07:59 AM
XK8V6974 by Genna B, on Flickr
04-12-14, 07:59 AM
#7
Senior Member

Join Date: Apr 2011
Location: Alpharetta, GA
Posts: 15,280
Bikes: Nashbar Road
Mentioned: 71 Post(s)
Tagged: 0 Thread(s)
Quoted: 2934 Post(s)
Liked 341 Times
in
228 Posts
I've only done one, but it was fun. I couldn't wait for an organized plan and put the pieces on as they came in  within reason.
within reason.
04-12-14, 08:24 AM
#8
Senior Member

Join Date: Dec 2009
Location: Houston, TX
Posts: 28,682
Bikes: 1990 Romic Reynolds 531 custom build, Merlin Works CR Ti custom build, super light Workswell 066 custom build
Mentioned: 109 Post(s)
Tagged: 1 Thread(s)
Quoted: 6556 Post(s)
Likes: 0
Liked 58 Times
in
36 Posts
04-12-14, 08:50 AM
#10
Banned
What would you do differently and why
have you bothered to search any how to pages , or pick up a book?.
what is the barter work have you to trade tor the help?
04-12-14, 10:17 AM
#11
Senior Member
Join Date: Dec 2009
Location: Houston, TX
Posts: 28,682
Bikes: 1990 Romic Reynolds 531 custom build, Merlin Works CR Ti custom build, super light Workswell 066 custom build
Mentioned: 109 Post(s)
Tagged: 1 Thread(s)
Quoted: 6556 Post(s)
Likes: 0
Liked 58 Times
in
36 Posts
04-12-14, 11:42 AM
#12
Senior Member
Thread Starter
Join Date: Jun 2010
Posts: 803
Mentioned: 0 Post(s)
Tagged: 0 Thread(s)
Quoted: 23 Post(s)
Likes: 0
Liked 1 Time
in
1 Post
All instructions I was able to find on Youtube are about assembling bikes that come (for example from BD) partially assembled. This is not what I have. That is why I am trying to lay down the plan before I start.
04-12-14, 11:48 AM
#13
Banned
Buy a book on bike repair , or visit the Public Library .. you have of course a lot of special bike tools to buy
perhaps you should avail yourself of a bike shop and speak to people in real time and present.
thousands of other posts here, before today , have you looked for any?
kids .. Internet induced helplessness
install the f'ing Fork & BB .
you want mom to tie you shoes for you too?
perhaps you should avail yourself of a bike shop and speak to people in real time and present.
thousands of other posts here, before today , have you looked for any?
kids
.. Internet induced helplessness install the f'ing Fork & BB .
you want mom to tie you shoes for you too?
Last edited by fietsbob; 04-12-14 at 02:23 PM.
04-12-14, 05:08 PM
#14
Senior Member
Join Date: Aug 2005
Location: Pittsburgh, PA
Posts: 33,656
Bikes: '96 Litespeed Catalyst, '05 Litespeed Firenze, '06 Litespeed Tuscany, '20 Surly Midnight Special, All are 3x10. It is hilly around here!
Mentioned: 39 Post(s)
Tagged: 0 Thread(s)
Quoted: 2026 Post(s)
Likes: 0
Liked 1,096 Times
in
742 Posts
Shimano, Campagnolo, and I assume SRAM, all have Tech Document" web sites with their component's instruction sheets, installation and adjustment directions and parts diagrams. Look up the appropriate ones if your parts don't include the proper documentation. Park Tools also has a huge range of tutorials on their web site.
04-12-14, 05:25 PM
#15
Senior Member
Join Date: Dec 2009
Location: Houston, TX
Posts: 28,682
Bikes: 1990 Romic Reynolds 531 custom build, Merlin Works CR Ti custom build, super light Workswell 066 custom build
Mentioned: 109 Post(s)
Tagged: 1 Thread(s)
Quoted: 6556 Post(s)
Likes: 0
Liked 58 Times
in
36 Posts
Of course a sensible action plan cannot hurt, but for the most part putting together a bike is really just about hanging the parts on the frame in some sensible order. You won't go too far wrong whether you start at the back, the front or the middle. I just let the spirit move me as to what goes on next. I like your idea of putting on the stay protector early. The crank and rear wheel can get in the way of that.
I do put the brakes on the fork after installing the fork, however. And likewise the pedals go on after the crank is installed. Bars go on after the stem is installed. That is because having less weight on the stem helps you to feel the proper adjustment of the head set bearings. Rear brakes go on just about anytime but always before the rear wheel to give your wrench as must freedom to turn in the tight space as possible. You need the rear wheel on before you can size the chain. Can't think of much else.
I do put the brakes on the fork after installing the fork, however. And likewise the pedals go on after the crank is installed. Bars go on after the stem is installed. That is because having less weight on the stem helps you to feel the proper adjustment of the head set bearings. Rear brakes go on just about anytime but always before the rear wheel to give your wrench as must freedom to turn in the tight space as possible. You need the rear wheel on before you can size the chain. Can't think of much else.
04-12-14, 06:54 PM
#16
Senior Member
Thread Starter
Join Date: Jun 2010
Posts: 803
Mentioned: 0 Post(s)
Tagged: 0 Thread(s)
Quoted: 23 Post(s)
Likes: 0
Liked 1 Time
in
1 Post
Of course a sensible action plan cannot hurt, but for the most part putting together a bike is really just about hanging the parts on the frame in some sensible order. You won't go too far wrong whether you start at the back, the front or the middle. I just let the spirit move me as to what goes on next. I like your idea of putting on the stay protector early. The crank and rear wheel can get in the way of that.
I do put the brakes on the fork after installing the fork, however. And likewise the pedals go on after the crank is installed. Bars go on after the stem is installed. That is because having less weight on the stem helps you to feel the proper adjustment of the head set bearings. Rear brakes go on just about anytime but always before the rear wheel to give your wrench as must freedom to turn in the tight space as possible. You need the rear wheel on before you can size the chain. Can't think of much else.
I do put the brakes on the fork after installing the fork, however. And likewise the pedals go on after the crank is installed. Bars go on after the stem is installed. That is because having less weight on the stem helps you to feel the proper adjustment of the head set bearings. Rear brakes go on just about anytime but always before the rear wheel to give your wrench as must freedom to turn in the tight space as possible. You need the rear wheel on before you can size the chain. Can't think of much else.
1. Run cable housings (internal cables)
2. Protective film on chainstay drive side
3. Headset bearings
4. Fork/Stem/Front Brakes
5. Rear Brakes
6. Handle bar, shifters, brake levers (TT)
7. Route and trim cable housing on the handle bar
7a. Inline barrel adjuster on FD housing
8. Run the cables
9. Bottom bracket/Crankset
10. FD and chain catcher
11. RD
12. Wheels/Chain
13. Seatpost/Saddle
14. Pedals
15. Adjust headset, brakes, RD and FD
16. Ride
04-13-14, 06:46 PM
#17
Senior Member
Thread Starter
Join Date: Jun 2010
Posts: 803
Mentioned: 0 Post(s)
Tagged: 0 Thread(s)
Quoted: 23 Post(s)
Likes: 0
Liked 1 Time
in
1 Post
I did it!
This is before:
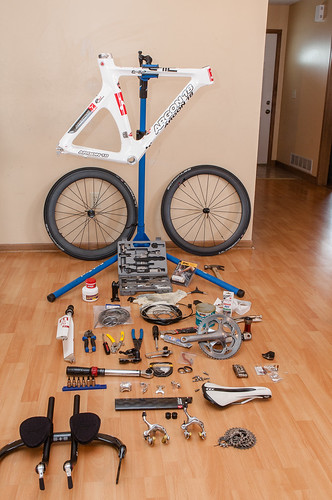
This is 4 hrs 37 min later:

I looked up the internet only once, because got mental block about what brake is front and what is rear. I left the housings intentionally longer than needed, will trim them after the retul fitting.
I did not do any fitting today, just estimated the seat height to be the same as on my road bike. Then I took a ride for about an hour, and it was fun, got average speed over 20 mph. Could be faster, but my seat bolt became loose, and I had to stop twice to tighten them with my fingers, because did not take any tools with me.
I want to thank you all for answering my questions
I liked it, will do it again any time I have an opportunity for a new bike.
This is before:
This is 4 hrs 37 min later:
I looked up the internet only once, because got mental block about what brake is front and what is rear. I left the housings intentionally longer than needed, will trim them after the retul fitting.
I did not do any fitting today, just estimated the seat height to be the same as on my road bike. Then I took a ride for about an hour, and it was fun, got average speed over 20 mph. Could be faster, but my seat bolt became loose, and I had to stop twice to tighten them with my fingers, because did not take any tools with me.
I want to thank you all for answering my questions
I liked it, will do it again any time I have an opportunity for a new bike.
04-13-14, 07:10 PM
#18
Senior Member
Join Date: Dec 2009
Location: Houston, TX
Posts: 28,682
Bikes: 1990 Romic Reynolds 531 custom build, Merlin Works CR Ti custom build, super light Workswell 066 custom build
Mentioned: 109 Post(s)
Tagged: 1 Thread(s)
Quoted: 6556 Post(s)
Likes: 0
Liked 58 Times
in
36 Posts
04-13-14, 09:51 PM
#19
Senior Member
Join Date: Mar 2010
Location: City of Brotherly Love
Posts: 1,562
Bikes: Raleigh Companion, Nashbar Touring, Novara DiVano, Trek FX 7.1, Giant Upland
Mentioned: 0 Post(s)
Tagged: 0 Thread(s)
Quoted: 22 Post(s)
Likes: 0
Liked 0 Times
in
0 Posts
Of course a sensible action plan cannot hurt, but for the most part putting together a bike is really just about hanging the parts on the frame in some sensible order. You won't go too far wrong whether you start at the back, the front or the middle. I just let the spirit move me as to what goes on next. I like your idea of putting on the stay protector early. The crank and rear wheel can get in the way of that.
04-14-14, 06:50 AM
#22
Senior Member
Join Date: Mar 2010
Location: Minnesota and Southern California
Posts: 628
Bikes: Specialized Tarmac (carbon), Specialized Roubaix (carbon, wifey), Raleigh Super Course (my favorite), and 2 Centurion project bikes.
Mentioned: 0 Post(s)
Tagged: 0 Thread(s)
Quoted: 1 Post(s)
Likes: 0
Liked 1 Time
in
1 Post
Buy a book on bike repair , or visit the Public Library .. you have of course a lot of special bike tools to buy perhaps you should avail yourself of a bike shop and speak to people in real time and present. thousands of other posts here, before today , have you looked for any? kids .. Internet induced helplessness install the f'ing Fork & BB . you want mom to tie you shoes for you too?
.. Internet induced helplessness install the f'ing Fork & BB . you want mom to tie you shoes for you too?Offhand, I can't think of any thing more non-productive, off-putting, or cowardly. See above for an example.
04-14-14, 06:59 AM
#23
Zip tie Karen
Join Date: Aug 2009
Location: Fair Oaks Ranch, TX
Posts: 7,004
Bikes: '13 Motobecane Fantom29 HT, '16 Motobecane Turino Pro Disc, '18 Velobuild VB-R-022, '21 Tsunami SNM-100
Mentioned: 26 Post(s)
Tagged: 0 Thread(s)
Quoted: 1465 Post(s)
Liked 1,542 Times
in
806 Posts
I always begin with the headset and bottom bracket bearings. Always, and the fork gets installed immediately after/with the headset. For unthreaded steerers, that means that the starnut, cap, and stem go on next.
Then I focus on the drivetrain. Crankset, re-check bb bearings, rear wheel and cogset, rear derailleur (set limit screws), and then fd (its limit screws). Then the chain (using the big-big method, my preference).
Then the shifters and cables for the drivetrain. This involves the handlebars usually, so they'll need to go before the shifters. (If using bar-end shifters (non-TT configuration), then brake levers must go on first). Cut the shifter cable housings for optimum length, not too much slop, and not binding. Then inner cables/ferrules and seating the cables, running the shifters through their paces. No crimp ends and leave the ends uncut until install is completed.
Wheels - on the stand or on the frame - stress relieving spokes, lubing nipples, retruing, checking the rim tape. Adjust hub bearings. So, now both front and back are ready to have brakeset installed.
Brake calipers and levers (if independent from shifters). Then the cable housings/ferrules, then inner cabling, securing housings against the handlebar. Add brake pads and align, adjusting toe-in. Re-check rims against pads. No crimp ends or cuts yet.
Tires and tubes - remove wheels and mount. Check headset, adjust.
Seatpost, seatpost clamp, saddle - adjust to [my, customer's] dimensions.
Bar tape, then wax frame lightly.
Test ride, adjust, trip and crimp cable ends. Re-true rims, adjust bottom bracket or headset, if needed.
04-14-14, 07:01 AM
#24
Senior Member
Join Date: Aug 2005
Location: Pittsburgh, PA
Posts: 33,656
Bikes: '96 Litespeed Catalyst, '05 Litespeed Firenze, '06 Litespeed Tuscany, '20 Surly Midnight Special, All are 3x10. It is hilly around here!
Mentioned: 39 Post(s)
Tagged: 0 Thread(s)
Quoted: 2026 Post(s)
Likes: 0
Liked 1,096 Times
in
742 Posts
1. He posts generally technically correct information phrased and formatted in ways that require several readings to decipher.
2. He is convinced (since he works in one) that everyone should always take their bikes to a bike shop and buy all of their parts from said shop.
3. Phil Wood is the second coming and their parts should be fitted to any and every bike no matter what the cost.
4. Anything beyond 7-speed and downtube or barend shifters is suspect. The sole exception is Rohloff's wildly expensive IGH.