


GP 4000sII
 01-21-15, 05:09 AM
#1
Senior Member
Thread Starter
Join Date: Jun 2014
Location: Eastern nc
Posts: 316
Bikes: 2009 caad 9
Mentioned: 0 Post(s)
Tagged: 0 Thread(s)
Quoted: 44 Post(s)
Likes: 0
Liked 0 Times
in
0 Posts
GP 4000sII
I ordered a set of these to replace the gum walls I had on my bike. Got them yesterday and figured I'd slap them on real quick and test them out before I had to be somewhere. That didn't happen...they were a nightmare to get on the rim (dt swiss rr440). I ended up spending about three hours screwing with them last night and finally got them on around 11pm. They were just ridiculously hard to get the last section onto the rim. I ended up using a hair dryer to heat them up a bit and then I was able to pry them on.
What caused this?
What am I supposed to do in the case of a roadside flat? There's no way, unless they loosen up that I'll ever be able to get them on the rim unless I carry a portable hair dryer in my jersey.
What caused this?
What am I supposed to do in the case of a roadside flat? There's no way, unless they loosen up that I'll ever be able to get them on the rim unless I carry a portable hair dryer in my jersey.
 01-21-15, 05:14 AM
#2
On Your Left

Join Date: Nov 2011
Location: Long Island, New York, USA
Posts: 8,373
Bikes: Trek Emonda SLR, Sram eTap, Zipp 303
Mentioned: 34 Post(s)
Tagged: 0 Thread(s)
Quoted: 3004 Post(s)
Liked 2,433 Times
in
1,187 Posts
I put a new set on a few days ago and they were not difficult. Not sure why you had problems.
01-21-15, 05:15 AM
#3
Senior Member
Join Date: Apr 2007
Posts: 128
Mentioned: 0 Post(s)
Tagged: 0 Thread(s)
Quoted: 0 Post(s)
Likes: 0
Liked 0 Times
in
0 Posts
Brand new tires are always the hardest to get on. When you put them on the first time, you stretch them out some, and they will be easier to remount the next time. One thing you can do to pre stretch them is to step on the tire with your foot, then pull up on it with your hands.
01-21-15, 06:37 AM
#4

Senior Member

Join Date: Dec 2009
Location: Houston, TX
Posts: 28,682
Bikes: 1990 Romic Reynolds 531 custom build, Merlin Works CR Ti custom build, super light Workswell 066 custom build
Mentioned: 109 Post(s)
Tagged: 1 Thread(s)
Quoted: 6556 Post(s)
Likes: 0
Liked 58 Times
in
36 Posts
Tight tires are a safety feature to keep them from blowing off so don't wish them otherwise. Some folks have sufficient hand strength for even the tightest tire/rim combination; others not so much. Be sure you move the first bead of the tire that is fully on the rim to the center of the rim where the circumference is a little smaller. That helps free up some slack to get the second bead on. Use a slight inflation to round out the tube, but let some air out at the end if you need too to make some slack. If you still don't have the hand strength to do it easily, no sweat. It isn't a lifetime accomplishment competition. Just get a "bead jack" type tire tool, such as a Kool Stop, VAR, or Crank Brothers. They never fail to get the second bead over the rim edge. The VAR and Crank Brothers are small enough to carry on the road, so no worries about getting stuck with a flat. There was another thread in the last few days on the same topic with photos and links to the bead jacks. Here is the link to that thread: https://www.bikeforums.net/road-cycli...ead-brand.html
01-21-15, 07:17 AM
#5
Senior Member
Thread Starter
Join Date: Jun 2014
Location: Eastern nc
Posts: 316
Bikes: 2009 caad 9
Mentioned: 0 Post(s)
Tagged: 0 Thread(s)
Quoted: 44 Post(s)
Likes: 0
Liked 0 Times
in
0 Posts
Thanks Robert. I'll probably get that VAR on order to keep in my bag because I'm genuinely concerned about not being able to change a flat on the road. And I'm no weakling by ANY stretch of the imagination...they were just that freaking hard.
Is is there a video or how to online for that tool somewhere? I don't really see how it works just from that picture.
Is is there a video or how to online for that tool somewhere? I don't really see how it works just from that picture.
01-21-15, 08:36 AM
#6

don't try this at home.

Join Date: Jan 2006
Location: N. KY
Posts: 5,940
Mentioned: 10 Post(s)
Tagged: 0 Thread(s)
Quoted: 974 Post(s)
Liked 512 Times
in
352 Posts
I had a similar problem when I first got my new wheels. The GP4000 tires seemed almost impossible to mount. I had sore fingers and mangled tire levers. Using a previously mounted tire, bead down in the center, pulling the slack around, no tube in the way, nothing worked. It's so tight that even down in the center with no tube, I can't slide the first bead around to line up the label with the valve hole.
But there's an easy way to mount these. The key is to just lift less than an inch of bead, slide the lever over, and repeat. It's fast and easy. I posted a step by step method back in 2010 in this thread.
Like this:
But there's an easy way to mount these. The key is to just lift less than an inch of bead, slide the lever over, and repeat. It's fast and easy. I posted a step by step method back in 2010 in this thread.
Like this:
Last edited by rm -rf; 01-21-15 at 08:50 AM.
01-21-15, 09:12 AM
#7
Senior Member
Join Date: Dec 2009
Location: Houston, TX
Posts: 28,682
Bikes: 1990 Romic Reynolds 531 custom build, Merlin Works CR Ti custom build, super light Workswell 066 custom build
Mentioned: 109 Post(s)
Tagged: 1 Thread(s)
Quoted: 6556 Post(s)
Likes: 0
Liked 58 Times
in
36 Posts
Thanks Robert. I'll probably get that VAR on order to keep in my bag because I'm genuinely concerned about not being able to change a flat on the road. And I'm no weakling by ANY stretch of the imagination...they were just that freaking hard.
Is is there a video or how to online for that tool somewhere? I don't really see how it works just from that picture.
Is is there a video or how to online for that tool somewhere? I don't really see how it works just from that picture.
Good luck.
01-21-15, 09:13 AM
#8
Stand and Deliver

Join Date: Jun 2008
Location: Tampa Bay
Posts: 3,340
Bikes: Cannondale R1000, Giant TCR Advanced, Giant TCR Advanced SL
Mentioned: 0 Post(s)
Tagged: 0 Thread(s)
Quoted: 0 Post(s)
Likes: 0
Liked 1 Time
in
1 Post
^^^ Nice write up @rm -rf. It's always best to use your fingers to muscle the tire over the last few inches, but sometimes its just too tight. Carefully use the tire lever as described above and make sure that you don't pinch the tube.
01-21-15, 10:27 AM
#9
Member
Join Date: Jul 2014
Posts: 31
Bikes: Bianchi Infinito CV, Cervelo S3
Mentioned: 0 Post(s)
Tagged: 0 Thread(s)
Quoted: 11 Post(s)
Likes: 0
Liked 0 Times
in
0 Posts
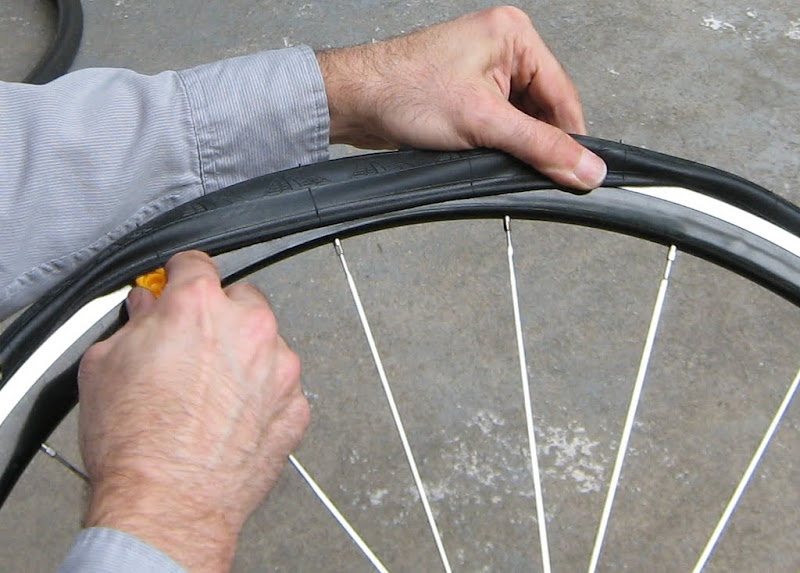
That "prying" places a good deal of stress on the rim. Instead, place the wheel between your legs with the tire at the point you see in your picture. Place your tire tool on the OUTSIDE of the tire (picture it about two inches to the left of where your tool is in the picture and with the tool facing up). Run the tool forward with force and the tire tool will "zip" the tire right on. No tire will take more than 10 seconds to mount this way no matter how tight AND there is zero risk of damage due to prying.
01-21-15, 02:31 PM
#10
Senior Member
Join Date: Sep 2013
Location: SW ONTARIO
Posts: 525
Bikes: P1 Domane Di2, SLR Emonda Di2, Trek Farley 9 Fatbike
Mentioned: 0 Post(s)
Tagged: 0 Thread(s)
Quoted: 10 Post(s)
Likes: 0
Liked 2 Times
in
2 Posts
Must be your rims. I have 3 sets of 4000s11 they all go onto either DA or Bontragger rims with fingers. You should find that after original mount they should go easier next round.
01-21-15, 02:54 PM
#11
Senior Member
Join Date: Dec 2009
Location: Houston, TX
Posts: 28,682
Bikes: 1990 Romic Reynolds 531 custom build, Merlin Works CR Ti custom build, super light Workswell 066 custom build
Mentioned: 109 Post(s)
Tagged: 1 Thread(s)
Quoted: 6556 Post(s)
Likes: 0
Liked 58 Times
in
36 Posts
That "prying" places a good deal of stress on the rim. Instead, place the wheel between your legs with the tire at the point you see in your picture. Place your tire tool on the OUTSIDE of the tire (picture it about two inches to the left of where your tool is in the picture and with the tool facing up). Run the tool forward with force and the tire tool will "zip" the tire right on. No tire will take more than 10 seconds to mount this way no matter how tight AND there is zero risk of damage due to prying.
01-21-15, 03:25 PM
#12
Senior Member

Join Date: Nov 2010
Posts: 2,875
Bikes: Cannondale CAAD 9, Specialized Transition, Specialized Fate, Specialized Crux
Mentioned: 2 Post(s)
Tagged: 0 Thread(s)
Quoted: 92 Post(s)
Likes: 0
Liked 14 Times
in
8 Posts
I heard real cyclists only use their guads to put tires on their rims.
01-21-15, 03:27 PM
#13
Senior Member
Join Date: Dec 2009
Location: Houston, TX
Posts: 28,682
Bikes: 1990 Romic Reynolds 531 custom build, Merlin Works CR Ti custom build, super light Workswell 066 custom build
Mentioned: 109 Post(s)
Tagged: 1 Thread(s)
Quoted: 6556 Post(s)
Likes: 0
Liked 58 Times
in
36 Posts
01-21-15, 03:37 PM
#15
Senior Member
Join Date: Dec 2009
Location: Houston, TX
Posts: 28,682
Bikes: 1990 Romic Reynolds 531 custom build, Merlin Works CR Ti custom build, super light Workswell 066 custom build
Mentioned: 109 Post(s)
Tagged: 1 Thread(s)
Quoted: 6556 Post(s)
Likes: 0
Liked 58 Times
in
36 Posts
Agreed, especially if you don't have to reinstall it for quite a while after the first time, like maybe a few months. But if you got a pinch flat say from catching the tube under the bead like say the next day while riding, you could still be looking at a really tight tire.
01-22-15, 06:16 AM
#16
Senior Member
Thread Starter
Join Date: Jun 2014
Location: Eastern nc
Posts: 316
Bikes: 2009 caad 9
Mentioned: 0 Post(s)
Tagged: 0 Thread(s)
Quoted: 44 Post(s)
Likes: 0
Liked 0 Times
in
0 Posts
Well wouldn't you know....took a half day off work yesterday because the weather was going to be great for a ride. Got my bike down and it had a flat tire. I decided I wasn't screwing with it anymore. Put the bike in the truck, grabbed a 20 and headed to the LBS. Told him all the trouble I had and asked him to install a new tube so I didn't have to. He put some new rim tape in it and mounted the tire....in about 5 minutes. With NO tools. I was amazed to say the least. Hopefully I learned well enough to do it myself. Gave him the 20 and felt it was well worth the lesson. Still shaking my head about how quickly and easily he did that. I would not have believed it if I didn't see it.
01-22-15, 06:42 AM
#17
Senior Member
Join Date: Dec 2009
Location: Houston, TX
Posts: 28,682
Bikes: 1990 Romic Reynolds 531 custom build, Merlin Works CR Ti custom build, super light Workswell 066 custom build
Mentioned: 109 Post(s)
Tagged: 1 Thread(s)
Quoted: 6556 Post(s)
Likes: 0
Liked 58 Times
in
36 Posts
Well wouldn't you know....took a half day off work yesterday because the weather was going to be great for a ride. Got my bike down and it had a flat tire. I decided I wasn't screwing with it anymore. Put the bike in the truck, grabbed a 20 and headed to the LBS. Told him all the trouble I had and asked him to install a new tube so I didn't have to. He put some new rim tape in it and mounted the tire....in about 5 minutes. With NO tools. I was amazed to say the least. Hopefully I learned well enough to do it myself. Gave him the 20 and felt it was well worth the lesson. Still shaking my head about how quickly and easily he did that. I would not have believed it if I didn't see it.
01-22-15, 07:11 AM
#18
John Wayne Toilet Paper
Join Date: Feb 2006
Location: Roanoke
Posts: 1,952
Bikes: BH carbon, Ritchey steel, Kona aluminum
Mentioned: 0 Post(s)
Tagged: 0 Thread(s)
Quoted: 1 Post(s)
Liked 0 Times
in
0 Posts
the DT RR440, being a Tubeless Ready rim bed, does in fact create a bit more effort for tire mounting. If anything, your old gumwalls were loose or stretched-loose. I've found that yellow Veloplugs work well in my DT RR440 and RR440Asymmetric rims, giving a hair more slack than a normal rim strip leaves. You absolutely have to install the tire correctly that that means the final bit of bead you seat is at the valve and that you keep the bead centered in the rim channel all the way around before you attempt to finish seating it.
01-22-15, 08:18 AM
#19
Senior Member
Join Date: Dec 2009
Location: Houston, TX
Posts: 28,682
Bikes: 1990 Romic Reynolds 531 custom build, Merlin Works CR Ti custom build, super light Workswell 066 custom build
Mentioned: 109 Post(s)
Tagged: 1 Thread(s)
Quoted: 6556 Post(s)
Likes: 0
Liked 58 Times
in
36 Posts
the DT RR440, being a Tubeless Ready rim bed, does in fact create a bit more effort for tire mounting. If anything, your old gumwalls were loose or stretched-loose. I've found that yellow Veloplugs work well in my DT RR440 and RR440Asymmetric rims, giving a hair more slack than a normal rim strip leaves. You absolutely have to install the tire correctly that that means the final bit of bead you seat is at the valve and that you keep the bead centered in the rim channel all the way around before you attempt to finish seating it.
01-22-15, 09:02 AM
#20
Fatty McFatcakes

Join Date: Nov 2013
Location: Krispy Kreme
Posts: 986
Bikes: Aero Cheeseburger w/ Sr(h)am eBacon
Mentioned: 2 Post(s)
Tagged: 0 Thread(s)
Quoted: 245 Post(s)
Likes: 0
Liked 2 Times
in
1 Post
Yes, GPK's are almost impossible to get on when new. But they definitely get a lot easier after that.
01-22-15, 09:39 AM
#21
John Wayne Toilet Paper
Join Date: Feb 2006
Location: Roanoke
Posts: 1,952
Bikes: BH carbon, Ritchey steel, Kona aluminum
Mentioned: 0 Post(s)
Tagged: 0 Thread(s)
Quoted: 1 Post(s)
Liked 0 Times
in
0 Posts
If you finish opposite the valve, that means your 2nd bead cannot be centered in the rim at the point furthest from your finishing point because the valve itself is blocking the bead from getting down into the channel. That effectively increases the circumference you're stretching the bead around and makes finishing harder. On the other hand, if you finish at the valve, the bead can be settled down into the rim channel all the way around giving you the most slack.
So sorry, but you're wrong. Next time you try to call somebody out for being wrong you might want to use your head first.
Last edited by nhluhr; 01-22-15 at 09:46 AM.
01-22-15, 10:00 AM
#22
Fatty McFatcakes
Join Date: Nov 2013
Location: Krispy Kreme
Posts: 986
Bikes: Aero Cheeseburger w/ Sr(h)am eBacon
Mentioned: 2 Post(s)
Tagged: 0 Thread(s)
Quoted: 245 Post(s)
Likes: 0
Liked 2 Times
in
1 Post
It's cute that you think you're right whereas I have an actual verifiable reason to prove I'm right.
If you finish opposite the valve, that means your 2nd bead cannot be centered in the rim at the point furthest from your finishing point because the valve itself is blocking the bead from getting down into the channel. That effectively increases the circumference you're stretching the bead around and makes finishing harder. On the other hand, if you finish at the valve, the bead can be settled down into the rim channel all the way around giving you the most slack.
So sorry, but you're wrong. Next time you try to call somebody out for being wrong you might want to use your head first.
If you're finishing on the stem side, it can be problematic because there is less give to the tube when manipulating the tire – the stem prevents full range of movement.
If you finish on the opposite side, you can yank the tire up into the rim around the stem and then roll the bead with your palms up and over the final part of the rim to get it seated.
Seems easier, at least in my experience (years of ham-fisted tire changes here, lol). So I'm inclined to agree with him because it's the way I do it too. But I'm not saying you're wrong. Diff'rent strokes yo.
Last edited by velociraptor; 01-22-15 at 10:04 AM.
01-22-15, 10:08 AM
#23
John Wayne Toilet Paper
Join Date: Feb 2006
Location: Roanoke
Posts: 1,952
Bikes: BH carbon, Ritchey steel, Kona aluminum
Mentioned: 0 Post(s)
Tagged: 0 Thread(s)
Quoted: 1 Post(s)
Liked 0 Times
in
0 Posts
Plain and simple, if you do it correctly, you don't have to work so hard to seat it over. Besides, you don't need to move the 2nd bead any further than the sidewall of the rim - why would that interfere with there being a tube in there?
I guess keep having fun with your bead jacks and sore fingers.
I guess keep having fun with your bead jacks and sore fingers.
01-22-15, 10:28 AM
#24
Senior Member
Join Date: Dec 2009
Location: Houston, TX
Posts: 28,682
Bikes: 1990 Romic Reynolds 531 custom build, Merlin Works CR Ti custom build, super light Workswell 066 custom build
Mentioned: 109 Post(s)
Tagged: 1 Thread(s)
Quoted: 6556 Post(s)
Likes: 0
Liked 58 Times
in
36 Posts
It's cute that you think you're right whereas I have an actual verifiable reason to prove I'm right.
If you finish opposite the valve, that means your 2nd bead cannot be centered in the rim at the point furthest from your finishing point because the valve itself is blocking the bead from getting down into the channel. That effectively increases the circumference you're stretching the bead around and makes finishing harder. On the other hand, if you finish at the valve, the bead can be settled down into the rim channel all the way around giving you the most slack.
So sorry, but you're wrong. Next time you try to call somebody out for being wrong you might want to use your head first.
If you finish opposite the valve, that means your 2nd bead cannot be centered in the rim at the point furthest from your finishing point because the valve itself is blocking the bead from getting down into the channel. That effectively increases the circumference you're stretching the bead around and makes finishing harder. On the other hand, if you finish at the valve, the bead can be settled down into the rim channel all the way around giving you the most slack.
So sorry, but you're wrong. Next time you try to call somebody out for being wrong you might want to use your head first.
01-22-15, 10:36 AM
#25
Senior Member

Join Date: Apr 2010
Location: Mountain View, CA USA and Golden, CO USA
Posts: 6,341
Bikes: 97 Litespeed, 50-39-30x13-26 10 cogs, Campagnolo Ultrashift, retroreflective rims on SON28/PowerTap hubs
Mentioned: 9 Post(s)
Tagged: 0 Thread(s)
Quoted: 550 Post(s)
Liked 325 Times
in
226 Posts
2 wraps of 1 mil Kapton will do the trick, totaling .005" versus .020" for most tapes like Velox and .009" for Rox. 5/8" wide (16mm) for traditional width rims, 3/4" (19mm) for wide.
It's also easy to remove, the lightest rim tape, and the least expensive tape when you buy 36 yard rolls not smaller ones which have been relabeled and marked up for the bicycle market.
Also finish at the valve stem.
Last edited by Drew Eckhardt; 01-22-15 at 10:41 AM.