


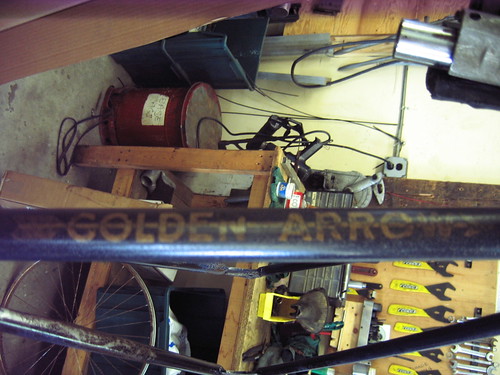
my 1921 Raleigh Golden arrow.
 11-07-10, 01:53 PM
#1
Senior Member
Thread Starter

Join Date: Apr 2010
Location: vermont
Posts: 3,081
Bikes: Many
Mentioned: 8 Post(s)
Tagged: 0 Thread(s)
Quoted: 5 Post(s)
Likes: 0
Liked 10 Times
in
10 Posts
my 1921 Raleigh Golden arrow.
In January of 1937 a young man the age of seventeen sailed from the port of New York on the steamer Berengaria. Upon arriving in Southhampton England to go to school Mr.Paul Savi stopped in to a local cycle shop and purchased a Raleigh Golden arrow. Paul completed four semesters and was doing well when his mother Eleanor requested his prompt return. The war was gaining momentum and the future of Europe was in question. Paul loved his bike and his mother was forced to book passage for the machine before her son would return home.
Eleanor could do little when Paul received notice that he would too be joining the war effort in March of 1943. He served his country and was discharged with honors. It is unknown to me when Paul met and married his bride but as post-war America grew, Paul and Eloise Savi returned to Charlestown New Hampshire to start their family on the property of his parents large estate.. The once prized Raleigh was kept indoors and cared for but ridden little.
The estate was quite large with 5 acres on main street and 4,000' feet of living space. With The elder Savis now gone a trust was set-up to provide for several years of maintainance of the Savi estate. Paul and Eloise lived a good life together and when she passed away Paul no longer wanted to live in the main house. The estate was purchased by long time family friends, Mr. and Mrs Martens and a bungalo was built from the garage and rented to Mr Savi for his home.
Years later, Paul Savi would move to his daughters home in Arizona and while his belongings were being packed Martha Martens noticed the bike in the corner of the garage. Paul told her the story of the now fifty year old machine had been his first adult transportation and that he had kept it all these years. Martha enjoyed entertaining and the bike would be a welcome addition to her beautiful home as a garden ornament to be brought out in the spring and returned to the garage in the fall.
Many years had passed and the aging Raleigh was no longer included in family picnics. Eventually it was edged outside permenently by a new riding lawnmower and quickly forgotten. Twenty years may have passed.
Max, the kid who works for me sometimes was helping out his buddy with some lawn-care work spotted the bike leaning behind the garden shed and called me. This was September of last year.
When we first spoke Martha didn't know the bike had been left outside. She wasn't happy. I stayed for a while and I told her I was interested in refurbuishing the old Raleigh. She would think about it and get back to me. I didn't think my chances were very good. She mentioned her son-in-law liked custom cars and might want the bike. I was sad.
When April of 2010 rolled around and Mrs Mortenson came to my shop. I was surprised to say the least. She told me that if I still wanted the Raleigh, I could have it. Her son in law, as it turns out is a customer of mine and has purchased several custom bikes.
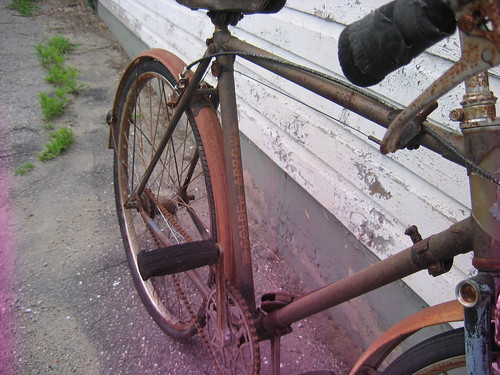
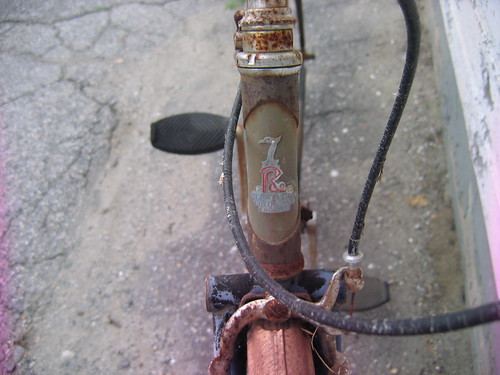
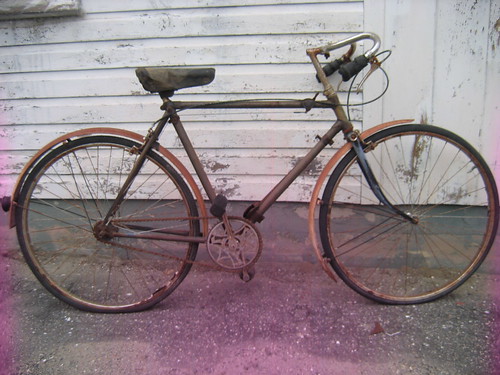
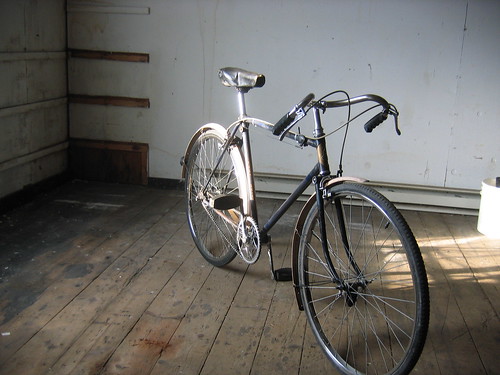
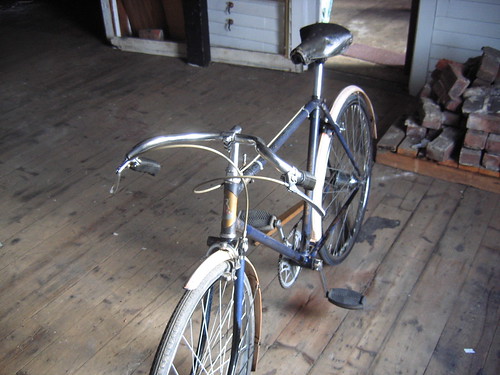
Here is a few images of the Golden Arrow where it was found.

asfound1 by barnstormerbikes, on Flickr
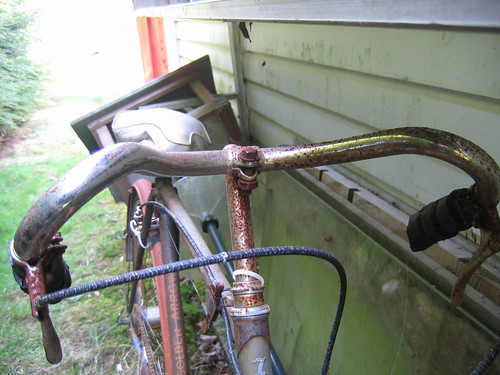
asfound2 by barnstormerbikes, on Flickr
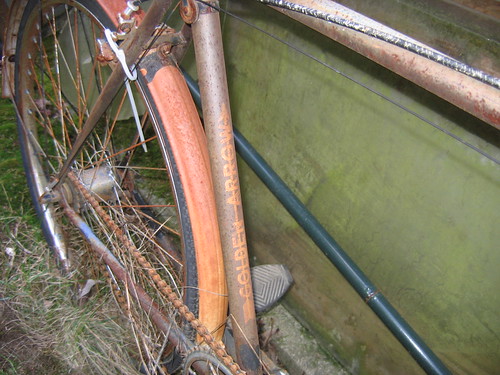
asfound3 by barnstormerbikes, on Flickr
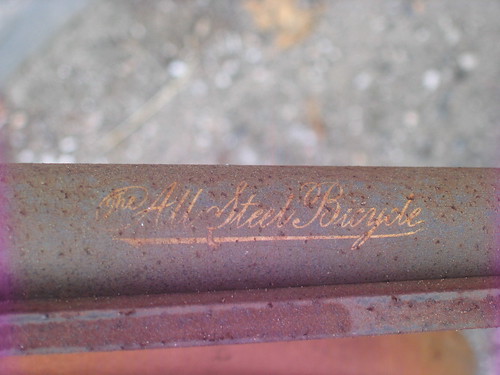
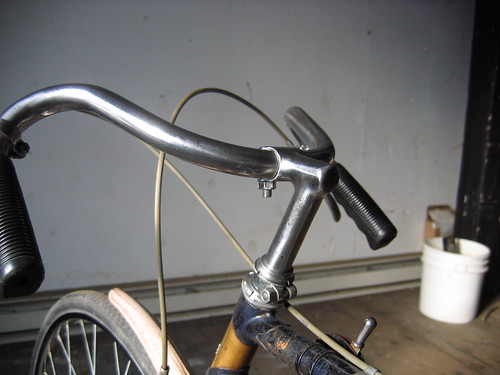
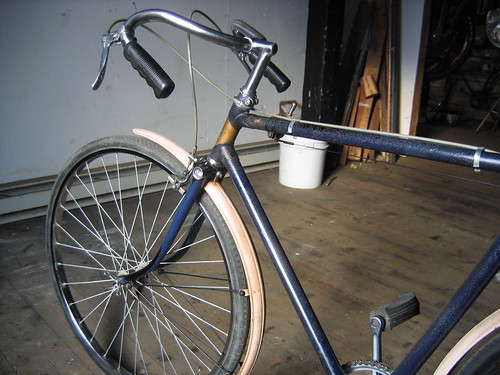
allsteelbicycle by barnstormerbikes, on Flickr
shop iso by barnstormerbikes, on Flickr
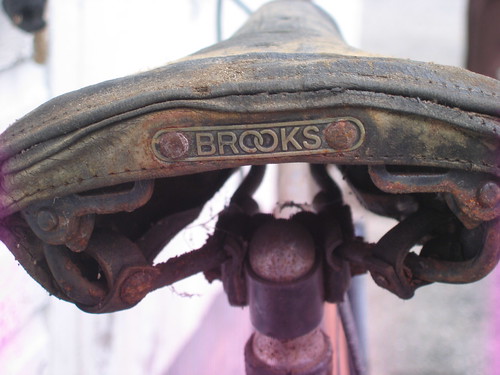
saddle by barnstormerbikes, on Flickr
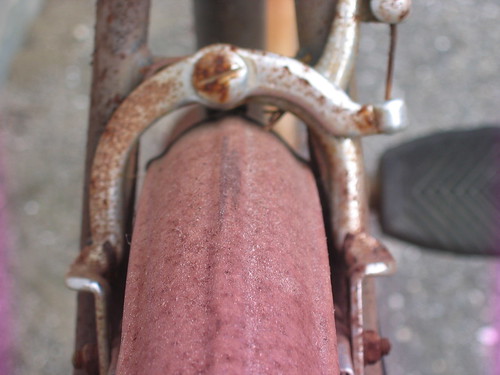
RRfender by barnstormerbikes, on Flickr
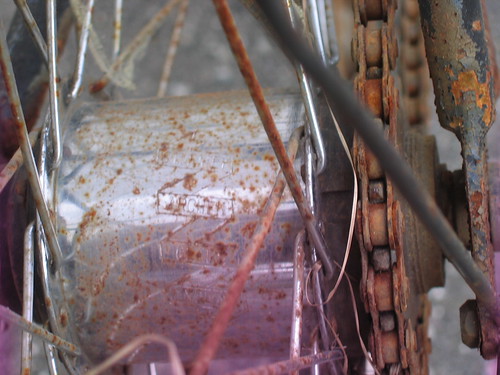
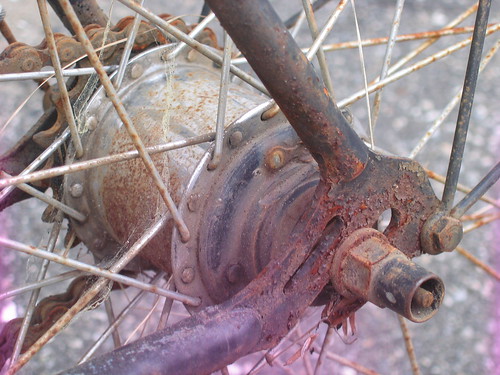
RR hub by barnstormerbikes, on Flickr
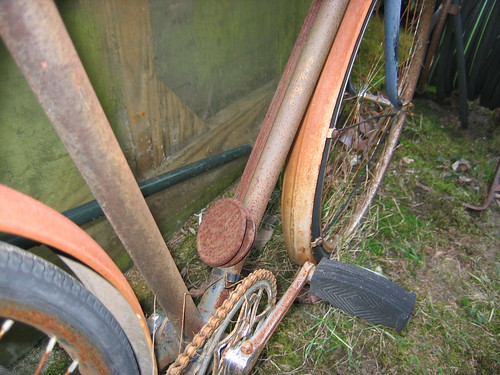
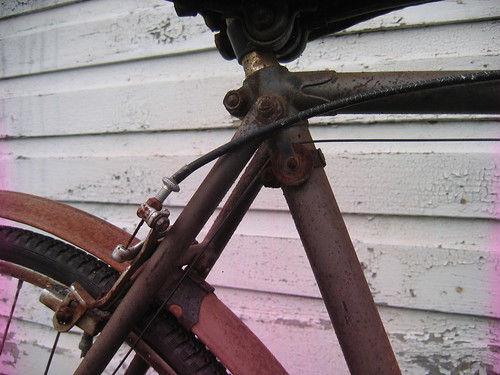
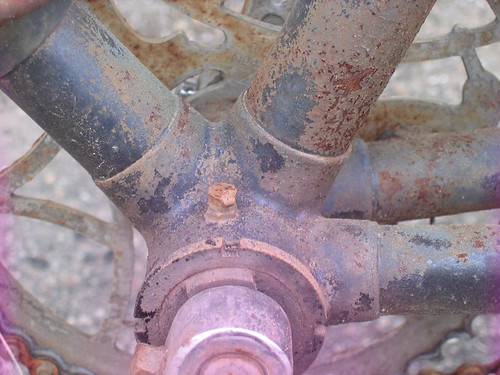
cranksidestand by barnstormerbikes, on Flickr
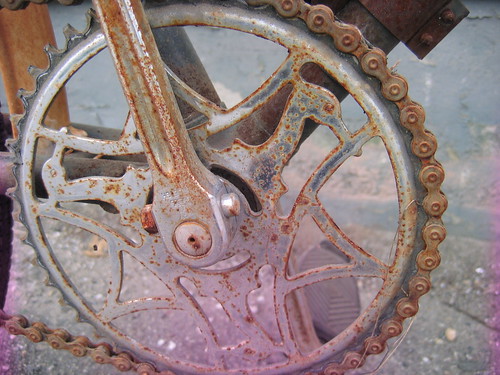
chgainwheel by barnstormerbikes, on Flickr
Eleanor could do little when Paul received notice that he would too be joining the war effort in March of 1943. He served his country and was discharged with honors. It is unknown to me when Paul met and married his bride but as post-war America grew, Paul and Eloise Savi returned to Charlestown New Hampshire to start their family on the property of his parents large estate.. The once prized Raleigh was kept indoors and cared for but ridden little.
The estate was quite large with 5 acres on main street and 4,000' feet of living space. With The elder Savis now gone a trust was set-up to provide for several years of maintainance of the Savi estate. Paul and Eloise lived a good life together and when she passed away Paul no longer wanted to live in the main house. The estate was purchased by long time family friends, Mr. and Mrs Martens and a bungalo was built from the garage and rented to Mr Savi for his home.
Years later, Paul Savi would move to his daughters home in Arizona and while his belongings were being packed Martha Martens noticed the bike in the corner of the garage. Paul told her the story of the now fifty year old machine had been his first adult transportation and that he had kept it all these years. Martha enjoyed entertaining and the bike would be a welcome addition to her beautiful home as a garden ornament to be brought out in the spring and returned to the garage in the fall.
Many years had passed and the aging Raleigh was no longer included in family picnics. Eventually it was edged outside permenently by a new riding lawnmower and quickly forgotten. Twenty years may have passed.
Max, the kid who works for me sometimes was helping out his buddy with some lawn-care work spotted the bike leaning behind the garden shed and called me. This was September of last year.
When we first spoke Martha didn't know the bike had been left outside. She wasn't happy. I stayed for a while and I told her I was interested in refurbuishing the old Raleigh. She would think about it and get back to me. I didn't think my chances were very good. She mentioned her son-in-law liked custom cars and might want the bike. I was sad.
When April of 2010 rolled around and Mrs Mortenson came to my shop. I was surprised to say the least. She told me that if I still wanted the Raleigh, I could have it. Her son in law, as it turns out is a customer of mine and has purchased several custom bikes.
Here is a few images of the Golden Arrow where it was found.
asfound1 by barnstormerbikes, on Flickr
asfound2 by barnstormerbikes, on Flickr
asfound3 by barnstormerbikes, on Flickr
allsteelbicycle by barnstormerbikes, on Flickr
shop iso by barnstormerbikes, on Flickr
saddle by barnstormerbikes, on Flickr
RRfender by barnstormerbikes, on Flickr
RR hub by barnstormerbikes, on Flickr
cranksidestand by barnstormerbikes, on Flickr
chgainwheel by barnstormerbikes, on Flickr
 11-07-10, 01:55 PM
#2
Senior Member
Thread Starter
Join Date: Apr 2010
Location: vermont
Posts: 3,081
Bikes: Many
Mentioned: 8 Post(s)
Tagged: 0 Thread(s)
Quoted: 5 Post(s)
Likes: 0
Liked 10 Times
in
10 Posts
seatcluster by barnstormerbikes, on Flickr
shifterstem by barnstormerbikes, on Flickr
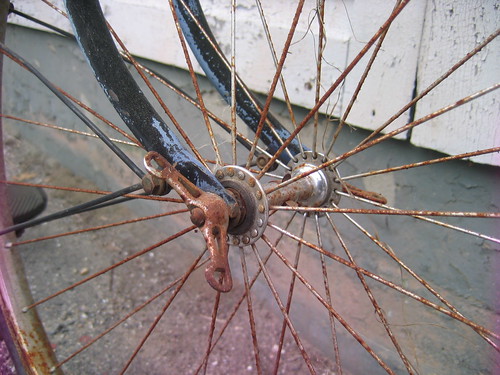
fronthub by barnstormerbikes, on Flickr
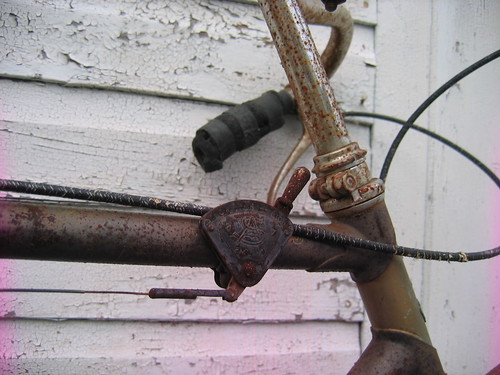
headbadge by barnstormerbikes, on Flickr
RRhubleft by barnstormerbikes, on Flickr\
bottombracket by barnstormerbikes, on Flickr
johnbull2 by barnstormerbikes, on Flickr
side by barnstormerbikes, on Flickr
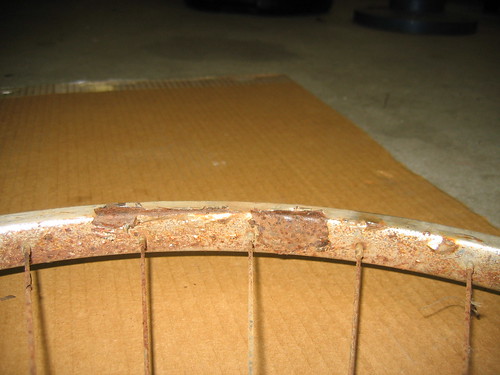
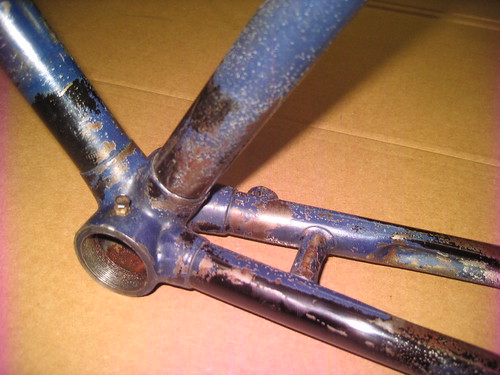
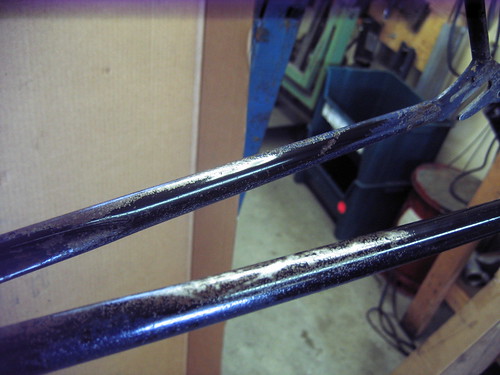
As you can tell the bike was in rough shape. It had been outside in the severe New England winters for more than ten years. Between what I had learned from forum members, personal experience and a couple of my clients advice (I recently helped in the restoration of a $300K Brough superior) I felt confident I could do this bike justice. After getting it safely to my shop I applied penetrating oil and was a bit surprised the next day when the oil had saturated the surface of about half the frame. I touched the transfers in a couple of places. I was relieved to find they had held fast.
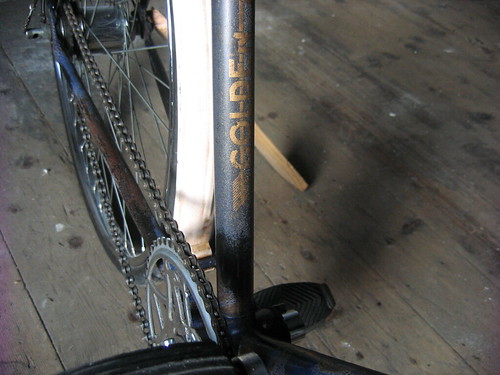
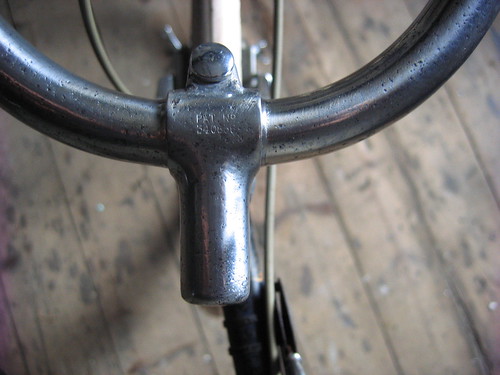
I had purchased a scanned catalog on ebay dated 1938. I figured the original color was the optional "Lustre Blue". You couldn't really tell by looking at the bike in person, it looked completely rusted. It was only when I viewed photographs of the machine that some color was visable. The chrome was rusted through in many places and the most severe being the rims. Layers of the hard plating had peeled up and yayed close to the surface, sharp as razor blades. The bars, stem and chainring looked pretty smoked also.
..........................................
11-07-10, 01:56 PM
#3
Senior Member
Thread Starter
Join Date: Apr 2010
Location: vermont
Posts: 3,081
Bikes: Many
Mentioned: 8 Post(s)
Tagged: 0 Thread(s)
Quoted: 5 Post(s)
Likes: 0
Liked 10 Times
in
10 Posts
IMG_3755 by barnstormerbikes, on Flickr
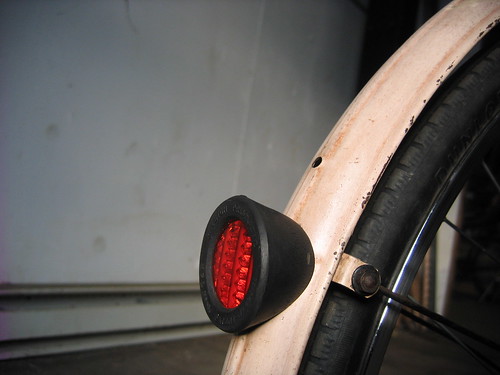
I had little difficulty getting the bike apart. I have a full set of Whitworth spanners as well as taps and dies. The only mechanical damage was some wear on the brake pads, shot cables and a buggered bolt on the seat works. I also replaced the handlebar clamp bolt. The post and stem were both free and straight. It was amazing seeing the original off-white paint in pristine condition under the rear reflector. Although this bike would be a good candidate for a proper restoration due to it's poor condition, I decided quickly that it would only be refurbished. There was plenty to work with.
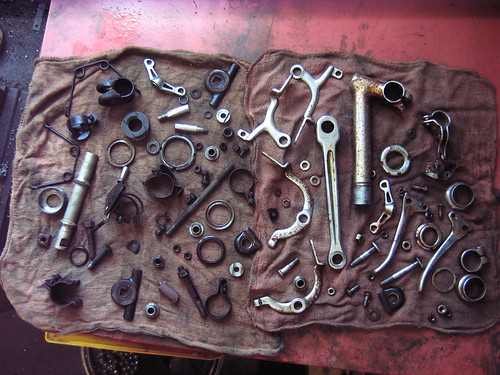
You may notice in the first image of this series the wingnut in the upper left corner. I had tested Oxalic acid on that part and was instantly sold on that process. Here are the bulk of the parts ready for cleaning and reconditioning.
IMG_3775 by barnstormerbikes, on Flickr
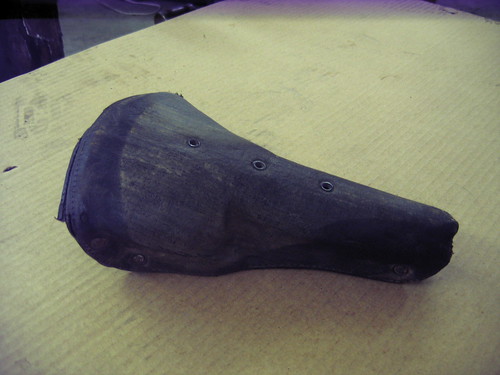
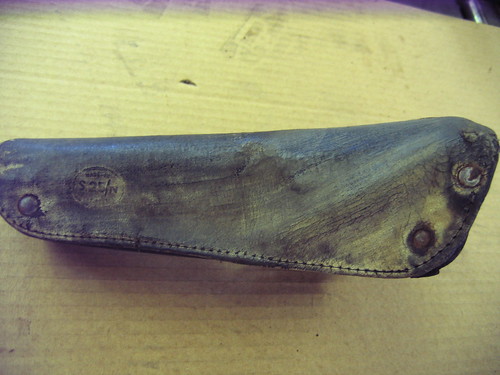
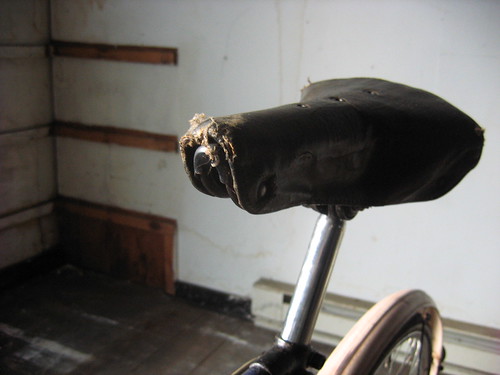
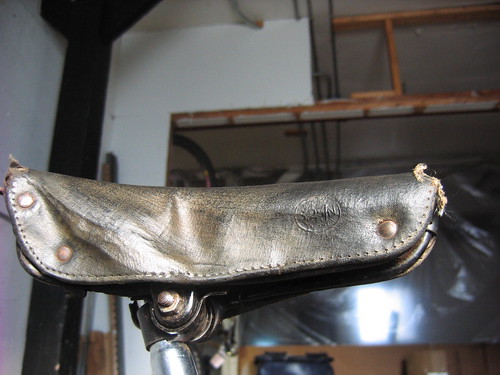
The saddle had the remains of a cheap plastic cover that melted and disolved leaving a tan tint on the black synthetic cover. The saddle in a Brooks "S 25/N" with single standard rails, steel springs, horsehair padding,leather liner with this odd cover that looks like modern ripstop ballistic fabric.
IMG_3776 by barnstormerbikes, on Flickr
IMG_3779 by barnstormerbikes, on Flickr
At this point the parts were being soaked and I began polishing the frame and fork. My objective was to try to preserve what remained of the graphics and at the same time level out the surface and make it smooth to the touch. I started by carefully washing the frame.
I had read that the waterslide graphics were very fragile when it came to water but I figured after what it had been though the decals were going to come off like dust anyway. I already had allowed solvent to come in contact with the graphics and nothing had come loose so I proceeded with using a kerosene after testing a small area with a white cloth dampened with the solution to make sure it wouldn't disolve the paint. I should mention that there was a very small amount of motor oil in the kerosene.
I washed the frame inside and out and removed a few chunks of flux that was stuck in the ends of the tubes. I used an engine block brush to get everywhere I could. I washed everywhere except the transfers which got wet anyway.
I usually like to start with the most intimidating part of a project but opted to try to learn more about the durability of the paint before attacking the transfers. I started with small areas with a very fine paint liquid polishing compound that an auto detailing friend provided me with and if nothing happened, I went to something more course. I quickly realized that the ash was very thick but in many areas there was still plenty of paint or beautiful black base coat. Most of the frame ended up requiring scotchbrite 7447 maroon handpads to cut through the crud. It took many hours working my way through from fine to course then back again. Some areas required 2-3 passes like the tops of the chainstays. I had to go at least .002" into the steel to get it clean. Areas like the bottom bracket shell had lost large chips of paint. In those areas I polished the metal with only the tip of my finger, feathering the edges of the paint to a smooth finish.
IMG_3782 by barnstormerbikes, on Flickr
IMG_3773 by barnstormerbikes, on Flickr
IMG_3772 by barnstormerbikes, on Flickr
............................................
11-07-10, 01:56 PM
#4
Senior Member
Thread Starter
Join Date: Apr 2010
Location: vermont
Posts: 3,081
Bikes: Many
Mentioned: 8 Post(s)
Tagged: 0 Thread(s)
Quoted: 5 Post(s)
Likes: 0
Liked 10 Times
in
10 Posts
The final effect totally reminds me of my earliest recognitions of surface textures. Things like fixtures in school and on the playground where some areas were so worn by thousands of hands touching. The fenders, handlebars, stem BB cups and hardware was all polished. The fenders have the texture of bird eggs and areas along the ridges had deeper stains that required the use of a pencil eraser dipped in compound to bring the color back. I dried the bike in the sun to help finish the wax coat and the fenders remained cool to the touch after hours in the sun.
The saddle was another interesting experience. I knew I wasn't going to be using any solvents on the saddle and so I began with soap and water on top surface. The skin of the saddle is some type of canvas but very thin and somehow "plasticized" for lack of a better word. If feels like the skin of a really old person.
I tried the soap and water
nothing.
I tried a bit of my kerosene solution.
nothing.
My heart was pounding when I grabbed the 0000 steel wool and began to address the surface.
still nothing.
I ended up using the 7447 pad again and quite aggresively before any of the tan stain would receed. I am not sure what this eighty-year-old fabric is but I am sure it would give Kevlar a good run for durability. Once I had the surface cleaned of the melted cover I brushed the thin leather liner that exists under the skin with olive oil. The springs under the saddle have nearly completely rusted away and some stitches have vanished to a rebuild is in the future.
The wheels and cables are also issues that will be on-going. I plan to replace the wires and cast new ends. The original housings will be used after several coats of linseed oil.
I have also decided to use the original rims if I can't find suitable 1-1/4" replacements. I also have plans the get the odd, wide ratio K series hub rebuilt.
Although the steel brake calipers look like sports calipers, they actually have shorter reach. I used a belt sander to flatten and freshen the original brake pads. The headset uses removable races and are have no angular contact (like a shopping cart wheel)
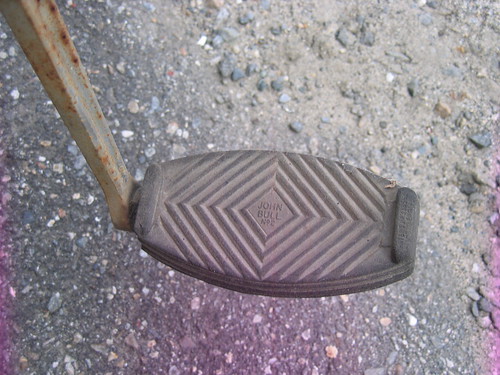
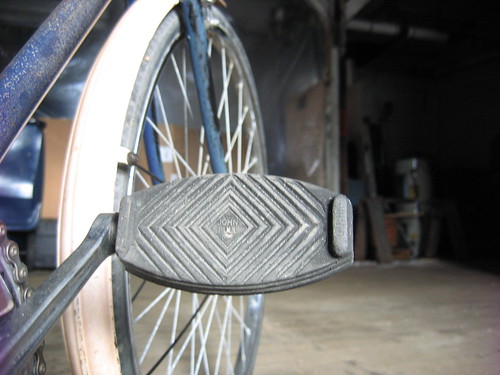
I hope to source a pair of the original rat-trap pedals at some point.
I am sorry I don't have more photographs of the assembly. I really was completely consumed and didn't have the patience to deal with my quirky camera. Please enjoy these images of the machine as of the last two weeks.
IMG_3827 by barnstormerbikes, on Flickr
IMG_3829 by barnstormerbikes, on Flickr
IMG_3830 by barnstormerbikes, on Flickr
IMG_3838 by barnstormerbikes, on Flickr
IMG_3860 by barnstormerbikes, on Flickr
IMG_3855 by barnstormerbikes, on Flickr
IMG_3853 by barnstormerbikes, on Flickr
IMG_3849 by barnstormerbikes, on Flickr
IMG_3847 by barnstormerbikes, on Flickr
The saddle was another interesting experience. I knew I wasn't going to be using any solvents on the saddle and so I began with soap and water on top surface. The skin of the saddle is some type of canvas but very thin and somehow "plasticized" for lack of a better word. If feels like the skin of a really old person.
I tried the soap and water
nothing.
I tried a bit of my kerosene solution.
nothing.
My heart was pounding when I grabbed the 0000 steel wool and began to address the surface.
still nothing.
I ended up using the 7447 pad again and quite aggresively before any of the tan stain would receed. I am not sure what this eighty-year-old fabric is but I am sure it would give Kevlar a good run for durability. Once I had the surface cleaned of the melted cover I brushed the thin leather liner that exists under the skin with olive oil. The springs under the saddle have nearly completely rusted away and some stitches have vanished to a rebuild is in the future.
The wheels and cables are also issues that will be on-going. I plan to replace the wires and cast new ends. The original housings will be used after several coats of linseed oil.
I have also decided to use the original rims if I can't find suitable 1-1/4" replacements. I also have plans the get the odd, wide ratio K series hub rebuilt.
Although the steel brake calipers look like sports calipers, they actually have shorter reach. I used a belt sander to flatten and freshen the original brake pads. The headset uses removable races and are have no angular contact (like a shopping cart wheel)
I hope to source a pair of the original rat-trap pedals at some point.
I am sorry I don't have more photographs of the assembly. I really was completely consumed and didn't have the patience to deal with my quirky camera. Please enjoy these images of the machine as of the last two weeks.
IMG_3827 by barnstormerbikes, on Flickr
IMG_3829 by barnstormerbikes, on Flickr
IMG_3830 by barnstormerbikes, on Flickr
IMG_3838 by barnstormerbikes, on Flickr
IMG_3860 by barnstormerbikes, on Flickr
IMG_3855 by barnstormerbikes, on Flickr
IMG_3853 by barnstormerbikes, on Flickr
IMG_3849 by barnstormerbikes, on Flickr
IMG_3847 by barnstormerbikes, on Flickr
11-07-10, 01:57 PM
#5
Senior Member
Thread Starter
Join Date: Apr 2010
Location: vermont
Posts: 3,081
Bikes: Many
Mentioned: 8 Post(s)
Tagged: 0 Thread(s)
Quoted: 5 Post(s)
Likes: 0
Liked 10 Times
in
10 Posts
IMG_3843 by barnstormerbikes, on Flickr
IMG_3837 by barnstormerbikes, on Flickr
IMG_3836 by barnstormerbikes, on Flickr
IMG_3835 by barnstormerbikes, on Flickr
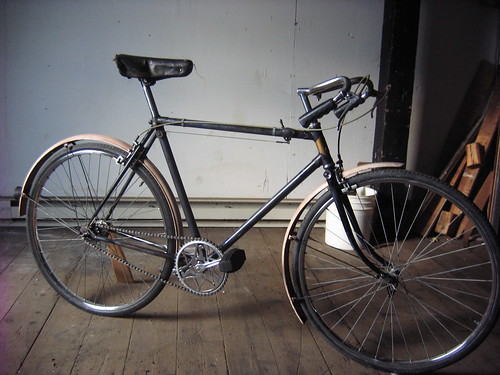
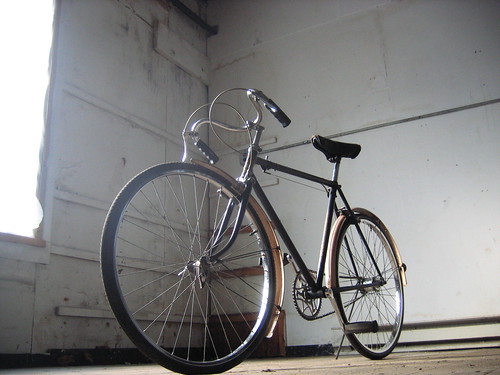
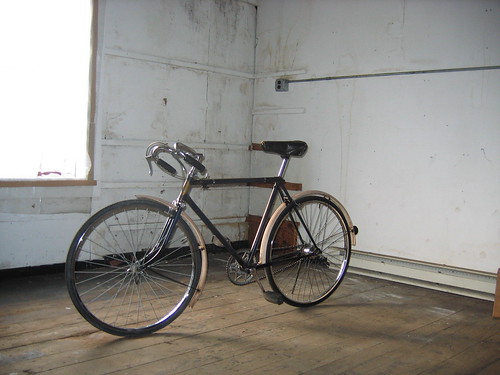
I rode the bike around a little and it actually drew some attention in my small town. It's a bit small but much post remains saftely buried in the frame. It feels best on the drops. I didn't pedal too hard because it feels like the John Bull #2 pedals have the outer bearing about 1/2 way down the spindle. It does however feel amazing over bumps and at speed with the geometry.
 11-07-10, 02:22 PM
#8


Senior Member
Join Date: Dec 2005
Posts: 17,158
Mentioned: 481 Post(s)
Tagged: 0 Thread(s)
Quoted: 3810 Post(s)
Liked 6,699 Times
in
2,611 Posts
Frank, terrific work and great story. The bike looks amazing. I'm curious--what's the model of the rear hub? And does it shift?
Neal
Neal
11-07-10, 02:35 PM
#9
Photographer

Join Date: May 2006
Location: The other Cape, Cape Ann
Posts: 3,116
Mentioned: 27 Post(s)
Tagged: 0 Thread(s)
Quoted: 105 Post(s)
Liked 98 Times
in
53 Posts
Frank, what a treat to read about this bike .. the history, the process, the results. One photograph I really love, the one with all the parts spread out in front of you. What a desk top image that would make!!! Thanks for sharing.
Scott
Scott
__________________
ClassicFuji.posthaven.com.archive
IG @scottryder.surf.cycle
IG @scottryder.fine.art
ClassicFuji.posthaven.com.archive
IG @scottryder.surf.cycle
IG @scottryder.fine.art
11-07-10, 02:46 PM
#10
1991 PBP Anciens
Join Date: Nov 2009
Location: Elburn, Illannoy
Posts: 625
Bikes: 1954 Robin Hood, 1964 Dunelt, 1968 Raleigh Superbe, 1969 Robin Hood, 197? Gitane, 1973 Raleigh SuperCourse, 1981 Miyata 710, 1990 Miyata 600GT, 2007 Rivendell Bleriot
Mentioned: 1 Post(s)
Tagged: 0 Thread(s)
Quoted: 65 Post(s)
Liked 305 Times
in
117 Posts
Great write up and a fantastic job. BTW, I'm freaking jealous.
11-07-10, 02:49 PM
#11

No one cares
great job. thanks for taking the time to give us all the history.
__________________
I prefer emails to private messages - holiday76@gmail.com
Jack Taylor Super Tourer Tandem (FOR SALE), Jack Taylor Tour of Britain, Px-10, Carlton Flyer, Fuji The Finest, Salsa Fargo, Santa Cruz Tallboy, Carver All-Road .
I prefer emails to private messages - holiday76@gmail.com
Jack Taylor Super Tourer Tandem (FOR SALE), Jack Taylor Tour of Britain, Px-10, Carlton Flyer, Fuji The Finest, Salsa Fargo, Santa Cruz Tallboy, Carver All-Road .
11-07-10, 02:51 PM
#12
Photographer
Join Date: May 2006
Location: The other Cape, Cape Ann
Posts: 3,116
Mentioned: 27 Post(s)
Tagged: 0 Thread(s)
Quoted: 105 Post(s)
Liked 98 Times
in
53 Posts
Frank, another thought, you really should bring that down next summer for the Larz Anderson show. ..
Scott
Scott
__________________
ClassicFuji.posthaven.com.archive
IG @scottryder.surf.cycle
IG @scottryder.fine.art
ClassicFuji.posthaven.com.archive
IG @scottryder.surf.cycle
IG @scottryder.fine.art
11-07-10, 02:54 PM
#13
You gonna eat that?

I'd ride it just the way it is. It looks awesome.
__________________
I stop for people / whose right of way I honor / but not for no one.
 Originally Posted by bragi
  "However, it's never a good idea to overgeneralize."
I stop for people / whose right of way I honor / but not for no one.
"However, it's never a good idea to overgeneralize."
11-07-10, 04:13 PM
#14
Senior Member
Thread Starter
Join Date: Apr 2010
Location: vermont
Posts: 3,081
Bikes: Many
Mentioned: 8 Post(s)
Tagged: 0 Thread(s)
Quoted: 5 Post(s)
Likes: 0
Liked 10 Times
in
10 Posts
Thanks! The hub I am using now is the AW three-speed from my 1965 Rudge. It shifts just fine. The quadrant shifter uses a very simple spring loaded arm that drops a wedged tab into holes in the case. Not unlike the height setting on a lawn-mower.
11-07-10, 04:23 PM
#15
Roadie in Training

Join Date: Aug 2009
Posts: 409
Mentioned: 0 Post(s)
Tagged: 0 Thread(s)
Quoted: 0 Post(s)
Likes: 0
Liked 1 Time
in
1 Post
That reeks of cool. Great job on the restoration.
And look at that radially laced front wheel, I thought that was a more modern development in the bicycle business.
And look at that radially laced front wheel, I thought that was a more modern development in the bicycle business.
11-07-10, 04:39 PM
#16
Senior Member
Join Date: Oct 2010
Location: Minnesota- the frozen tundra
Posts: 1,946
Bikes: 1977 Raleigh Super Grand Prix, 1976 Gitane Tour de France
Mentioned: 1 Post(s)
Tagged: 0 Thread(s)
Quoted: 0 Post(s)
Likes: 0
Liked 2 Times
in
2 Posts
Gorgeous bike!! You did an amazing job with it.
11-07-10, 04:56 PM
#17
Senior Member

Join Date: Apr 2009
Location: Detroit
Posts: 10,303
Mentioned: 6 Post(s)
Tagged: 0 Thread(s)
Quoted: 17 Post(s)
Likes: 0
Liked 42 Times
in
33 Posts
That is just awe-inspiring ftwelder . . . The bike's early provenance - and even the tale of those Vermont winters behind the shed, about abandonment, being read plainly in the finish of the bike. It's almost a miracle that the bike found you (yes, it found you), to be rescued, and so lovingly restored!
Great story.
Great story.
__________________
- Auchen
- Auchen
 11-07-10, 05:56 PM
#19
Senior Member
Join Date: Aug 2010
Location: Around Seattle
Posts: 1,207
Bikes: 1969 Raleigh Sports: The Root Beer Bomber
Mentioned: 0 Post(s)
Tagged: 0 Thread(s)
Quoted: 1 Post(s)
Likes: 0
Liked 0 Times
in
0 Posts
Wonderful. Lovely job. I'd love to see it someday in person.
11-07-10, 06:19 PM
#20
Senior Member
That is So awesome! Great tale and probably one of the coolest bikes I've seen. And I thought riding an old 52 Schwinn was cool. I've got Nothing on you!
11-07-10, 06:55 PM
#21
holyrollin'

Nice job of preserving, without losing all of the original flavor. This is a very instructive post, not just in methods, but in attitude.
You've got me thinking hard about a Raleigh frame that came out of storage much worse than it was when I put it up. I'll try to get a bottom bracket into it, and if that goes well, the finish will get a bit of loving attention to see if it can be revived in a fashion appropriate to the bicycle.
Is Scotchbrite 7447 the mildest in terms of abrasiveness?
11-07-10, 06:57 PM
#22
Senior Member

Join Date: Apr 2007
Location: Thunder Bay, Ontario, Canada - burrrrr!
Posts: 11,674
Bikes: 1958 Rabeneick 120D, 1968 Legnano Gran Premio, 196? Torpado Professional, 2000 Marinoni Piuma
Mentioned: 210 Post(s)
Tagged: 0 Thread(s)
Quoted: 1372 Post(s)
Likes: 0
Liked 1,751 Times
in
938 Posts
Well done on many levels.
11-07-10, 07:14 PM
#23
Senior Member
Join Date: Aug 2010
Location: Liberty, Missouri
Posts: 3,120
Bikes: 1966 Paramount | 1971 Raleigh International | ca. 1970 Bernard Carre | 1989 Waterford Paramount | 2012 Boulder Brevet | 2019 Specialized Diverge
Mentioned: 23 Post(s)
Tagged: 0 Thread(s)
Quoted: 129 Post(s)
Liked 77 Times
in
40 Posts
Terrific story! Wonderful restoration! Standing ovation, all the way around! Thanks so very much for sharing this with us!
11-07-10, 07:14 PM
#24
Senior Member
Join Date: Feb 2010
Location: New Jersey
Posts: 904
Mentioned: 0 Post(s)
Tagged: 0 Thread(s)
Quoted: 0 Post(s)
Likes: 0
Liked 1 Time
in
1 Post
Great job Frank! Those pics. are worth a thousand words. I picked up an pre-war (?) Hercules Remown last Spring and I am quiet happy to see so many simularities between the two bikes; the relaxed head tube, brake calipers, oiler caps....You got be motivated to take it down and start working on it....A big thanks for the motivation and the wonderful story!
ps The bars are great, I've been trying to snag a set without getting a second mortgage
ps The bars are great, I've been trying to snag a set without getting a second mortgage