


Stripping the paint from a 2008 Schwinn Madison
 11-26-08, 03:08 AM
#1

On yer bike
Thread Starter

Stripping the paint from a 2008 Schwinn Madison
While browsing ebay a while ago, looking for a fun commuter/beater bike, I found a great deal on a Madison frame. I did some research to find out what people though about it, and came across a BF thread that had a guy's Madison totally stripped of all its paint.
I thought it looked like a fun project and decided to try it out. So then I started looking around for other chrome frames that people had stripped, and explanations on how they did it. I found lots of frames, mostly chrome Pistas and classic Paramounts, but not much detailed info on the process of removing the paint and prepping the frame to be built up. There were plenty of threads on stripping paint from a frame, but I was worried about damaging the underlying chrome.
Finally, I found a guy on Velospace who had stripped his Pista, AND provided the instructions he had used, which ended up being from a thread I missed on BF. His bike looked great, so I used his process as the basis for stripping my frame.
Even though his instructions were great and doubtlessly made my own experience much easier, there were questions that I wasn't able to find answers to that would have made my job even easier than it already was.
Figured I'd share my experiences with those who are curious about doing something similar, in the hopes that it saves you a little time and a lot of nail-biting. Please note that I can only attest to the results I achieved using one particular product on one particular frame. Also: Please use your own judgment when deciding what precautions to take when dealing with the ridiculously harmful chemicals that are used during this process.
Workspace: I recommend doing this outside, or at least in a VERY well ventilated indoor area. If you're working over flooring that you don't care about paint stripper falling on, awesome. If not, lay down enough cardboard (or whatever) for you to fit 3-5 frames on. This will provide enough working area to catch all the crap coming off your bike, and still leave plenty of clean work area for the later stages. I would also recommend setting up near a hose, or at least somewhere that you can wash off the frame without fear of spraying caustic chemicals on something important. Living in an apartment, I used the faucet on the side of my building. Not ideal, but at least I was able to just turn on the water and still have both hands free.
Materials:
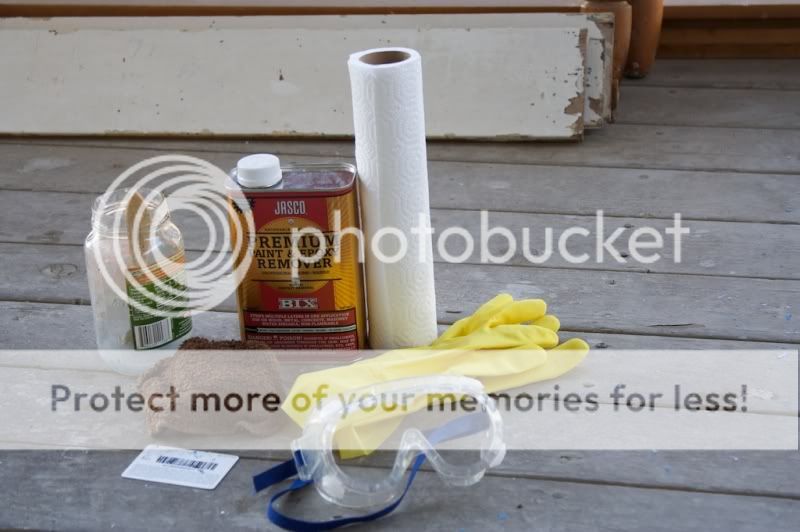
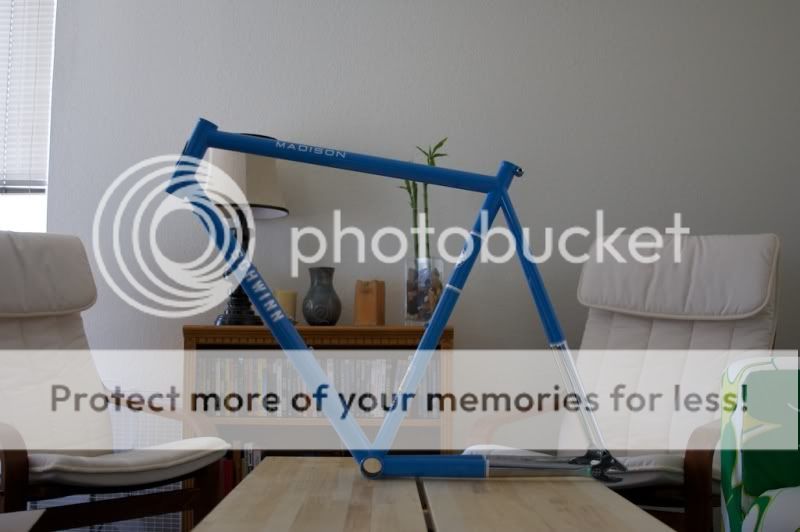
Here's what I started with (I did the fork the night before):
Step 1 - Wipe off any dirt, grease, oil, etc. from the frame. Tape off any areas you don't want to strip. I only taped off the very back, starting at the vent holes near the track ends in the seat stays and chain stays. I did this to prevent Jasco from getting into the interior of the stays, and to leave the clearcoat over the track ends for a little added protection, since this will be the highest wear area. I also chose to leave the water bottle bolts in the frame, again to help prevent Jasco from getting into the tubes.
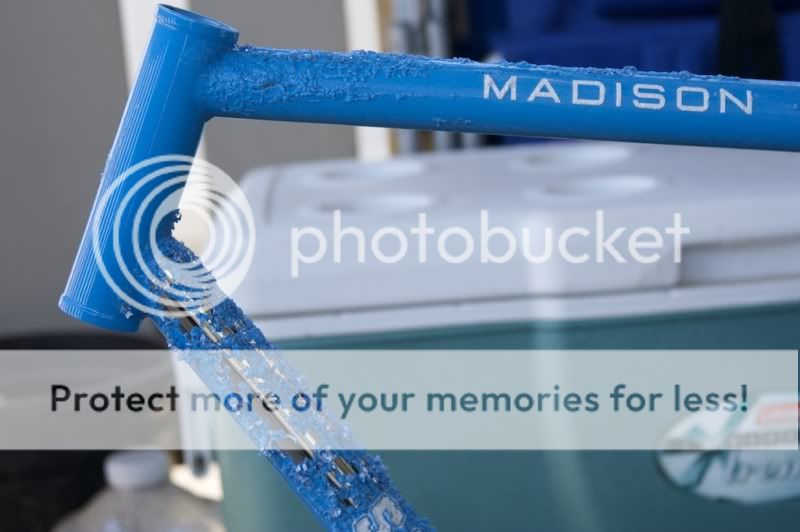
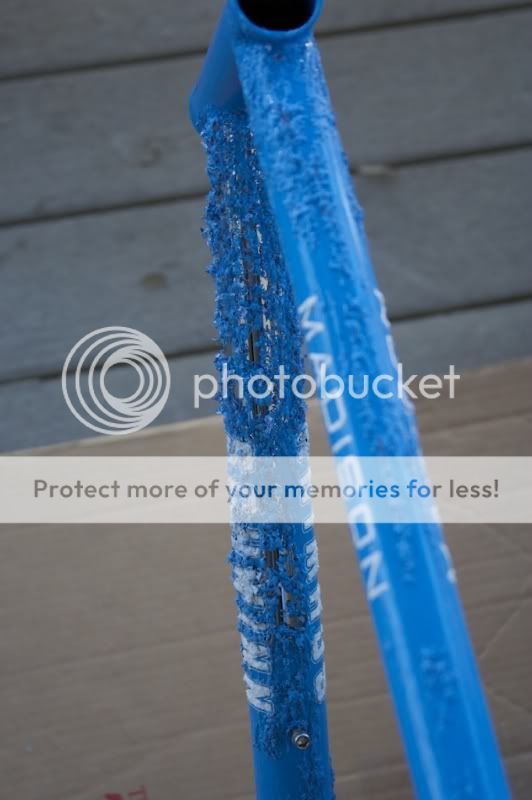
Step 2 - Using the paintbrush, apply a generous coating of Jasco over the areas that you want to strip. When applying, try to brush-on the Jasco unidirectionally. This will make the process much more efficient. Why? I have no idea, but I tested it out and it's true. On the first coating I used unidirectional brush strokes on the down tube, and random overlapping strokes on the top tube. You can see how much more effective the Jasco worked on the down tube. You'll notice that the Jasco gets to work almost immediately, bubbling and hissing. After brushing on the Jasco, let it sit. From what I've read, there's an inverse relationship between the air temperature and how long you need to let it sit on the frame. It was about 65�F when I did my frame, and after 20 minutes, a healthy amount of paint had bubbled up or fallen off.
*Note* I never had the patience to wait more than 20 minutes, so I really don't know what a longer exposure would result in. It might work brilliantly, or it might only be minimally more effective.
Step 3 - If you applied the Jasco well, and it did its job, you should come back to find that the paint/clearcoat has bubbled up and even fallen right off! Using your plastic tool (credit card, knife, etc.), scrape away the paint, decals, and leftover Jasco from the frame. Once you've removed the majority of these materials, use a rag and water (hose/faucet) to rinse and wipe off the frame. Dry the frame with a clean rag.
Step 4 - Repeat steps 2 and 3 as needed to completely remove all the paint/clearcoat/decals from your frame.
My frame after the first round of Jasco, scraping, and rinsing:
*Note* As you can see, after the first coating of Jasco, there is still a decent amount of paint and decal left on the frame, even on the down tube (where I applied a healthy unidirectional coat). I chose to do the frame in sections and needed to do each section two or three times. If I had this to do over, I would do a first coating over the entire frame and see where that left me. It might only take one or two more coats to finish the entire frame.
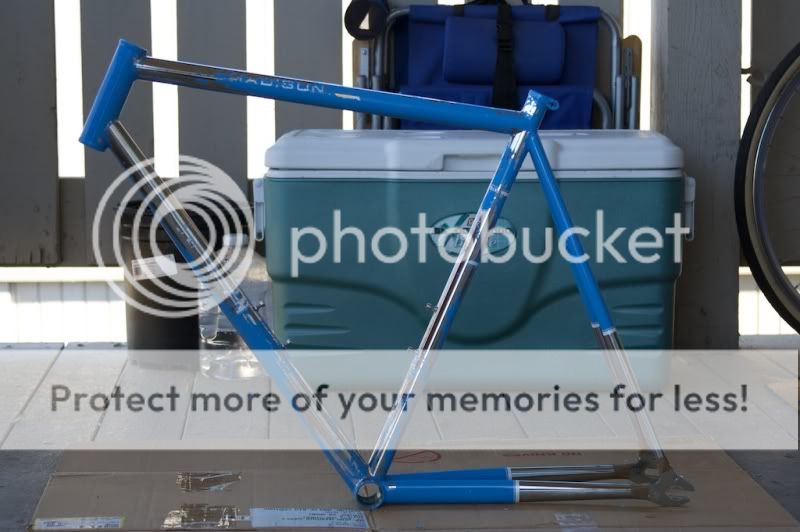
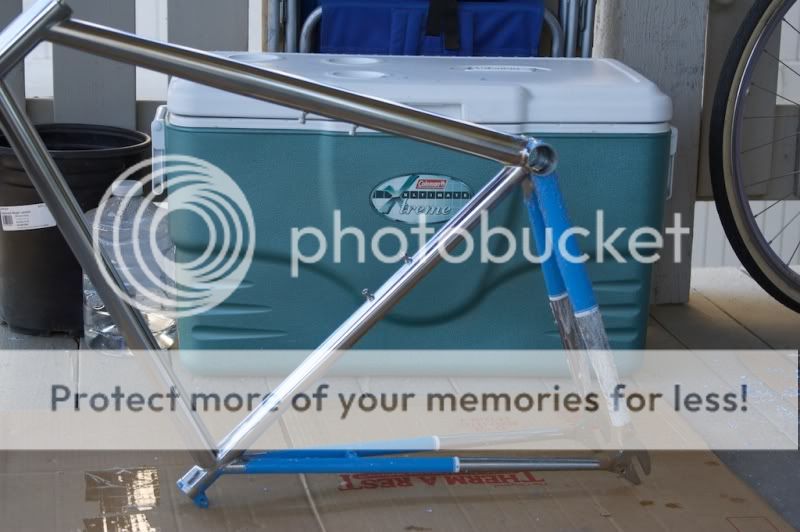
I think this was during the fourth coat of Jasco:
Step 5 - Remove any tape/masking and take out any of the screws/plugs that were preventing Jasco from getting into your frame. Thoroughly rinse the outside and inside of your frame, doing your best to remove ALL the Jasco from the frame. Even though its safe to use on metal and chrome during the short amount of time it takes to strip your bike, if you leave it on for extended periods of time it might corrode or eat away at your frame. I went to a do-it-yourself carwash and used the high-pressure sprayer to hose out the inside of my frame. This was probably over-kill, and a normal garden hose will probably work fine.
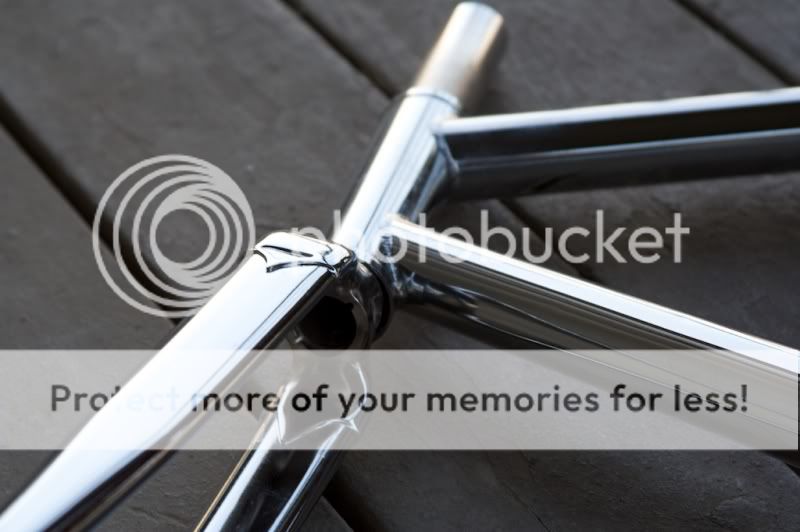
The finished product:
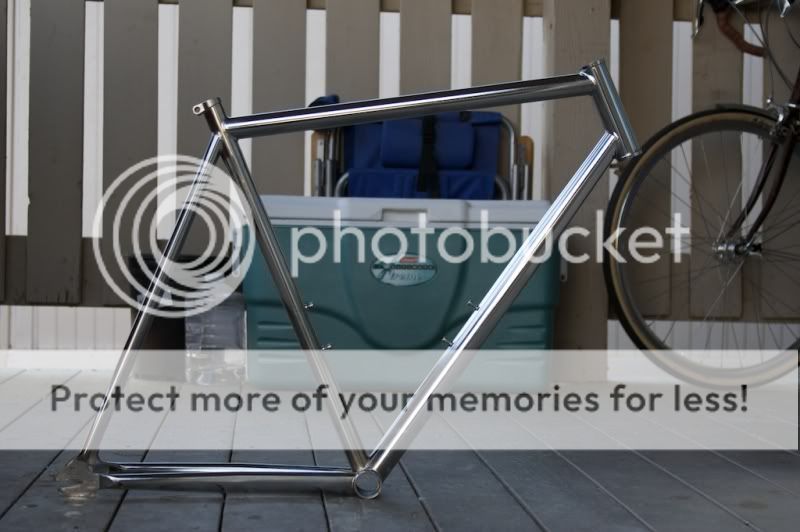
I let my frame dry overnight, and then took this opportunity to "Frame-Saver" the inside of the tubes. If you're stripping a steel frame, and you hosed out the interior of your frame, I HIGHLY recommend you treat the interior of your frame with an anti-rust treatment. I used Frame-Saver, but linseed oil works too.
Conclusions: Going into this, I had two concerns. The first being that the Jasco would either not do the job well enough (leaving behind paint and decals), or would do it too well (eating away the chrome or frame). The second was that I would find the chrome that was under the paint to be of a vastly inferior quality to the chrome on the fork and rear triangle.
As to concern #1 - The Jasco worked brilliantly, and I would highly recommend it. However, it is a VERY toxic substance. Next time, I think I'll start with a "green" paint stripper and see how it works. If it fails miserably, I'll revert to Jasco. However, I believe that if there was going to be an application where a less potent paint stripper would work, it would be with removing paint from chrome.
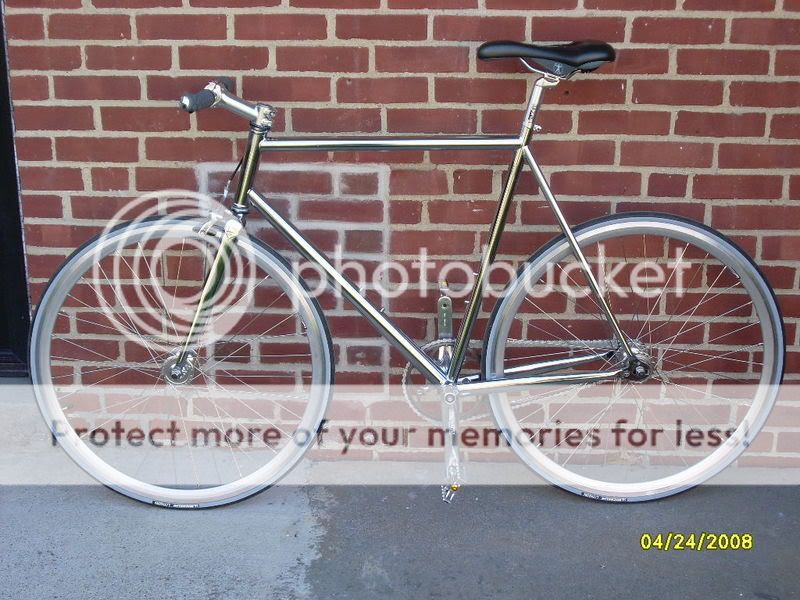
As to concern #2 - The chrome is of the same quality and finish on the entire frame with two exceptions. It's obvious that Schwinn knew the majority of the frame was going to be painted over, because there is a streak of something (welding material maybe) on the down tube, and the chrome has a bronze coloration around the bottom bracket area. I believe the bronze coloration is due to a slightly thinner layer of nickel in that area, thus letting the copper under-layer show through. Both of these are small in scale, and not evident unless you're looking really carefully. (If you look carefully at the profile shot of the full-chrome frame, you can see the bottom bracket area)
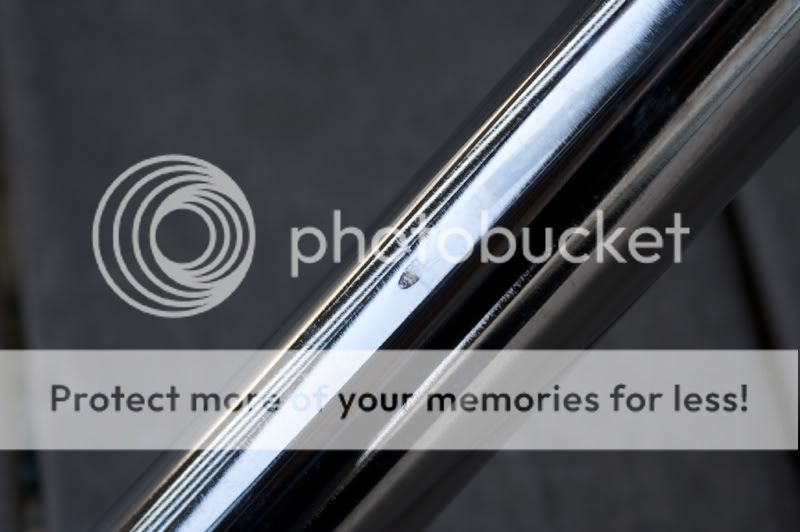
The streak on the down tube:
Overall, the chrome looks great all over. That being said, since Schwinn is painting most of the frame, I wouldn't expect them to be particularly worried about the appearance of the chrome under the paint. This could mean that I just got lucky with a good frame and that the next one out of the factory would be an eyesore if stripped to the chrome. That said, I would do this again in an instant. It was fun and I wasn't really a big fan of the blue paint job on the Madison.
Next steps - I would like to add some sort of protection to the chrome now, so it continues to look sharp, and to avoid oxidation. From the research I've done, it sounds like clear coating won't work too well, and will actually tarnish the appearance of the chrome. The two other options I've read about are waxing and polishing, both of which have their fans and detractors. But that's another thread entirely. And of course, I need to build it up and ride it!
I thought it looked like a fun project and decided to try it out. So then I started looking around for other chrome frames that people had stripped, and explanations on how they did it. I found lots of frames, mostly chrome Pistas and classic Paramounts, but not much detailed info on the process of removing the paint and prepping the frame to be built up. There were plenty of threads on stripping paint from a frame, but I was worried about damaging the underlying chrome.
Finally, I found a guy on Velospace who had stripped his Pista, AND provided the instructions he had used, which ended up being from a thread I missed on BF. His bike looked great, so I used his process as the basis for stripping my frame.
Even though his instructions were great and doubtlessly made my own experience much easier, there were questions that I wasn't able to find answers to that would have made my job even easier than it already was.
Figured I'd share my experiences with those who are curious about doing something similar, in the hopes that it saves you a little time and a lot of nail-biting. Please note that I can only attest to the results I achieved using one particular product on one particular frame. Also: Please use your own judgment when deciding what precautions to take when dealing with the ridiculously harmful chemicals that are used during this process.
Workspace: I recommend doing this outside, or at least in a VERY well ventilated indoor area. If you're working over flooring that you don't care about paint stripper falling on, awesome. If not, lay down enough cardboard (or whatever) for you to fit 3-5 frames on. This will provide enough working area to catch all the crap coming off your bike, and still leave plenty of clean work area for the later stages. I would also recommend setting up near a hose, or at least somewhere that you can wash off the frame without fear of spraying caustic chemicals on something important. Living in an apartment, I used the faucet on the side of my building. Not ideal, but at least I was able to just turn on the water and still have both hands free.
Materials:
- Jasco Paint and Epoxy Remover - Jasco makes a variety of products designed to remove various materials from stuff, and the names all sound similar. I used the "Premium Paint and Epoxy Remover" which they claim will remove paint in 5 minutes. Probably the most toxic product, but also probably the most effective. They also offer this in a spray version, but I opted for what I felt would be more control with the brush-on stuff.
- Glass jar - Pour the Jasco into this as needed. It much easier (and safer) than trying to work straight from the can.
- 1.5" crappy paintbrush - Any old brush will do the job. I found 1.5" manageable for spreading over a decent sized area, but still able to get into the tighter spots.
- Protective eyewear - If I need to explain this, then maybe you shouldn't be working with these chemicals.
- Protective gloves - The Jasco can recommends using chemical resistant gloves, so you probably should. Someone in another thread who was using Jasco claimed it ate through the latex gloves he was using, although he didn't specify whether they were the thick dish-washing gloves or the thin "prostate exam" gloves. That said, I used a pair of yellow dish-washing gloves and they seemed to work okay.
- Multiple rags - One or two rags for wiping off the Jasco, and one or two rags for wiping off the water after rinsing the frame.
- Rigid plastic object - This is for scraping off the Jasco, decals, and paint. I used some old credit cards and read about someone else using a plastic knife. The credit cards did okay, but after some scraping and exposure to the Jasco, you'll notice the cards starting to de-laminate, and thus losing some of their edging ability. I ended up going through three plastic cards, so I guess it's not the best tool for the job.
- Paper towels - Only used these for getting the last of the water off the frame between coatings of Jasco.
Here's what I started with (I did the fork the night before):
Step 1 - Wipe off any dirt, grease, oil, etc. from the frame. Tape off any areas you don't want to strip. I only taped off the very back, starting at the vent holes near the track ends in the seat stays and chain stays. I did this to prevent Jasco from getting into the interior of the stays, and to leave the clearcoat over the track ends for a little added protection, since this will be the highest wear area. I also chose to leave the water bottle bolts in the frame, again to help prevent Jasco from getting into the tubes.
Step 2 - Using the paintbrush, apply a generous coating of Jasco over the areas that you want to strip. When applying, try to brush-on the Jasco unidirectionally. This will make the process much more efficient. Why? I have no idea, but I tested it out and it's true. On the first coating I used unidirectional brush strokes on the down tube, and random overlapping strokes on the top tube. You can see how much more effective the Jasco worked on the down tube. You'll notice that the Jasco gets to work almost immediately, bubbling and hissing. After brushing on the Jasco, let it sit. From what I've read, there's an inverse relationship between the air temperature and how long you need to let it sit on the frame. It was about 65�F when I did my frame, and after 20 minutes, a healthy amount of paint had bubbled up or fallen off.
*Note* I never had the patience to wait more than 20 minutes, so I really don't know what a longer exposure would result in. It might work brilliantly, or it might only be minimally more effective.
Step 3 - If you applied the Jasco well, and it did its job, you should come back to find that the paint/clearcoat has bubbled up and even fallen right off! Using your plastic tool (credit card, knife, etc.), scrape away the paint, decals, and leftover Jasco from the frame. Once you've removed the majority of these materials, use a rag and water (hose/faucet) to rinse and wipe off the frame. Dry the frame with a clean rag.
Step 4 - Repeat steps 2 and 3 as needed to completely remove all the paint/clearcoat/decals from your frame.
My frame after the first round of Jasco, scraping, and rinsing:
*Note* As you can see, after the first coating of Jasco, there is still a decent amount of paint and decal left on the frame, even on the down tube (where I applied a healthy unidirectional coat). I chose to do the frame in sections and needed to do each section two or three times. If I had this to do over, I would do a first coating over the entire frame and see where that left me. It might only take one or two more coats to finish the entire frame.
I think this was during the fourth coat of Jasco:
Step 5 - Remove any tape/masking and take out any of the screws/plugs that were preventing Jasco from getting into your frame. Thoroughly rinse the outside and inside of your frame, doing your best to remove ALL the Jasco from the frame. Even though its safe to use on metal and chrome during the short amount of time it takes to strip your bike, if you leave it on for extended periods of time it might corrode or eat away at your frame. I went to a do-it-yourself carwash and used the high-pressure sprayer to hose out the inside of my frame. This was probably over-kill, and a normal garden hose will probably work fine.
The finished product:
I let my frame dry overnight, and then took this opportunity to "Frame-Saver" the inside of the tubes. If you're stripping a steel frame, and you hosed out the interior of your frame, I HIGHLY recommend you treat the interior of your frame with an anti-rust treatment. I used Frame-Saver, but linseed oil works too.
Conclusions: Going into this, I had two concerns. The first being that the Jasco would either not do the job well enough (leaving behind paint and decals), or would do it too well (eating away the chrome or frame). The second was that I would find the chrome that was under the paint to be of a vastly inferior quality to the chrome on the fork and rear triangle.
As to concern #1 - The Jasco worked brilliantly, and I would highly recommend it. However, it is a VERY toxic substance. Next time, I think I'll start with a "green" paint stripper and see how it works. If it fails miserably, I'll revert to Jasco. However, I believe that if there was going to be an application where a less potent paint stripper would work, it would be with removing paint from chrome.
As to concern #2 - The chrome is of the same quality and finish on the entire frame with two exceptions. It's obvious that Schwinn knew the majority of the frame was going to be painted over, because there is a streak of something (welding material maybe) on the down tube, and the chrome has a bronze coloration around the bottom bracket area. I believe the bronze coloration is due to a slightly thinner layer of nickel in that area, thus letting the copper under-layer show through. Both of these are small in scale, and not evident unless you're looking really carefully. (If you look carefully at the profile shot of the full-chrome frame, you can see the bottom bracket area)
The streak on the down tube:
Overall, the chrome looks great all over. That being said, since Schwinn is painting most of the frame, I wouldn't expect them to be particularly worried about the appearance of the chrome under the paint. This could mean that I just got lucky with a good frame and that the next one out of the factory would be an eyesore if stripped to the chrome. That said, I would do this again in an instant. It was fun and I wasn't really a big fan of the blue paint job on the Madison.
Next steps - I would like to add some sort of protection to the chrome now, so it continues to look sharp, and to avoid oxidation. From the research I've done, it sounds like clear coating won't work too well, and will actually tarnish the appearance of the chrome. The two other options I've read about are waxing and polishing, both of which have their fans and detractors. But that's another thread entirely. And of course, I need to build it up and ride it!
 11-26-08, 03:37 AM
#2
Senior Member
Join Date: Aug 2008
Posts: 138
Mentioned: 0 Post(s)
Tagged: 0 Thread(s)
Quoted: 0 Post(s)
Likes: 0
Liked 0 Times
in
0 Posts
Nice post, thanks for the tips!
I heard if you don't do something right away to your frame it will start oxidizing. Not sure if this applies to frames with an actual chrome coating.
I heard if you don't do something right away to your frame it will start oxidizing. Not sure if this applies to frames with an actual chrome coating.
11-26-08, 11:35 AM
#4
Senior Member
Join Date: Aug 2008
Location: SoCal
Posts: 2,694
Bikes: A few BSO's.
Mentioned: 4 Post(s)
Tagged: 0 Thread(s)
Quoted: 164 Post(s)
Likes: 0
Liked 55 Times
in
27 Posts
In the profile shot of the finished chrome frame there is a tangent from the bottom of the head tube to the tire in the background. It throws off the composition of the photo. Could you re-shoot that one?
Seriously, that was so detailed and informative you should get some kind of SS/FG prize. I was surprised the photo was a little bit off because of your attention to detail.
Also could you put a neutral background behind the frame, off white maybe.
Seriously, that was so detailed and informative you should get some kind of SS/FG prize. I was surprised the photo was a little bit off because of your attention to detail.
Also could you put a neutral background behind the frame, off white maybe.
11-26-08, 11:57 AM
#7
Senior Member

Yep, as others have said, great post. Chrome can become tarnished and then the tarnished bits can rust, so it is usually a good idea to clear coat chrome. Unless you are really good about keeping the bike clean, that is.
Nice job, I am tempted to get one of these myself...
Nice job, I am tempted to get one of these myself...
11-26-08, 12:35 PM
#8
On yer bike
Thread Starter
Nice work. Makes me wish I had set up a solid background behind my working space. Yeah, a couple of those shots wouldn't normally be my first choice, but with the ten pic limit on posts I chose the ones that showed the important stuff. I had a better profile shot, but it obscured the bronze coloration on the bottom bracket area. I'll save the photo skills for the build pics.
11-26-08, 12:40 PM
#9
On yer bike
Thread Starter
Yep, as others have said, great post. Chrome can become tarnished and then the tarnished bits can rust, so it is usually a good idea to clear coat chrome. Unless you are really good about keeping the bike clean, that is.
Nice job, I am tempted to get one of these myself...
Nice job, I am tempted to get one of these myself...
 11-26-08, 05:37 PM
#11

K2ProFlex baby!

Join Date: Feb 2007
Location: My response would have been something along the lines of: "Does your bike have computer controlled suspension? Then shut your piehole, this baby is from the future!"
Posts: 6,133
Bikes: to many to list
Mentioned: 0 Post(s)
Tagged: 0 Thread(s)
Quoted: 16 Post(s)
Liked 56 Times
in
31 Posts
This was a great post! Fantastic job OP! 
__________________
You see, their morals, their code...it's a bad joke, dropped at the first sign of trouble. They're only as good as the world allows them to be. I'll show you. When the chips are down, these...These "civilized" people...they'll eat each other. See, I'm not a monster. I'm just ahead of the curve
You see, their morals, their code...it's a bad joke, dropped at the first sign of trouble. They're only as good as the world allows them to be. I'll show you. When the chips are down, these...These "civilized" people...they'll eat each other. See, I'm not a monster. I'm just ahead of the curve
11-26-08, 05:55 PM
#12
Eats Rice

Join Date: Jul 2008
Location: Sacramento
Posts: 144
Bikes: Motobecane Fantom Trail DS - Gary Fisher Tass Genesis - Genius CGX Starling - Old School Redline Proline - EightInch Scrambler FG/SS
Mentioned: 0 Post(s)
Tagged: 0 Thread(s)
Quoted: 0 Post(s)
Likes: 0
Liked 0 Times
in
0 Posts
Very informative and detailed. Thank you for a well thought out post.
Ride Safe!
Ride Safe!
11-26-08, 08:58 PM
#13
Ridin' Hard.
Join Date: Sep 2008
Location: Erie, PA
Posts: 271
Bikes: I have cut my stable down to one bike in hopes to make room for a roadie.
Mentioned: 0 Post(s)
Tagged: 0 Thread(s)
Quoted: 0 Post(s)
Likes: 0
Liked 0 Times
in
0 Posts
Clear coat chips very easily off of chrome. I have heard that you can use hard furniture wax to get a really long lasting protection, or just lots and lots of turtle wax.
"If the parts are bright and shiny, they are nickel plated and chrome plated, not just chrome plated. It is true that the chrome is porous, as it is supposed to be, but the nickel is not. The nickel provides the primary corrosion resistance; the chrome keeps the nickel from tarnishing (turning yellow) and spreads the corrosive energy around so the nickel is not overloaded.
Frequent waxing not only keeps the chrome looking good, but keeps corrosive dirt off it, and can't hurt. A really good nickel-chrome plating job, though, doesn't need babying."
-finishing.com
11-26-08, 09:01 PM
#14
Ridin' Hard.
Join Date: Sep 2008
Location: Erie, PA
Posts: 271
Bikes: I have cut my stable down to one bike in hopes to make room for a roadie.
Mentioned: 0 Post(s)
Tagged: 0 Thread(s)
Quoted: 0 Post(s)
Likes: 0
Liked 0 Times
in
0 Posts
I forgot to say that I think that chrome frame would look hot to trot with all black components...very contrasty.
12-14-08, 12:15 AM
#18
K2ProFlex baby!
Join Date: Feb 2007
Location: My response would have been something along the lines of: "Does your bike have computer controlled suspension? Then shut your piehole, this baby is from the future!"
Posts: 6,133
Bikes: to many to list
Mentioned: 0 Post(s)
Tagged: 0 Thread(s)
Quoted: 16 Post(s)
Liked 56 Times
in
31 Posts
Any updated pics? we're all waiting! 
__________________
You see, their morals, their code...it's a bad joke, dropped at the first sign of trouble. They're only as good as the world allows them to be. I'll show you. When the chips are down, these...These "civilized" people...they'll eat each other. See, I'm not a monster. I'm just ahead of the curve
You see, their morals, their code...it's a bad joke, dropped at the first sign of trouble. They're only as good as the world allows them to be. I'll show you. When the chips are down, these...These "civilized" people...they'll eat each other. See, I'm not a monster. I'm just ahead of the curve
12-14-08, 01:52 AM
#19
On yer bike
Thread Starter
Still in the process of gathering parts. I'll proudly post the results once they've all come in.
12-14-08, 04:42 AM
#20
Newbie
Join Date: Dec 2008
Location: State of disarray
Posts: 3
Mentioned: 0 Post(s)
Tagged: 0 Thread(s)
Quoted: 0 Post(s)
Likes: 0
Liked 0 Times
in
0 Posts
I picked up one of these at the end of last season, and after yanking off the brakes and throwing on a Deda Stem and drop bar, haven't really done anything with it, aside from beating up the wheels... I think when I get some time and boredom, I'm gonna yank the paint off the sucker, and leave the fork at first...I'll try to post if I ever get around to it.
12-14-08, 10:16 AM
#21
...
Join Date: Aug 2008
Location: Columbia, SC
Posts: 216
Bikes: IRO mark V
Mentioned: 0 Post(s)
Tagged: 0 Thread(s)
Quoted: 0 Post(s)
Likes: 0
Liked 0 Times
in
0 Posts
I picked up one of these at the end of last season, and after yanking off the brakes and throwing on a Deda Stem and drop bar, haven't really done anything with it, aside from beating up the wheels... I think when I get some time and boredom, I'm gonna yank the paint off the sucker, and leave the fork at first...I'll try to post if I ever get around to it.
gracias!
this thread actually makes me want to get a madison frame.
12-14-08, 10:32 AM
#22
Se�or Member

Join Date: Jan 2008
Location: Midwest USA
Posts: 547
Bikes: Ti Fatback
Mentioned: 0 Post(s)
Tagged: 0 Thread(s)
Quoted: 0 Post(s)
Likes: 0
Liked 0 Times
in
0 Posts
Stripping my 1x1 today...good to review the refresher on chem' stripping.
__________________
......_ .
O/---\/O
......_ .
O/---\/O
 12-14-08, 06:51 PM
#24
No plan.

Join Date: May 2007
Location: PA
Posts: 2,743
Mentioned: 0 Post(s)
Tagged: 0 Thread(s)
Quoted: 0 Post(s)
Likes: 0
Liked 0 Times
in
0 Posts
Sounds good, looks good. For the Madison 2009 owners, though, who knows if Schwinn decided to stop full-chroming the bike this year. So it's probably not a good idea to strip an 09 unless you're willing to be a guinea pig!
06-10-14, 08:10 AM
#25
Senior Member
Join Date: Oct 2012
Location: Twin Cities, Minnesota, USA
Posts: 1,257
Bikes: 2017 Salsa Carbon Mukluk frame built with XT, 2018 Kona Rove NRB build with Sram Apex 1,2008 Salsa El Mariachi, 1986 Centurion Ironman
Mentioned: 11 Post(s)
Tagged: 0 Thread(s)
Quoted: 286 Post(s)
Liked 100 Times
in
65 Posts
Resurrecting a zombie. I'm fixing up a black chrome schwinn high sierra as a commuter for my son. The black has discolored in places, flaked or scratched off in others. My understanding of this "color" is that it is simply a thin black coat over chrome. I looked this post up because I'm assuming I can strip the paint and be left with a chrome frame. Anyone know whether that's the case? And I don't think I would clear coat. I recovered a very tough looking schwinn cimarron chrome fork with 15 minutes of polishing with aluminum foil. Looks brand new. I would do the same with the entire frame and then probably use an automotive spray wax.
__________________
Don't complain about the weather and cower in fear. It's all good weather. Just different.
Don't complain about the weather and cower in fear. It's all good weather. Just different.