


Simple Modification to improve bike light safety.
 06-18-12, 05:16 AM
#1
Commander, UFO Bike
Thread Starter

Simple Modification to improve bike light safety.
Years ago, I had a problem with one of my headlights. That night, it was wet, dark, and the power light showed that the light was working. However, the bulb burned out from the shock of a sudden drop (old halogen light). I knew that the bulb burned out because, I had modified the light based on something I saw on one of NiteRider's digital headlights, and saw the indicating "light" go out. Fortunately, I had a backup light, so I was safe to ride.
It seems that NiteRider only has this feature on it's more expensive dual beam lights, such as the one you can see below...

See those green dots on the top of the shroud? They're fluorescent rods embedded in the shroud to let you know which light is on. Sure, you could take your hand off of the handlebars/brakes, and wave it in front of the light, but in an emergency would you really want to do that?
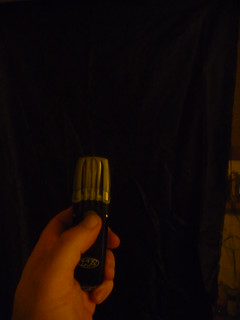
Is this light on or off?
The red power light indicates the light is on, but the light is actually between settings, and the lamp is dark. (battery was low, if it was charged, the red light would have been green)

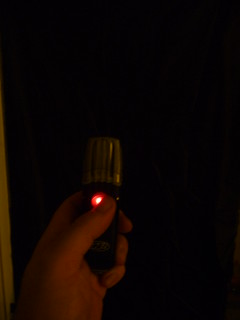
Ah!!! That's Better!!! That green dot only shows if the lamp is on.
It's really easy to do this yourself. It only takes a couple of minutes, a few bucks in materials, and some common tools.
You need:
Headlight
1/16" Drill Bit
Hand Drill
1/16" Blue or Green Fluorescent Rod (available at hobby shops)
Hobby Knife
Emery Board
Clear Blue or Green Hobby Paint (optional)
Pledge Wood Floor Finish with Future Shine (optional)
Carefully drill a 1/16" hole in the shroud of the light in front of the lens.
Using the hobby knife, bevel the edge of the fluorescent rod to make it easier to push it through the shroud.
Press the rod into the hole, from the top of the light until it extends past the end of the cut (if it's too loose, a drop of CA glue can set it into place).
Cut the rod about 3/16" above the top of the light. Clean up the cut with the emery board, then firmly press the rod flush with the top of the light using a hard flat surface. lastly, trim off the extra from the inside of the shroud.
If the color of the dot is a little too bright (I find that blue fluorescent rod looks too white), a drop of clear blue hobby paint (Tamiya's acrylic works well) can be used to get the right appearance. To make the dot appear more glossy, a drop of the floor finish will do wonders.
It seems that NiteRider only has this feature on it's more expensive dual beam lights, such as the one you can see below...
See those green dots on the top of the shroud? They're fluorescent rods embedded in the shroud to let you know which light is on. Sure, you could take your hand off of the handlebars/brakes, and wave it in front of the light, but in an emergency would you really want to do that?
Is this light on or off?
The red power light indicates the light is on, but the light is actually between settings, and the lamp is dark. (battery was low, if it was charged, the red light would have been green)
Ah!!! That's Better!!! That green dot only shows if the lamp is on.
It's really easy to do this yourself. It only takes a couple of minutes, a few bucks in materials, and some common tools.
You need:
Headlight
1/16" Drill Bit
Hand Drill
1/16" Blue or Green Fluorescent Rod (available at hobby shops)
Hobby Knife
Emery Board
Clear Blue or Green Hobby Paint (optional)
Pledge Wood Floor Finish with Future Shine (optional)
Carefully drill a 1/16" hole in the shroud of the light in front of the lens.
Using the hobby knife, bevel the edge of the fluorescent rod to make it easier to push it through the shroud.
Press the rod into the hole, from the top of the light until it extends past the end of the cut (if it's too loose, a drop of CA glue can set it into place).
Cut the rod about 3/16" above the top of the light. Clean up the cut with the emery board, then firmly press the rod flush with the top of the light using a hard flat surface. lastly, trim off the extra from the inside of the shroud.
If the color of the dot is a little too bright (I find that blue fluorescent rod looks too white), a drop of clear blue hobby paint (Tamiya's acrylic works well) can be used to get the right appearance. To make the dot appear more glossy, a drop of the floor finish will do wonders.
Last edited by K'Tesh; 06-18-12 at 05:51 AM.
 06-18-12, 01:15 PM
#2
Senior Member

You should've posted this in Electronics, Lighting and Gadgets. But anyway, the people here in A&S need a reminder to get good headlights.
I build my own 12 volt systems. Recently, an LED version of an old favorite, the halogen MR16, has become available. Since the light is bright enough to cast a spot on the road ahead, I don't think I need your modification. I mount my lights on the bottom of my fairing, to avoid glare in my eyes.
But here is a video:
This bulb is an LED MR16. Only 6.2 Watts, with an eight degree beam angle. Power comes from a 12 volt , 12 amp/hour, lead/acid rechargeable battery, so I can get close to 24 hours on run time. But I plan on adding a second light and tail lights, and amber marker lights. Which will be fine since night time doesn't last a full 24 hours.
Two other tips for checking whether your lights are on: Use panel mount Toggle switches that click, so you can feel if the switch is up or down, and install a piezo alarm, so you can get an audible signal to confirm that you have power on the front of your bike (that only needs a momentary contact).
06-18-12, 01:19 PM
#3
Senior Member
Oops, I forgot to mention, I have since aimed the headlight up higher. You could have a high beam/low beam setup. Maybe a second light with a 35 degree beam angle.
Raised headlight:
I have since lowered the headlight just a nick, since I didn't want to blind oncoming drivers.
Raised headlight:
I have since lowered the headlight just a nick, since I didn't want to blind oncoming drivers.

Thread
Thread Starter
Forum
Replies
Last Post
rex_kramer
Commuting
13
10-06-11 06:57 PM
