


Threadless steerer tubes, expansion plugs/star nuts, spacers and stem stack height
 07-26-18 | 11:38 PM
#1
Thread Starter
Senior Member
Joined: Oct 2016
Posts: 663
Likes: 2
Threadless steerer tubes, expansion plugs/star nuts, spacers and stem stack height
A couple questions here. I've seen the expansion plugs and atar nuts but have not seen the below style before.
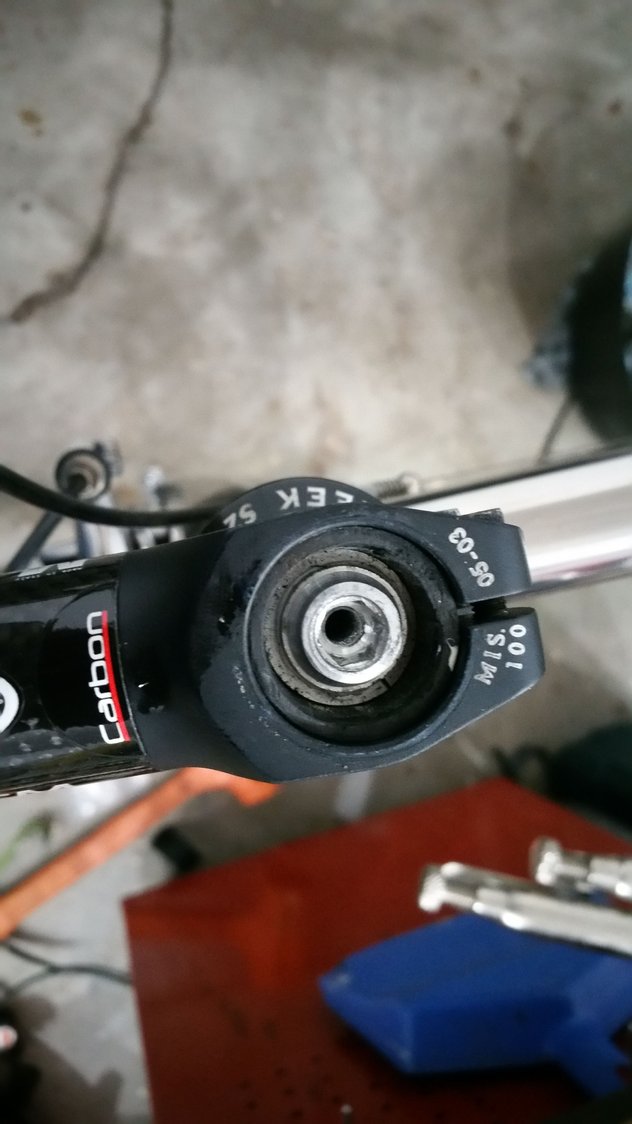
It looks to be a combination of the two. Is this plug style still made?
From what I understand, the top of stem should be stacked to be 3mm above the top of the steerer tube. Are there any standards as to what the stack heights of stems are? Or if stems increase in stack height in a standardized way?
If a stem is stacked with spacers such that the top of the stem is greater than 3mm, the fear is that the top of the steerer tube will get crushed (ovalize) and (eventually) fail from the clamp force of the stem since it is unsupported in that area. Correct?
So how do you deal with a steerer tube that has been cut down already and you want to fit a new stem with a different stack height and no combination of spacer stacking will get you that 3mm clearance? I mean stem stack height is rarely given when buying a new stem.
 07-26-18 | 11:42 PM
#2
Senior Member
Joined: Jul 2018
Posts: 144
Likes: 0
I love that guy^. He really knows his stuff when it comes to carbon.
edit: Sorry for not directly answering your questions. I really don't know how common it is. I just love to share that guy's stuff whenever I get the chance. He's great.
Last edited by toast3d; 07-26-18 at 11:46 PM.
07-27-18 | 09:48 AM
#3
Thread Starter
Senior Member
Joined: Oct 2016
Posts: 663
Likes: 2
[MENTION=487020]toast3d[/MENTION] - Thanks, that was an informative post.
Although, the steerer tube I have pictured is all carbon, I have other bikes with steel/Al steerers and would still be interested in understanding this more in general so any further insight is appreciated.
Although, the steerer tube I have pictured is all carbon, I have other bikes with steel/Al steerers and would still be interested in understanding this more in general so any further insight is appreciated.
07-27-18 | 12:05 PM
#4
Senior Member
Joined: Jul 2018
Posts: 144
Likes: 0
Okay, so... your initial post did confuse me a little, because you are saying that the compression plug is kind of a hybrid between a star nut and a compression plug. I really doubt that's the case.
As far as I know, the entire reason that a compression plug exists is that you simply can't use a star nut on a carbon fork. A star nut would basically destroy the fork tube. So I don't think your plug is a funky hybrid of the two types. I think it's probably just a normal compression plug.
You slide the plug down into the tube, and as you tighten the plug, it expands out. The outward expansion of the plug holds it in place inside the tube, allowing the top cap to have an anchored point to tighten into, compressing the headset bearings. On an alloy fork tube, the star nut would be providing that anchor point.
So really the important thing to worry about is getting the plug to the correct depth.
Apologies if I am explaining things you already know.
As for mounting your stem, I really don't think you want to mess with that on a carbon fork. The problem with cutting a fork tube is that once it is cut, it's cut. There's no going back. I think you'd be better off modifying a spacer to get you the height you want above the stem. So basically, cut a spacer down. You'd need a pretty straight cut though. Maybe you should have somebody skilled do it for you, especially if your spacers are carbon too.
07-27-18 | 02:52 PM
#6
Senior Member
Joined: Sep 2008
Posts: 7,296
Likes: 577
From: Loveland, CO
Bikes: Cervelo Rouvida x 2
There actually is a way to safely extend the length of a steering tube, by up to 1cm. You would never want to modify a spacer, since they can be had in many lengths to use as-is.
Here's the lengthy descrption of the process. It needs to be long to get all of the detail needed to do the job correctly. I've used a bike with this mod for many years, with no problem.
Material needed:
1. one package (two tubes) JB weld
2. 1" star nut
3. 6mm bolt long enough to thread deep into the star nut and extend above the top of the extended steerer
4. foam rubber, 1" ID
5. plastic drinking straw or vinyl tubing with ID 6mm or larger
6. 1" copper tube solder coupler with no stop in the middle
A 1” star nut will slip into a 1-1/8” steerer, if the sharp corners are filed down. Do this as uniformly as possible and be sure to reduce the diameter just enough to allow the star nut to slip into the steerer. If the star nut has guide tabs that hang down below the bottom, these should be cut off with a dremel abrasive cutoff tool. Degrease the star nut with acetone or lacquer thinner.
Degrease the inside and top of the steerer with acetone or lacquer thinner.
Sand the inner surface and top of the steerer with 80-120 grit sandpaper to promote adhesion of the epoxy.
Cut a length of plastic tubing long enough to cover most of the threads on the 6mm bolt. Leave enough threads exposed to thread all the way to the bottom the star nut. Apply a small amount of grease to the bottom of the bolt, after it’s screwed into the star nut to prevent adhesion with the epoxy. Leave NO exposed threads at the top of the start nut.
Something light in weight must be used to plug the steerer and prevent the epoxy from running into it. I used a piece of 1” foam rubber. The copper coupling worked pretty well as a cutting tool to cut a cylindrical plug from the foam.
Insert the foam rubber plug just enough to position the top of the star nut a few millimeters below the top of the steerer.
Remove any burrs from the ID of the copper tube coupling and be sure that it will slide over the steerer. Lightly grease or apply automotive paste wax to the inside of the coupling, leaving almost no visible grease, to prevent bonding of the epoxy to the coupling. Slide the coupling over the steerer to the desired length of extension. A piece of masking tape around the bottom of the coupling might be a good idea to keep the coupling from sliding down. Also be sure that the steerer is approximately plumb, or the epoxy won’t be level along the top.
Combine the two tubes of JB Weld in a small container and mix thoroughly. Apply some epoxy to the inside of the steerer, and apply a large amount to the star nut, to fill the area between the two stars. Insert the star nut into the steering tube, making sure that the top of the nut is a few millimeters below the top of the steerer. Carefully place the remainder of the epoxy into the steering tube, filling it to the top of the coupling. It may be difficult to get all of the air out of the epoxy, so watch for air bubbles in the first 30 minutes or so after placing the epoxy. A toothpick will help to work out air bubbles.
Don’t disturb the copper tube coupling for at least 6 hours, or until the next day. Then the coupling can be removed and the top cap bolt unscrewed from the star nut. I used needle nose pliers to grab the plastic tube and remove it. You should then have a solid epoxy extension on top of the original steerer, with a permanently glued-in-place star nut.
There is some chance that your top cap might hit the solid epoxy, depending on the design of the underside of the cap. A little hand relieving with a small dremel tool sanding drum and/or large drill bit might be required to provide clearance.

Thread
Thread Starter
Forum
Replies
Last Post
spectastic
Bicycle Mechanics
15
08-30-18 09:11 PM
