


Remove square taper bottom bracket?
 06-04-24 | 11:55 PM
#1
Thread Starter
Senior Member

Joined: Aug 2011
Posts: 2,752
Likes: 139
From: Paris, France
[SOLVED] Remove square taper bottom bracket?
Hello,
Since the rear triangle on that folding bike prevents the front derailleur from moving totally to the inside, the chain rubs slightly against the derailleur's fork when on the inner ring. No biggie, but a silent bike is nice.
To add a spacer on the drive side and move the bottom bracket axle a bit to the right, I thus need to undo the BB (plastic) cups. Worth trying before buying a BB with a longer axle.
Before using more force, do you confirm 1) it's the right tool, and 2) it's the usual threading on both sides (lefty loosey)?
Thank you.
Last edited by Winfried; 06-06-24 at 02:03 AM.

 06-05-24 | 12:28 AM
#3
Highly Enriched Driftium


Joined: Apr 2017
Posts: 6,715
Likes: 2,174
I had same problem on Dahon Speed 2X conversion, front derailleur cage would hit on front derailleur adaptor, due to its thickness and huge diameter seat tube, cage not far enough inboard to shift to the small ring. So I spaced BB out 4mm. Worked, but kept dropping chain, and this is a 2 piece crank so left crank arm then had 4mm less clamping length, came loose. Then fixed proper:
Removed spacers, now chainline is perfect like the biking gods intended, not constantly dropping chain when shifting to low chainring when on low cog.
Inner lip on front derailleur was massive overkill, thick metal and a large lip width. Marked area where it interfered, and with a 4" angle grinder, ground just that area off, almost to flush. Was still plenty stiff. Put front derailleur back on, adjusted, has worked flawlessly for two years, a lot of miles, a lot of shifts.
For you, you don't need to take as much off. Just enough to allow you to adjust your derailleur limit screw to allow the cage to go in just a hair more.
Threads: PEDALS are right hand thread on right, left hand on left.
Standard (BSA) bottom bracket is reverse, Right hand thread on left, left hand thread on right.
Last edited by Duragrouch; 06-05-24 at 05:35 AM.
06-05-24 | 01:03 AM
#4
Senior Member


Joined: Apr 2009
Posts: 39,897
Likes: 3,865
From: New Rochelle, NY
Bikes: too many bikes from 1967 10s (5x2)Frejus to a Sumitomo Ti/Chorus aluminum 10s (10x2), plus one non-susp mtn bike I use as my commuter
It's easy to remember if you're a bit contrary by nature-------
Right is left, and left is right.
Right is left, and left is right.
__________________
FB
Chain-L site
An ounce of diagnosis is worth a pound of cure.
Just because I'm tired of arguing, doesn't mean you're right.
�One accurate measurement is worth a thousand expert opinions� - Adm Grace Murray Hopper - USN
WARNING, I'm from New York. Thin skinned people should maintain safe distance.
FB
Chain-L site
An ounce of diagnosis is worth a pound of cure.
Just because I'm tired of arguing, doesn't mean you're right.
�One accurate measurement is worth a thousand expert opinions� - Adm Grace Murray Hopper - USN
WARNING, I'm from New York. Thin skinned people should maintain safe distance.
06-05-24 | 06:20 AM
#5
Senior Member
Joined: Feb 2012
Posts: 3,030
Likes: 1,063
From: Golden, CO and Tucson, AZ
Bikes: 2012 Specialized Elite Disc, 1983 Trek 520
That looks like a nice version of the tool. Be sure to loosen the locknut immediately after breaking it free.
If muscle power doesn't do it, try impact on the wrench handle with a dead-blow mallet. Also try a heat gun/hair dryer on the metal shell, after protecting or removing plastic parts.
If muscle power doesn't do it, try impact on the wrench handle with a dead-blow mallet. Also try a heat gun/hair dryer on the metal shell, after protecting or removing plastic parts.
06-05-24 | 08:31 AM
#6
Senior Member
Joined: Feb 2012
Posts: 19,352
Likes: 5,469
From: Rochester, NY
Bikes: Stewart S&S coupled sport tourer, Stewart Sunday light, Stewart Commuting, Stewart Touring, Co Motion Tandem, Stewart 3-Spd, Stewart Track, Fuji Finest, Mongoose Tomac ATB, GT Bravado ATB, JCP Folder, Stewart 650B ATB
Generally only the left side uses plastic retaining cups. One trick to reduce their breakage possibility is to loosen the right/drive side first. This reduces the force needed to remove the plastic cup.
BTW "Before using more force, do you confirm 1) it's the right tool, and 2) it's the usual threading on both sides (lefty loosey)?" could be miss understood by some. My answers might be yes, do confirm the tool and threading before using the tool. Andy (fighting the trend to minimize verbiage which also increases ambiguity)
BTW "Before using more force, do you confirm 1) it's the right tool, and 2) it's the usual threading on both sides (lefty loosey)?" could be miss understood by some. My answers might be yes, do confirm the tool and threading before using the tool. Andy (fighting the trend to minimize verbiage which also increases ambiguity)
__________________
AndrewRStewart
AndrewRStewart
06-05-24 | 10:14 AM
#7
Clark W. Griswold

Joined: Mar 2014
Posts: 18,252
Likes: 6,624
From: ,location, location
Bikes: Foundry Chilkoot Ti W/Ultegra Di2, Salsa Timberjack Ti, Cinelli Mash Work RandoCross Fun Time Machine, 1x9 XT Parts Hybrid, Co-Motion Cascadia, Specialized Langster, Phil Wood Apple VeloXS Frame (w/DA 7400), R+M Supercharger2 Rohloff, Habanero Ti 26
I would recommend the new BB or replace the plastic cup with a metal one. Having seen a few broken plastic cups in my day and not liking to see them again getting a new B.B. or just a metal cup would be the way to go.
As others have said that is the tool and right is left and left is right.
As others have said that is the tool and right is left and left is right.
06-05-24 | 09:00 PM
#8
Senior Member
Joined: Apr 2011
Posts: 12,648
Likes: 4,791
I would recommend the new BB or replace the plastic cup with a metal one. Having seen a few broken plastic cups in my day and not liking to see them again getting a new B.B. or just a metal cup would be the way to go.
As others have said that is the tool and right is left and left is right.
As others have said that is the tool and right is left and left is right.
In my Ti MTB I've had a cheap BB with two plastic cups for a couple decades. Completely proof against galvanic corrosion.
06-05-24 | 10:22 PM
#9
Senior Member
Joined: Feb 2012
Posts: 19,352
Likes: 5,469
From: Rochester, NY
Bikes: Stewart S&S coupled sport tourer, Stewart Sunday light, Stewart Commuting, Stewart Touring, Co Motion Tandem, Stewart 3-Spd, Stewart Track, Fuji Finest, Mongoose Tomac ATB, GT Bravado ATB, JCP Folder, Stewart 650B ATB
Generally, I much prefer metal to plastic for fittings (and frames but that's another topic). But there are some applications of plastic in bikes that work quite well. Andy
__________________
AndrewRStewart
AndrewRStewart
06-06-24 | 01:59 AM
#10
Thread Starter
Senior Member
Joined: Aug 2011
Posts: 2,752
Likes: 139
From: Paris, France
So on a British BB, the right cup comes loose by turning clockwise. But it still wouldn't budge: Turned out I should start by loosening the left-side cup (turn anti-clockwise, as usual).
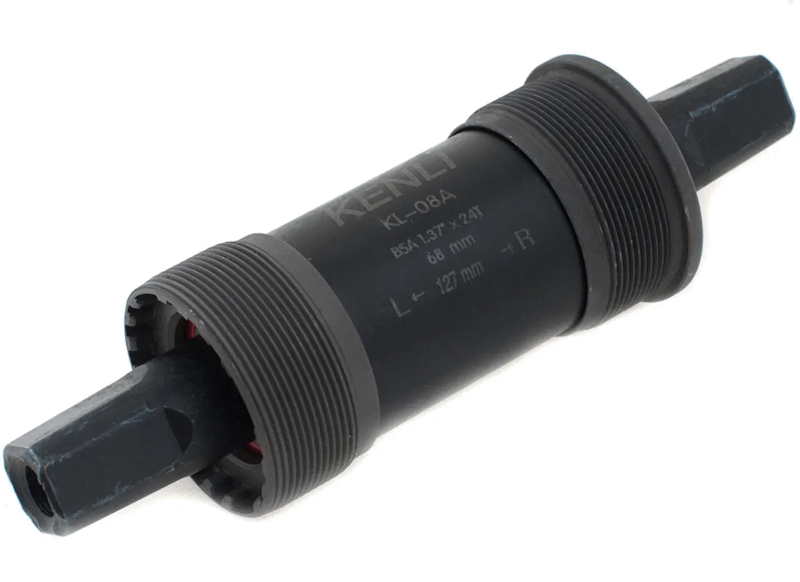
As for the BB shell (68mm wide): ID ~33,5mm OD ~40mm. I'll look around to find a set of spacers to find one that matches, before either going medieval on the inner lip with an angle grinder or getting a BB with a longer axle (current: 127mm.)
Thanks all.
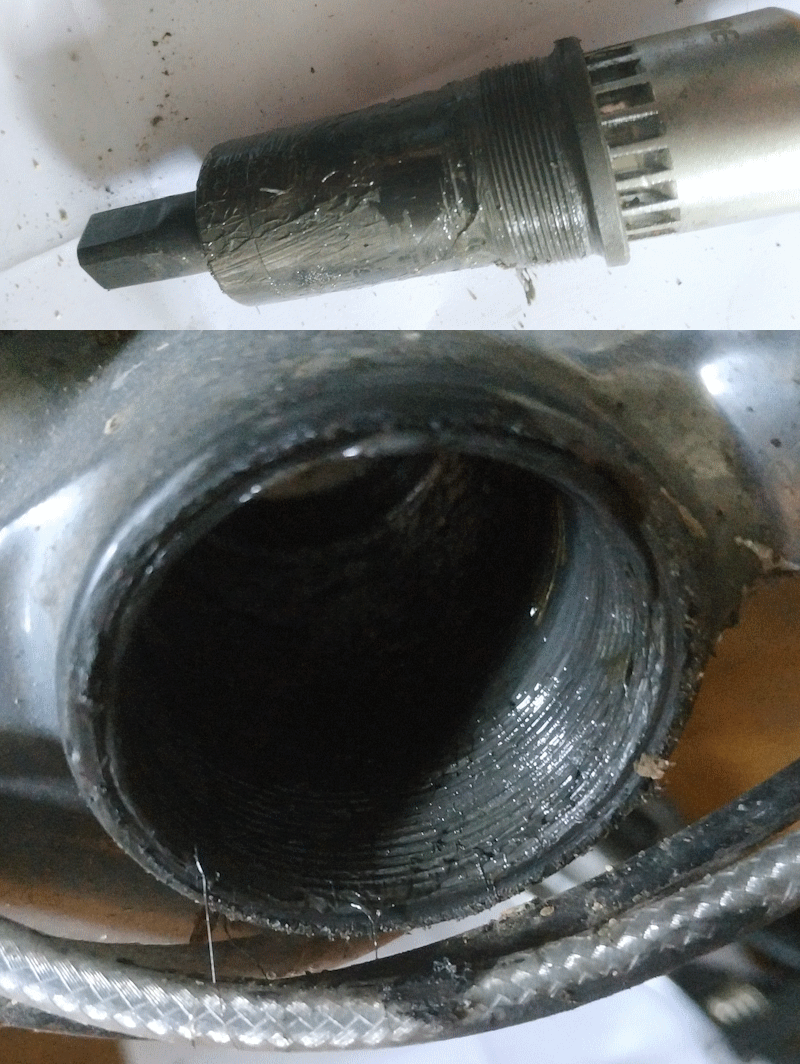
As for the BB shell (68mm wide): ID ~33,5mm OD ~40mm. I'll look around to find a set of spacers to find one that matches, before either going medieval on the inner lip with an angle grinder or getting a BB with a longer axle (current: 127mm.)
Thanks all.
Last edited by Winfried; 06-06-24 at 02:48 AM.
06-06-24 | 02:42 AM
#11
Senior Member
Joined: Apr 2009
Posts: 39,897
Likes: 3,865
From: New Rochelle, NY
Bikes: too many bikes from 1967 10s (5x2)Frejus to a Sumitomo Ti/Chorus aluminum 10s (10x2), plus one non-susp mtn bike I use as my commuter
So on a British BB, the right cup comes loose by turning clockwise. But it still wouldn't budge: Turned out I should start by loosening the left-side cup (turn anti-clockwise, as usual).....
So, here you have two cups, one flanged one not. If you stop to think, you'd see that the flanged one must go on first. Otherwise, there'd be no reference for how far the left one would go, nor to ensure the flange met the BB shell.
Once you dope out the assembly sequence, the disassembly is identical, in reverse, aka last in, first out.
__________________
FB
Chain-L site
An ounce of diagnosis is worth a pound of cure.
Just because I'm tired of arguing, doesn't mean you're right.
�One accurate measurement is worth a thousand expert opinions� - Adm Grace Murray Hopper - USN
WARNING, I'm from New York. Thin skinned people should maintain safe distance.
FB
Chain-L site
An ounce of diagnosis is worth a pound of cure.
Just because I'm tired of arguing, doesn't mean you're right.
�One accurate measurement is worth a thousand expert opinions� - Adm Grace Murray Hopper - USN
WARNING, I'm from New York. Thin skinned people should maintain safe distance.
06-06-24 | 03:00 AM
#13
Highly Enriched Driftium
Joined: Apr 2017
Posts: 6,715
Likes: 2,174
So on a British BB, the right cup comes loose by turning clockwise. But it still wouldn't budge: Turned out I should start by loosening the left-side cup (turn anti-clockwise, as usual).
As for the BB shell (68mm wide): ID ~33,5mm OD ~40mm. I'll look around to find a set of spacers to find one that matches, before either going medieval on the inner lip with an angle grinder or getting a BB with a longer axle (current: 127mm.)
Thanks all.
As for the BB shell (68mm wide): ID ~33,5mm OD ~40mm. I'll look around to find a set of spacers to find one that matches, before either going medieval on the inner lip with an angle grinder or getting a BB with a longer axle (current: 127mm.)
Thanks all.
06-06-24 | 06:47 AM
#14
Senior Member
Joined: Apr 2011
Posts: 12,648
Likes: 4,791
One of my favorite (mental) tools when taking apart the unfamiliar is to consider how it would have gone together.
So, here you have two cups, one flanged one not. If you stop to think, you'd see that the flanged one must go on first. Otherwise, there'd be no reference for how far the left one would go, nor to ensure the flange met the BB shell.
Once you dope out the assembly sequence, the disassembly is identical, in reverse, aka last in, first out.
Regardless of what order they were installed in, either should be okay to start with.
06-06-24 | 07:57 AM
#16

Mad bike riding scientist

Joined: Nov 2004
Posts: 29,149
Likes: 6,206
From: Denver, CO
Bikes: Some silver ones, a red one, a black and orange one, and a few titanium ones
Left is right and right is wrong.
__________________
Stuart Black
Dreamin' of Bemidji Down the Mississippi (in part)
Plan Epsilon Around Lake Michigan in the era of Covid
Gold Fever Three days of dirt in Colorado
Pokin' around the Poconos A cold ride around Lake Erie
Dinosaurs in Colorado A mountain bike guide to the Purgatory Canyon dinosaur trackway
Solo Without Pie. The search for pie in the Midwest.
Picking the Scablands. Washington and Oregon, 2005. Pie and spiders on the Columbia River!
06-06-24 | 07:58 AM
#17
Mad bike riding scientist
Joined: Nov 2004
Posts: 29,149
Likes: 6,206
From: Denver, CO
Bikes: Some silver ones, a red one, a black and orange one, and a few titanium ones
No need. The axle spins with the tool in place. There isn�t any binding as the bottom bracket comes out.
__________________
Stuart Black
Dreamin' of Bemidji Down the Mississippi (in part)
Plan Epsilon Around Lake Michigan in the era of Covid
Gold Fever Three days of dirt in Colorado
Pokin' around the Poconos A cold ride around Lake Erie
Dinosaurs in Colorado A mountain bike guide to the Purgatory Canyon dinosaur trackway
Solo Without Pie. The search for pie in the Midwest.
Picking the Scablands. Washington and Oregon, 2005. Pie and spiders on the Columbia River!
Stuart Black
Dreamin' of Bemidji Down the Mississippi (in part)
Plan Epsilon Around Lake Michigan in the era of Covid
Gold Fever Three days of dirt in Colorado
Pokin' around the Poconos A cold ride around Lake Erie
Dinosaurs in Colorado A mountain bike guide to the Purgatory Canyon dinosaur trackway
Solo Without Pie. The search for pie in the Midwest.
Picking the Scablands. Washington and Oregon, 2005. Pie and spiders on the Columbia River!
06-06-24 | 08:14 AM
#18
Mad bike riding scientist
Joined: Nov 2004
Posts: 29,149
Likes: 6,206
From: Denver, CO
Bikes: Some silver ones, a red one, a black and orange one, and a few titanium ones
So on a British BB, the right cup comes loose by turning clockwise. But it still wouldn't budge: Turned out I should start by loosening the left-side cup (turn anti-clockwise, as usual).

__________________
Stuart Black
Dreamin' of Bemidji Down the Mississippi (in part)
Plan Epsilon Around Lake Michigan in the era of Covid
Gold Fever Three days of dirt in Colorado
Pokin' around the Poconos A cold ride around Lake Erie
Dinosaurs in Colorado A mountain bike guide to the Purgatory Canyon dinosaur trackway
Solo Without Pie. The search for pie in the Midwest.
Picking the Scablands. Washington and Oregon, 2005. Pie and spiders on the Columbia River!
Stuart Black
Dreamin' of Bemidji Down the Mississippi (in part)
Plan Epsilon Around Lake Michigan in the era of Covid
Gold Fever Three days of dirt in Colorado
Pokin' around the Poconos A cold ride around Lake Erie
Dinosaurs in Colorado A mountain bike guide to the Purgatory Canyon dinosaur trackway
Solo Without Pie. The search for pie in the Midwest.
Picking the Scablands. Washington and Oregon, 2005. Pie and spiders on the Columbia River!
06-06-24 | 10:07 AM
#19
Senior Member
Joined: Apr 2011
Posts: 12,648
Likes: 4,791
Rather than try to remember which cup is left threaded and which is right threaded, I�ve found that people remember how to remove the cups easier if they are instructed to push down on the wrench when it is at the 3 o�clock position as in the picture below. This works for both sides which is what makes it easy to remember.
So that's not useful.
You probably meant push down when the wrench is pointing at the front hub.
06-06-24 | 10:56 AM
#20
Senior Member
Joined: Apr 2009
Posts: 39,897
Likes: 3,865
From: New Rochelle, NY
Bikes: too many bikes from 1967 10s (5x2)Frejus to a Sumitomo Ti/Chorus aluminum 10s (10x2), plus one non-susp mtn bike I use as my commuter
BBs with flanges have them as a reference point, where it's tightened against the shell to locate the unit, with the unflanged
side tightened against the cartridge.
__________________
FB
Chain-L site
An ounce of diagnosis is worth a pound of cure.
Just because I'm tired of arguing, doesn't mean you're right.
�One accurate measurement is worth a thousand expert opinions� - Adm Grace Murray Hopper - USN
WARNING, I'm from New York. Thin skinned people should maintain safe distance.
FB
Chain-L site
An ounce of diagnosis is worth a pound of cure.
Just because I'm tired of arguing, doesn't mean you're right.
�One accurate measurement is worth a thousand expert opinions� - Adm Grace Murray Hopper - USN
WARNING, I'm from New York. Thin skinned people should maintain safe distance.
 06-07-24 | 03:56 AM
#22
Senior Member
Joined: Apr 2009
Posts: 39,897
Likes: 3,865
From: New Rochelle, NY
Bikes: too many bikes from 1967 10s (5x2)Frejus to a Sumitomo Ti/Chorus aluminum 10s (10x2), plus one non-susp mtn bike I use as my commuter
Is it not equally obvious while installed?
__________________
FB
Chain-L site
An ounce of diagnosis is worth a pound of cure.
Just because I'm tired of arguing, doesn't mean you're right.
�One accurate measurement is worth a thousand expert opinions� - Adm Grace Murray Hopper - USN
WARNING, I'm from New York. Thin skinned people should maintain safe distance.
FB
Chain-L site
An ounce of diagnosis is worth a pound of cure.
Just because I'm tired of arguing, doesn't mean you're right.
�One accurate measurement is worth a thousand expert opinions� - Adm Grace Murray Hopper - USN
WARNING, I'm from New York. Thin skinned people should maintain safe distance.
