


Threaded Headset with Two Lock Rings. How to adjust?
 07-15-24 | 08:31 AM
#1
Thread Starter
Newbie
Joined: Nov 2022
Posts: 44
Likes: 13
From: Toledo, OH
Threaded Headset with Two Lock Rings. How to adjust?
Hello.
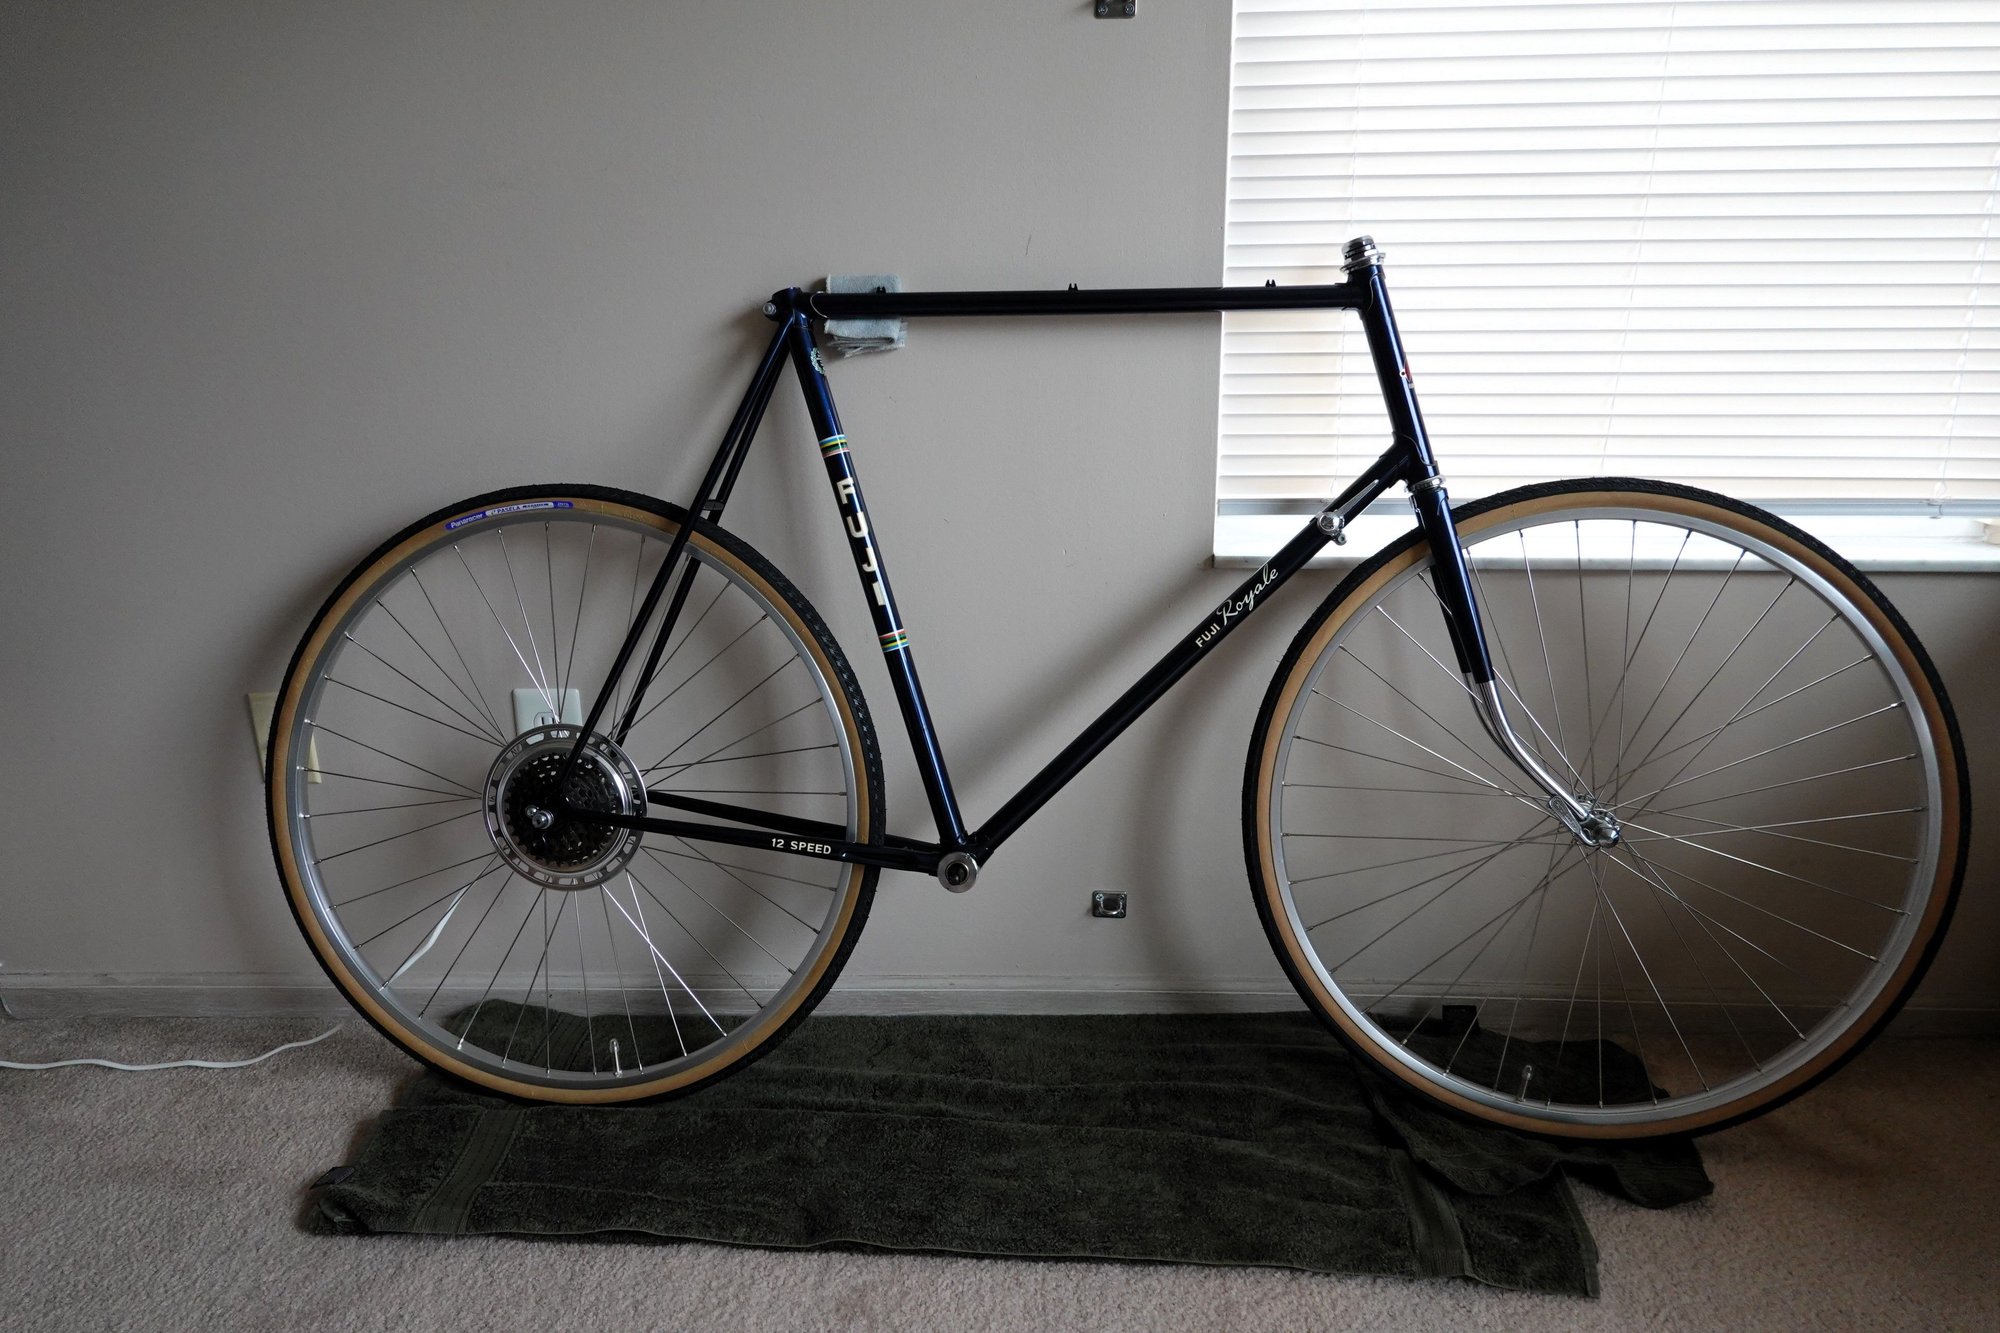
I am assembling my 1981 FUJI ROYALE after restoration. I see there are a lock ring and lock nut on the headset (TANGE brand). See photos. I am not sure how to properly tighten these.
Should I first tighten the lower ring (with notches) while holding the cup underneath, then tighten the top nut?
Any advice would be appreciated. This is a nice bike, and I don't want to ruin anything.
Thank you.
 07-15-24 | 08:41 AM
#2
Senior Member


Joined: Feb 2012
Posts: 19,349
Likes: 5,466
From: Rochester, NY
Bikes: Stewart S&S coupled sport tourer, Stewart Sunday light, Stewart Commuting, Stewart Touring, Co Motion Tandem, Stewart 3-Spd, Stewart Track, Fuji Finest, Mongoose Tomac ATB, GT Bravado ATB, JCP Folder, Stewart 650B ATB
"Should I first tighten the lower ring (with notches) while holding the cup underneath, then tighten the top nut?"
Yes. The lock ring with its 3 notches is not easy to grab with the "common" BB lock ring spanner due to the smaller OD. If you have a hook tool intended for a track hub's lock ring try that as it is made for a smaller diameter than the BB tools are. I'll often just spin the top nut up a bunch and grab the lock ring with a large channel lock type of pliers. Andy
Yes. The lock ring with its 3 notches is not easy to grab with the "common" BB lock ring spanner due to the smaller OD. If you have a hook tool intended for a track hub's lock ring try that as it is made for a smaller diameter than the BB tools are. I'll often just spin the top nut up a bunch and grab the lock ring with a large channel lock type of pliers. Andy
__________________
AndrewRStewart
AndrewRStewart
07-15-24 | 10:32 AM
#3
Facts just confuse people


Joined: Jul 2017
Posts: 19,317
Likes: 7,048
From: Mississippi
Bikes: Tarmac Disc Comp Di2 - 2020
Sometimes you get a better understanding of what does what if you take it apart.
I haven't messed with threaded headsets in so long. But several that gave me issues were simply a misunderstanding till they were taken apart.
I haven't messed with threaded headsets in so long. But several that gave me issues were simply a misunderstanding till they were taken apart.
Last edited by Iride01; 07-15-24 at 10:36 AM.
07-15-24 | 03:09 PM
#4

Mad bike riding scientist

Joined: Nov 2004
Posts: 29,141
Likes: 6,201
From: Denver, CO
Bikes: Some silver ones, a red one, a black and orange one, and a few titanium ones
This is an example of how a bicycle works through a simple machine: two nuts lock together on a threaded bolt. It's how hubs work. It's how a bottom bracket works. It's how pedals work.
First, throw away the notched lock nut. As in, in the trash. Replace it with an aluminum headset spacer from your local bike shop. This will make adjusting your headset soooo much easier.
The adjustable cup of your headset has flats for a wrench. The top lock nut has flats for a wrench. Use two wrenches to lock these two pieces together with your new spacer in between.
You can use a regular adjustable wrench (without teeth!) on the top lock nut. Use a specific Park Tool headset wrench on the adjustable cup. Don't have one? Look on eBay.
Park Tools has excellent videos on YouTube.
__________________
Stuart Black
Dreamin' of Bemidji Down the Mississippi (in part)
Plan Epsilon Around Lake Michigan in the era of Covid
Gold Fever Three days of dirt in Colorado
Pokin' around the Poconos A cold ride around Lake Erie
Dinosaurs in Colorado A mountain bike guide to the Purgatory Canyon dinosaur trackway
Solo Without Pie. The search for pie in the Midwest.
Picking the Scablands. Washington and Oregon, 2005. Pie and spiders on the Columbia River!
07-15-24 | 03:18 PM
#5
Thread Starter
Newbie
Joined: Nov 2022
Posts: 44
Likes: 13
From: Toledo, OH
Thank you, SurferRosa and cyccommute, for the great insight. I will measure the diameter of the threaded tube and try to search online for a spacer with a tab and same thickness.
07-15-24 | 03:31 PM
#6
Mad bike riding scientist
Joined: Nov 2004
Posts: 29,141
Likes: 6,201
From: Denver, CO
Bikes: Some silver ones, a red one, a black and orange one, and a few titanium ones
Thank you, SurferRosa and cyccommute, for the great insight. I will measure the diameter of the threaded tube and try to search online for a spacer with a tab and same thickness.
__________________
Stuart Black
Dreamin' of Bemidji Down the Mississippi (in part)
Plan Epsilon Around Lake Michigan in the era of Covid
Gold Fever Three days of dirt in Colorado
Pokin' around the Poconos A cold ride around Lake Erie
Dinosaurs in Colorado A mountain bike guide to the Purgatory Canyon dinosaur trackway
Solo Without Pie. The search for pie in the Midwest.
Picking the Scablands. Washington and Oregon, 2005. Pie and spiders on the Columbia River!
Stuart Black
Dreamin' of Bemidji Down the Mississippi (in part)
Plan Epsilon Around Lake Michigan in the era of Covid
Gold Fever Three days of dirt in Colorado
Pokin' around the Poconos A cold ride around Lake Erie
Dinosaurs in Colorado A mountain bike guide to the Purgatory Canyon dinosaur trackway
Solo Without Pie. The search for pie in the Midwest.
Picking the Scablands. Washington and Oregon, 2005. Pie and spiders on the Columbia River!
07-15-24 | 07:37 PM
#7
Senior Member
Joined: Feb 2012
Posts: 19,349
Likes: 5,466
From: Rochester, NY
Bikes: Stewart S&S coupled sport tourer, Stewart Sunday light, Stewart Commuting, Stewart Touring, Co Motion Tandem, Stewart 3-Spd, Stewart Track, Fuji Finest, Mongoose Tomac ATB, GT Bravado ATB, JCP Folder, Stewart 650B ATB
This is an example of how a bicycle works through a simple machine: two nuts lock together on a threaded bolt. It's how hubs work. It's how a bottom bracket works. It's how pedals work.
First, throw away the notched lock nut. As in, in the trash. Replace it with an aluminum headset spacer from your local bike shop. This will make adjusting your headset soooo much easier.
The adjustable cup of your headset has flats for a wrench. The top lock nut has flats for a wrench. Use two wrenches to lock these two pieces together with your new spacer in between.
You can use a regular adjustable wrench (without teeth!) on the top lock nut. Use a specific Park Tool headset wrench on the adjustable cup. Don't have one? Look on eBay.
Park Tools has excellent videos on YouTube.
First, throw away the notched lock nut. As in, in the trash. Replace it with an aluminum headset spacer from your local bike shop. This will make adjusting your headset soooo much easier.
The adjustable cup of your headset has flats for a wrench. The top lock nut has flats for a wrench. Use two wrenches to lock these two pieces together with your new spacer in between.
You can use a regular adjustable wrench (without teeth!) on the top lock nut. Use a specific Park Tool headset wrench on the adjustable cup. Don't have one? Look on eBay.
Park Tools has excellent videos on YouTube.
However the 3 notch lock ring and the threaded upper headset race together are a two nut system already. Adding the third nut (the common top lock nut) is just like Normandy and Shimano using three threaded fittings (one being the cone, the others the locknuts/spacer nuts) on the driveside of hundreds of thousands of rear hubs. One simply works the cone and the adjacent locking nut before running down the outer, and second, lock nut. I see the issue being one of tools and their use and less the number of locknuts. Andy
__________________
AndrewRStewart
AndrewRStewart
07-16-24 | 08:11 AM
#8

Senior Member
Joined: Aug 2015
Posts: 4,173
Likes: 2,917
On those I spin the cone down as much as a can finger tight, same with hook nut. I raise the cone to the hooknut with a wrench, and then the wrench the locknut. I then check for loose or tight and will reverse and repeat if needed.
I find the the time the hook spanner is needed for removing if the cone nut has no flats, but not so much for the install.
I find the the time the hook spanner is needed for removing if the cone nut has no flats, but not so much for the install.
07-16-24 | 08:12 AM
#9

Old fart
Joined: Nov 2004
Posts: 26,345
Likes: 5,251
From: Appleton WI
Bikes: Several, mostly not name brands.
I don't argue the result sought, an easy to adjust headset. I don't argue with the suggestion of removing the 3 notch lock ring and turning this headset into a two nut type. I have done as much myself a number of times over the years.
However the 3 notch lock ring and the threaded upper headset race together are a two nut system already. Adding the third nut (the common top lock nut) is just like Normandy and Shimano using three threaded fittings (one being the cone, the others the locknuts/spacer nuts) on the driveside of hundreds of thousands of rear hubs. One simply works the cone and the adjacent locking nut before running down the outer, and second, lock nut. I see the issue being one of tools and their use and less the number of locknuts. Andy
However the 3 notch lock ring and the threaded upper headset race together are a two nut system already. Adding the third nut (the common top lock nut) is just like Normandy and Shimano using three threaded fittings (one being the cone, the others the locknuts/spacer nuts) on the driveside of hundreds of thousands of rear hubs. One simply works the cone and the adjacent locking nut before running down the outer, and second, lock nut. I see the issue being one of tools and their use and less the number of locknuts. Andy
07-17-24 | 06:27 AM
#11
Senior Member


Joined: Oct 2008
Posts: 3,032
Likes: 795
From: in a house
Bikes: Specialized Aethos, Specialized Diverge Comp E5 and 2025 Spesh Tarmac SL8 Expert
The lower "knurled" 'nut' is the 'load' nut. It applies load to the bearings, whether in a 'cage' or 'loose', so the headset is properly adjusted. It is properly adjusted when the steerer tube has no forward/backward 'play' when you engage the front brake and rock the bike back and forth...then checking the smoothness of the steering when turning the handlebars left and right. It should turn smoothly.
Once this is done, you can do it by hand tightening the knurled portion of the 'nut' which is why it is knurled in the first place, you hold it in place and hand tighten the 'lock' nut until it is engaged. Now you need a 'headset' wrench to hold the lower adjusting nut in place and an adjustable wrench on the 'lock' nut to tighten it thus holding the load nut in place. There were no specific 'newton meters' of force in use for bikes at that time, you learned by doing it over and over until you know you are tightening it correctly or someone else with experience talks you through it.
I was told, lol back in the '80's, that the spacer is used to allow the headset wrench to be applied and removed without getting jammed in by the lock nut.
If the headset feels stiff or 'crunchy' you have tightened it too much...using the two wrenches hold the adjusting nut in place and slightly, just a tiny bit, loosen the lock nut then holding that in place slightly loosen the adjusting nut until it moves freely and smoothly then make sure the lock nut is firmly affixed to the adjusting nut.
I'm hoping before you did all this you thoroughly cleaned, inspected the bearings and races, regreased the headset with the bearings in the races...more grease is always better...wipe off the excess.
Good luck
07-17-24 | 09:28 AM
#12
Thread Starter
Newbie
Joined: Nov 2022
Posts: 44
Likes: 13
From: Toledo, OH
Thank you, Kai, for your excellent explanation that reflects many years of experience and understanding. This is my first vintage bike restoration project. I am now in the assembly stage. All seems fine but this double locknut was unusual and thus I wanted to ask in this forum. I completely dis-assembled the bike and replaced all hub and wheel bearings and greased with the green Phil Wood grease. I am using loose bearings everywhere including the headset. Below is a photo of the current condition. Thanks again.
07-17-24 | 09:36 AM
#13
Senior Member
Joined: Jul 2007
Posts: 8,600
Likes: 3,531
From: South shore, L.I., NY
Bikes: Trek Emonda SL7, Cannondale Topstone, Miyata City Liner, Specialized Chisel, Specialized Epic Evo
I have a set of headset wrench’s and used to install and adjust this style of headset, which was used until the Aheadset was introduced. You need a set of these wrenches, which were 32 mm headset wrenches, which Park Tools still makes.
07-18-24 | 05:18 PM
#14
Thread Starter
Newbie
Joined: Nov 2022
Posts: 44
Likes: 13
From: Toledo, OH
Thank you everyone for your great advice. I was able to adjust the two lockring system as suggested here. It was relatively easy, and the headset seems quite free without any play or rocking. I used a $7 C hook spanner from Amazon (34-36 mm). It has a 5" small handle, but it was sufficient to hold the lockring in place while tightening the top locknut. Thanks again!
07-26-24 | 10:16 AM
#15

Senior Member
Joined: Mar 2024
Posts: 1,948
Likes: 782
From: San Diego
Bikes: Columbine, Lynskey GR300, Paramount Track Bike, Colnago Super (4), Santana Tandems (1995 & 2007), Gary Fisher Piranha (retired), Bianchi Track Bike, a couple of Honda mountain bikes
I have a follow-on question to this. I'm assembling a threaded 1" fork for the first time in 40+ years. It has a new (Chinese) headset and bearings. The headset cups are installed correctly and the bearings are greased.
I tighten the headset until the wheel has some minor resistance to turning and then back off a "smidge". I then tighten down the upper nut on top of a tabbed washer, all using Park 32mm spanners. I don't know the torque I'm putting on the headset nuts, but is more than sufficient.
All good? Nope. After a ride of any distance (as little as 50 yards), the headset loosens up slightly.
Any clues? Ideas?
07-26-24 | 10:42 AM
#16

Senior Member
Joined: Aug 2009
Posts: 4,266
Likes: 3,679
I have a follow-on question to this. I'm assembling a threaded 1" fork for the first time in 40+ years. It has a new (Chinese) headset and bearings. The headset cups are installed correctly and the bearings are greased.
I tighten the headset until the wheel has some minor resistance to turning and then back off a "smidge". I then tighten down the upper nut on top of a tabbed washer, all using Park 32mm spanners. I don't know the torque I'm putting on the headset nuts, but is more than sufficient.
All good? Nope. After a ride of any distance (as little as 50 yards), the headset loosens up slightly.
Any clues? Ideas?
I tighten the headset until the wheel has some minor resistance to turning and then back off a "smidge". I then tighten down the upper nut on top of a tabbed washer, all using Park 32mm spanners. I don't know the torque I'm putting on the headset nuts, but is more than sufficient.
All good? Nope. After a ride of any distance (as little as 50 yards), the headset loosens up slightly.
Any clues? Ideas?
07-26-24 | 01:01 PM
#17
Senior Member
Joined: Apr 2016
Posts: 3,835
Likes: 1,768
07-26-24 | 01:56 PM
#18
Senior Member
Joined: Mar 2024
Posts: 1,948
Likes: 782
From: San Diego
Bikes: Columbine, Lynskey GR300, Paramount Track Bike, Colnago Super (4), Santana Tandems (1995 & 2007), Gary Fisher Piranha (retired), Bianchi Track Bike, a couple of Honda mountain bikes
I put the cups in firmly with the Park tool, and they headset has loosened multiple times. Indication of the head tube needing to be faced (It's an eBay Colnago frame, so I don't know the history) or bored out so the cups are loose?
Last edited by PromptCritical; 07-26-24 at 02:26 PM.
07-26-24 | 08:21 PM
#19

Happy With My Bikes
Joined: Sep 2020
Posts: 2,773
Likes: 3,287
From: Oklahoma
Bikes: Hi-Ten bike boomers, a Trek Domane and some projects
 07-26-24 | 08:31 PM
#20
Senior Member
Joined: Mar 2024
Posts: 1,948
Likes: 782
From: San Diego
Bikes: Columbine, Lynskey GR300, Paramount Track Bike, Colnago Super (4), Santana Tandems (1995 & 2007), Gary Fisher Piranha (retired), Bianchi Track Bike, a couple of Honda mountain bikes
07-26-24 | 08:43 PM
#21
Senior Member
Joined: Mar 2024
Posts: 1,948
Likes: 782
From: San Diego
Bikes: Columbine, Lynskey GR300, Paramount Track Bike, Colnago Super (4), Santana Tandems (1995 & 2007), Gary Fisher Piranha (retired), Bianchi Track Bike, a couple of Honda mountain bikes
Are Origin8 headsets any good?
07-27-24 | 09:49 AM
#22
Old fart
Joined: Nov 2004
Posts: 26,345
Likes: 5,251
From: Appleton WI
Bikes: Several, mostly not name brands.
If the pressed fittings keep coming loose, you can use a bearing retaining compound, like Loctite #609, to secure them in the head tube.
07-27-24 | 10:22 AM
#23
Senior Member
Joined: Sep 2021
Posts: 1,596
Likes: 864
From: SW Florida, USA
Bikes: Yes
If you haven't already, you might want to measure the OD of your existing headset's frame cups (e.g., the parts that insert into the head tube).
If your existing headset is ISO/Italian/French/Campagnolo Pro (the latter 3 types are now obsolete), they should measure 30.2mm OD. JIS/Raleigh headsets should measure 30.0mm OD.
JIS/Raleigh headsets in an ISO frame's head tube likely won't yield a proper interference fit. I'd guess that's not the problem here - but confirming the OD of the headset is correct for your frame would eliminate one possibility.
07-27-24 | 12:16 PM
#24
Senior Member
Joined: Feb 2012
Posts: 19,349
Likes: 5,466
From: Rochester, NY
Bikes: Stewart S&S coupled sport tourer, Stewart Sunday light, Stewart Commuting, Stewart Touring, Co Motion Tandem, Stewart 3-Spd, Stewart Track, Fuji Finest, Mongoose Tomac ATB, GT Bravado ATB, JCP Folder, Stewart 650B ATB

