


Motiv Bottom Bracket Removal
 07-15-25 | 09:46 AM
#1
Thread Starter
Newbie
Joined: Jul 2025
Posts: 10
Likes: 4
From: SoCal
Bikes: 1998ish Motiv 21 speed Mountain Bike, 1968 Schwinn Racer with All new components, Schwinn RunaBout, 1961 24" Schwinn Tornado with Fat Tires & Krate Springer Fork
Motiv Bottom Bracket Removal
Hello, New user here looking for some tech tips on removing a bottom bracket from my 25 year old Motiv mountain bike. I've put thousands of miles on this and it's a real beater so I am doing a long overdue tuneup. I'm more of a Singray and cruiser kind of guy so these bottom brackets are a mystery to me. If I'm not mistaken, this is similar to the type used on old Raleigh bikes. Mine has a good amount of slop in it so i want to take it apart for service. I got the nut holding the left crank arm off but no further. Do I need a puller to remove the crank arm? Also, beyond that, how is everything removed? I've enclosed photos and I do happen to have a tool that fits the outer ring with the notches in it.
I've attached a couple of photos. Any help is greatly appreciated.
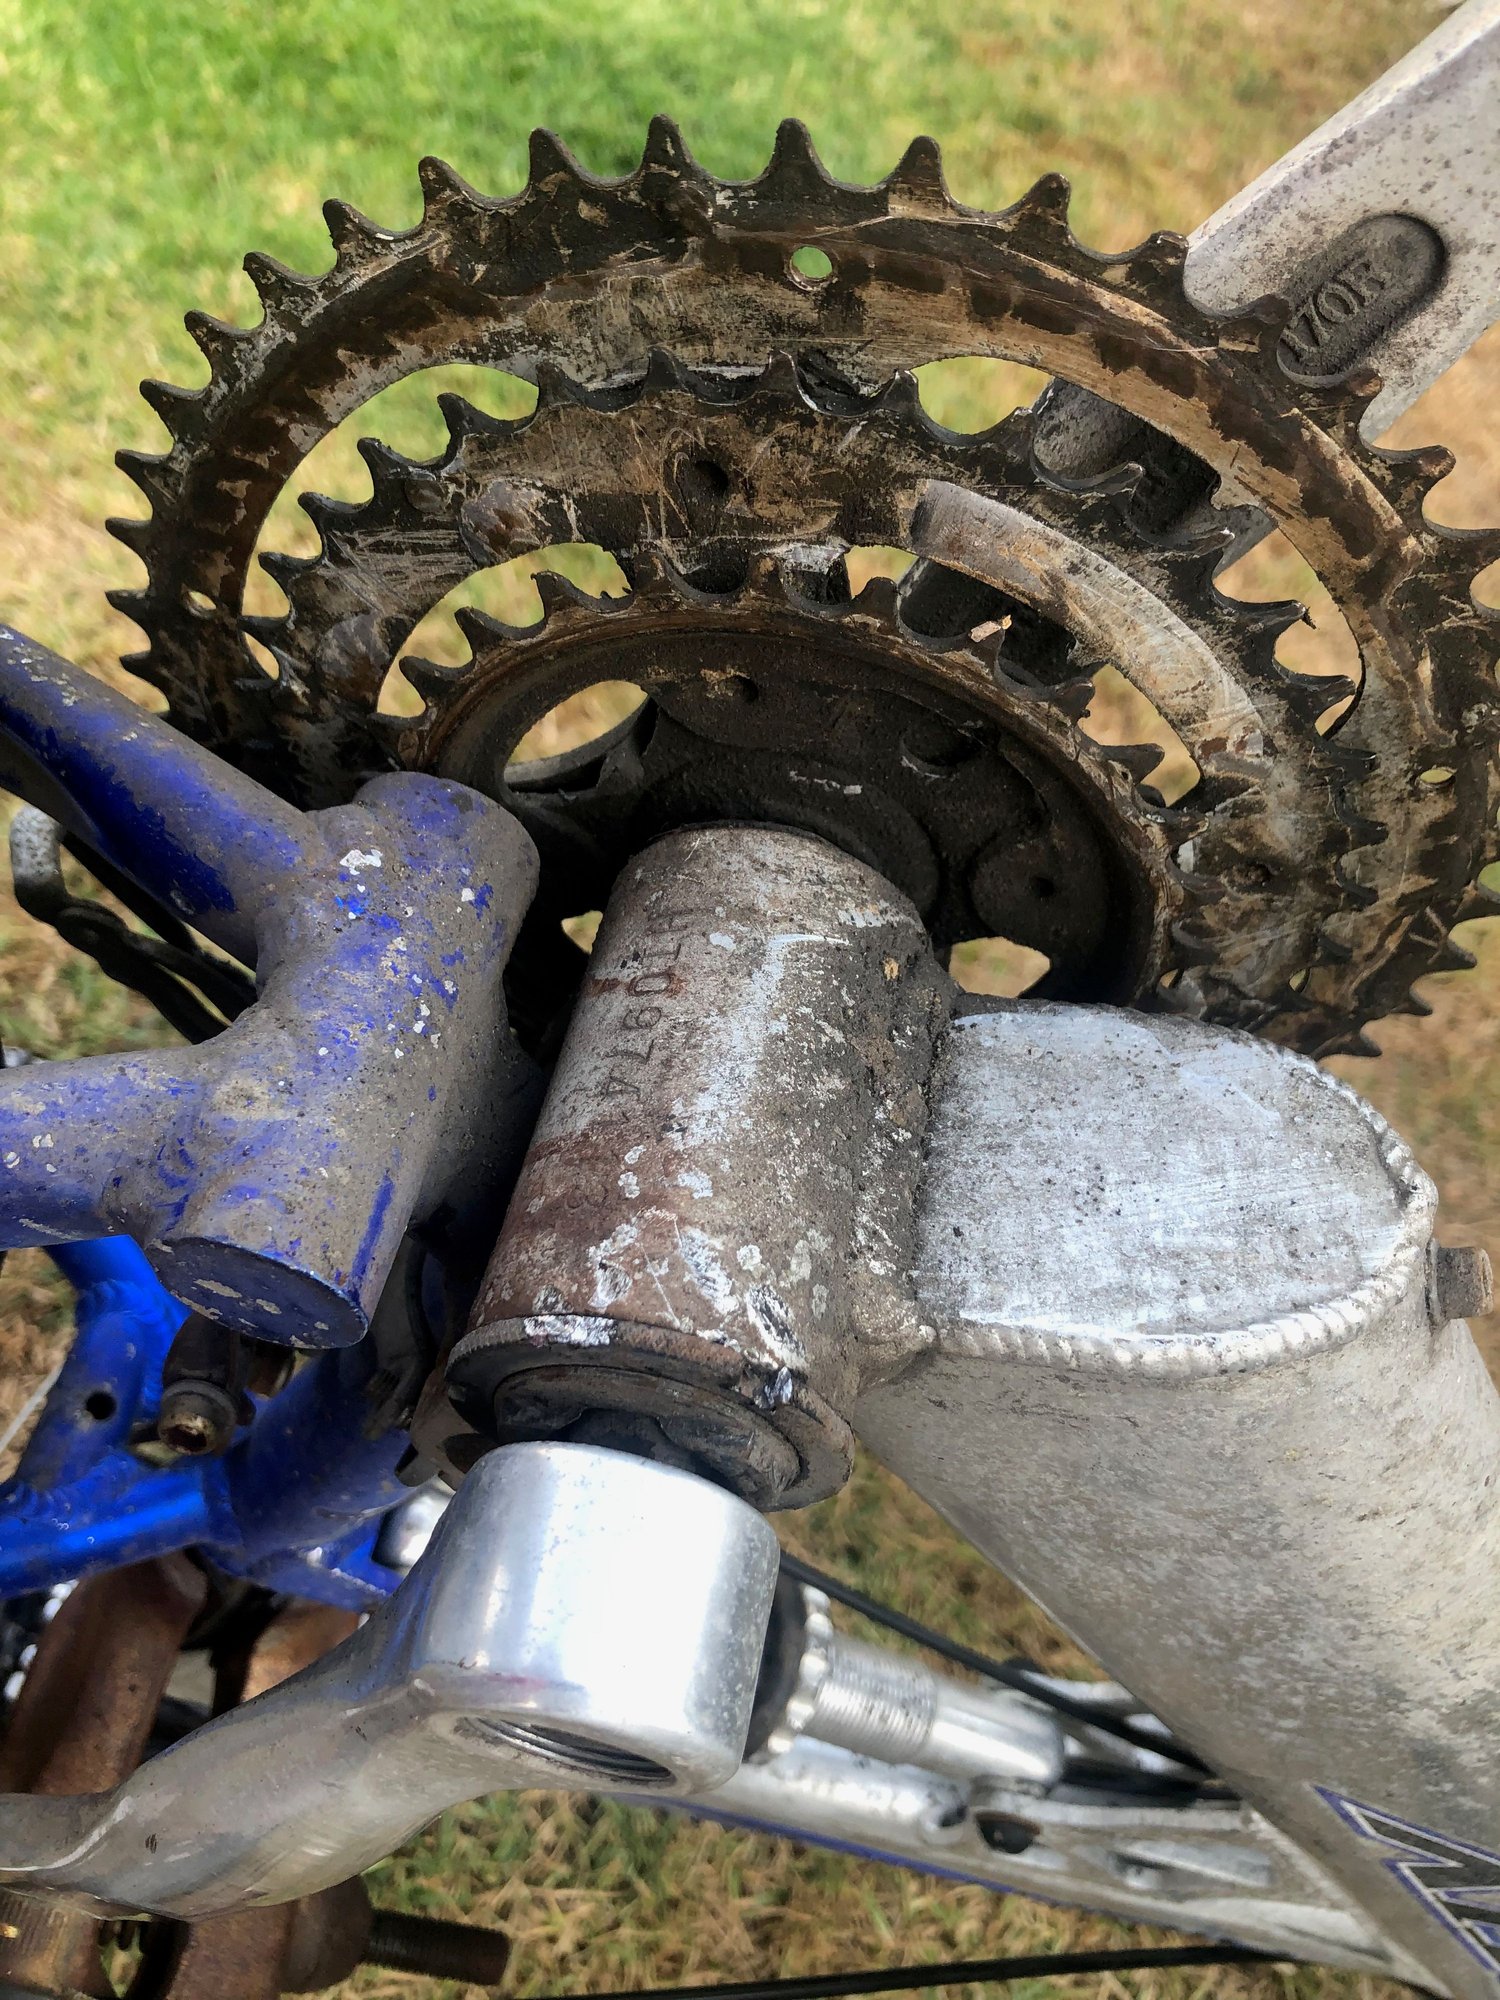

I've attached a couple of photos. Any help is greatly appreciated.
 07-15-25 | 10:20 AM
#2

Mad bike riding scientist


Joined: Nov 2004
Posts: 29,183
Likes: 6,261
From: Denver, CO
Bikes: Some silver ones, a red one, a black and orange one, and a few titanium ones
Hello, New user here looking for some tech tips on removing a bottom bracket from my 25 year old Motiv mountain bike. I've put thousands of miles on this and it's a real beater so I am doing a long overdue tuneup. I'm more of a Singray and cruiser kind of guy so these bottom brackets are a mystery to me. If I'm not mistaken, this is similar to the type used on old Raleigh bikes. Mine has a good amount of slop in it so i want to take it apart for service. I got the nut holding the left crank arm off but no further. Do I need a puller to remove the crank arm? Also, beyond that, how is everything removed? I've enclosed photos and I do happen to have a tool that fits the outer ring with the notches in it.
I've attached a couple of photos. Any help is greatly appreciated.
I've attached a couple of photos. Any help is greatly appreciated.
To remove the cups you should remember that “left is right and right is wrong”. In other words, the left cup is right hand threaded and the right cup is left hand threaded. The best way to remember this is to put the wrench on both cups so that it points toward the front of the bike and push them down (see green arrow below).
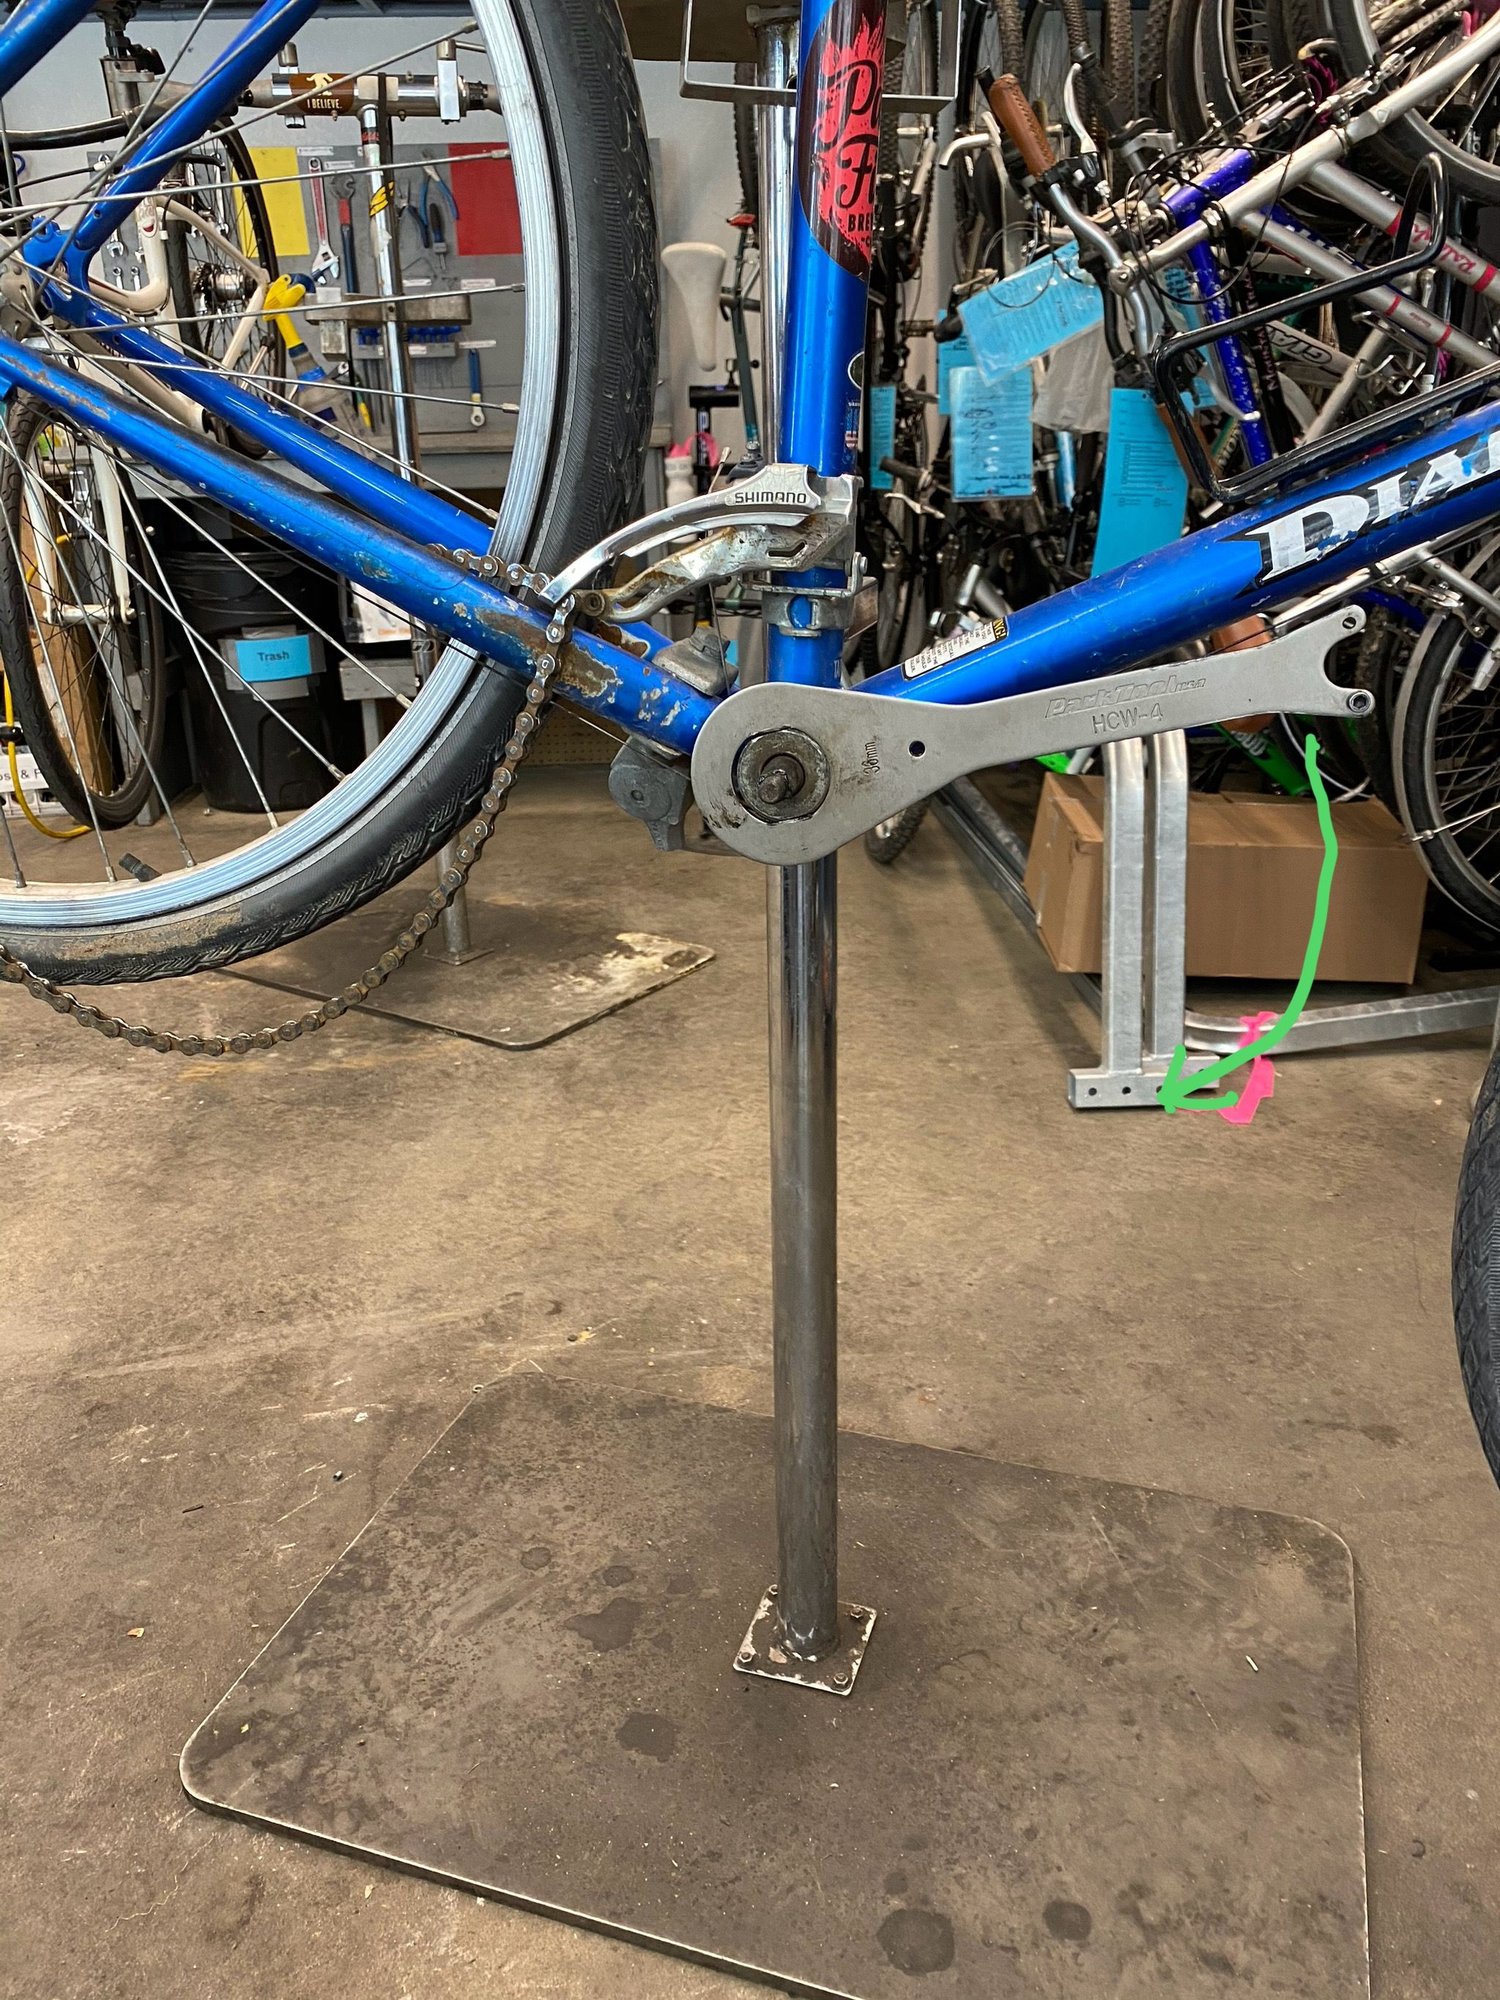
The fixed cup is difficult to remove and the tool always slips. I learned how to remove bottom brackets like this by first removing the left cup and then the right. However, I’ve come up with a much better way of doing it by removing the fixed cup first as illustrated here.
Unfortunately, your tools are going to cost you $60 to $80. I would also almost consider most of them single use because you should replace the bottom bracket with a sealed unit which requires yet another tool but is easier to deal with since they don’t require maintenance. If they go wrong, you just replace them. If possible, see if there is a co-op near you that can help and, more importantly, loan you the tools you need.
__________________
Stuart Black
Dreamin' of Bemidji Down the Mississippi (in part)
Plan Epsilon Around Lake Michigan in the era of Covid
Gold Fever Three days of dirt in Colorado
Pokin' around the Poconos A cold ride around Lake Erie
Dinosaurs in Colorado A mountain bike guide to the Purgatory Canyon dinosaur trackway
Solo Without Pie. The search for pie in the Midwest.
Picking the Scablands. Washington and Oregon, 2005. Pie and spiders on the Columbia River!
Stuart Black
Dreamin' of Bemidji Down the Mississippi (in part)
Plan Epsilon Around Lake Michigan in the era of Covid
Gold Fever Three days of dirt in Colorado
Pokin' around the Poconos A cold ride around Lake Erie
Dinosaurs in Colorado A mountain bike guide to the Purgatory Canyon dinosaur trackway
Solo Without Pie. The search for pie in the Midwest.
Picking the Scablands. Washington and Oregon, 2005. Pie and spiders on the Columbia River!

 07-15-25 | 12:17 PM
#3
Senior Member

Joined: Jan 2009
Posts: 4,413
Likes: 1,679
From: San Diego, CA
Last edited by Crankycrank; 07-15-25 at 12:24 PM.
07-15-25 | 11:36 PM
#4
Thread Starter
Newbie
Joined: Jul 2025
Posts: 10
Likes: 4
From: SoCal
Bikes: 1998ish Motiv 21 speed Mountain Bike, 1968 Schwinn Racer with All new components, Schwinn RunaBout, 1961 24" Schwinn Tornado with Fat Tires & Krate Springer Fork
Thanks for the replies. I had to read them a few times before I was clear on everything but they explain everything very well. Much appreciated!
I did manage to get it apart (except the fixed cup) using a gear puller from Auto Zone to remove the crank arms, the hook spanner I had, which I think came from a Raleigh tool kit and a big adjustable wrench.
I understand replacing the unit with a modern replacement makes sense but everything inside looks usable so I'll just clean it up, re-grease and reassemble.
I did manage to get it apart (except the fixed cup) using a gear puller from Auto Zone to remove the crank arms, the hook spanner I had, which I think came from a Raleigh tool kit and a big adjustable wrench.
I understand replacing the unit with a modern replacement makes sense but everything inside looks usable so I'll just clean it up, re-grease and reassemble.
07-16-25 | 05:32 AM
#5

Senior Member

Joined: Apr 2016
Posts: 3,877
Likes: 1,786
07-16-25 | 06:21 AM
#6
Mad bike riding scientist
Joined: Nov 2004
Posts: 29,183
Likes: 6,261
From: Denver, CO
Bikes: Some silver ones, a red one, a black and orange one, and a few titanium ones
Thanks for the replies. I had to read them a few times before I was clear on everything but they explain everything very well. Much appreciated!
I did manage to get it apart (except the fixed cup) using a gear puller from Auto Zone to remove the crank arms, the hook spanner I had, which I think came from a Raleigh tool kit and a big adjustable wrench.
I understand replacing the unit with a modern replacement makes sense but everything inside looks usable so I'll just clean it up, re-grease and reassemble.
I did manage to get it apart (except the fixed cup) using a gear puller from Auto Zone to remove the crank arms, the hook spanner I had, which I think came from a Raleigh tool kit and a big adjustable wrench.
I understand replacing the unit with a modern replacement makes sense but everything inside looks usable so I'll just clean it up, re-grease and reassemble.
When you reassemble, make sure the crank bolts are good and tight. I torque all square taper bolts to around 35 to 40 nM (around 30 foot lb). You don’t want the arm to come loose which will result in hogging out the taper on the soft crank.
__________________
Stuart Black
Dreamin' of Bemidji Down the Mississippi (in part)
Plan Epsilon Around Lake Michigan in the era of Covid
Gold Fever Three days of dirt in Colorado
Pokin' around the Poconos A cold ride around Lake Erie
Dinosaurs in Colorado A mountain bike guide to the Purgatory Canyon dinosaur trackway
Solo Without Pie. The search for pie in the Midwest.
Picking the Scablands. Washington and Oregon, 2005. Pie and spiders on the Columbia River!
Stuart Black
Dreamin' of Bemidji Down the Mississippi (in part)
Plan Epsilon Around Lake Michigan in the era of Covid
Gold Fever Three days of dirt in Colorado
Pokin' around the Poconos A cold ride around Lake Erie
Dinosaurs in Colorado A mountain bike guide to the Purgatory Canyon dinosaur trackway
Solo Without Pie. The search for pie in the Midwest.
Picking the Scablands. Washington and Oregon, 2005. Pie and spiders on the Columbia River!
07-16-25 | 11:11 PM
#8
Thread Starter
Newbie
Joined: Jul 2025
Posts: 10
Likes: 4
From: SoCal
Bikes: 1998ish Motiv 21 speed Mountain Bike, 1968 Schwinn Racer with All new components, Schwinn RunaBout, 1961 24" Schwinn Tornado with Fat Tires & Krate Springer Fork
Everything went back together great with new chain, shifters, cables and 25 years of dirt and grime removed. The ride is night and day compared to before the service which I knew was long overdue. I got the shifters adjusted nicely and everything is good there except for one issue that was present before and I was hoping would go away after all this attention. With the chain on the middle sprocket in front, all gears at the rear perform fine except for #6. It is finicky to shift into either up or downshifting and if I do get it engaged, it is still not solid and any hard pedaling will cause it to become unstable and basically be in loose engagement.
Every other gear is rock solid and I can stand on the pedals in any of them. They all shift smoothly too. I also shifted the chain on to the small sprocket in front and got the same behavior. I did not try it with the chain on the big sprocket in the front.
I thought with all of the service it got, this issue would go away but if anything, it got worse. I looked closely at the cassette and can see no irregularities. Please pardon me if some of my terminology is a little off.
.
Again, any input is greatly appreciated
Every other gear is rock solid and I can stand on the pedals in any of them. They all shift smoothly too. I also shifted the chain on to the small sprocket in front and got the same behavior. I did not try it with the chain on the big sprocket in the front.
I thought with all of the service it got, this issue would go away but if anything, it got worse. I looked closely at the cassette and can see no irregularities. Please pardon me if some of my terminology is a little off.
.
Again, any input is greatly appreciated
