


How to properly route the cables?
 10-17-25 | 02:09 AM
#1
Thread Starter
Newbie
Joined: Oct 2025
Posts: 5
Likes: 0
From: South Korea
Bikes: Seaboard CX03 custom build
How to properly route the cables?


 First time building a bike from the frame up. I am confused on how I should route the shift and brake cables.
This is the Seaboard/Tsunami CX03 gravel bike frame. It is made of chromoly steel.
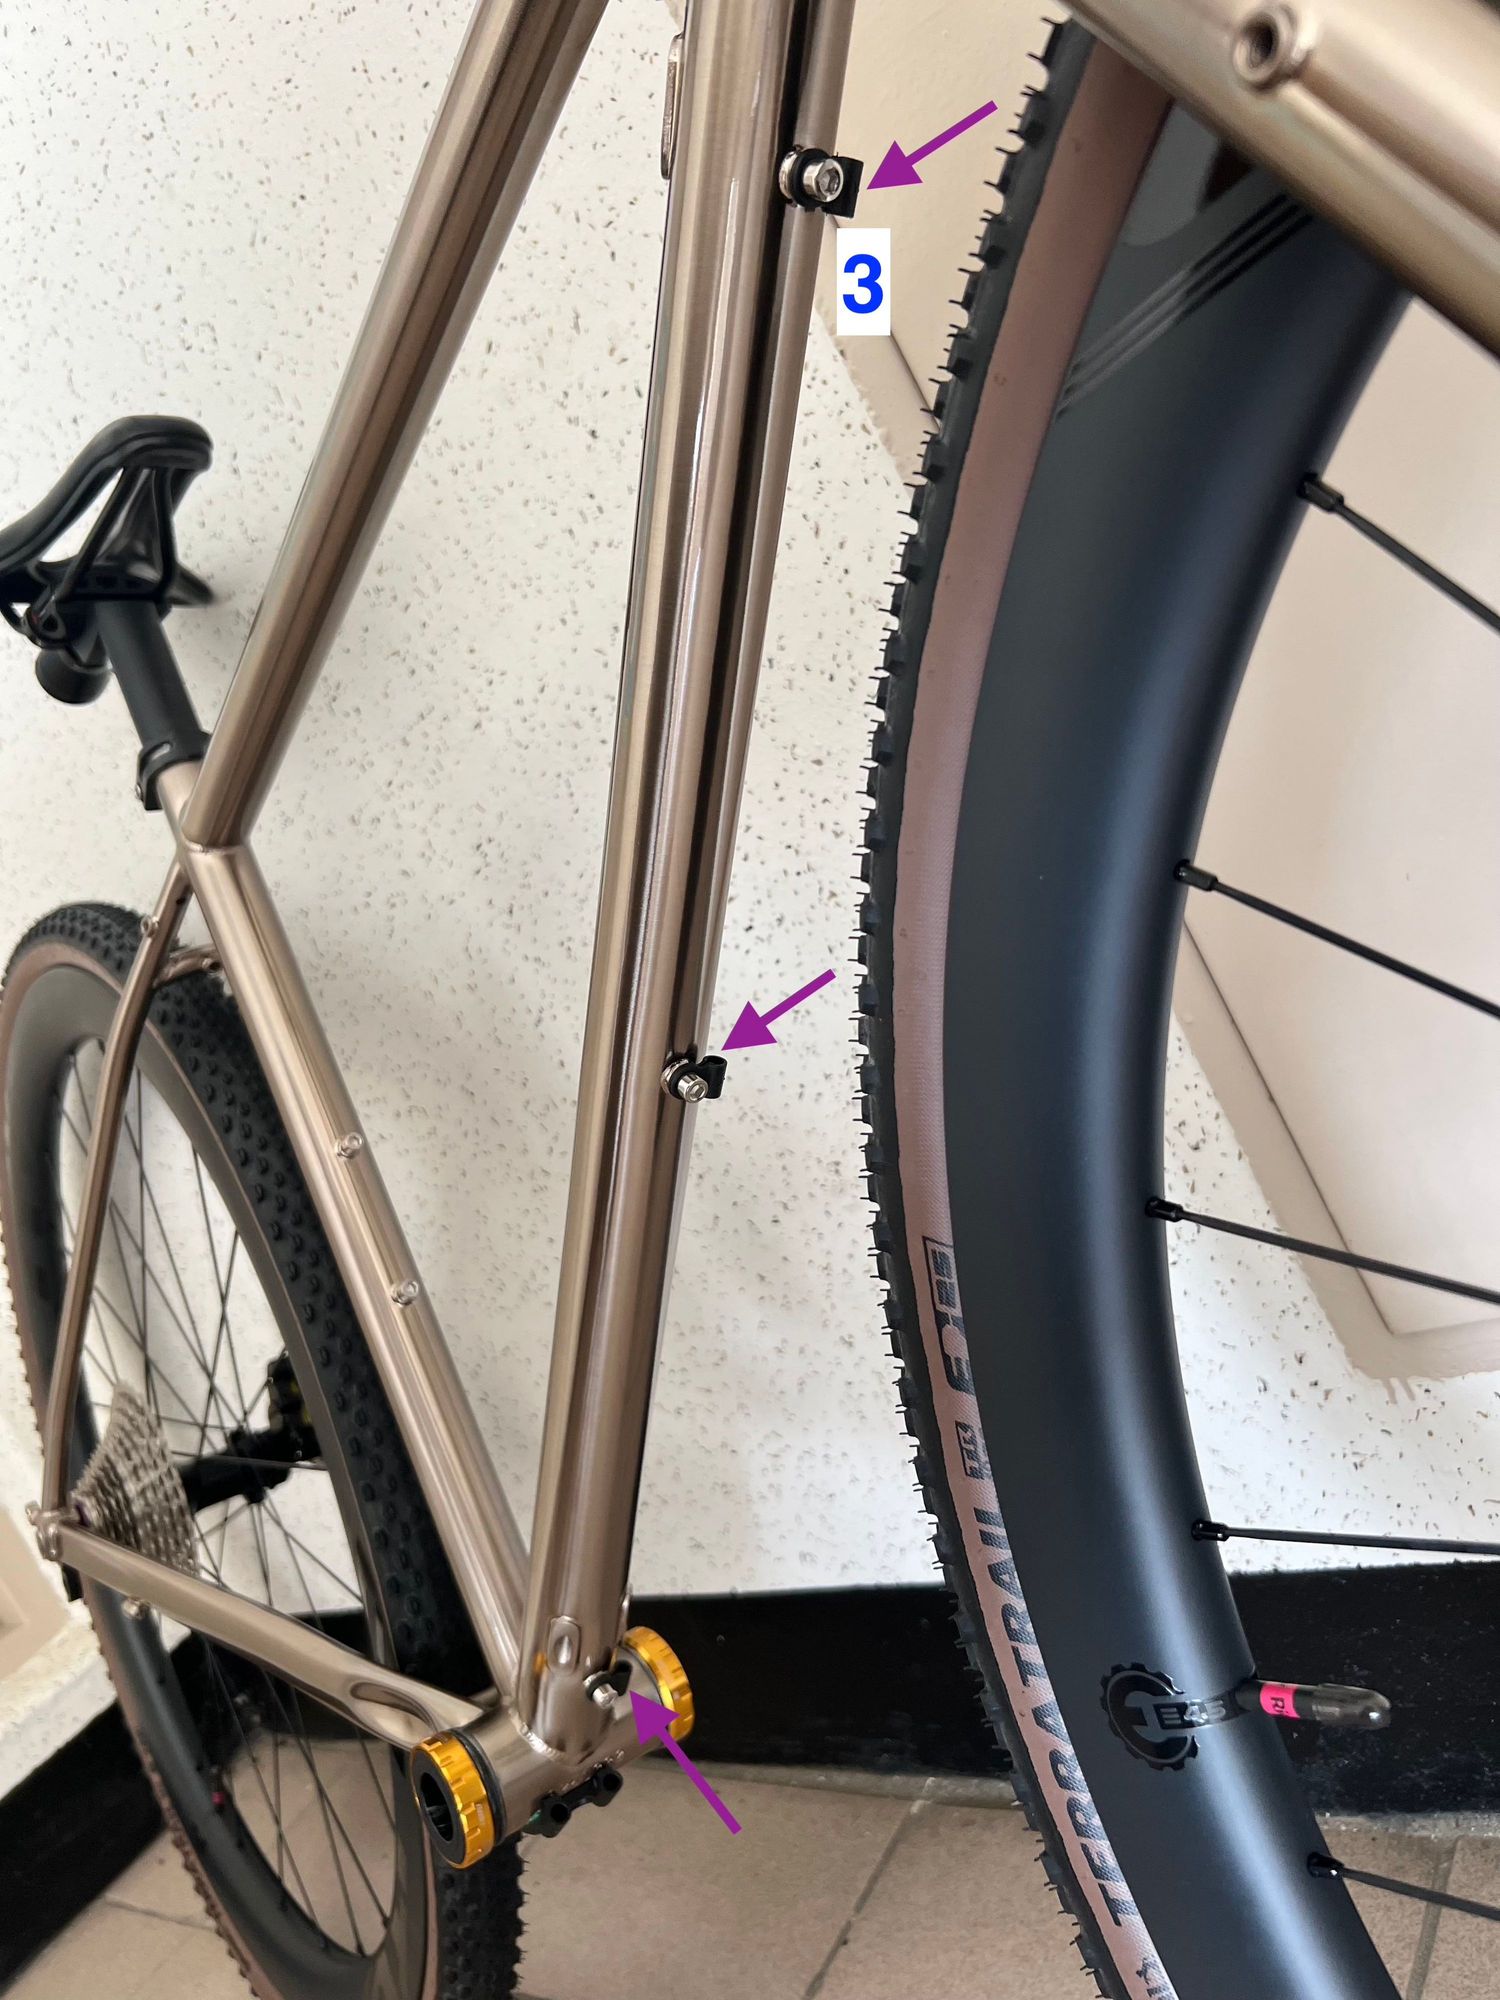
There are 2 internal cable slots on the downtube, and one external cable hanger.
I am using the Shimano 105 R7000 groupset and mechanical disc brakes. Until GRX comes out with crankarms that are 160mm or smaller, I will have to use the 105 crankarm. This is why I am sticking to having a front derailleur. When most people build on this or similar frames, they use a 1x drivetrain, so I am unsure where to put the front derailleur cable.
My cables are the Jagwire 2X Sport Shift Gear Cable Kit and the Jagwire Pro Road Brake Cable Kit. I just tried opening the Pro Road Brake kit, and there is only one cable. I am questioning whether I will have enough for both front and rear brakes.
How should I go about this? I would like Left brifter to be rear brake and Right brifter to be front brake (I apologize if this is not the standard layout!). So I was thinking to have the Right brake cable cross in front the headset and down the fork to the disc brake.
In the picture above, I labeled 5 positions. After that, do I put the Right shift (rear derailleur) cable in #1 or in #2? Do I put the Left shift (front derailleur) cable in the other slot, and hang the rear brake cable on #3, or the other way around? If I do hang the rear brake cable on #3, do I wrap it under the BB (and induce rubbing) or hang it over the top of the BB to reach the brake?
All advice on how to route the cables would be highly appreciated! Thank you!!
 10-17-25 | 07:29 AM
#2
Senior Member


Joined: Jan 2009
Posts: 4,439
Likes: 1,700
From: San Diego, CA
Right/Rear derailleur is 1-1-4
Front derailleur is 2-2-5
Rear Brake from Left brake lever is all the #3 clamps but you may want to play around with which side of the headtube to run it. I would guess running it around the front of the headtube and down the right side will work best but can't say for sure and you would want to rotate the top 1 or 2 #3 downtube clamps 180 degrees to route the cable to the right but leave the clamp near the bottom bracket as is.
10-17-25 | 07:41 AM
#3

Senior Member

Joined: May 2010
Posts: 5,634
Likes: 2,504
From: Bastrop Texas
Bikes: Univega, Peu P6, Peu PR-10, Ted Williams, Peu UO-8, Peu UO-18 Mixte, Peu Dolomites
10-17-25 | 09:29 AM
#4
Thread Starter
Newbie
Joined: Oct 2025
Posts: 5
Likes: 0
From: South Korea
Bikes: Seaboard CX03 custom build
Right/Rear derailleur is 1-1-4
Front derailleur is 2-2-5
Rear Brake from Left brake lever is all the #3 clamps but you may want to play around with which side of the headtube to run it. I would guess running it around the front of the headtube and down the right side will work best but can't say for sure and you would want to rotate the top 1 or 2 #3 downtube clamps 180 degrees to route the cable to the right but leave the clamp near the bottom bracket as is.
Front derailleur is 2-2-5
Rear Brake from Left brake lever is all the #3 clamps but you may want to play around with which side of the headtube to run it. I would guess running it around the front of the headtube and down the right side will work best but can't say for sure and you would want to rotate the top 1 or 2 #3 downtube clamps 180 degrees to route the cable to the right but leave the clamp near the bottom bracket as is.

Your suggestion of 1-1-4 and 2-2-5 is much neater, but I worry that the shift cables will have too steep a bend near the headset.
10-17-25 | 10:56 AM
#5

Mad bike riding scientist


Joined: Nov 2004
Posts: 29,210
Likes: 6,286
From: Denver, CO
Bikes: Some silver ones, a red one, a black and orange one, and a few titanium ones
Right/Rear derailleur is 1-1-4
Front derailleur is 2-2-5
Rear Brake from Left brake lever is all the #3 clamps but you may want to play around with which side of the headtube to run it. I would guess running it around the front of the headtube and down the right side will work best but can't say for sure and you would want to rotate the top 1 or 2 #3 downtube clamps 180 degrees to route the cable to the right but leave the clamp near the bottom bracket as is.
Front derailleur is 2-2-5
Rear Brake from Left brake lever is all the #3 clamps but you may want to play around with which side of the headtube to run it. I would guess running it around the front of the headtube and down the right side will work best but can't say for sure and you would want to rotate the top 1 or 2 #3 downtube clamps 180 degrees to route the cable to the right but leave the clamp near the bottom bracket as is.
__________________
Stuart Black
Dreamin' of Bemidji Down the Mississippi (in part)
Plan Epsilon Around Lake Michigan in the era of Covid
Gold Fever Three days of dirt in Colorado
Pokin' around the Poconos A cold ride around Lake Erie
Dinosaurs in Colorado A mountain bike guide to the Purgatory Canyon dinosaur trackway
Solo Without Pie. The search for pie in the Midwest.
Picking the Scablands. Washington and Oregon, 2005. Pie and spiders on the Columbia River!
10-17-25 | 11:03 AM
#6
Mad bike riding scientist
Joined: Nov 2004
Posts: 29,210
Likes: 6,286
From: Denver, CO
Bikes: Some silver ones, a red one, a black and orange one, and a few titanium ones
First time building a bike from the frame up. I am confused on how I should route the shift and brake cables.
This is the Seaboard/Tsunami CX03 gravel bike frame. It is made of chromoly steel.
There are 2 internal cable slots on the downtube, and one external cable hanger.
I am using the Shimano 105 R7000 groupset and mechanical disc brakes. Until GRX comes out with crankarms that are 160mm or smaller, I will have to use the 105 crankarm. This is why I am sticking to having a front derailleur. When most people build on this or similar frames, they use a 1x drivetrain, so I am unsure where to put the front derailleur cable.
My cables are the Jagwire 2X Sport Shift Gear Cable Kit and the Jagwire Pro Road Brake Cable Kit. I just tried opening the Pro Road Brake kit, and there is only one cable. I am questioning whether I will have enough for both front and rear brakes.
How should I go about this? I would like Left brifter to be rear brake and Right brifter to be front brake (I apologize if this is not the standard layout!). So I was thinking to have the Right brake cable cross in front the headset and down the fork to the disc brake.
In the picture above, I labeled 5 positions. After that, do I put the Right shift (rear derailleur) cable in #1 or in #2? Do I put the Left shift (front derailleur) cable in the other slot, and hang the rear brake cable on #3, or the other way around? If I do hang the rear brake cable on #3, do I wrap it under the BB (and induce rubbing) or hang it over the top of the BB to reach the brake?
All advice on how to route the cables would be highly appreciated! Thank you!!
__________________
Stuart Black
Dreamin' of Bemidji Down the Mississippi (in part)
Plan Epsilon Around Lake Michigan in the era of Covid
Gold Fever Three days of dirt in Colorado
Pokin' around the Poconos A cold ride around Lake Erie
Dinosaurs in Colorado A mountain bike guide to the Purgatory Canyon dinosaur trackway
Solo Without Pie. The search for pie in the Midwest.
Picking the Scablands. Washington and Oregon, 2005. Pie and spiders on the Columbia River!
Stuart Black
Dreamin' of Bemidji Down the Mississippi (in part)
Plan Epsilon Around Lake Michigan in the era of Covid
Gold Fever Three days of dirt in Colorado
Pokin' around the Poconos A cold ride around Lake Erie
Dinosaurs in Colorado A mountain bike guide to the Purgatory Canyon dinosaur trackway
Solo Without Pie. The search for pie in the Midwest.
Picking the Scablands. Washington and Oregon, 2005. Pie and spiders on the Columbia River!
10-17-25 | 11:40 AM
#7
Bike Sorceress
Joined: Apr 2008
Posts: 1,244
Likes: 475
From: MPLS
Bikes: Yes
For the shift cables, first I would check if the routing in the downtube has guides for the cable the whole way or not. If not, I would have the right cable cross over to port 2 on the non-drive side, then exit out the drive side. The left cable would go into port 1 on the drive side, and exit out the non-drive side. This will get you the lowest possible resistance. If the frame has internal guides that prevent this, then you will have to do right shifter to port 1, and have it exit on the same side. If there are no internal guides, an internal routing tool and a flashlight will help reduce headaches. The Jagwire Pro internal routing tool is fantastic.
With the rear brake, it looks like those guides can be flipped around. For setting up left lever controlling the rear brake, I would flip around the upper downtube guide to face towards the drive side, have the cable cross over the headtube to that guide. The middle guide could face either direction, I suspect facing towards the drive side would be better, but it would be worth trying both options to see if one works better. The lowest downtube cable guide looks like it might be low enough that routing the housing underneath the bottom bracket would offer less resistance, but again, mocking up both options to see what will work better is worthwhile. If the housing goes underneath the bottom bracket, it seems like the chainstay guide could go up or down, pick whichever offers the smoothest transition to the caliper. Adding a zip tie around the chainstay between the bottom bracket and the brace can help tidy up the cable a bit more, reducing the chance of it rubbing against the tire.
If you know the bike is going to be a perfect fit with the parts you have, you want to cut the housing to a length that allows for nice graceful curves, lets you turn the handlebar all the way to the left and to the right without binding up, and is otherwise as short as possible. If you don't know that it is a perfect fit with the cockpit you have, then add an extra inch or two to all pieces of housing coming from the bars so you have some room to change up handlebars and stem without having to redo all your cables. Either way, get your bars, stem, and levers positioned exactly where you want them before deciding on the length of the housing.
10-17-25 | 04:49 PM
#8
Senior Member
Joined: Jan 2009
Posts: 4,439
Likes: 1,700
From: San Diego, CA
OP mentioned he wants to run left brake to the rear in post #1
10-17-25 | 04:58 PM
#9
Senior Member
Joined: Jan 2009
Posts: 4,439
Likes: 1,700
From: San Diego, CA
Thanks for the reply! Do I not need to cross the derailleur cables in front of the headset, for example, Right/RD 2-2-4 and Left/FD 1-1-5? Or maybe even 2-1-4 and 1-2-5, somehow crossing the cables/sleeves inside the down tube?
Your suggestion of 1-1-4 and 2-2-5 is much neater, but I worry that the shift cables will have too steep a bend near the headset.
Your suggestion of 1-1-4 and 2-2-5 is much neater, but I worry that the shift cables will have too steep a bend near the headset.
10-18-25 | 02:33 AM
#10
Thread Starter
Newbie
Joined: Oct 2025
Posts: 5
Likes: 0
From: South Korea
Bikes: Seaboard CX03 custom build
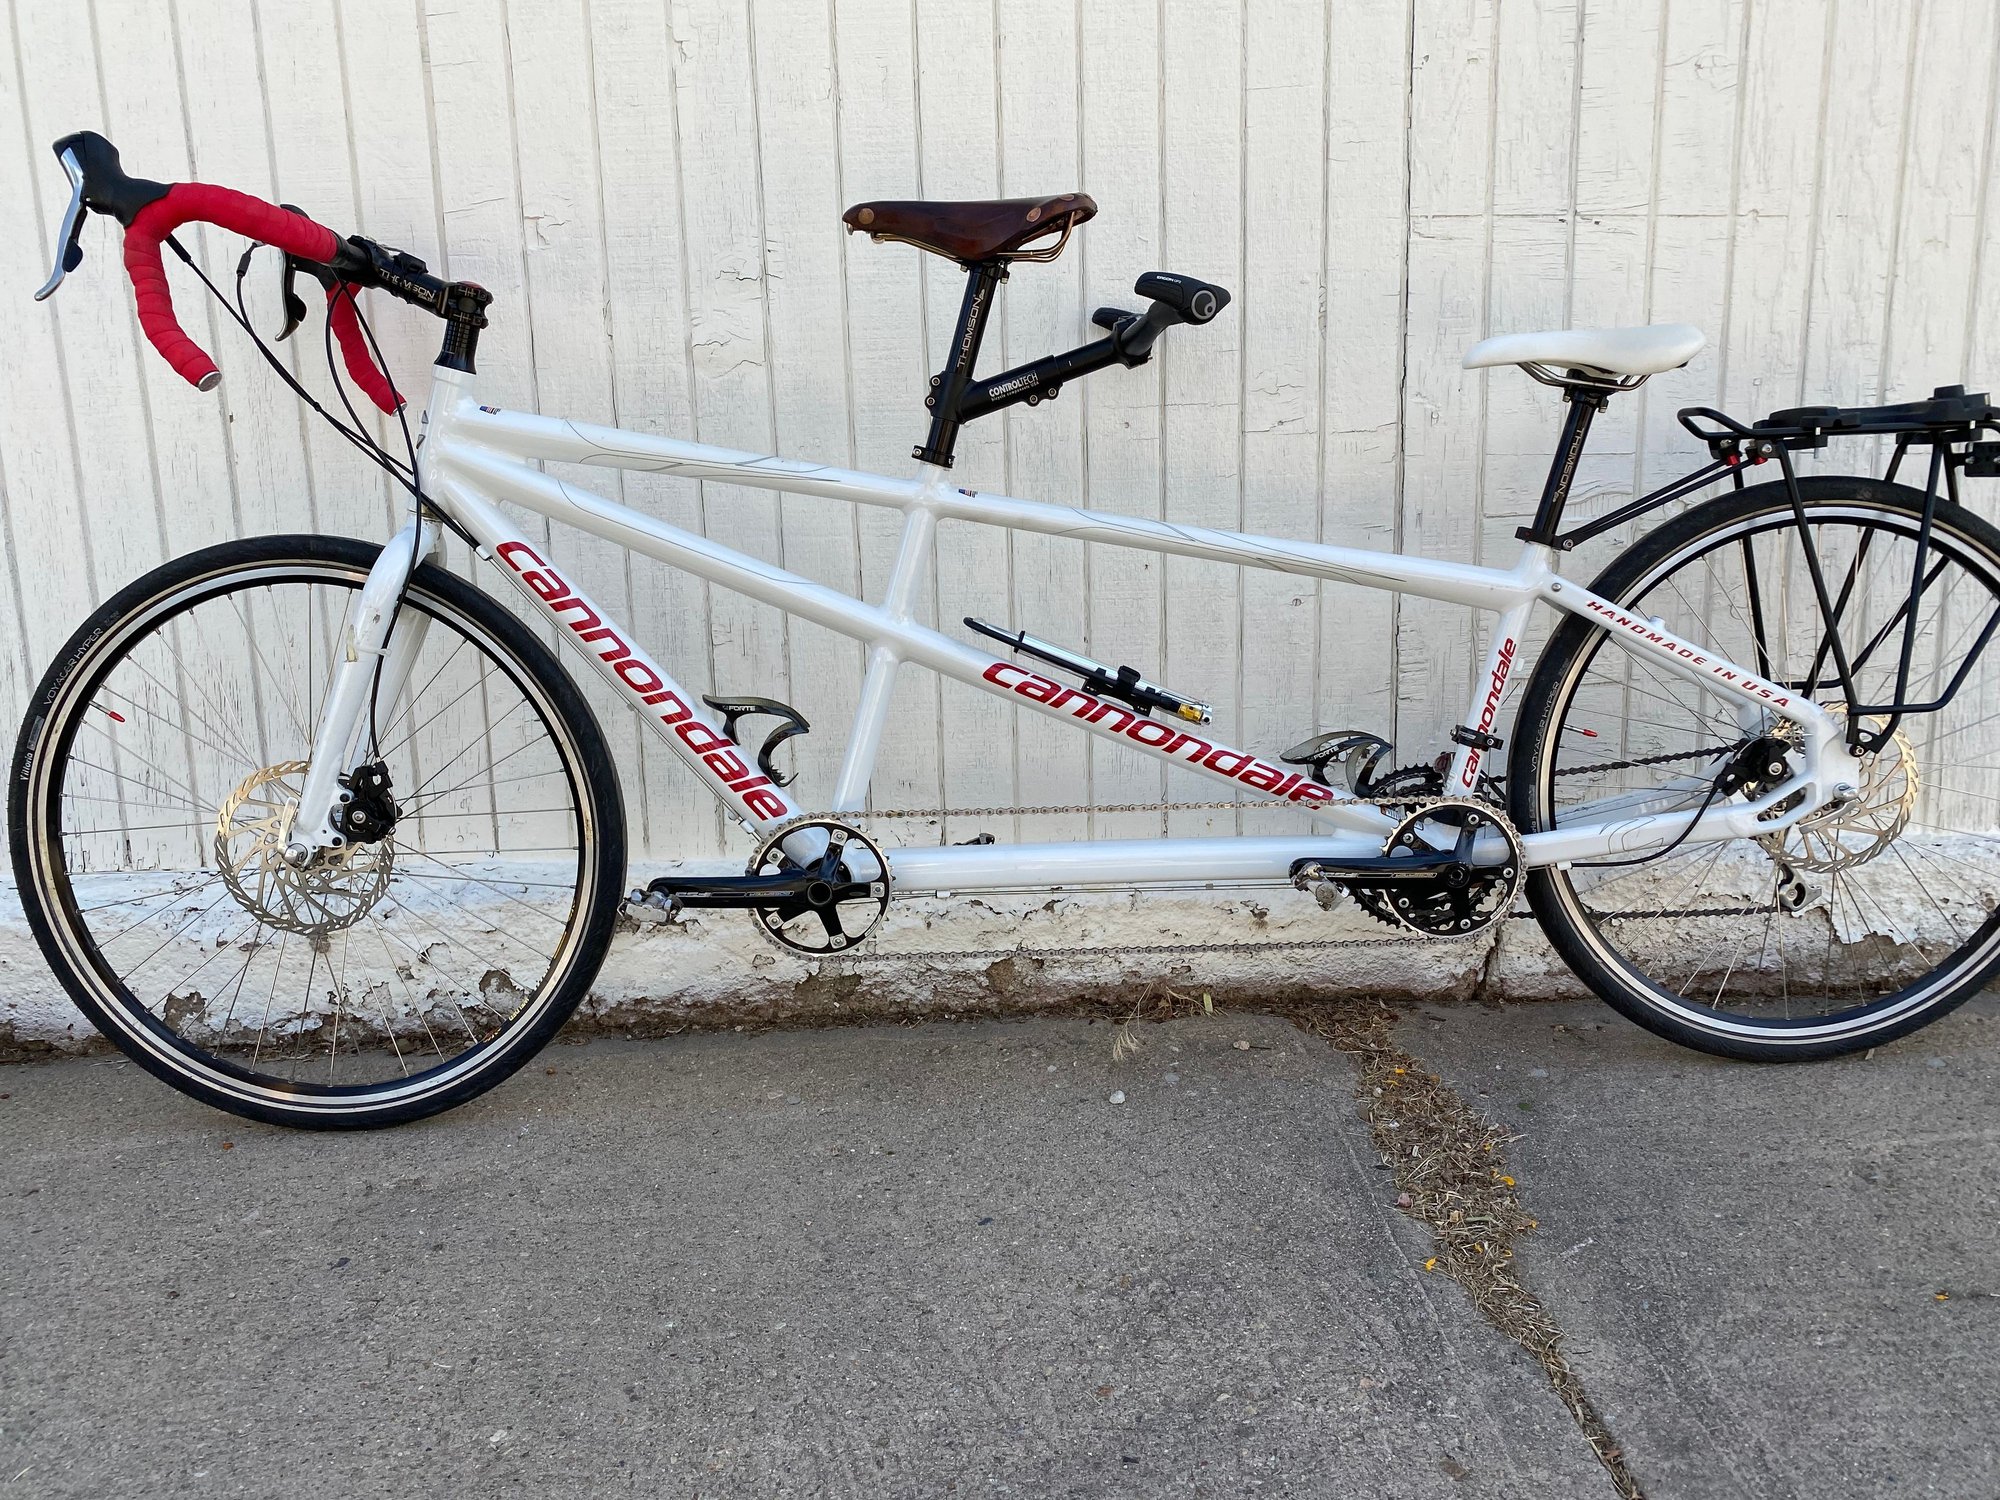
cyccommute Thank you for the advice and picture! (That is a sick tandem bike, btw!) This is my first bike build, so I'm trying to switch to right/front brake and left/rear because I'd like to use my dominant hand for the front braking and modulation. I honestly don't know if this is a good idea, because I have another commuter bike that has right/rear and left/front -- but maybe I'll end up switching the brake cables on that bike too, or just get used to it? I haven't fully settled on the brakes for the new build yet, as the build is going very, very slowly, haha.
I'm planning to use cable-actuated hydraulic brakes, i.e., the mech-hydro hybrid. I want to learn more about bike maintenance, and even though I used to have an MTB with hydros, hydro brakes are intimidating to me. I figured that mech brakes will be easier to learn on and repair on the road if need be. You and others have recommended keeping the rear brake cable external, so that's what I'll do!
Arrowana I did manage to poke around and somehow threaded the housing through the down tube. Twice on both sides actually! I followed your suggestion (so, 2-1-4 and 1-2-5), especially since that is similar to what the Park Tool video recommends for installing shifter cables. I didn't like the look of how much the cables stuck out around the headset. So I decided to go with Crankycrank 's original suggestion of 1-1-4 and 2-2-5. Much neater looking. I wouldn't do this configuration for EVERY bike, but I hope that it will work here.
I've only just finished routing the housing, and I have yet to tune-up the shifting, not to mention installing the brake cables...
The whole reason I am even doing a custom build is because everything I need on this bike is XXS or XS sized. The drop bar width is 360mm, the crank arm is 160mm, and the frame is 44cm (XXS). You can imagine how small and cramped everything will be once I attach all my accessories later, haha! Once I finish the build, I will post pictures!!
10-18-25 | 08:39 AM
#11
Mad bike riding scientist
Joined: Nov 2004
Posts: 29,210
Likes: 6,286
From: Denver, CO
Bikes: Some silver ones, a red one, a black and orange one, and a few titanium ones
cyccommute Thank you for the advice and picture! (That is a sick tandem bike, btw!) This is my first bike build, so I'm trying to switch to right/front brake and left/rear because I'd like to use my dominant hand for the front braking and modulation. I honestly don't know if this is a good idea, because I have another commuter bike that has right/rear and left/front -- but maybe I'll end up switching the brake cables on that bike too, or just get used to it? I haven't fully settled on the brakes for the new build yet, as the build is going very, very slowly, haha.
I'm planning to use cable-actuated hydraulic brakes, i.e., the mech-hydro hybrid. I want to learn more about bike maintenance, and even though I used to have an MTB with hydros, hydro brakes are intimidating to me. I figured that mech brakes will be easier to learn on and repair on the road if need be. You and others have recommended keeping the rear brake cable external, so that's what I'll do!
I'm planning to use cable-actuated hydraulic brakes, i.e., the mech-hydro hybrid. I want to learn more about bike maintenance, and even though I used to have an MTB with hydros, hydro brakes are intimidating to me. I figured that mech brakes will be easier to learn on and repair on the road if need be. You and others have recommended keeping the rear brake cable external, so that's what I'll do!
I realize now that you want to run moto-style. I don’t think it’s that much of an issue to run one bike moto and another not but it is something you’ll have to be aware of constantly on both bikes. Whatever brake arrangement you settle on, running the cables to the rear is trivial. Just give yourself enough cable or hose so that you can turn the wheel 90�. Best to have too much cable housing than too little.
The whole reason I am even doing a custom build is because everything I need on this bike is XXS or XS sized. The drop bar width is 360mm, the crank arm is 160mm, and the frame is 44cm (XXS). You can imagine how small and cramped everything will be once I attach all my accessories later, haha! Once I finish the build, I will post pictures!!
This is a Specialized XXS Sirrus we got for her a couple of years ago. It had 700C wheels and too long cranks.
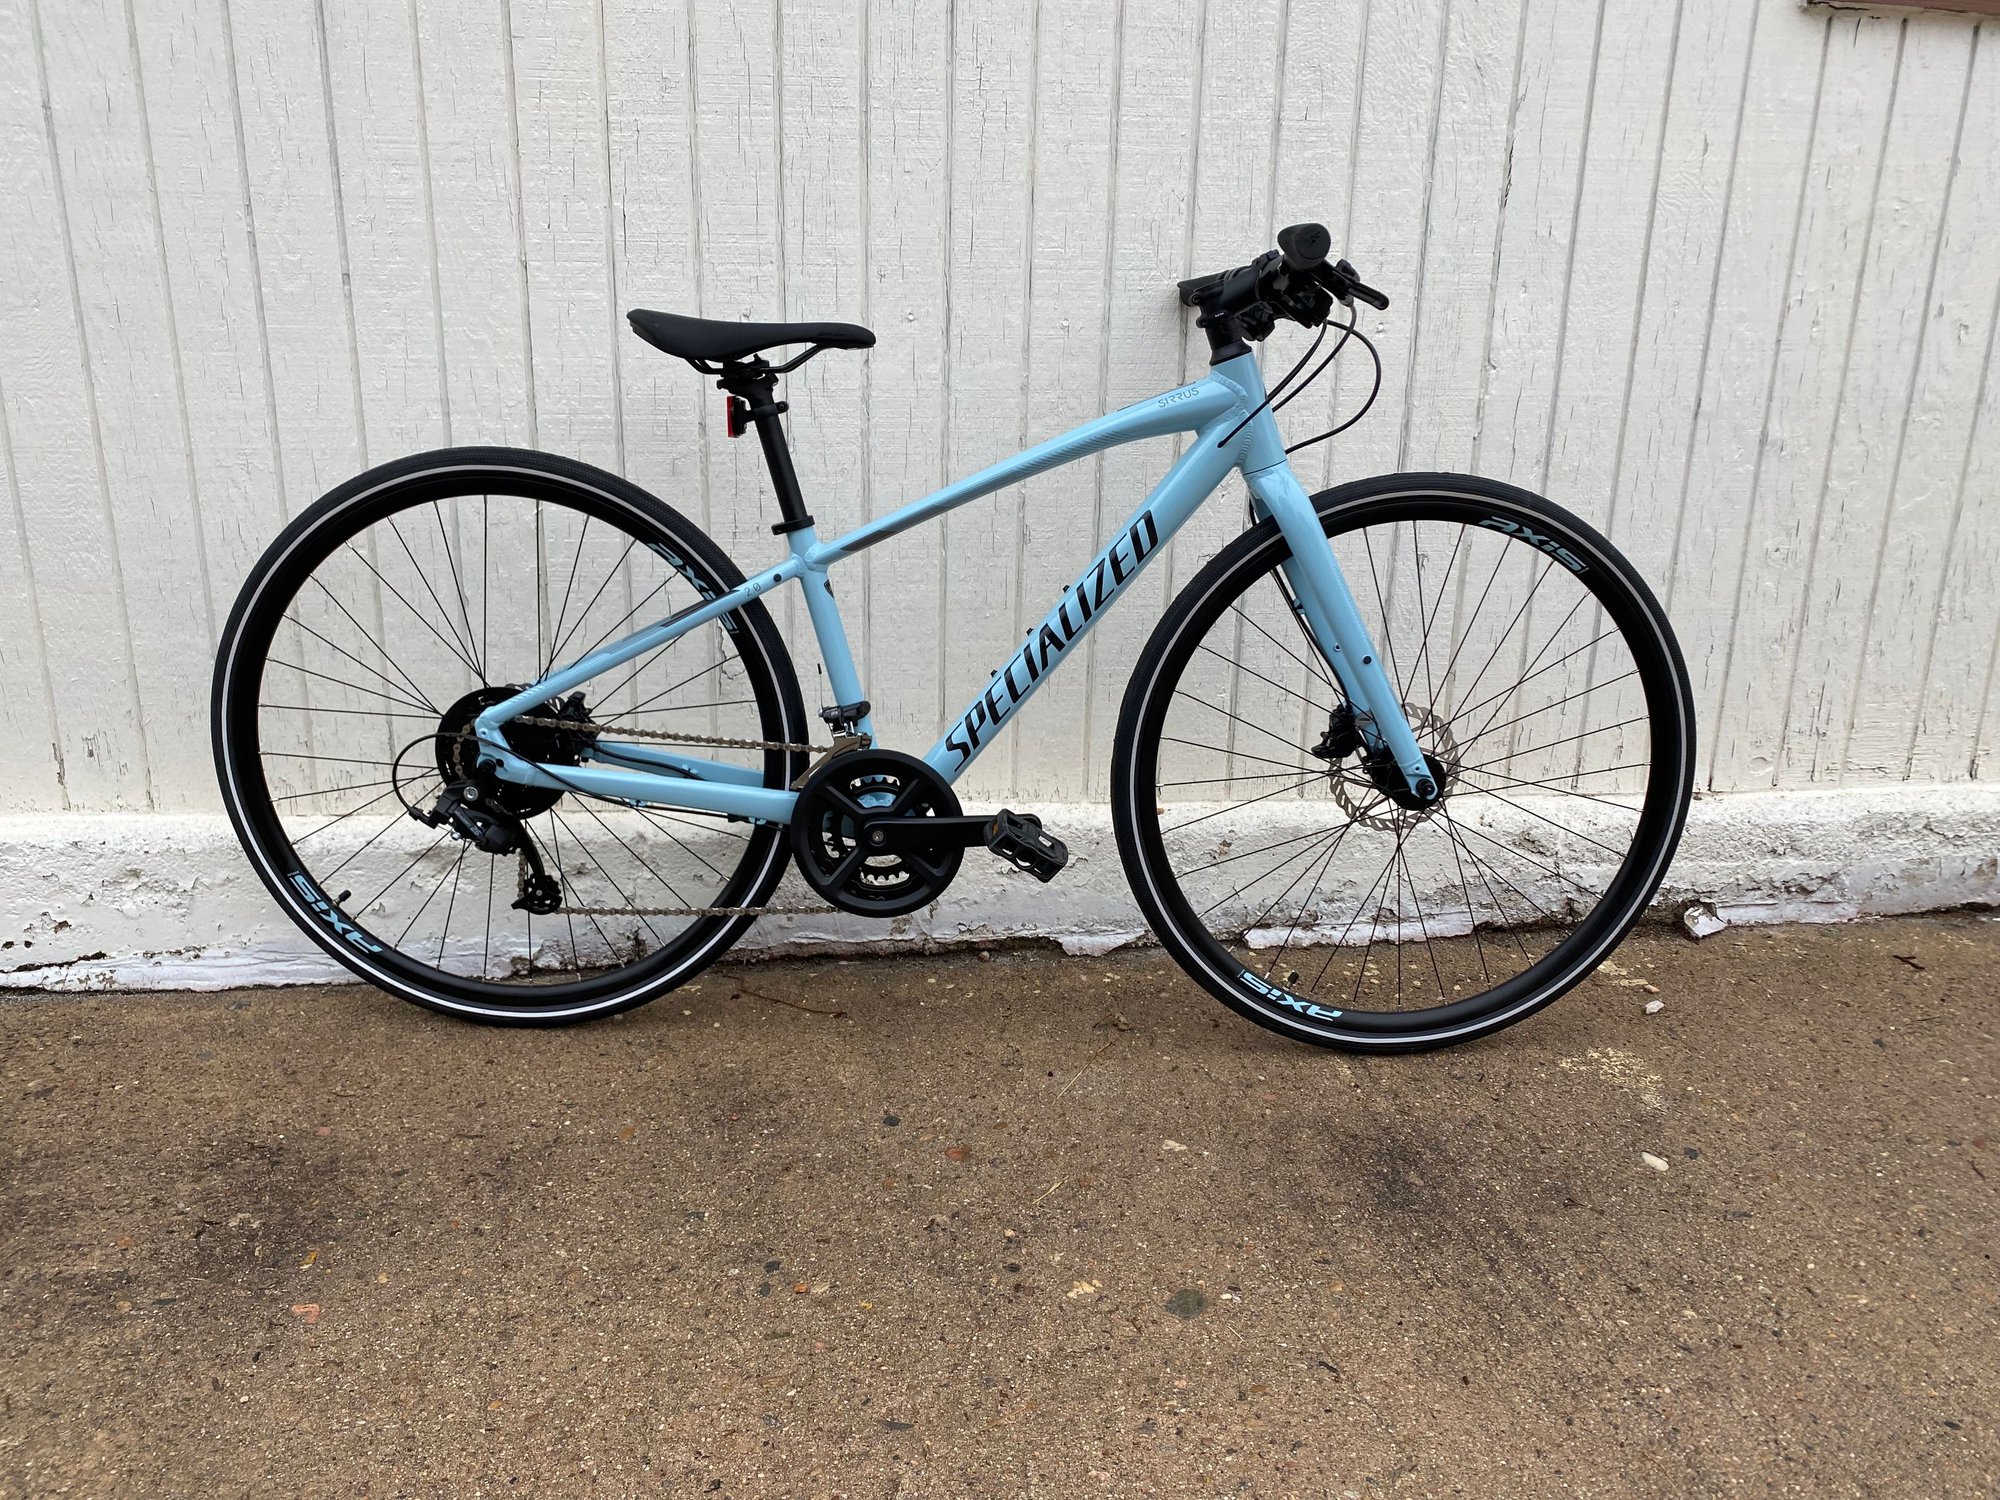
I decided to change out the wheels to 26” to give her more standover and a better fit. The short cranks make that drop in height possible without risking pedal strike.
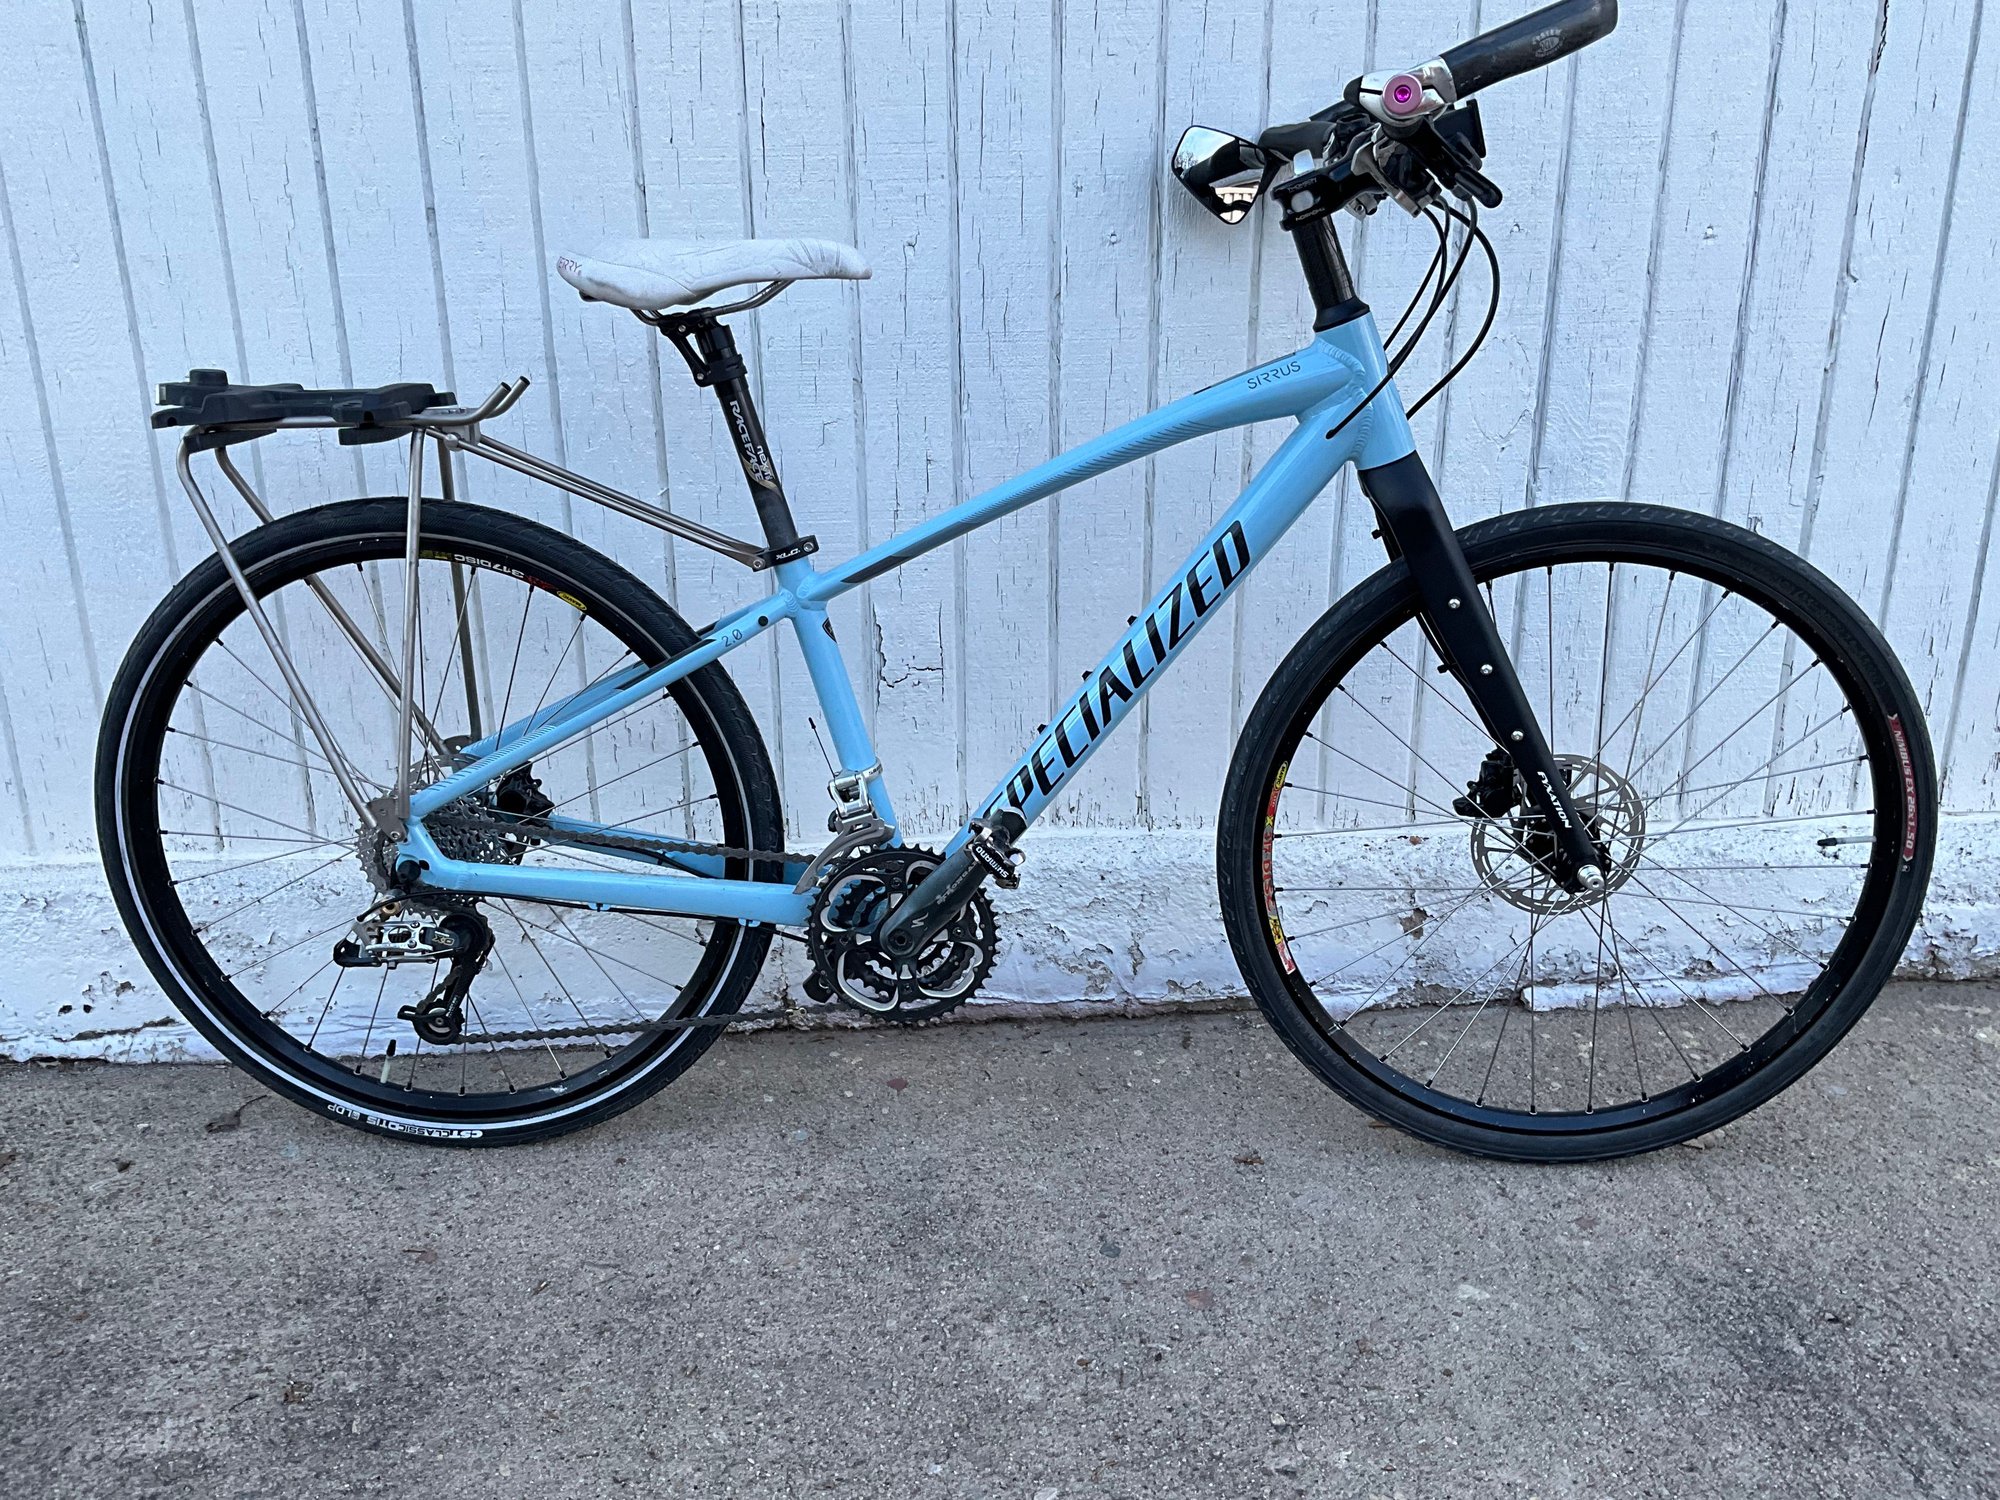
Very small bikes have several challenges that larger bikes don’t. If you are thinking of doing any bikepacking with your bike, you won’t be able to use a seat bike for carrying gear. The wheel is just too close to the saddle and even the smallest seat bag would rub. You’ll need to use a rack but as you can see in the picture above, the stays on the rack can’t be used on the frame braze-on mounts. Even with Ortlieb’s longest rack stay…240mm…is too short to reach the seatstay mounts and keep the rack level. That stays on the rack are as far forward as I can get them but they are still too short. I had to go with a seat collar mount instead,
Another consideration is brake lever reach. If you are going to go with a drop bar, look for shifters that allow you to move the reach inboard for small hands. The brakes on the Sirrus are hydraulic and have reach adjustment but only for moving the levers further away from the bars! I’ve swapped the brakes over to mechanicals with levers that can be adjusted for her smaller hands.
__________________
Stuart Black
Dreamin' of Bemidji Down the Mississippi (in part)
Plan Epsilon Around Lake Michigan in the era of Covid
Gold Fever Three days of dirt in Colorado
Pokin' around the Poconos A cold ride around Lake Erie
Dinosaurs in Colorado A mountain bike guide to the Purgatory Canyon dinosaur trackway
Solo Without Pie. The search for pie in the Midwest.
Picking the Scablands. Washington and Oregon, 2005. Pie and spiders on the Columbia River!
Stuart Black
Dreamin' of Bemidji Down the Mississippi (in part)
Plan Epsilon Around Lake Michigan in the era of Covid
Gold Fever Three days of dirt in Colorado
Pokin' around the Poconos A cold ride around Lake Erie
Dinosaurs in Colorado A mountain bike guide to the Purgatory Canyon dinosaur trackway
Solo Without Pie. The search for pie in the Midwest.
Picking the Scablands. Washington and Oregon, 2005. Pie and spiders on the Columbia River!
Last edited by cyccommute; 10-18-25 at 09:15 AM.
10-19-25 | 09:46 AM
#12
Senior Member
Joined: Sep 2004
Posts: 3,359
Likes: 1,100
From: Chicago area
Bikes: Airborne "Carpe Diem", Motobecane "Mirage", Trek 6000, Strida 2, Dahon "Helios XL", Dahon "Mu XL", Tern "Verge S11i"


 10-21-25 | 07:53 PM
#14

Not lost wanderer.

Joined: Jan 2013
Posts: 3,688
Likes: 1,434
From: Lancaster, Pa
Bikes: Cambodia bike,2012 Fuji Stratos...
If the internal routing is dedicated 1 to 1 and 2 to 2, in other words, there is an internal tube connecting them, I would run the front derailer in 2 and the rear in 1. If you can cross the housing inside the down tube, run the front into 1 and out 2, and the rear in 2 and out 1.
I run all my bikes right front. Right rear is a throw back to DT shifters, where you wanted to shift with your right hand but still have the most powerful brake accessible to the left.
I run all my bikes right front. Right rear is a throw back to DT shifters, where you wanted to shift with your right hand but still have the most powerful brake accessible to the left.
__________________
72 Geoffery Butler, 72 Gugificatizion Witcomb, 72 Raleigh Gran Sport SS, 74 Raleigh GrandPrix dingle speed, 74 Raleigh international, 81 Centurion Pro-Tour, 85 Gazelle Primeur, 29rBMX, Surley Steamroller 650b
72 Geoffery Butler, 72 Gugificatizion Witcomb, 72 Raleigh Gran Sport SS, 74 Raleigh GrandPrix dingle speed, 74 Raleigh international, 81 Centurion Pro-Tour, 85 Gazelle Primeur, 29rBMX, Surley Steamroller 650b
