Difficulties truing a rear wheel.
 08-25-09, 09:15 AM
#1
Senior Member
Thread Starter

Join Date: Jul 2009
Posts: 151
Mentioned: 0 Post(s)
Tagged: 0 Thread(s)
Quoted: 0 Post(s)
Likes: 0
Liked 0 Times
in
0 Posts
Difficulties truing a rear wheel.
This is my second time truing a wheel, and while the first time went great and I was successful, this is another bike entirely (mountain) and I'm having a real hard time this time. I started out with a wheel out of true, or possibly out of round, and made it much worse, and wobbly.
I don't have a truing stand, so I'm working with the bike upside down, with the wheel centred in the frame (tire removed), and me looking down from above at the rim to judge lateral trueness. (Can't use the brake pads or anything like that, the wheel is too warped). The problem is a section of the wheel is bent toward the non-drive side. But tightening a spoke (extremely) in the area on the drive side and (completely) loosening the two opposite spokes on the non-drive side is still NOT centering it back enough. Doing the same with other spokes in the area or just outside the problem area, is still not straignthening the bend (yes, I know theoretically the drive side should be about twice as tight as the non-drive). In a long day's attempt to correct this kind of problem, I stripped many nipples and starting to strip the heads of the nipples, by working the spokes from the top side of the rim with a screwdriver.
I've already loosened most of the spokes on the non-drive side. Should I just try to loosen everything and start all over? (Bit risky, as there may be one or two spokes on the drive side I can't loosen). Otherwise, any ideas why its not working?
 08-25-09, 09:20 AM
#3
Type 1 Racer

Join Date: Apr 2006
Location: Davis, CA
Posts: 2,579
Bikes: A dozen or so.
Mentioned: 0 Post(s)
Tagged: 0 Thread(s)
Quoted: 0 Post(s)
Likes: 0
Liked 0 Times
in
0 Posts
It sounds like the rim is bent, badly. You can loosen all the spokes and try to bend the rim back into decent shape. Otherwise, time for a new rim.
08-25-09, 09:54 AM
#4
All-round nice guy.

Join Date: May 2005
Location: Ontario Canada
Posts: 448
Bikes: Kish road bike, Seven mtb, Marinoni road and track bikes.
Mentioned: 0 Post(s)
Tagged: 0 Thread(s)
Quoted: 1 Post(s)
Likes: 0
Liked 0 Times
in
0 Posts
You're completely wasting your time on this. Not even an expert wheelbuilder can pull a bent rim into shape and if they got even close, the spokes would be so unequal in tensions that the wheel wouldn't last.
It's tough enough for Newbs to true/build wheels from perfect parts but it's a total exercise in futility to try with bent parts. Plus you've got stripped nipples and "spokes on the drive side I can't loosen".
Give 'er up. Learn how to build a proper wheel. Read my wheelbuilding tips and click the links at the end. Buy Roger's e-book. I used my frame and fork to build wheels for decades so there's nothing wrong with that setup.
08-25-09, 11:33 AM
#6

Senior Member

Unlace the wheel and lay the rim on a glass coffee table to see how flat it is. You may find that the rim taco'ed and the lateral displacement is about equal to the wobble you have that can't be trued. Don't waste time on bent rims, it's so much easier and faster to just replace it. Tape a new rim next to the old one and transfer all the spokes & nipples over. Takes all of 5-10 minutes with an electric screwdrivers. Then another 5 minutes to true and you're back on the road.
08-25-09, 11:38 AM
#7
Senior Member
Join Date: Apr 2009
Location: New Rochelle, NY
Posts: 38,716
Bikes: too many bikes from 1967 10s (5x2)Frejus to a Sumitomo Ti/Chorus aluminum 10s (10x2), plus one non-susp mtn bike I use as my commuter
Mentioned: 140 Post(s)
Tagged: 1 Thread(s)
Quoted: 5786 Post(s)
Liked 2,579 Times
in
1,430 Posts
As others have said, you might need a new rim (total wheel rebuild) but that's no reason not to use this wheel as a learning experience.
First off, understand that unlike many bike repair tasks which are straight froward knowledge based, and can be done by following a simple sequence of steps, wheel building and alignment is skill based, and besides knowledge requires a degree of feel and judgment, that can only be gained through experience.
A few hints,
When working with tight nipples, resist the temptation to over torque and strip them with a standard spoke wrench. Make sure you have a close fitting spoke key, or even one of the 3 or 4 corner box wrench style keys, and that you engage it fully on the nipple flats to spread the load.
When you're turning tight nipples try to flex the rim towards the spoke you're working on to reduce the tension and nipple torque. I use a cut-down broom handle wedged between the hub and rim as a lever for this. Taking the weight off a bit goes a long way to eliminating spoke twist, and stripped nipples.
Learn to feel spoke twist. This is common on tight spokes, so while you think you're tightening or loosening a nipple, what's really happening is the spoke is winding up a bit instead.
Lastly, Concentrate, you're not the first person, nor will you be the last to lose track of which way to turn to tighten/loosen nipples, or right and left sides of the rim, especially when working upside down or mirror imaged. Turn off all distractions and before turning any nipple use your right hand to verify which direction is which. (right hand rule---- put your right hand over the nut, screw or nipple, if you turn in the direction of the fingers the part will move in the direction the thumb points).
Before moving onto a more ambitious project like building a new wheel, use this as a practice wheel. You won't get it perfect, but what you learn will help later on.
__________________
FB
Chain-L site
An ounce of diagnosis is worth a pound of cure.
Just because I'm tired of arguing, doesn't mean you're right.
�One accurate measurement is worth a thousand expert opinions� - Adm Grace Murray Hopper - USN
WARNING, I'm from New York. Thin skinned people should maintain safe distance.
FB
Chain-L site
An ounce of diagnosis is worth a pound of cure.
Just because I'm tired of arguing, doesn't mean you're right.
�One accurate measurement is worth a thousand expert opinions� - Adm Grace Murray Hopper - USN
WARNING, I'm from New York. Thin skinned people should maintain safe distance.
08-25-09, 12:04 PM
#8
Senior Member
Thread Starter
Join Date: Jul 2009
Posts: 151
Mentioned: 0 Post(s)
Tagged: 0 Thread(s)
Quoted: 0 Post(s)
Likes: 0
Liked 0 Times
in
0 Posts
I think there's a misunderstanding here. When I say the rim is bent, I mean it leans toward one side or the other, as a cause of me playing with the spoke tension. Which is normally what happens when you play too much with tensioning & detensioning, and/or are not doing something correctly. So it's not like the wheel was damaged by an accident, because it while it was out of true when I started the truing, it was not so bent & wobbly as when I had finished. I figure I should at least be able to get it back to where it was when I started, then see what I can do from there! But that's turning out to be easier said than done....
Last edited by TheCappucinoKid; 08-25-09 at 12:07 PM.
08-25-09, 12:32 PM
#9
Senior Member
Join Date: Apr 2009
Location: New Rochelle, NY
Posts: 38,716
Bikes: too many bikes from 1967 10s (5x2)Frejus to a Sumitomo Ti/Chorus aluminum 10s (10x2), plus one non-susp mtn bike I use as my commuter
Mentioned: 140 Post(s)
Tagged: 1 Thread(s)
Quoted: 5786 Post(s)
Liked 2,579 Times
in
1,430 Posts
Regardless of whether this wheel is salvageable or not, take your time and develop your technique.
Wheel alignment is like playing the piano -- it takes practice. With this being only your second effort, I'm not surprised that you're struggling. Now that you've loosened most of the spokes, replace all the damaged nipples one at a time making sure to use ones that are identical to those you're leaving in place. (having different nipples that require different spoke wrenches is a recipe for disaster, or at least lots of frustration).
Re-tighten the spokes to where they carry light tension and true up the wheel focusing on hop first then side to side movement. Bring the rim too far to the right side, so it'll be easier to achieve dish by moving to the left at the end. As the wheel comes back to line, tighten spokes by half turns working your way around then by quarter turns, and re-aligning between each pass so it's never too far out.
As you near final tension, try for perfect alignment, and move the dish to center by adding the last bit of tension to the left side (slacker) spokes only.
Lastly I repeat, Work undisturbed, in a quiet place, free from all distractions and interruptions.
__________________
FB
Chain-L site
An ounce of diagnosis is worth a pound of cure.
Just because I'm tired of arguing, doesn't mean you're right.
�One accurate measurement is worth a thousand expert opinions� - Adm Grace Murray Hopper - USN
WARNING, I'm from New York. Thin skinned people should maintain safe distance.
FB
Chain-L site
An ounce of diagnosis is worth a pound of cure.
Just because I'm tired of arguing, doesn't mean you're right.
�One accurate measurement is worth a thousand expert opinions� - Adm Grace Murray Hopper - USN
WARNING, I'm from New York. Thin skinned people should maintain safe distance.
08-25-09, 01:41 PM
#10
Senior Member
Join Date: Mar 2008
Posts: 8,688
Mentioned: 46 Post(s)
Tagged: 0 Thread(s)
Quoted: 1074 Post(s)
Liked 295 Times
in
222 Posts
I think there's a misunderstanding here. When I say the rim is bent, I mean it leans toward one side or the other, as a cause of me playing with the spoke tension. Which is normally what happens when you play too much with tensioning & detensioning, and/or are not doing something correctly. So it's not like the wheel was damaged by an accident, because it while it was out of true when I started the truing, it was not so bent & wobbly as when I had finished. I figure I should at least be able to get it back to where it was when I started, then see what I can do from there! But that's turning out to be easier said than done....
08-25-09, 02:46 PM
#11
Great State of Varmint

Join Date: Sep 2008
Location: Dante's Third Ring
Posts: 7,476
Mentioned: 0 Post(s)
Tagged: 0 Thread(s)
Quoted: 2 Post(s)
Likes: 0
Liked 15 Times
in
15 Posts
To each their own mantra.
08-25-09, 04:19 PM
#12
Senior Member
Join Date: Apr 2009
Location: New Rochelle, NY
Posts: 38,716
Bikes: too many bikes from 1967 10s (5x2)Frejus to a Sumitomo Ti/Chorus aluminum 10s (10x2), plus one non-susp mtn bike I use as my commuter
Mentioned: 140 Post(s)
Tagged: 1 Thread(s)
Quoted: 5786 Post(s)
Liked 2,579 Times
in
1,430 Posts
My point was that when interrupted or distracted while working on wheels it's easy to lose your place and the job becomes that much harder.
__________________
FB
Chain-L site
An ounce of diagnosis is worth a pound of cure.
Just because I'm tired of arguing, doesn't mean you're right.
�One accurate measurement is worth a thousand expert opinions� - Adm Grace Murray Hopper - USN
WARNING, I'm from New York. Thin skinned people should maintain safe distance.
FB
Chain-L site
An ounce of diagnosis is worth a pound of cure.
Just because I'm tired of arguing, doesn't mean you're right.
�One accurate measurement is worth a thousand expert opinions� - Adm Grace Murray Hopper - USN
WARNING, I'm from New York. Thin skinned people should maintain safe distance.
08-25-09, 04:28 PM
#13
Great State of Varmint
Join Date: Sep 2008
Location: Dante's Third Ring
Posts: 7,476
Mentioned: 0 Post(s)
Tagged: 0 Thread(s)
Quoted: 2 Post(s)
Likes: 0
Liked 15 Times
in
15 Posts
There's an idea!
I have an old carabiner (for rope-climbing) that I use to mark the spoke I'm on - so I can pick up where I left off if needed. I hope everyone has a favorite object to perform this task.
I have an old carabiner (for rope-climbing) that I use to mark the spoke I'm on - so I can pick up where I left off if needed. I hope everyone has a favorite object to perform this task.
08-25-09, 06:57 PM
#14
Senior Member
Would be a good idea to go get a tensionometer.
Also remember that the direction of spin is reversed depending upon whether the nipple is at the top of the wheel versus at the bottom. If you're looking down at the nipple that's at the top of the wheel, tightening is clockwise. If you're looking at the nipple that's at the bottom of the wheel, tightening is counter-clockwise. I always use the right-hand-rule (think EMF directions), and think of moving the nipple towards or away from the hub rather than tighten/loosen.
Also remember that the direction of spin is reversed depending upon whether the nipple is at the top of the wheel versus at the bottom. If you're looking down at the nipple that's at the top of the wheel, tightening is clockwise. If you're looking at the nipple that's at the bottom of the wheel, tightening is counter-clockwise. I always use the right-hand-rule (think EMF directions), and think of moving the nipple towards or away from the hub rather than tighten/loosen.
08-25-09, 07:33 PM
#15
Senior Member
Thread Starter
Join Date: Jul 2009
Posts: 151
Mentioned: 0 Post(s)
Tagged: 0 Thread(s)
Quoted: 0 Post(s)
Likes: 0
Liked 0 Times
in
0 Posts
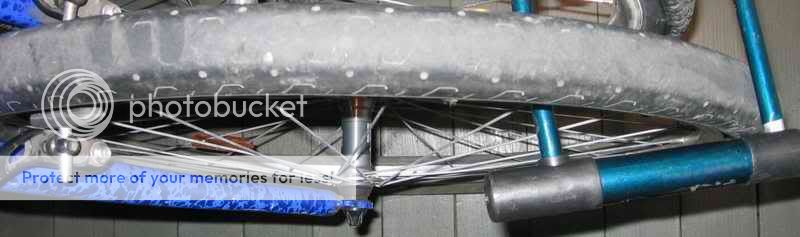
Ok, following feedback (thanks), I loosened every spoke on both drive & non-drive side until I could turn the nipples with my finger. I'm assuming at this point, a proper rim should be straight (unless you really need to remove the spokes entirely to check if the rim is warped). Well, this one isn't. It appears I was wrong about the rim being bent only because of overtensioning, as it is still bent in the area I originally noticed it, plus another area near the stem hole (see pic). However, I don't know if I caused this warpage myself due to a bad truing job & overtenionsing, or if the wheel was like that originally. Because I only bought the bike 2nd hand the day before (and the seller neglected to mention the aluminum seatpost was stuck, so its not like it was gingerly cared for). On the other hand, if the rim was bent, I certainly didn't notice it when I rode it, it seemed fine. I just noticed it was a bit radially & laterally out of true, when I was checking it standing still.
Now the intro to this forum promises help with a "tacoed wheel". So... does that mean I can fix the tacoed rim?! I sure hope so, because I don't want to have to buy a new rim! This was purchased as a sort of gift for a friend, and spending more money on a bike that isn't mine, is going to be a problem for me.....
Now the intro to this forum promises help with a "tacoed wheel". So... does that mean I can fix the tacoed rim?! I sure hope so, because I don't want to have to buy a new rim! This was purchased as a sort of gift for a friend, and spending more money on a bike that isn't mine, is going to be a problem for me.....
08-25-09, 09:07 PM
#16
Type 1 Racer
Join Date: Apr 2006
Location: Davis, CA
Posts: 2,579
Bikes: A dozen or so.
Mentioned: 0 Post(s)
Tagged: 0 Thread(s)
Quoted: 0 Post(s)
Likes: 0
Liked 0 Times
in
0 Posts
This helped me fix a bent front wheel after a crash.
https://www.sheldonbrown.com/tooltips/truing.html
https://www.sheldonbrown.com/tooltips/truing.html
08-25-09, 09:26 PM
#17
Senior Member
Now the intro to this forum promises help with a "tacoed wheel". So... does that mean I can fix the tacoed rim?! I sure hope so, because I don't want to have to buy a new rim! This was purchased as a sort of gift for a friend, and spending more money on a bike that isn't mine, is going to be a problem for me.....
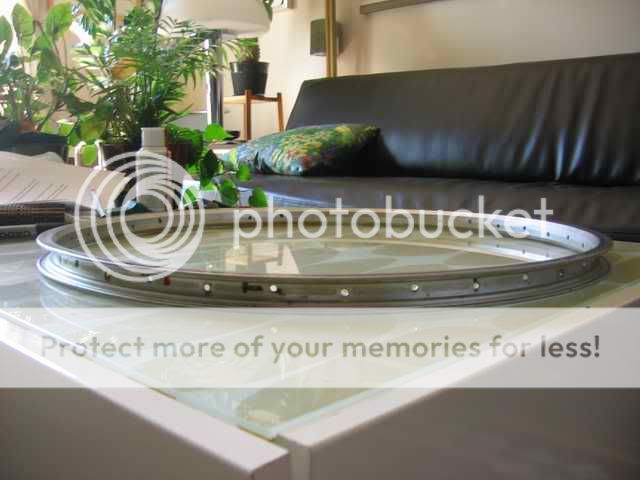
I've found a much, much more precise, accurate and good-as-new method is to unlace the rim completely. Lay it on a glass coffee table and mark the exact high & low spots. Then grab the opposite high spots and lay the low-spots against a door-frame and push. With out the spokes and hub in the way, you can bend the rim a precise amount opposite the bend. Typically just one or two pushes against the door-frame is necessary and the rim will lay pretty flat on the glass coffee-table. Then re-lace it and tension it up and you've got a perfectly true wheel with much, much more even tension and overall strength.
08-26-09, 12:38 AM
#18
Senior Member
Thread Starter
Join Date: Jul 2009
Posts: 151
Mentioned: 0 Post(s)
Tagged: 0 Thread(s)
Quoted: 0 Post(s)
Likes: 0
Liked 0 Times
in
0 Posts
Thanks, I may like to try your more accurate method. But is it really necessary to completely remove the spokes, even if I loosen them all up? That would necessitate me having to buy a freewheel removal tool, which is probably what just buying a new rim would cost.
08-26-09, 02:18 AM
#19
Senior Member
Join Date: Mar 2008
Posts: 8,688
Mentioned: 46 Post(s)
Tagged: 0 Thread(s)
Quoted: 1074 Post(s)
Liked 295 Times
in
222 Posts
There's considerable spring back in a rim, so if it's off with 5 deg to the right, then bending it 5 deg to the left won't bring it back to zero. You need to overshoot considerably, and to be able to do that you usually have to unlace the rim.
Why? You can leave the spokes in the hub while bending the rim. Actually, I suggest that you put a small strip of tape around each spoke cross. That'll keep them in alignment and make reattaching the rim easy for a rookie wheelbuilder.
08-26-09, 02:27 AM
#20
Senior Member
Join Date: Mar 2008
Posts: 8,688
Mentioned: 46 Post(s)
Tagged: 0 Thread(s)
Quoted: 1074 Post(s)
Liked 295 Times
in
222 Posts
..I've found a much, much more precise, accurate and good-as-new method is to unlace the rim completely. Lay it on a glass coffee table and mark the exact high & low spots. Then grab the opposite high spots and lay the low-spots against a door-frame and push. With out the spokes and hub in the way, you can bend the rim a precise amount opposite the bend. Typically just one or two pushes against the door-frame is necessary and the rim will lay pretty flat on the glass coffee-table. Then re-lace it and tension it up and you've got a perfectly true wheel with much, much more even tension and overall strength.
Although I've always had to use much more force for some reason...
Best results so far has been with a technique suggested by someone else here on BF: Clamp the rim to a sturdy workbench with low/high spots resting at the edge, then heave/push down as required. Eyeball along rim/bench top to judge result.
08-26-09, 08:30 AM
#21
Type 1 Racer
Join Date: Apr 2006
Location: Davis, CA
Posts: 2,579
Bikes: A dozen or so.
Mentioned: 0 Post(s)
Tagged: 0 Thread(s)
Quoted: 0 Post(s)
Likes: 0
Liked 0 Times
in
0 Posts
I was drawn to the doorway with a rim I needed to bend back into shape. I loosened all the spokes but kept the wheel laced. Then I proceeded to slam the wheel into the doorway with a lot of force. I actually left some marks from the axel. Oops.
I agree that taking the wheel apart will yield better results. But I would question whether it's really worth it. That single wall rim you have there is not top quality by any means. At some point you have to ask if this is worth the time.
I agree that taking the wheel apart will yield better results. But I would question whether it's really worth it. That single wall rim you have there is not top quality by any means. At some point you have to ask if this is worth the time.
08-26-09, 09:21 AM
#22
Great State of Varmint
Join Date: Sep 2008
Location: Dante's Third Ring
Posts: 7,476
Mentioned: 0 Post(s)
Tagged: 0 Thread(s)
Quoted: 2 Post(s)
Likes: 0
Liked 15 Times
in
15 Posts
Why is it that in shop-class at schools kids are forced to make wooden-fish and birdhouses? They should be teaching bike-mechanics. Lordy!
08-26-09, 08:42 PM
#23
Senior Member
Thread Starter
Join Date: Jul 2009
Posts: 151
Mentioned: 0 Post(s)
Tagged: 0 Thread(s)
Quoted: 0 Post(s)
Likes: 0
Liked 0 Times
in
0 Posts
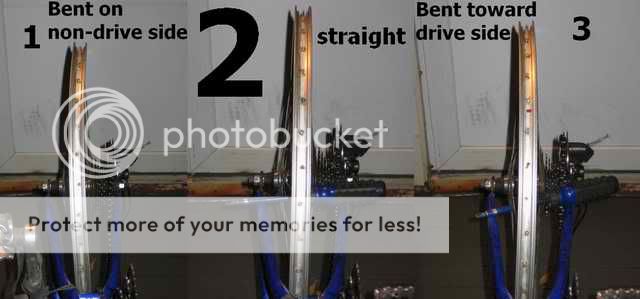
Well thanks Dabac, Danno, etc. for your tips, which helped me to finally fix my wheel. I can see now you really do have to remove the rim entirely from the spokes to do this, but thankfully, I didn't have to remove them from the hub. My first attempt was to lay the rim flat on the deck and bang the heck out of it with a mallet. Didn't do anything. Danno's suggestion to bend the rim against the corner of a door frame is what worked, and it was almost perfect by the time I finished with it (see pic 1). But it wasn't easy or quick, though. Took a lot of force to bend the rim, and if it had broken, I would have slammed my head into the side of the doorway with quite a bit of force. It did start to come apart actually, at the seam (pic 3), when I applied force to an area near the seam (not so wise in retrospect to not avoid that area). But I fixed the problem by bending it back. (Rydaddy: the method is to hold it widely apart and press the centre of the high spot rim against the frame with a lot of pressure, using your entire body to supply the pressure... not slamming it into the frame. I did scrape the paint on the corner of the frame, but I'm getting a new door + frame soon so no worries). Relacing the wheel was made easier by putting masking tape where the spokes cross, and marking a couple spokes with their respective holes, as well as along the plastic spoke guard.
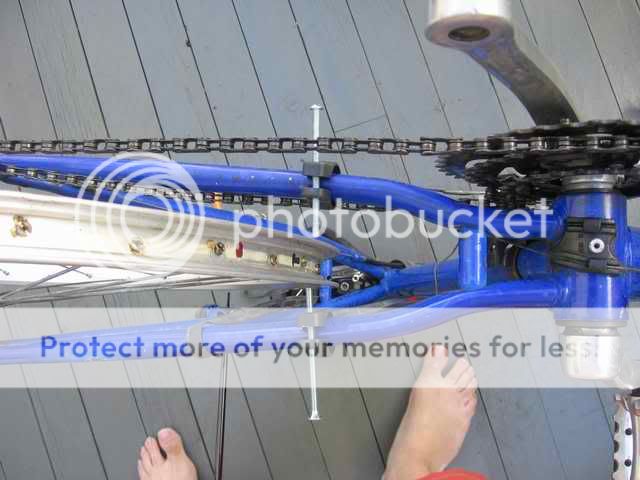
The truing process was expectedly laborious, so I invented a poor man's truing stand, attaching a couple of bike light brackets on the rear frame, with long bolts and nuts thru this for the "feelers" (pic 2). It is easy to adjust the position of the guides when necessary, by turning the bolts. I prefer this location above the wheel, because it's easier on my back then using Sheldon's reverse-brake shoe method, and going down on the ground to try to evaluate position. I managed to get the lateral truing to a very respectable degree, allowing me to do a good job on the brakes (a lot of the truing was done by looking at the rim from the top to see which way it bends, and working by screwing the nipple heads, because this method was faster & easier). I tried radial truing as well, but I wasn't as successful. It wasn't doing much other than screwing with my lateral truing, and I no longer had the patience to persist truing the wheel. So yeah, the wheel hops a bit; as it did before I started all this. I also noticed there's some play when it's tight in the frame and I push the wheel side to side, so I guess the hub or something needs tightening as well.

The truing process was expectedly laborious, so I invented a poor man's truing stand, attaching a couple of bike light brackets on the rear frame, with long bolts and nuts thru this for the "feelers" (pic 2). It is easy to adjust the position of the guides when necessary, by turning the bolts. I prefer this location above the wheel, because it's easier on my back then using Sheldon's reverse-brake shoe method, and going down on the ground to try to evaluate position. I managed to get the lateral truing to a very respectable degree, allowing me to do a good job on the brakes (a lot of the truing was done by looking at the rim from the top to see which way it bends, and working by screwing the nipple heads, because this method was faster & easier). I tried radial truing as well, but I wasn't as successful. It wasn't doing much other than screwing with my lateral truing, and I no longer had the patience to persist truing the wheel. So yeah, the wheel hops a bit; as it did before I started all this. I also noticed there's some play when it's tight in the frame and I push the wheel side to side, so I guess the hub or something needs tightening as well.
Last edited by TheCappucinoKid; 08-26-09 at 08:51 PM.
08-26-09, 08:50 PM
#24
Great State of Varmint
Join Date: Sep 2008
Location: Dante's Third Ring
Posts: 7,476
Mentioned: 0 Post(s)
Tagged: 0 Thread(s)
Quoted: 2 Post(s)
Likes: 0
Liked 15 Times
in
15 Posts
If that seam is rough - it looks like it is - some emery-cloth will smooth it out so it doesn't eat brake-pads.
08-26-09, 09:06 PM
#25
Senior Member
Thread Starter
Join Date: Jul 2009
Posts: 151
Mentioned: 0 Post(s)
Tagged: 0 Thread(s)
Quoted: 0 Post(s)
Likes: 0
Liked 0 Times
in
0 Posts
BTW, can anyone tell me what the deal is with the tires on this bike? Are they worn out or are they slicks that are supposed to look like that? How do you know when slicks are worn? Can you tell by the inverted tread or something, how much life they have left?