


Drilling rear dropouts for rack
 01-26-14, 01:26 AM
#1
Senior Member
Thread Starter

Drilling rear dropouts for rack
I picked up a '95 aluminum A1 comp Rockhopper last fall. Thought I'd use it as a winter bike and not have to worry as much about corrosion in the MN winters. I'd been scanning craigslist obsessively, checking bikepedia, etc, etc, so when I saw this for $100, it seemed like a no brainer. Rigid fork, ready to ride, in really good shape.
It wasn't until I got it home that I noticed the rear dropouts did not have eyelet/holes for a rear rack. I was surprised; all the steel Rockhoppers of that vintage had rack eyelets. Anyway, it wasn't a deal killer, I put on some stainless P-clamps to mount my fenders and have been riding it all winter.
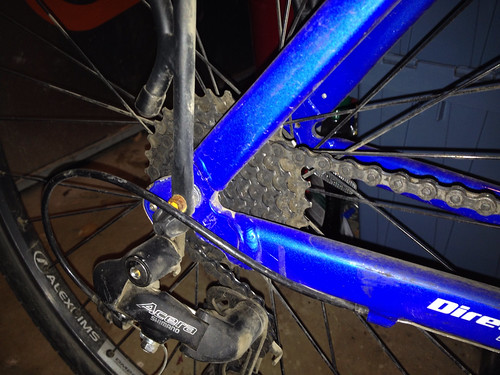
Just last week I see a '98 aluminum Rockhopper frame on Craigslist - appears to have almost identical rear dropouts, but these are drilled to accept a rack. Before I saw this, I wasn't going to mess with it - wasn't quite sure if I'd be compromising the strength. But now it looks like it would be easy to do, especially using this photo as a guide. Not to mention I have a couple extra rear racks in the parts bin.
Anyone drilled rack holes on rear dropouts before? Any non obvious pitfalls I should be worried about?


It wasn't until I got it home that I noticed the rear dropouts did not have eyelet/holes for a rear rack. I was surprised; all the steel Rockhoppers of that vintage had rack eyelets. Anyway, it wasn't a deal killer, I put on some stainless P-clamps to mount my fenders and have been riding it all winter.
Just last week I see a '98 aluminum Rockhopper frame on Craigslist - appears to have almost identical rear dropouts, but these are drilled to accept a rack. Before I saw this, I wasn't going to mess with it - wasn't quite sure if I'd be compromising the strength. But now it looks like it would be easy to do, especially using this photo as a guide. Not to mention I have a couple extra rear racks in the parts bin.
Anyone drilled rack holes on rear dropouts before? Any non obvious pitfalls I should be worried about?
 01-26-14, 01:43 AM
#2
Senior Member
Join Date: Jan 2014
Location: US
Posts: 177
Bikes: 50's-60's Ross Deluxe, 68 Schwinn, 83 Peugeot P8, 84 Jamis Durango, 85 Peugeot PH501, 86 Raleigh Grand Prix, 91 Maruishi RX-7, 92 Marin Bear Valley, 92 Trek 950
Mentioned: 0 Post(s)
Tagged: 0 Thread(s)
Quoted: 0 Post(s)
Likes: 0
Liked 1 Time
in
1 Post
Measure twice, drill once. Cliche I know, but sound advice. Aluminum is softer and easier to cut through, so you want to set everything up right and drill carefully. Once you have measured and marked where you are going to drill your hole, use an awl or other pointed metal object to tap a dent into the center of the spot where you are going to drill through. It will guide your drill bit and help prevent it from "walking" and causing damage to the dropout. The threads will be easy to cut, just keep your tap well oiled and again start off right by taking your time and going slow. You should have professional results when you are done.
Also FYI, since you are going to be using this in the winter weather, when steel comes into contact with aluminum a unique form of corrosion know as galling is formed when exposed to moisture. Use some antiseize or other anti-corrosive sealant on the threads to prevent this from happening. You can use aluminum bolts instead of steel if you wish, but aluminum does corrode as well, so anti-corrosives are a good thing to use. Stainless fasteners will not be an issue, and are best for your situation.
Also FYI, since you are going to be using this in the winter weather, when steel comes into contact with aluminum a unique form of corrosion know as galling is formed when exposed to moisture. Use some antiseize or other anti-corrosive sealant on the threads to prevent this from happening. You can use aluminum bolts instead of steel if you wish, but aluminum does corrode as well, so anti-corrosives are a good thing to use. Stainless fasteners will not be an issue, and are best for your situation.
01-26-14, 01:59 AM
#4
Senior Member
Join Date: Jan 2014
Location: US
Posts: 177
Bikes: 50's-60's Ross Deluxe, 68 Schwinn, 83 Peugeot P8, 84 Jamis Durango, 85 Peugeot PH501, 86 Raleigh Grand Prix, 91 Maruishi RX-7, 92 Marin Bear Valley, 92 Trek 950
Mentioned: 0 Post(s)
Tagged: 0 Thread(s)
Quoted: 0 Post(s)
Likes: 0
Liked 1 Time
in
1 Post
I think that is a great option if he has access them fietsbob.
01-26-14, 07:35 AM
#5
Senior Member

Join Date: Sep 2010
Location: Roswell, GA
Posts: 8,319
Bikes: '93 Trek 750, '92 Schwinn Crisscross, '93 Mongoose Alta
Mentioned: 30 Post(s)
Tagged: 0 Thread(s)
Quoted: 1438 Post(s)
Liked 1,092 Times
in
723 Posts
Electrolytic corrosion rather than galling is the concern with dissimilar metals in contact. I recommend Tef-Gel as an anti-seize agent. It was specifically designed to keep salt brine from corroding metal fasteners. I would not recommend aluminum bolts as they lack strength and are easily sheared
Also not the position of the welds attaching the dropouts to the frame tubes. You will either need to position your new holes so that the rack will clear them, which might put you into a rather narrow area of the dropouts, or put washers between the rack and the dropouts as spacers. You could also just reef down on the bolts abd let the rack ears bend over the welds but that would not be my preference.
BTW, what is the problem with the p-clamps, which appear to have given satisfactory service? I tend to just leave things which are working alone.
01-26-14, 08:17 AM
#6

Senior Member

Join Date: Feb 2004
Location: St Peters, Missouri
Posts: 30,225
Bikes: Catrike 559 I own some others but they don't get ridden very much.
Mentioned: 16 Post(s)
Tagged: 0 Thread(s)
Quoted: 1572 Post(s)
Liked 643 Times
in
364 Posts
If it was my bike I'd do it. It's a '95 Rockhopper. What do you have to lose?
__________________
My greatest fear is all of my kids standing around my coffin and talking about "how sensible" dad was.
My greatest fear is all of my kids standing around my coffin and talking about "how sensible" dad was.
01-26-14, 08:24 AM
#7
Banned
Join Date: Apr 2010
Location: Lincoln Ne
Posts: 9,924
Bikes: RANS Stratus TerraTrike Tour II
Mentioned: 46 Post(s)
Tagged: 0 Thread(s)
Quoted: 3352 Post(s)
Liked 1,056 Times
in
635 Posts
There is no reason at all that I can see that you couldnt drill and tap the drop out. Just pick an area away from the edge.
01-26-14, 08:32 AM
#8
Senior Member
Join Date: Aug 2005
Location: Pittsburgh, PA
Posts: 33,656
Bikes: '96 Litespeed Catalyst, '05 Litespeed Firenze, '06 Litespeed Tuscany, '20 Surly Midnight Special, All are 3x10. It is hilly around here!
Mentioned: 39 Post(s)
Tagged: 0 Thread(s)
Quoted: 2026 Post(s)
Likes: 0
Liked 1,096 Times
in
742 Posts
Given that Specialized thought it was safe in a later model of the same bike I expect you will be too. As mentioned, use a sharp drill bit, deburr the hole edges and use a clean well lubricated tap (M5x.8). Anti-seize on the bolt threads is a good idea but don't use aluminum bolts. They aren't strong enough to be reliable supporting the weight of the rack and it's load over rough roads.
If you want to remount the fender struts to double up on the new rack mounting holes, be sure to locate the rack struts on the inboard side nearest the dropout.
If you want to remount the fender struts to double up on the new rack mounting holes, be sure to locate the rack struts on the inboard side nearest the dropout.
01-26-14, 09:39 AM
#9
Cottered Crank

Join Date: Aug 2010
Location: Chicago
Posts: 3,401
Bikes: 1954 Raleigh Sports 1974 Raleigh Competition 1969 Raleigh Twenty 1964 Raleigh LTD-3
Mentioned: 0 Post(s)
Tagged: 0 Thread(s)
Quoted: 8 Post(s)
Likes: 0
Liked 11 Times
in
7 Posts
Drill baby drill.
I'd go for it too. You don't have much to lose. If you had access to a drill press that would be great. Otherwise drill carefully and use a lot of lube. I like RapidTap as it is good stuff.
Keep an eye on that hole and the area around it on the DO for a while to make sure it isn't causing the DO to fail. It'd suck to lose the rear end in traffic. I'd also be sure to put a short bolt back into it if I ever took the rack off. It'd be stronger with a bolt filling up the hole than just empty. I daresay that the DO would be as strong with a bolt tightly threaded into it than it was before it was drilled and tapped -just heavier for the addition of the bolt. But an open hole would be slightly weaker. The rounder the hole, the stronger the part with the hole in it.
On a similar note, I have drilled/tapped DO's to accept modified claw-type derailleur hangers on a droupout that didn't have an integrated derailleur hanger. I ground off that little tab at the back of the slot so that the claw hanger slot sat flush with the slot of the DO and the axle could come fully back to the rear of both dropouts. That's the issue with the claw-type derailleur hanger, you lose that rear 3/8" of the dropout. After grinding off that tab I then clamp the claw tightly against the DO with a vise-grips and use a couple of bolts to keep it aligned perfectly to the DO. Drill and tap the dropout for the bolt at the rear of the claw and Viola! A replaceable integrated derailleur hanger for a dropout that didn't have one before. I wouldn't do this on an aluminum frame but on a steel bike with stamped dropouts (where you usually find the lack of a derailleur hanger) this works just fine.
Last edited by Amesja; 01-26-14 at 09:45 AM.
01-26-14, 09:55 AM
#10
Senior Member
Thread Starter
Electrolytic corrosion rather than galling is the concern with dissimilar metals in contact. I recommend Tef-Gel as an anti-seize agent. It was specifically designed to keep salt brine from corroding metal fasteners. I would not recommend aluminum bolts as they lack strength and are easily sheared
Also not the position of the welds attaching the dropouts to the frame tubes. You will either need to position your new holes so that the rack will clear them, which might put you into a rather narrow area of the dropouts, or put washers between the rack and the dropouts as spacers. You could also just reef down on the bolts abd let the rack ears bend over the welds but that would not be my preference.
BTW, what is the problem with the p-clamps, which appear to have given satisfactory service? I tend to just leave things which are working alone.
Also not the position of the welds attaching the dropouts to the frame tubes. You will either need to position your new holes so that the rack will clear them, which might put you into a rather narrow area of the dropouts, or put washers between the rack and the dropouts as spacers. You could also just reef down on the bolts abd let the rack ears bend over the welds but that would not be my preference.
BTW, what is the problem with the p-clamps, which appear to have given satisfactory service? I tend to just leave things which are working alone.
I was concerned about where exactly to place the holes. Like you say, the welds could get in the way if they were in the wrong place. Using the craigslist photo as a guide gives me a better starting point.
01-26-14, 10:15 AM
#11
Senior Member
Thread Starter
 I think I'll wait for the weather warm up just a bit before I try this. Like maybe 100F - supposed to be -22F tomorrow morning.
Thanks everybody for all the tips.
01-26-14, 10:16 AM
#12
Disco Infiltrator

Join Date: May 2013
Location: Folsom CA
Posts: 13,446
Bikes: Stormchaser, Paramount, Tilt, Samba tandem
Mentioned: 72 Post(s)
Tagged: 0 Thread(s)
Quoted: 3126 Post(s)
Liked 2,105 Times
in
1,369 Posts
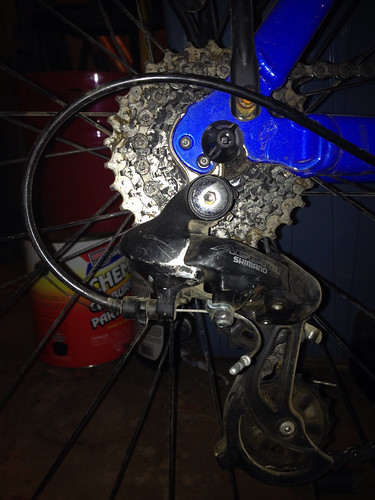
Just for reference... My 02 Hardrock has holes in essentially the same place as the above photo, in front of and above the skewer. The rack interfered with the seat stay. I had to stretch out the rack to big enough, then use some longer bolts and add some washers under it to make it work. I'll post some photos later when my phone is charged...
Last edited by Darth Lefty; 01-26-14 at 10:19 AM.
01-26-14, 10:29 AM
#13
Old fart

Join Date: Nov 2004
Location: Appleton WI
Posts: 24,786
Bikes: Several, mostly not name brands.
Mentioned: 153 Post(s)
Tagged: 0 Thread(s)
Quoted: 3588 Post(s)
Liked 3,400 Times
in
1,934 Posts
Or using P-clamps on the seat stays.
But if the OP does insist on drilling the dropouts, make sure that the rack will actually fit where you intend to drill the holes, without interference from the hub axle or stays. And make sure you leave enough metal between the hole and the edge of the dropout to prevent failure. With aluminum, I'd go for locating the hole at least as far from the edge of the dropout as the diameter of the hole itself; that is, for a 5mm hole, the edge of the hole should be 5mm from the edge of the dropout, the center of the hole therefore 7.5mm from the edge.
But if the OP does insist on drilling the dropouts, make sure that the rack will actually fit where you intend to drill the holes, without interference from the hub axle or stays. And make sure you leave enough metal between the hole and the edge of the dropout to prevent failure. With aluminum, I'd go for locating the hole at least as far from the edge of the dropout as the diameter of the hole itself; that is, for a 5mm hole, the edge of the hole should be 5mm from the edge of the dropout, the center of the hole therefore 7.5mm from the edge.
01-26-14, 10:57 AM
#14
Senior Member
Thread Starter
Or using P-clamps on the seat stays.
But if the OP does insist on drilling the dropouts, make sure that the rack will actually fit where you intend to drill the holes, without interference from the hub axle or stays. And make sure you leave enough metal between the hole and the edge of the dropout to prevent failure. With aluminum, I'd go for locating the hole at least as far from the edge of the dropout as the diameter of the hole itself; that is, for a 5mm hole, the edge of the hole should be 5mm from the edge of the dropout, the center of the hole therefore 7.5mm from the edge.
But if the OP does insist on drilling the dropouts, make sure that the rack will actually fit where you intend to drill the holes, without interference from the hub axle or stays. And make sure you leave enough metal between the hole and the edge of the dropout to prevent failure. With aluminum, I'd go for locating the hole at least as far from the edge of the dropout as the diameter of the hole itself; that is, for a 5mm hole, the edge of the hole should be 5mm from the edge of the dropout, the center of the hole therefore 7.5mm from the edge.
01-26-14, 10:59 AM
#15
Senior Member
Thread Starter
Drill baby drill.
I'd go for it too. You don't have much to lose. If you had access to a drill press that would be great. Otherwise drill carefully and use a lot of lube. I like RapidTap as it is good stuff.
Keep an eye on that hole and the area around it on the DO for a while to make sure it isn't causing the DO to fail. It'd suck to lose the rear end in traffic. I'd also be sure to put a short bolt back into it if I ever took the rack off. It'd be stronger with a bolt filling up the hole than just empty. I daresay that the DO would be as strong with a bolt tightly threaded into it than it was before it was drilled and tapped -just heavier for the addition of the bolt. But an open hole would be slightly weaker. The rounder the hole, the stronger the part with the hole in it.
On a similar note, I have drilled/tapped DO's to accept modified claw-type derailleur hangers on a droupout that didn't have an integrated derailleur hanger. I ground off that little tab at the back of the slot so that the claw hanger slot sat flush with the slot of the DO and the axle could come fully back to the rear of both dropouts. That's the issue with the claw-type derailleur hanger, you lose that rear 3/8" of the dropout. After grinding off that tab I then clamp the claw tightly against the DO with a vise-grips and use a couple of bolts to keep it aligned perfectly to the DO. Drill and tap the dropout for the bolt at the rear of the claw and Viola! A replaceable integrated derailleur hanger for a dropout that didn't have one before. I wouldn't do this on an aluminum frame but on a steel bike with stamped dropouts (where you usually find the lack of a derailleur hanger) this works just fine.
I'd go for it too. You don't have much to lose. If you had access to a drill press that would be great. Otherwise drill carefully and use a lot of lube. I like RapidTap as it is good stuff.
Keep an eye on that hole and the area around it on the DO for a while to make sure it isn't causing the DO to fail. It'd suck to lose the rear end in traffic. I'd also be sure to put a short bolt back into it if I ever took the rack off. It'd be stronger with a bolt filling up the hole than just empty. I daresay that the DO would be as strong with a bolt tightly threaded into it than it was before it was drilled and tapped -just heavier for the addition of the bolt. But an open hole would be slightly weaker. The rounder the hole, the stronger the part with the hole in it.
On a similar note, I have drilled/tapped DO's to accept modified claw-type derailleur hangers on a droupout that didn't have an integrated derailleur hanger. I ground off that little tab at the back of the slot so that the claw hanger slot sat flush with the slot of the DO and the axle could come fully back to the rear of both dropouts. That's the issue with the claw-type derailleur hanger, you lose that rear 3/8" of the dropout. After grinding off that tab I then clamp the claw tightly against the DO with a vise-grips and use a couple of bolts to keep it aligned perfectly to the DO. Drill and tap the dropout for the bolt at the rear of the claw and Viola! A replaceable integrated derailleur hanger for a dropout that didn't have one before. I wouldn't do this on an aluminum frame but on a steel bike with stamped dropouts (where you usually find the lack of a derailleur hanger) this works just fine.
01-26-14, 01:25 PM
#16
Senior Member
Join Date: Jan 2012
Location: Spokane, WA
Posts: 2,243
Bikes: Specialized Sequoia Elite/Motobecane Fantom Cross Team Ti/'85 Trek 520
Mentioned: 0 Post(s)
Tagged: 0 Thread(s)
Quoted: 6 Post(s)
Likes: 0
Liked 3 Times
in
3 Posts
I usually use a drill bit a size or two smaller than the given drill size for a particular tap when drilling alloy metals for tapping especially if I'm not using a drill press with a solid vise to hold the material in place because bit will wobble a tiny bit and make the hole a little larger.
When tapping a steel hole, you want the proper sized hole but when tapping an aluminum hole, the hole can be smaller than the hole for steel and provided you use cutting fluid, the tap will still run through the smaller hole like butter. And it will leave a bit more material behind so the screws/bolts will lock in place better.
When tapping a steel hole, you want the proper sized hole but when tapping an aluminum hole, the hole can be smaller than the hole for steel and provided you use cutting fluid, the tap will still run through the smaller hole like butter. And it will leave a bit more material behind so the screws/bolts will lock in place better.
01-26-14, 02:25 PM
#17
Senior Member
Join Date: Aug 2005
Location: Pittsburgh, PA
Posts: 33,656
Bikes: '96 Litespeed Catalyst, '05 Litespeed Firenze, '06 Litespeed Tuscany, '20 Surly Midnight Special, All are 3x10. It is hilly around here!
Mentioned: 39 Post(s)
Tagged: 0 Thread(s)
Quoted: 2026 Post(s)
Likes: 0
Liked 1,096 Times
in
742 Posts
01-26-14, 08:03 PM
#18
Disco Infiltrator
Join Date: May 2013
Location: Folsom CA
Posts: 13,446
Bikes: Stormchaser, Paramount, Tilt, Samba tandem
Mentioned: 72 Post(s)
Tagged: 0 Thread(s)
Quoted: 3126 Post(s)
Liked 2,105 Times
in
1,369 Posts
As promised. Hole in the same place and washers to space it out from the seat stay.
01-26-14, 08:50 PM
#20
SE Wis
Join Date: Apr 2005
Location: Milwaukee, WI
Posts: 10,515
Bikes: '68 Raleigh Sprite, '02 Raleigh C500, '84 Raleigh Gran Prix, '91 Trek 400, 2013 Novara Randonee, 1990 Trek 970
Mentioned: 40 Post(s)
Tagged: 0 Thread(s)
Quoted: 2747 Post(s)
Liked 3,395 Times
in
2,056 Posts
I did this on a Trek tag along so we could mount a rack. Not a big deal.
01-26-14, 10:13 PM
#21
Senior Member
Thread Starter
01-26-14, 10:17 PM
#22
Senior Member
Thread Starter
 01-27-14, 10:58 AM
#23
Senior Member
Join Date: Jan 2012
Location: Spokane, WA
Posts: 2,243
Bikes: Specialized Sequoia Elite/Motobecane Fantom Cross Team Ti/'85 Trek 520
Mentioned: 0 Post(s)
Tagged: 0 Thread(s)
Quoted: 6 Post(s)
Likes: 0
Liked 3 Times
in
3 Posts
I assume you are referring to "number" drill bits where adjacent diameters are very close together, not fractional size where the differences are 1/64". For an M5x.8 thread the tap drill is a #19 which is 0.1660". The next size smaller is #20 which is 0.1610". There are no fractional drill bits close enough as 10/64 (5/32") = 0.1563 and 11/64"= 0.1719"
02-15-14, 11:09 PM
#24
Newbie
Join Date: Feb 2014
Posts: 3
Mentioned: 0 Post(s)
Tagged: 0 Thread(s)
Quoted: 0 Post(s)
Likes: 0
Liked 0 Times
in
0 Posts
Considering this myself. I think someone at Specialized is just playing games with us and sending out random bikes with no DO eyelets. I have four specialized bikes, older hard rock, newer hard rock 29er, an allez triple sport, and a tricross triple. Now they all have eyelets everywhere except the tricross lacks the DO eyelets, but has them on the seat stay and forks. WTH, isnt this supposed to be the do all bike??? AT least its the one I really want to mount a rack to for commuting. Really wanting to do the mod as I have all the tools and have cut many threads, but its just a scary place to play with tools like that
02-16-14, 10:24 AM
#25
Banned
Anyhow drill should be no larger than the minimum width of the valley bottoms of the screw..
then you buy a 5 x .8 tpMM tap to cut the threads and a tin of oil to put on the tap so the cut goes cleanly.
the machine shop trade has a Cutting Oil , but you may not use up a dropper vial in your lifetime ..
1/2 turns cutting, 3/4turns backing out, and then repeat, continue the cut, clear chips of metal, removed , cut
process slowly, so the thread cut is clean.
NB Specialized does not make their bikes , they contract that out..
they design and market them.
distribution warehouse and warrantee services .