


Now Sure How This One Piece Handlebar & Stem Are Removed
 10-21-14, 05:39 PM
#1
Member
Thread Starter
Join Date: Sep 2014
Location: Detroit, Michigan USA
Posts: 49
Bikes: The Keepers- My Daily Rider is a 1973 CCM Concorde 10 Speed. I also like my Schwinn Typhoon with Monkey Bars & my wife's very nice Schwinn Sierra with a really cool Bouncy Seat! Nothing fancy, but those 3 are special to me! Latest Project- 1962 Pixie
Mentioned: 0 Post(s)
Tagged: 0 Thread(s)
Quoted: 3 Post(s)
Liked 0 Times
in
0 Posts
Now Sure How This One Piece Handlebar & Stem Are Removed
Hi All,
Hope you had a great ride today!
(Sorry- I messed up the title. It should say "Not Sure How..." I could not figure out how to edit the title.)
My "Project-O-The-Month" a 1968 Schwinn Pixie. (Knowing me, it will probably be a project of many months)
The steering & fork are quite loose and wobbly, so I'd like to remove the fork and related components for inspection and repair.
The handle bar plus its quill and stem are all one piece of tubing.
But, I'm a bit confused. I thought I had better ask you all before I wreck something.
I don't see the usual jamb and cone nuts to loosen & remove the stem and fork.
In the attached photos, you can see a chrome escutcheon that I think is covering the jamb and cone nuts. It is at the top of the headtube where the handlebar stem enters the tube.
In that escutcheon is what looks like a pin. However, there is no hole on the opposite side to drive the 'pin' through.
My second guess was that the escutcheon is threaded onto a hidden fastener.
I did not try to un-thread the escutcheon with a leather strap wrench. (Deciding instead to ask the experts first...)
So, my final guess is that the 'pin' is in reality a rusted-in-place threaded bolt or screw holding the escutcheon on and that someone snapped it off in days gone by.
Please tell me I'm wrong! (Screw extractors & I don't often play well together when the fastener is this small.)
Assuming it is a screw and I remove it and lift the cap up, will I find the jamb nut and cone nut below and be able to remove the fork & handlebars?
Thanks For Your Advice! It's much appreciated.
Paul
Last edited by PJB1; 10-21-14 at 05:48 PM. Reason: Typographical Error In Title Now should say Not
 10-21-14, 05:49 PM
#2

Senior Member
Join Date: Apr 2009
Location: New Rochelle, NY
Posts: 38,815
Bikes: too many bikes from 1967 10s (5x2)Frejus to a Sumitomo Ti/Chorus aluminum 10s (10x2), plus one non-susp mtn bike I use as my commuter
Mentioned: 140 Post(s)
Tagged: 1 Thread(s)
Quoted: 5839 Post(s)
Liked 2,673 Times
in
1,488 Posts
Those stems are held to the fork by the nut in the collar. It works the same way as typical shaft collars. Loosen the "mystery" screw and the collar and bar will both be free.
Note - the screw passes through a hole in the steerer to set against the stem. Loosening it frees the stem, loosening it more or removing it lets the fork drop out.
Note - the screw passes through a hole in the steerer to set against the stem. Loosening it frees the stem, loosening it more or removing it lets the fork drop out.
__________________
FB
Chain-L site
An ounce of diagnosis is worth a pound of cure.
Just because I'm tired of arguing, doesn't mean you're right.
�One accurate measurement is worth a thousand expert opinions� - Adm Grace Murray Hopper - USN
WARNING, I'm from New York. Thin skinned people should maintain safe distance.
FB
Chain-L site
An ounce of diagnosis is worth a pound of cure.
Just because I'm tired of arguing, doesn't mean you're right.
�One accurate measurement is worth a thousand expert opinions� - Adm Grace Murray Hopper - USN
WARNING, I'm from New York. Thin skinned people should maintain safe distance.
10-21-14, 06:05 PM
#3
Member
Thread Starter
Join Date: Sep 2014
Location: Detroit, Michigan USA
Posts: 49
Bikes: The Keepers- My Daily Rider is a 1973 CCM Concorde 10 Speed. I also like my Schwinn Typhoon with Monkey Bars & my wife's very nice Schwinn Sierra with a really cool Bouncy Seat! Nothing fancy, but those 3 are special to me! Latest Project- 1962 Pixie
Mentioned: 0 Post(s)
Tagged: 0 Thread(s)
Quoted: 3 Post(s)
Liked 0 Times
in
0 Posts
Thank You FBinNY!
I appreciate your advice.
I'll let it have a good soak in penetrating oil before I start arguing with the easy-out tool.
I suppose if it won't come out, it'll get rigged into the drill press and I can drill then tap oversize, or maybe braze the holes closed and begin fresh.
Thanks Again!
Paul
I appreciate your advice.
I'll let it have a good soak in penetrating oil before I start arguing with the easy-out tool.
I suppose if it won't come out, it'll get rigged into the drill press and I can drill then tap oversize, or maybe braze the holes closed and begin fresh.
Thanks Again!
Paul
10-21-14, 07:22 PM
#4
Senior Member
Join Date: Apr 2009
Location: New Rochelle, NY
Posts: 38,815
Bikes: too many bikes from 1967 10s (5x2)Frejus to a Sumitomo Ti/Chorus aluminum 10s (10x2), plus one non-susp mtn bike I use as my commuter
Mentioned: 140 Post(s)
Tagged: 1 Thread(s)
Quoted: 5839 Post(s)
Liked 2,673 Times
in
1,488 Posts
You might estimate the thread size, most likely 1/4 or 5/16" coarse. Then use the pilot drill size to take out the root. Once you've done that, pry or chisel the collar to shear off the last vestige of the screw and all should come apart. Now you'll be free to try to retap the collar following the old thread down, or drill/tap the next size up.
__________________
FB
Chain-L site
An ounce of diagnosis is worth a pound of cure.
Just because I'm tired of arguing, doesn't mean you're right.
�One accurate measurement is worth a thousand expert opinions� - Adm Grace Murray Hopper - USN
WARNING, I'm from New York. Thin skinned people should maintain safe distance.
FB
Chain-L site
An ounce of diagnosis is worth a pound of cure.
Just because I'm tired of arguing, doesn't mean you're right.
�One accurate measurement is worth a thousand expert opinions� - Adm Grace Murray Hopper - USN
WARNING, I'm from New York. Thin skinned people should maintain safe distance.
10-22-14, 05:12 AM
#5
Member
Thread Starter
Join Date: Sep 2014
Location: Detroit, Michigan USA
Posts: 49
Bikes: The Keepers- My Daily Rider is a 1973 CCM Concorde 10 Speed. I also like my Schwinn Typhoon with Monkey Bars & my wife's very nice Schwinn Sierra with a really cool Bouncy Seat! Nothing fancy, but those 3 are special to me! Latest Project- 1962 Pixie
Mentioned: 0 Post(s)
Tagged: 0 Thread(s)
Quoted: 3 Post(s)
Liked 0 Times
in
0 Posts
Thanks FBinNY!
Your method sounds like a good plan. I'll give it a go & report success. Hopefully this week will provide time.
Paul
Your method sounds like a good plan. I'll give it a go & report success. Hopefully this week will provide time.
Paul
10-22-14, 05:59 AM
#6
Senior Member
That one-piece handlebar/stem is retained by a bolt that goes through the collar and into the stem:

In your case it looks like the head of the bolt has been sheared off. Drilling it out will allow you to remove the handlebar/stem. Here's another pic showing the parts:
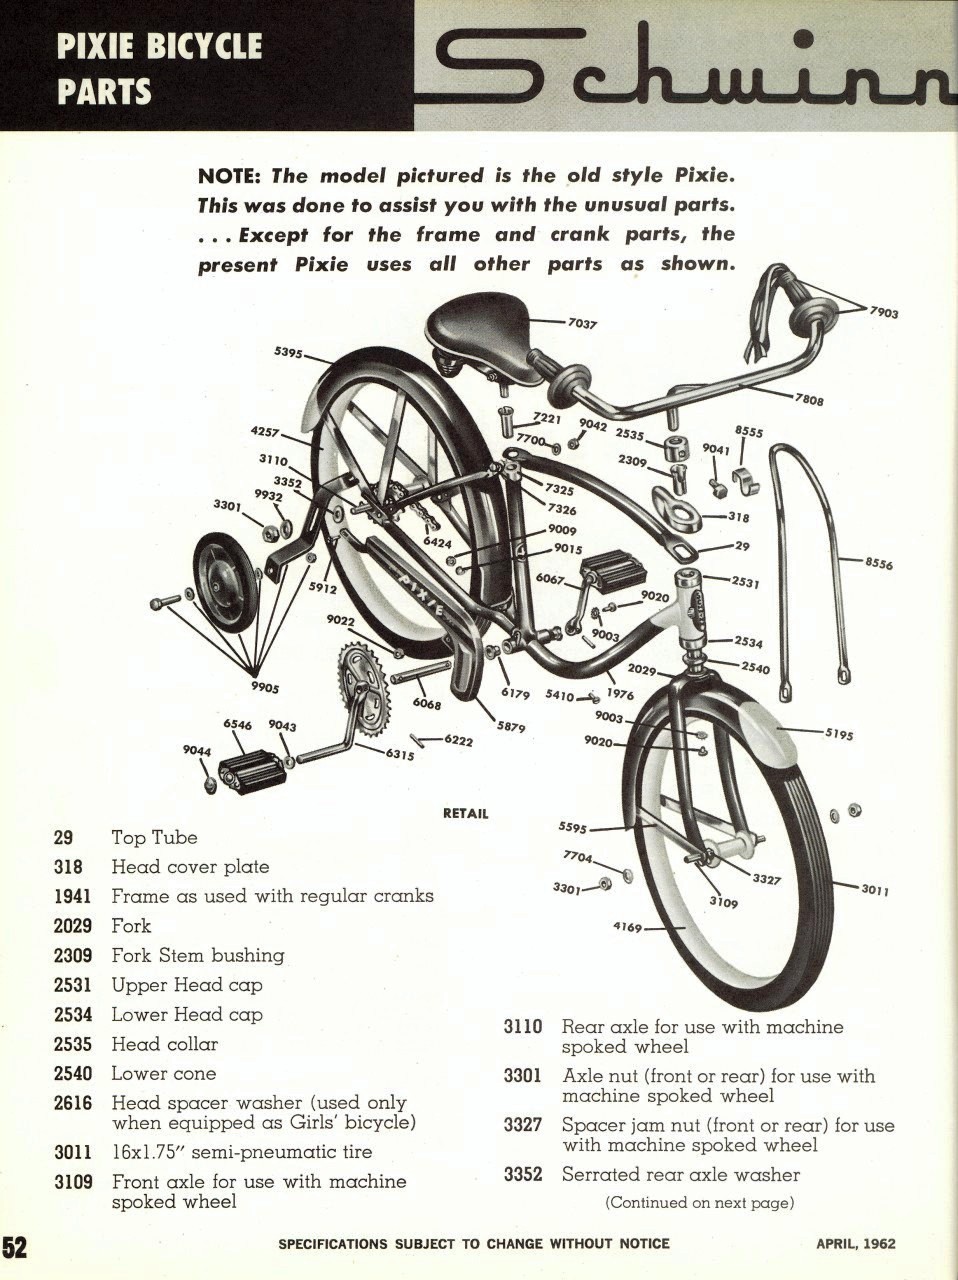
In your case it looks like the head of the bolt has been sheared off. Drilling it out will allow you to remove the handlebar/stem. Here's another pic showing the parts:
Last edited by Metacortex; 10-22-14 at 06:54 AM.
10-22-14, 09:17 AM
#7
Member
Thread Starter
Join Date: Sep 2014
Location: Detroit, Michigan USA
Posts: 49
Bikes: The Keepers- My Daily Rider is a 1973 CCM Concorde 10 Speed. I also like my Schwinn Typhoon with Monkey Bars & my wife's very nice Schwinn Sierra with a really cool Bouncy Seat! Nothing fancy, but those 3 are special to me! Latest Project- 1962 Pixie
Mentioned: 0 Post(s)
Tagged: 0 Thread(s)
Quoted: 3 Post(s)
Liked 0 Times
in
0 Posts
Thank You Metacortex for posting those pictures.
They will be very helpful not only for the steering & handlebar project, but for the whole bicycle rebuilding adventure. I sure appreciate your contribution to my project!
Paul
They will be very helpful not only for the steering & handlebar project, but for the whole bicycle rebuilding adventure. I sure appreciate your contribution to my project!
Paul
10-29-14, 08:25 AM
#8
Member
Thread Starter
Join Date: Sep 2014
Location: Detroit, Michigan USA
Posts: 49
Bikes: The Keepers- My Daily Rider is a 1973 CCM Concorde 10 Speed. I also like my Schwinn Typhoon with Monkey Bars & my wife's very nice Schwinn Sierra with a really cool Bouncy Seat! Nothing fancy, but those 3 are special to me! Latest Project- 1962 Pixie
Mentioned: 0 Post(s)
Tagged: 0 Thread(s)
Quoted: 3 Post(s)
Liked 0 Times
in
0 Posts
Success!
Thanks to the help you all supplied, I was able to get the headset disassembled.
It turned out that the snapped off bolt was hardened. (I guess this explains the clean break without the usual spiral at the twist-off point.)
I was able to use my flex shaft grinder with a very small diameter diamond tool to slowly & carefully grind out what was left of the existing fastener, then pick out the threads. (It was 5/16-18) But, a new bolt was very loose in the existing threads.
I could not move up to the next size (3/8-16) because the bolt would be too large to fit the slot in the steerer tube. Turning down the end of the bolt to 5/16" diameter seemed like it would not allow the user to have enough threads engaged while the stem is loose for adjustment.
Since the bushing is fixed in the cap, it could not be rotated to a new spot, so I filled the hole with bronze alloy brazing rod, drilled & tapped for a new 5/16-18 bolt. If the off-color alloy is not covered by the bolt head, I can get the cap re-chromed, but that decision will wait until the bike is at the cosmetics stage of the project.
The Fork Stem Bushing was seized in the steerer tube. I think the proper term is "Steerer Tube". It is the long tube that is welded to the fork crown & slides into the headtube. An overnight vinegar soak solved that problem.
It needed some re-rounding which was accomplished by sliding a .625" drill rod inside & peening the bushing into shape. (Kinda-Sorta into shape, but it works well)
Next, I had to work on the tube welded to the top of the fork crown. (Steerer Tube?)
It was was smashed into an oval shape. My only guess is that a user tightened the stem mounting bolt when it was not aligned with the slot in the tube.
I used a 7/8" flare block to re-round it slowly & carefully. (Oil the tube, then Tighten-Loosen-Rotate-Tighten-Loosen-Rotate-Repeat....)
The handlebar stem is quite smashed in a few places from over tightening of the mounting bolt.
Since these spots are hidden, I'll re-round the stem, then drill small anchoring holes in each divot and fill the divots with brazing alloy. If that fails, I can always cut the tube above the damaged section, rotate to a good spot & re-weld if the tube seems strong enough to use. Plan B- Garage sale find of a matching handlebar.
Just in case someone searches for Pixie Headset (or headstock as I erroneously called it) I attached a photo of the components. Hopefully it will be of help to someone someday.
Thanks Again Guys for all of your help!
Paul
10-29-14, 06:50 PM
#9
Senior Member
Join Date: Oct 2009
Location: England, currently dividing my time between university in Guildford and home just outside Reading
Posts: 1,921
Bikes: Too many to list here!
Mentioned: 1 Post(s)
Tagged: 0 Thread(s)
Quoted: 2 Post(s)
Likes: 0
Liked 4 Times
in
2 Posts
Yes, the tube sticking out of the top of the fork crown is the steerer tube.
10-30-14, 10:34 AM
#10
Banned
9401 in post 6, shows the bolt before someone broke the head off the bolt . I'd say, now you have a broken off bolt extraction process to perform .
10-30-14, 10:39 AM
#11
Hogosha Sekai

Join Date: Jun 2011
Location: STS
Posts: 6,669
Bikes: Leader 725, Centurion Turbo, Scwhinn Peloton, Schwinn Premis, GT Tequesta, Bridgestone CB-2,72' Centurion Lemans, 72 Raleigh Competition
Mentioned: 19 Post(s)
Tagged: 0 Thread(s)
Quoted: 70 Post(s)
Likes: 0
Liked 21 Times
in
15 Posts
Silly question.. couldn't he notch the bolt pre the soak and just use a screw driver?
10-31-14, 08:17 AM
#12
Member
Thread Starter
Join Date: Sep 2014
Location: Detroit, Michigan USA
Posts: 49
Bikes: The Keepers- My Daily Rider is a 1973 CCM Concorde 10 Speed. I also like my Schwinn Typhoon with Monkey Bars & my wife's very nice Schwinn Sierra with a really cool Bouncy Seat! Nothing fancy, but those 3 are special to me! Latest Project- 1962 Pixie
Mentioned: 0 Post(s)
Tagged: 0 Thread(s)
Quoted: 3 Post(s)
Liked 0 Times
in
0 Posts
Thanks for confirming the part name Airburst. It's always a good day when I learn new stuff.
I had tried your good idea, RaleighSport, when I could not drill for an extractor. That stud was Super Stuck!
I took a tiny cutoff disk & wore it down on purpose so it would fit in without touching the chrome (the stud was broken just about flush with the chrome cap).
I even managed to snap more of the stud using a wrench driven, hex shank screwdriver while trying to remove the bolt via its new slot. If the bolts holding my truck together would hold on that tightly, I'd be thrilled. (Well, until it came time to remove them...) Just kidding, I use thread locker on everything that shakes & vibrates. No loosening & no rust seizures.
The braze closed-redrill-and-retap plan seems to be holding the new bolt well. I got creative and coated the bronze colored filler with plumber's silver-tin solder. It polished up well and almost matches the chrome. If it looks like I'll go for a total cosmetic rehab on the Pixie, I'll get it re-chromed or wait for one on eBay or garage sale donor bike.
Thanks Again Guys!
Paul

Thread
Thread Starter
Forum
Replies
Last Post
windsorpro
Classic & Vintage
24
09-17-11 06:55 PM
