


What have you been wrenching on lately?
 03-13-23, 08:22 AM
#6001
Full Member
Join Date: Jan 2022
Posts: 476
Mentioned: 6 Post(s)
Tagged: 0 Thread(s)
Quoted: 253 Post(s)
Liked 223 Times
in
118 Posts
tbf, to me it was a daunting task building my own (and so far only) wheelset - lot's of things can go wrong and it's quite the initial investment.
 03-13-23, 09:43 AM
#6002

Senior Member

Join Date: Jul 2007
Location: Manhattan & Woodstock NY
Posts: 2,807
Bikes: 1987 Mercian Pro, 1985 Shogun 500, early '70s Falcon San Remo, 1972 Peugeot PX-10, 1972 Schwinn Paramount P13-9, 1971 Raleigh International, 1971 Peugeot PX-10, 1970 Raleigh Professional Mk1
Mentioned: 114 Post(s)
Tagged: 0 Thread(s)
Quoted: 960 Post(s)
Liked 3,153 Times
in
1,015 Posts
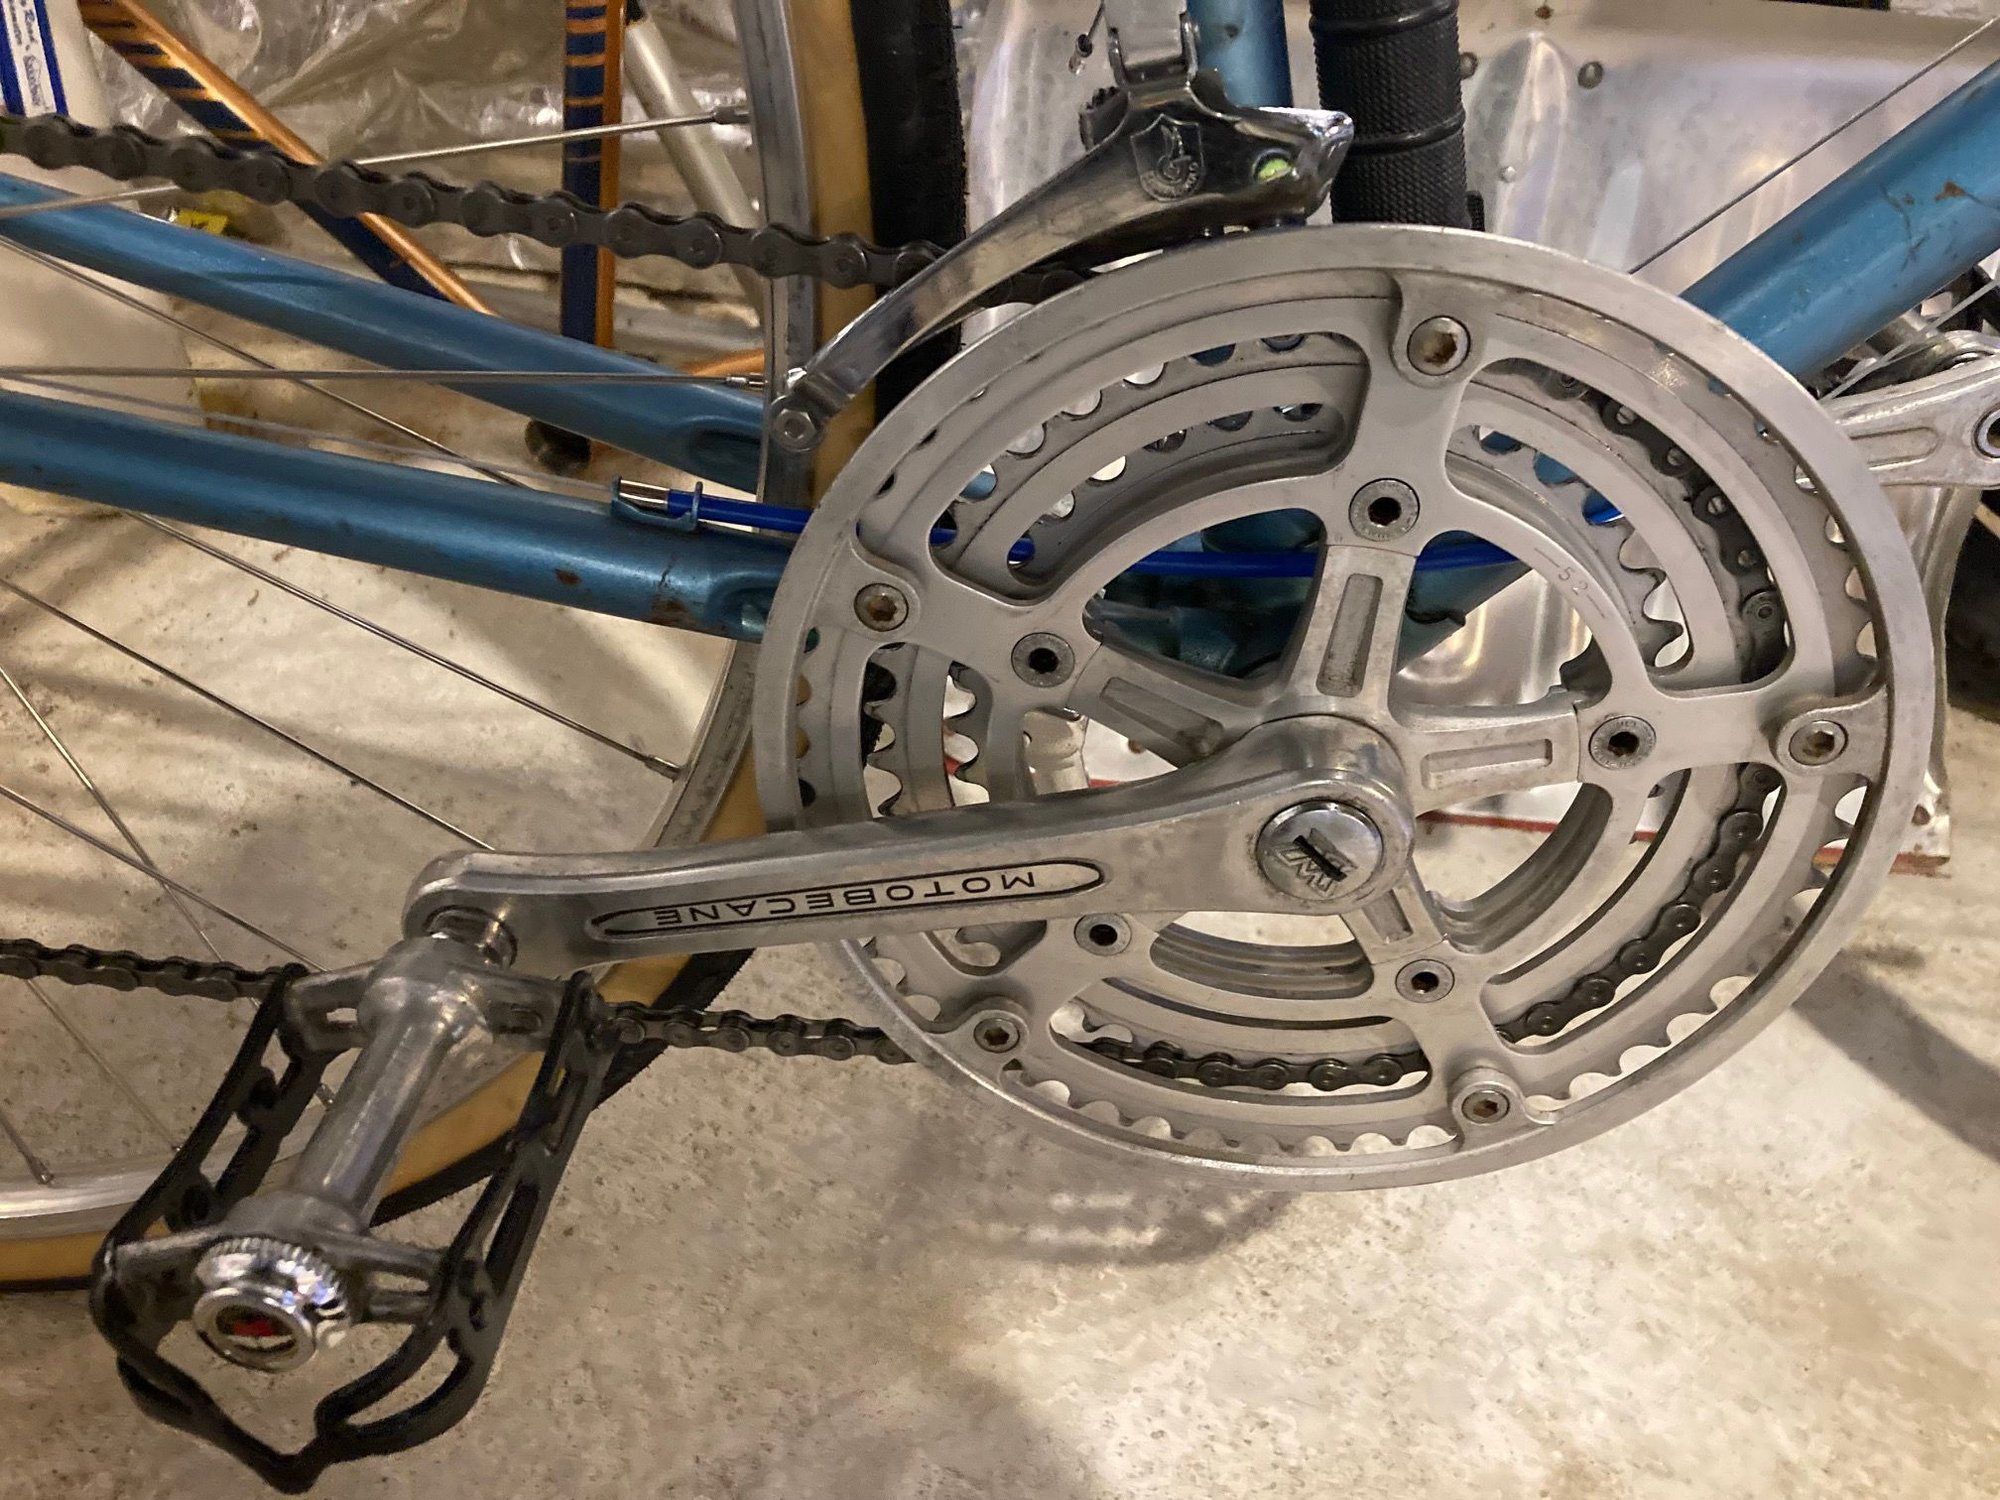
A couple of hours with the PX10 this weekend but no action shots of me laboriously cleaning the triple, sorry. I pulled a 52 off my '71 PX to put on this one, and spent some time with 3000 sandpaper removing oxidation from the arms. Not going crazy because it's a rider. It's now clean and shiny but not mirror. Starting to put it back together, the cranks are back on the frame as is the rear derailleur. I expect to have it largely reassembled next weekend.
__________________
1987 Mercian Pro, 1985 Shogun 500, 197? Falcon San Remo, 1972 Peugeot PX-10, 1972 Schwinn Paramount P13-9, 1971 Peugeot PX-10, 1971 Raleigh International, 1970 Raleigh Professional Mark I
Curator/Team Mechanic: 2016 Dawes Streetfighter, 1984 Lotus Eclair, 1975 Motobecane Jubile Mixte, 1974 Raleigh Sports, 1973 Free Spirit Ted Williams, 1972 Raleigh Super Course, 1971 Philips Sport
03-13-23, 10:27 AM
#6003
Senior Member

Join Date: May 2021
Location: London
Posts: 564
Bikes: Motobecane C41, Matsu$hita Nashonaru
Mentioned: 7 Post(s)
Tagged: 0 Thread(s)
Quoted: 215 Post(s)
Liked 439 Times
in
255 Posts
Well, there is the cost of a stand, or, if you get a rubbish stand, you pay with the whole process taking more time. I'm lucky to have a good supplier for quality spokes and nipples, so a wheelset costs me about �37 ($44) plus the hub and rim. So all depends on how much you want to splash on that. Typically I don't splash much.
03-13-23, 10:52 AM
#6004
Palmer

Join Date: Mar 2007
Location: Parts Unknown
Posts: 8,699
Bikes: Mike Melton custom, Alex Moulton AM, Dahon Curl
Mentioned: 37 Post(s)
Tagged: 0 Thread(s)
Quoted: 1706 Post(s)
Liked 1,900 Times
in
1,099 Posts
Chapeau!
Likes For tcs:
03-13-23, 02:46 PM
#6005
Senior Member
Join Date: May 2021
Location: London
Posts: 564
Bikes: Motobecane C41, Matsu$hita Nashonaru
Mentioned: 7 Post(s)
Tagged: 0 Thread(s)
Quoted: 215 Post(s)
Liked 439 Times
in
255 Posts
Quality tools are much cheaper in the long run.I needed something light and portable and it's fine for the time being, but I know I will have to spend money again or build another stand myself.
Likes For VintageSteelEU:
03-13-23, 04:51 PM
#6006
Senior Member
Join Date: Jul 2018
Posts: 631
Mentioned: 2 Post(s)
Tagged: 0 Thread(s)
Quoted: 172 Post(s)
Likes: 0
Liked 261 Times
in
152 Posts
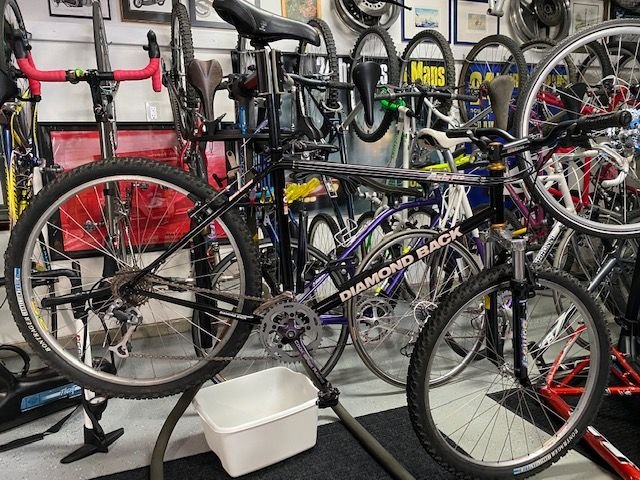
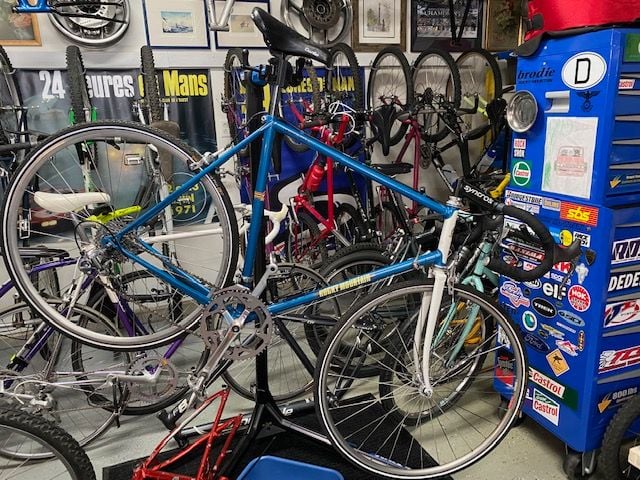
Here are my latest projects, a '92 DB Axis Pro that I picked up as a parts bike but decided to salvage as the frame was so nice, and an '85 Rocky Mountain Giro.
03-14-23, 10:11 AM
#6007
Senior Member
Join Date: Nov 2014
Location: Saratoga calif.
Posts: 1,055
Bikes: Miyata 610(66cm), GT Vantara Hybrid (64cm), Nishiki International (64cm), Peugeot rat rod (62 cm), Trek 800 Burning Man helicopter bike, Bob Jackson frame (to be restored?) plus a never ending stream of neglected waifs from the Bike exchange.
Mentioned: 28 Post(s)
Tagged: 0 Thread(s)
Quoted: 346 Post(s)
Likes: 0
Liked 643 Times
in
234 Posts
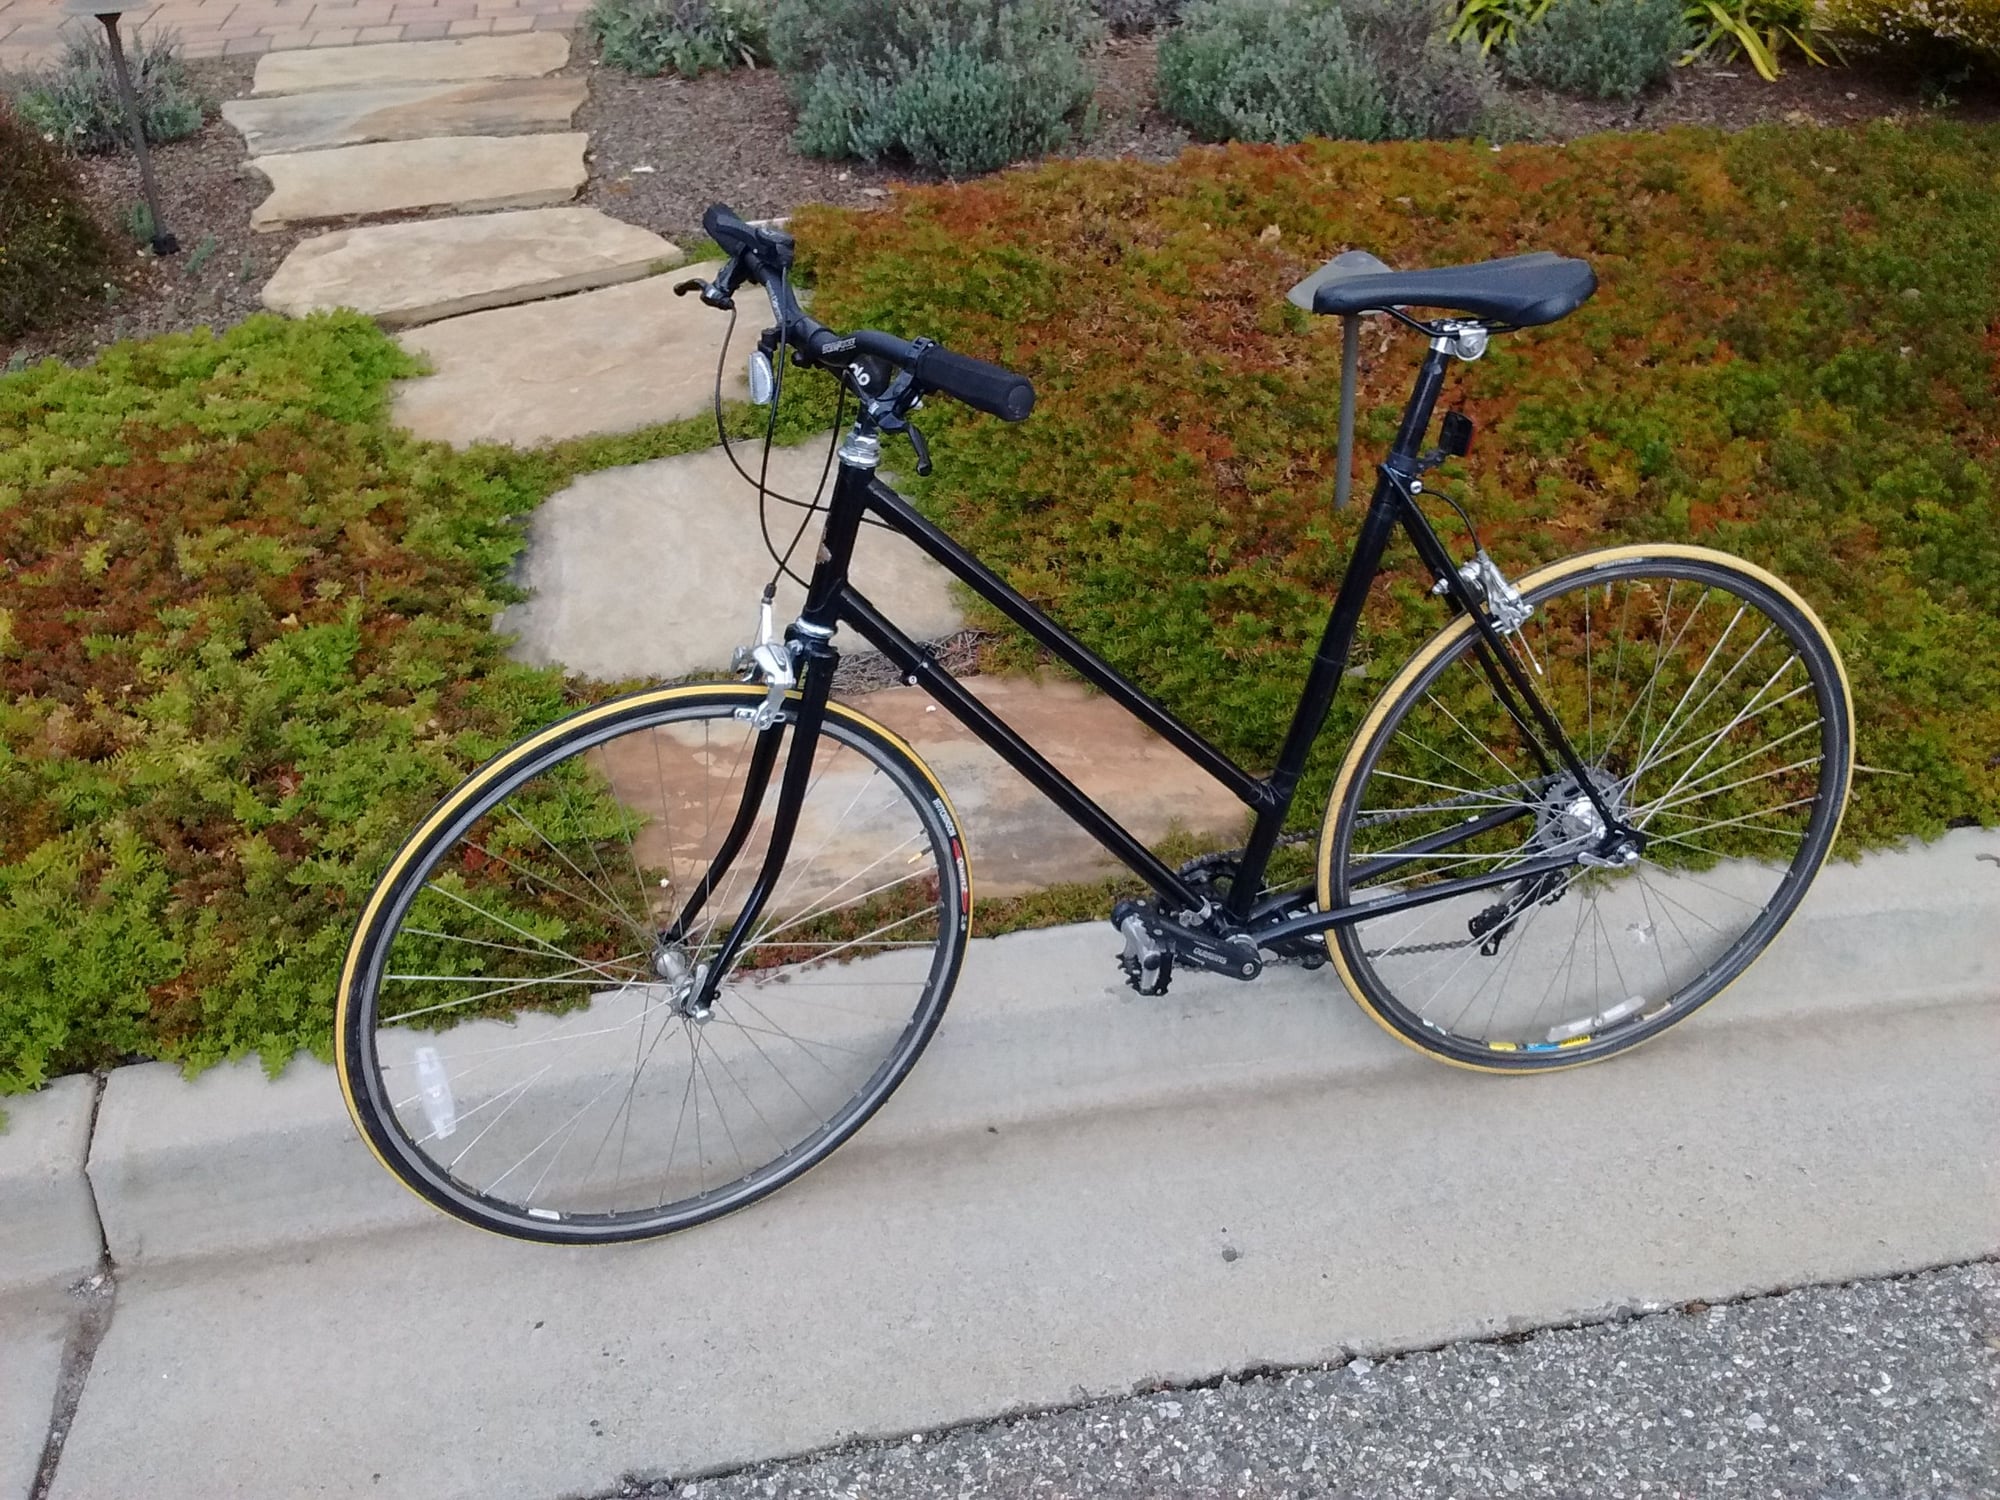
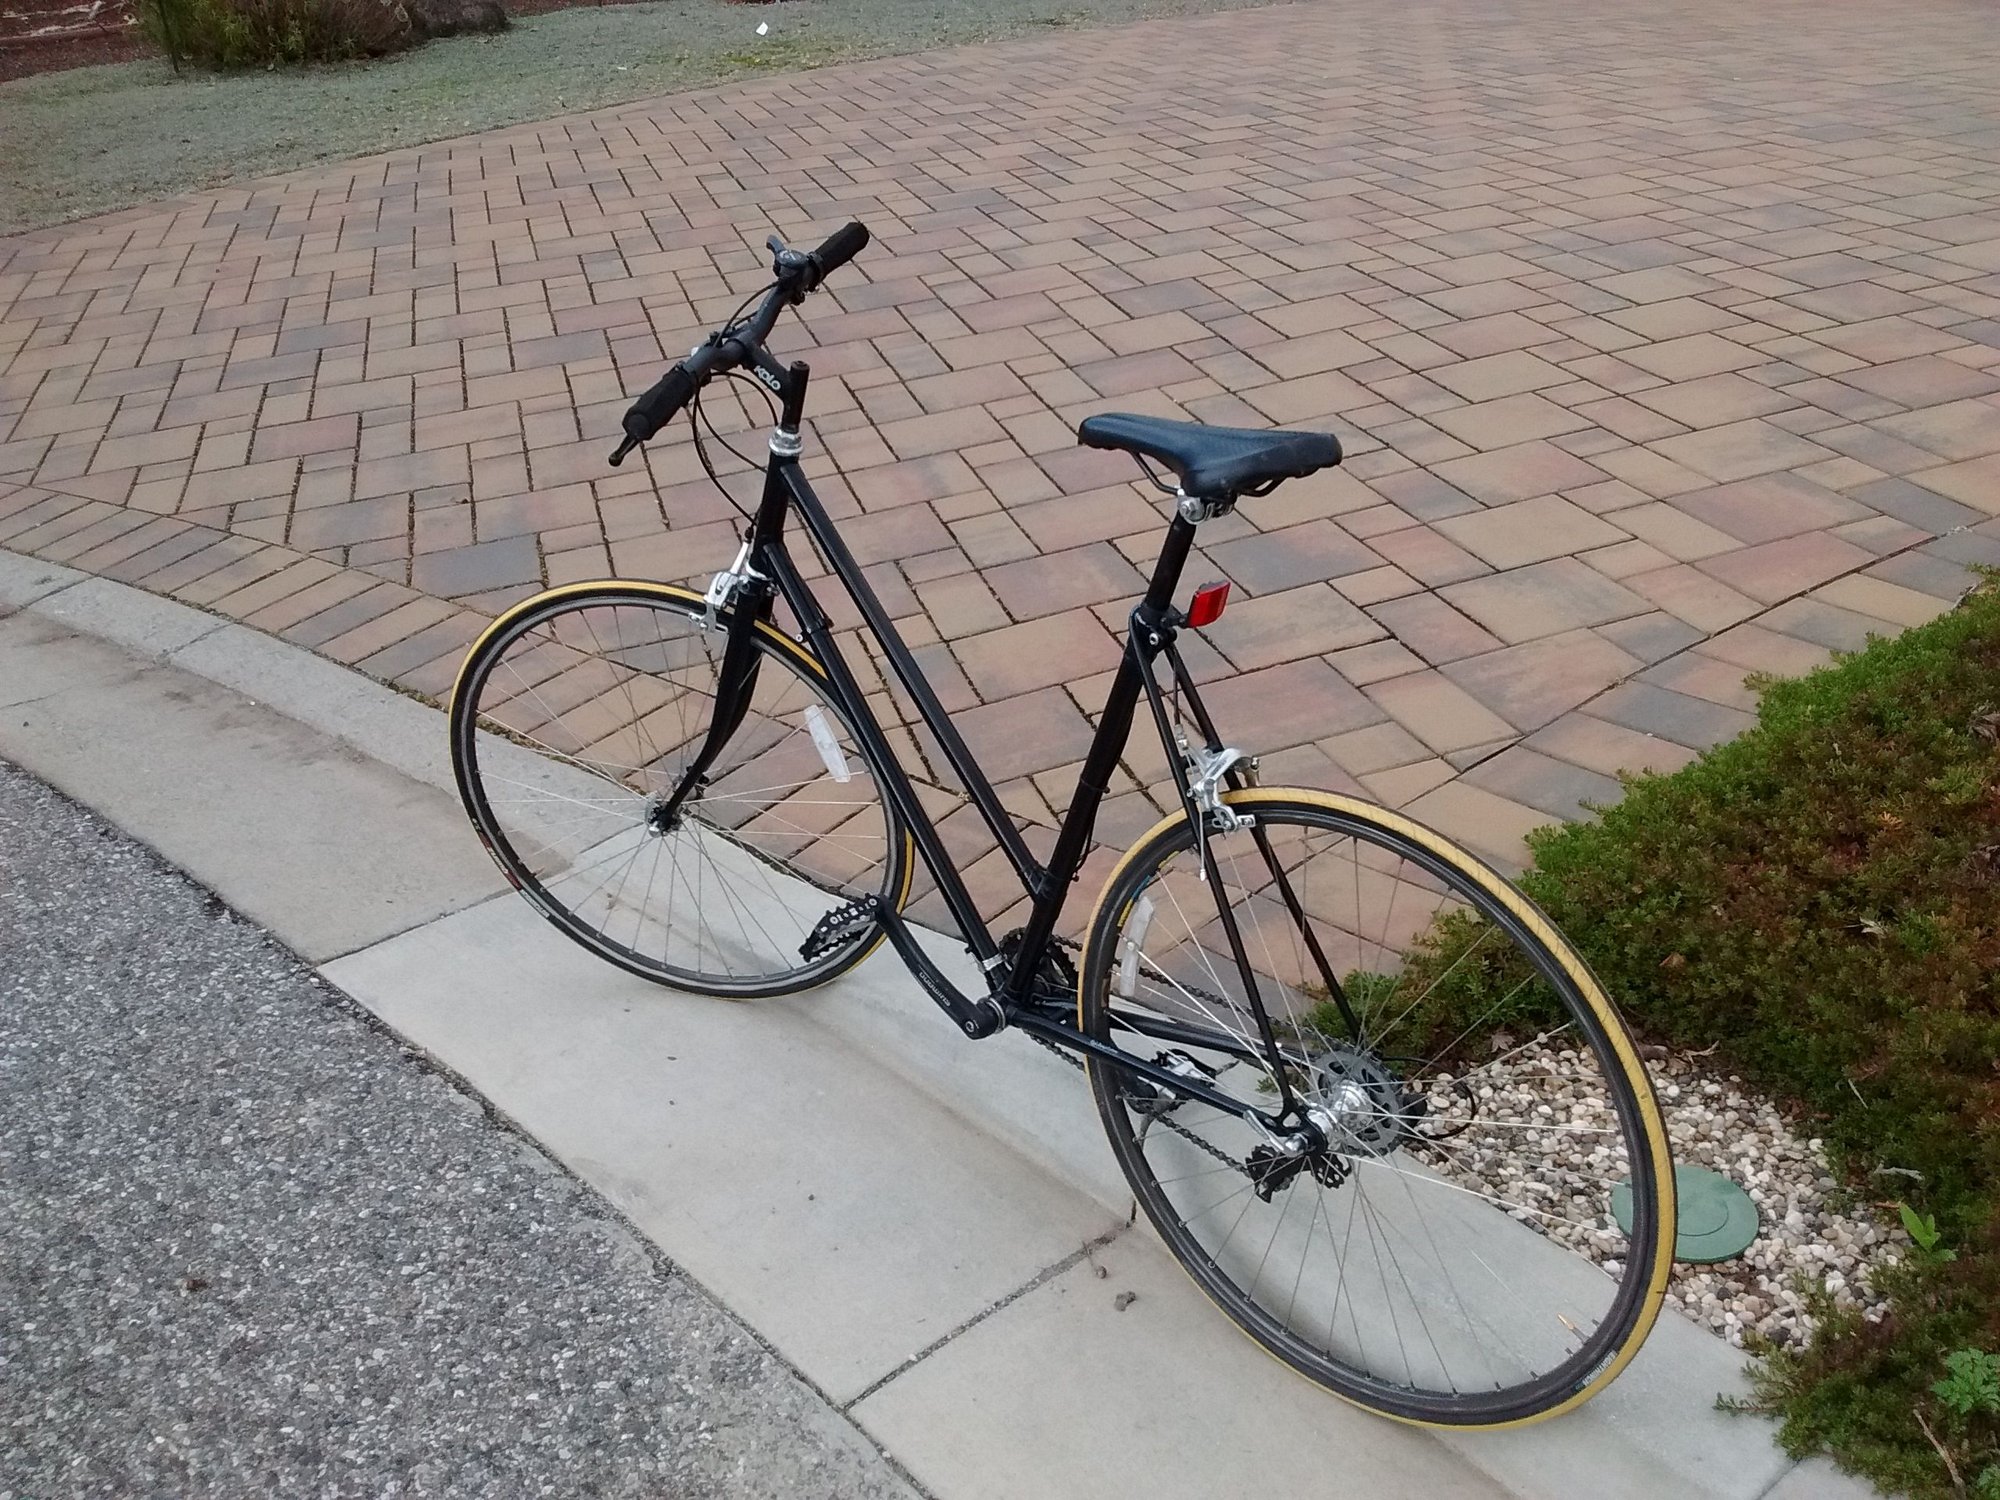
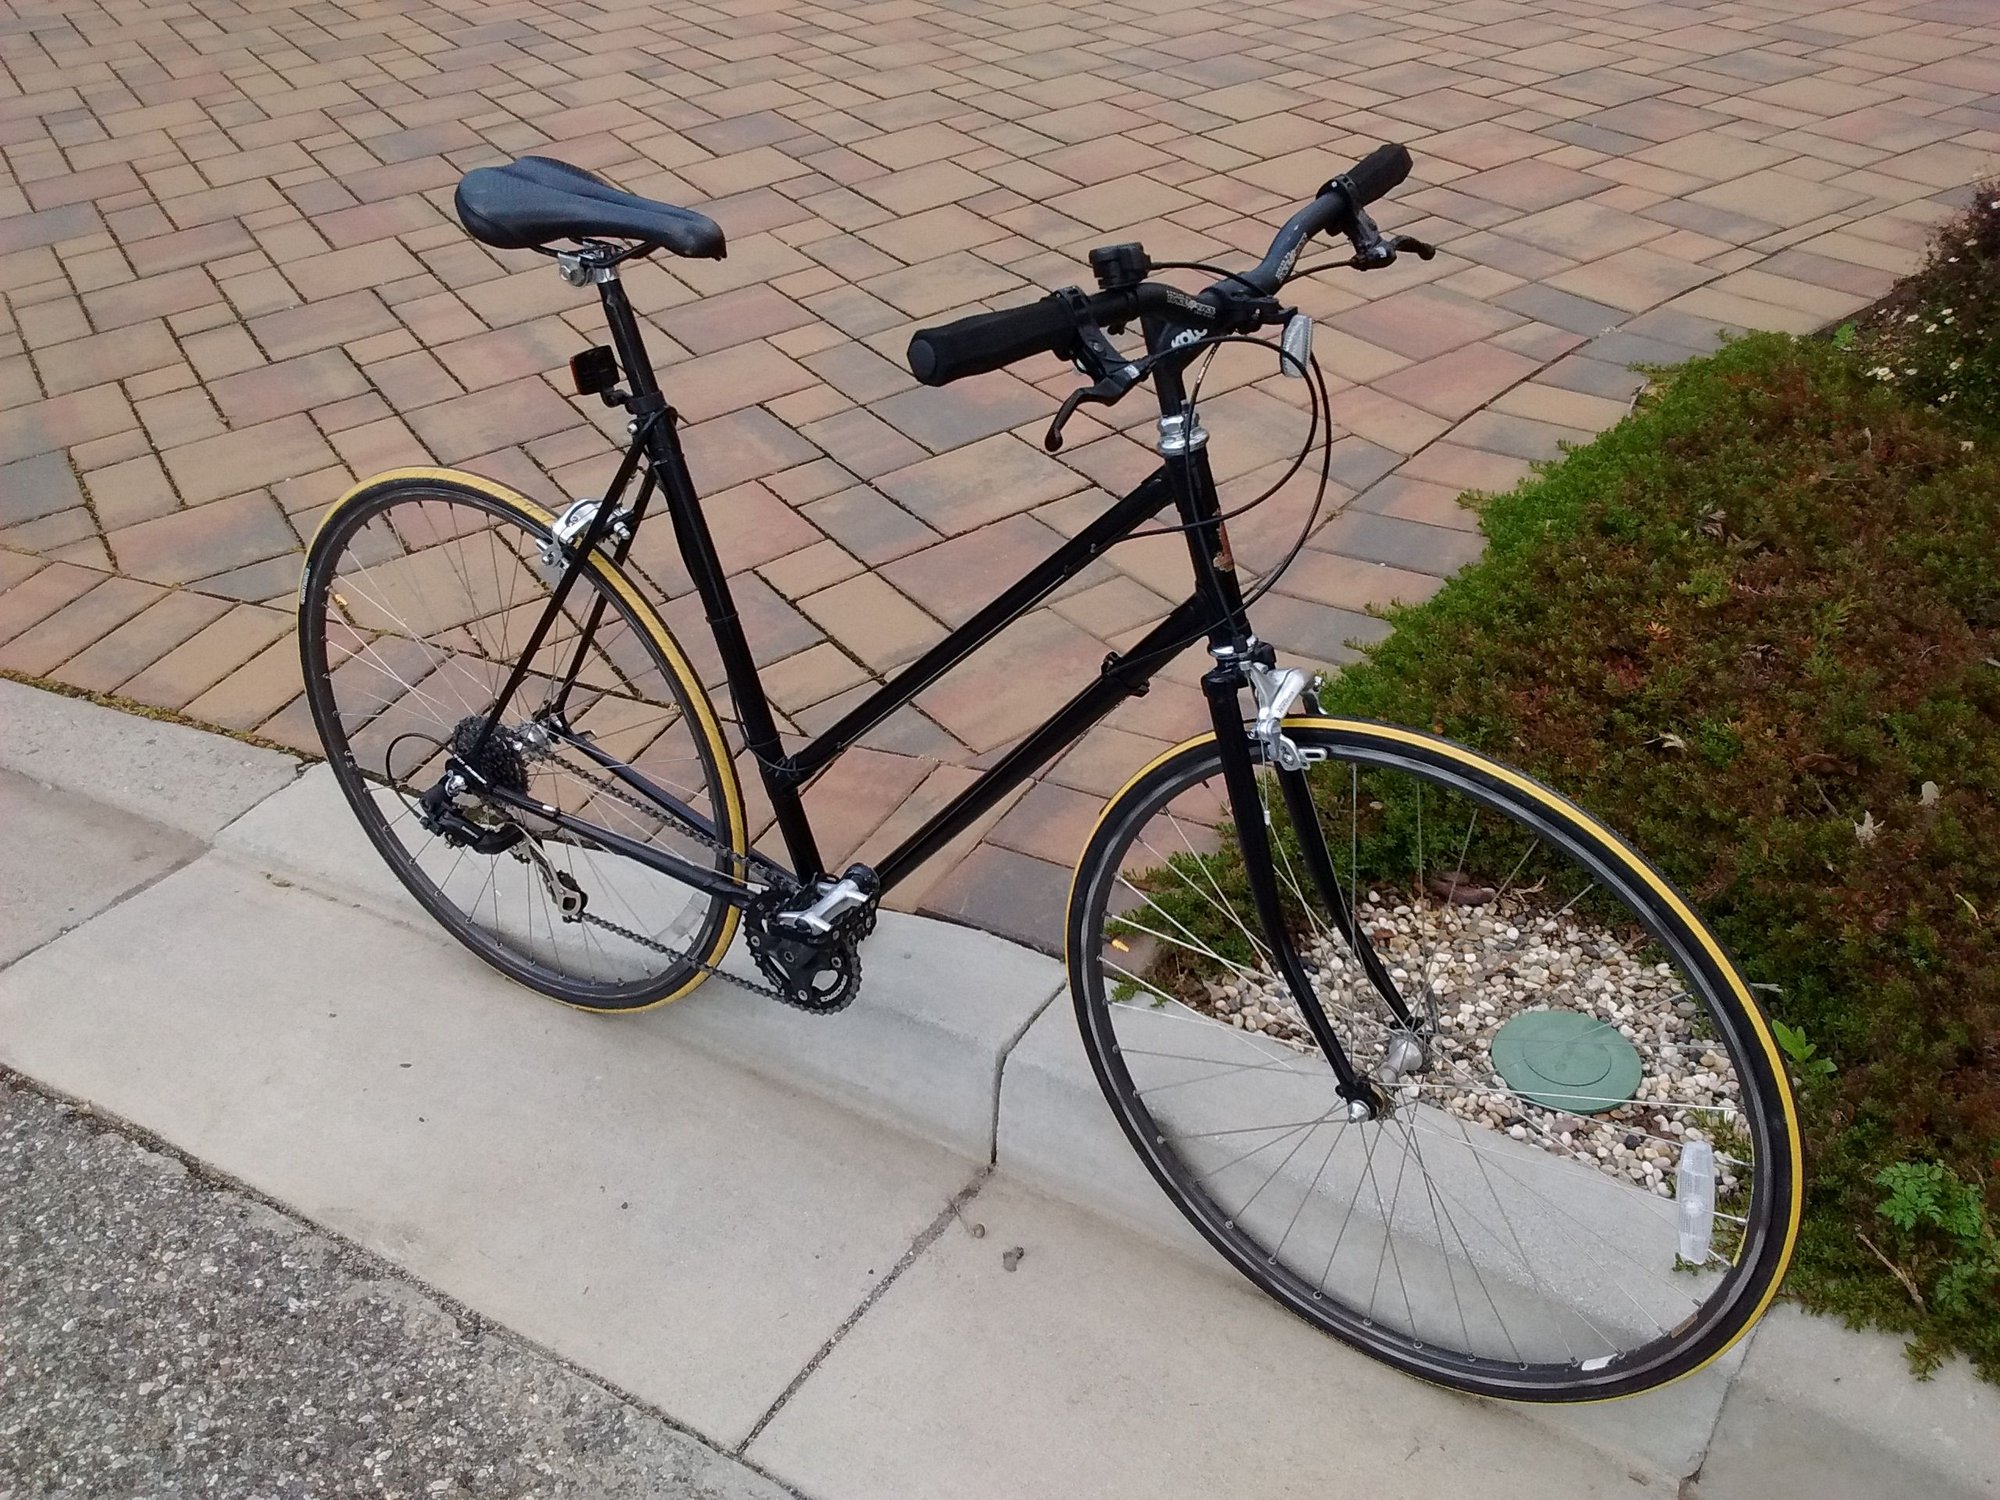
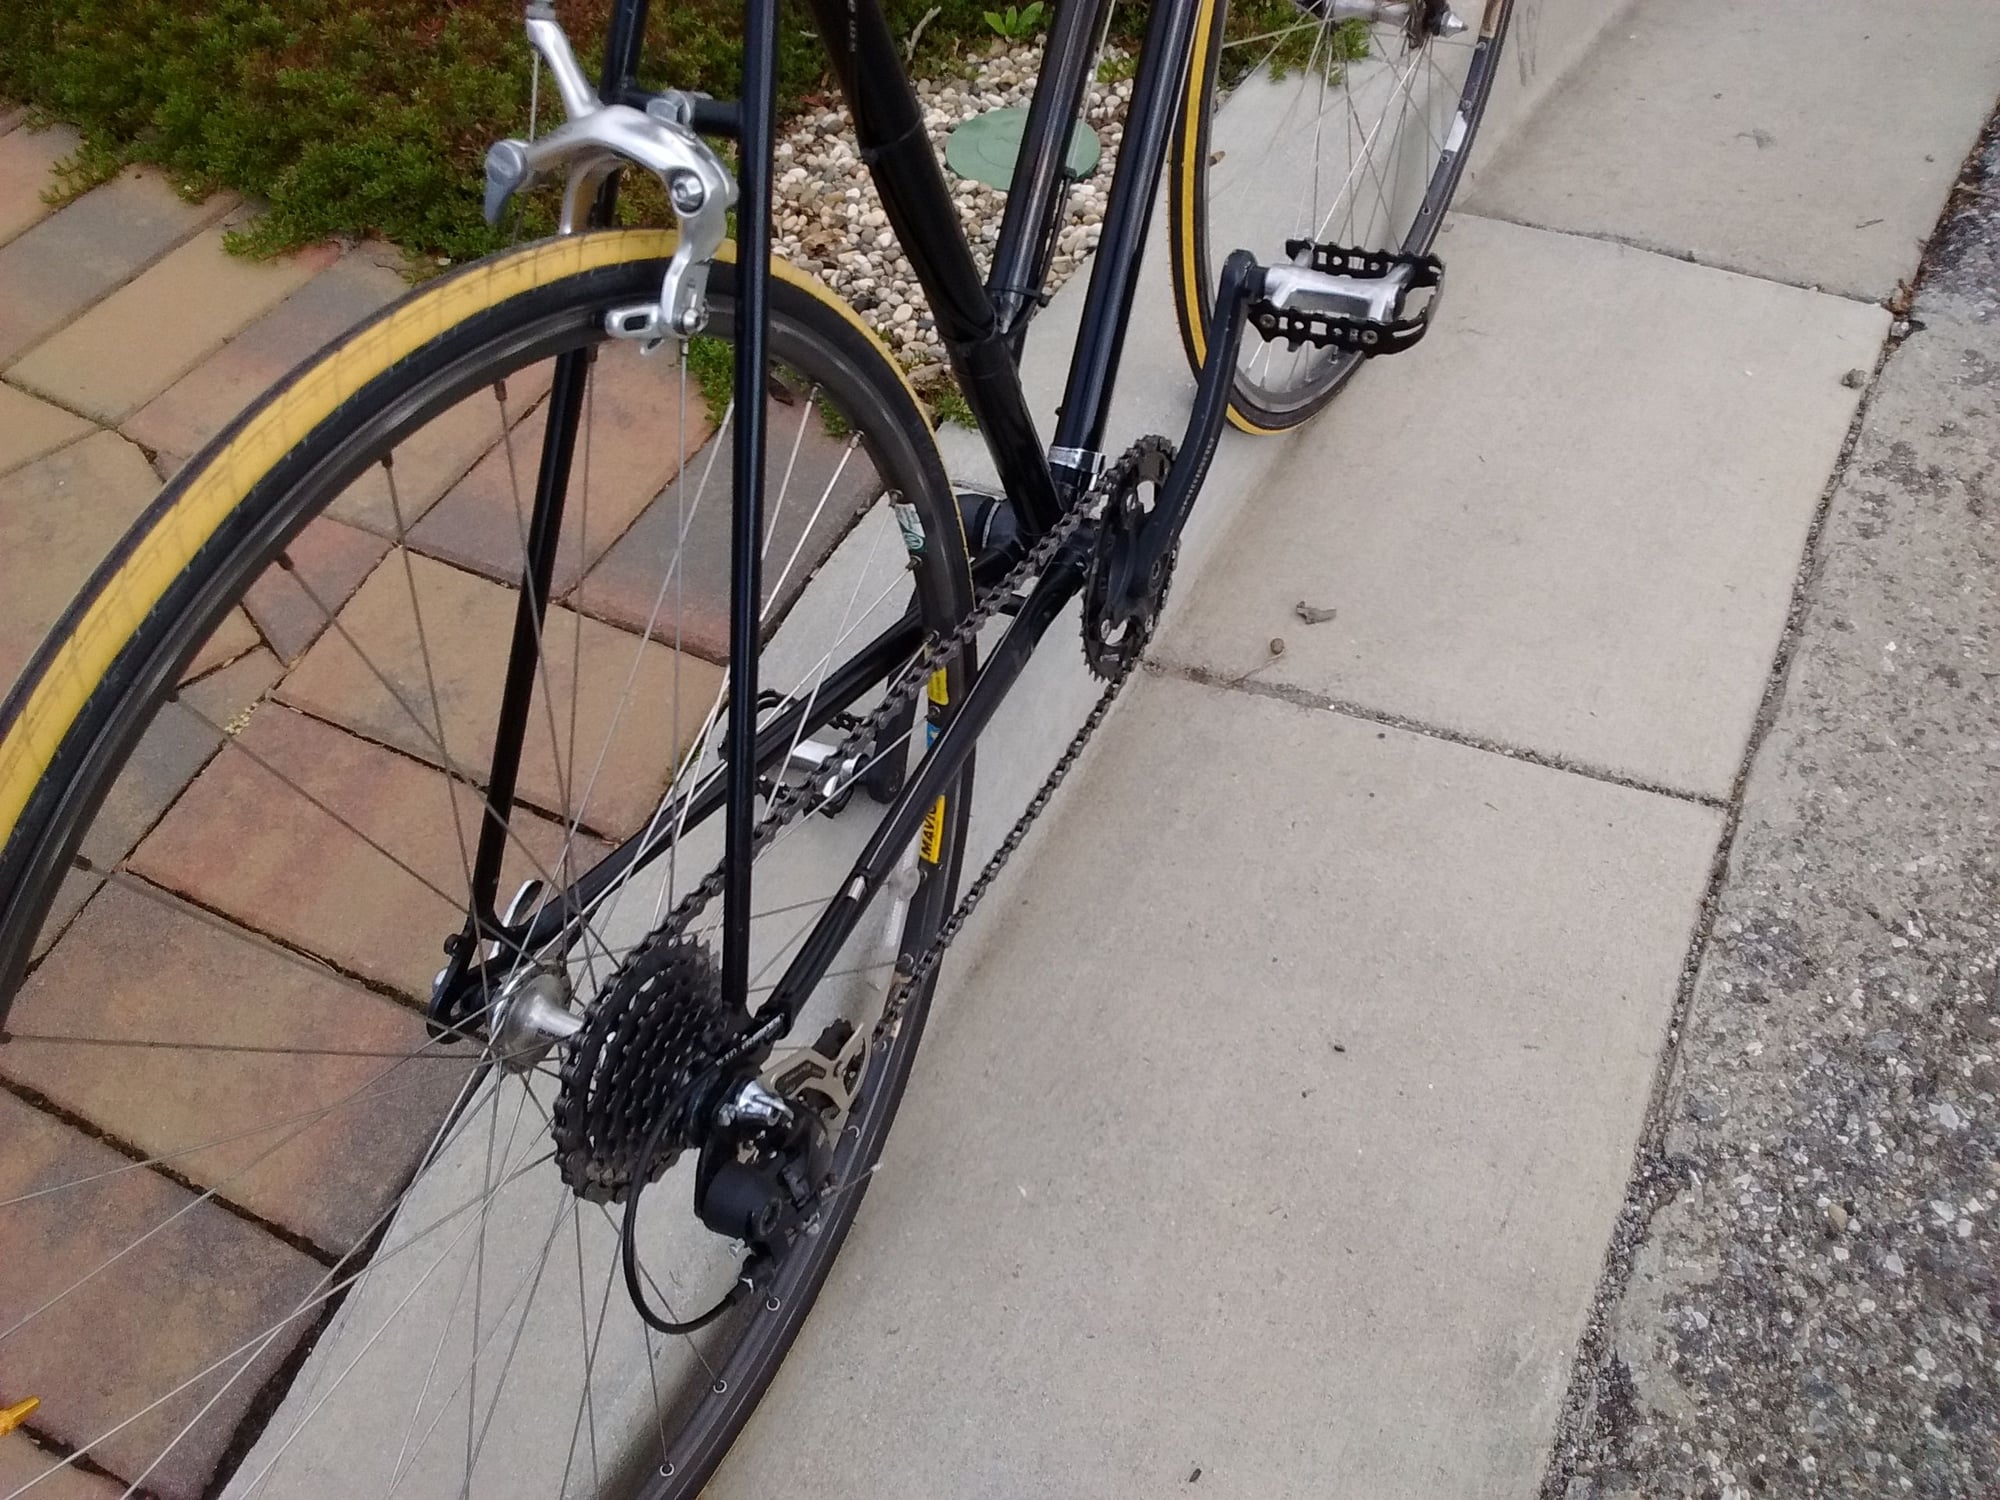
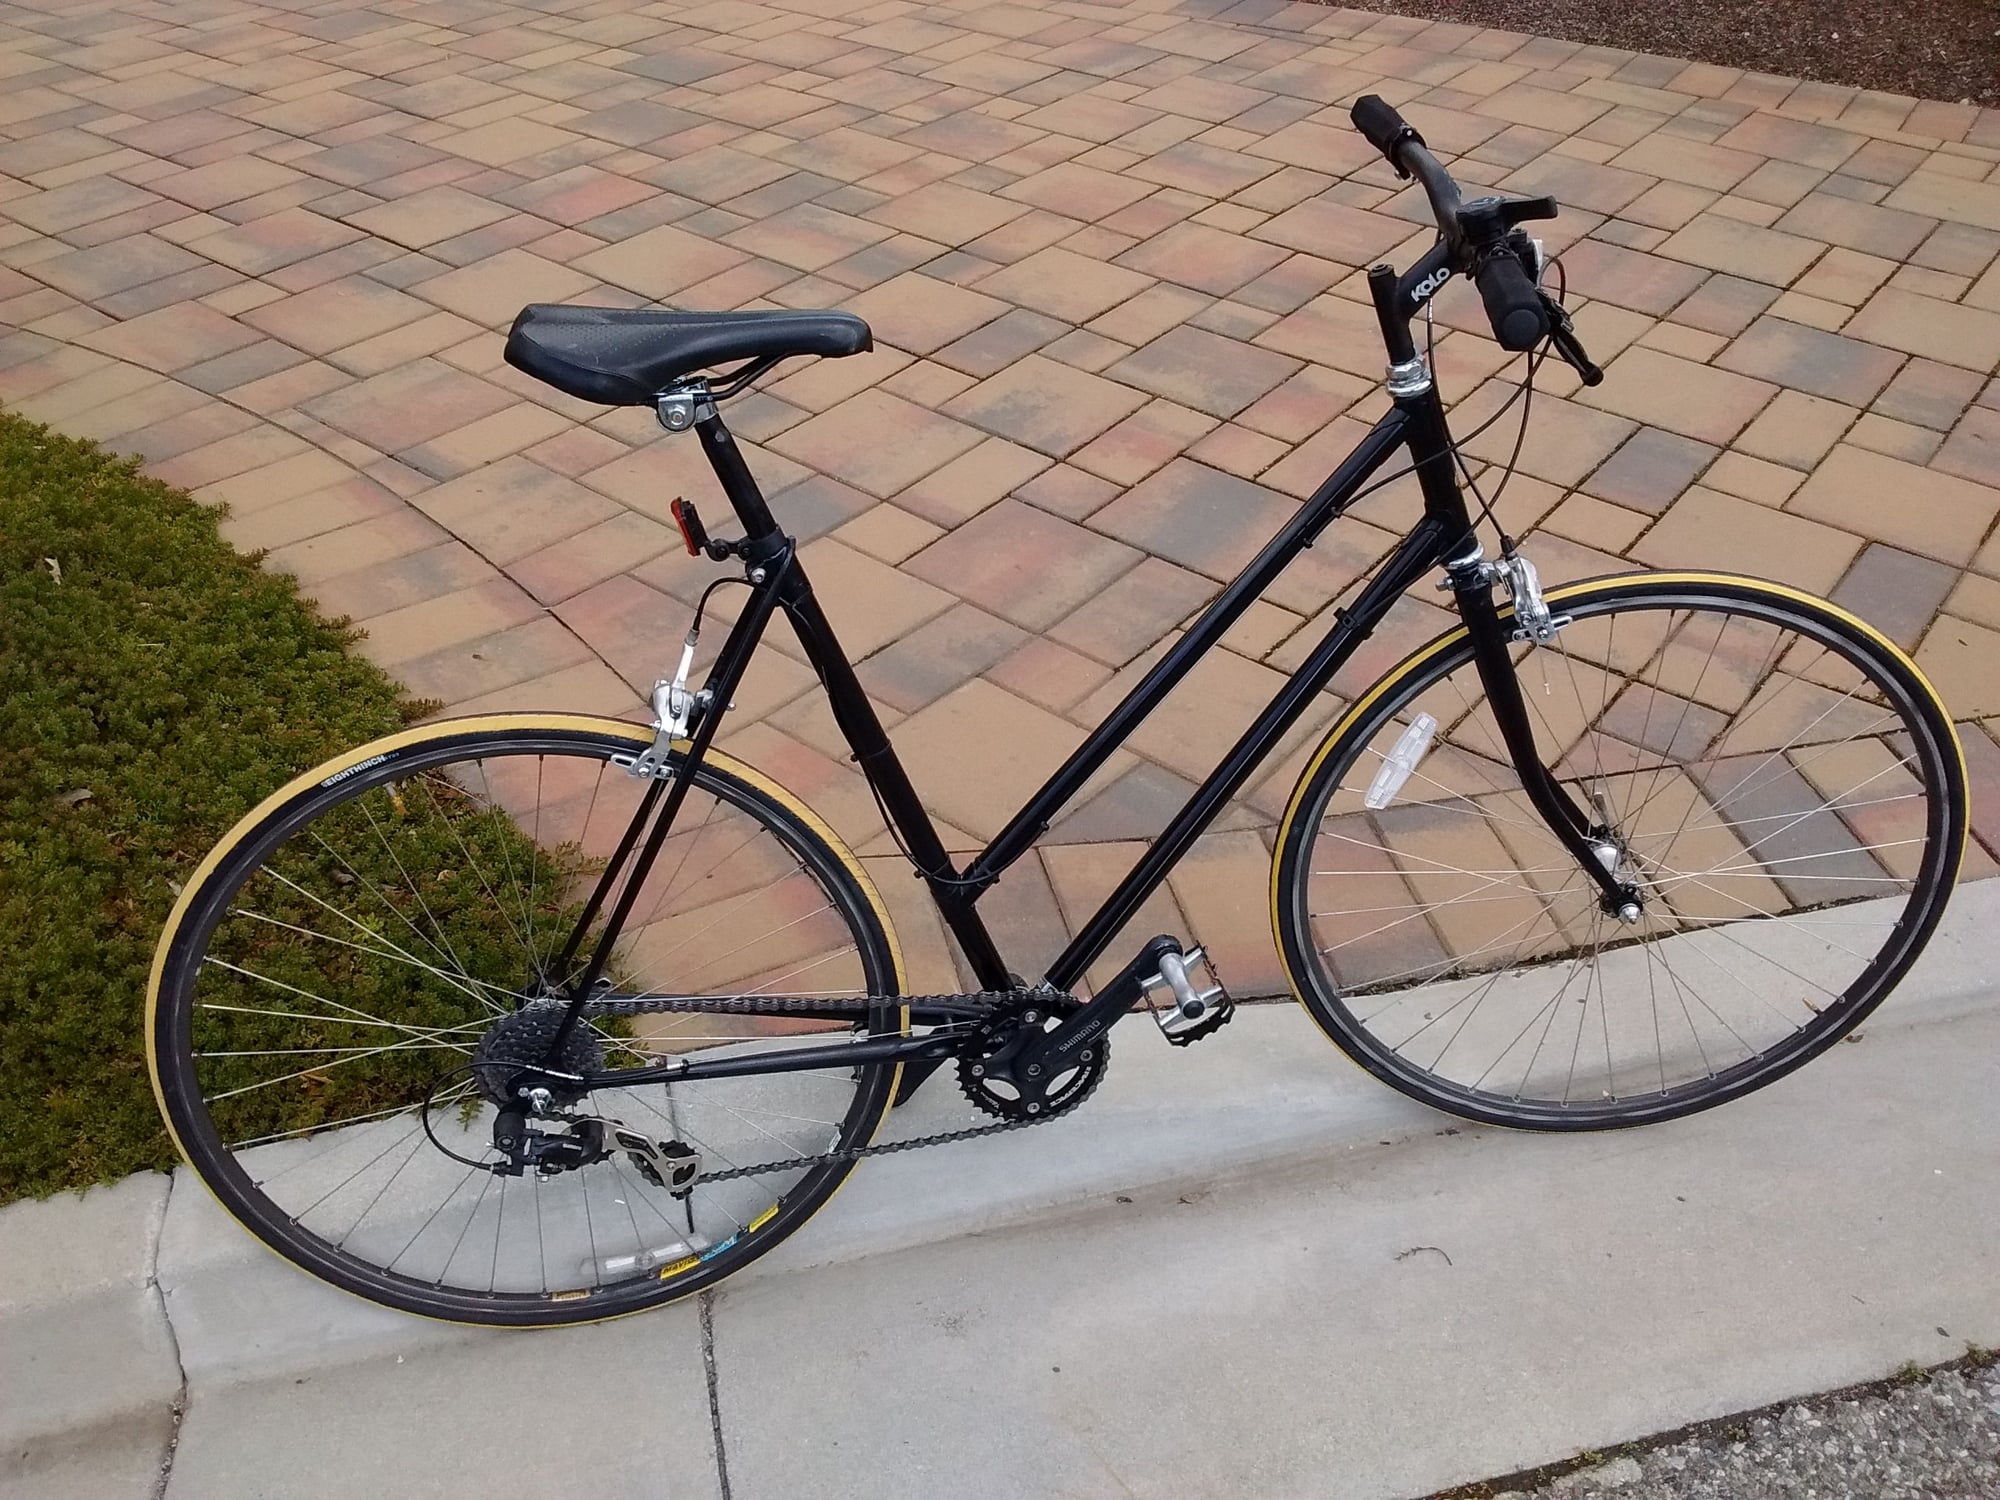
Here is a little something I just finished.
It started out as an early 70's Raleigh Record that had been donated to the bike Exchange. At first glance it looked like just another tired old workhorse bicycle but on closer inspection was fitted out with Campagnolo Record hardware. I stripped off all the good stuf and was about to throw it into a pile of old frames in the back room for probable disposal later. lying there on the floor was another old Raleigh ladies frame the same color. Instead of tossing my frame I picked up the other one too and brought them back to my place. As I was working in the garage building up another bike I got the inspiration for this one.
Originally I planned to mask off the original decals mounted on a black panel and paint the rest of the bike black to match. Then I was going to clear coat everything, hopefully blending in the decal background. Unfortunately, when I pulled off the masking tape from the decal a good portion of the lettering came with it so I changed plans, sanded off the rest of the lettering, and painted the entire frame Rustoleum Automotive Black enamel.
A unique feature on this bike is the drop down adaptors for the caliper brakes which lower them enough to work with 700 c rims. This made possible the fitting of the 622 x 23 yellow stripe tires which I had just waiting for rhe right build. The 1x7 indexed gearing is a good fit for an urban commuter and saves weight and complexity .
Everything for this build came from my parts stash. I wasn't trying to build a weight weenie but when everything was complete and I put it on my hanging scale it only weighed 24.6 lbs. It should make some Techie hipster, Male, Female, or Other, the perfect townie. If nothing else, at that weight it should make carrying it upstairs easy.
Last edited by capnjonny; 03-14-23 at 11:21 PM.
03-14-23, 10:51 AM
#6008
Senior Member
Join Date: May 2021
Location: London
Posts: 564
Bikes: Motobecane C41, Matsu$hita Nashonaru
Mentioned: 7 Post(s)
Tagged: 0 Thread(s)
Quoted: 215 Post(s)
Liked 439 Times
in
255 Posts
Here is a little something I just finished.
It started out as an early 70's Raleigh Record that had been donated to the bike Exchange. At first glance it looked like just another tired old workhorse bicycle but on closer inspection was fitted out with Campagnolo Record hardware. I stripped off all the good stuf and was about to throw it into a pile of old frames in the back room for probable disposal later. lying there on the floor was another old Raleigh ladies frame the same color. Instead of tossing my frame I picked up the other one too and brought them back to my place. As I was working in the garage building up another bike I got the inspiration for tis one.
Originally I planned to mask off the original decals mounted on a black panel and paint the rest of the bike black to match. Then I was going to clear coat everything, hopefully blending in the decal background. Unfortunately, when I pulled off the masking tape from the decal a good portion of the lettering came with it so I changed plans, sanded off the rest of the lettering, and painted the entire frame Rustoleum Automotive Black enamel.
A unique feature on this bike is the drop down adaptors for the caliper brakes which lower them enough to work with 700 c rims. This made possible the fitting of the 622 x 23 yellow stripe tires which I had just waiting for rhe right build. The 1x7 indexed gearing is a good fit for an urban commuter and saves weight and complexity .
Everything for this build came from my parts stash. I wasn't trying to build a weight weenie but when everything was complete and I put it on my hanging scale it only weighed 24.6 lbs. It should make some Techie hipster, Male, Female, or Other, the perfect townie. If nothing else, at that weight it should make carrying it upstairs easy.
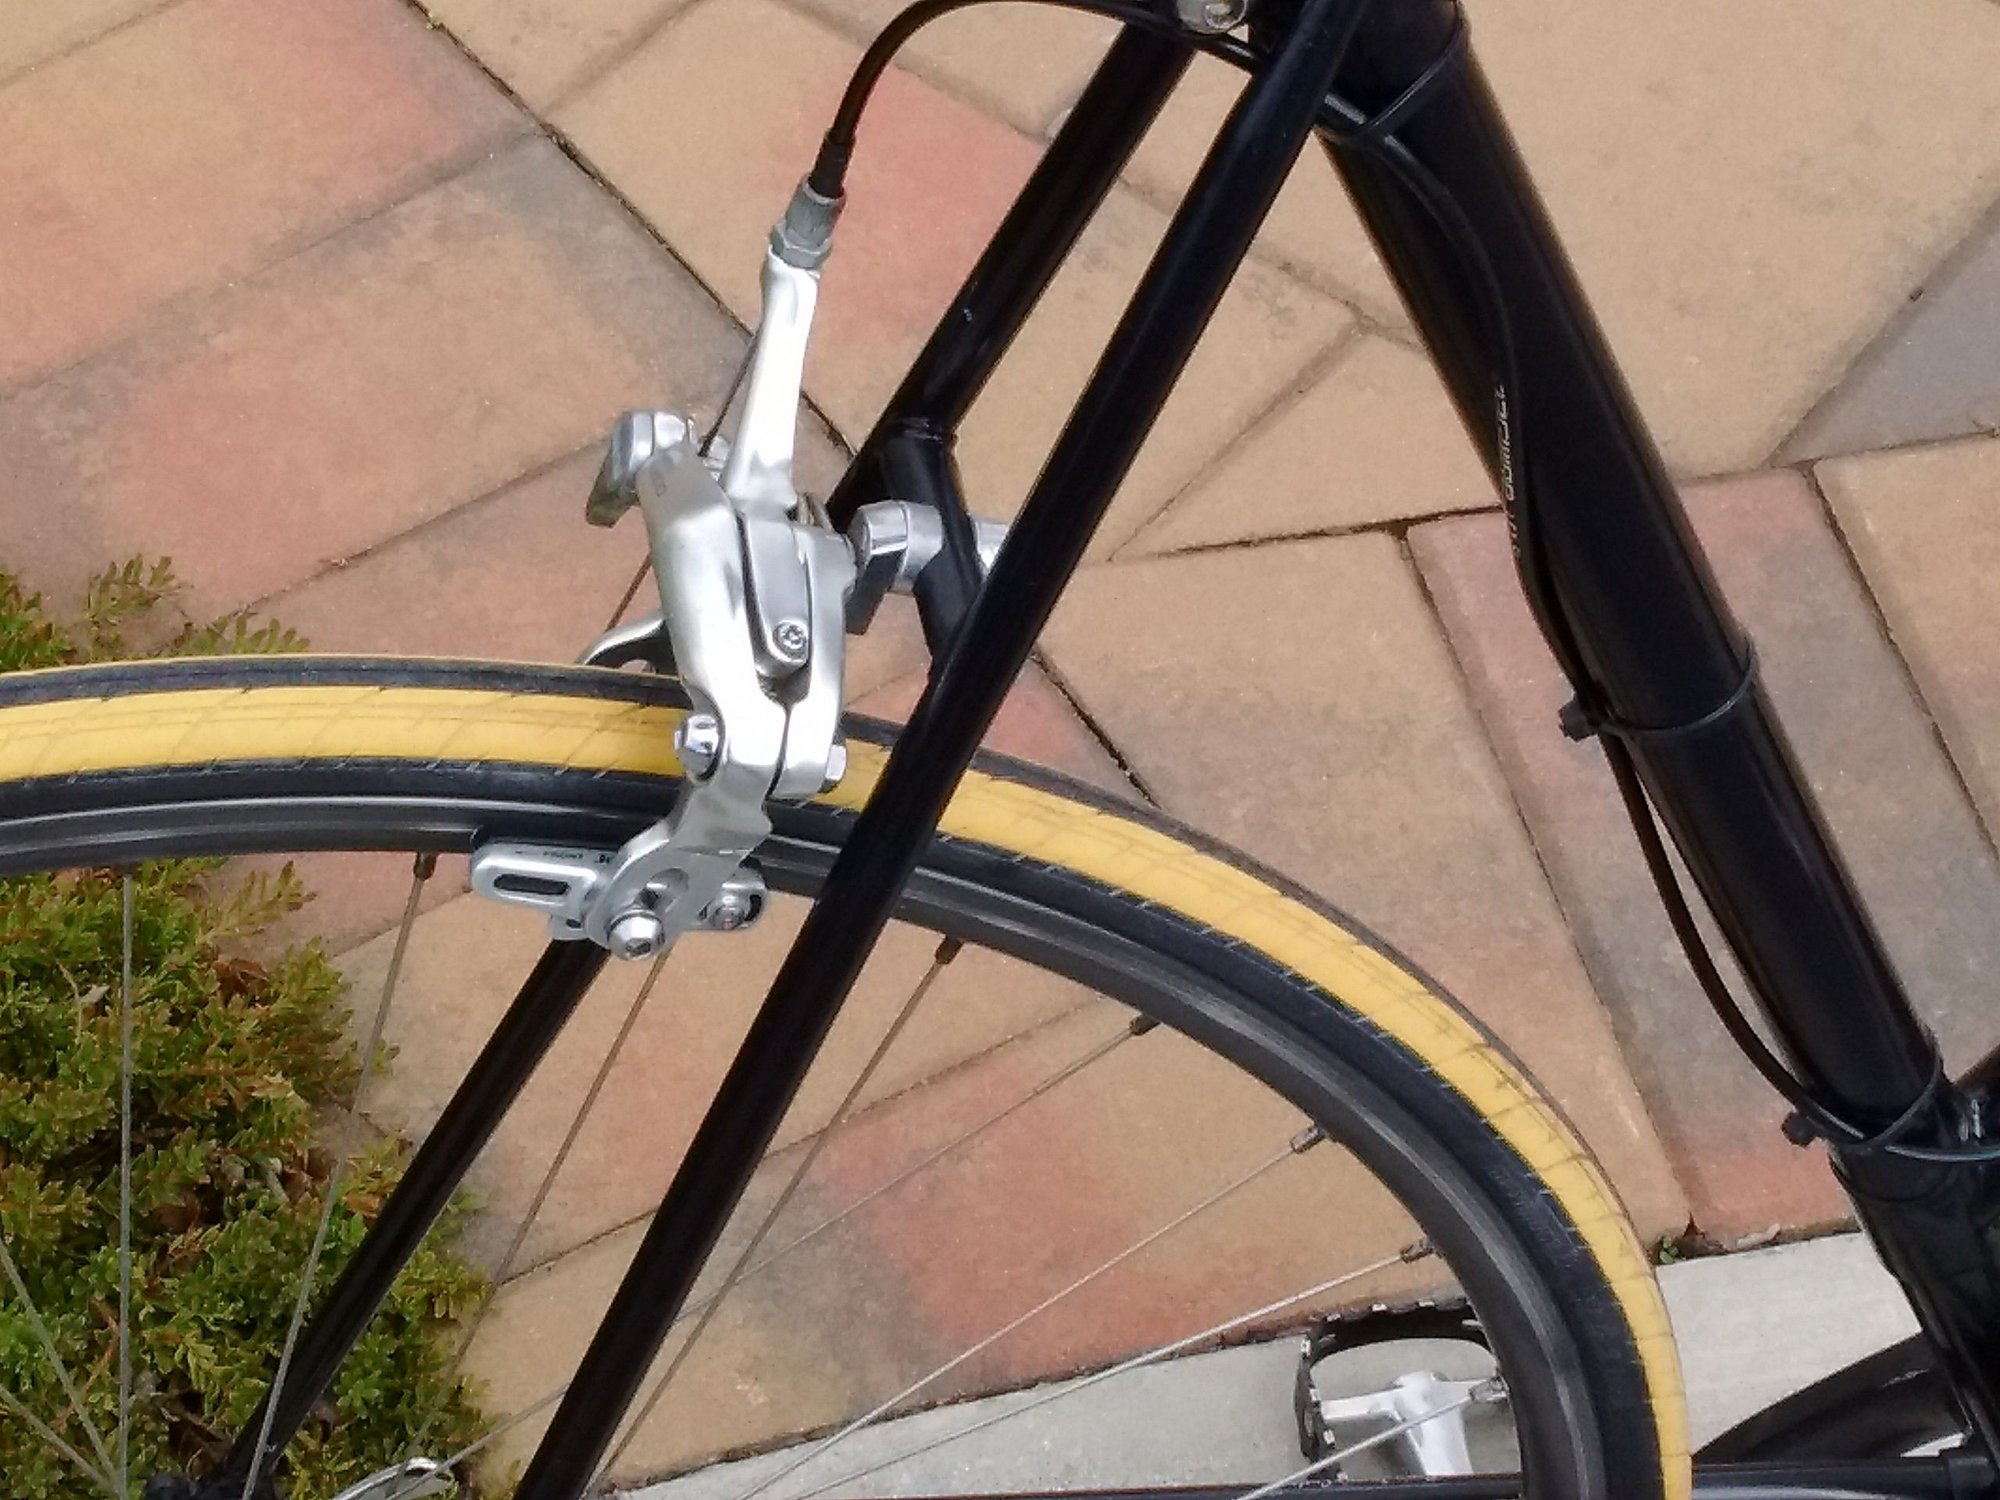
Arent's the pads on the rear caliper backwards though?
03-14-23, 04:19 PM
#6009
Senior Member
Join Date: Oct 2015
Location: PDX
Posts: 13,257
Bikes: Merz x 5 + Specialized Merz Allez x 2, Strawberry/Newlands/DiNucci/Ti x3, Gordon, Fuso/Moulton x2, Bornstein, Paisley,1958-74 Paramounts x3, 3rensho, 74 Moto TC, 73-78 Raleigh Pro's x5, Marinoni x2, 1960 Cinelli SC, 1980 Bianchi SC, PX-10 X 2
Mentioned: 271 Post(s)
Tagged: 0 Thread(s)
Quoted: 4574 Post(s)
Liked 6,559 Times
in
3,765 Posts
Here is a little something I just finished.
It started out as an early 70's Raleigh Record that had been donated to the bike Exchange. At first glance it looked like just another tired old workhorse bicycle but on closer inspection was fitted out with Campagnolo Record hardware. I stripped off all the good stuf and was about to throw it into a pile of old frames in the back room for probable disposal later. lying there on the floor was another old Raleigh ladies frame the same color. Instead of tossing my frame I picked up the other one too and brought them back to my place. As I was working in the garage building up another bike I got the inspiration for tis one.
Originally I planned to mask off the original decals mounted on a black panel and paint the rest of the bike black to match. Then I was going to clear coat everything, hopefully blending in the decal background. Unfortunately, when I pulled off the masking tape from the decal a good portion of the lettering came with it so I changed plans, sanded off the rest of the lettering, and painted the entire frame Rustoleum Automotive Black enamel.
A unique feature on this bike is the drop down adaptors for the caliper brakes which lower them enough to work with 700 c rims. This made possible the fitting of the 622 x 23 yellow stripe tires which I had just waiting for rhe right build. The 1x7 indexed gearing is a good fit for an urban commuter and saves weight and complexity .
Everything for this build came from my parts stash. I wasn't trying to build a weight weenie but when everything was complete and I put it on my hanging scale it only weighed 24.6 lbs. It should make some Techie hipster, Male, Female, or Other, the perfect townie. If nothing else, at that weight it should make carrying it upstairs easy.

Wish I had cool wheelsets like that in my stash, pretty sure I would find some more "expendable" ones for a project that was going to get moved along.

 03-15-23, 05:30 AM
#6010
buy my bikes

Join Date: Jun 2014
Location: Michigan
Posts: 1,822
Bikes: my very own customized GUNNAR CrossHairs
Mentioned: 19 Post(s)
Tagged: 0 Thread(s)
Quoted: 528 Post(s)
Liked 452 Times
in
254 Posts
Lighten Up
Getting some lighting installed on the camper tourer commuter
dyno on the way!
SuperNova
dyno on the way!
SuperNova
Last edited by mrv; 03-15-23 at 06:48 PM.
Likes For mrv:
03-15-23, 09:20 AM
#6011
Senior Member
Join Date: May 2021
Location: London
Posts: 564
Bikes: Motobecane C41, Matsu$hita Nashonaru
Mentioned: 7 Post(s)
Tagged: 0 Thread(s)
Quoted: 215 Post(s)
Liked 439 Times
in
255 Posts
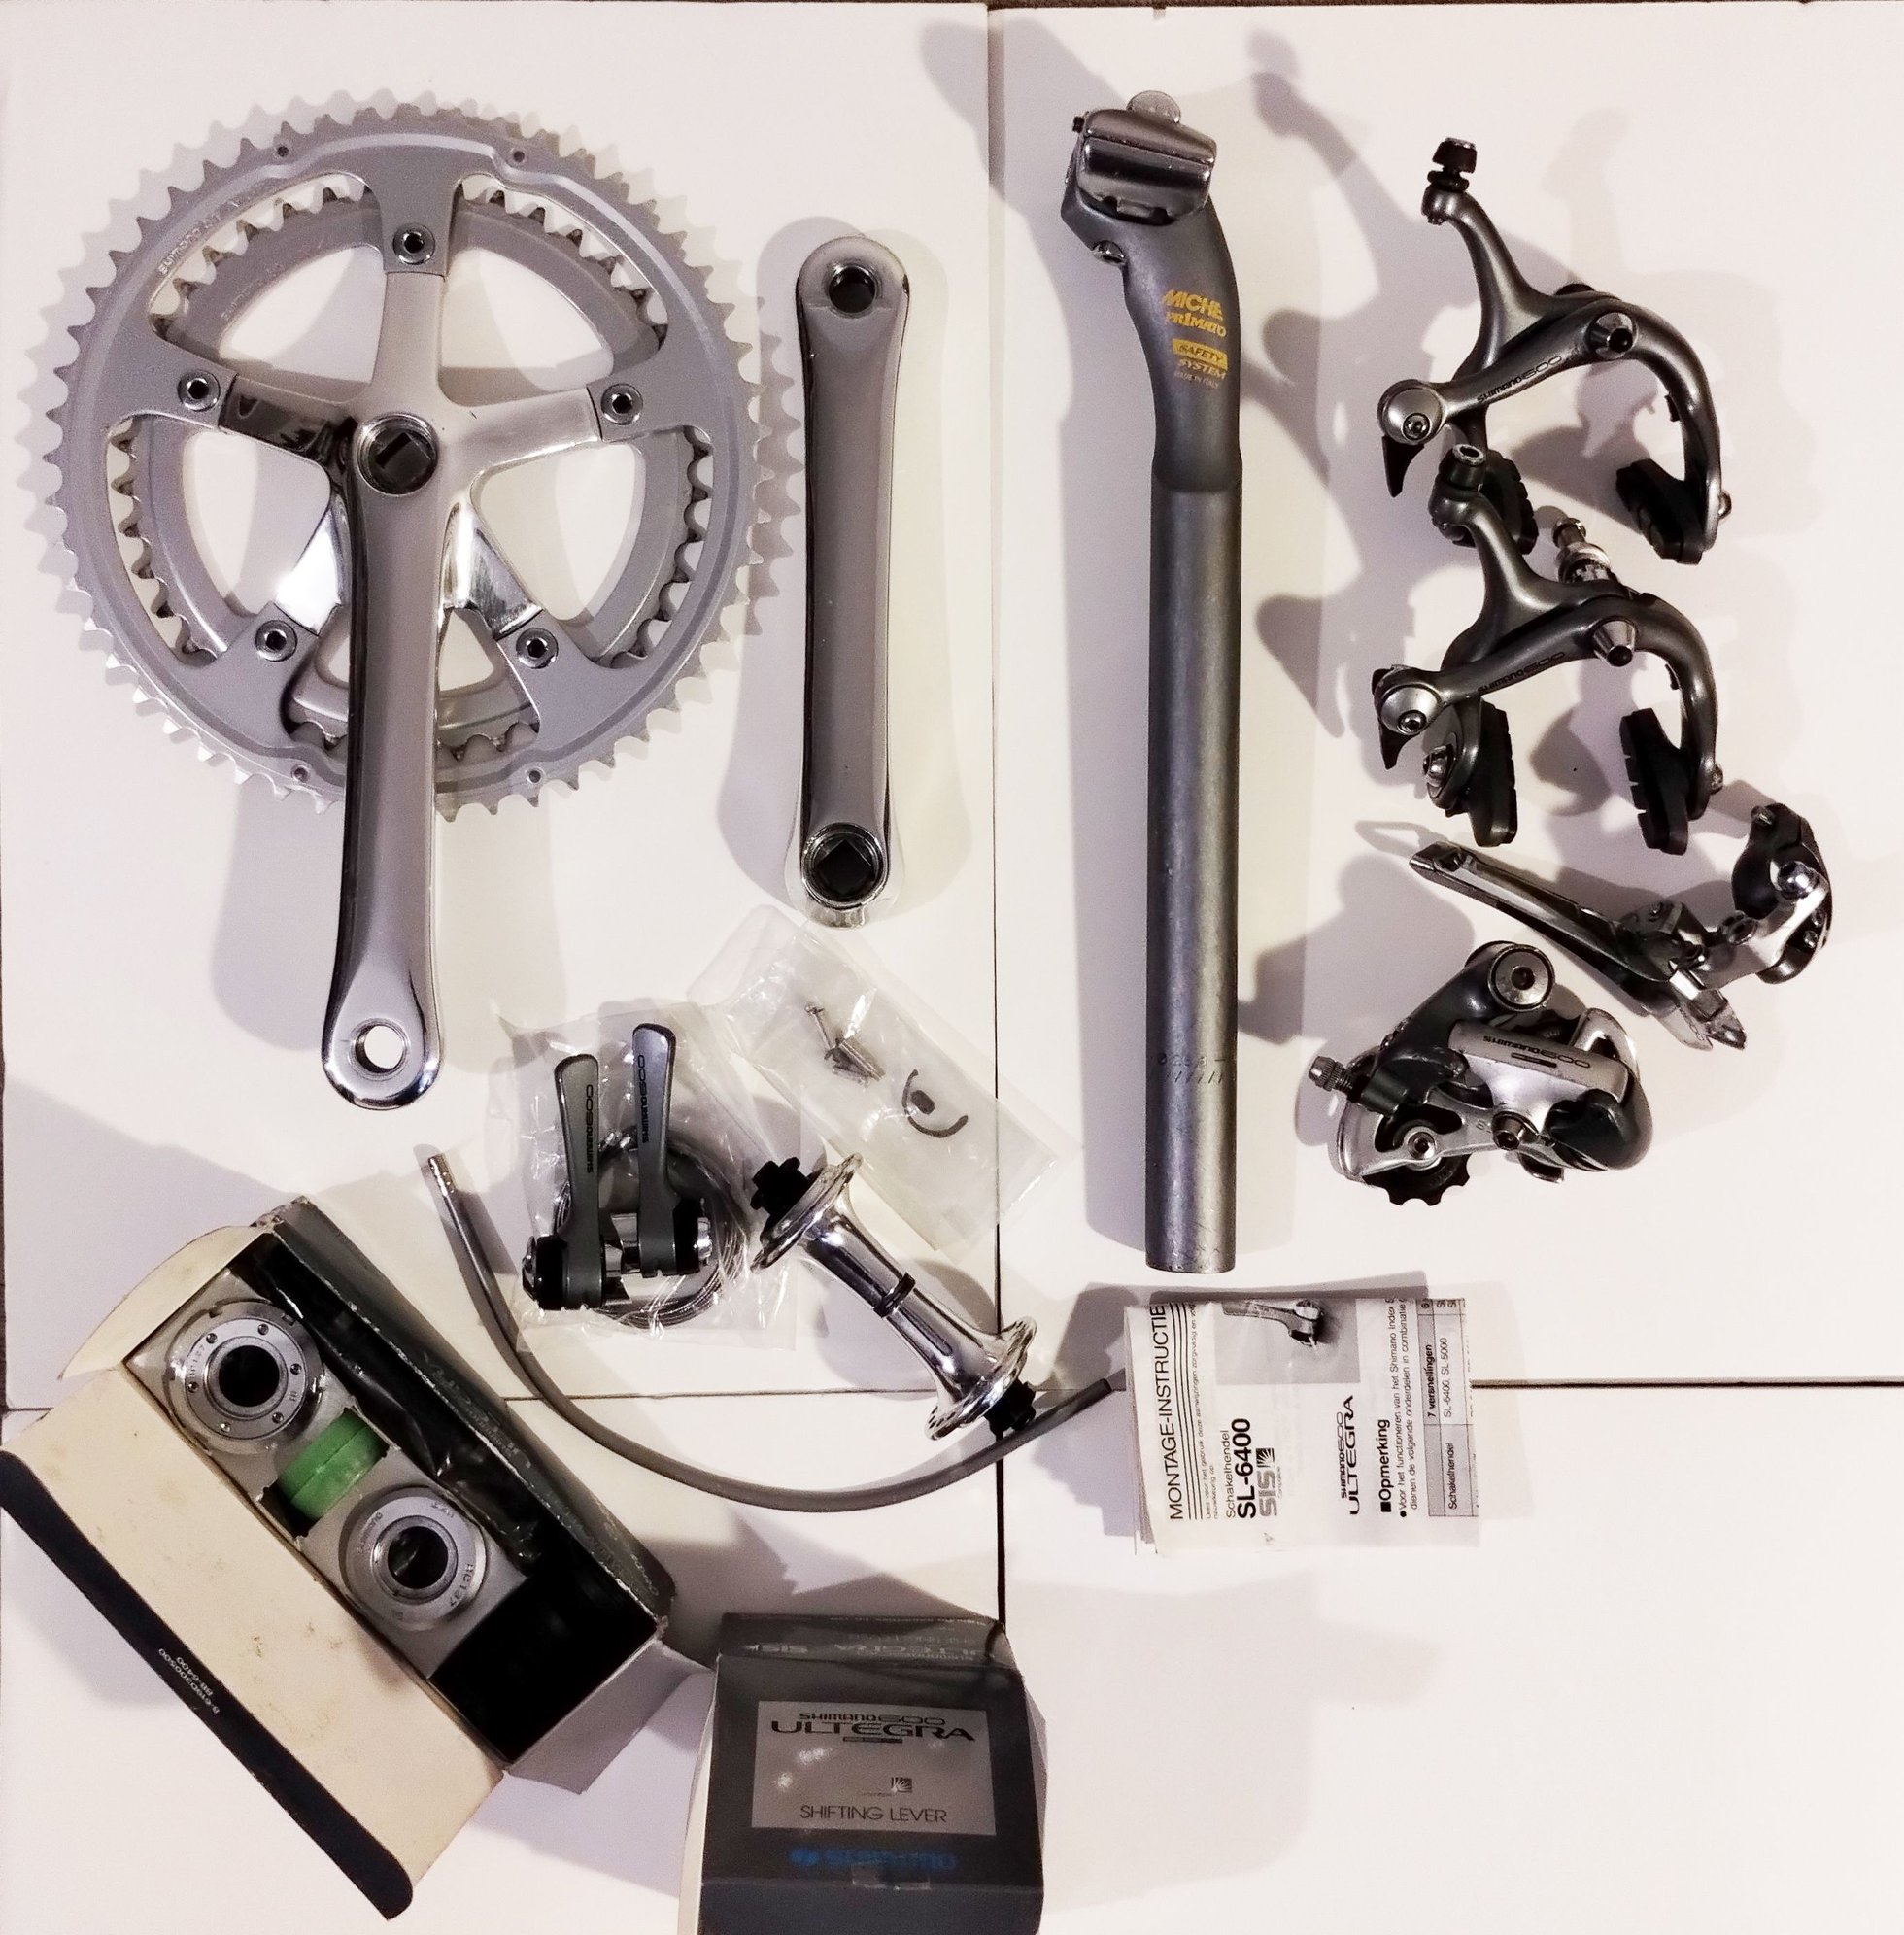
I'm preparing Spring clearance. After a bit of deliberation I decided I don't actually want to build up an early 90's bicycle. I have two projects going on and sadly no room for infinite fleet of bicycles or components. So I decided to pull out all the Ultegra 6400 components I was preparing for it, check everything, clean the items that were used and prepare it all for sale. Miche Primato seatpost is obviously not a part of the Ultegra 6400 group. I got it because it was long and its colour is similar to Shimano anodising on those components. Now back to photographing each item and trawling through my other parts boxes.
03-15-23, 09:33 AM
#6012
Senior Member
Join Date: Aug 2010
Location: Utah
Posts: 8,796
Bikes: Paletti,Pinarello Monviso,Duell Vienna,Giordana XL Super,Lemond Maillot Juane.& custom,PDG Paramount,Fuji Opus III,Davidson Impulse,Pashley Guv'nor,Evans,Fishlips,Y-Foil,Softride, Tetra Pro, CAAD8 Optimo,
Mentioned: 157 Post(s)
Tagged: 0 Thread(s)
Quoted: 2355 Post(s)
Liked 5,328 Times
in
1,855 Posts
A different kind of "wrenching" yesterday. With over 4 ft. of snow on the roof and two days of rain coming I had to get it off. Plan was to cut as much off as I could with some paracord. But luckily I live in Utah. Neighbors rallied and came over to help this hobbled up old soldier. I was out there about 7 hours yesterday and had help for at least 3 of them. Knees were screaming and at the end each foot step was about 6" long. Man, I can't wait for the new knees that are coming finally!! Anyway it was a ton of work mostly done by my neighbors, that snow was so wet and heavy. When we got done I still had to climb up on one pile in front to shovel it off the window it was covering. As luck would have it one leg broke through and left the other one twisted behind me. Needless to say I took off work today because I can't even bend the one knee.
Anyway to keep 'er bike related here's a shot from this morning out of the bike cave. This is my first floor and my basement is only halfway submerged. So yeah, this is high, LOL!
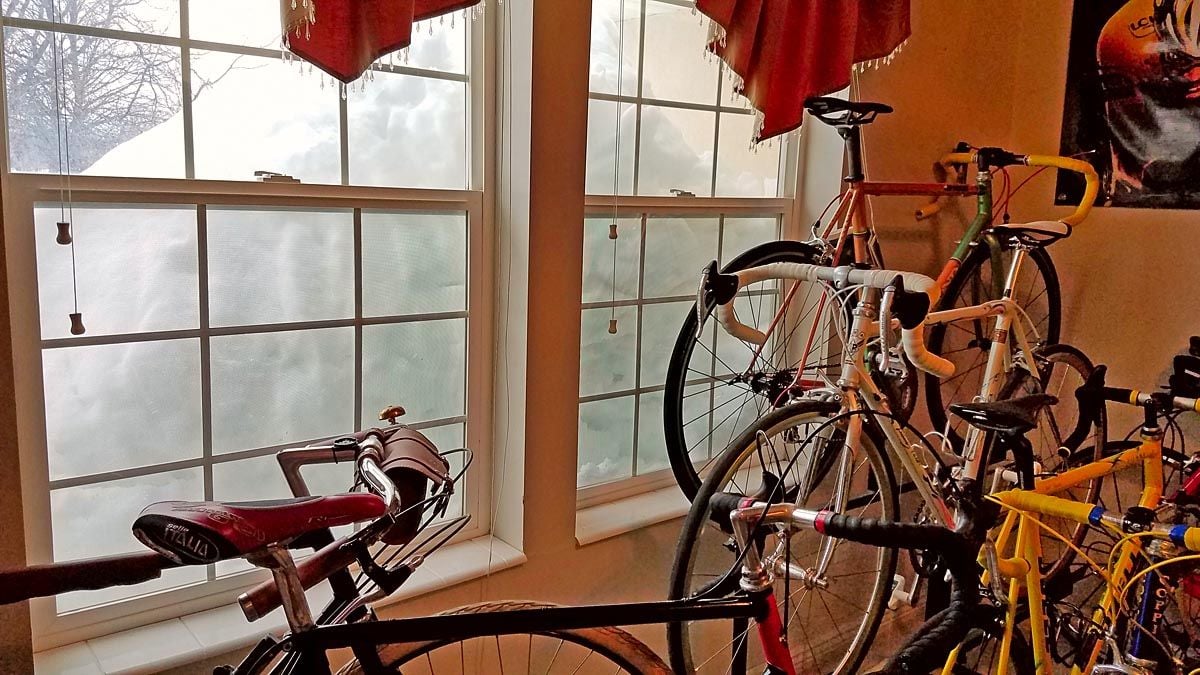
Looking out of the bike cave
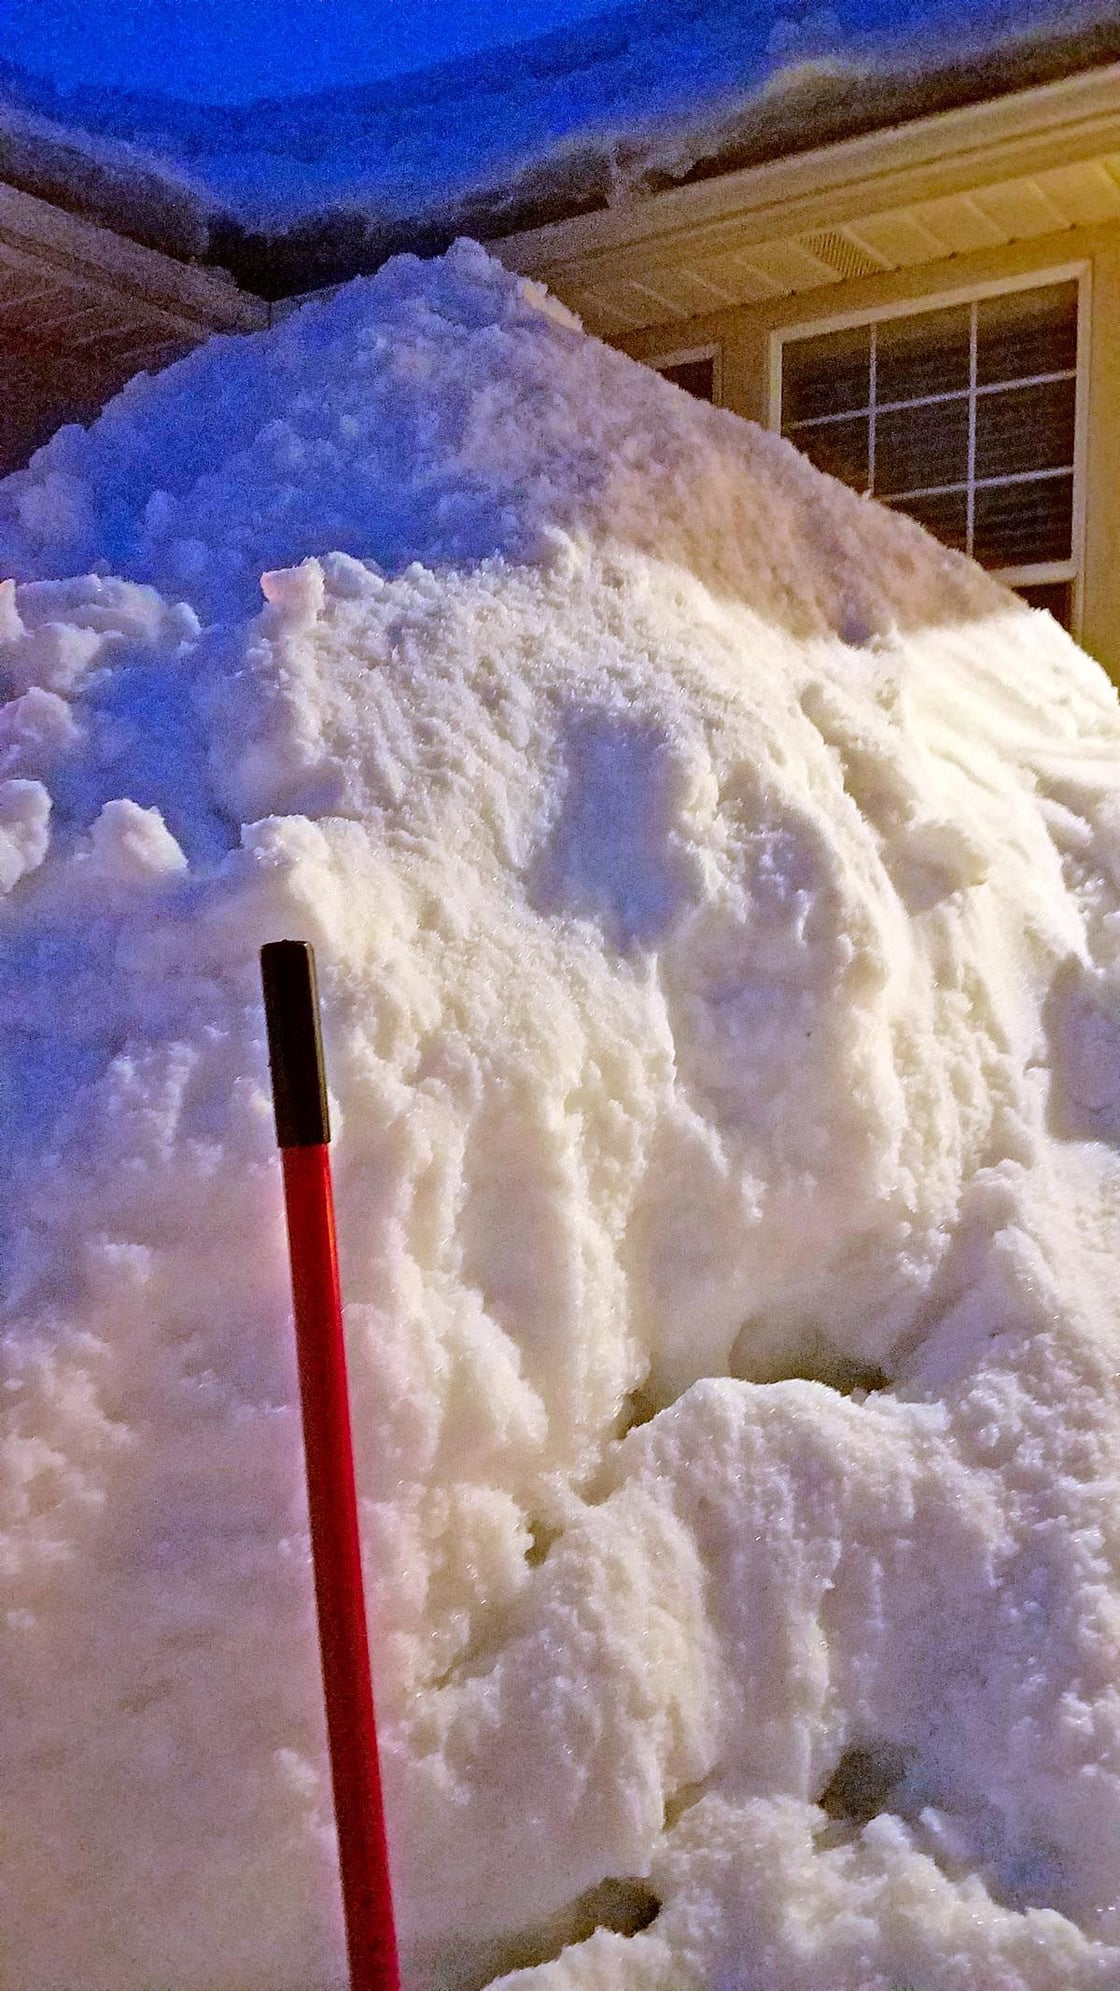
Same pile from outside last night after we "finished".
I've still got to go out there today and clear about 3 ft. of this wet stuff from my front sidewalk and door. I need them to be able to deliver the final parts I need for the Krapf bike today. That's more important than resting the old body, LOL!
Anyway to keep 'er bike related here's a shot from this morning out of the bike cave. This is my first floor and my basement is only halfway submerged. So yeah, this is high, LOL!
Looking out of the bike cave
Same pile from outside last night after we "finished".
I've still got to go out there today and clear about 3 ft. of this wet stuff from my front sidewalk and door. I need them to be able to deliver the final parts I need for the Krapf bike today. That's more important than resting the old body, LOL!
__________________
Steel is real...and comfy.
Steel is real...and comfy.
Likes For jamesdak:
03-15-23, 09:54 AM
#6013
Edumacator
Join Date: Jan 2018
Location: Goose Creek, SC
Posts: 7,125
Bikes: '87 Crestdale, '87 Basso Gap, '92 Rossin Performance EL-OS, 1990 VanTuyl, 1980s Losa, 1985 Trek 670, 1982 AD SLE, 1987 PX10, etc...
Mentioned: 59 Post(s)
Tagged: 0 Thread(s)
Quoted: 2544 Post(s)
Liked 3,369 Times
in
2,112 Posts
A different kind of "wrenching" yesterday. With over 4 ft. of snow on the roof and two days of rain coming I had to get it off. Plan was to cut as much off as I could with some paracord. But luckily I live in Utah. Neighbors rallied and came over to help this hobbled up old soldier. I was out there about 7 hours yesterday and had help for at least 3 of them. Knees were screaming and at the end each foot step was about 6" long. Man, I can't wait for the new knees that are coming finally!! Anyway it was a ton of work mostly done by my neighbors, that snow was so wet and heavy. When we got done I still had to climb up on one pile in front to shovel it off the window it was covering. As luck would have it one leg broke through and left the other one twisted behind me. Needless to say I took off work today because I can't even bend the one knee.
Anyway to keep 'er bike related here's a shot from this morning out of the bike cave. This is my first floor and my basement is only halfway submerged. So yeah, this is high, LOL!
Looking out of the bike cave
Same pile from outside last night after we "finished".
I've still got to go out there today and clear about 3 ft. of this wet stuff from my front sidewalk and door. I need them to be able to deliver the final parts I need for the Krapf bike today. That's more important than resting the old body, LOL!
__________________
1987 Crest Cannondale, 1987 Basso Gap, 1992 Rossin Performance EL, 1990ish Van Tuyl, 1985 Trek 670, 2003 Pinarello Surprise, 1990ish MBK Atlantique, 1987 Peugeot Competition, 1987 Nishiki Tri-A, 1981 Faggin, 1996 Cannondale M500, 1984 Mercian, 1982 AD SuperLeicht, 1985 Massi (model unknown), 1988 Daccordi Griffe , 1989 Fauxsin MTB, 1981 Ciocc Mockba, 1992 Bianchi Giro, 1977 Colnago Super, 1971 Raleigh International, 1998 Corratec Ap & Dun, 1991 Peugeot Slimestone
1987 Crest Cannondale, 1987 Basso Gap, 1992 Rossin Performance EL, 1990ish Van Tuyl, 1985 Trek 670, 2003 Pinarello Surprise, 1990ish MBK Atlantique, 1987 Peugeot Competition, 1987 Nishiki Tri-A, 1981 Faggin, 1996 Cannondale M500, 1984 Mercian, 1982 AD SuperLeicht, 1985 Massi (model unknown), 1988 Daccordi Griffe , 1989 Fauxsin MTB, 1981 Ciocc Mockba, 1992 Bianchi Giro, 1977 Colnago Super, 1971 Raleigh International, 1998 Corratec Ap & Dun, 1991 Peugeot Slimestone
03-15-23, 02:45 PM
#6014
Junior Member
Join Date: Jul 2014
Location: Carrollton, Tx
Posts: 128
Mentioned: 6 Post(s)
Tagged: 0 Thread(s)
Quoted: 100 Post(s)
Liked 451 Times
in
151 Posts
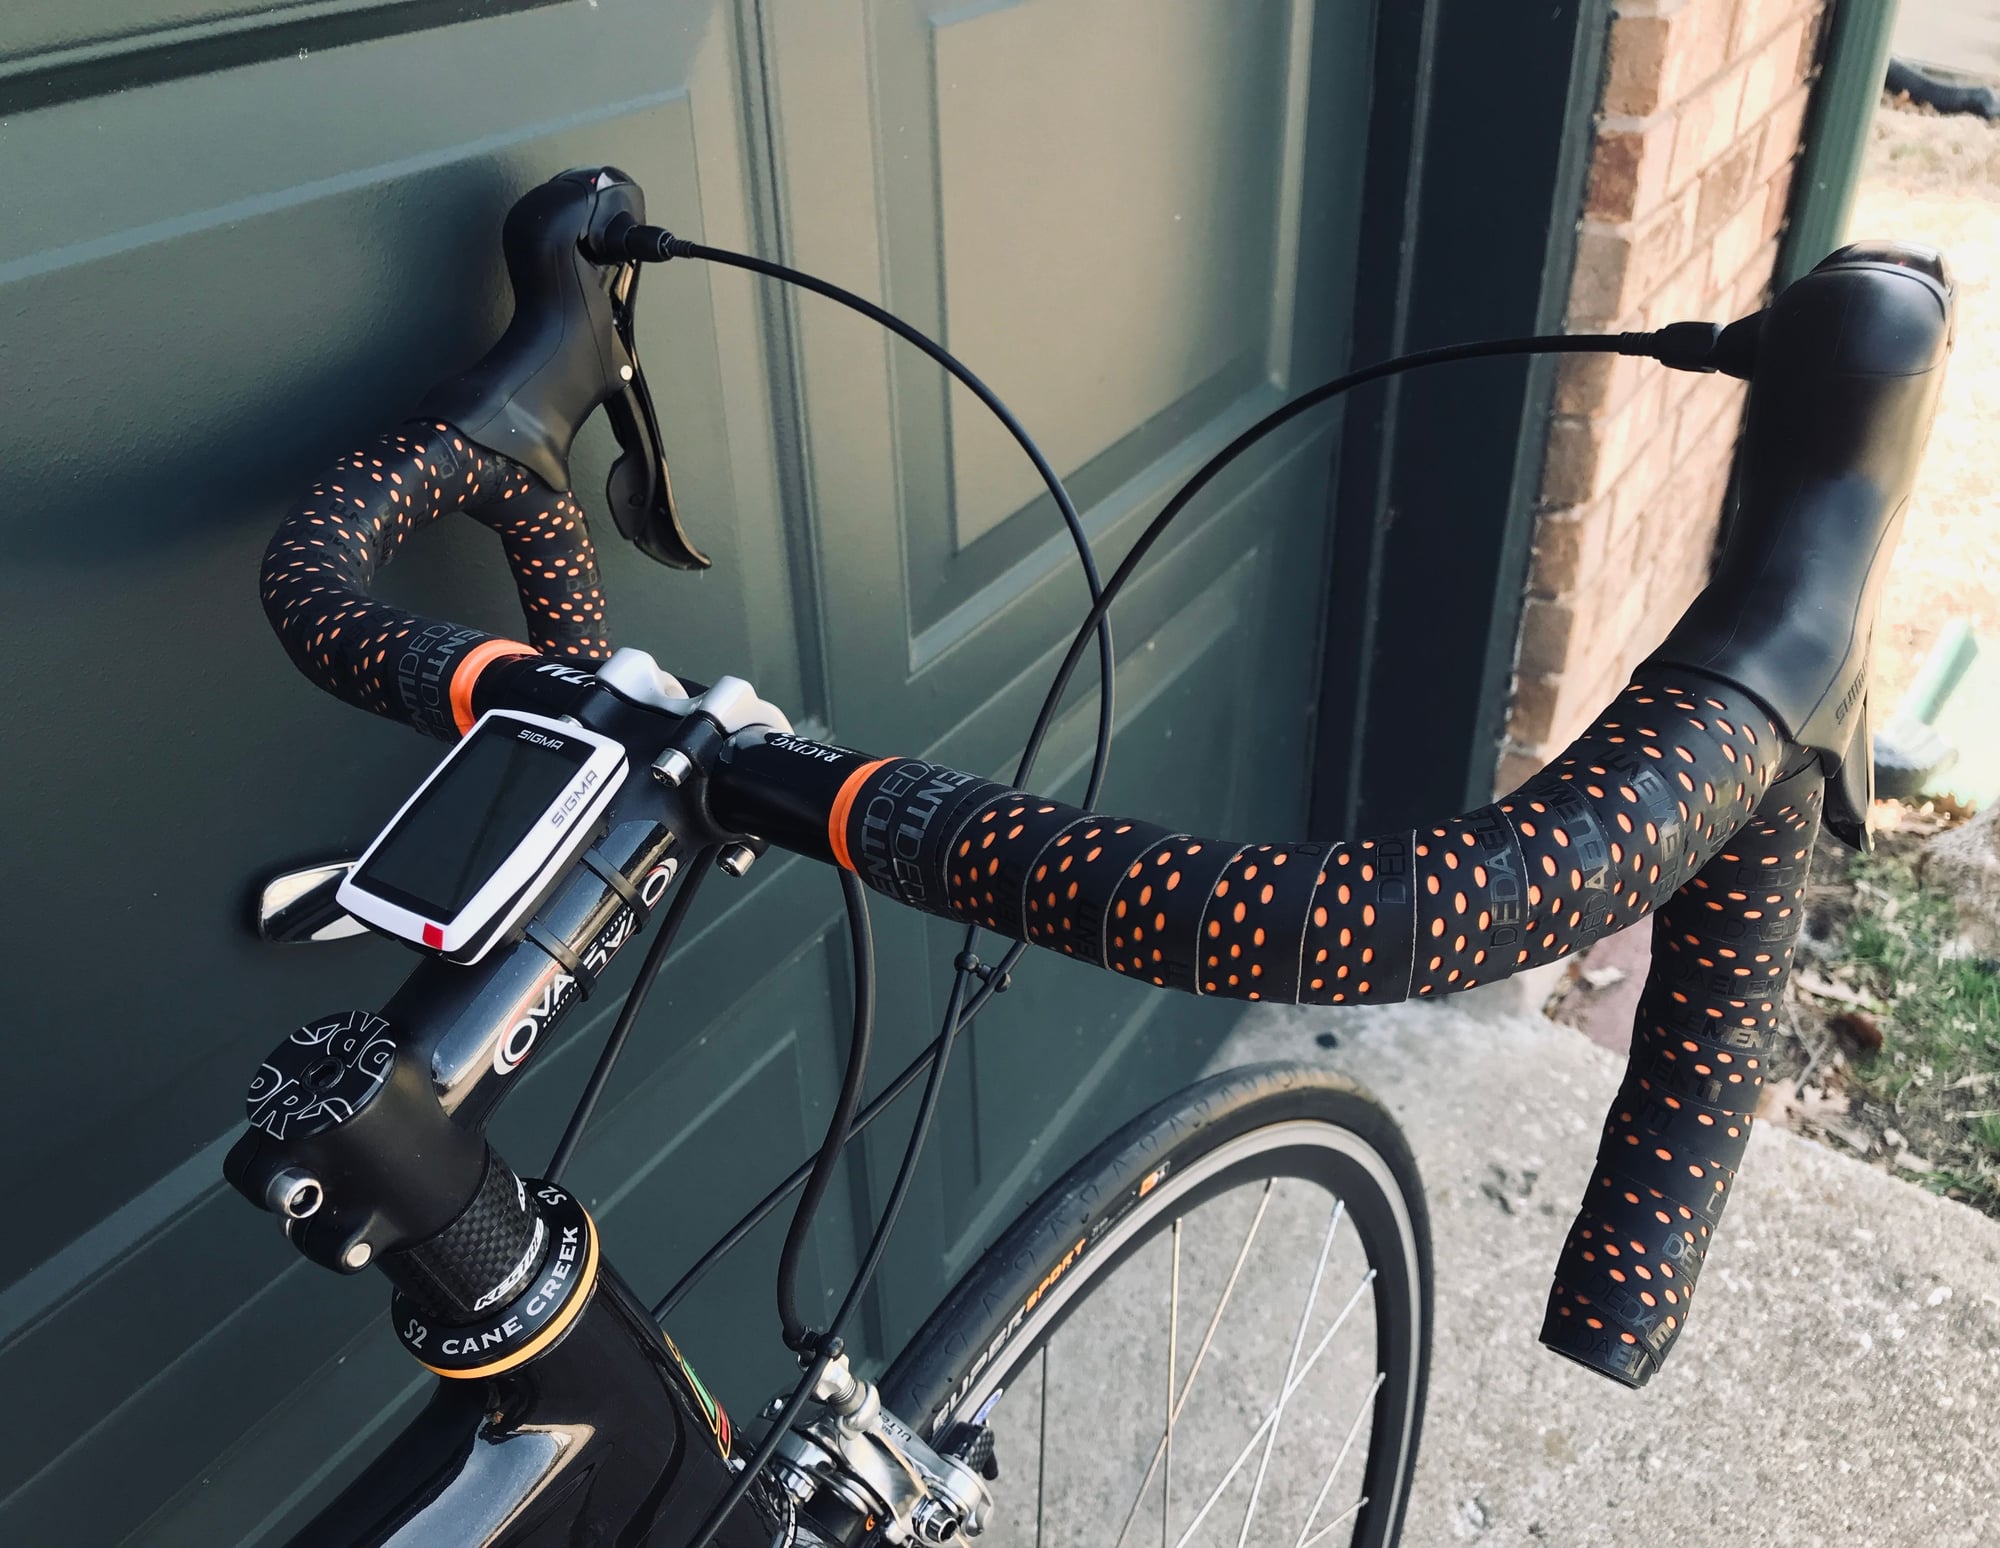
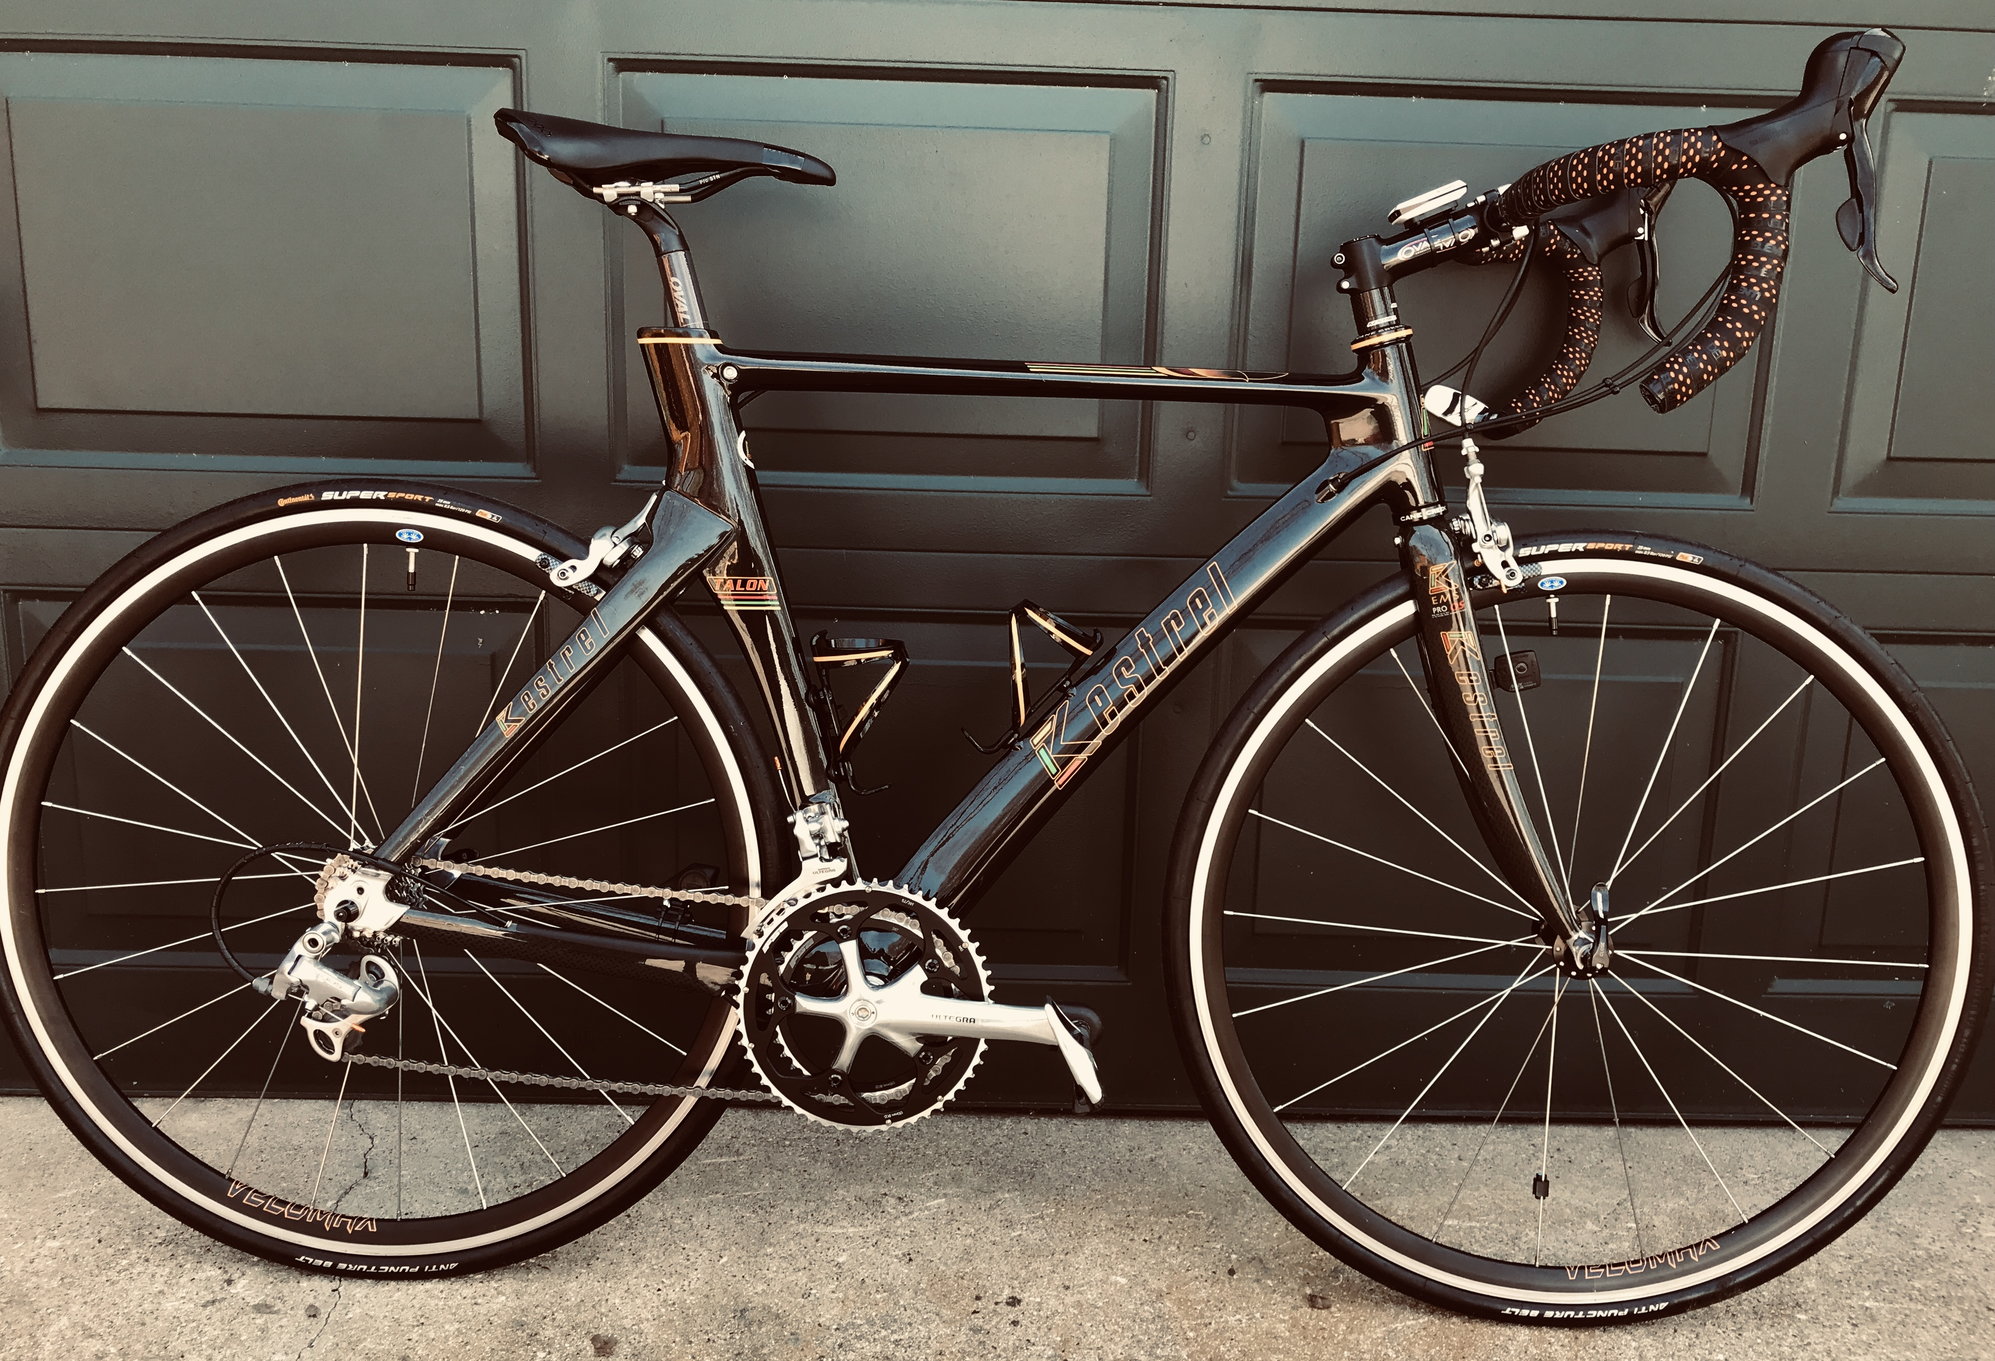
The Kestrel Build Project � Finished.
Finished The Winter Build.

As received
The fun part
Satisfactory results
The two photos are Before and After. It was a well cared for bike to begin with, so, cosmetically wasn�t difficult. The Project was to convert the set of antlers to drop bars. Internal cable routing made me rather nervous as I had never done that process before. Some over budget purchases on eBay, an hour on YouTube, and six feet of thin tubing from Richardson Bike Mart, and I was ready to go. Three hours later and Done!
JD, Dallas
03-15-23, 08:43 PM
#6015
Am-a-tour
Join Date: Aug 2020
Location: NOVA
Posts: 129
Bikes: 2020 New Albion Privateer, 1983 Schwinn Super Sport, 2022 Rivendell Atlantis
Mentioned: 0 Post(s)
Tagged: 0 Thread(s)
Quoted: 45 Post(s)
Liked 65 Times
in
40 Posts
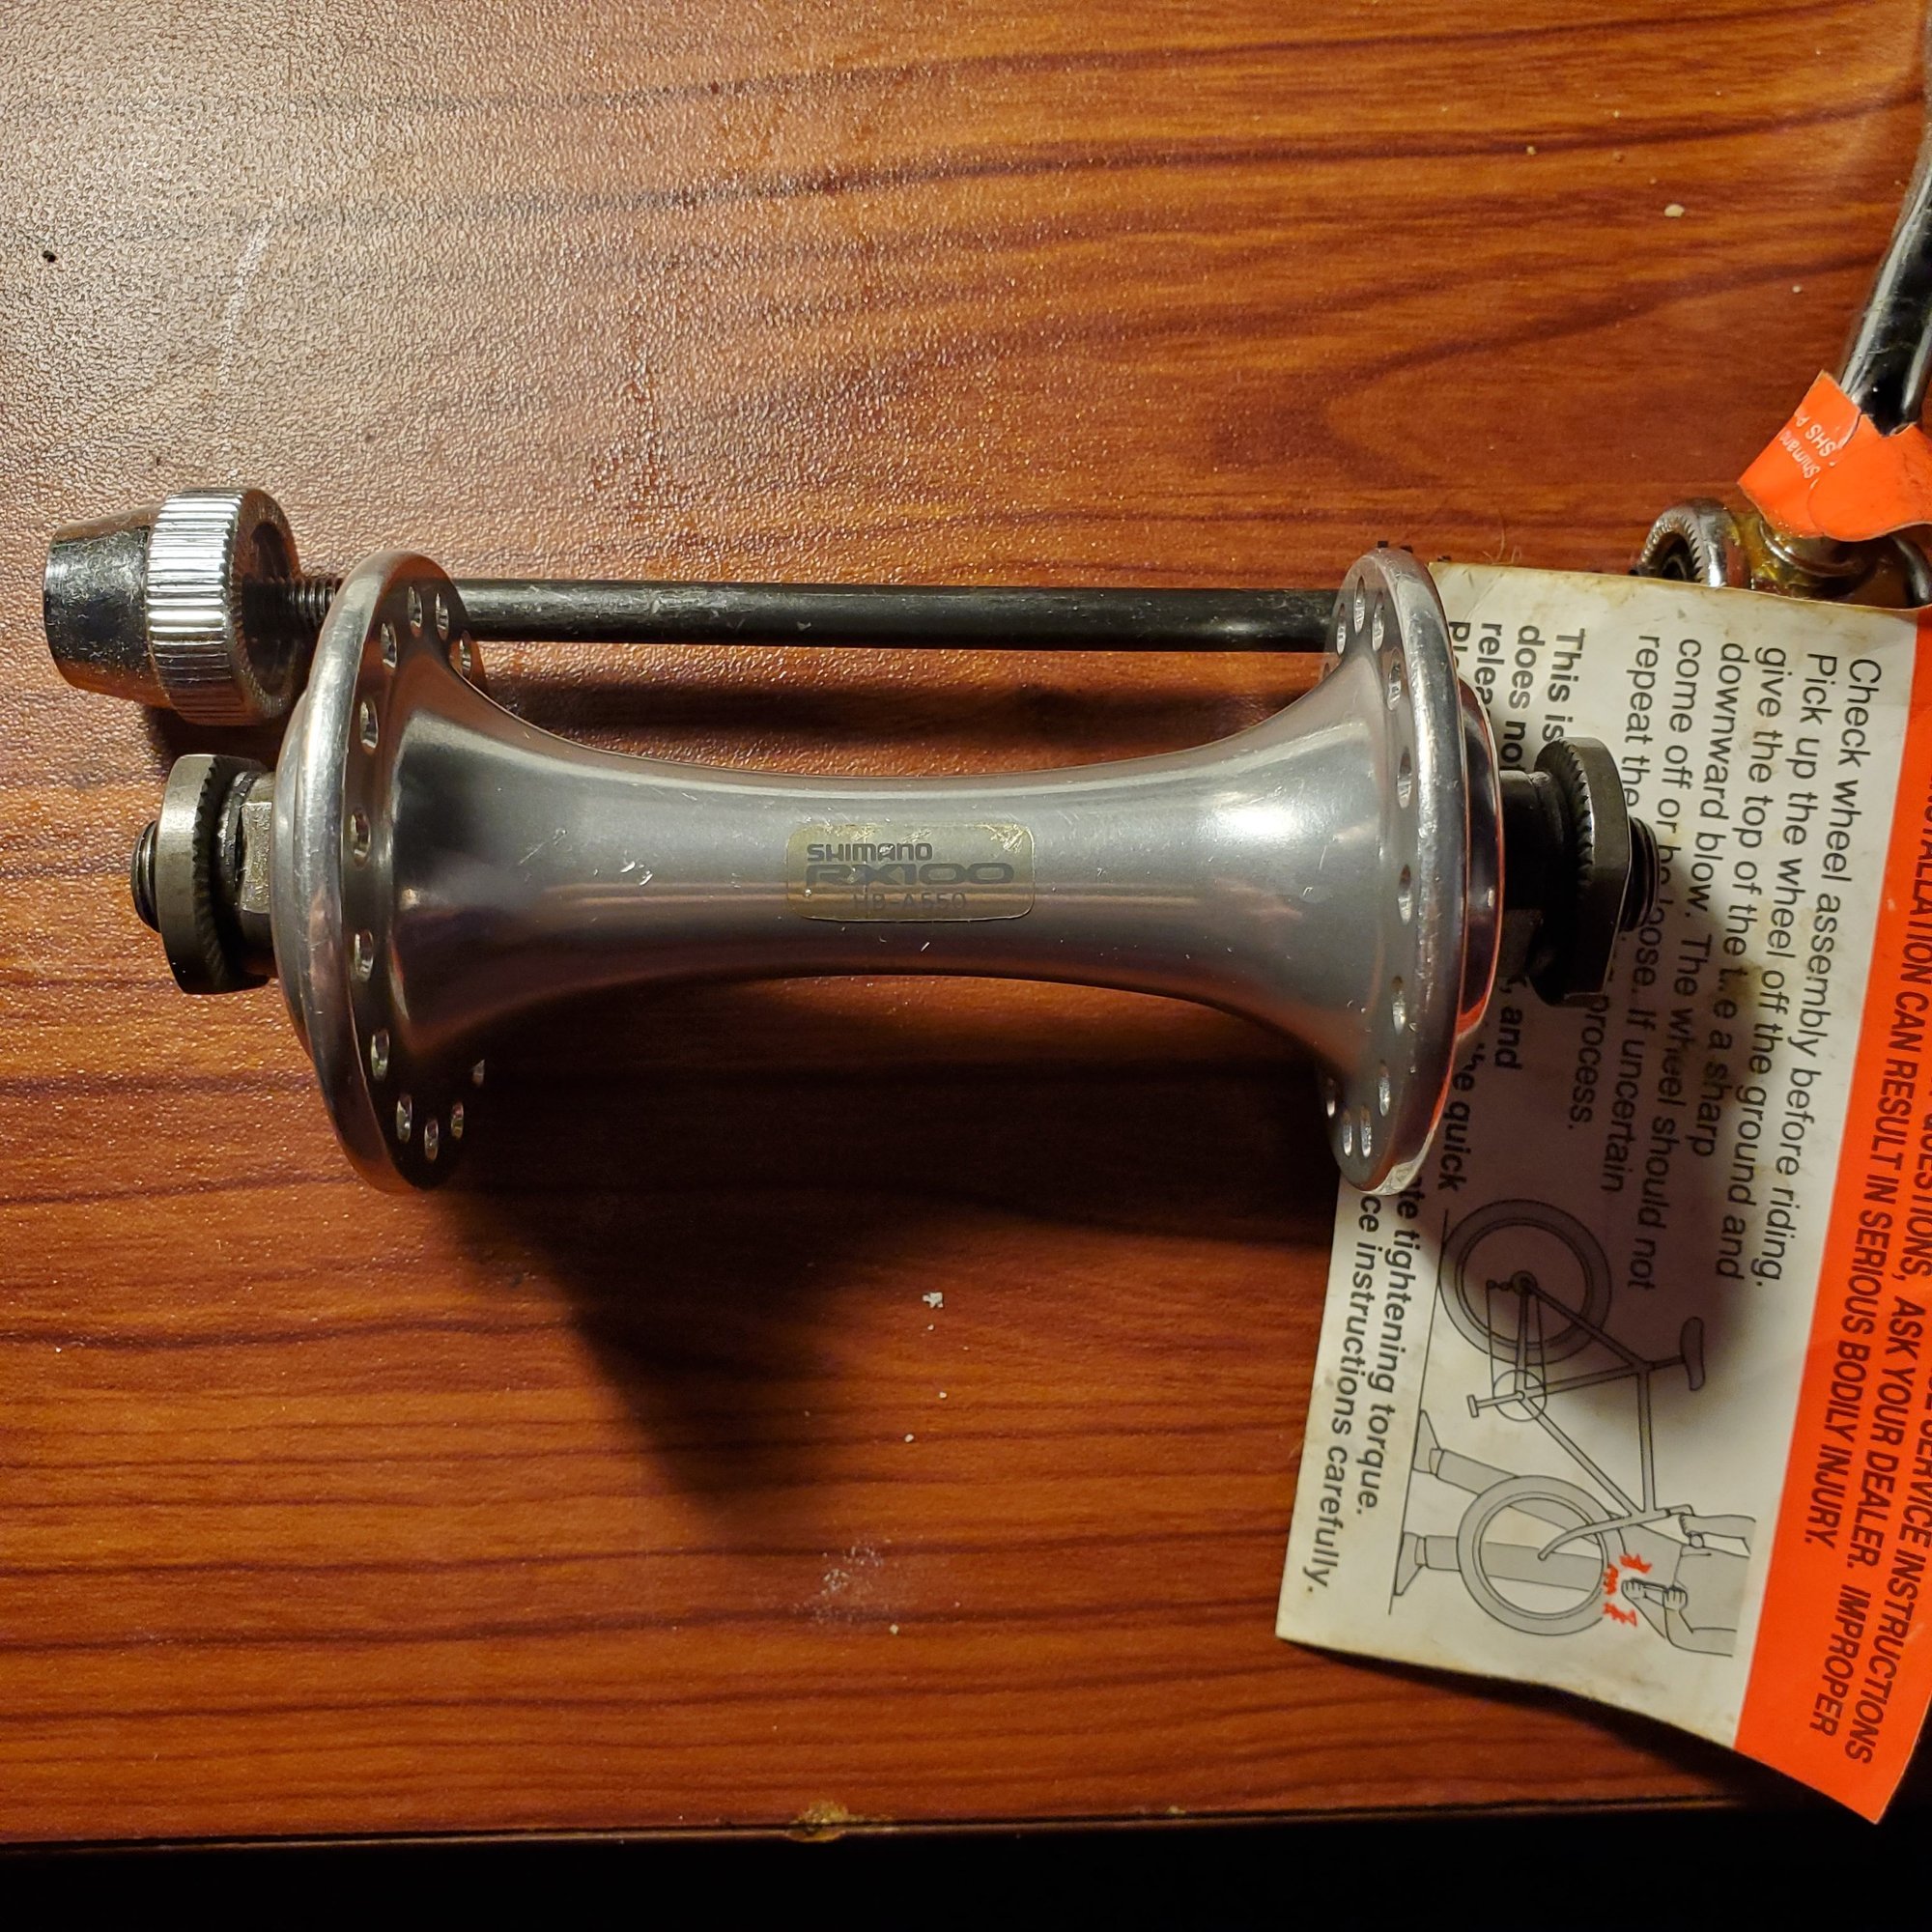
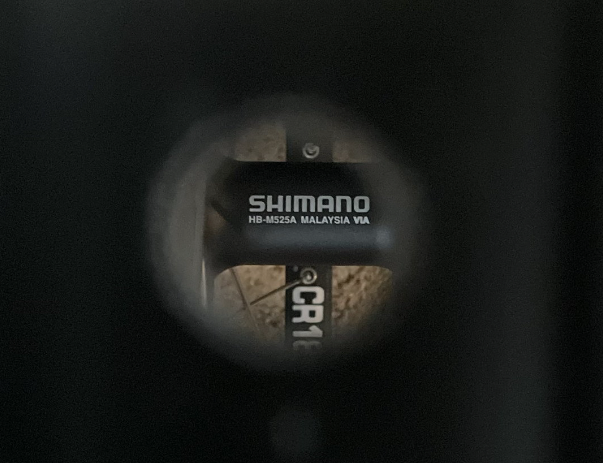
Overhauled this seemingly NOS RX100 front hub tonight. Lots of old crusty grease to clean out, but I think it'll run very smoothly now (and hopefully for another 30+years)
Likes For nick_a:
03-16-23, 11:37 AM
#6016
Old age cyclist

Join Date: Oct 2021
Location: Northern Virginia
Posts: 128
Bikes: Motobecane Grand Record, Motobecane Super Mirage (3x5 speeds), Motobecane Mirage, Atala (unknown model), Peugeot mixte frame Tourist and Schwinn Sport. A bunch more kids bikes. Most recently a Trek Verve One, tricked up for serious touring.
Mentioned: 1 Post(s)
Tagged: 0 Thread(s)
Quoted: 46 Post(s)
Liked 53 Times
in
36 Posts
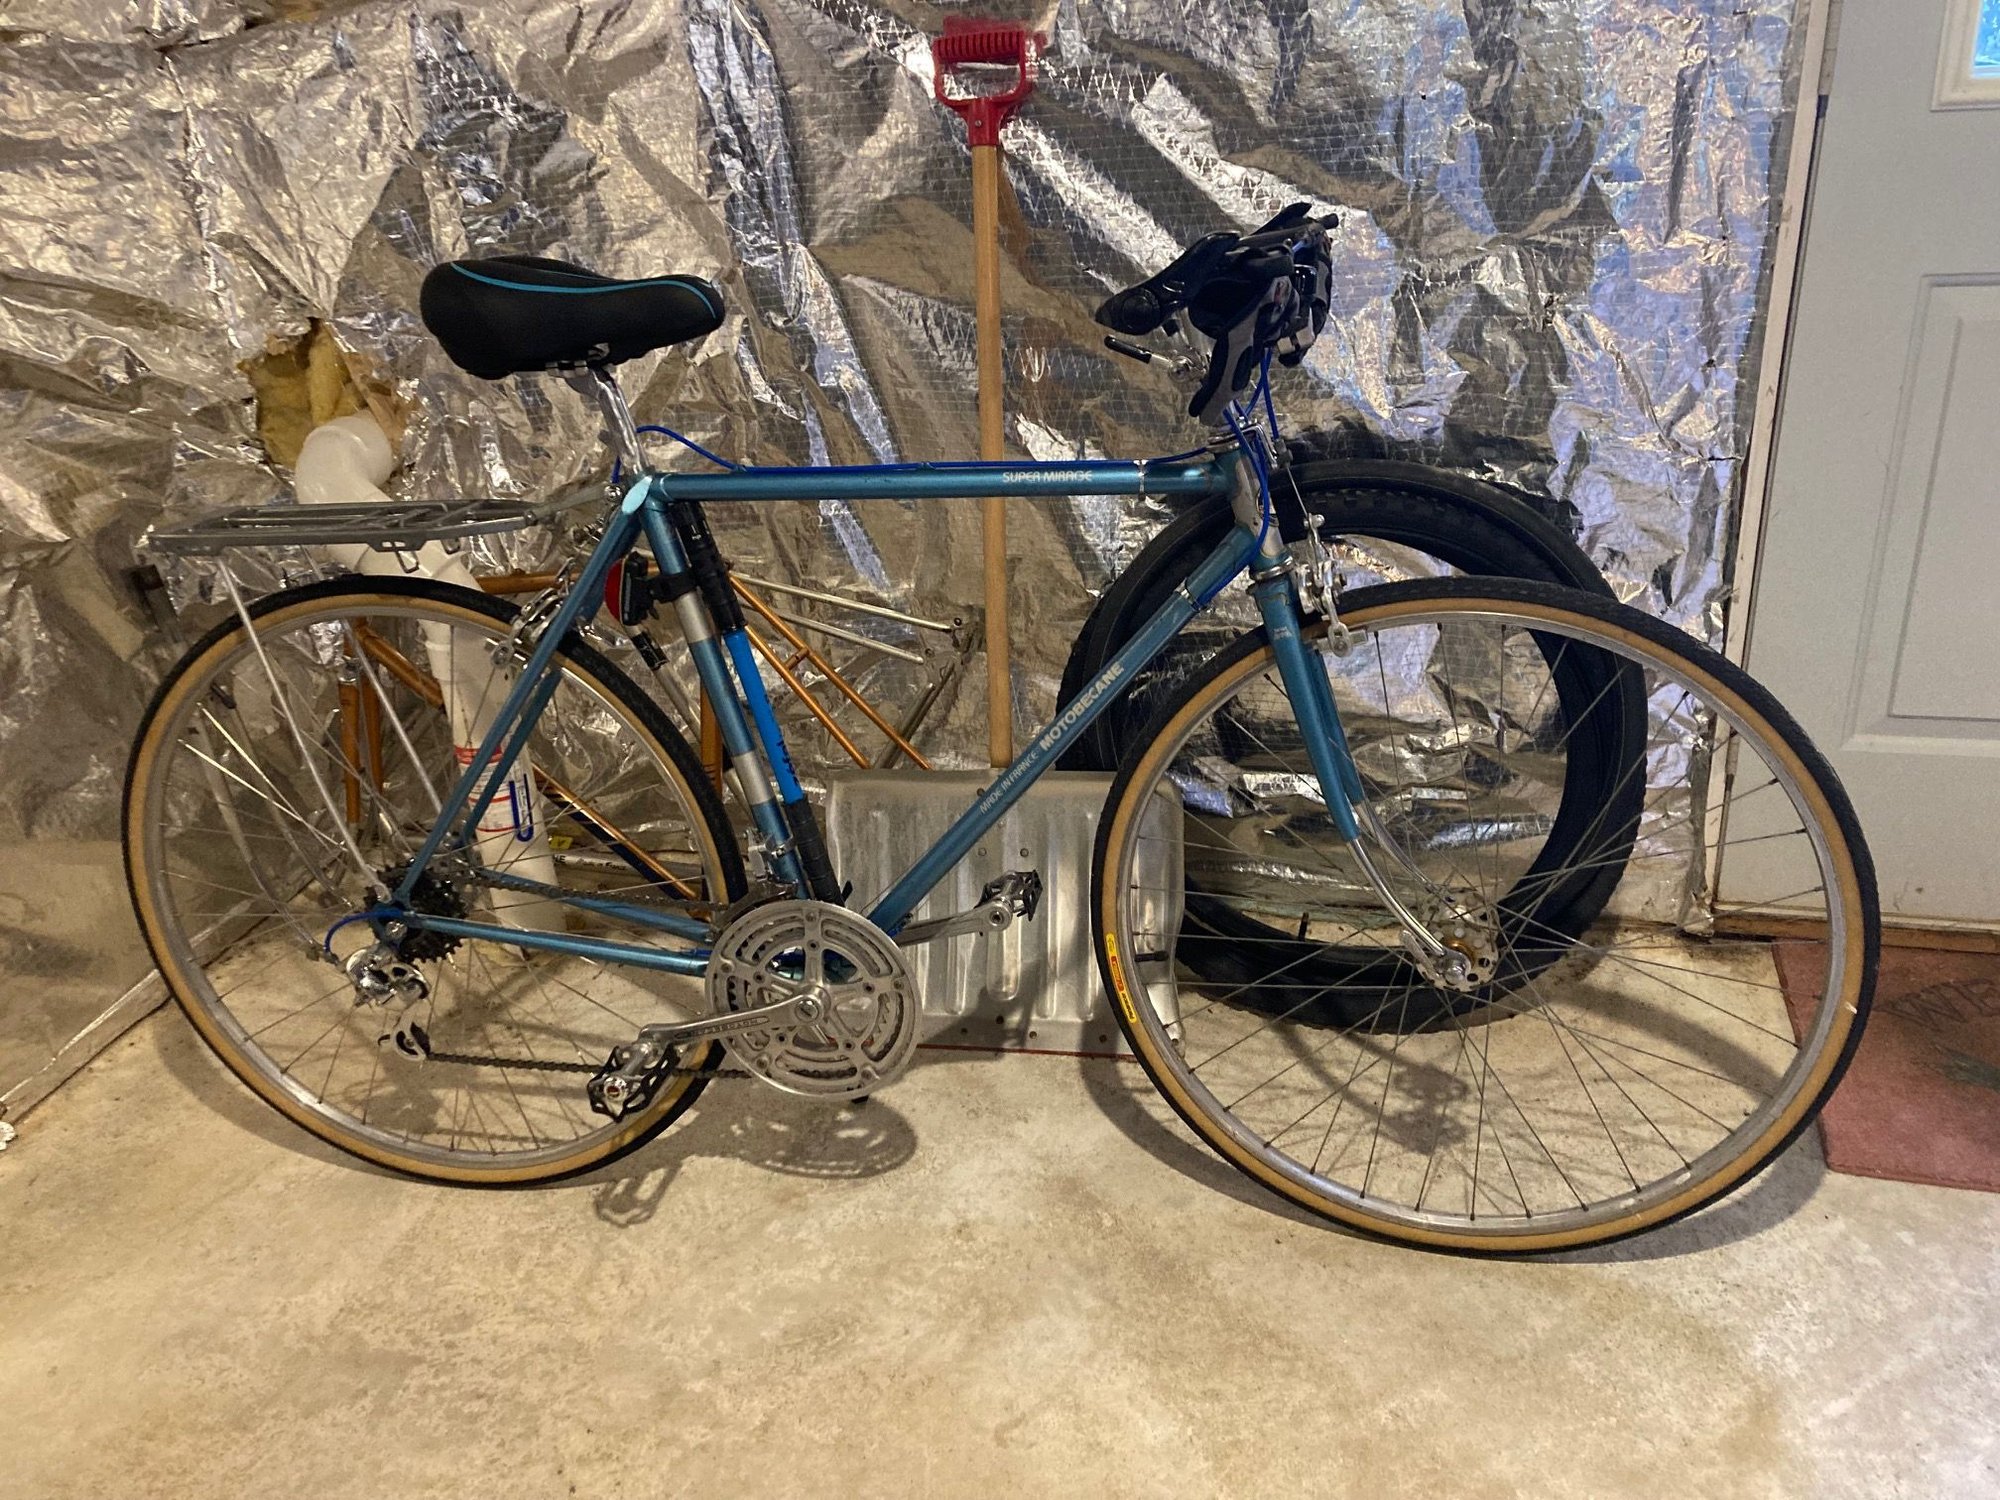
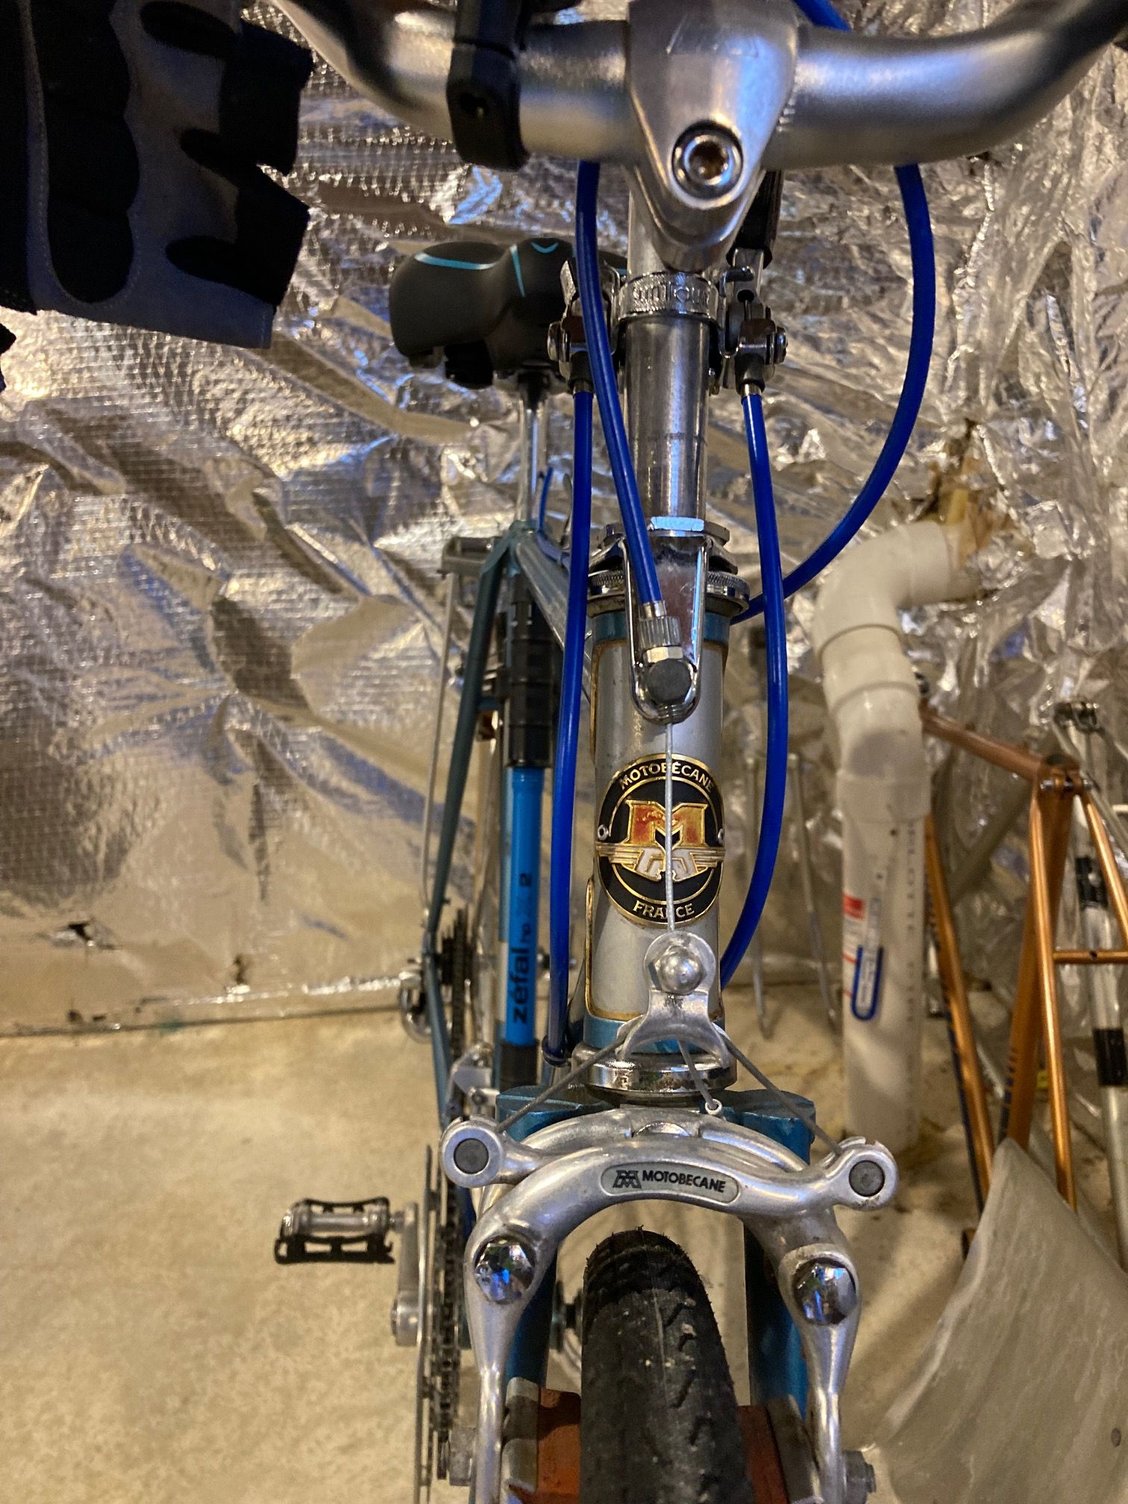
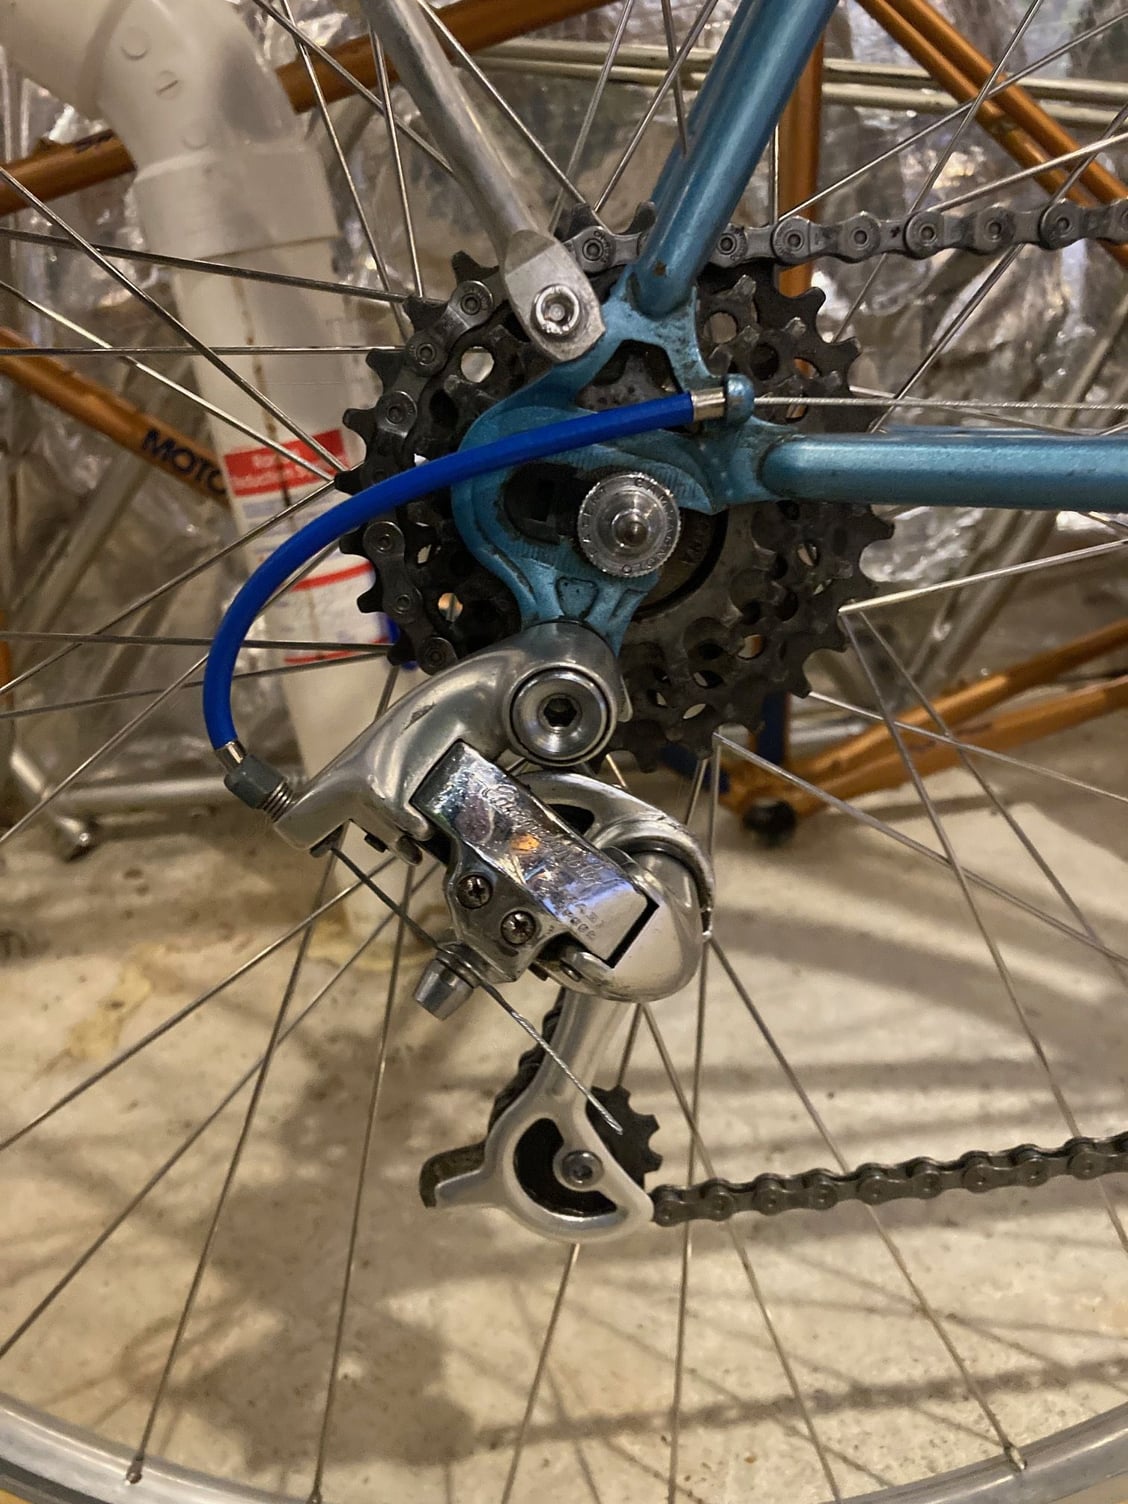
Just
Just finished this Motobecane Super Mirage. Either Motobecane or Compagnolo components. It has been a labor of love.
Likes For sbrudno:
03-16-23, 12:36 PM
#6017
Senior Member
Join Date: May 2008
Location: Fredericksburg, Va
Posts: 9,628
Bikes: '65 Frejus TDF, '73 Bottecchia Giro d'Italia, '83 Colnago Superissimo, '84 Trek 610, '84 Trek 760, '88 Pinarello Veneto, '88 De Rosa Pro, '89 Pinarello Montello, '94 Burley Duet, 97 Specialized RockHopper, 2010 Langster, Tern Link D8
Mentioned: 74 Post(s)
Tagged: 0 Thread(s)
Quoted: 1633 Post(s)
Liked 2,257 Times
in
1,127 Posts
In January I reported getting a Park 2.2 truing stand.
I broke down and bought the base. My rational was that the stand was such a good price that overpaying for some plastic and a couple of parts was worth it.
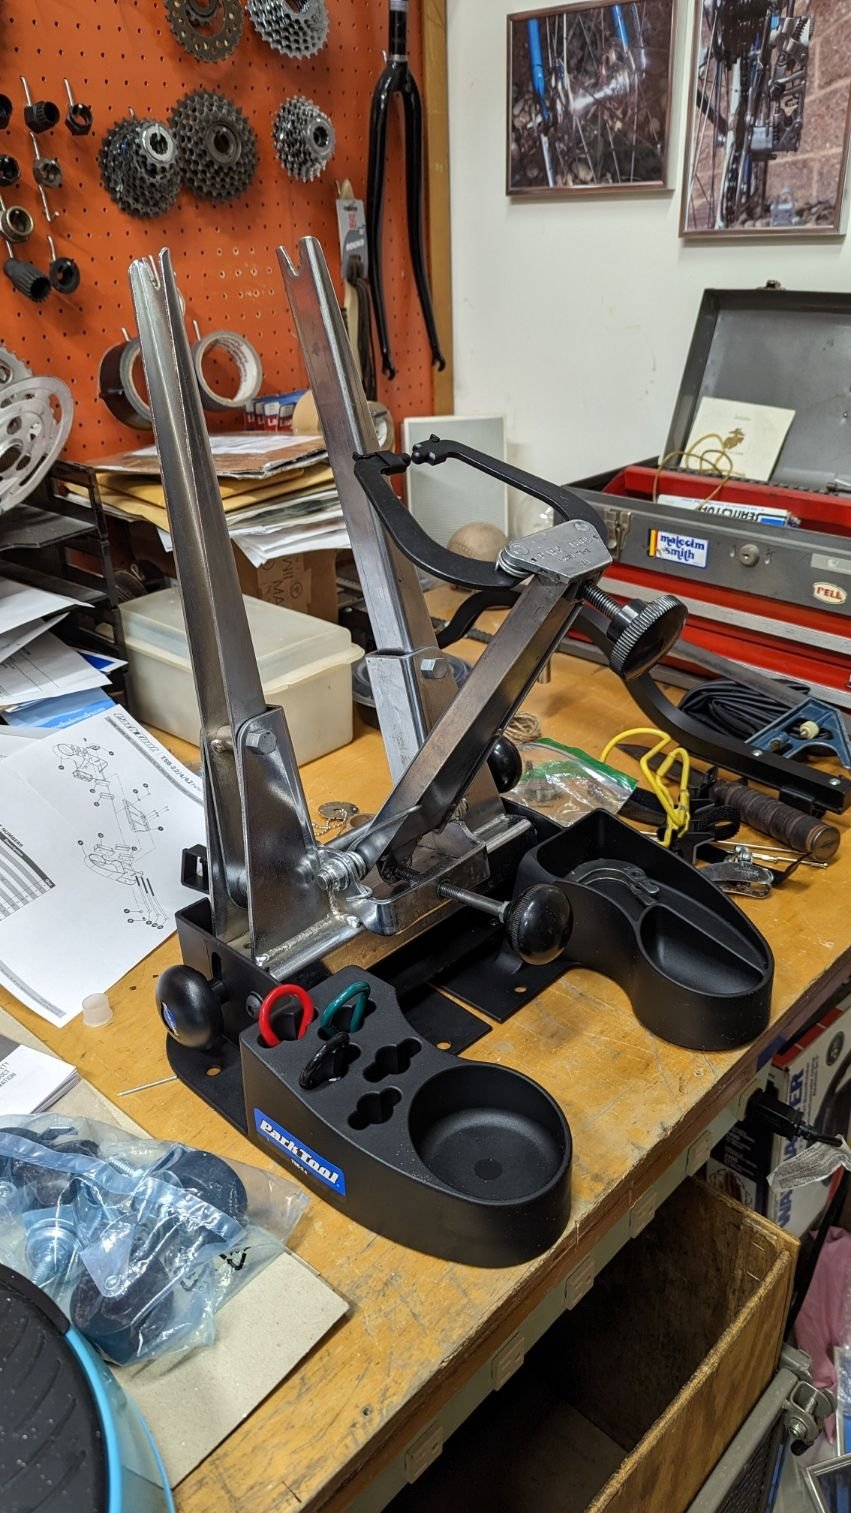
Today the broken, stuck adjustment screw was finally removed with some heat and lube. It was in the corner.
I broke down and bought the base. My rational was that the stand was such a good price that overpaying for some plastic and a couple of parts was worth it.
Today the broken, stuck adjustment screw was finally removed with some heat and lube. It was in the corner.
__________________
Bikes don't stand alone. They are two tired.
Bikes don't stand alone. They are two tired.
Likes For SJX426:
03-16-23, 04:06 PM
#6018
Senior Member
Join Date: May 2021
Location: London
Posts: 564
Bikes: Motobecane C41, Matsu$hita Nashonaru
Mentioned: 7 Post(s)
Tagged: 0 Thread(s)
Quoted: 215 Post(s)
Liked 439 Times
in
255 Posts
I'm still stuck with the Superbe Pro frame. Well, the stem is stuck, so patiently soaking it in oil and WD40. Don't really want to mess up $200 stem for sure. So I'm taking the long route here. No rush. Also drive side BB cup is stuck, but the obstacle here is lack of spring washers of correct size in my local hardware store. And then the freewheel still resists, so again, WD40 and oil soaking until I can get it off. I feel like my life would be much easier if everyone gresed stuff and maintained it properly, but these are the charms of working with vintage components.
So, whilst I'm waiting for oil and WD40 to soak into seized threads, I decided to make a start on the Superbe components. Today it was the pedals. Whilst I'm not able to take the cages off fully (again, stuck / seized screws), I did my best at cleaning them. I resigned myself to accepting they won't be visually perfect. Still, mechanically, they are fantastic. Smotth like butter. I was also todays' years old when I found out that using steel brush bit on the rotary tool is much better when working on chromed parts than using the brass brush bit. Clears out surface rust like a charm. Now I'm going to put these pedals on my daily commuting bike (replacing current Lyotard 460D which need some adjustment) to get used to them. Heck, to be honest, I'm really tempted to put all the Superbe components on it and thake them for a spin.
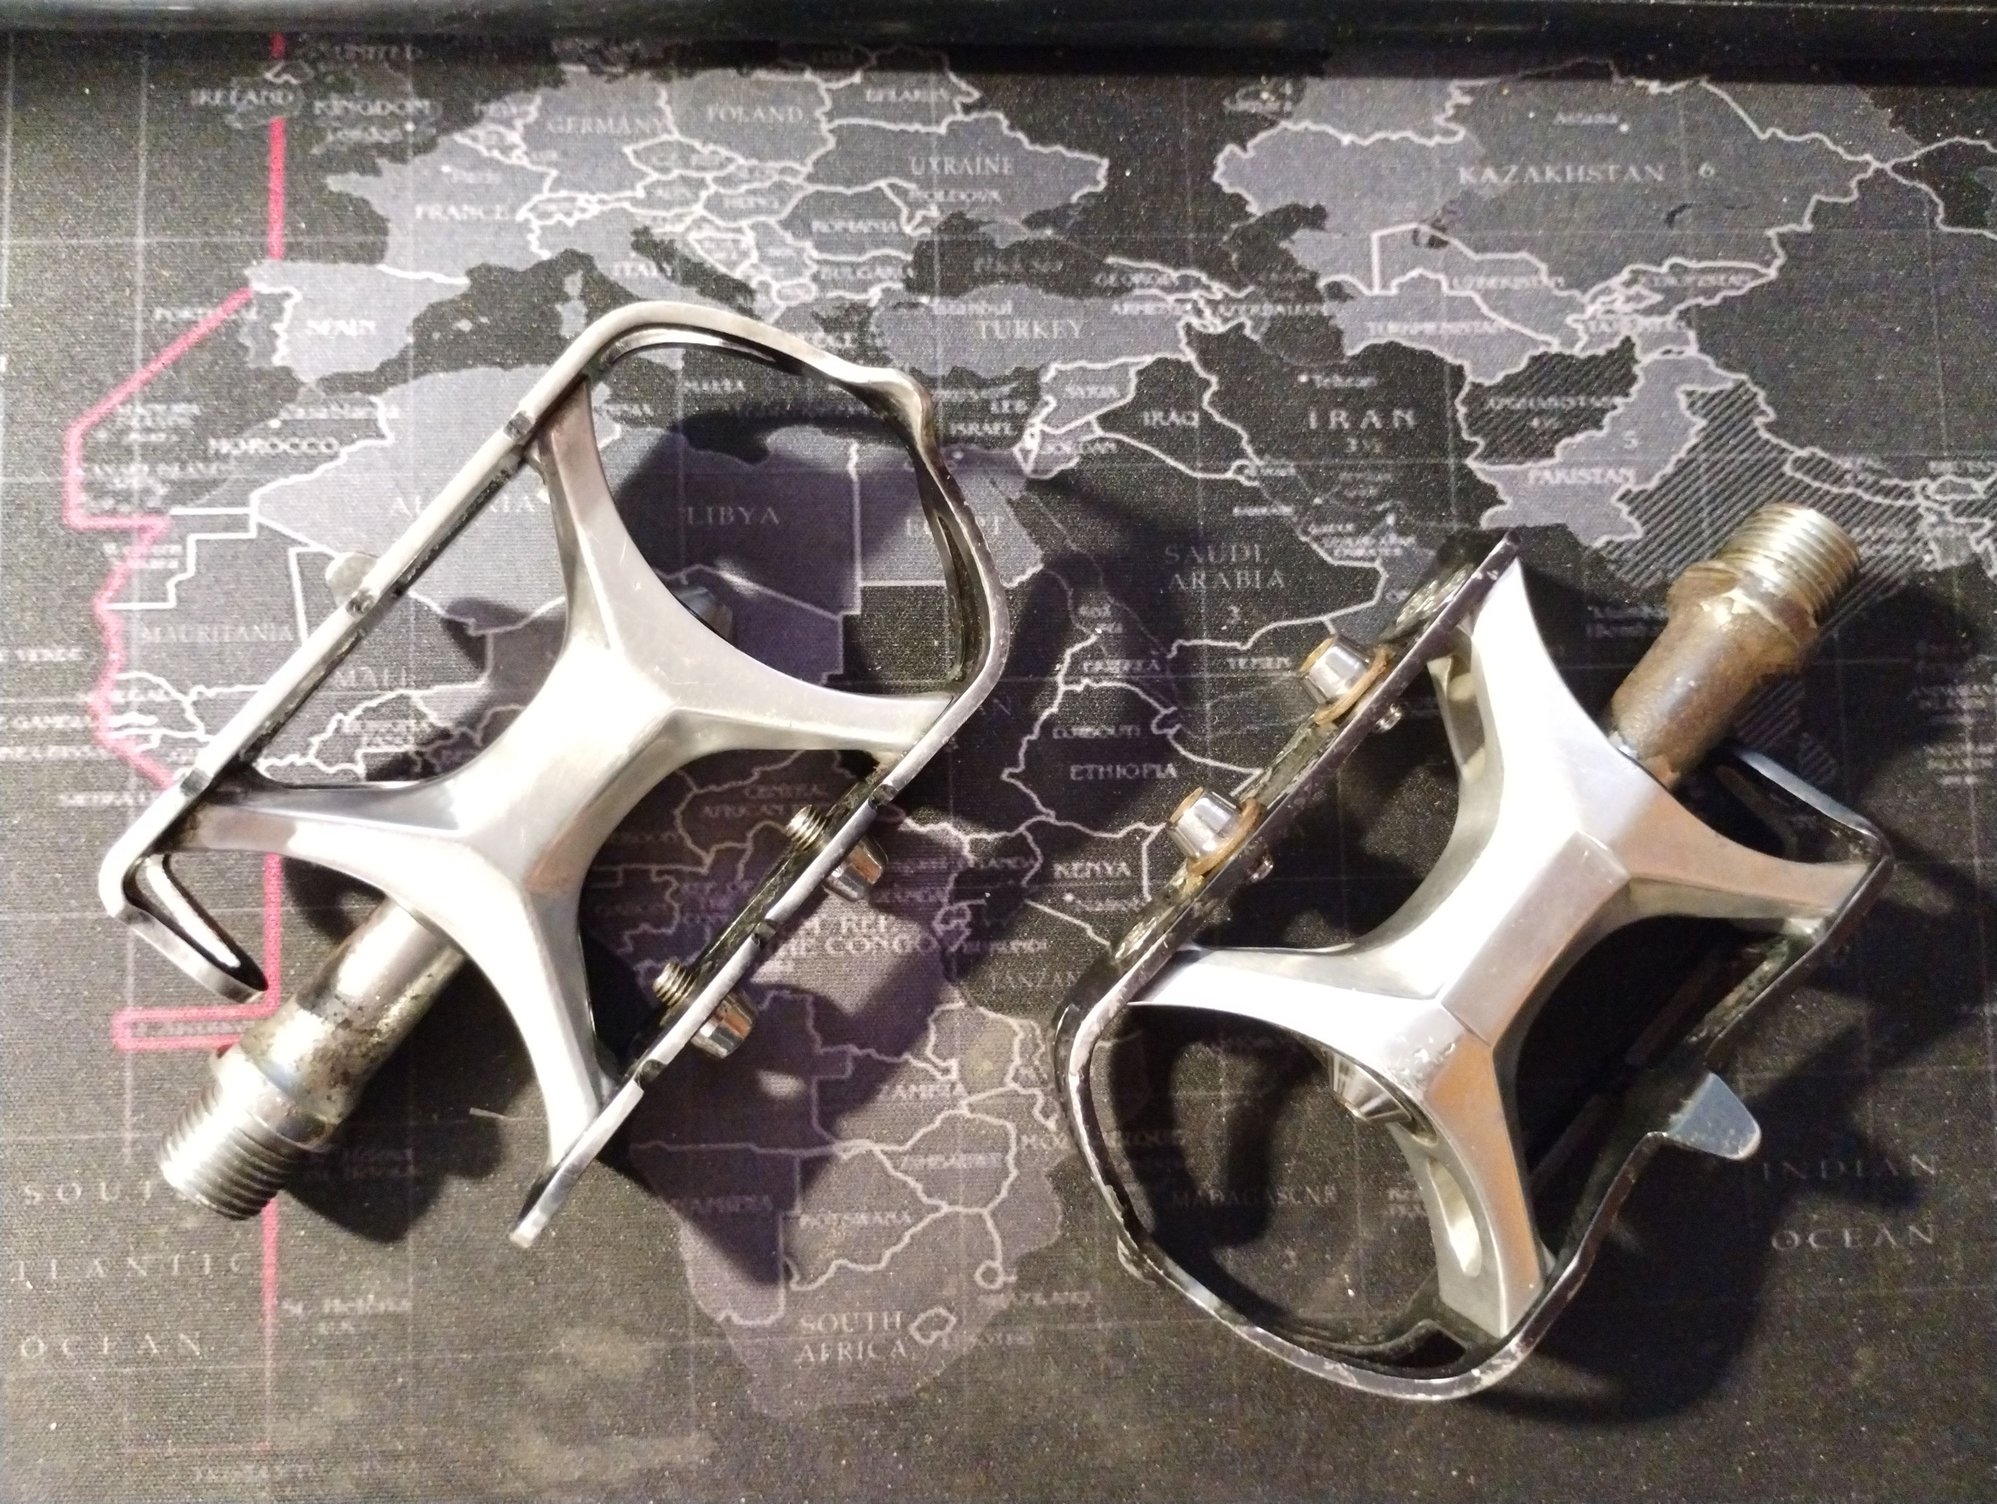
So, whilst I'm waiting for oil and WD40 to soak into seized threads, I decided to make a start on the Superbe components. Today it was the pedals. Whilst I'm not able to take the cages off fully (again, stuck / seized screws), I did my best at cleaning them. I resigned myself to accepting they won't be visually perfect. Still, mechanically, they are fantastic. Smotth like butter. I was also todays' years old when I found out that using steel brush bit on the rotary tool is much better when working on chromed parts than using the brass brush bit. Clears out surface rust like a charm. Now I'm going to put these pedals on my daily commuting bike (replacing current Lyotard 460D which need some adjustment) to get used to them. Heck, to be honest, I'm really tempted to put all the Superbe components on it and thake them for a spin.
Likes For VintageSteelEU:
03-16-23, 05:37 PM
#6019
Senior Member
Join Date: Oct 2015
Location: PDX
Posts: 13,257
Bikes: Merz x 5 + Specialized Merz Allez x 2, Strawberry/Newlands/DiNucci/Ti x3, Gordon, Fuso/Moulton x2, Bornstein, Paisley,1958-74 Paramounts x3, 3rensho, 74 Moto TC, 73-78 Raleigh Pro's x5, Marinoni x2, 1960 Cinelli SC, 1980 Bianchi SC, PX-10 X 2
Mentioned: 271 Post(s)
Tagged: 0 Thread(s)
Quoted: 4574 Post(s)
Liked 6,559 Times
in
3,765 Posts
I'm still stuck with the Superbe Pro frame. Well, the stem is stuck, so patiently soaking it in oil and WD40. Don't really want to mess up $200 stem for sure. So I'm taking the long route here. No rush. Also drive side BB cup is stuck, but the obstacle here is lack of spring washers of correct size in my local hardware store. And then the freewheel still resists, so again, WD40 and oil soaking until I can get it off. I feel like my life would be much easier if everyone gresed stuff and maintained it properly, but these are the charms of working with vintage components.
So, whilst I'm waiting for oil and WD40 to soak into seized threads, I decided to make a start on the Superbe components. Today it was the pedals. Whilst I'm not able to take the cages off fully (again, stuck / seized screws), I did my best at cleaning them. I resigned myself to accepting they won't be visually perfect. Still, mechanically, they are fantastic. Smotth like butter. I was also todays' years old when I found out that using steel brush bit on the rotary tool is much better when working on chromed parts than using the brass brush bit. Clears out surface rust like a charm. Now I'm going to put these pedals on my daily commuting bike (replacing current Lyotard 460D which need some adjustment) to get used to them. Heck, to be honest, I'm really tempted to put all the Superbe components on it and thake them for a spin.
So, whilst I'm waiting for oil and WD40 to soak into seized threads, I decided to make a start on the Superbe components. Today it was the pedals. Whilst I'm not able to take the cages off fully (again, stuck / seized screws), I did my best at cleaning them. I resigned myself to accepting they won't be visually perfect. Still, mechanically, they are fantastic. Smotth like butter. I was also todays' years old when I found out that using steel brush bit on the rotary tool is much better when working on chromed parts than using the brass brush bit. Clears out surface rust like a charm. Now I'm going to put these pedals on my daily commuting bike (replacing current Lyotard 460D which need some adjustment) to get used to them. Heck, to be honest, I'm really tempted to put all the Superbe components on it and thake them for a spin.
I really do hope you get there, I have a couple of stuck stems that I refuse to destruct including one that has the wedge completely pulled up inside the stem.
They both got soaked and manhandled a bunch to no avail so far, I need to get back after them.

Likes For merziac:
03-16-23, 10:36 PM
#6020
Cantilever believer

Join Date: Nov 2021
Location: Phoenix, AZ
Posts: 1,663
Mentioned: 6 Post(s)
Tagged: 0 Thread(s)
Quoted: 568 Post(s)
Liked 1,970 Times
in
886 Posts
Today's wrenching wasn't on an actual bicycle, but adding additional bicycle carrying capacity to my ol' pickup. Recently I've had to repeatedly carry 10+ bikes at a time, so I figure space for two more up front should prove useful soon.
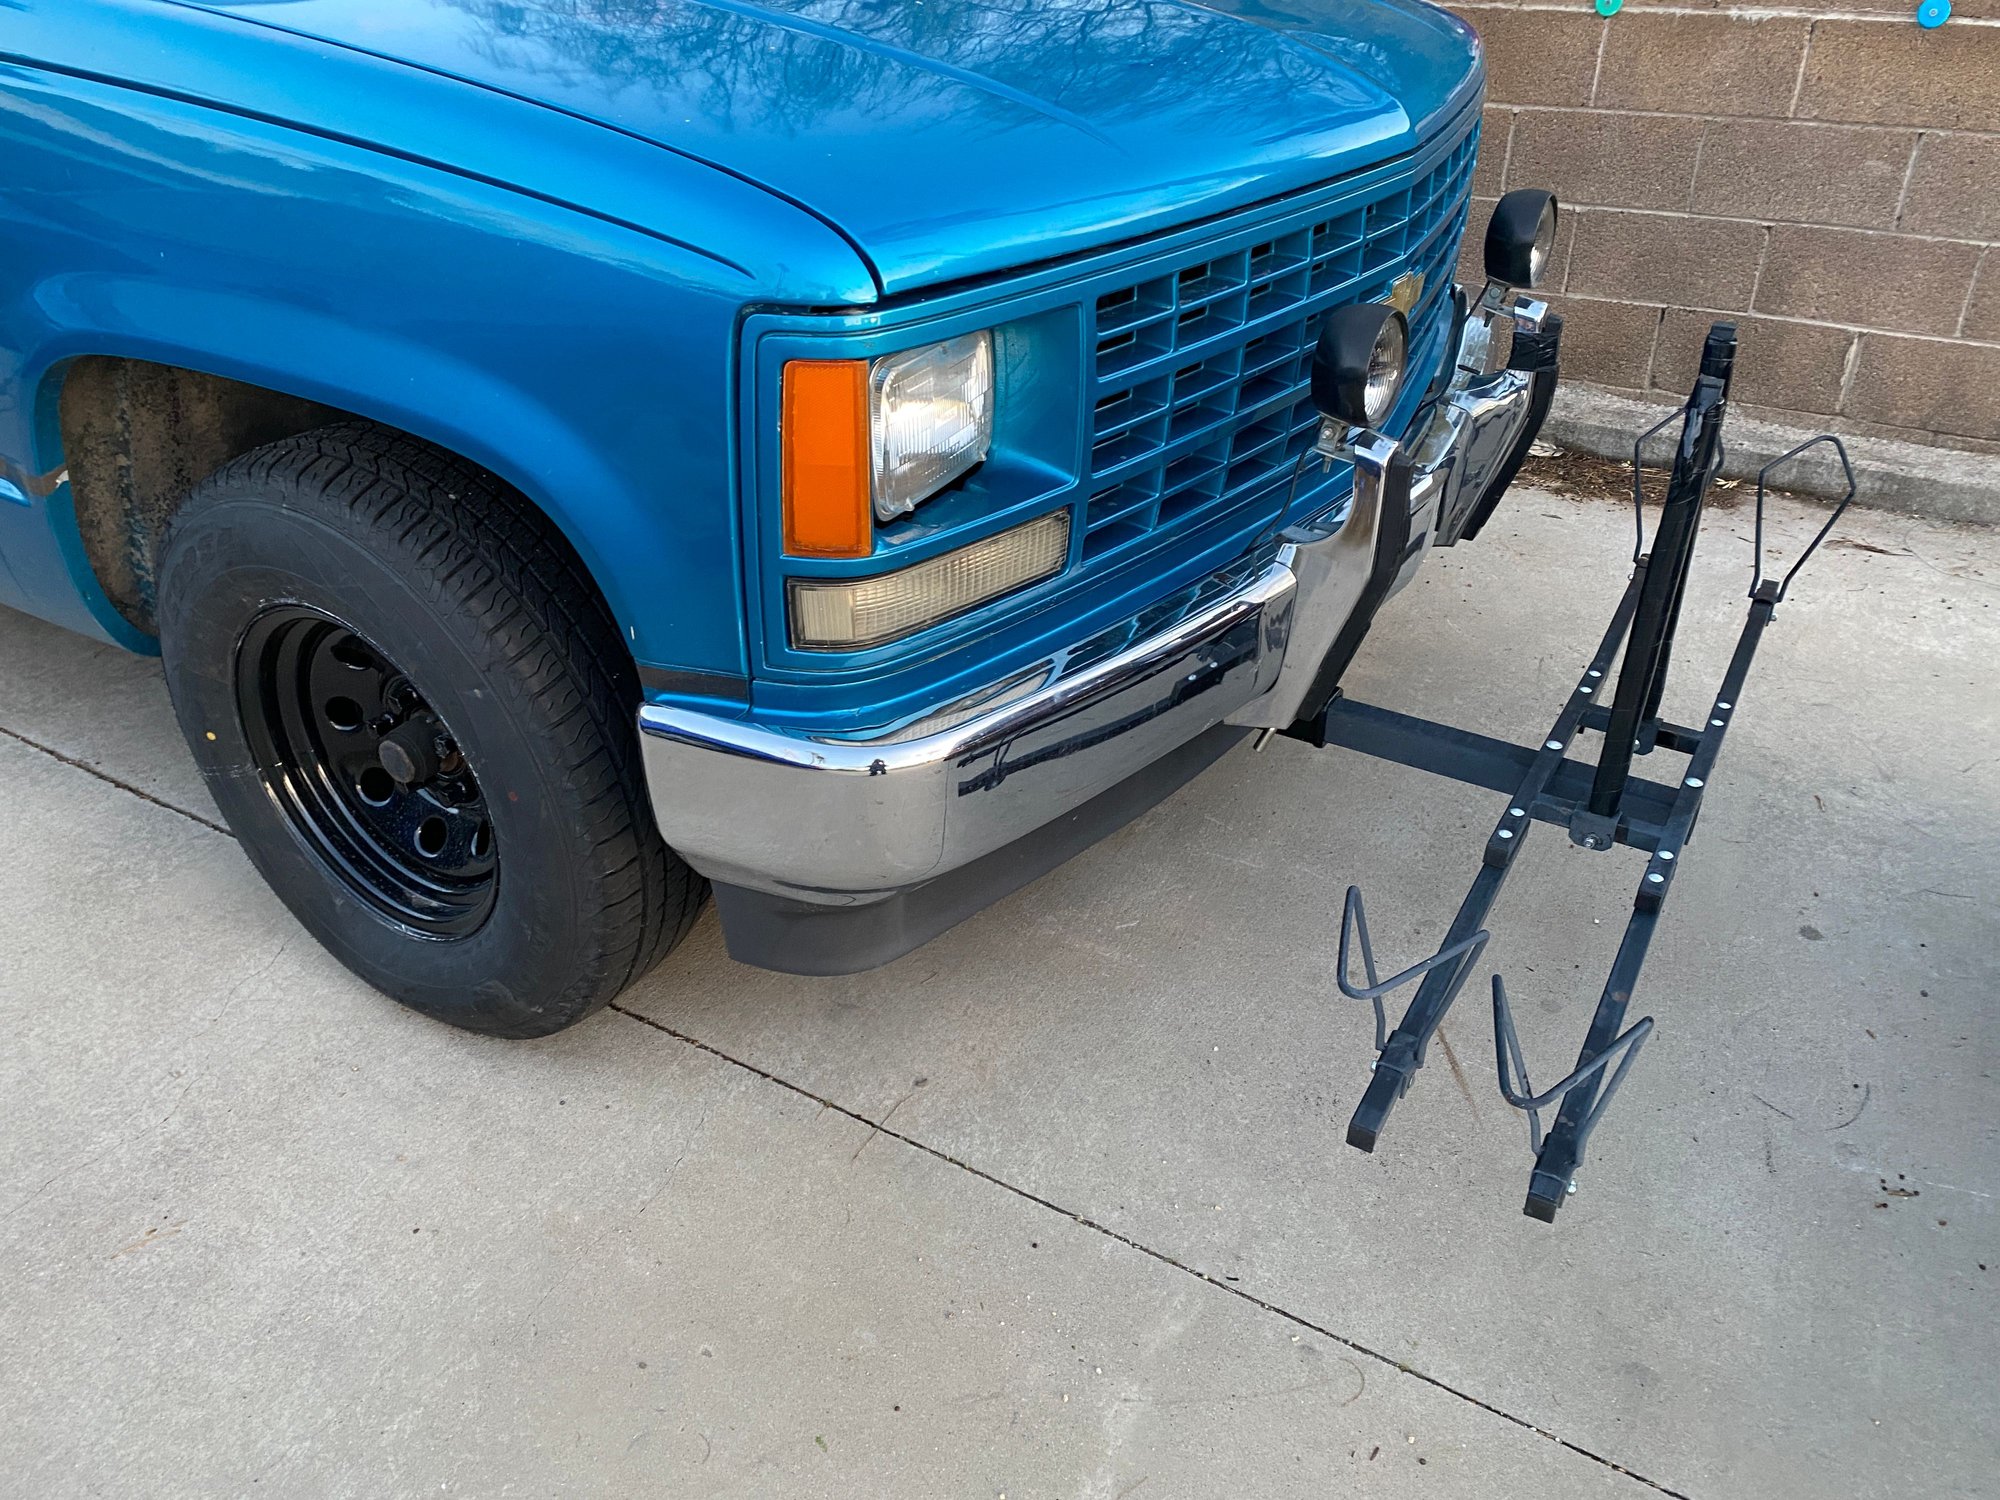
Just need to check the curb clearance, and we should be set.
Just need to check the curb clearance, and we should be set.
__________________
Richard C. Moeur, PE - Phoenix AZ, USA
https://www.richardcmoeur.com/bikestuf.html
Richard C. Moeur, PE - Phoenix AZ, USA
https://www.richardcmoeur.com/bikestuf.html
Likes For RCMoeur:
03-16-23, 10:42 PM
#6021
Banned.

Join Date: Jul 2009
Location: PAZ
Posts: 12,294
Mentioned: 256 Post(s)
Tagged: 0 Thread(s)
Quoted: 2588 Post(s)
Liked 4,829 Times
in
1,709 Posts
Drat! I must've hit my "Like Limit" for this 24-hour period once again!

 This is gettin' redonkulous...
DD
This is gettin' redonkulous...DD

Likes For Drillium Dude:
03-16-23, 11:40 PM
#6022
Senior Member
Join Date: May 2021
Location: London
Posts: 564
Bikes: Motobecane C41, Matsu$hita Nashonaru
Mentioned: 7 Post(s)
Tagged: 0 Thread(s)
Quoted: 215 Post(s)
Liked 439 Times
in
255 Posts
IMO, you may not get there with WD and oil, you need a far more robust penetrant, PB Blaster, Kroil, ATF and acetone, Marvel Mystery oil or the like.
I really do hope you get there, I have a couple of stuck stems that I refuse to destruct including one that has the wedge completely pulled up inside the stem.
They both got soaked and manhandled a bunch to no avail so far, I need to get back after them.
I really do hope you get there, I have a couple of stuck stems that I refuse to destruct including one that has the wedge completely pulled up inside the stem.
They both got soaked and manhandled a bunch to no avail so far, I need to get back after them.

The wedge here is of the conical variety. I was trying to shine some light down the stem yesterday and it does seem to be inside the stem still. Not actually sure if the wedge is steel, though difficult to say looking through a 6mm hole. The next stage will be blocking the head tube from below and spraying stuff inside the bolt hole of the stem. And then probably looking for more effective penetrants.
The bicycle was generally in an okay-ish condition, it probably was stored somewhere indoors and perhaps ridden sometime over the last decade. So I'm hoping the stem isn't stuck too bad. If it doesn't come out, I will probably build the bike up anyway and ride it for some time (and regulary spray the stem / inside of it with penetrants). Perhaps this will help to get it unstuck.
03-17-23, 12:21 AM
#6023
Senior Member
Join Date: Oct 2015
Location: PDX
Posts: 13,257
Bikes: Merz x 5 + Specialized Merz Allez x 2, Strawberry/Newlands/DiNucci/Ti x3, Gordon, Fuso/Moulton x2, Bornstein, Paisley,1958-74 Paramounts x3, 3rensho, 74 Moto TC, 73-78 Raleigh Pro's x5, Marinoni x2, 1960 Cinelli SC, 1980 Bianchi SC, PX-10 X 2
Mentioned: 271 Post(s)
Tagged: 0 Thread(s)
Quoted: 4574 Post(s)
Liked 6,559 Times
in
3,765 Posts
That's what I have at hand at the moment, so it probably won't hurt. Got a bottle of acetone somewhere though, thanks for reminding me
The wedge here is of the conical variety. I was trying to shine some light down the stem yesterday and it does seem to be inside the stem still. Not actually sure if the wedge is steel, though difficult to say looking through a 6mm hole. The next stage will be blocking the head tube from below and spraying stuff inside the bolt hole of the stem. And then probably looking for more effective penetrants.
The bicycle was generally in an okay-ish condition, it probably was stored somewhere indoors and perhaps ridden sometime over the last decade. So I'm hoping the stem isn't stuck too bad. If it doesn't come out, I will probably build the bike up anyway and ride it for some time (and regulary spray the stem / inside of it with penetrants). Perhaps this will help to get it unstuck.
If the wedge is still engaged, that may be why it is still stuck or whats keeping it stuck.
Then if you get the wedge out and the stem is still stuck, you can attack it from the bottom and or plug the top to fill with juice if need be.
Strip it down as much as you can to manipulate and wrestle with it.
03-17-23, 09:04 AM
#6024
Senior Member
Join Date: May 2021
Location: London
Posts: 564
Bikes: Motobecane C41, Matsu$hita Nashonaru
Mentioned: 7 Post(s)
Tagged: 0 Thread(s)
Quoted: 215 Post(s)
Liked 439 Times
in
255 Posts
If the wedge is still engaged, that may be why it is still stuck or whats keeping it stuck.
Then if you get the wedge out and the stem is still stuck, you can attack it from the bottom and or plug the top to fill with juice if need be.
Strip it down as much as you can to manipulate and wrestle with it.
Then if you get the wedge out and the stem is still stuck, you can attack it from the bottom and or plug the top to fill with juice if need be.
Strip it down as much as you can to manipulate and wrestle with it.
to this:
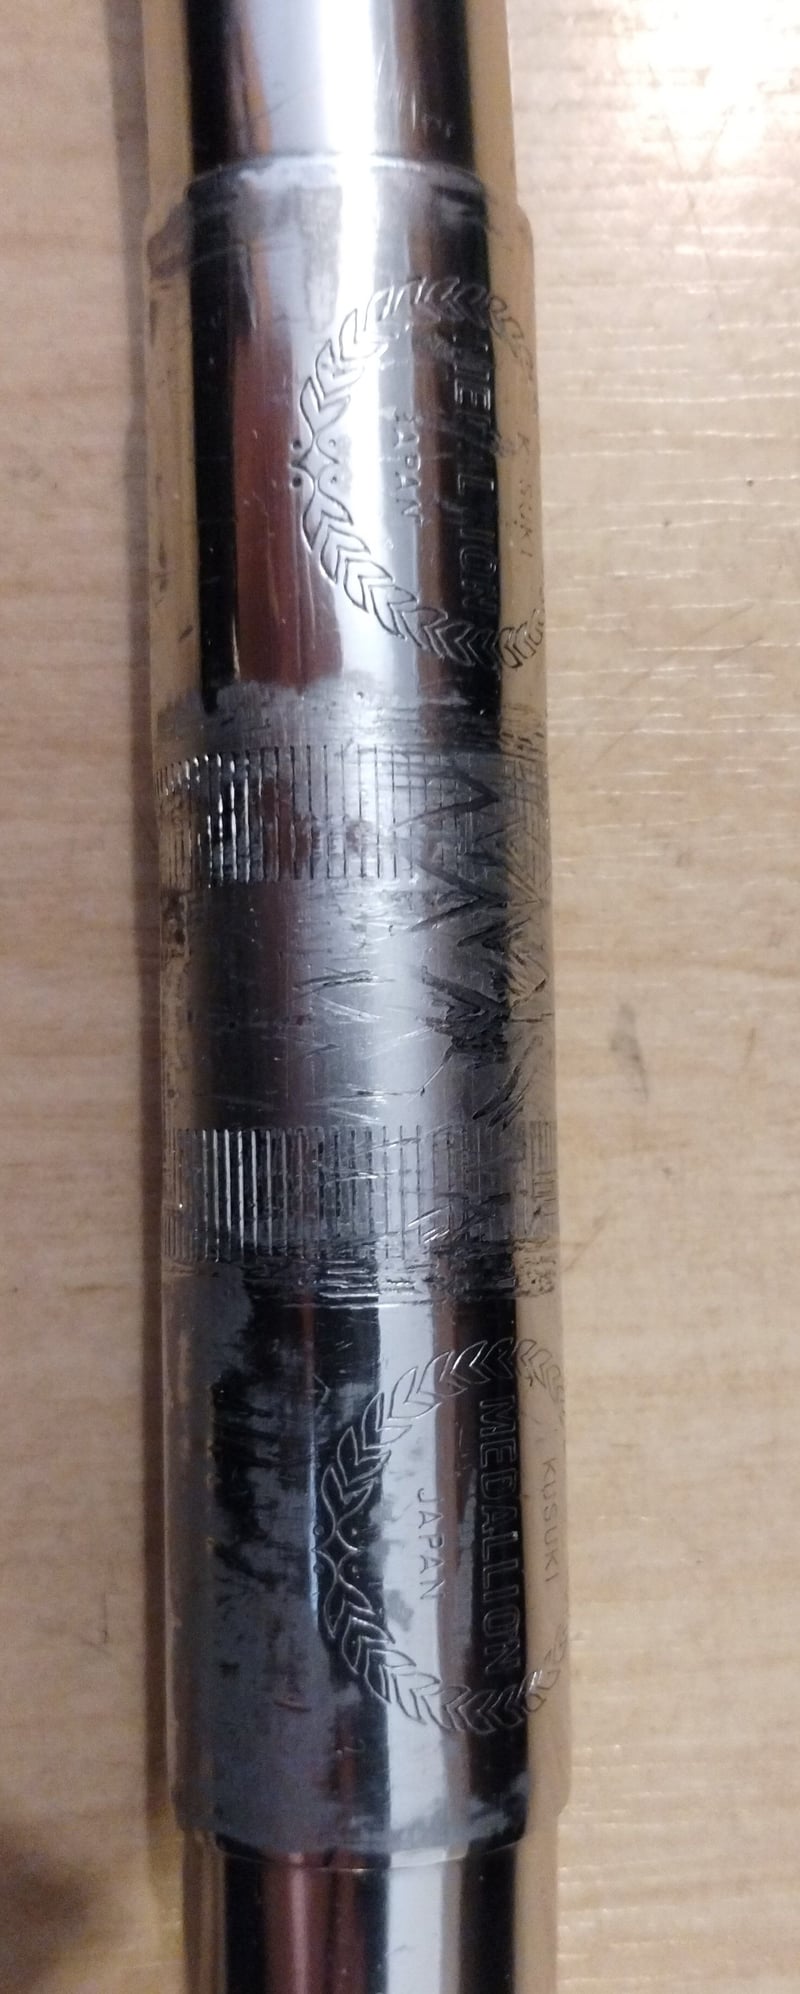
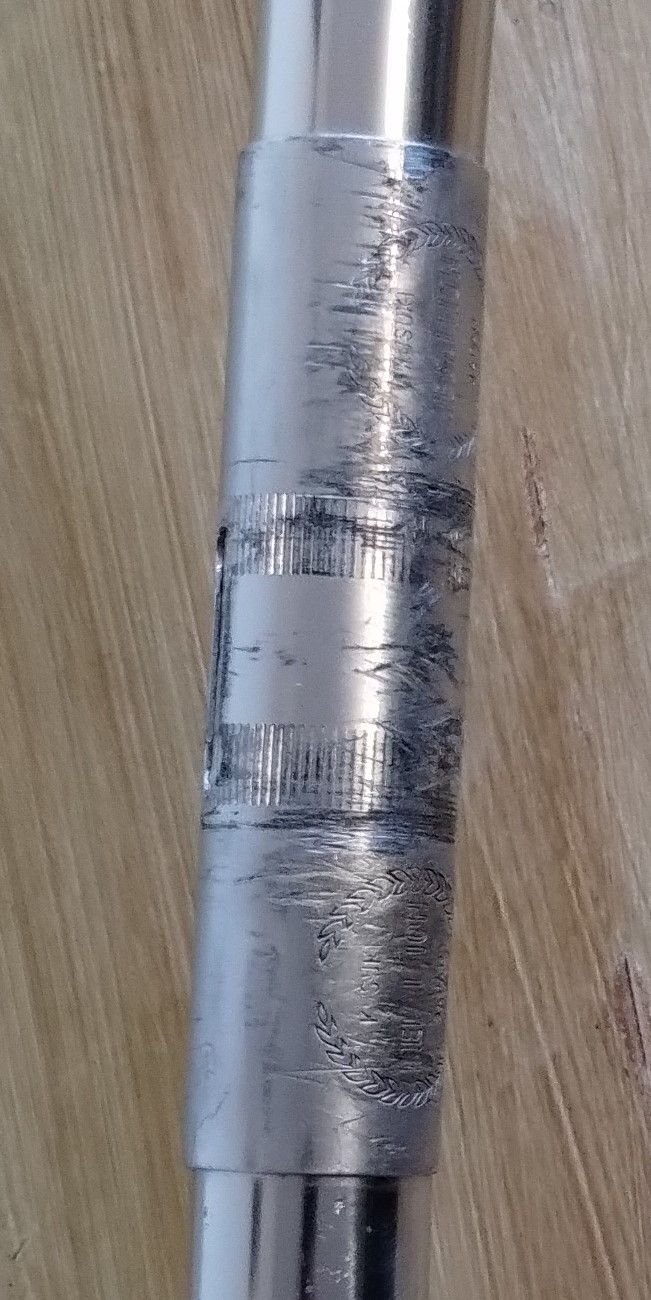
Of course, it's not over yet, I expect several more sessions with 1k grit sand paper and some water, alternating with sessions with polishing paste. They will look alright in the end, though battle scars are sadly here to say. I might use a shim for the central bit and camouflage bits sticking out of the stem.
I'd happily replace the bars, but Kusuki Medallion handlebars seem to be rather rare. No info on Velobase, for example, and these don't show up on fleabay too often. For now, I'm not sure if like the bend and width yet. These are 390mm and I'm used to wider handlebars, but I'll reserve my judgement until I'm able to take them for a spin. I might go for the other Kusuki model eventually.
03-18-23, 08:18 AM
#6025
Senior Member
Join Date: May 2021
Location: London
Posts: 564
Bikes: Motobecane C41, Matsu$hita Nashonaru
Mentioned: 7 Post(s)
Tagged: 0 Thread(s)
Quoted: 215 Post(s)
Liked 439 Times
in
255 Posts
I will be finally getting on with removing the fixed cup on the Superbe frame today and hopefully make a start on cleaning aluminium saw dust from there (remnants of the previous owner's seatpost removal). I think at some point I'll just have to flush it with something. Any recommendations for what I should do that with?
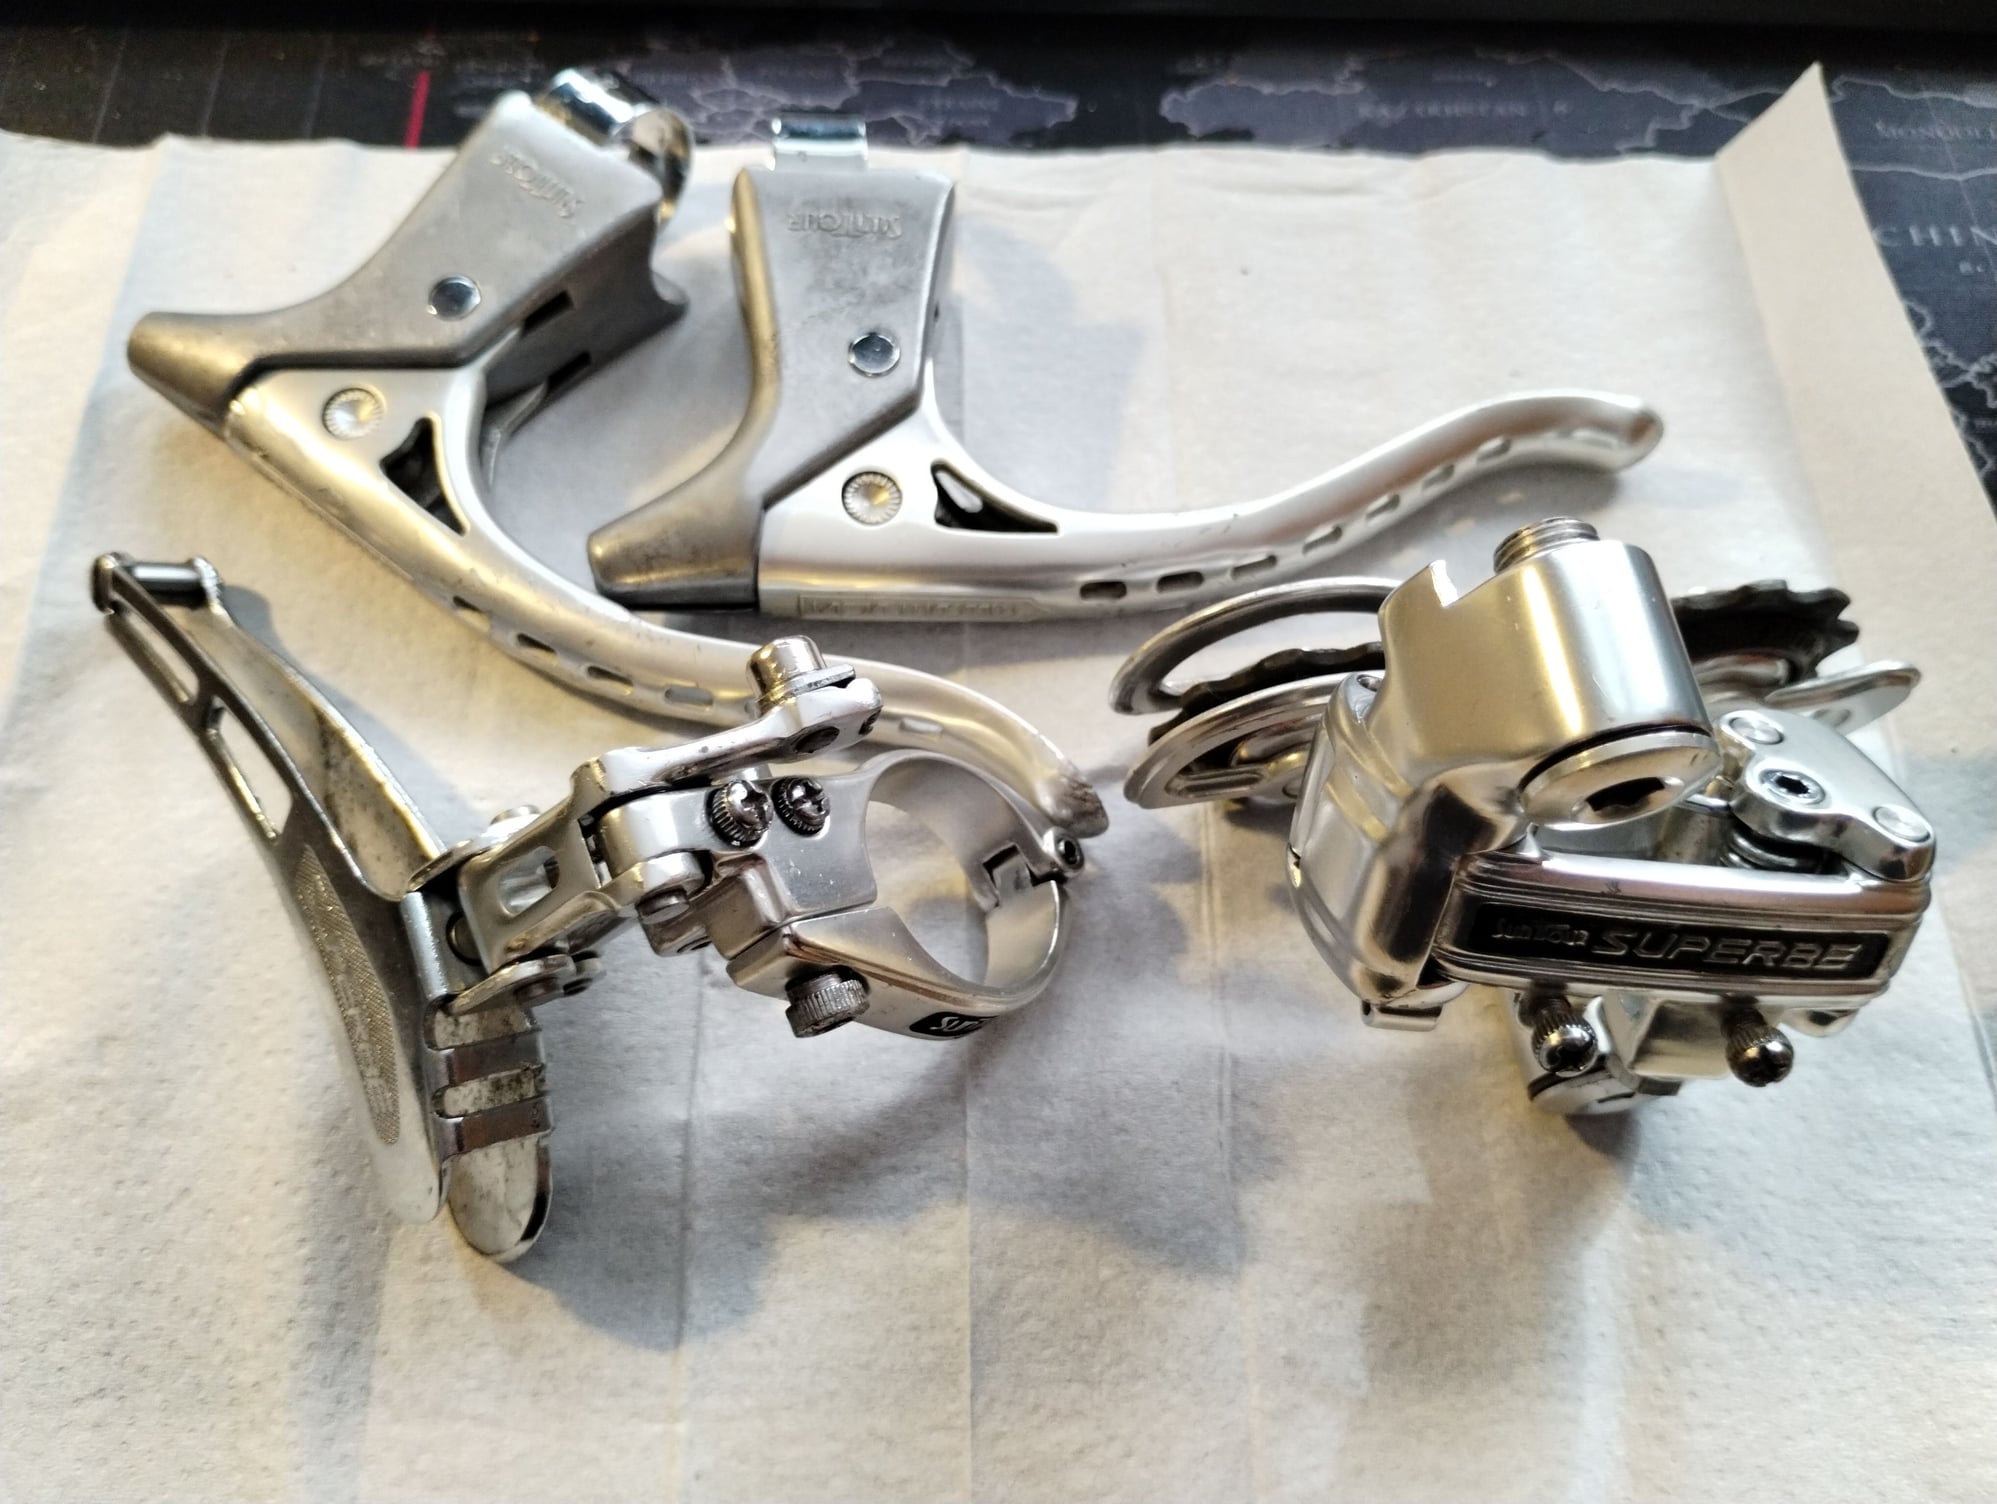
In the meantime, I'm getting on with cleaning the components. This batch was the brake levers, front derailleur and rear derailleur. All items have some scuff marks, but nothing too bad.
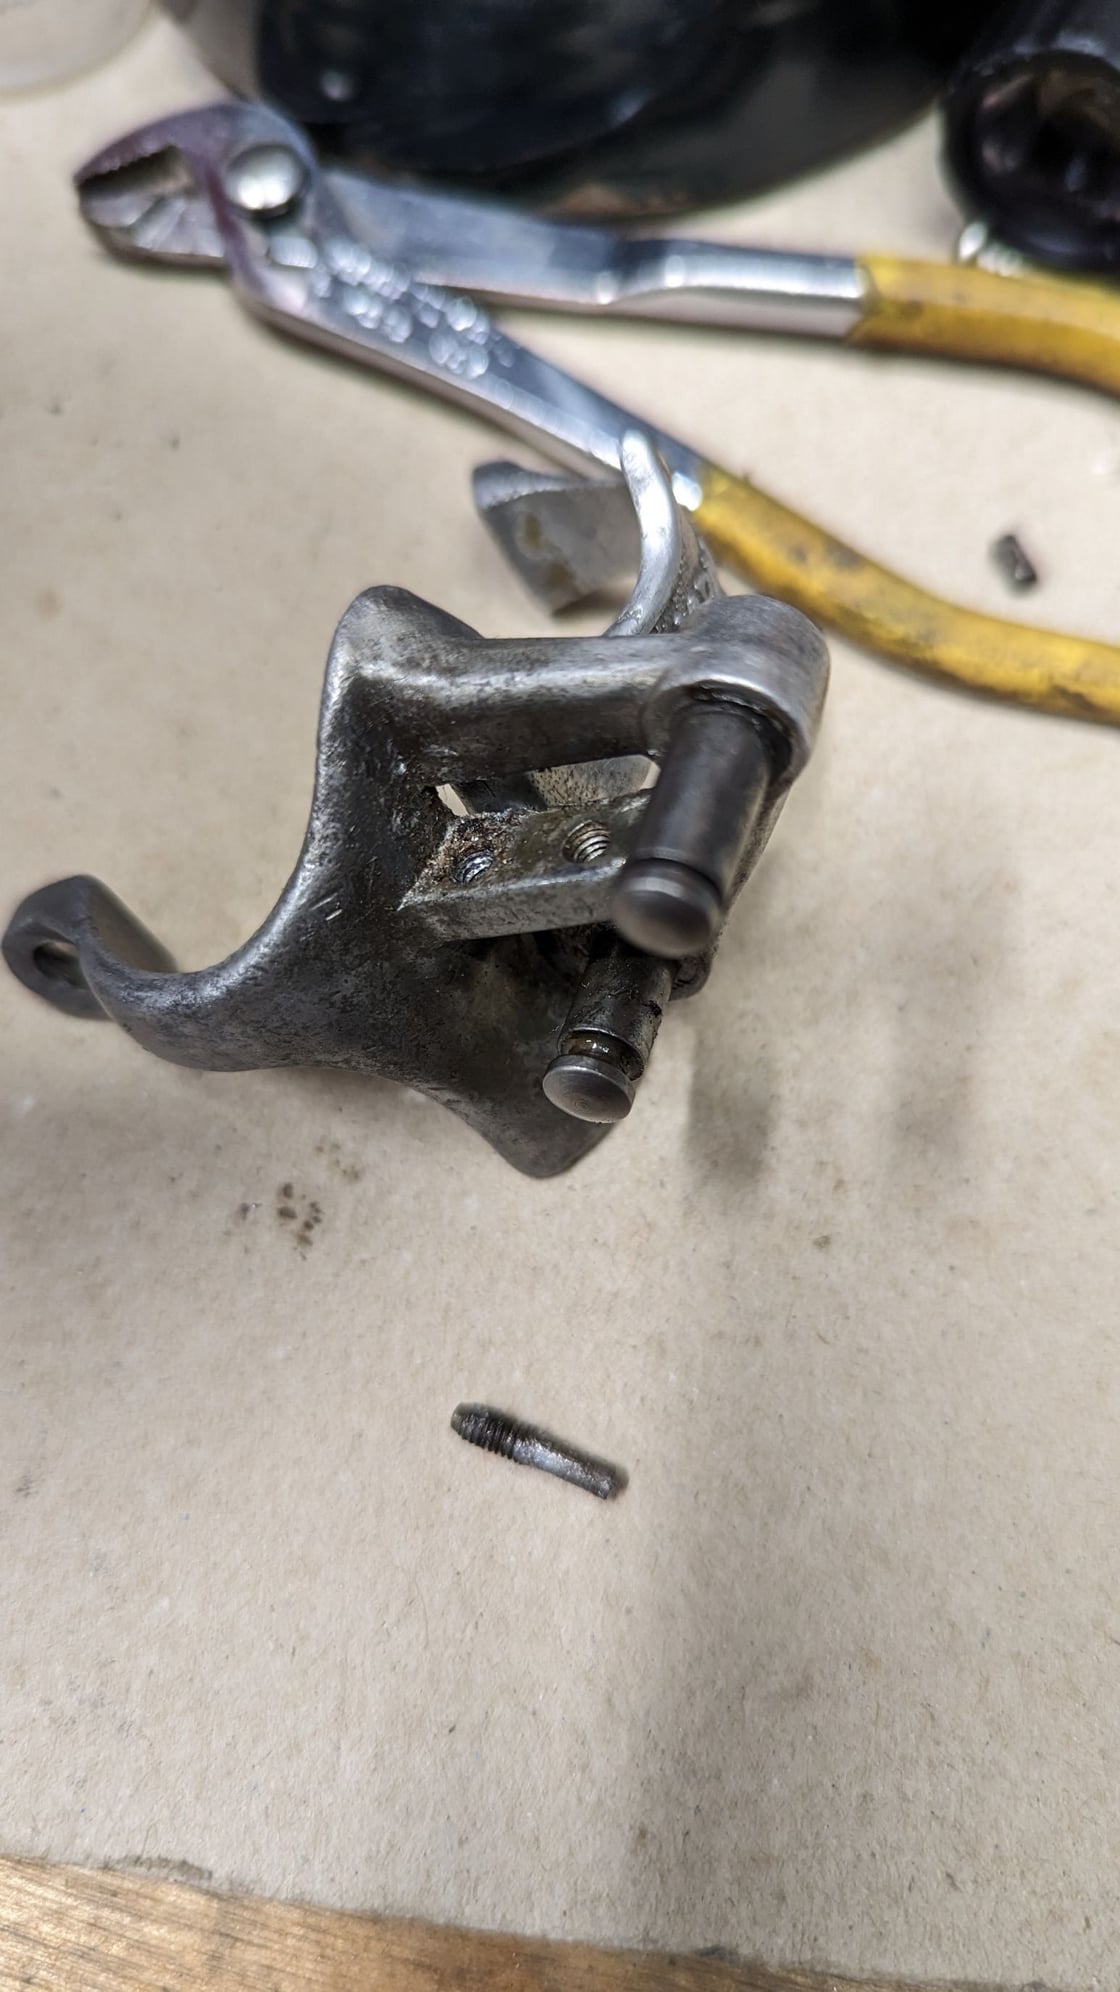
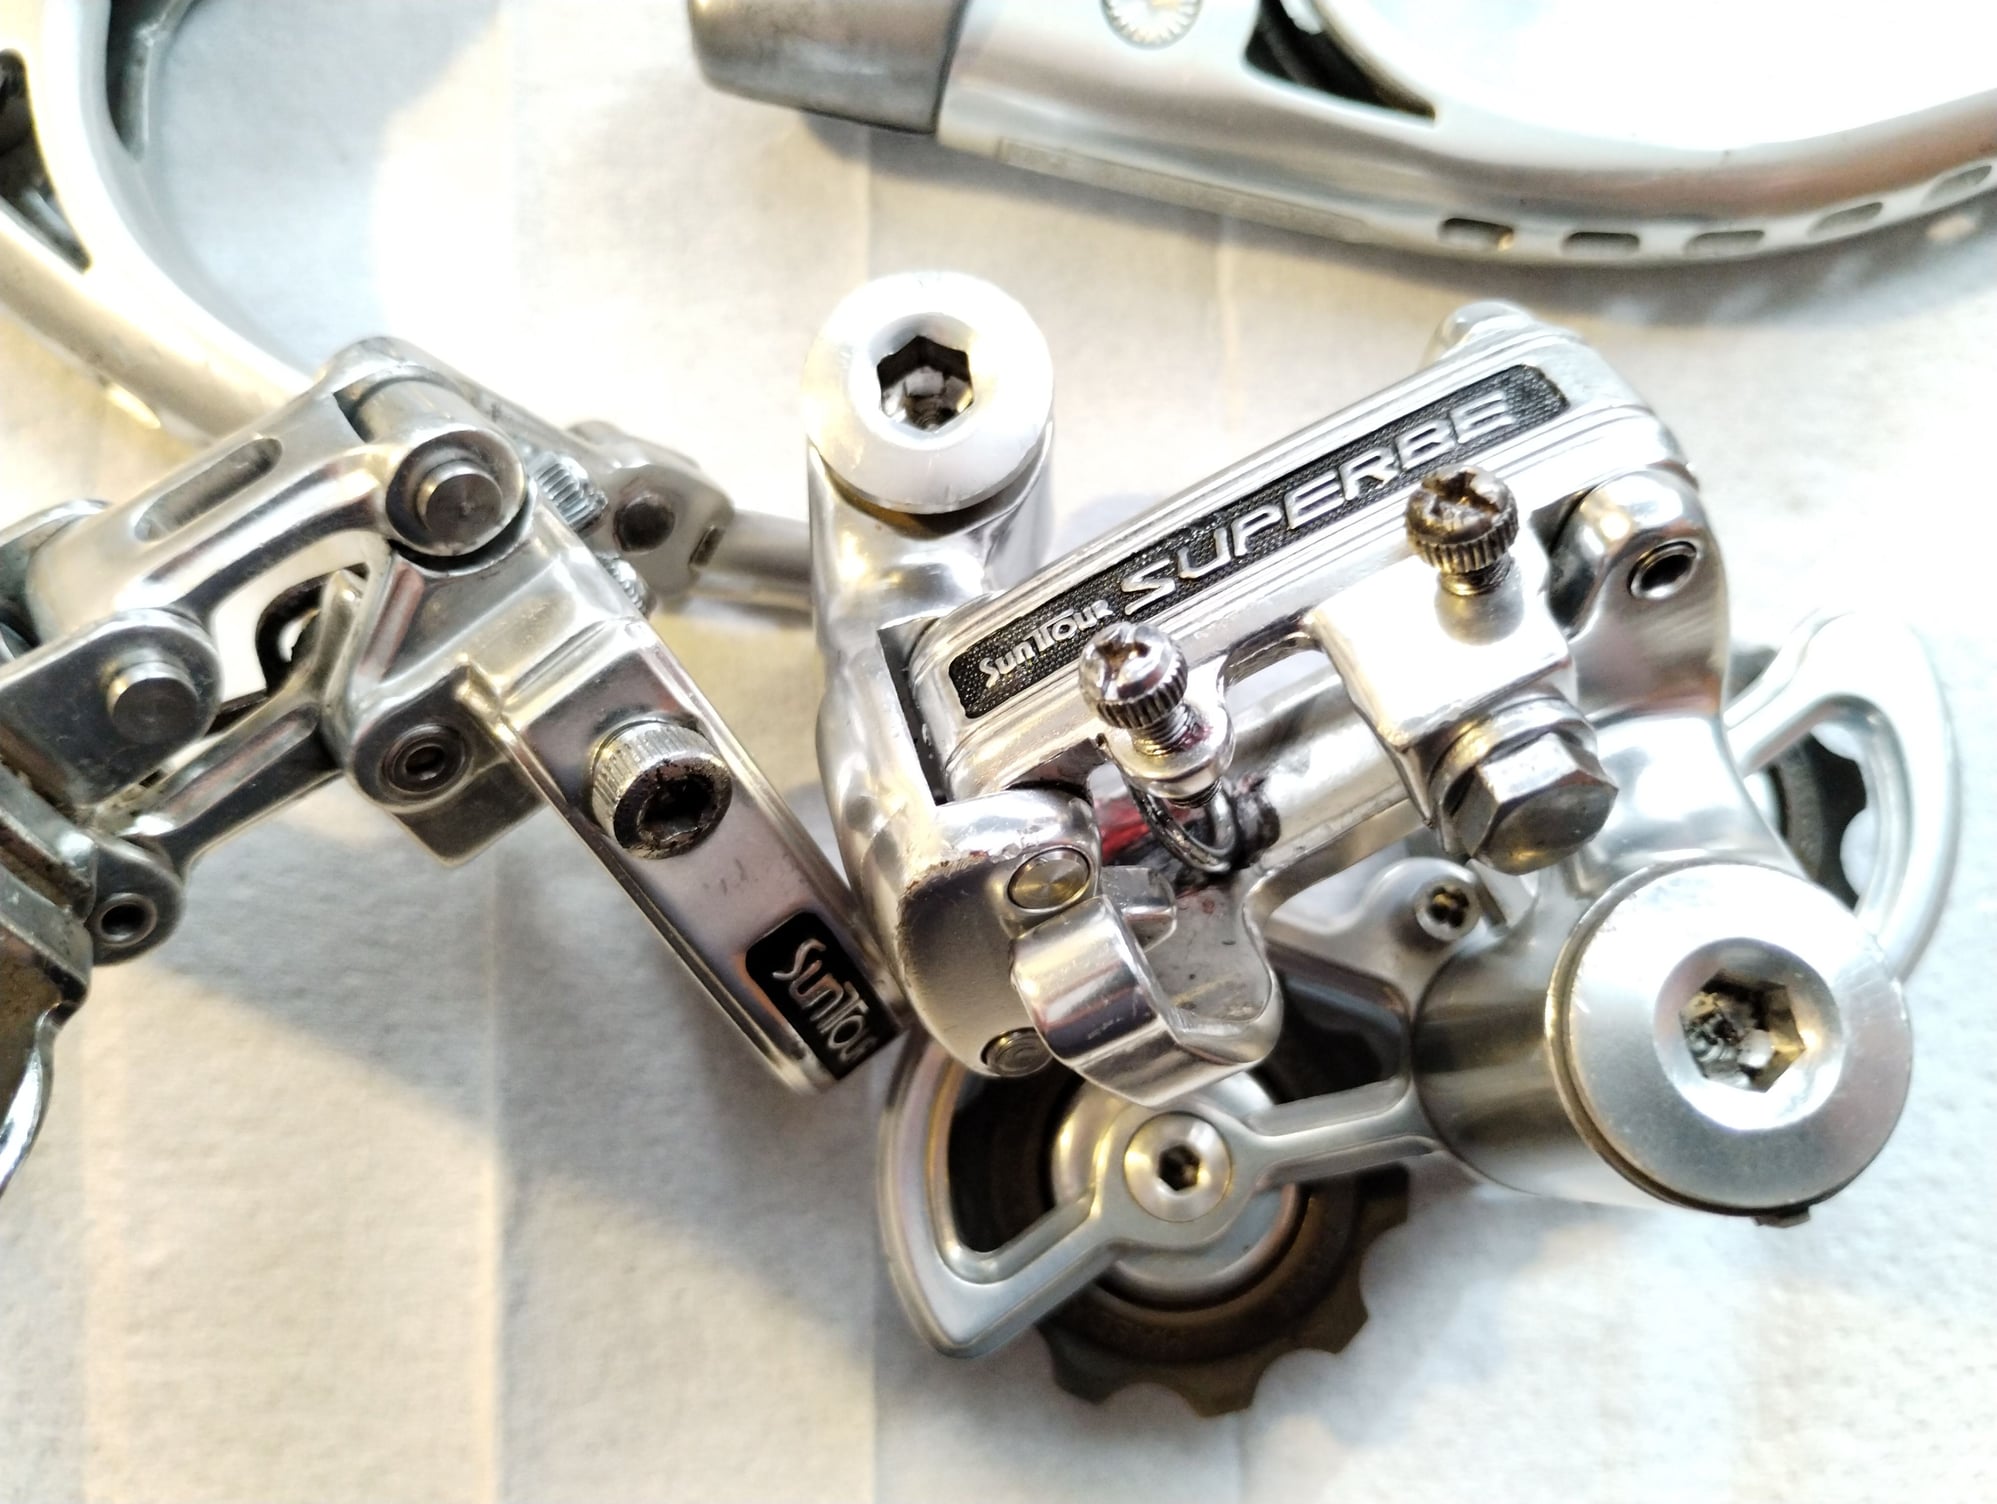
The rear derailleur is very similar to another one I have, which I previously thought was RD-2100 or some variant of. Right now I'm convinced both are actually versions of RD-3100. The difference between the ones I have is the type of bolt used to hold the parallelogram spring (hex on the other one vs allen key on the on in the photos). Both have aluminium pulley bolts and pivot bolts. So I think initially Suntour was reusing components from RD-2100 with slight updates to make it lighter and then at some point around 1979 they decided to change the bolt for parallelogram spring and go for allen key one for the cable clamping bolt.
This one wasn't quite as springhtly as the previous RD-3100 I got (which was NOS or close to). Pulley cage felt sluggish. After I disasembled the cage pivot, I found out that Suntour decided to use a shim (they sure loved their shims), or two, to be precise, to keep the spring firmly in place. Both shims / washers were shattered, which I suspect made the end of the spring loose. Of course, these washers were not exactly any standard washers, but very thin, stainless steel pieces designed to fit precisely over the bolt and notches for tensioning the spring. After a bit of rummaging I found out I have nothing remotely similar, so modified a standard washer to fit in there. Not the most elegant solution and will probably look for something else at some point, but it works and almost as good as the other copy.
I decided to disagree with Suntour's idea for allen key cable clamp bolt. There's no room on the derailleur for the one they chose and its head bumps into the casing for the cage pivot spring. So I went with the older solution: 8mm hex. After thoroughly cleaning, oiling and greasing the derailleur where needed I've put some black enamel into places on the logo where it was worn out. I think it doesn't look to shabby. I look forward to facing problems with maximum sprocket size and chain wrap Well, not really, I seldom use anything bigger than 24T, so should be alright.
In the meantime, I'm getting on with cleaning the components. This batch was the brake levers, front derailleur and rear derailleur. All items have some scuff marks, but nothing too bad.
The rear derailleur is very similar to another one I have, which I previously thought was RD-2100 or some variant of. Right now I'm convinced both are actually versions of RD-3100. The difference between the ones I have is the type of bolt used to hold the parallelogram spring (hex on the other one vs allen key on the on in the photos). Both have aluminium pulley bolts and pivot bolts. So I think initially Suntour was reusing components from RD-2100 with slight updates to make it lighter and then at some point around 1979 they decided to change the bolt for parallelogram spring and go for allen key one for the cable clamping bolt.
This one wasn't quite as springhtly as the previous RD-3100 I got (which was NOS or close to). Pulley cage felt sluggish. After I disasembled the cage pivot, I found out that Suntour decided to use a shim (they sure loved their shims), or two, to be precise, to keep the spring firmly in place. Both shims / washers were shattered, which I suspect made the end of the spring loose. Of course, these washers were not exactly any standard washers, but very thin, stainless steel pieces designed to fit precisely over the bolt and notches for tensioning the spring. After a bit of rummaging I found out I have nothing remotely similar, so modified a standard washer to fit in there. Not the most elegant solution and will probably look for something else at some point, but it works and almost as good as the other copy.
I decided to disagree with Suntour's idea for allen key cable clamp bolt. There's no room on the derailleur for the one they chose and its head bumps into the casing for the cage pivot spring. So I went with the older solution: 8mm hex. After thoroughly cleaning, oiling and greasing the derailleur where needed I've put some black enamel into places on the logo where it was worn out. I think it doesn't look to shabby. I look forward to facing problems with maximum sprocket size and chain wrap
Well, not really, I seldom use anything bigger than 24T, so should be alright.
Likes For VintageSteelEU: