


Your custom, Constructeur inspired modifications
 08-10-16 | 11:38 AM
#1
Thread Starter
Newbie
Joined: May 2016
Posts: 51
Likes: 2
From: Ontario, Canada
Your custom, Constructeur inspired modifications
I know many of us enjoy working on bicycles almost as much as riding them. I really like keeping the classic & vintage appearance while still having a functionable and reliable ride. There has been some impressive custom work to frames, components and acessories that I have seen in many different build/restoration threads over the years. I would like to see them all in one place, both for reference and for inspiration to the rest of us of what is possible.
I'd like to see photos of everyones Constructeur-inspired modifications they have made to make modern components classic, or make classic components modern. Cutting up a plastic soda bottle and using it for a fender doesn't count. I want to see the real creative modifications, the well thought out ones. The ones that integrate components into the bicycle. Channelling the spirit of Rene Herse, or your inner J.P. Weigle.
Clever mounting solutions for accessories, LED internals put in a classic headlight/tail, clever headlight/tail light mounting or wire routing, creative fender mounting, re-shaping or re-radiusing, making quick-release or Rinko-style parts, modifying old or ill fitting racks, rattle can paint jobs that came out awesome, removing anodizing or excessive branding, milling and drilling components, customizing handlerbar/saddle bags and panniers, 27" to 700c conversions, 700c to 650b conversions, bringing components back from the dead with sanding and polishing, etc, etc, etc.
There is so much of this excellent work here on the C&V forum. So show off your finished product as well as process/progress pictures, even a how-to so we can try it ourselves.
 08-10-16 | 11:47 AM
#2
Banned
Joined: Jun 2010
Posts: 43,586
Likes: 1,380
From: NW,Oregon Coast
Bikes: 8
1975,
before the French word for 'someone who constructs stuff', was sold So effectively by VBQ.
You must be a subscriber since you are into the Jargon.
I built a Touring Frame with the cantilever bosses on the forward side of the seatstays. [Pannier Tailwind Aero]
mudguard mounted tail light Bulb 0.6w .. wire glued inside to the BB had a BB dynamo.
.. Explore . Pictures witheld.
Last edited by fietsbob; 08-10-16 at 11:54 AM.
08-10-16 | 11:48 AM
#3
Senior Member

Joined: Feb 2014
Posts: 2,750
Likes: 149
From: SD
Bikes: Handsome Fredward, Trek 1.1
My centerpull QR modifcation These should have been made this way from day one. As long as your pads aren't super close to the rim, you don't need a separate QR for the brake.

Oddly, the front 'fang' of what remains of the eyelet was left on merely for aesthetics. When I first attempted this modification I cut the front 'fang' to line up with rear one and they worked just as well, it just looks sketchy. 1 year of regular use, no issues. Full tutorial on my blog.
Oddly, the front 'fang' of what remains of the eyelet was left on merely for aesthetics. When I first attempted this modification I cut the front 'fang' to line up with rear one and they worked just as well, it just looks sketchy. 1 year of regular use, no issues. Full tutorial on my blog.
Last edited by 50voltphantom; 08-10-16 at 11:55 AM.
08-10-16 | 11:57 AM
#4

Calamari Marionette Ph.D
Joined: Dec 2013
Posts: 7,861
Likes: 41
From: Coeur d' Alene
Bikes: 3 Chinese Gas Pipe Nerdcycles and 2 Chicago Electroforged Boat Anchors
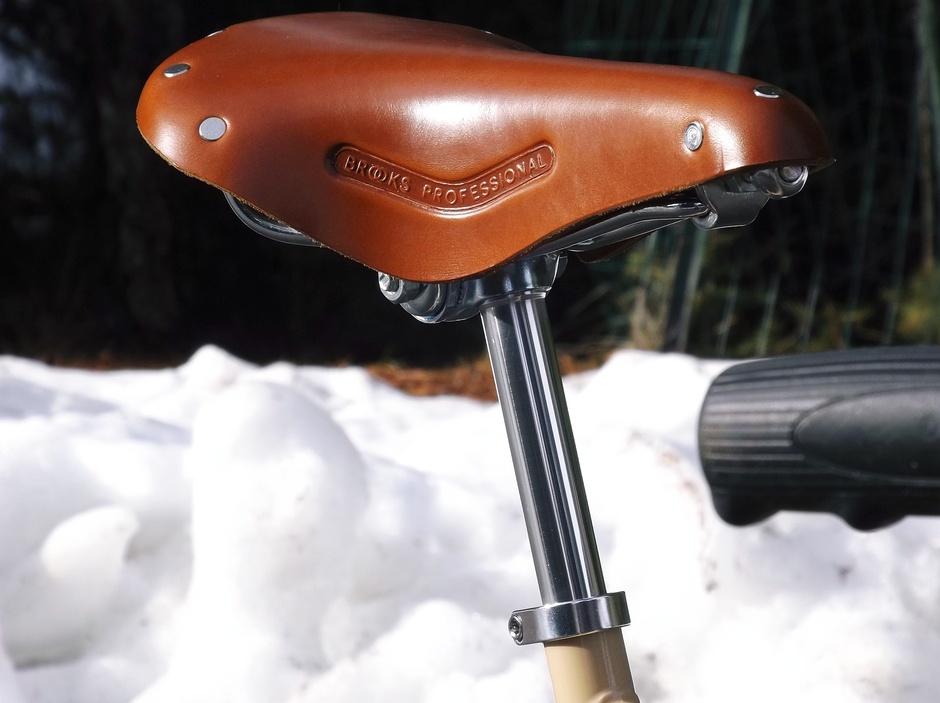
Seat Post
1970's Gas Pipe Schwinns had a 13/16" seat tube ID. ")
Try finding a nice seat post for that. They can be found, but they are horribly cheap steel with horrible finishes. If extended very tall, they bend. You still need a wonky shim or something to make a modern 7/8" seat clamp to work.
So, I bought a ~six foot length of 7/8" solid rod 6061-t6 for $14.00 and cut a piece to my desired seat post length. Chucked it in a lathe (a friend actually) and took it down to 13/16" except for the exact amount at the top required to fill the saddle clamp. Plus the exposed little taper to prevent stress risers. I left that exposed for inspection convenience. Sanded and polished.
I have used the leftover rod to make seat posts for two other bikes. CHEAP, pretty, and STRONG.
08-10-16 | 11:59 AM
#5

Cyclotouriste


Joined: Aug 2009
Posts: 11,785
Likes: 6,996
From: South Holland, NL
Bikes: Yes, please.
Now, there's an American thread if ever I saw one. 
 08-10-16 | 12:00 PM
#6
Senior Member
Joined: Feb 2014
Posts: 2,750
Likes: 149
From: SD
Bikes: Handsome Fredward, Trek 1.1
1970's Gas Pipe Schwinns had a 13/16" seat tube ID.
Try finding a nice seat post for that. They can be found, but they are horribly cheap steel with horrible finishes. If extended very tall, they bend. You still need a wonky shim or something to make a modern 7/8" seat clamp to work.
So, I bought a ~six foot length of 7/8" solid rod 6061-t6 for $14.00 and cut a piece to my desired seat post length. Chucked it in a lathe (a friend actually) and took it down to 13/16" except for the exact amount at the top required to fill the saddle clamp. Plus the exposed little taper to prevent stress risers. I left that exposed for inspection convenience. Sanded and polished.
I have used the leftover rod to make seat posts for two other bikes. CHEAP, pretty, and STRONG.
08-10-16 | 12:14 PM
#7
Calamari Marionette Ph.D
Joined: Dec 2013
Posts: 7,861
Likes: 41
From: Coeur d' Alene
Bikes: 3 Chinese Gas Pipe Nerdcycles and 2 Chicago Electroforged Boat Anchors
As much as I could at both ends with a small drill diameter drill. The temptation is there to just grab a big diameter long bit and have at it. Can't do that though. You have to be careful because sometimes the bit will wander/creep and you have no way to control that. You can't even see it happening until it's too late.  Ooopsy.
I was tempted to buy tubing, as it is available in many different wall thicknesses. But by the time you have a wall thick enough to be safely taken to 13/16 there isn't enough weight savings to make it worth it for a clunker bike. Especially considering that tubing was way more expensive than rod.
Removing the stock 937 kilogram kickstand more than made up for it.
Ooopsy.I was tempted to buy tubing, as it is available in many different wall thicknesses. But by the time you have a wall thick enough to be safely taken to 13/16 there isn't enough weight savings to make it worth it for a clunker bike. Especially considering that tubing was way more expensive than rod.
Removing the stock 937 kilogram kickstand more than made up for it.
Last edited by SquidPuppet; 08-11-16 at 09:50 AM.
08-10-16 | 12:23 PM
#8


multimodal commuter
Joined: Nov 2006
Posts: 19,810
Likes: 597
From: NJ, NYC, LI
Bikes: 1940s Fothergill, 1959 Allegro Special, 1963? Claud Butler Olympic Sprint, Lambert 'Clubman', 1974 Fuji "the Ace", 1976 Holdsworth 650b conversion rando bike, 1983 Trek 720 tourer, 1984 Counterpoint Opus II, 1993 Basso Gap, 2010 Downtube 8h, and...
Not sure if this is what this thread is about, but check out the 2-speed top tube quadrant shifter I made for the Trivelox derailleur on my Fothergill:


The shifter itself, and its housing, is made from scrap aluminum, most of it from a Razor scooter. The clamp is also, partly, from a Razor scooter and part of a coaster brake reactor band.
__________________
www.rhmsaddles.com.
www.rhmsaddles.com.
Last edited by rhm; 08-10-16 at 12:32 PM.
08-10-16 | 12:28 PM
#9
Calamari Marionette Ph.D
Joined: Dec 2013
Posts: 7,861
Likes: 41
From: Coeur d' Alene
Bikes: 3 Chinese Gas Pipe Nerdcycles and 2 Chicago Electroforged Boat Anchors
08-10-16 | 12:45 PM
#10
multimodal commuter
Joined: Nov 2006
Posts: 19,810
Likes: 597
From: NJ, NYC, LI
Bikes: 1940s Fothergill, 1959 Allegro Special, 1963? Claud Butler Olympic Sprint, Lambert 'Clubman', 1974 Fuji "the Ace", 1976 Holdsworth 650b conversion rando bike, 1983 Trek 720 tourer, 1984 Counterpoint Opus II, 1993 Basso Gap, 2010 Downtube 8h, and...
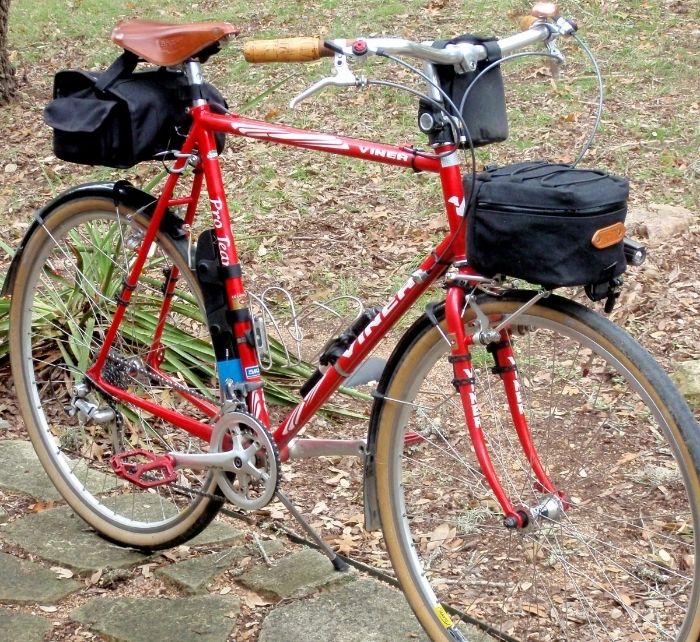
I got these fenders, some brand I'd never heard of, and this headlight, from the same seller (in Germany). The fender has strips of aluminum in it, and snaps where you can attach wires for a taillight. And the taillight is made to go on a fender. Cool, huh? But the curve on the taillight dictates a location far lower down on the fender than the snaps. So I had to made a bracket from aluminum.

I made this taillight from a copper 3/4" pipe cap, beaten to a bullet shape, soldered to scrap copper, with an LED and optics inside it.

And the matching headlight:

Admittedly these were not very bright lights, and have been replaced with higher tech stuff.
Here's an old standby...

That's a Wald rear rack, substantially down.

I made this taillight from a copper 3/4" pipe cap, beaten to a bullet shape, soldered to scrap copper, with an LED and optics inside it.
And the matching headlight:
Admittedly these were not very bright lights, and have been replaced with higher tech stuff.
Here's an old standby...
That's a Wald rear rack, substantially down.
__________________
www.rhmsaddles.com.
www.rhmsaddles.com.
Last edited by rhm; 08-10-16 at 12:52 PM.
08-10-16 | 12:51 PM
#11

Senior Member
Joined: Aug 2011
Posts: 22,676
Likes: 2,642
From: CID
Bikes: 1991 Bianchi Eros, 1964 Armstrong, 1988 Diamondback Ascent, 1988 Bianchi Premio, 1987 Bianchi Sport SX, 1980s Raleigh mixte (hers), All-City Space Horse (hers)
My centerpull QR modifcation These should have been made this way from day one. As long as your pads aren't super close to the rim, you don't need a separate QR for the brake.
Oddly, the front 'fang' of what remains of the eyelet was left on merely for aesthetics. When I first attempted this modification I cut the front 'fang' to line up with rear one and they worked just as well, it just looks sketchy. 1 year of regular use, no issues. Full tutorial on my blog.
Oddly, the front 'fang' of what remains of the eyelet was left on merely for aesthetics. When I first attempted this modification I cut the front 'fang' to line up with rear one and they worked just as well, it just looks sketchy. 1 year of regular use, no issues. Full tutorial on my blog.
 08-10-16 | 12:59 PM
#12
Senior Member
Joined: Feb 2014
Posts: 2,750
Likes: 149
From: SD
Bikes: Handsome Fredward, Trek 1.1
I just knew this thread would bear interesting stuff! I chose Dia-Compe 154 brake levers with the built-in QRs to facilitate getting the wheels in and out of the Weinmann centerpulls on my bike, but now you've got me thinking...
 )and promptly went to my garage.
08-10-16 | 01:02 PM
)and promptly went to my garage.
08-10-16 | 01:02 PM
#13
Senior Member
Joined: Feb 2014
Posts: 2,750
Likes: 149
From: SD
Bikes: Handsome Fredward, Trek 1.1
08-10-16 | 01:25 PM
#14
Banned.
Joined: Jul 2016
Posts: 2,717
Likes: 10
From: downtown Bulverde, Texas
Bikes: '74 Raleigh International utility; '98 Moser Forma road; '92 Viner Pro CX upright
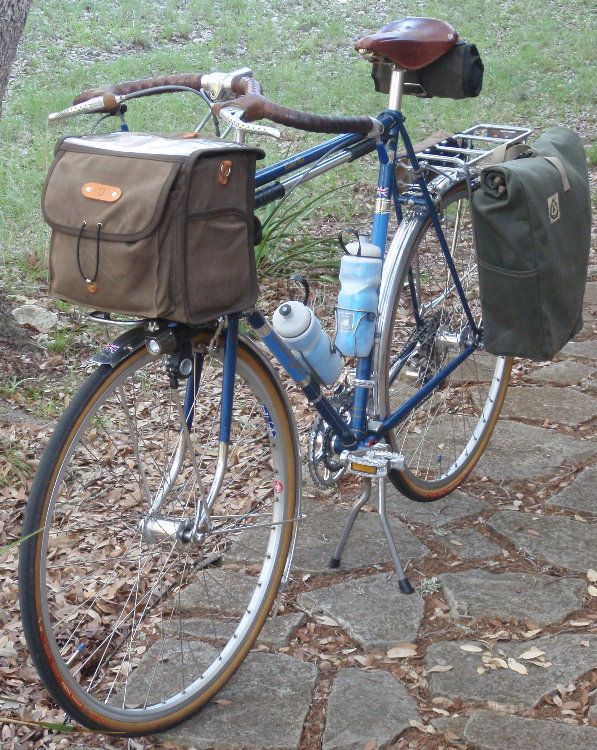
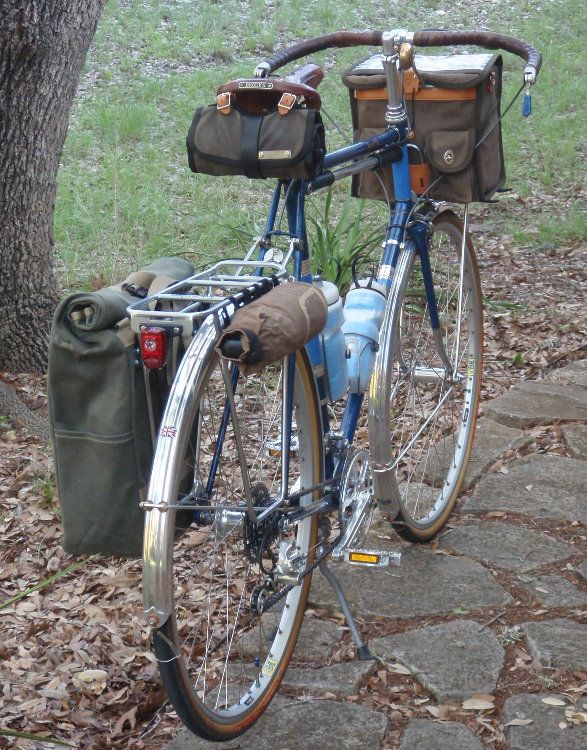
Several I can throw up on this thread, but it will be my CX upright.
Not hole one in this frame or fork, not a brake bolt hole, not a fender boss
I ride distance and I'm serious about my roadside gear.
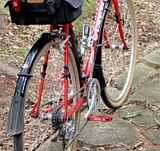
Great deal on an Ostrich 7-l bag, used a Nitto R12 bag support and wire cage for the canti brake. The bag doesn't even come close to thighs and one bag strap is attached to the wire cage
Put a Gino light mount on my Paul monkey brake hanger, using a longer M-5 and 3 split lock washers to fill the gap in the Gino
For my rear light mount, took the Hot Shot seatpost mount apart and ran an M-5 through a strap gusset on the saddle bag
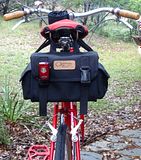
When winter got here, and my Ostrich full enough of 38mm fold-up tire, et.al, needed a place to stuff layers.
I had been thinking from day one how to put a front mini rack on the bike.
The answer was Nitto marks rack since it has 4 rod bolt clevises. Rear rack struts to Tubus LM-1 clamps on the unicrown, and the front rack struts to Paul canti rack mounts, but also had to get some L-brackets from McMaster
Which brings up another dilemma, a front bag crops the top headlight mount right in front of the bike, so I added a Gino mount to the front rack strut using a Nitto rod bolt and roll-tapping the Gino to the rod bolt M-6, plus a Bellville washer (have done this before on another bike with Nitto M18 front rack and long struts, and also have done it for several other people who mailed me their Ginos and Nitto rod bolts)
Thinking out the fender problem - and we had a monsoon spring - I finally settled on Raceblade XL, and added a PDW Origami (front) splash guard to the seat tube to make it near-enough full-coverage (cut some width from the Origami and used heat to take some flare out of the bracket)
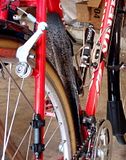
I love these fenders - adequate coverage for 38mm Barlows. You adjust their shape by sliding the fender in the stays. They come with self-tapping screws to pin them, but ride them for a few weeks and make adjustments to get them perfect before you use the screws. After that, they're 2 min to install and 30 seconds to remove. Probably should also mention the Klickfix bottle cage mounts - tried different strap-type mounts on another bike and these are the winners.
My front bag was custom by Ely at Ruthworks
btw, this is a distance bike, and it's fast.
Everybody wants to pigeonhole it, but it's not a cruiser, at least a sport-touring bike, but I like to call it an upright rando
I was thinking about Condorinos and climbing my hills, but everything about this bike is better than a Condorino.
Not hole one in this frame or fork, not a brake bolt hole, not a fender boss
I ride distance and I'm serious about my roadside gear.
Great deal on an Ostrich 7-l bag, used a Nitto R12 bag support and wire cage for the canti brake. The bag doesn't even come close to thighs and one bag strap is attached to the wire cage

Put a Gino light mount on my Paul monkey brake hanger, using a longer M-5 and 3 split lock washers to fill the gap in the Gino

For my rear light mount, took the Hot Shot seatpost mount apart and ran an M-5 through a strap gusset on the saddle bag

When winter got here, and my Ostrich full enough of 38mm fold-up tire, et.al, needed a place to stuff layers.
I had been thinking from day one how to put a front mini rack on the bike.
The answer was Nitto marks rack since it has 4 rod bolt clevises. Rear rack struts to Tubus LM-1 clamps on the unicrown, and the front rack struts to Paul canti rack mounts, but also had to get some L-brackets from McMaster


Which brings up another dilemma, a front bag crops the top headlight mount right in front of the bike, so I added a Gino mount to the front rack strut using a Nitto rod bolt and roll-tapping the Gino to the rod bolt M-6, plus a Bellville washer (have done this before on another bike with Nitto M18 front rack and long struts, and also have done it for several other people who mailed me their Ginos and Nitto rod bolts)
Thinking out the fender problem - and we had a monsoon spring - I finally settled on Raceblade XL, and added a PDW Origami (front) splash guard to the seat tube to make it near-enough full-coverage (cut some width from the Origami and used heat to take some flare out of the bracket)


I love these fenders - adequate coverage for 38mm Barlows. You adjust their shape by sliding the fender in the stays. They come with self-tapping screws to pin them, but ride them for a few weeks and make adjustments to get them perfect before you use the screws. After that, they're 2 min to install and 30 seconds to remove. Probably should also mention the Klickfix bottle cage mounts - tried different strap-type mounts on another bike and these are the winners.
My front bag was custom by Ely at Ruthworks
btw, this is a distance bike, and it's fast.
Everybody wants to pigeonhole it, but it's not a cruiser, at least a sport-touring bike, but I like to call it an upright rando
I was thinking about Condorinos and climbing my hills, but everything about this bike is better than a Condorino.
Last edited by bulldog1935; 08-11-16 at 10:54 AM.
08-10-16 | 01:29 PM
#15
multimodal commuter
Joined: Nov 2006
Posts: 19,810
Likes: 597
From: NJ, NYC, LI
Bikes: 1940s Fothergill, 1959 Allegro Special, 1963? Claud Butler Olympic Sprint, Lambert 'Clubman', 1974 Fuji "the Ace", 1976 Holdsworth 650b conversion rando bike, 1983 Trek 720 tourer, 1984 Counterpoint Opus II, 1993 Basso Gap, 2010 Downtube 8h, and...
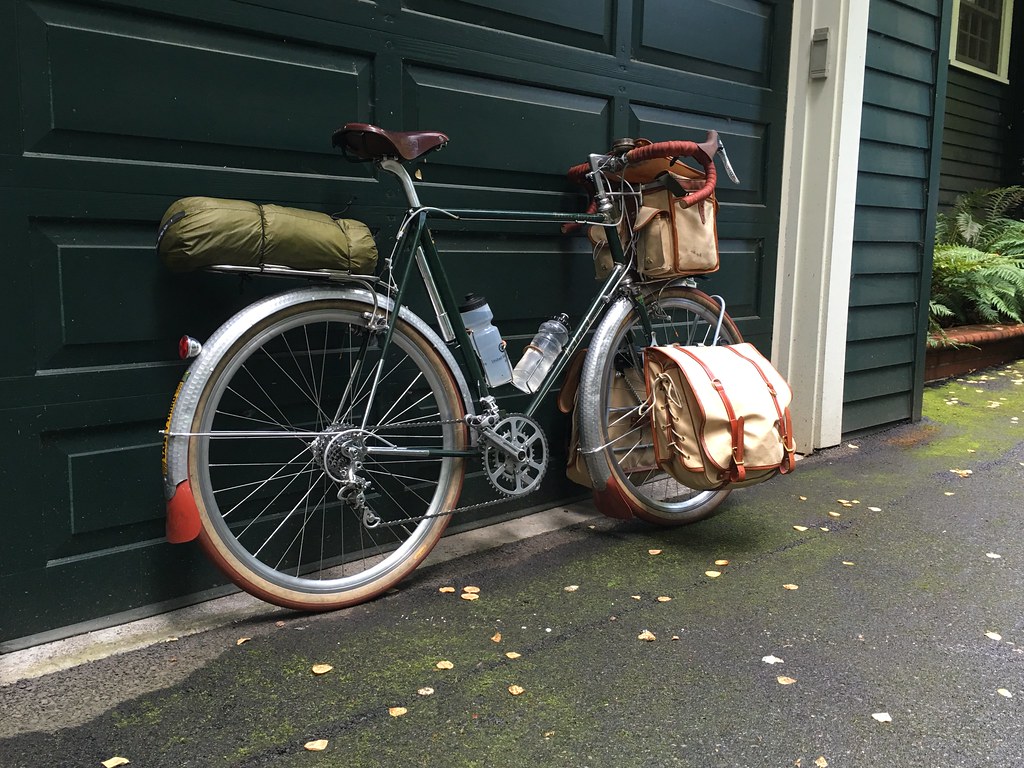
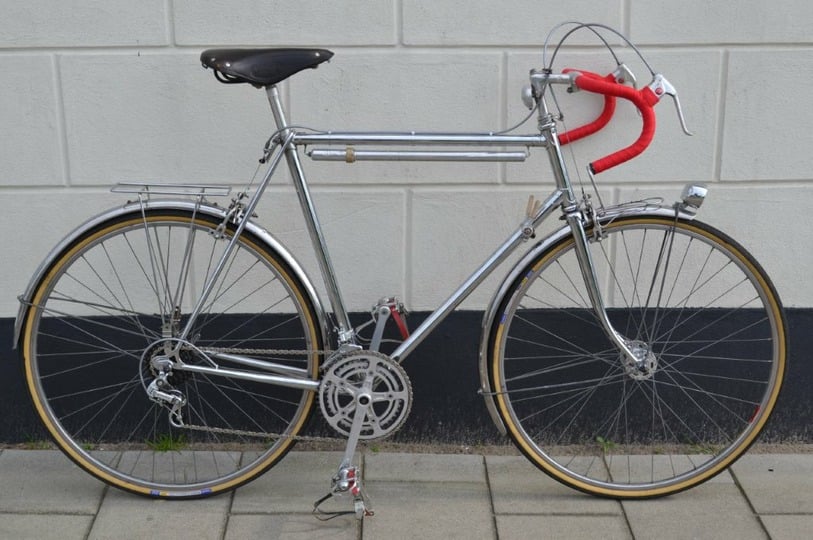
Resilion Cantilever Brakes. The original 'cantilever' brake! The ones on my bike are, I think, from 1934.
"A Real Engineering Job" - The Resilion Story
"A Real Engineering Job" - The Resilion Story
__________________
www.rhmsaddles.com.
www.rhmsaddles.com.
08-10-16 | 10:07 PM
#16
Thread Starter
Newbie
Joined: May 2016
Posts: 51
Likes: 2
From: Ontario, Canada
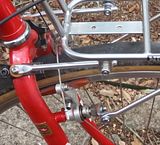
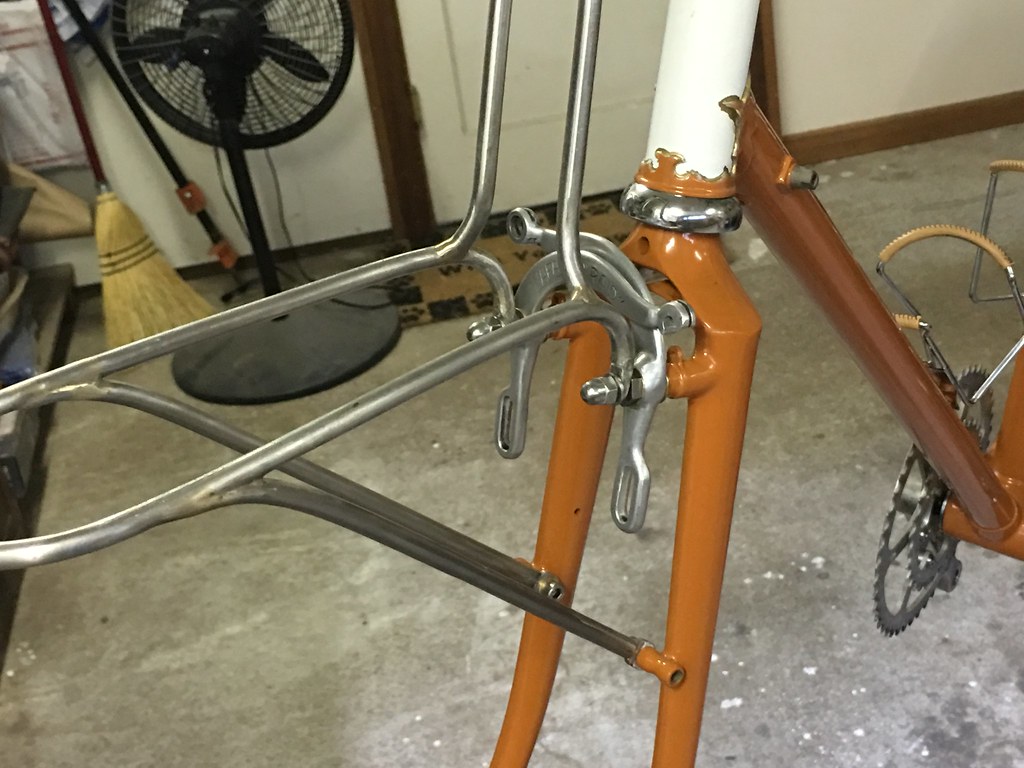
Here is a 1" threaded 'GripNut' Chris King that I got cheap because cosmetically it looked terrible. Tons of scratches on the cups, and both nuts were badly stripped and rounded. I swapped in a '2Nut' set in its place, and spent a weekend wet sanding and polishing the scratched headset cups, which ended up removing the laser etching as well. They polished up to a near mirror finish. The grease was dried up inside, so the bearings got cleaned and a received a healthy dose of Phil Wood grease. The headset is buttery smooth once again.


There was not enough room to fit both a decaleur AND the brake cable stop in between the headset nuts, and I was not going to give up this shinny new (to me) headset for one with a small stack height. I had a Velo Orange decalleur, and cut the steerer ring off. Then the horse-shoe shaped piece was welded onto the Dia Compe cable stop. A guy down the street with some welding skills made it happen for a few bucks. It is a beefy weld and the cable stop is slotted as well as the steering tube, so it does not move at all in between the headset nuts (this was a problem with the original Velo Orange decalleur as the mounting ring is not slotted).

And here is a picture with the handlebar bag mounted.

There was not enough room to fit both a decaleur AND the brake cable stop in between the headset nuts, and I was not going to give up this shinny new (to me) headset for one with a small stack height. I had a Velo Orange decalleur, and cut the steerer ring off. Then the horse-shoe shaped piece was welded onto the Dia Compe cable stop. A guy down the street with some welding skills made it happen for a few bucks. It is a beefy weld and the cable stop is slotted as well as the steering tube, so it does not move at all in between the headset nuts (this was a problem with the original Velo Orange decalleur as the mounting ring is not slotted).
And here is a picture with the handlebar bag mounted.
08-10-16 | 10:17 PM
#17

Bike Butcher of Portland
Joined: Jul 2014
Posts: 12,444
Likes: 7,978
From: Portland, OR
Bikes: It's complicated.
Something like these?
Currently in Connecticut.
There's this one:

One for my daughter:
Working on this one:
A couple more in queue.
Currently in Connecticut.
There's this one:
One for my daughter:
Working on this one:
A couple more in queue.
__________________
If someone tells you that you have enough bicycles and you don't need any more, stop talking to them. You don't need that kind of negativity in your life.
If someone tells you that you have enough bicycles and you don't need any more, stop talking to them. You don't need that kind of negativity in your life.
Last edited by gugie; 08-10-16 at 10:23 PM.
 08-11-16 | 10:40 AM
#21
Banned.
Joined: Jul 2016
Posts: 2,717
Likes: 10
From: downtown Bulverde, Texas
Bikes: '74 Raleigh International utility; '98 Moser Forma road; '92 Viner Pro CX upright
thank you, still riding it 1500 mi/yr after 40 years (that much and maybe more on two other bikes, too) - the only original components are the brake calipers and headset (everything is in great shape)
08-11-16 | 10:48 AM
#22
Cyclotouriste
Joined: Aug 2009
Posts: 11,785
Likes: 6,996
From: South Holland, NL
Bikes: Yes, please.
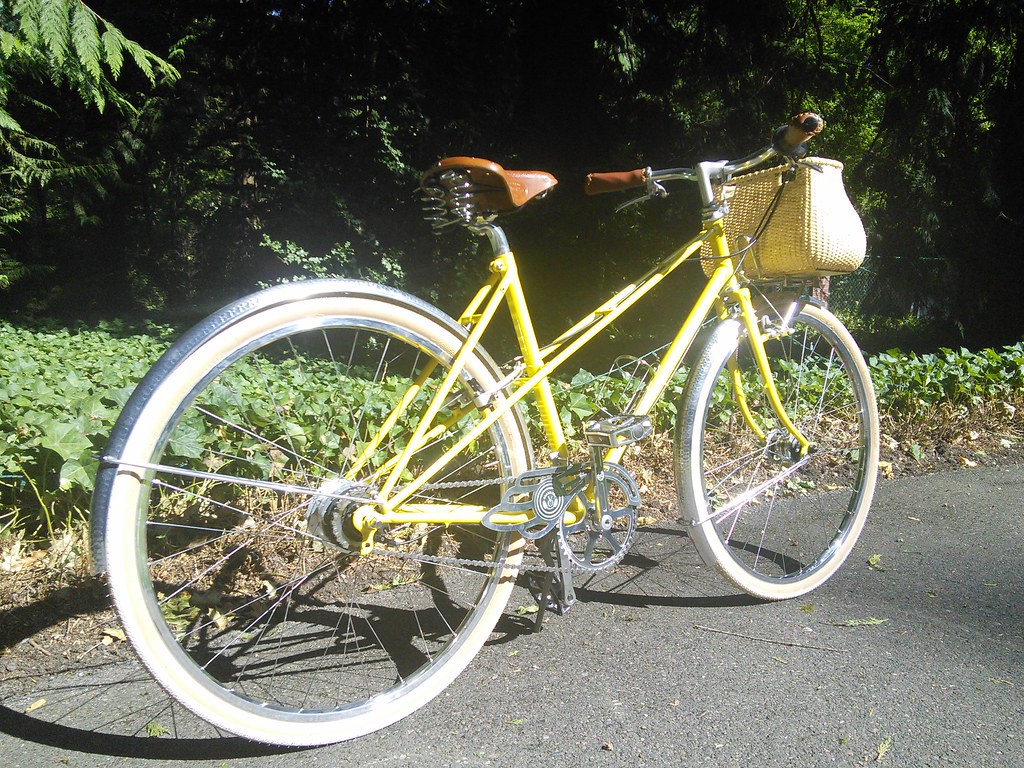
OK, I'll throw in my 'Ronnie Hearse'.
08-11-16 | 10:53 AM
#23
Pedal to the medal
Joined: Sep 2012
Posts: 1,442
Likes: 331
From: The Arsenal of Democracy
Bikes: 1991 Team Miyata Track, 1992 Lemond Alpe d'Huez, 19?? Schwinn High Serra, 1982 Trek 614, 198X Raleigh Alyeska


