


Cleaning and polishing
 03-16-18 | 10:08 PM
#1

Thread Starter
Senior Member


Joined: Jul 2017
Posts: 3,706
Likes: 3,104
From: Niagara Region
Bikes: Panasonic PT-4500, Miele Touring and Batavus Pro
Cleaning and polishing
I have a Sugino SP-KC alloy seatpost that is rusted and dull. Not the flake off kind of rust but the kind of etched into the metal rusting. I don't want to use steel wool or sand paper as I want to leave as much detail on the post as possible.
I went to the hardware store where choices were very limited, either a Mothers chrome and aluminum polish or a brand named "AutoSol". I explained I wanted to remove any rusting and polish the post and the nice man at the store told me that people with bikes preferred the Autosol product over the Mothers.
I purchased the Autosol and went home and applied it and waited several minutes and then buffed the post with a clean dry rag. I did this twice to the bottom of the post.
It did remove some of the rust and what wasn't rusty shines, but I am not happy and believe it could be better. I think I will return the product and seek something else.
I could try using a Dremel tool with a polishing bit or steel wool but first I'm asking of anyone knows of a better product to use or alternatively would 0000 steel wool, perhaps used with the the Autosol or another product as a lubricant.
Does anyone have a better product they'd use or a better idea?
I went to the hardware store where choices were very limited, either a Mothers chrome and aluminum polish or a brand named "AutoSol". I explained I wanted to remove any rusting and polish the post and the nice man at the store told me that people with bikes preferred the Autosol product over the Mothers.
I purchased the Autosol and went home and applied it and waited several minutes and then buffed the post with a clean dry rag. I did this twice to the bottom of the post.
It did remove some of the rust and what wasn't rusty shines, but I am not happy and believe it could be better. I think I will return the product and seek something else.
I could try using a Dremel tool with a polishing bit or steel wool but first I'm asking of anyone knows of a better product to use or alternatively would 0000 steel wool, perhaps used with the the Autosol or another product as a lubricant.
Does anyone have a better product they'd use or a better idea?
 03-16-18 | 11:13 PM
#2
Iowa10Speed

Joined: Mar 2012
Posts: 81
Likes: 52
From: Iowa
Bikes: 87 Schwinn Prologue, 85 Trek 720, 86 Panasonic Pro Touring, 75 Schwinn Voyageur II ("Voyareo"). projects: 98 Lemond Zurich, 81 Raleigh Competition GS, 50 Schwinn Superior
Do a Google search on 'khatfull polishing'. You'll find some classic Bike Forum threads on polishing. I use some techniques I learned there and get great results.
For my purposes, I do a basic wet sanding with successively finer grits of sandpaper (400, 1000, 2000) depending on the severity of scratches and discolorations that need to be removed, then finish with Mothers Mag and Aluminum Polish.
The forum threads have much more detail and options that will be helpful.
For my purposes, I do a basic wet sanding with successively finer grits of sandpaper (400, 1000, 2000) depending on the severity of scratches and discolorations that need to be removed, then finish with Mothers Mag and Aluminum Polish.
The forum threads have much more detail and options that will be helpful.
03-16-18 | 11:57 PM
#3
Iowa10Speed
Joined: Mar 2012
Posts: 81
Likes: 52
From: Iowa
Bikes: 87 Schwinn Prologue, 85 Trek 720, 86 Panasonic Pro Touring, 75 Schwinn Voyageur II ("Voyareo"). projects: 98 Lemond Zurich, 81 Raleigh Competition GS, 50 Schwinn Superior
This is the thread I was remembering ...
https://www.bikeforums.net/classic-vintage/697520-khatfulls-aluminum-polishing-thread.html
https://www.bikeforums.net/classic-vintage/697520-khatfulls-aluminum-polishing-thread.html
03-17-18 | 12:03 AM
#4

Senior Member
Joined: Aug 2011
Posts: 1,394
Likes: 20
From: OZARKS
Size
Did you ever sand too far and make the seatpost too small?
QUOTE=Iowa10Speed;20228165]Do a Google search on 'khatfull polishing'. You'll find some classic Bike Forum threads on polishing. I use some techniques I learned there and get great results.
For my purposes, I do a basic wet sanding with successively finer grits of sandpaper (400, 1000, 2000) depending on the severity of scratches and discolorations that need to be removed, then finish with Mothers Mag and Aluminum Polish.
The forum threads have much more detail and options that will be helpful.[/QUOTE]
QUOTE=Iowa10Speed;20228165]Do a Google search on 'khatfull polishing'. You'll find some classic Bike Forum threads on polishing. I use some techniques I learned there and get great results.
For my purposes, I do a basic wet sanding with successively finer grits of sandpaper (400, 1000, 2000) depending on the severity of scratches and discolorations that need to be removed, then finish with Mothers Mag and Aluminum Polish.
The forum threads have much more detail and options that will be helpful.[/QUOTE]
__________________
riding
riding
03-17-18 | 05:26 AM
#6
Mike J
Joined: Nov 2013
Posts: 1,587
Likes: 9
From: Jacksonville Florida
Bikes: 1975 Peugeot PX-50L, 1971 Peugeot PX-10, 1974 Peugeot PX-8
Those V-shaped twisting scratches won't come out with either polishing compound or steel wool. They'll need to be sanded out. The best bet, since you're concerned about not removing too mush material, is to start with a finer grade sandpaper, then move to a heavier grade if that doesn't work. Whatever you do, it will take successive levels of sanding and then polishing to have decent results.
03-17-18 | 05:36 AM
#7

Overdoing projects
Joined: Oct 2011
Posts: 2,464
Likes: 1,370
From: Rotterdam, former republic of the Netherlands
Bikes: Batavus Randonneur GL, Gazelle Orange Excellent, Gazelle Super Licht, Gazelle Grand Tourist, Gazelle Lausanne, Gazelle Tandem, Koga-Miyata SilverAce, Koga-Miyata WorldTraveller
03-17-18 | 05:42 AM
#8
Senior Member
Joined: Oct 2015
Posts: 6,280
Likes: 612
From: Los Angeles
Bikes: 78 Masi Criterium, 68 PX10, 2016 Mercian King of Mercia, Rivendell Clem Smith Jr
Since the main problem is the rust stains, try some barkeeper's friend. Good for removing rust stains. It will turn the aluminum gray, but that can be polished out again with your metal polish. It's mainly oxalic acid, so don't leave it on too long or it will eat the aluminum and the rust. It will chemically react. Try a small area first.
I'd suggest avoiding any abrasive more coarse than a scouring kitchen sponge or some extra fine scotchbrite.
Autosol and similar polishes are not meant to be used that way, btw. It's a very fine polishing compound, not a chemical cleaner. Dip a rag in a bit of it and rub hard, then buff with a clean dry rag.
I'd suggest avoiding any abrasive more coarse than a scouring kitchen sponge or some extra fine scotchbrite.
Autosol and similar polishes are not meant to be used that way, btw. It's a very fine polishing compound, not a chemical cleaner. Dip a rag in a bit of it and rub hard, then buff with a clean dry rag.
Last edited by Salamandrine; 03-17-18 at 05:46 AM.
03-17-18 | 07:34 AM
#9

Junior Member
Joined: Jan 2018
Posts: 119
Likes: 17
From: Hayward, CA
Bikes: Giant Talon, Pinarello Catena Lusso, Pinarello Rahza K, Pinarello Dogma F8
You can do it!
I've polished aluminum many times with sand paper with glorious results. Don't worry about sanding the detail off, it won't happen unless you use 80 grit and a power tool. Polishing rusty steel will take longer than aluminum.
Start with 400 wet/dry (use it wet) to get the rust areas down to good metal, then switch to 800. It's going to take some elbow grease. Then finish up on the bench buffer with polishing compound.
Start with 400 wet/dry (use it wet) to get the rust areas down to good metal, then switch to 800. It's going to take some elbow grease. Then finish up on the bench buffer with polishing compound.
03-17-18 | 08:23 AM
#10
Thread Starter
Senior Member
Joined: Jul 2017
Posts: 3,706
Likes: 3,104
From: Niagara Region
Bikes: Panasonic PT-4500, Miele Touring and Batavus Pro
Thank you all - esp M Sasso (that post isn't just impressive, it's a challenge)
Will shine it up this weekend.
I think that ending with a post like yours will feel better than buying an NOS post because every time I take the bike out it will register - I did that, which to me is a huge part of C&V.
Salamandrine - could I use Eaporust or similar first (never seen "Barkeepers friend before) and then move to the polishing compound?
Ps has anyone had any good (safe - nondestructive) results with a Dremel and buffing pads??.
Will shine it up this weekend.
I think that ending with a post like yours will feel better than buying an NOS post because every time I take the bike out it will register - I did that, which to me is a huge part of C&V.
Salamandrine - could I use Eaporust or similar first (never seen "Barkeepers friend before) and then move to the polishing compound?
Ps has anyone had any good (safe - nondestructive) results with a Dremel and buffing pads??.
03-17-18 | 08:33 AM
#11
Thread Starter
Senior Member
Joined: Jul 2017
Posts: 3,706
Likes: 3,104
From: Niagara Region
Bikes: Panasonic PT-4500, Miele Touring and Batavus Pro
Ps has anyone had any good (safe - nondestructive) results with a Dremel and buffing pads??.
Just read the kahtfull post and screw the Dremel - at least until I know what I am talking about!!!
Just read the kahtfull post and screw the Dremel - at least until I know what I am talking about!!!
03-17-18 | 09:03 AM
#13
Senior Member
Joined: Oct 2015
Posts: 6,280
Likes: 612
From: Los Angeles
Bikes: 78 Masi Criterium, 68 PX10, 2016 Mercian King of Mercia, Rivendell Clem Smith Jr
The newer dremel buff pads with a little mini cloth buffing wheel work pretty well for small parts. The old felt ones are useless. IMHO... For something like this, it's easier IME to polish by hand. (or with a full size buffing wheel)
03-17-18 | 09:15 AM
#14
Iowa10Speed
Joined: Mar 2012
Posts: 81
Likes: 52
From: Iowa
Bikes: 87 Schwinn Prologue, 85 Trek 720, 86 Panasonic Pro Touring, 75 Schwinn Voyageur II ("Voyareo"). projects: 98 Lemond Zurich, 81 Raleigh Competition GS, 50 Schwinn Superior
Seat posts and stems are ideal first projects because you can practice on the section that's hidden inside the bike.
I had that "what am I getting myself into?" feeling on my first project but that quickly faded. You'll doubt yourself, especially if you have to resort to more aggressive grits like 400. The finish goes a horrid dull gray and the part looks ruined. But with each finer grit the finish clearly gets better. The final polish with Mother's is magic.
On fluted seatposts, the indented parts were often not highly polished originally. They are a little bumpy. Try using just Mothers and no sandpaper. That may clean and shine the metal to your liking.
I had that "what am I getting myself into?" feeling on my first project but that quickly faded. You'll doubt yourself, especially if you have to resort to more aggressive grits like 400. The finish goes a horrid dull gray and the part looks ruined. But with each finer grit the finish clearly gets better. The final polish with Mother's is magic.
On fluted seatposts, the indented parts were often not highly polished originally. They are a little bumpy. Try using just Mothers and no sandpaper. That may clean and shine the metal to your liking.
03-17-18 | 09:36 AM
#15

Senior Member

Joined: Aug 2009
Posts: 7,723
Likes: 4,174
From: Berkeley, CA
Bikes: 72 Cilo Pacer, 72 Gitane GT, 72 Peugeot PX10, 73 Speedwell Ti,l, 75 Peugeot PR-10L, 80 Colnago Super, 81 Zinn, 85 ALAN Cross, 85 De Rosa Pro, 86 Look 753, 86 Look KG86, 89 Parkpre Team, 90 Parkpre Team MTB, 90 Merlin
I would not return the original polish on principle. It seems to have done its job adequately. That post wasn’t going to shine like m_sasso’s unless it got some sanding before polishing.
The only details appear to be inside the flutes and those don’t need sanding. But you are right not to want to sand over details. My Campy posts just get minimal sanding on engraved logos before polishing.
The only details appear to be inside the flutes and those don’t need sanding. But you are right not to want to sand over details. My Campy posts just get minimal sanding on engraved logos before polishing.
03-17-18 | 12:02 PM
#17
Thread Starter
Senior Member
Joined: Jul 2017
Posts: 3,706
Likes: 3,104
From: Niagara Region
Bikes: Panasonic PT-4500, Miele Touring and Batavus Pro
No, you are right about the polish, I bought it and used it and won't return it. Based on what I got here, I get it works if used right.
I took what was stated here and tried wet 200 sandpaper. I then rebuffed with the polish. This is only 5 minutes with wet sandpaper! Impressed so far as I didn't even see the writing in the small circle because it was so stained. The differences in the shine in the photos is simply the first is in a bit of shade and the second is in bright sun. It's still a little too cold here to work outside with wet hands for long but spring is coming.
My question is about the abrasive balls mentioned by KHatfull. Do these get into the small spots (like where the numbers are on the side of the post pictured)?
I took what was stated here and tried wet 200 sandpaper. I then rebuffed with the polish. This is only 5 minutes with wet sandpaper! Impressed so far as I didn't even see the writing in the small circle because it was so stained. The differences in the shine in the photos is simply the first is in a bit of shade and the second is in bright sun. It's still a little too cold here to work outside with wet hands for long but spring is coming.
My question is about the abrasive balls mentioned by KHatfull. Do these get into the small spots (like where the numbers are on the side of the post pictured)?
03-17-18 | 12:08 PM
#18

Senior Member
Joined: Jan 2007
Posts: 2,831
Likes: 848
From: Ontario
Nice work so far! You can work up from the 200 to 400/600/1000 before polishing. Be wary of over-polishing (unless you want it to shine like chrome) - often even new items like this were not super bright.
Also, Autosol is well respected in the motorcycle community, but I also like the cotton impregnated polishes like Nev-R-Dull for the final polish.
Also, Autosol is well respected in the motorcycle community, but I also like the cotton impregnated polishes like Nev-R-Dull for the final polish.
03-17-18 | 01:25 PM
#19
Thread Starter
Senior Member
Joined: Jul 2017
Posts: 3,706
Likes: 3,104
From: Niagara Region
Bikes: Panasonic PT-4500, Miele Touring and Batavus Pro
Markk900
The polish was just there to confirm I was on the right track. Next will be 600, 1000, 1200 and possibly 1500 paper, then a quick polish.
Will have to try either a pad or one of those abrasive balls on a drill.
The polish was just there to confirm I was on the right track. Next will be 600, 1000, 1200 and possibly 1500 paper, then a quick polish.
Will have to try either a pad or one of those abrasive balls on a drill.
03-17-18 | 02:25 PM
#20
Senior Member
Joined: Jan 2007
Posts: 2,831
Likes: 848
From: Ontario
Nice! To be perfectly honest, when doing motorcycle parts at least I found there to be diminishing returns above about 600 grit.... 600 or 800, with a decent finishing polish was always quite acceptable.
I did the cases and other alloy bits in front of the TV one winter many moons ago....No buffing wheel as I didn't have a place for one.

I did the cases and other alloy bits in front of the TV one winter many moons ago....No buffing wheel as I didn't have a place for one.
03-17-18 | 04:02 PM
#22
Junior Member
Joined: Jan 2018
Posts: 119
Likes: 17
From: Hayward, CA
Bikes: Giant Talon, Pinarello Catena Lusso, Pinarello Rahza K, Pinarello Dogma F8
Agreed. I've found 400 wet sanding is as far as I ever needed to go before hitting the buffer.
03-17-18 | 05:36 PM
#23
Senior Member
Joined: Sep 2017
Posts: 2,157
Likes: 835
From: Eastern Shore, MD
Bikes: Road ready: 1993 Koga Miyata City Liner Touring Hybrid, 1989 Centurion Sport DLX, "I Blame GP" Bridgestone CB-1. Projects: Yea, I got a problem....
Can anyone recommend an inexpensive and portable low speed buffer suitable for small parts? I have to do all my "dirty" work outside right now.
03-17-18 | 09:35 PM
#24

Calamari Marionette Ph.D
Joined: Dec 2013
Posts: 7,861
Likes: 41
From: Coeur d' Alene
Bikes: 3 Chinese Gas Pipe Nerdcycles and 2 Chicago Electroforged Boat Anchors
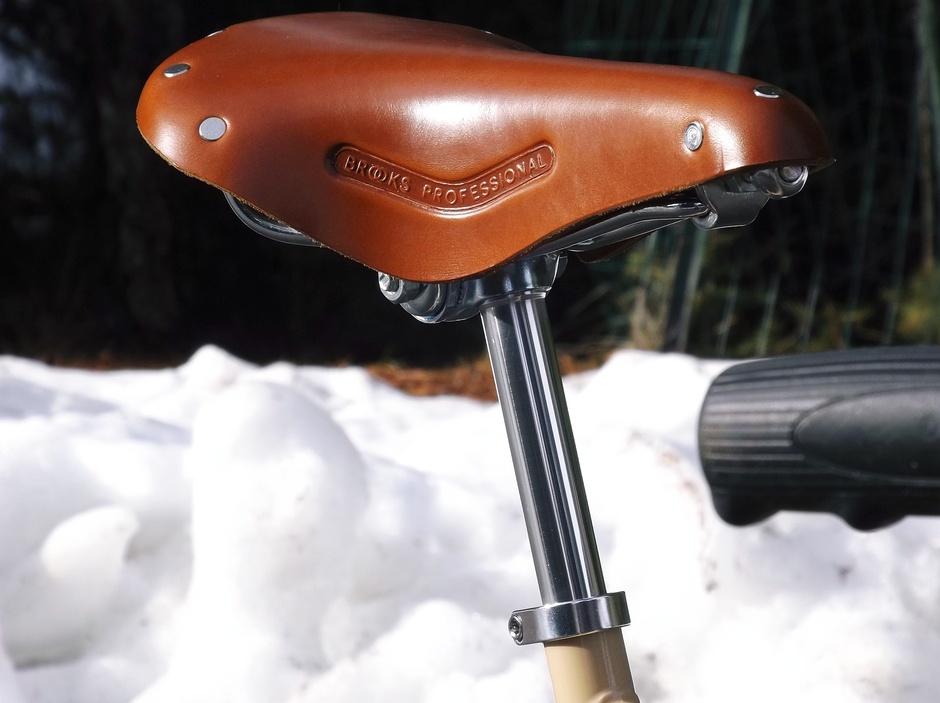
You don't need power tools when dealing with aluminum. Go all the way to 2000 sandpaper. Then polish (I like Blue Magic) by hand. It goes easy and fast.
On the post below I went 600, 800, 1000, 1500, 2000 and then two applications of polish. It was WAY uglier than yours when I started. It took all of 30 minutes. Granted, it has no detail, but it gives you an idea of how fast it goes.
 03-17-18 | 09:39 PM
#25
Calamari Marionette Ph.D
Joined: Dec 2013
Posts: 7,861
Likes: 41
From: Coeur d' Alene
Bikes: 3 Chinese Gas Pipe Nerdcycles and 2 Chicago Electroforged Boat Anchors


