


Changing Spring On Campagnolo Nuovo Record F Derailleur?
 11-30-18 | 06:50 AM
#1
Thread Starter
Senior Member
Joined: Sep 2015
Posts: 190
Likes: 5
From: Florida
Changing Spring On Campagnolo Nuovo Record F Derailleur?
Good morning all! Finding exploded views for rear derailleur and shifters is easy. Can't find the front derailleur. Anyone have experience changing out the front derailleur spring? Haven't found anything anywhere about it- disassembly wise. Is it as simple as unhooking the spring and sliding out the retaining bolt? I'm quite good mechanically, just want to be sure. It is one tough spring.
Thanx, Xeta
Thanx, Xeta


 11-30-18 | 08:31 AM
#3

Senior Member


Joined: Nov 2015
Posts: 4,900
Likes: 1,125
Good morning all! Finding exploded views for rear derailleur and shifters is easy. Can't find the front derailleur. Anyone have experience changing out the front derailleur spring? Haven't found anything anywhere about it- disassembly wise. Is it as simple as unhooking the spring and sliding out the retaining bolt? I'm quite good mechanically, just want to be sure. It is one tough spring.
Thanx, Xeta
Thanx, Xeta
11-30-18 | 09:10 AM
#4
Thread Starter
Senior Member
Joined: Sep 2015
Posts: 190
Likes: 5
From: Florida
Thank you! I also want to replace the bolt and wanted to make sure of the part number. Couldn't find this in my searches :0 I'm tempted to buy a badly worn and cheap one from ebay to practice on. The one I have is in excellent condition except for the rusty spring and bolt.
11-30-18 | 09:33 AM
#5
Thread Starter
Senior Member
Joined: Sep 2015
Posts: 190
Likes: 5
From: Florida
Coincidentally I was looking at my SR and NR FD's last week wondering about the same thing. As you said, it looks like it is just a matter of unsaddling the tip of the spring from one of the pivot bolt ends and unbolting (there might be a circlip involved, IIRC) the pivots off the body to take off the cage and pivot arm assembly and get to the spring. The thought of the spring's toughness also scares me, as I remember on other FD's those things can be a bear to handle, even with their small size.
11-30-18 | 09:41 AM
#6

Senior Member
Joined: Apr 2005
Posts: 16,748
Likes: 138
From: Wherever
I have one of those springs. NOS. As well as the bolt, #788 , also new old stock. As for the little nut, # 217, probably not.
I also have the lower arm, #782 . As well as the upper arm. 778.
Shoot me a PM, Xetaprime, if interested. p.s. Yes...these can be real tricky to disassemble, and mostly, re-assemble.
Wear protective gear! ;>
I also have the lower arm, #782 . As well as the upper arm. 778.
Shoot me a PM, Xetaprime, if interested. p.s. Yes...these can be real tricky to disassemble, and mostly, re-assemble.
Wear protective gear! ;>
12-02-18 | 11:41 PM
#7
Junior Member

Joined: Mar 2010
Posts: 92
Likes: 10
From: Swanage UK
Bikes: 1976, Alan Super Record, 1977 Bob Jackson, 1978 Viner Special Professional, 1978 Bianchi Super Corsa
Changing spring on Campagnolo Nuovo Record FD
I have one of those springs. NOS. As well as the bolt, #788 , also new old stock. As for the little nut, # 217, probably not.
I also have the lower arm, #782 . As well as the upper arm. 778.
Shoot me a PM, Xetaprime, if interested. p.s. Yes...these can be real tricky to disassemble, and mostly, re-assemble.
Wear protective gear! ;>
I also have the lower arm, #782 . As well as the upper arm. 778.
Shoot me a PM, Xetaprime, if interested. p.s. Yes...these can be real tricky to disassemble, and mostly, re-assemble.
Wear protective gear! ;>
12-03-18 | 12:23 AM
#8


Senior Member

Joined: Apr 2005
Posts: 17,196
Likes: 761
From: Ann Arbor, MI
Bikes: 1980 Masi, 1984 Mondonico, 1984 Trek 610, 1980 Woodrup Giro, 2005 Mondonico Futura Leggera ELOS, 1967 PX10E, 1971 Peugeot UO-8
Good morning all! Finding exploded views for rear derailleur and shifters is easy. Can't find the front derailleur. Anyone have experience changing out the front derailleur spring? Haven't found anything anywhere about it- disassembly wise. Is it as simple as unhooking the spring and sliding out the retaining bolt? I'm quite good mechanically, just want to be sure. It is one tough spring.
Thanx, Xeta
Thanx, Xeta
12-03-18 | 02:26 AM
#9
Senior Member
Joined: Dec 2014
Posts: 5,368
Likes: 5,251
From: Central Virginia
Bikes: Numerous
I’ve done it a couple of times before but I think it was on a 8 or 10 speed FD. Same concept though. Flat tip screwdriver and eye protection!
__________________
N = '96 Colnago C40, '04 Wilier Alpe D'Huez, '10 Colnago EPS, '85 Merckx Pro, '89 Merckx Century, '86 Tommasini Professional, '04 Teschner Aero FX Pro, '05 Alan Carbon Cross, '86 De Rosa Professional, '95 Gios Compact Pro, '95 Carrera Zeus, ‘81 Masi Gran Criterium, ‘81 Merckx Pro, ‘89 Cinelli Supercorsa, ‘83 Bianchi Specialissima, ‘VO Randonneur, Ritchey Breakaway Steel, Rivendell Rambouillet, Heron Randonneur, ‘92 Ciöcc Columbus EL
N = '96 Colnago C40, '04 Wilier Alpe D'Huez, '10 Colnago EPS, '85 Merckx Pro, '89 Merckx Century, '86 Tommasini Professional, '04 Teschner Aero FX Pro, '05 Alan Carbon Cross, '86 De Rosa Professional, '95 Gios Compact Pro, '95 Carrera Zeus, ‘81 Masi Gran Criterium, ‘81 Merckx Pro, ‘89 Cinelli Supercorsa, ‘83 Bianchi Specialissima, ‘VO Randonneur, Ritchey Breakaway Steel, Rivendell Rambouillet, Heron Randonneur, ‘92 Ciöcc Columbus EL
12-03-18 | 05:48 AM
#10
Senior Member
Joined: Apr 2005
Posts: 16,748
Likes: 138
From: Wherever
12-03-18 | 06:10 AM
#11
Thread Starter
Senior Member
Joined: Sep 2015
Posts: 190
Likes: 5
From: Florida
The spring and bolt head show rust and some corrosion. Truth is the derailleur is quite nice, but was wondering how hard replacement would be. I decided to purchase a NOS FD and sell the one I have to offset the cost. My NR RD and shifters though not purchased as NOS, look new and wanted to match.
12-03-18 | 06:29 AM
#12

Senior Member


Joined: Mar 2007
Posts: 9,203
Likes: 5,402
From: SF Bay Area, East bay
Bikes: Miyata 618 GT, Marinoni, Kestral 200, Soma double cross 2002 Trek 5200, KHS Flite, Koga Miyata, Schwinn Spitfire 5, Mondia Special, Univega Alpina, Miyata team Ti, Santa Cruz Highball, Waterford rs11
I've had pretty good results soaking derailleurs in evaporust. Doesn't seem to harm aluminium or paint.
12-04-18 | 11:28 PM
#13

Full Member

Joined: Jun 2017
Posts: 219
Likes: 68
From: Northern CA
Bikes: 1971 Gitane TDF, 1974 Gitane Interclub, 2001 Serotta Rapid Tour CS3, 1986 Bruce Gordon touring bike, 1972 Gitane Super Corsa, 1978 Michal Johnson, 1972 Lambert Professional Grand Prix, 1983 Vitus (resto project), 1972 Raleigh Professional (resto)
Last week I overhauled both NR FD and RD for the first time. I’m used to taking apart Simplex components but found the Campy stuff to be easier to work with and don’t know why, probably dumb luck. As long as you have an exploded parts diagram and help yourself with a photo or simple diagram or note, when things look a little dicey, I bet that you can take the FD apart and reassemble. Think of it as a small puzzle and the beauty of the challenge is that you can’t put it back together unless it is reassembled correctly.
Give it a try and good luck!
Give it a try and good luck!
12-04-18 | 11:30 PM
#14
Full Member
Joined: Jun 2017
Posts: 219
Likes: 68
From: Northern CA
Bikes: 1971 Gitane TDF, 1974 Gitane Interclub, 2001 Serotta Rapid Tour CS3, 1986 Bruce Gordon touring bike, 1972 Gitane Super Corsa, 1978 Michal Johnson, 1972 Lambert Professional Grand Prix, 1983 Vitus (resto project), 1972 Raleigh Professional (resto)
Agree that Evaporust is magical stuff, as well.
12-07-18 | 07:22 PM
#15
Thread Starter
Senior Member
Joined: Sep 2015
Posts: 190
Likes: 5
From: Florida
Good evening all! Okay, I decided to mess with the derailleur just because. I'd already ordered another so at least I knew that was coming. Sadly I didn't think about pictures until it was already apart but took some as it went back together.
Let me start by saying I feel the difficulty factor is around 3-4-5 It came apart quite easily and to my surprise there was no danger of the spring shooting out, bouncing off the wall and piercing through my glasses and into my eye. I will attempt to explain what I did. This way you can replace the spring or the cage/arm assembly. But leave the circ clip on until spring is out- helps hold arm in place.
1. Remove the adjustment screws.
2. Take the spring off it's rest, so it is now leaning against the cage. I used a small screwdriver. And you might want to use some tape to protect the aluminum in case you slip.
3. You can now swing the cage farther out with little effort.
4. Unscrew cage bolt nut.
5. There is still pressure so I had to tap the bolt out. To my surprise though nothing shot across the room, hit the wall and bounced back into my eye! It just came apart. Cool.
6. You can now remove the spring or circ clip.
7. Tricky parts- when putting the spring back on, set the large end of spring against top of cage and small part against the bottom as it was before. But what happens is, the little end wants to go through the opening in the back cage and at the same time the pivot arm want to move outward. The small end of spring of course must be against the cage. And If you get the spring on right but the arm isn't all the way in, you have to start over. The pressure will not let you move it in.
8. With spring in position and arm on snug, press it together, aligning the holes until you can push the bolt back in. Reattach nut.
9. Pry spring back into position.
Pictures are from apart to back together.
At least I now know it's not too difficult. It is a tough spring but with the arms outward, there is not much tension. My biggest problem was when I knocked one of the adjustment screws on the floor. I picked it up and realized it's spring was missing. Thank God I hadn't stepped on it or lost it... anyway...
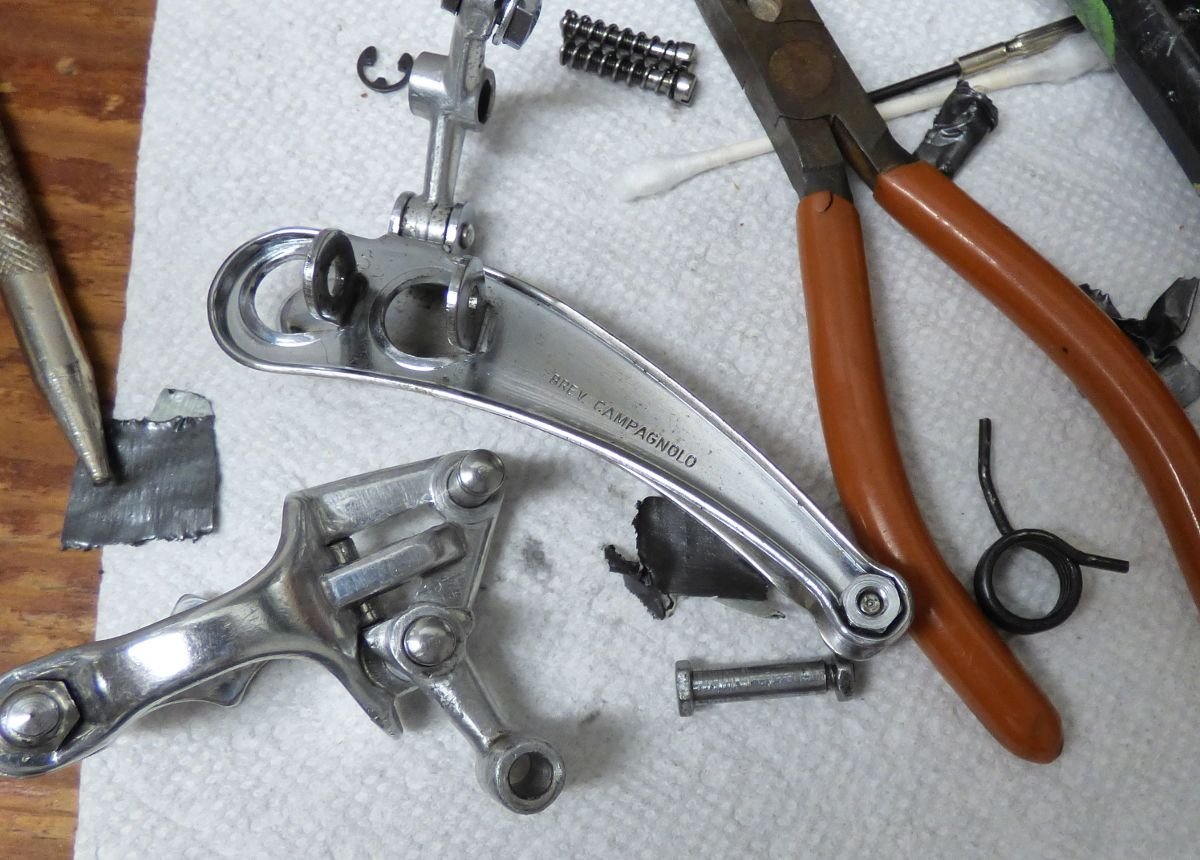


Let me start by saying I feel the difficulty factor is around 3-4-5
It came apart quite easily and to my surprise there was no danger of the spring shooting out, bouncing off the wall and piercing through my glasses and into my eye. I will attempt to explain what I did. This way you can replace the spring or the cage/arm assembly. But leave the circ clip on until spring is out- helps hold arm in place.1. Remove the adjustment screws.
2. Take the spring off it's rest, so it is now leaning against the cage. I used a small screwdriver. And you might want to use some tape to protect the aluminum in case you slip.
3. You can now swing the cage farther out with little effort.
4. Unscrew cage bolt nut.
5. There is still pressure so I had to tap the bolt out. To my surprise though nothing shot across the room, hit the wall and bounced back into my eye! It just came apart. Cool.
6. You can now remove the spring or circ clip.
7. Tricky parts- when putting the spring back on, set the large end of spring against top of cage and small part against the bottom as it was before. But what happens is, the little end wants to go through the opening in the back cage and at the same time the pivot arm want to move outward. The small end of spring of course must be against the cage. And If you get the spring on right but the arm isn't all the way in, you have to start over. The pressure will not let you move it in.
8. With spring in position and arm on snug, press it together, aligning the holes until you can push the bolt back in. Reattach nut.
9. Pry spring back into position.
Pictures are from apart to back together.
At least I now know it's not too difficult. It is a tough spring but with the arms outward, there is not much tension. My biggest problem was when I knocked one of the adjustment screws on the floor. I picked it up and realized it's spring was missing. Thank God I hadn't stepped on it or lost it... anyway...

Thread
Thread Starter
Forum
Replies
Last Post
Jantaras
Bicycle Mechanics
4
04-13-18 06:06 AM
hazzak
Bicycle Mechanics
12
08-26-13 06:09 PM
