


Freehub to Freewheel
 08-30-19 | 09:34 AM
#26

Senior Member


Joined: Nov 2014
Posts: 27,576
Likes: 5,474
From: Eugene, Oregon, USA
A couple of comments. If you have the skills & tools to fabricate your freehub adapter, then you likely could simply fabricate a hub from scratch, especially if you're choosing sealed bearings. 50+ years ago, prior to CNC, the bike component manufacturing companies were using pretty simple tools.
There are a few stable lacing patterns that allow one to skip holes on a hub.
So, with 36h.
18h on each side.
Divide by 3, and one has 6.
So, if one skips every third hole, one gets 24 spokes.
It actually works out very well as one has one spoke going each direction, and a hole in between. What I think I've seen, the spokes crossing near the flange get the extra spoke hole between them.
There may be other more creative patterns available.
There are a few stable lacing patterns that allow one to skip holes on a hub.
So, with 36h.
18h on each side.
Divide by 3, and one has 6.
So, if one skips every third hole, one gets 24 spokes.
It actually works out very well as one has one spoke going each direction, and a hole in between. What I think I've seen, the spokes crossing near the flange get the extra spoke hole between them.
There may be other more creative patterns available.

 08-30-19 | 10:30 AM
#27
Used to be Conspiratemus

Joined: Jan 2009
Posts: 1,520
Likes: 247
From: Hamilton ON Canada
as I said to the OP in a PM, almost anything can be done if you have access to a machine shop.
The drawing looks fine but it does not take into account the wall thickness of the hub shell once you start removing material. e
consider for a moment how much force you are going to be applying at the interface betw. the cassette ratchet and the hub shell....
Mark Petry
Bainbridge Island, WA USA
The drawing looks fine but it does not take into account the wall thickness of the hub shell once you start removing material. e
consider for a moment how much force you are going to be applying at the interface betw. the cassette ratchet and the hub shell....
Mark Petry
Bainbridge Island, WA USA
I'm one of the contributors to the thread mentioned by @seypat about attaching an extra cog to the inside of a cassette (my case) or a freewheel [MENTION=485669]Eiko[/MENTION]'s case -- his thread). The problem there is much simpler (at least in my case) because I didn't have to fabricate anything novel. The only hard part was drilling holes for bolts (or Rivnuts) in the hardened steel sprockets. It is relevant here, though, because several of the comments on [MENTION=485669]Eiko[/MENTION]'s project-in-progress incorrectly argued (as a result of mis-reading) that the project involved more metal-removing from, or damage to, his existing hub, or set it up for more risk of axle-breakage or derailer-spoke fouling, than was actually the case....along the lines of, "It won't work because....." If the claim that follows the "because" is factually false, the prediction "It won't work" remains unproven. In the end, it only won't work if it doesn't. If the adapter has to be too thin-walled to fit and be strong at the same time, the OP will either figure that out with detailed drawings, or it'll break in service. Either way, lots learned.

 08-30-19 | 10:47 AM
#28
Senior Member


Joined: Jan 2004
Posts: 6,169
Likes: 1,799
From: Madison, WI USA
Isn't this the essence of truly bold techlogical change/breakthrough?
08-30-19 | 10:50 AM
#29

aged to perfection
Joined: Jun 2009
Posts: 2,242
Likes: 1,660
From: PacNW
Bikes: Dinucci Allez 2.0, Richard Sachs, Alex Singer, Serotta, Masi GC, Raleigh Pro Mk.1, Hetchins, etc
You're right, that hub shell to FW "carrier" interface is the hard part. Made even harder b/c the hub is aluminum and the proposed carrier will be steel.
Take a look at how the Cinelli Bivalent attempted to solve this problem - they used a steel spline pressed on to the hub body and then a special regina FW with a matching female spline. Even so, these all failed ! the pair I have is display only, you can ride it but it is not a robust design.
Considering the loads applied, steel against aluminum will wear pretty fast. Like between your driveway and the end of the block.
Mark Petry
Bainbridge Island, WA USA
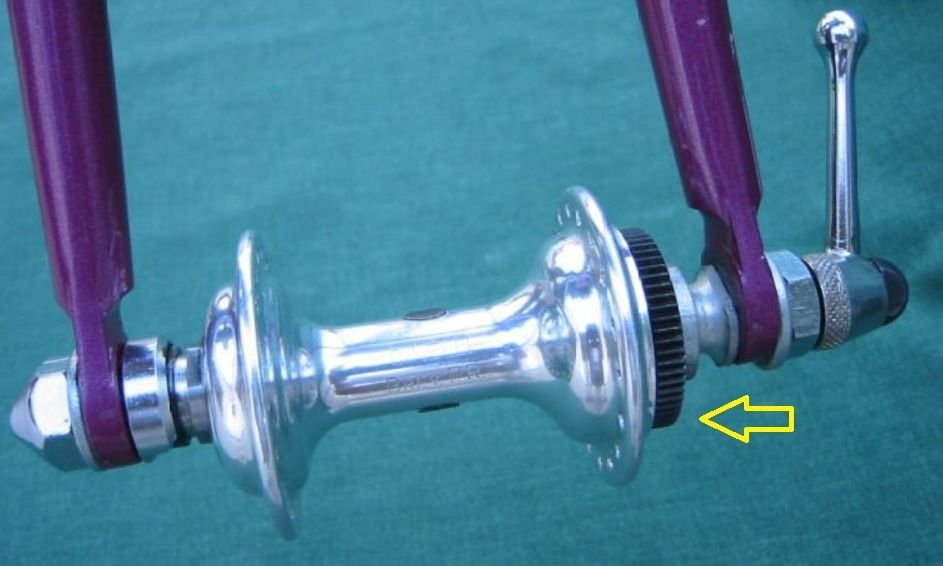

Take a look at how the Cinelli Bivalent attempted to solve this problem - they used a steel spline pressed on to the hub body and then a special regina FW with a matching female spline. Even so, these all failed ! the pair I have is display only, you can ride it but it is not a robust design.
Considering the loads applied, steel against aluminum will wear pretty fast. Like between your driveway and the end of the block.
Mark Petry
Bainbridge Island, WA USA
08-30-19 | 11:02 AM
#30
Senior Member
Joined: Nov 2014
Posts: 27,576
Likes: 5,474
From: Eugene, Oregon, USA
Is there room between the inner circumference of the freewheel body and the rachet ring of the hub shell to make the adapter thick enough for strength? Well, the large inner freewheel sprockets have much bigger holes in them than cassette sprockets do, so maybe there is. He has said he needs to find out when he designs this in more detail. The finished product will have no moving parts so there are no long-term wear issues. It just has to withstand the pedaling torque transmitted through it to the underlying hub without breaking. Wish him every success.
If one made this with steel or stainless, my guess there would be more than adequate space to get everything squeezed in.
A little tighter tolerances with aluminum, but it may be fine.
I very much dislike the idea of mixing a sealed bearing + a cup & cone bearing.
The sealed bearings do best with straight vertical forces.
The cup & cone bearings have an element of lateral forces.
There have been people who popped out the loose bearing races and fitted sealed bearing cartridges.
One thing to keep in mind is ultimate cost.
Say one is trying to avoid buying a $50 to $80 hub, by taking a $20 hub, and doing a bunch of work to it. In the end, is it really worth the cost savings?
09-12-19 | 01:05 PM
#31
Member
Joined: Jun 2018
Posts: 34
Likes: 5
I'd love to continue hearing of your progress, if any.

Thread
Thread Starter
Forum
Replies
Last Post
mrrabbit
Bicycle Mechanics
5
11-18-18 12:03 AM
peloton1986
Bicycle Mechanics
19
07-28-12 11:53 AM
