


Tube patching!
 11-16-19, 08:06 PM
#26

www.theheadbadge.com

Join Date: Sep 2005
Location: Southern Florida
Posts: 28,521
Bikes: https://www.theheadbadge.com
Mentioned: 124 Post(s)
Tagged: 0 Thread(s)
Quoted: 2425 Post(s)
Liked 4,415 Times
in
2,097 Posts

-Kurt
__________________


 11-17-19, 01:10 AM
#27
Not lost wanderer.
Thread Starter

Join Date: Jan 2013
Location: Lititz, Pa
Posts: 3,354
Bikes: In USA; 73 Raleigh Super Course dingle speed, 72 Raleigh Gran Sport SS, 72 Geoffry Butler, 81 Centurion Pro-Tour, 74 Gugie Grandier Sportier
Mentioned: 73 Post(s)
Tagged: 0 Thread(s)
Quoted: 890 Post(s)
Liked 1,015 Times
in
534 Posts
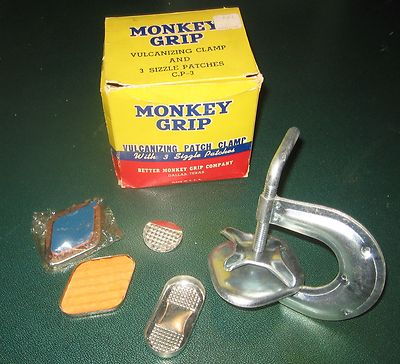
Yes, it is a piston, probably from a 250 Honda.
These patches almost never fail even when they just use a piece of old inner tube.
I can get 2 square centimeters of this patching for $.50
The press is about $5
These patches almost never fail even when they just use a piece of old inner tube.
I can get 2 square centimeters of this patching for $.50
The press is about $5
__________________
Cambodia bikes, Bridgestone SRAM 2 speed, 2012 Fuji Stratos...
Cambodia bikes, Bridgestone SRAM 2 speed, 2012 Fuji Stratos...
Likes For bwilli88:
11-17-19, 10:35 AM
#28
Senior Member
Join Date: Jul 2008
Location: 25 miles northwest of Boston
Posts: 29,589
Bikes: Bottecchia Sprint, GT Timberline 29r, Marin Muirwoods 29er, Trek FX Alpha 7.0
Mentioned: 112 Post(s)
Tagged: 0 Thread(s)
Quoted: 5234 Post(s)
Liked 3,602 Times
in
2,356 Posts
I don�t get it - what is the heat source in the photo?


 11-17-19, 08:14 PM
#31
tantum vehi

Join Date: Jul 2008
Location: Flathead Valley, MT
Posts: 4,441
Bikes: More than I care to admit
Mentioned: 153 Post(s)
Tagged: 0 Thread(s)
Quoted: 1168 Post(s)
Liked 993 Times
in
492 Posts
I�m fascinated by this heat process. Do they use glue or just two pieces of butyl tube and heat & pressure? Both?
Inquiring minds want to know!
Inquiring minds want to know!
11-18-19, 03:39 AM
#32
Not lost wanderer.
Thread Starter
Join Date: Jan 2013
Location: Lititz, Pa
Posts: 3,354
Bikes: In USA; 73 Raleigh Super Course dingle speed, 72 Raleigh Gran Sport SS, 72 Geoffry Butler, 81 Centurion Pro-Tour, 74 Gugie Grandier Sportier
Mentioned: 73 Post(s)
Tagged: 0 Thread(s)
Quoted: 890 Post(s)
Liked 1,015 Times
in
534 Posts
The heat is either alcohol or diesel fuel, the patching is heat vulcanized rubber patching or just a piece of old tube.
No glue, just heat and pressure preferably with vulcanizing patches.
No glue, just heat and pressure preferably with vulcanizing patches.
__________________
Cambodia bikes, Bridgestone SRAM 2 speed, 2012 Fuji Stratos...
Cambodia bikes, Bridgestone SRAM 2 speed, 2012 Fuji Stratos...
11-18-19, 09:10 AM
#34
Senior Member
Join Date: May 2008
Location: Fredericksburg, Va
Posts: 9,588
Bikes: '65 Frejus TDF, '73 Bottecchia Giro d'Italia, '83 Colnago Superissimo, '84 Trek 610, '84 Trek 760, '88 Pinarello Veneto, '88 De Rosa Pro, '89 Pinarello Montello, '94 Burley Duet, 97 Specialized RockHopper, 2010 Langster, Tern Link D8
Mentioned: 73 Post(s)
Tagged: 0 Thread(s)
Quoted: 1616 Post(s)
Liked 2,221 Times
in
1,106 Posts
I was in India in the late 60's. I was in HS during that time. We went down to visit the Taj Mahal from New Delhi. Our car was a 1966 Plymouth Satellite with a 360. Tires were purchased through the Embassy Commissary, Firestones. They fell apart on the roads we had to drive on. In the two weeks we traveled, we had 7 flat tires. They were tubeless tires that eventually had to have tubes put in. Vulcanizing kits were kept in the car to repair tubes.
Being the young teenager, I had to fix all of them. This involved breaking the bead on the rim by using the jack base that had a curve specifically for that task. How you ask? Pretend to jack the car up with the base on the bead under the edge of the rim. Use a hand sledge (5#) to beat on the tire on either side to get it to slide off.
We also had a hose with a special connector that connected to the engine by replacing a spark plug. Turn the engine on and let it fill the tire. Getting the bead to seat was a real pain. One way was to put a line around the center of the tire and tighten it up to get the sidewalls to bulge against the rim bead. Soapy water was very helpful. Watch for the bubble's and try to seal them up with manipulating the tire on the rim.
We stopped going to tire repair places the first time we did. They used a BFH and screw driver to try to break the bead seat. Tires were fragile enough without undue trauma!
Wished I had known about the starter fluid and lighter approach to seat the beads!
__________________
Bikes don't stand alone. They are two tired.
Bikes don't stand alone. They are two tired.
Likes For SJX426:
11-18-19, 10:45 PM
#35
Senior Member
The most important part of patching a tube is scuffing and scuffing and scuffing the site to be patched. I cannot over-emphasize the importance of proper, full scuffing of the site to be patched.
I wonder if the patcher properly scuffed the site to be patched before patching it with that arcane, archaic monstrosity?
What happens if both sidewalls of the tube get welded together? I suspect that can't happen because the insides of the tube were not scuffed!
I wonder if the patcher properly scuffed the site to be patched before patching it with that arcane, archaic monstrosity?
What happens if both sidewalls of the tube get welded together? I suspect that can't happen because the insides of the tube were not scuffed!
Last edited by Bad Lag; 11-19-19 at 10:49 AM.
11-19-19, 06:19 AM
#36
www.theheadbadge.com
Join Date: Sep 2005
Location: Southern Florida
Posts: 28,521
Bikes: https://www.theheadbadge.com
Mentioned: 124 Post(s)
Tagged: 0 Thread(s)
Quoted: 2425 Post(s)
Liked 4,415 Times
in
2,097 Posts
Granted, I share your curiosity as to how it doesn't bond the two sides together.
-Kurt
__________________
Last edited by cudak888; 11-19-19 at 06:23 AM.
11-19-19, 06:31 AM
#37
2-Wheeled Fool
Join Date: Sep 2016
Location: New Hampshire
Posts: 2,346
Bikes: Surly Ogre, Brompton
Mentioned: 18 Post(s)
Tagged: 0 Thread(s)
Quoted: 1385 Post(s)
Liked 677 Times
in
457 Posts
When I was a kid, we always patched our tubes by lighting the glue on fire. Always. Light it. Let it burn for a second our two - just to heat up the rubber - then apply the patch. I do not remember ever having a patch fail that way. Bicycle innertubes didn't exactly grow on trees in my neck of the woods in Maine back then, so we'd be riding patched tubes forever. I never heard of doing it any other way until I was a teen and started working in bike shops when our family moved to the mainland.
11-19-19, 07:57 AM
#38
aka Tom Reingold

Join Date: Jan 2009
Location: New York, NY, and High Falls, NY, USA
Posts: 40,524
Bikes: 1962 Rudge Sports, 1971 Raleigh Super Course, 1971 Raleigh Pro Track, 1974 Raleigh International, 1975 Viscount Fixie, 1982 McLean, 1996 Lemond (Ti), 2002 Burley Zydeco tandem
Mentioned: 511 Post(s)
Tagged: 0 Thread(s)
Quoted: 7359 Post(s)
Liked 2,502 Times
in
1,451 Posts
When I was a kid, we always patched our tubes by lighting the glue on fire. Always. Light it. Let it burn for a second our two - just to heat up the rubber - then apply the patch. I do not remember ever having a patch fail that way. Bicycle innertubes didn't exactly grow on trees in my neck of the woods in Maine back then, so we'd be riding patched tubes forever. I never heard of doing it any other way until I was a teen and started working in bike shops when our family moved to the mainland.
__________________
Tom Reingold, tom@noglider.com
New York City and High Falls, NY
Blogs: The Experienced Cyclist; noglider's ride blog
�When man invented the bicycle he reached the peak of his attainments.� � Elizabeth West, US author
Please email me rather than PM'ing me. Thanks.
Tom Reingold, tom@noglider.com
New York City and High Falls, NY
Blogs: The Experienced Cyclist; noglider's ride blog
�When man invented the bicycle he reached the peak of his attainments.� � Elizabeth West, US author
Please email me rather than PM'ing me. Thanks.
11-19-19, 09:24 AM
#39
Full Member
Join Date: Aug 2014
Location: ETX/ SNH
Posts: 225
Bikes: 2011 Handsome/ Twin Six Speedy Devil, 2006 Soma Groove, 1991 Haro Impulse Comp, 1987 KHS Montana Pro, 1986 Ross Mount Hood, 1986 Mongoose ATB, 1985 Shogun Prairie Breaker I, 1973 World Voyageur, 1941 Schwinn DX "Klunker"
Mentioned: 3 Post(s)
Tagged: 0 Thread(s)
Quoted: 83 Post(s)
Liked 96 Times
in
45 Posts
On the vulcanizing kits that we used to use.
The patch was on a patch sized diamond shaped, throw away tray. The outside of the patch was lightly attached to the tray, and the patch has a peel off on the tire side.
The tray was preloaded with a hard fuel, like the Esbit stoves used.
So you would rough up, peel off the back of the patch and center it, then clamp it with the clamp and the two long ends of the tray would stick out from under the clamp and get lit.
11-19-19, 10:57 AM
#40
Senior Member
It's not kind to make a judgement call on this stuff when it keeps people moving in other societies that work vastly differently than your own. There's no "monstrosity" in the method when it's reliable and repeatable.
Granted, I share your curiosity as to how it doesn't bond the two sides together.
-Kurt
Granted, I share your curiosity as to how it doesn't bond the two sides together.
-Kurt
Consider, however, that you may have entirely missed the tongue-in-cheek humor intended for and directed at THIS audience.
At the same time, the need to scuff, scuff, scuff before applying the patch, is apparently a lesson some here really need (see other thread about how people hate patching tubes).
Learning that it is almost impossible to over-scuff is why my patches never fail. If you can see ANY of the original surface, you have not yet scuffed enough (also true for almost all bonding operations).
11-19-19, 01:29 PM
#41
Port

Join Date: Jan 2008
Location: Boston
Posts: 6,672
Bikes: 2022 Soma Fog Cutter, 2021 Calfee Draqonfly 44, 1984 Peter Mooney, 2017 Soma Stanyan, 1990 Fuji Ace, 1990 Bridgestone RB-1, 1995 Independent Fabrications Track, 2003 Calfee Dragonfly Pro
Mentioned: 18 Post(s)
Tagged: 0 Thread(s)
Quoted: 992 Post(s)
Liked 1,901 Times
in
1,080 Posts
Semi-related....
Is it possible to patch a tube when the leak is at the base of the valve stem? Like the stem is separating from the tube?
Is it possible to patch a tube when the leak is at the base of the valve stem? Like the stem is separating from the tube?
__________________
https://rowdml.tripod.com/panmass
https://rowdml.tripod.com/panmass
11-19-19, 03:16 PM
#43
Senior Member
Join Date: Oct 2015
Location: PDX
Posts: 13,118
Bikes: Merz x 5 + Specialized Merz Allez x 2, Strawberry/Newlands/DiNucci/Ti x3, Gordon, Fuso/Moulton x2, Bornstein, Paisley,1958-74 Paramounts x3, 3rensho, 74 Moto TC, 73-78 Raleigh Pro's x5, Marinoni x2, 1960 Cinelli SC, 1980 Bianchi SC, PX-10 X 2
Mentioned: 269 Post(s)
Tagged: 0 Thread(s)
Quoted: 4528 Post(s)
Liked 6,427 Times
in
3,700 Posts
You can clean with glass cleaner or light solvent used very sparingly, just scrubbing the area at all before scuffing can help, the residue is the plague.
 11-19-19, 05:21 PM
#44
Senior Member

Join Date: Jul 2006
Location: San Jose (Willow Glen) Ca
Posts: 9,875
Bikes: Kirk Custom JK Special, '84 Team Miyata,(dura ace old school) 80?? SR Semi-Pro 600 Arabesque
Mentioned: 107 Post(s)
Tagged: 0 Thread(s)
Quoted: 2351 Post(s)
Liked 2,865 Times
in
1,560 Posts
So the tubes are coated to some degree with talc like powder and/or lube/preservative that is the opposite of glue and stops it from doing it's job by creating a barrier that is not eliminated by scuffing.
You can clean with glass cleaner or light solvent used very sparingly, just scrubbing the area at all before scuffing can help, the residue is the plague.
You can clean with glass cleaner or light solvent used very sparingly, just scrubbing the area at all before scuffing can help, the residue is the plague.
__________________
Life is too short not to ride the best bike you have, as much as you can
(looking for Torpado Super light frame/fork or for Raleigh International frame fork 58cm)
Life is too short not to ride the best bike you have, as much as you can
(looking for Torpado Super light frame/fork or for Raleigh International frame fork 58cm)
Likes For squirtdad:
11-19-19, 05:45 PM
#45
aka Tom Reingold
Join Date: Jan 2009
Location: New York, NY, and High Falls, NY, USA
Posts: 40,524
Bikes: 1962 Rudge Sports, 1971 Raleigh Super Course, 1971 Raleigh Pro Track, 1974 Raleigh International, 1975 Viscount Fixie, 1982 McLean, 1996 Lemond (Ti), 2002 Burley Zydeco tandem
Mentioned: 511 Post(s)
Tagged: 0 Thread(s)
Quoted: 7359 Post(s)
Liked 2,502 Times
in
1,451 Posts
I use a pen and make a circle around the hole, and then I put a cross over it, too, so it's like an X'd out O. That helps me keep track of where it is.
__________________
Tom Reingold, tom@noglider.com
New York City and High Falls, NY
Blogs: The Experienced Cyclist; noglider's ride blog
�When man invented the bicycle he reached the peak of his attainments.� � Elizabeth West, US author
Please email me rather than PM'ing me. Thanks.
Tom Reingold, tom@noglider.com
New York City and High Falls, NY
Blogs: The Experienced Cyclist; noglider's ride blog
�When man invented the bicycle he reached the peak of his attainments.� � Elizabeth West, US author
Please email me rather than PM'ing me. Thanks.
11-19-19, 05:50 PM
#46
Senior Member
Join Date: Oct 2015
Location: PDX
Posts: 13,118
Bikes: Merz x 5 + Specialized Merz Allez x 2, Strawberry/Newlands/DiNucci/Ti x3, Gordon, Fuso/Moulton x2, Bornstein, Paisley,1958-74 Paramounts x3, 3rensho, 74 Moto TC, 73-78 Raleigh Pro's x5, Marinoni x2, 1960 Cinelli SC, 1980 Bianchi SC, PX-10 X 2
Mentioned: 269 Post(s)
Tagged: 0 Thread(s)
Quoted: 4528 Post(s)
Liked 6,427 Times
in
3,700 Posts
 Patience and diligence are key as with many things, always in a hurry will get you doing it again.
11-19-19, 09:55 PM
Patience and diligence are key as with many things, always in a hurry will get you doing it again.
11-19-19, 09:55 PM
#47
curmudgineer

Join Date: Dec 2009
Location: Chicago SW burbs
Posts: 4,417
Bikes: 2 many 2 fit here
Mentioned: 8 Post(s)
Tagged: 0 Thread(s)
Quoted: 263 Post(s)
Liked 112 Times
in
70 Posts
with that our of the way, FYI, I have salvaged several otherwise good tubes but with the valve stem separated from the tube rubber, or a crack/puncture in the rubber so close to the stem that it is impossible to patch. My salvage procedure is to splice in a rectangular cutout of a tube with an intact section around the stem, taken from a tube that has suffered a catastrophic failure beyond patching, or is otherwise scrap, e.g. due to excessive punctures/patches.
11-19-19, 10:14 PM
#48
weapons-grade bolognium

Join Date: Dec 2008
Location: Across the street from Chicago
Posts: 6,353
Bikes: Battaglin Cromor, Ciocc Designer 84, Schwinn Superior 1981
Mentioned: 44 Post(s)
Tagged: 0 Thread(s)
Quoted: 988 Post(s)
Liked 2,397 Times
in
897 Posts
My dad had one of those Monkey Grip dealies. We used it to patch our motorcycle tubes.
Worked well and was fun to boot!
Worked well and was fun to boot!
