


Wheel hub adjustment hack
 12-05-21 | 09:16 AM
#1
Thread Starter
Senior Member


Joined: Nov 2013
Posts: 2,401
Likes: 1,574
From: Near Pottstown, PA: 30 miles NW of Philadelphia
Bikes: 2 Trek Mtn, Cannondale R600 road, 6 vintage road bikes
Wheel hub adjustment hack
This another idea that has worked real well for me and I was using this today and decided to share.
Most of us know that hollow axles do compress a tiny bit when we clamp the QR skewer, so I really don't "sign off" a bearing adjustment until I've checked under compression. And that's a PIA if you can only reinstall the wheel into a frame to get that compression. So I've made two sets of clamping handles, one wooden and the most recent from aluminum. I like the aluminum set best. When I've had a hub apart, such as during an overhaul, I reassemble the hub leaving the cones a whisker tight, then snug the lock nut. I then use cone wrenches (13 or 15mm) to turn the two cones out against each other a whisker so the adjustment loosens and feels right - just the barest bit of play.
I then install these handles on the wheel and clamp with a QR. I hold the assembly on the edge of the bench and "clock" the wheel: turn it slowly and watch it rotate, slow, change direction and rotate again, sometimes two or three changes, like the heavy spot is a pendulem. No play and even, smooth direction changes tells me its done. Lately I can achieve this on the first try or maybe with one correction. If a correction is needed, I loosen the QR, adjust the cones, close the QR and check again. When done I tighten the lock nut fully and check again just to be sure.

No, its not hanging in mid air. My hand is holding the wheel, stage left.
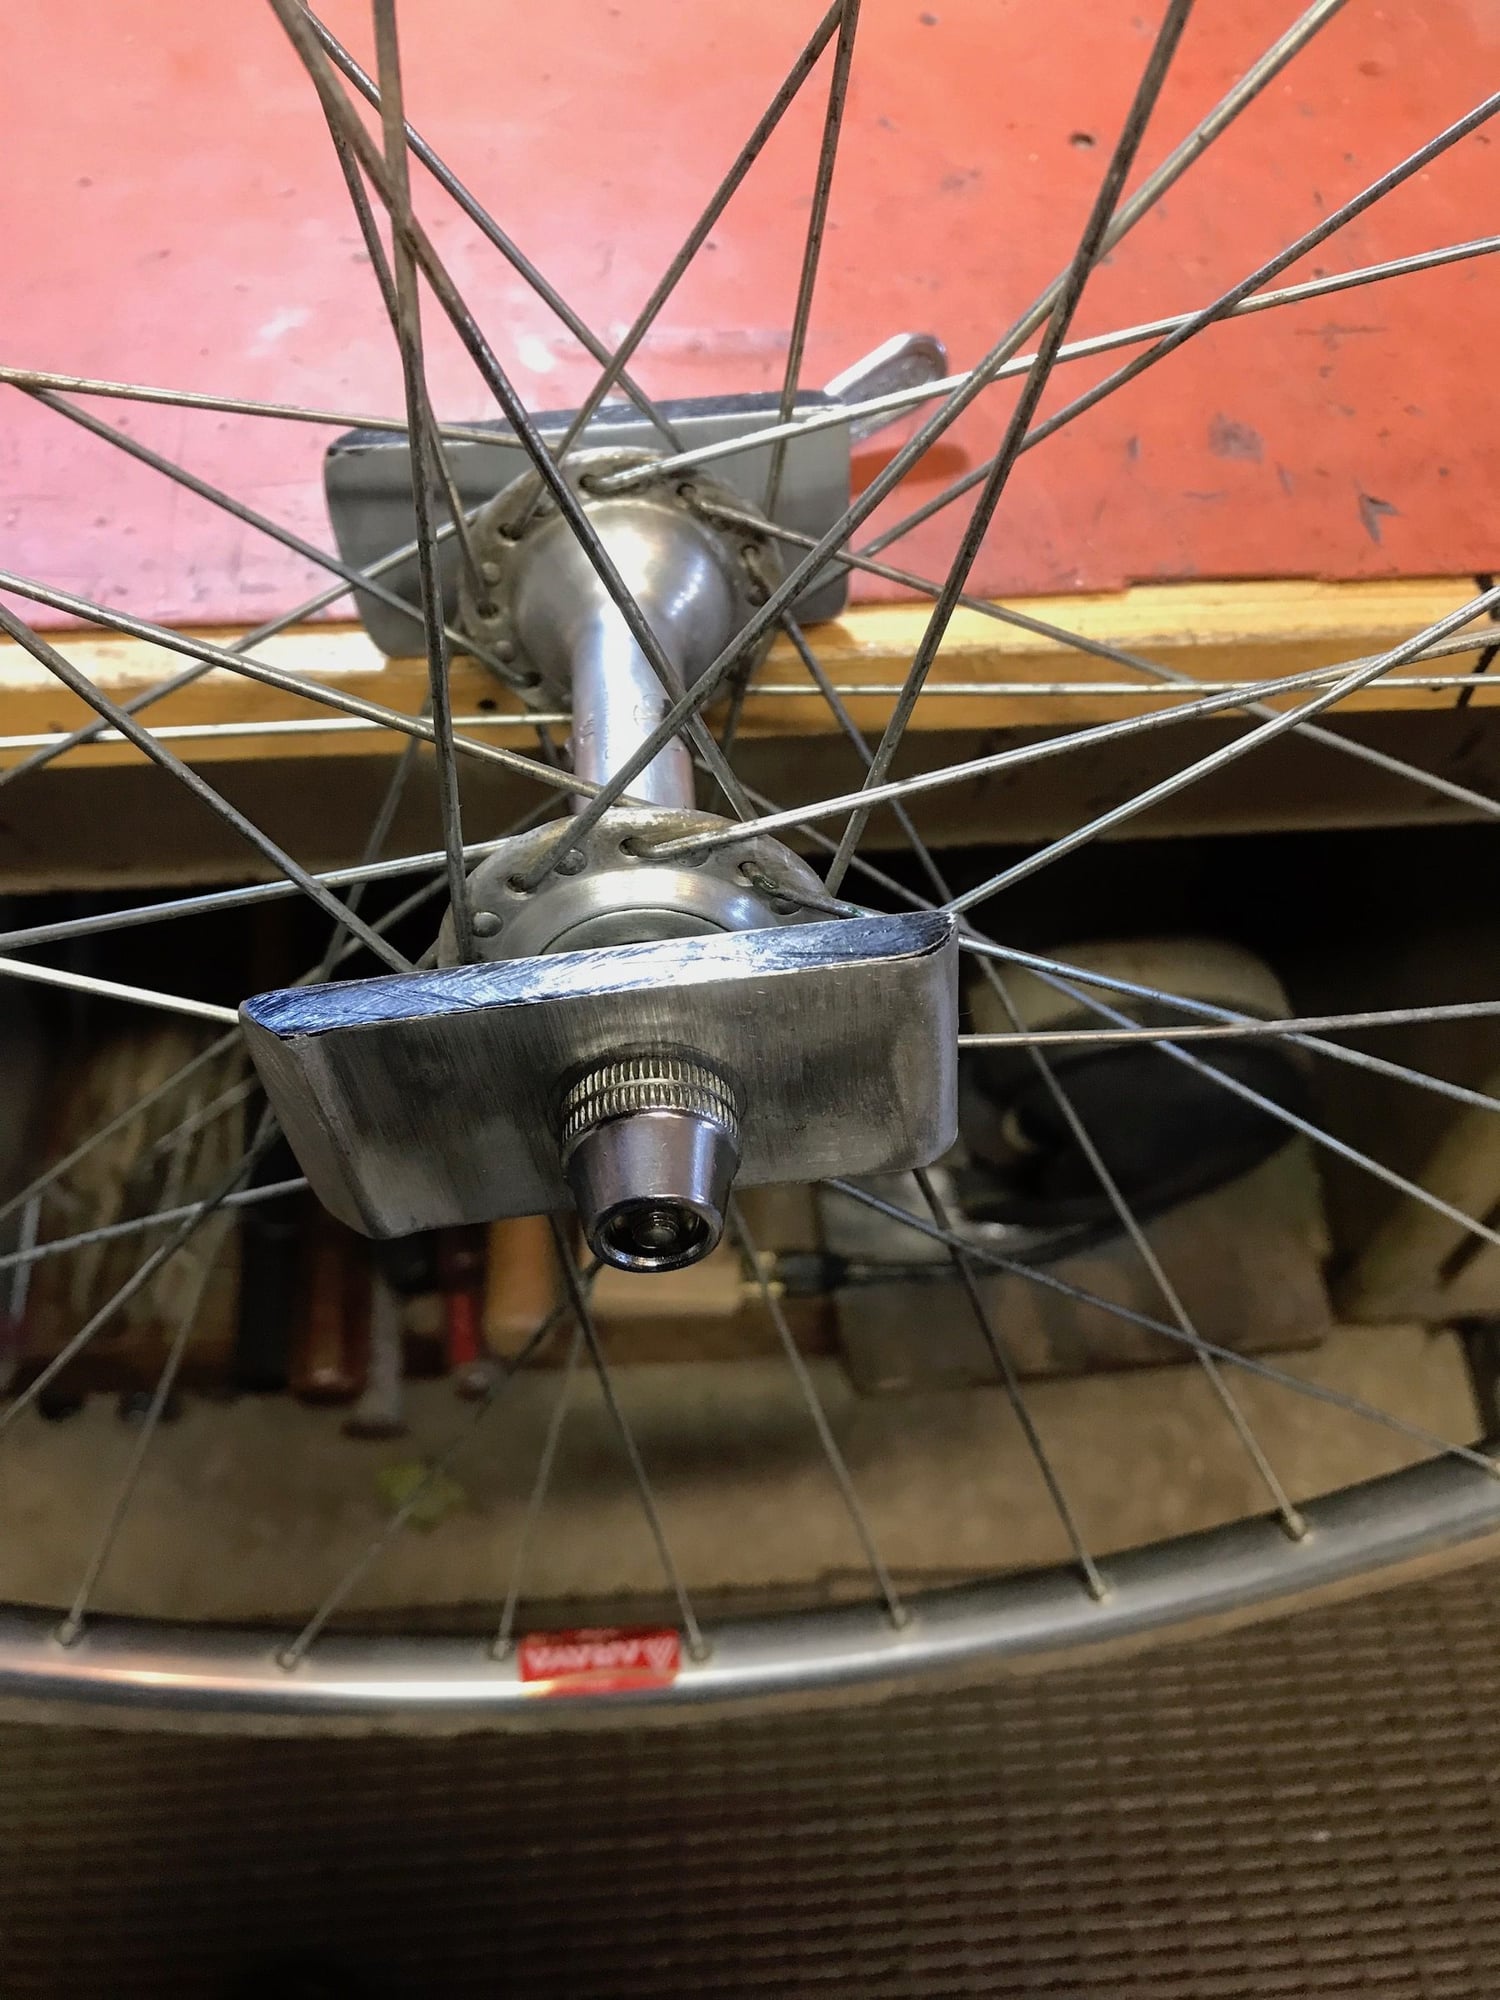

The dimensions are not critical but the hole should be close to the 10mm axle diameter (I drilled a 3/8" hole as I have no metric drills), the thickness should be greater than 5mm (mine is 6mm) and the dimensions should be a handy size (mine are 7mm x 3.5mm as that's the scrap piece I had). The bottom pix shows them on bench. I've prepared two QR skewers with any plastic removed from the nuts so they spin on quickly. One long one and one std front skewer. And these handles are nice when you want to spin up the wheel to hear/feel how smooth the hub is. Always a good final check.
BTW, my daughter-in-law works in an OR and they use those small white plastic trays for something, throwing out many per day. She salvaged a couple for me. Handy as the bearings go in the small compartment, the small parts in the medium one and the large parts in the large compartment. Handy for keeping things organized, especially when you're doing a pair of wheels and NEED to keep things where they belong.
Oh, yeah, those are two vintage VAR cone wrenches that came out of a barn (literally). Nice and I'm glad to have them.
Most of us know that hollow axles do compress a tiny bit when we clamp the QR skewer, so I really don't "sign off" a bearing adjustment until I've checked under compression. And that's a PIA if you can only reinstall the wheel into a frame to get that compression. So I've made two sets of clamping handles, one wooden and the most recent from aluminum. I like the aluminum set best. When I've had a hub apart, such as during an overhaul, I reassemble the hub leaving the cones a whisker tight, then snug the lock nut. I then use cone wrenches (13 or 15mm) to turn the two cones out against each other a whisker so the adjustment loosens and feels right - just the barest bit of play.
I then install these handles on the wheel and clamp with a QR. I hold the assembly on the edge of the bench and "clock" the wheel: turn it slowly and watch it rotate, slow, change direction and rotate again, sometimes two or three changes, like the heavy spot is a pendulem. No play and even, smooth direction changes tells me its done. Lately I can achieve this on the first try or maybe with one correction. If a correction is needed, I loosen the QR, adjust the cones, close the QR and check again. When done I tighten the lock nut fully and check again just to be sure.
No, its not hanging in mid air. My hand is holding the wheel, stage left.
The dimensions are not critical but the hole should be close to the 10mm axle diameter (I drilled a 3/8" hole as I have no metric drills), the thickness should be greater than 5mm (mine is 6mm) and the dimensions should be a handy size (mine are 7mm x 3.5mm as that's the scrap piece I had). The bottom pix shows them on bench. I've prepared two QR skewers with any plastic removed from the nuts so they spin on quickly. One long one and one std front skewer. And these handles are nice when you want to spin up the wheel to hear/feel how smooth the hub is. Always a good final check.
BTW, my daughter-in-law works in an OR and they use those small white plastic trays for something, throwing out many per day. She salvaged a couple for me. Handy as the bearings go in the small compartment, the small parts in the medium one and the large parts in the large compartment. Handy for keeping things organized, especially when you're doing a pair of wheels and NEED to keep things where they belong.
Oh, yeah, those are two vintage VAR cone wrenches that came out of a barn (literally). Nice and I'm glad to have them.
 12-05-21 | 10:07 AM
#2

se�or miembro

Joined: Dec 2018
Posts: 3,517
Likes: 8,905
From: Pac NW
Bikes: '70s - '80s Campagnolo
How do you hold the "clamping handles" in a solid, fixed position to check for play in the hub?
12-05-21 | 01:23 PM
#4


feros ferio

Joined: Jul 2000
Posts: 22,408
Likes: 1,873
From: www.ci.encinitas.ca.us
Bikes: 1959 Capo Modell Campagnolo; 1960 Capo Sieger (2); 1962 Carlton Franco Suisse; 1970 Peugeot UO-8; 1982 Bianchi Campione d'Italia; 1988 Schwinn Project KOM-10;
Many of us collectors have unused frames that work splendidly for this purpose.
This thread is spot on -- with quick release axles, it is far too easy to adjust cone-type bearings too tightly.
This thread is spot on -- with quick release axles, it is far too easy to adjust cone-type bearings too tightly.
__________________
"Far and away the best prize that life offers is the chance to work hard at work worth doing." --Theodore Roosevelt
Capo: 1959 Modell Campagnolo, S/N 40324; 1960 Sieger (2), S/N 42624, 42597
Carlton: 1962 Franco Suisse, S/N K7911
Peugeot: 1970 UO-8, S/N 0010468
Bianchi: 1982 Campione d'Italia, S/N 1.M9914
Schwinn: 1988 Project KOM-10, S/N F804069
12-05-21 | 02:09 PM
#5
Thread Starter
Senior Member
Joined: Nov 2013
Posts: 2,401
Likes: 1,574
From: Near Pottstown, PA: 30 miles NW of Philadelphia
Bikes: 2 Trek Mtn, Cannondale R600 road, 6 vintage road bikes
When i start I likely have the cones set to tight, but no play. I hold the wheel level with one hand then give it a gentle turn, often just enough to get a half rotation, then watch for how smoothly that rotation stops and reverses direction. If it stops abruptly that's drag and I loosen the cones. If it smoothly stops then reverses two or three times then thats good enough for me.
I don't have a truing stand that I can clamp a wheel into with the QR tightened. The Park stands I'm familiar make that difficult due to the shape of the arms at the top of the slot where the axle sits. Besides, I find these handles quicker than getting out a truing stand.
Works for me. YMMV
12-05-21 | 03:02 PM
#6

Senior Member


Joined: Aug 2009
Posts: 4,287
Likes: 3,702
it�s not the same thing though. The wheel is massive enough that when you rotate the wheel it masks the roughness in the bearings. Whereas if you just rotate the axle you can feel the roughness or free play much more readily.
12-05-21 | 03:08 PM
#7

Just Pedaling
Joined: Oct 2021
Posts: 1,475
Likes: 1,105
Absolutely correct. You use your fingers for a final check after you pull it from the stand and before you mount it on the bike. My truing stand is home made and works great with QR's. Plus it's always sitting out so it takes nothing to drop a wheel on even just for a quick check after changing tires or whatever reason for having a wheel off a bike.
12-06-21 | 10:35 AM
#8
Senior Member
Joined: Aug 2009
Posts: 4,287
Likes: 3,702
Absolutely correct. You use your fingers for a final check after you pull it from the stand and before you mount it on the bike. My truing stand is home made and works great with QR's. Plus it's always sitting out so it takes nothing to drop a wheel on even just for a quick check after changing tires or whatever reason for having a wheel off a bike.
12-06-21 | 10:55 AM
#9
Junior Member
Joined: Aug 2011
Posts: 9
Likes: 1
From: nor' east
12-06-21 | 11:14 AM
#10

aged to perfection
Joined: Jun 2009
Posts: 2,242
Likes: 1,660
From: PacNW
Bikes: Dinucci Allez 2.0, Richard Sachs, Alex Singer, Serotta, Masi GC, Raleigh Pro Mk.1, Hetchins, etc
this is great. I have a set of dropouts that I use for this purpose, altho pretty infrequently these days.
Modern campagnolo hubs allow adjustment on the bike with a locking set screw on the adjustable cone.
hubs with large diameter axles are less susceptable to changes to adjustment than classic Campagnolo hubs, which "bow" slightly as the QR is tightened.
/markp
Modern campagnolo hubs allow adjustment on the bike with a locking set screw on the adjustable cone.
hubs with large diameter axles are less susceptable to changes to adjustment than classic Campagnolo hubs, which "bow" slightly as the QR is tightened.
/markp
12-06-21 | 11:38 AM
#11
Just Pedaling
Joined: Oct 2021
Posts: 1,475
Likes: 1,105
You are also correct. I've always just assumed that because the wheel rotated freely with no grinding when clamped and no play when unclamped it was good to go. But I understand what the OP is offering now. Thanks
12-06-21 | 04:03 PM
#12
Thread Starter
Senior Member
Joined: Nov 2013
Posts: 2,401
Likes: 1,574
From: Near Pottstown, PA: 30 miles NW of Philadelphia
Bikes: 2 Trek Mtn, Cannondale R600 road, 6 vintage road bikes
Just because I was curious, I checked today and the shop. We use a Park TS-2 there and the steel V notches where the wheel axle rests is only 2.5mm thick on each side. That would not work for me nor would the minimal clamping pressure the stand can apply. The axle projection on all my wheels is 4 to 5mm which is why I need a clamping mechanism that is at least 6mm thick/side to ensure the clamping in the DO is simulated.
BTW, I cannot take credit for this method of adjusting wheel cones. I first read about it in the writings of "Sir Sheldon". It made sense and it applied some of my prior experience. Not for everyone though.
BTW, I cannot take credit for this method of adjusting wheel cones. I first read about it in the writings of "Sir Sheldon". It made sense and it applied some of my prior experience. Not for everyone though.
12-06-21 | 06:43 PM
#13

Phyllo-buster
Joined: Jan 2010
Posts: 9,271
Likes: 2,696
From: Nova Scotia
Bikes: roadsters, club bikes, fixed and classic
The VAR offset wrenches are so cool. Nothing wrong with Heycos for that matter.
Thanks for the tip. My wheel stand doesn't like QR's either so I've always tried to adjust cones perfectly, then loosen a quarter turn or so. Total guesstimate.
Thanks for the tip. My wheel stand doesn't like QR's either so I've always tried to adjust cones perfectly, then loosen a quarter turn or so. Total guesstimate.
12-07-21 | 02:15 AM
#14

Senior Member
Joined: May 2013
Posts: 2,036
Likes: 549
From: Pacific Northwest
Bikes: �87 Marinoni SLX Sports Tourer, �79 Miyata 912 by Gugificazione
I use a pair of 10mm box wrenches (11mm works, too) for the same purpose described in the OP as pseudo-dropouts, clamped by the QR skewer. They slide over a front or rear axle and are thicker than the axle stub is long. Very easy to feel the effect of final hub adjustment off the bike.
I’m also a fan of using a pair of cone wrenches on opposing hub cones to ever-so-slightly loosen if too tight, or a pair of 17mm wrenches or whatever fits the locknuts to ever-so-slightly tighten opposing locknuts.
I’m also a fan of using a pair of cone wrenches on opposing hub cones to ever-so-slightly loosen if too tight, or a pair of 17mm wrenches or whatever fits the locknuts to ever-so-slightly tighten opposing locknuts.
12-07-21 | 05:49 AM
#15
Junior Member
Joined: Feb 2019
Posts: 154
Likes: 44
Thanks Prowler!
Here is a variation for those of us not so handy-
https://steintool.com/portfolio-items/hub-axle-vises/
Here is a variation for those of us not so handy-
https://steintool.com/portfolio-items/hub-axle-vises/
12-07-21 | 05:54 AM
#16
Thread Starter
Senior Member
Joined: Nov 2013
Posts: 2,401
Likes: 1,574
From: Near Pottstown, PA: 30 miles NW of Philadelphia
Bikes: 2 Trek Mtn, Cannondale R600 road, 6 vintage road bikes
When I OH a hub I ensure that the DS lock n cone is very tight and only disassembled the NDS lock nut n cone set. Makes hub service easier for me. On the front hub I put a wee dot of paint on the NDS cone to keep track of it.
Last edited by Prowler; 12-07-21 at 06:04 AM.
12-07-21 | 08:40 AM
#17
Dont fix whats not broken

Joined: Sep 2019
Posts: 331
Likes: 190
From: Mooresville, NC
Bikes: Steelman Stage Race w/Ultegra 8000 11s, Trek Checkpoint SL5 Gen. 3
I check mine on the bike in the work stand, but if you want to use a truing stand it will work - just put some washers or spare axle spacers to cover the exposed axle stub, and then the QR can compress the axle just like in a frame.
