Ideal (or range) axle locknut to cog spacing?
#1
Senior Member
Thread Starter
Join Date: Apr 2011
Location: Maryland, USA
Posts: 2,442
Bikes: Drysdale/Gitane/Zeus/Masi/Falcon/Palo Alto/Raleigh/Legnano
Mentioned: 34 Post(s)
Tagged: 0 Thread(s)
Quoted: 987 Post(s)
Liked 641 Times
in
407 Posts
Ideal (or range) axle locknut to cog spacing?
I thought there would already be a topic but a Search... none that I find.
What should I be looking for in the lateral space from the centerline of the smallest freewheel cog to the outboard surface of the axle locknut? This impacts clearance for the cog and particularly room to ensure the chain can get on and off that last cog. In another topic, I am (as part of a rebuild) "upgrading" a friend's bike from 5 cogs to 6 and, of course, this means changing the axle spacing (and redishing the wheel, and likely cold-setting the frame, and...) So, I got a longer axle and, last year, investing the $$$ assortment of axle spacers from Wheels Manufacturing, I think I'll be good in terms of supplies needed. And, prepared to cut the axle. But, first, how to ensure not too much or too little? With the new freewheel on the (Record high-flange) hub as-is, the last cog is about flush with the "mounting surface" of the outboard locknut, so that ain't going to work. A quick check of a few bikes here give me varying results, from centerline of cog to end of locknut varies 6mm to 10mm. Is there guideline?
Obviously, only want to cut once. I am tempted to simply add spacers, spring out the dropouts until I jam in the wheel, take a look and, once I am happy with the look, cut the axle and set the frame. This seems crude...
And, of course, this affects chainline.
__________________
Larry:1958 Drysdale, 1961 Gitane Gran Sport, 1974 Zeus track, 1988 Masi Gran Corsa, 1974 Falcon, 1980 Palo Alto, 1973 Raleigh Gran Sport, 1974 Legnano. Susan: 1976 Windsor Profesional.
Larry:1958 Drysdale, 1961 Gitane Gran Sport, 1974 Zeus track, 1988 Masi Gran Corsa, 1974 Falcon, 1980 Palo Alto, 1973 Raleigh Gran Sport, 1974 Legnano. Susan: 1976 Windsor Profesional.
#2
Senior Member
I thought there would already be a topic but a Search... none that I find.
What should I be looking for in the lateral space from the centerline of the smallest freewheel cog to the outboard surface of the axle locknut? This impacts clearance for the cog and particularly room to ensure the chain can get on and off that last cog. In another topic, I am (as part of a rebuild) "upgrading" a friend's bike from 5 cogs to 6 and, of course, this means changing the axle spacing (and redishing the wheel, and likely cold-setting the frame, and...) So, I got a longer axle and, last year, investing the $$$ assortment of axle spacers from Wheels Manufacturing, I think I'll be good in terms of supplies needed. And, prepared to cut the axle. But, first, how to ensure not too much or too little? With the new freewheel on the (Record high-flange) hub as-is, the last cog is about flush with the "mounting surface" of the outboard locknut, so that ain't going to work. A quick check of a few bikes here give me varying results, from centerline of cog to end of locknut varies 6mm to 10mm. Is there guideline?
Obviously, only want to cut once. I am tempted to simply add spacers, spring out the dropouts until I jam in the wheel, take a look and, once I am happy with the look, cut the axle and set the frame. This seems crude...
And, of course, this affects chainline.
What should I be looking for in the lateral space from the centerline of the smallest freewheel cog to the outboard surface of the axle locknut? This impacts clearance for the cog and particularly room to ensure the chain can get on and off that last cog. In another topic, I am (as part of a rebuild) "upgrading" a friend's bike from 5 cogs to 6 and, of course, this means changing the axle spacing (and redishing the wheel, and likely cold-setting the frame, and...) So, I got a longer axle and, last year, investing the $$$ assortment of axle spacers from Wheels Manufacturing, I think I'll be good in terms of supplies needed. And, prepared to cut the axle. But, first, how to ensure not too much or too little? With the new freewheel on the (Record high-flange) hub as-is, the last cog is about flush with the "mounting surface" of the outboard locknut, so that ain't going to work. A quick check of a few bikes here give me varying results, from centerline of cog to end of locknut varies 6mm to 10mm. Is there guideline?
Obviously, only want to cut once. I am tempted to simply add spacers, spring out the dropouts until I jam in the wheel, take a look and, once I am happy with the look, cut the axle and set the frame. This seems crude...
And, of course, this affects chainline.
With early index shifting, here is some info from Suntour about the measurement of the placement of the inner stop of freewheel. Outer sprocket to frame is not specifically mentioned.
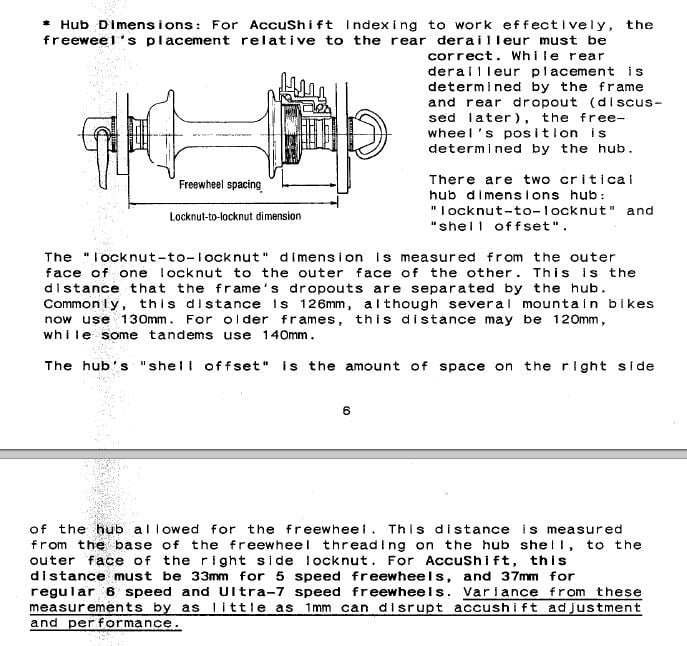
Shimano specified 38mm for 7 speed for the same dimension in 2005.
For modern freehubs (8 speed and up), the center of outer sprocket to frame seems to run be about 4.5-5mm. Of course, teeth count of the outer sprocket and the dropout/seatstay configuration will have to be considered.
#3
Senior Member
Join Date: Apr 2011
Posts: 7,077
Mentioned: 41 Post(s)
Tagged: 0 Thread(s)
Quoted: 4415 Post(s)
Liked 1,567 Times
in
1,029 Posts
I thought my axle was too short for the freewheel I mounted until I actually mounted it with a chain. It turned out that between tightening down the FW all the way and the built in chain clearance of the frame, the small amount of axle protrusion was actually enough.
#4
Senior Member
Join Date: Jan 2015
Location: Los Angeles
Posts: 4,707
Bikes: 82 Medici, 2011 Richard Sachs, 2011 Milwaukee Road
Mentioned: 55 Post(s)
Tagged: 0 Thread(s)
Quoted: 1952 Post(s)
Liked 2,013 Times
in
1,112 Posts
Before you cut, build the hub, install the FW, put the wheel in place, and adjust as needed. THEN cut.
__________________
I don't do: disks, tubeless, e-shifting, or bead head nymphs.
I don't do: disks, tubeless, e-shifting, or bead head nymphs.
#5
Senior Member
Join Date: Jun 2006
Posts: 20,305
Mentioned: 130 Post(s)
Tagged: 0 Thread(s)
Quoted: 3464 Post(s)
Liked 2,831 Times
in
1,997 Posts
The way I read the question is how much extension beyond the small cog outer face is required for the lock nut for the shifting to work?
depends a bit on the frame.
many Italian and American small builders will have blacksmithed the inside of the seat stay to provide clearance.
Some British and French do not do that.
there are exceptions.
review the frame, if the seat stay is fully round to its terminus, you are going to need a wider overall spaced hub- 2-4mm more room than a typical “Italian” frame.
I just did my afternoon coffee run on an ultra 6 equipped Masi GC with 122mm overall spacing, I could not place that wheel into my unmolested LeJeune or Bertin. The chain would catch while shifting from the smallest cog.
#6
blahblahblah chrome moly
Join Date: Apr 2009
Location: Seattle
Posts: 1,994
Mentioned: 92 Post(s)
Tagged: 0 Thread(s)
Quoted: 1181 Post(s)
Liked 2,576 Times
in
1,076 Posts
In the C&V days, racers could get a neutral support wheel. (Is this still done anywhere? I'm out of touch, but I doubt it).
For someone else's wheel to shift properly, the freewheel spacing had to be standardized. For USA racers, what I'm most familiar with, but also probably elsewhere, Campy's standard was THE standard. Maybe that was different in France? In the '70s and earlier, French hubs often (usually) had more space there than Campy, just another reason not to use French stuff for racing. I bet the pro teams that used French hubs respaced them to the Campy dimension, but that's just a guess.
The spec I'm talking about is what's labeled as dimension "A" in this diagram from Sutherland's:
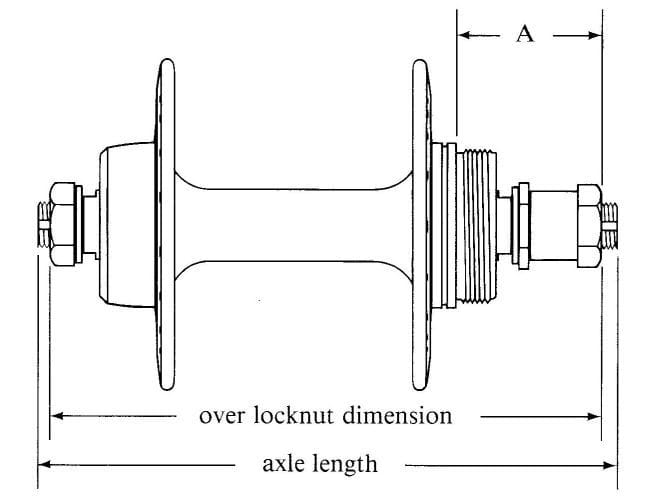
The Campy spec, from the shoulder at the end of the freewheel thread to the outer face of the cone locknut, was 30 mm for 5-sp, and 35 mm for 6-sp. Some brands of freewheel moved the cogs right or left a little, relative to that shoulder on the hub, compared to other brands, so complete compatibility was not assured. But it was good to stick to those numbers. The equivalent number for French hubs was 34 mm for a 5-sp, lots of extra dish for no good reason. Campy rules, Normandy drools.
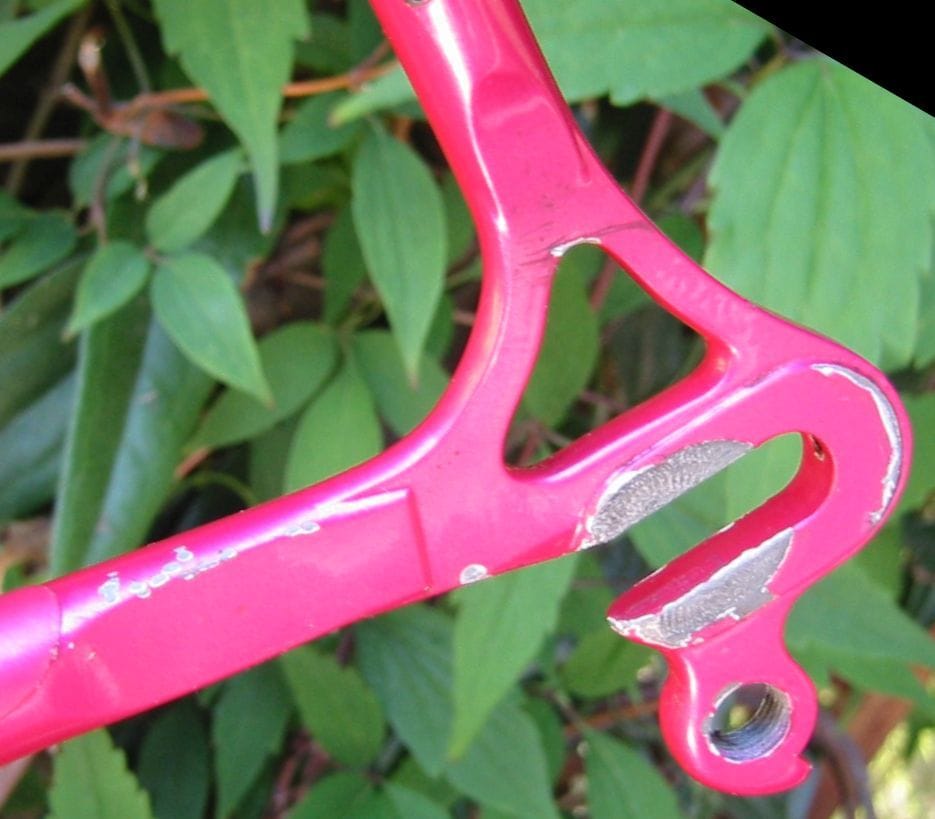
Poorly designed frames (even those marketed as "professional racing bikes") often didn't have the chainstay or seatstay clearance to allow such a narrow freewheel space, leaving you no option but grinding away the offending material from the stays, or adding extra spacers (and dish) to your wheel. The better Italians had the frame clearance down pat by the '50s, maybe earlier, but some stubborn French and English brands kept doing it wrong well into the '70s, using "domed" seatstays, centered on the dropout tab (not offset outward), no indent, no metal trimmed away. Lame! I have no qualms about grinding the metal off vintage frames that were made wrong, and I won't apologize for calling it "wrong", there's no defense for it.
Ultra-6 was marketed as fitting in the same space as a 5-sp but it was never true, they were always a bit wider than a 5-sp, so you typically had to add 1.0 or 1.5 mm of axle spacer and redish, or grind even more metal off the stays on the inner face of the dropout. I doubt anyone ever put Ultra-6 freewheels on neutral support wheels, they were either 5- or 6-sp in my experience.
Maybe it's obvious but it's good to note that the chainstay only has to clear the freewheel teeth, not the chain, so it doesn't need to be flattened as far to the right as the seatstay, but the flattening should allow the wheel to be removed without gouging the frame, so with horizontal dropouts, that meant the flattening had to extend much further forward. The seatstay flattening had to go further right, like almost flush with the inner face of the dropout, but not very far upward. It has to clear the chain not just when riding steady-state in high gear, but also when shifting. Shifts can be a bit chaotic, with the chain moving around sometimes more or less, I think of it as a "probability cloud". So if you never want to nick the paint there, the clearance has to be considerably more than you might think from just looking at it in the stand.
Here's an example of a frame with (1) the seatstay clearance taken all the way down to flush with the inner face of the dropout, and (2) the chainstay flattening is longer toward the front of the bike for fast wheel changes, but not as deep — some chainstay remains inboard of the dropout, for strength. Chainstays are loaded much more, and more likely to crack from fatigue, so a bt more metal remaining there was considered worth it.
Related question, does anyone remember what freewheel space Phil Wood used BITD? Since adding an axle spacer is nearly impossible with that design, did they wimp out like the French and just throw more dish at it to make the frame clearance problem go away? If they stuck with the Campy standard of 30 mm, then their hubs wouldn't work on a lot of frames. I've used plenty of Phil hubs over the years but I don't remember what they measured there. Same Q for similar "unspaceable" hubs like Hi-E, Bullseye and the like, that don't use 10 mm threaded axles with washers. I used a fair number of Hi-E hubs but I made my own spacers for Hi-E to dial in the spacing. That's also possible with Phil, but a lot more difficult. Most people, lacking a lathe and an arbor press, could only send their hub back to Phil for respacing, so it was rarely done.
For someone else's wheel to shift properly, the freewheel spacing had to be standardized. For USA racers, what I'm most familiar with, but also probably elsewhere, Campy's standard was THE standard. Maybe that was different in France? In the '70s and earlier, French hubs often (usually) had more space there than Campy, just another reason not to use French stuff for racing. I bet the pro teams that used French hubs respaced them to the Campy dimension, but that's just a guess.
The spec I'm talking about is what's labeled as dimension "A" in this diagram from Sutherland's:

The Campy spec, from the shoulder at the end of the freewheel thread to the outer face of the cone locknut, was 30 mm for 5-sp, and 35 mm for 6-sp. Some brands of freewheel moved the cogs right or left a little, relative to that shoulder on the hub, compared to other brands, so complete compatibility was not assured. But it was good to stick to those numbers. The equivalent number for French hubs was 34 mm for a 5-sp, lots of extra dish for no good reason. Campy rules, Normandy drools.
Poorly designed frames (even those marketed as "professional racing bikes") often didn't have the chainstay or seatstay clearance to allow such a narrow freewheel space, leaving you no option but grinding away the offending material from the stays, or adding extra spacers (and dish) to your wheel. The better Italians had the frame clearance down pat by the '50s, maybe earlier, but some stubborn French and English brands kept doing it wrong well into the '70s, using "domed" seatstays, centered on the dropout tab (not offset outward), no indent, no metal trimmed away. Lame! I have no qualms about grinding the metal off vintage frames that were made wrong, and I won't apologize for calling it "wrong", there's no defense for it.
Ultra-6 was marketed as fitting in the same space as a 5-sp but it was never true, they were always a bit wider than a 5-sp, so you typically had to add 1.0 or 1.5 mm of axle spacer and redish, or grind even more metal off the stays on the inner face of the dropout. I doubt anyone ever put Ultra-6 freewheels on neutral support wheels, they were either 5- or 6-sp in my experience.
Maybe it's obvious but it's good to note that the chainstay only has to clear the freewheel teeth, not the chain, so it doesn't need to be flattened as far to the right as the seatstay, but the flattening should allow the wheel to be removed without gouging the frame, so with horizontal dropouts, that meant the flattening had to extend much further forward. The seatstay flattening had to go further right, like almost flush with the inner face of the dropout, but not very far upward. It has to clear the chain not just when riding steady-state in high gear, but also when shifting. Shifts can be a bit chaotic, with the chain moving around sometimes more or less, I think of it as a "probability cloud". So if you never want to nick the paint there, the clearance has to be considerably more than you might think from just looking at it in the stand.
Here's an example of a frame with (1) the seatstay clearance taken all the way down to flush with the inner face of the dropout, and (2) the chainstay flattening is longer toward the front of the bike for fast wheel changes, but not as deep — some chainstay remains inboard of the dropout, for strength. Chainstays are loaded much more, and more likely to crack from fatigue, so a bt more metal remaining there was considered worth it.

Related question, does anyone remember what freewheel space Phil Wood used BITD? Since adding an axle spacer is nearly impossible with that design, did they wimp out like the French and just throw more dish at it to make the frame clearance problem go away? If they stuck with the Campy standard of 30 mm, then their hubs wouldn't work on a lot of frames. I've used plenty of Phil hubs over the years but I don't remember what they measured there. Same Q for similar "unspaceable" hubs like Hi-E, Bullseye and the like, that don't use 10 mm threaded axles with washers. I used a fair number of Hi-E hubs but I made my own spacers for Hi-E to dial in the spacing. That's also possible with Phil, but a lot more difficult. Most people, lacking a lathe and an arbor press, could only send their hub back to Phil for respacing, so it was rarely done.
Likes For bulgie:
#7
Ride, Wrench, Swap, Race
Join Date: Jan 2010
Location: Northern California
Posts: 9,194
Bikes: Cheltenham-Pedersen racer, Boulder F/S Paris-Roubaix, Varsity racer, '52 Christophe, '62 Continental, '92 Merckx, '75 Limongi, '76 Presto, '72 Gitane SC, '71 Schwinn SS, etc.
Mentioned: 132 Post(s)
Tagged: 0 Thread(s)
Quoted: 1565 Post(s)
Liked 1,296 Times
in
866 Posts
The needed clearance depends further on the diameter of the smallest cog, as well as the width of the chain.
In the normal course of spacing rear axles, I generally find that a minimum of 3 to 3.5mm between the inside dropout face and the outer face of the smallest cog to be sufficient for chain clearance.
I tend to avoid or modify any combination of domed seatstay end and a big 14t smallest cog.
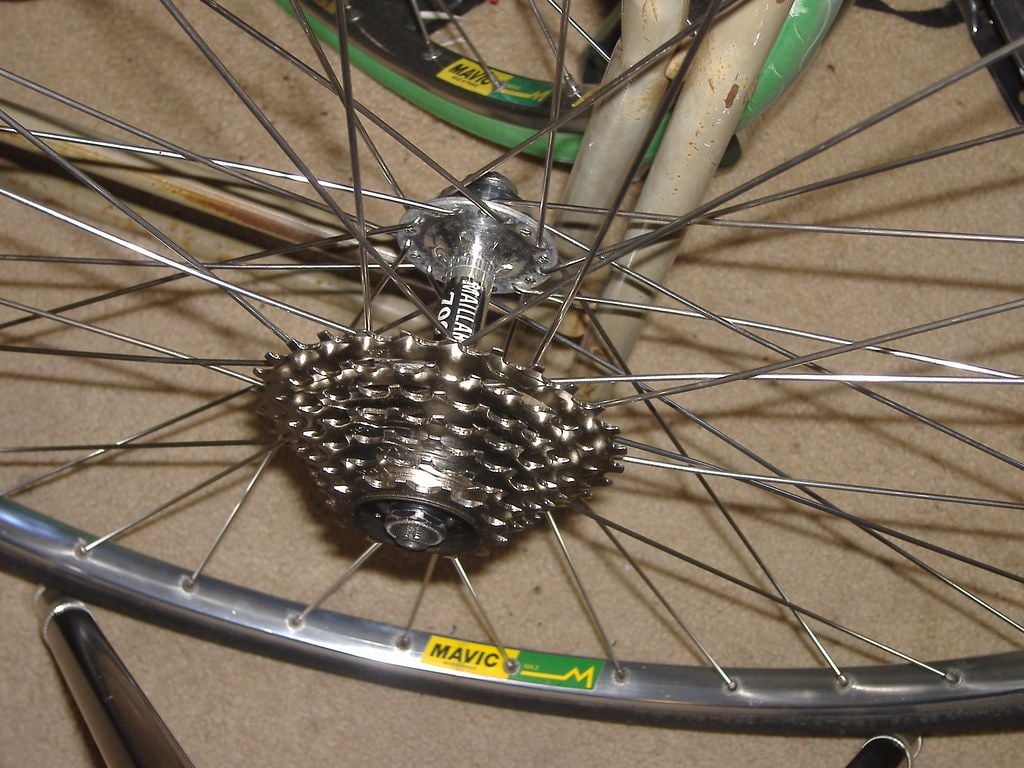
I do try to keep the axle protrusion to a minimum, below I have built a 7s hub to 124mm width for use in a 121mm-spaced PX10LE frame (even grinding away at the dropout's axle stop hardware as needed):

Likes For dddd:
#8
Ride, Wrench, Swap, Race
Join Date: Jan 2010
Location: Northern California
Posts: 9,194
Bikes: Cheltenham-Pedersen racer, Boulder F/S Paris-Roubaix, Varsity racer, '52 Christophe, '62 Continental, '92 Merckx, '75 Limongi, '76 Presto, '72 Gitane SC, '71 Schwinn SS, etc.
Mentioned: 132 Post(s)
Tagged: 0 Thread(s)
Quoted: 1565 Post(s)
Liked 1,296 Times
in
866 Posts
...Related question, does anyone remember what freewheel space Phil Wood used BITD? Since adding an axle spacer is nearly impossible with that design, did they wimp out like the French and just throw more dish at it to make the frame clearance problem go away? If they stuck with the Campy standard of 30 mm, then their hubs wouldn't work on a lot of frames. I've used plenty of Phil hubs over the years but I don't remember what they measured there. Same Q for similar "unspaceable" hubs like Hi-E, Bullseye and the like, that don't use 10 mm threaded axles with washers. I used a fair number of Hi-E hubs but I made my own spacers for Hi-E to dial in the spacing. That's also possible with Phil, but a lot more difficult. Most people, lacking a lathe and an arbor press, could only send their hub back to Phil for respacing, so it was rarely done.
Campagnolo hubs similarly didn't leave a lot of redundant axle extension, at least compared to most others (where for example a 6s freewheel might replace a 5s freewheel by the mere addition of a 1mm washer to the driveside stack, as on many Normandy hub fitments that come to mind).
The Helicomatic hubs/freewheels, despite their narrow cog spacing, might be a best example of where they "just threw more dish at it", to all-around poor effect. Bent rims, broken spokes, cracked rims resulted.
Last edited by dddd; 03-29-24 at 10:10 PM.
Likes For dddd:
#9
Senior Member
Join Date: Feb 2020
Posts: 2,820
Mentioned: 49 Post(s)
Tagged: 0 Thread(s)
Quoted: 1106 Post(s)
Likes: 0
Liked 1,328 Times
in
784 Posts
Better-quality frames often have the right stay relieved of flattened for chain clearance, and some dropouts are offset inwards from the stays.
In some cases the chain will run free when the wheel is actually in the dropout, but you can't get the wheel in with the chain on the outer-most sprocket.
Very much like BB and crank clearance, build it and see.
#10
Wheelman
Join Date: Aug 2021
Location: Putney, London UK
Posts: 847
Bikes: 1982 Holdsworth Avanti (531), 1961 Holdsworth Cyclone
Mentioned: 4 Post(s)
Tagged: 0 Thread(s)
Quoted: 298 Post(s)
Liked 676 Times
in
341 Posts
I've found the easiest way is to put the hub+freewheel in the dropouts and see if the chain has clearance and then add/move spacers (before building the wheel).
I've got axle spacers down to 0.5mm
Example:
Small cog face to outside of locknut = 5.1mm
OLD 120.2mm.
And it works damn fine.
I've got axle spacers down to 0.5mm
Example:
1961 Holdsworth Cyclone - 120mm OLD
Sunshine 5345 large flange hub
SunTour New Winner Ultra 6 13-32 freewheel
KMC 8 speed chain
.Sunshine 5345 large flange hub
SunTour New Winner Ultra 6 13-32 freewheel
KMC 8 speed chain
Small cog face to outside of locknut = 5.1mm
OLD 120.2mm.
And it works damn fine.
#11
Senior Member
Join Date: Jan 2019
Location: Toledo Ohio
Posts: 1,497
Bikes: 1964 Huffy Sportsman, 1972 Fuji Newest, 1973 Schwinn Super Sport (3), 1982 Trek 412, 1983 Trek 700, 1989 Miyata 1000LT, 1991 Bianchi Boardwalk, plus others
Mentioned: 21 Post(s)
Tagged: 0 Thread(s)
Quoted: 583 Post(s)
Liked 700 Times
in
395 Posts
I just measured or tried to measure a Phil Wood hub that came on a 1974 bicycle. As close as I could observe it was about 31.5-32mm to locknut. Kinda hard to be too exact with the two different diameters to span. That might make it a candidate then for an ultra 6 in the future.
Likes For sd5782:
#12
Senior Member
Also, take into account the smallest cog's size. I have a bike that a 13 tooth cog works perfectly, but a 14 tooth cog will jam the chain into the frame.
#13
Senior Member
Join Date: Dec 2005
Posts: 17,160
Mentioned: 481 Post(s)
Tagged: 0 Thread(s)
Quoted: 3811 Post(s)
Liked 6,717 Times
in
2,614 Posts
Here’s a pic of an early 120mm Phil hub and 5-speed freewheel. Only 2-3mm of space by my measurement.

#14
Senior Member
Join Date: Jan 2019
Location: Toledo Ohio
Posts: 1,497
Bikes: 1964 Huffy Sportsman, 1972 Fuji Newest, 1973 Schwinn Super Sport (3), 1982 Trek 412, 1983 Trek 700, 1989 Miyata 1000LT, 1991 Bianchi Boardwalk, plus others
Mentioned: 21 Post(s)
Tagged: 0 Thread(s)
Quoted: 583 Post(s)
Liked 700 Times
in
395 Posts
Whoa, not much clearance on that one. On the 1974 Campania that had the Phil I don’t recall it being that close when I took off the stock 5 speed Suntour. I seem to remember nothing unusual looking or tight fitting. I will screw a couple freewheels on tomorrow and get a pic or two hopefully.
#15
Ride, Wrench, Swap, Race
Join Date: Jan 2010
Location: Northern California
Posts: 9,194
Bikes: Cheltenham-Pedersen racer, Boulder F/S Paris-Roubaix, Varsity racer, '52 Christophe, '62 Continental, '92 Merckx, '75 Limongi, '76 Presto, '72 Gitane SC, '71 Schwinn SS, etc.
Mentioned: 132 Post(s)
Tagged: 0 Thread(s)
Quoted: 1565 Post(s)
Liked 1,296 Times
in
866 Posts
There are at least three "steps" outward starting with the step on the smallest cog itself, then with what looks like two more larger steps on the body itself?
I imagine that if the axle cap "teeth" settled into a worn spot on an alloy dropout that the body might not turn freely!
Campag and especially Phil hubs weren't made with the expectation of bolt-on claw-hanger hardware impeding the chain clearance, but which hasn't stopped me and my Dremel from making things fit.
I've ridden rubbing freewheels until they stopped rubbing, just one ride was needed!
Likes For dddd:
#16
Senior Member
Join Date: Jan 2019
Location: Toledo Ohio
Posts: 1,497
Bikes: 1964 Huffy Sportsman, 1972 Fuji Newest, 1973 Schwinn Super Sport (3), 1982 Trek 412, 1983 Trek 700, 1989 Miyata 1000LT, 1991 Bianchi Boardwalk, plus others
Mentioned: 21 Post(s)
Tagged: 0 Thread(s)
Quoted: 583 Post(s)
Liked 700 Times
in
395 Posts
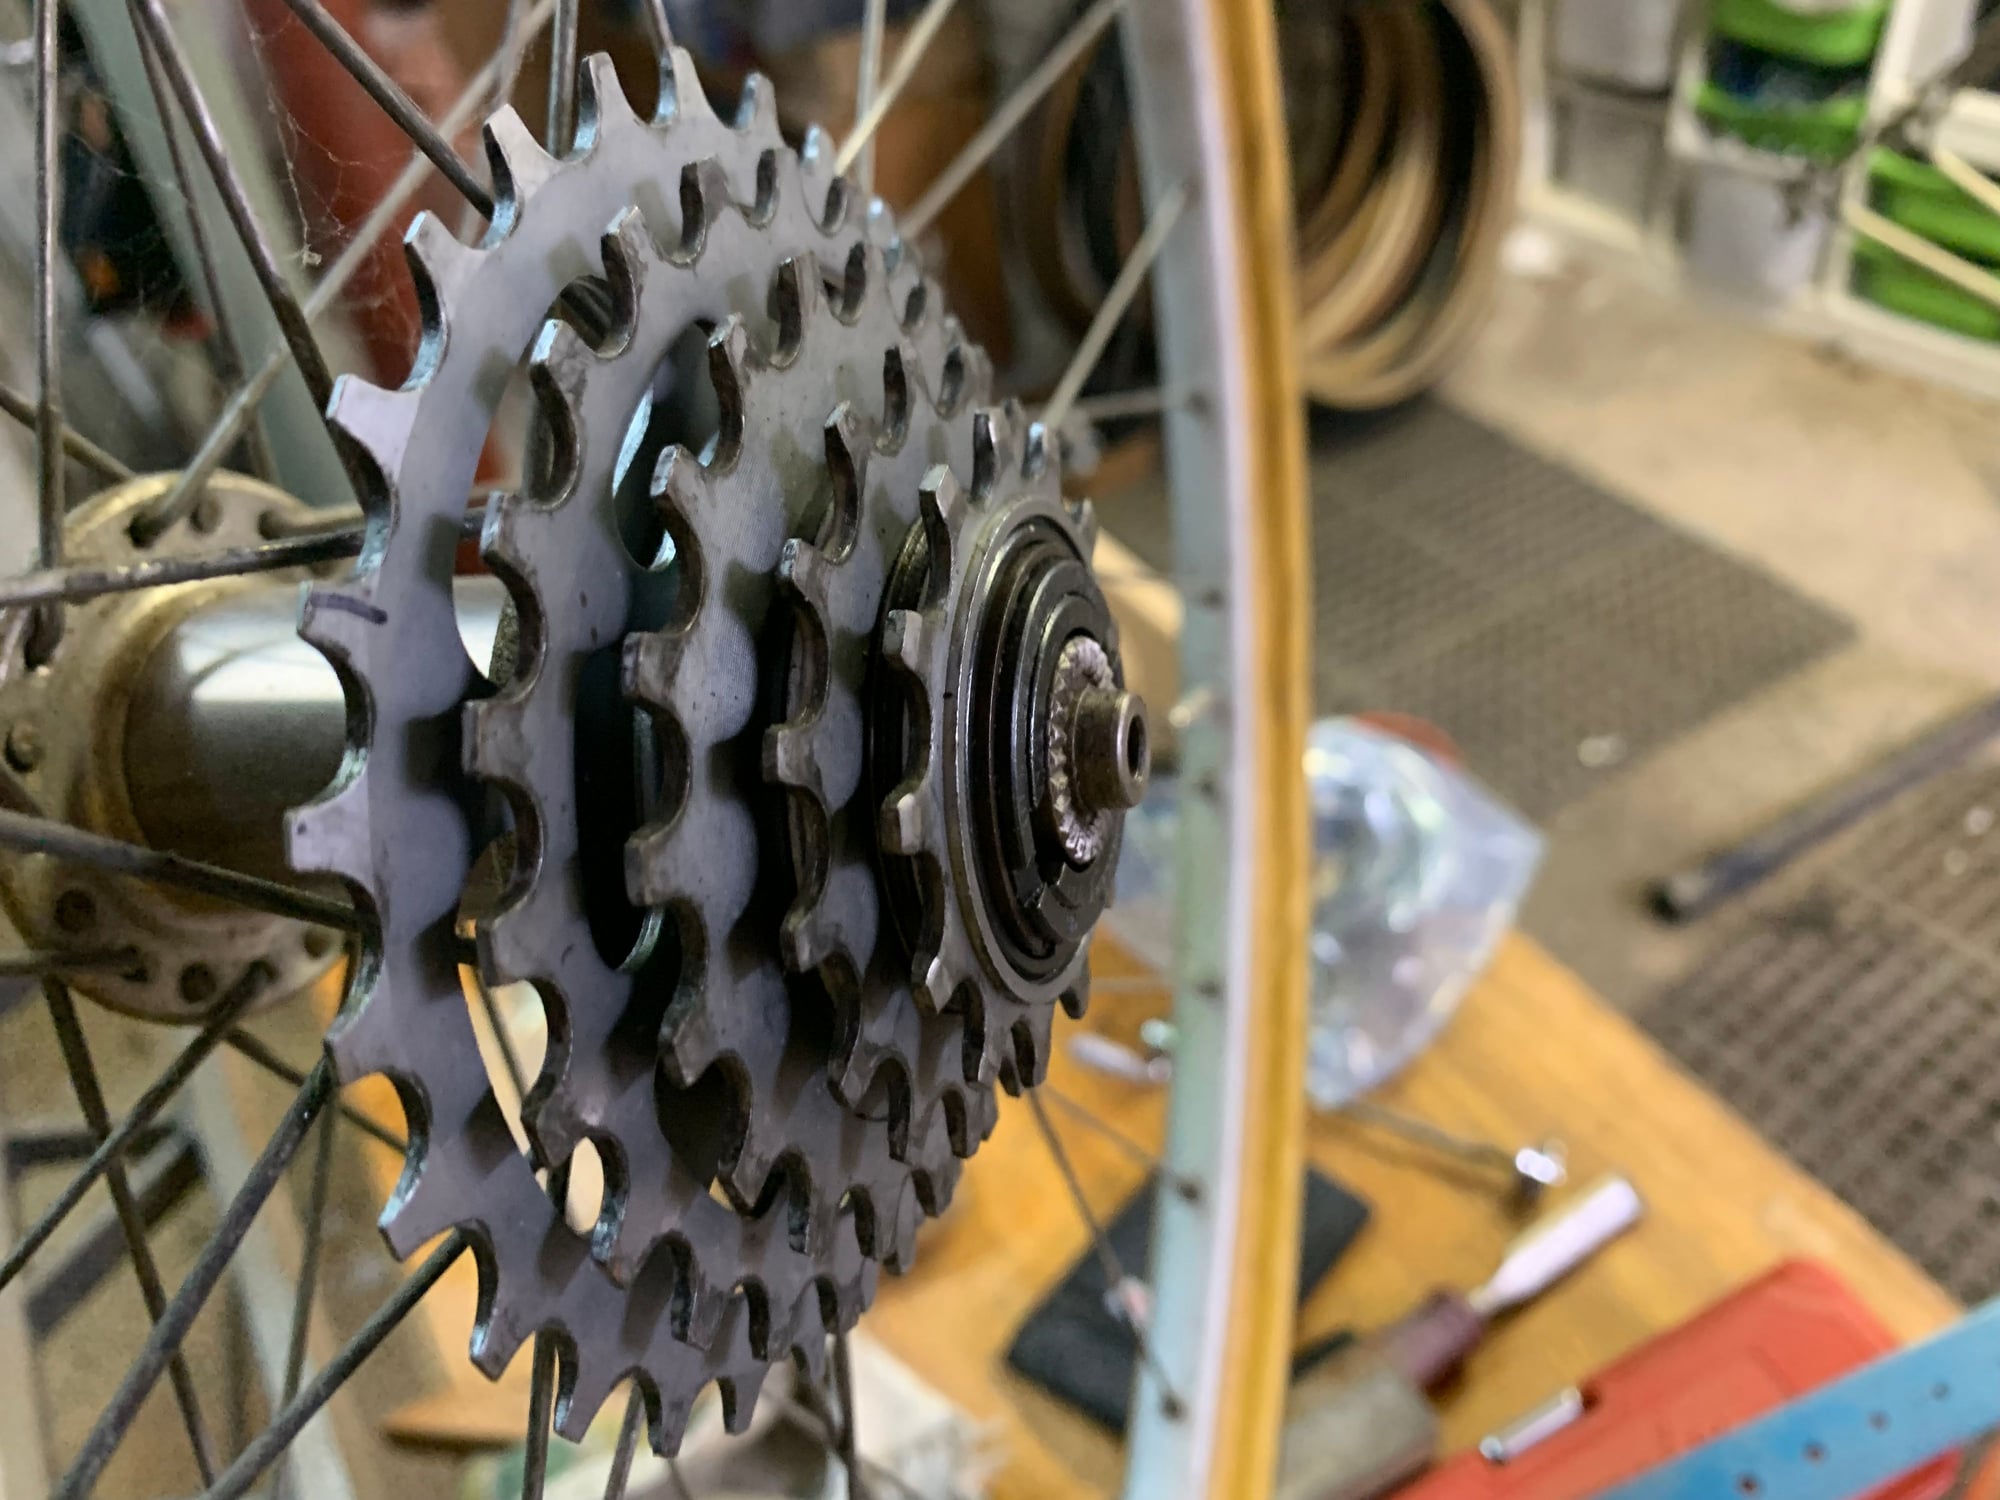
Kind of interesting discussion on this. I’ve always found it to be a try it and see, and adjust if possible. After recently acquiring a very early Phil wheel set, this is something to look into. OLD on this set is about 120.8. The distance from the back ledge for freewheel to the locknut on this one is about 32mm. A five speed freewheel has way more room than on nlerner’s hub with about 5mm to the face of the small sprocket. Two compact 6s have 3.5-4mm to the sprocket.
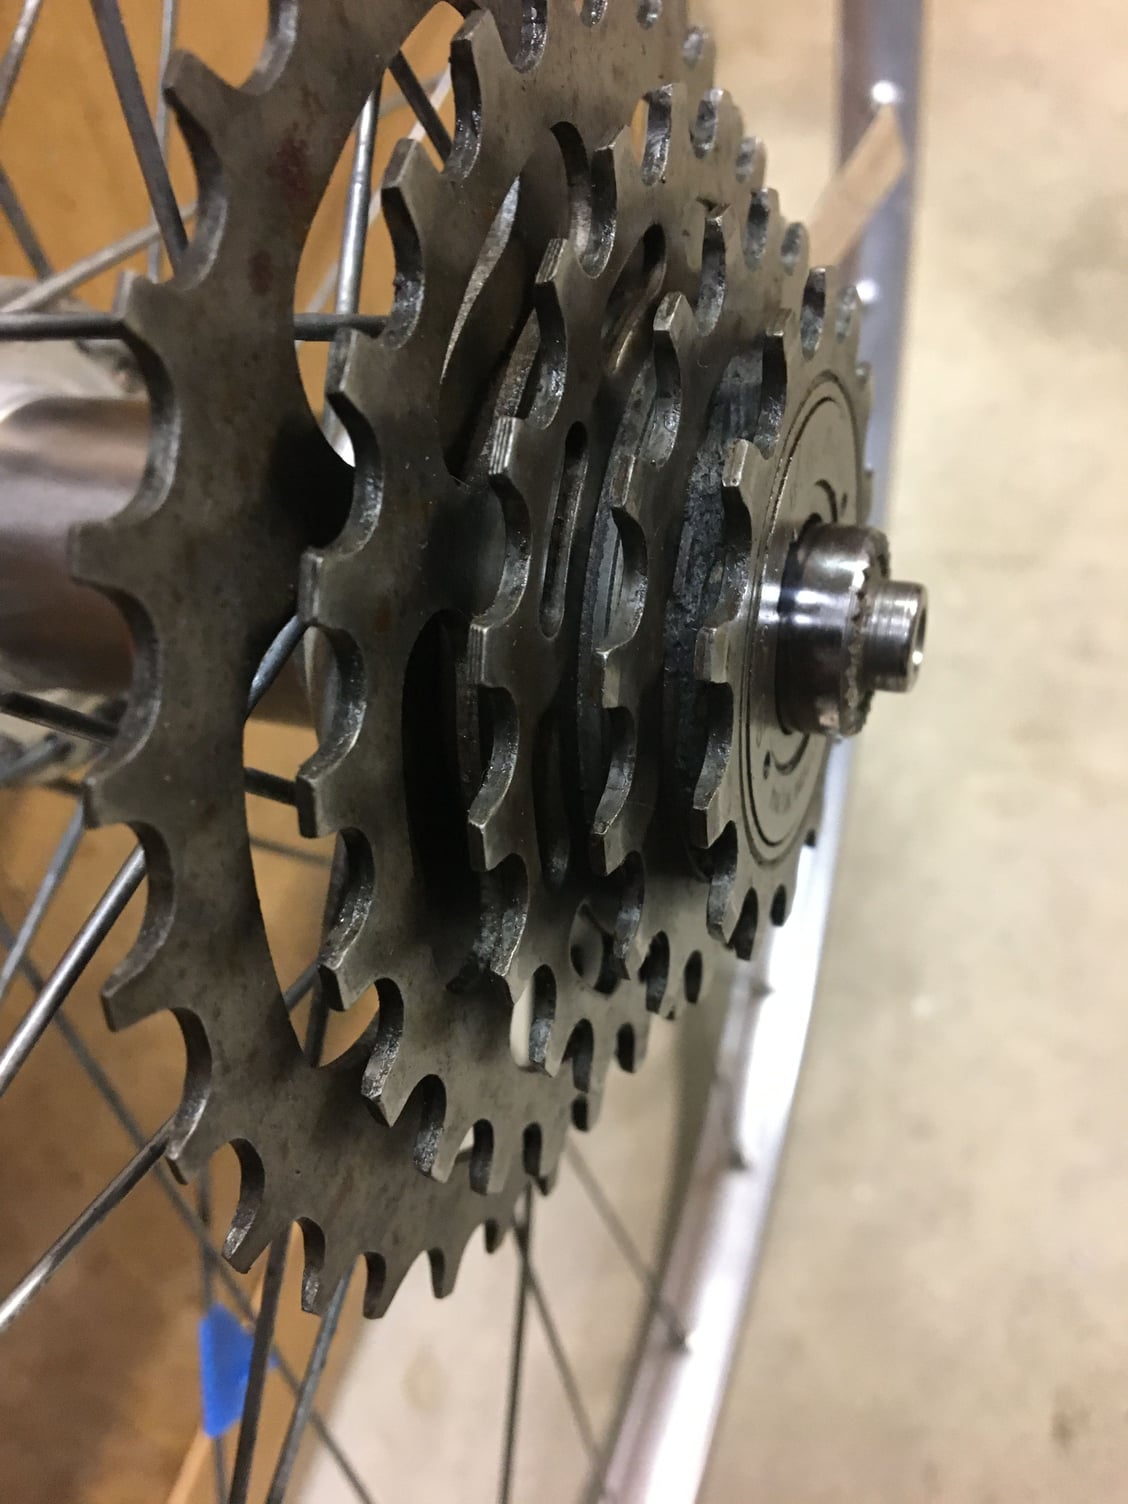
5 speed
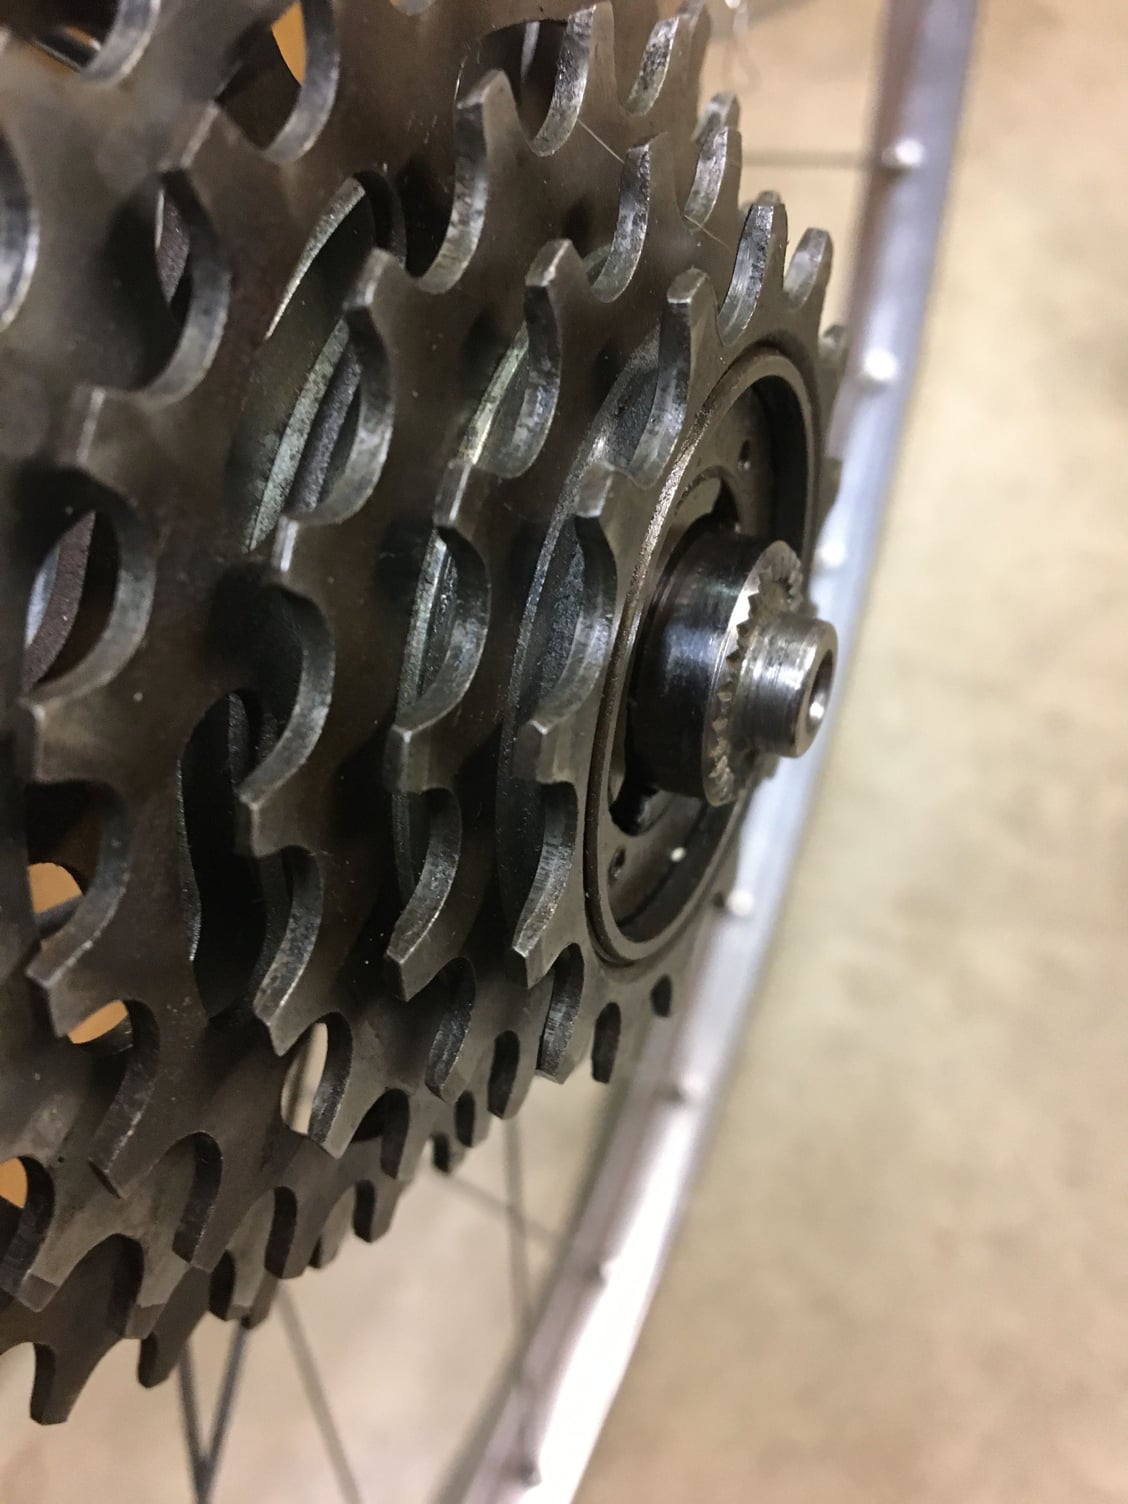
Compact 6 on perfect body I think
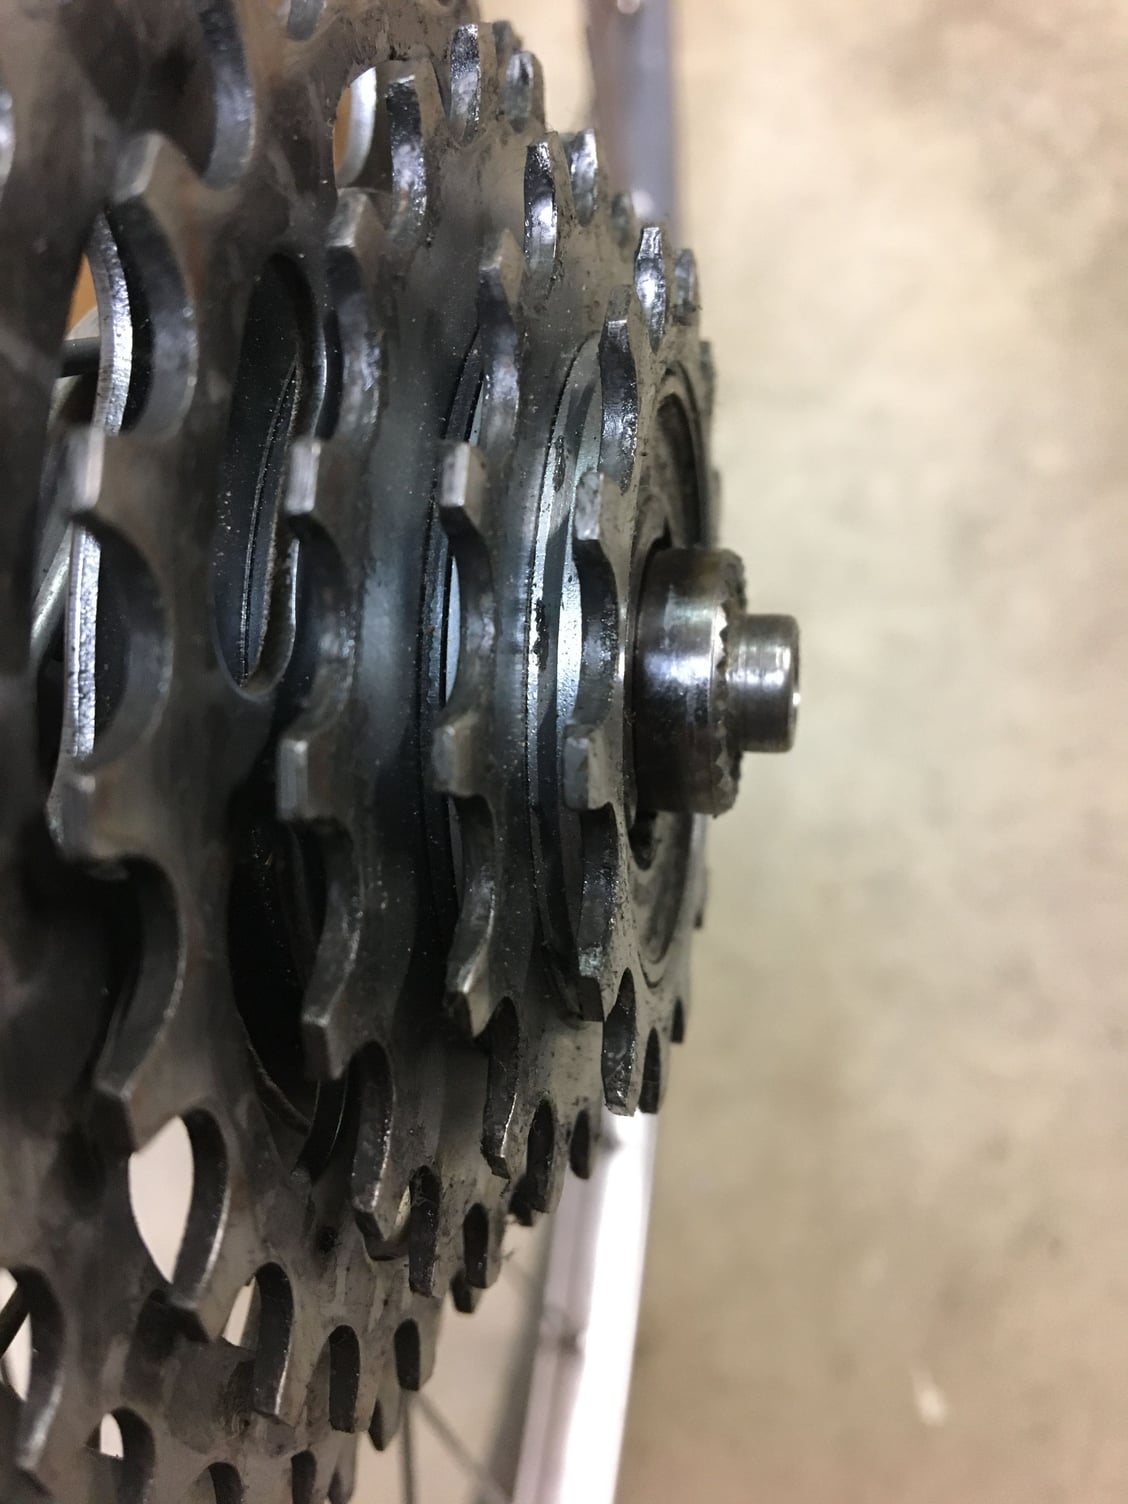
Compact 6 on pro Compe body
Just a few data points for anyone interested.

5 speed

Compact 6 on perfect body I think

Compact 6 on pro Compe body
Just a few data points for anyone interested.
Likes For sd5782:
#17
blahblahblah chrome moly
Join Date: Apr 2009
Location: Seattle
Posts: 1,994
Mentioned: 92 Post(s)
Tagged: 0 Thread(s)
Quoted: 1181 Post(s)
Liked 2,576 Times
in
1,076 Posts
After recently acquiring a very early Phil wheel set, this is something to look into. OLD on this set is about 120.8. The distance from the back ledge for freewheel to the locknut on this one is about 32mm. A five speed freewheel has way more room than on nlerner’s hub with about 5mm to the face of the small sprocket. Two compact 6s have 3.5-4mm to the sprocket. [snip]
Just a few data points for anyone interested.
Just a few data points for anyone interested.
Thanks for the data point. It looks like Phil probably offered more than one size in right-side axle caps for 120-121 mm hubs. Possibly the spec changed over time.
#18
blahblahblah chrome moly
Join Date: Apr 2009
Location: Seattle
Posts: 1,994
Mentioned: 92 Post(s)
Tagged: 0 Thread(s)
Quoted: 1181 Post(s)
Liked 2,576 Times
in
1,076 Posts
Drifting from the original question a bit, but I thought I'd mention a caution about Phil hubs. Many here will know this of course, but there's always newbies...
One problem with Phil hubs is you have to use extreme caution (or a special tool*) when removing the freewheel. The problem happens when you hold the FW remover onto the FW with the QR skewer, which is a Best Practice, recommended for not ruining the FW and/or the remover by having it slip. So do use the skewer, but here's the essential bit: remember to loosen the skewer immediately as soon as the FW thread starts to budge. If you keep on removing the FW with the skewer still in place, you can extract the entire axle + bearings subassembly from the hub. In fact this is a decent way to get the axle out if you don't have an arbor press, but most of the time you don't want that axle to move at all.
If you shifted the axle+bearings subassembly just a mm (or whatever), then the hub might function fine, but your freewheel space (dimension "A" in the Sutherland's drawing I posted earlier) will be larger than Phil intended, and your wheel won't be properly dished anymore. You'll have to tighten the already-tight right-side spokes, with all the disadvantages of increasing dish, so this is not recommended. Plus the bearings are held in by Loctite originally. After breaking that glue joint loose, your hub shell is only held to the bearings by the press fit. Maybe adequate, but it seems risky — I assume they used Loctite for a reason. So if it looks like your axle+bearings subassembly has been shifted over to the right by incorrect FW removal, I'd recommend pressing it the rest of the way out, then re-installing with fresh Loctite.
* The special tool I mentioned for removing the FW is a steel cap that shipped with each Phil hub, but which most Phil owners have lost. It goes over the left side of the hub before you stick the skewer through, and transfers the pull of the skewer to the hub shell rather than to the axle, so the FW can't pull the axle to the right. Even though I have that Phil tool, I don't bother with it usually, I just make sure to barely crack the FW loose before loosening the skewer, to avoid shifting the axle over. But I'm a daredevil with a deathwish so don't follow my example, use the Phil cup-tool-thingy if you have one!
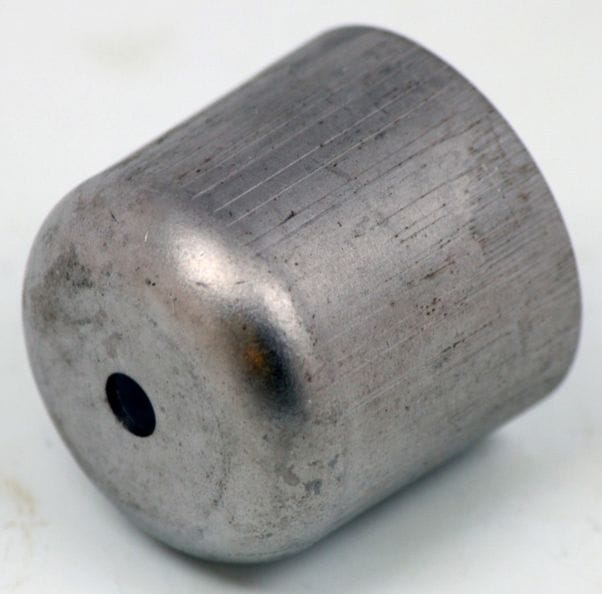
BTW ***** at Bike Recyclery in Portland OR has a couple of those in stock at the moment, $15.
EDIT: Haha I see the robocensor thinks the name of the proprietor of that shop is a Bad Word? Her name is like Zelle the money-transfer app, but with an "a" at the end instead of an "e". I wonder why that bugs the censor?
One problem with Phil hubs is you have to use extreme caution (or a special tool*) when removing the freewheel. The problem happens when you hold the FW remover onto the FW with the QR skewer, which is a Best Practice, recommended for not ruining the FW and/or the remover by having it slip. So do use the skewer, but here's the essential bit: remember to loosen the skewer immediately as soon as the FW thread starts to budge. If you keep on removing the FW with the skewer still in place, you can extract the entire axle + bearings subassembly from the hub. In fact this is a decent way to get the axle out if you don't have an arbor press, but most of the time you don't want that axle to move at all.
If you shifted the axle+bearings subassembly just a mm (or whatever), then the hub might function fine, but your freewheel space (dimension "A" in the Sutherland's drawing I posted earlier) will be larger than Phil intended, and your wheel won't be properly dished anymore. You'll have to tighten the already-tight right-side spokes, with all the disadvantages of increasing dish, so this is not recommended. Plus the bearings are held in by Loctite originally. After breaking that glue joint loose, your hub shell is only held to the bearings by the press fit. Maybe adequate, but it seems risky — I assume they used Loctite for a reason. So if it looks like your axle+bearings subassembly has been shifted over to the right by incorrect FW removal, I'd recommend pressing it the rest of the way out, then re-installing with fresh Loctite.
* The special tool I mentioned for removing the FW is a steel cap that shipped with each Phil hub, but which most Phil owners have lost. It goes over the left side of the hub before you stick the skewer through, and transfers the pull of the skewer to the hub shell rather than to the axle, so the FW can't pull the axle to the right. Even though I have that Phil tool, I don't bother with it usually, I just make sure to barely crack the FW loose before loosening the skewer, to avoid shifting the axle over. But I'm a daredevil with a deathwish so don't follow my example, use the Phil cup-tool-thingy if you have one!

BTW ***** at Bike Recyclery in Portland OR has a couple of those in stock at the moment, $15.
EDIT: Haha I see the robocensor thinks the name of the proprietor of that shop is a Bad Word? Her name is like Zelle the money-transfer app, but with an "a" at the end instead of an "e". I wonder why that bugs the censor?
Likes For bulgie:
#19
Senior Member
Thread Starter
Join Date: Apr 2011
Location: Maryland, USA
Posts: 2,442
Bikes: Drysdale/Gitane/Zeus/Masi/Falcon/Palo Alto/Raleigh/Legnano
Mentioned: 34 Post(s)
Tagged: 0 Thread(s)
Quoted: 987 Post(s)
Liked 641 Times
in
407 Posts
As I will hopefully, finally, have an axle today*, Perhaps I can implement some of this input; thanks. I don't think there is a consensus on the spacing, but I'll target 5mm-6mm from centerline of cog to the inner surface of the dropout. It's starting to look like the safe bet is set the NDS cone and locknut with about 5mm of axle exposure, assemble the hub, slide it into place on the bike, check the clearances on the DS and then cut. This means assembling and disassembling the hub, but that's life. Ideally, I'd have the BB and crankset in place beforehand to check chainlink but, as I might be cold setting the frame (I hope not and right now at 126mm so 6-speed should work) there's a chance it would have to came right back out, I could visualize repeated assemble and disassembly.
*Wow, having fun with getting the Wheels Manufacturing 141mm 10mm x 26TPI replacement axles. WM is out of stock and did not answer my question on when to be back in stock. I found two more at online dealers in Texas and Idaho; the latter sat in Idaho for a long time but is "out for delivery today", OK but I'll believe it when I see it. The one from Texas arrived, and I found they had sent me one that had been cut to 132mm and you could see the hacksaw marks, at least they allowed a return. Found yet another axle in Minnesota, bought but not shipped yet according to UPS. Yes, I am about 35 miles from Baltimore and am expecting every product to be entangled in "supply chain issues" for some time to come, but stuff coming from MN, ID and TX should not need to go through a port -- plus some other items in the past week now experiencing "unexpected delays".
 I don't think there is a consensus on the spacing, but I'll target 5mm-6mm from centerline of cog to the inner surface of the dropout. It's starting to look like the safe bet is set the NDS cone and locknut with about 5mm of axle exposure, assemble the hub, slide it into place on the bike, check the clearances on the DS and then cut. This means assembling and disassembling the hub, but that's life. Ideally, I'd have the BB and crankset in place beforehand to check chainlink but, as I might be cold setting the frame (I hope not and right now at 126mm so 6-speed should work) there's a chance it would have to came right back out, I could visualize repeated assemble and disassembly.
*Wow, having fun with getting the Wheels Manufacturing 141mm 10mm x 26TPI replacement axles. WM is out of stock and did not answer my question on when to be back in stock. I found two more at online dealers in Texas and Idaho; the latter sat in Idaho for a long time but is "out for delivery today", OK but I'll believe it when I see it. The one from Texas arrived, and I found they had sent me one that had been cut to 132mm and you could see the hacksaw marks, at least they allowed a return. Found yet another axle in Minnesota, bought but not shipped yet according to UPS. Yes, I am about 35 miles from Baltimore and am expecting every product to be entangled in "supply chain issues" for some time to come, but stuff coming from MN, ID and TX should not need to go through a port -- plus some other items in the past week now experiencing "unexpected delays".

__________________
Larry:1958 Drysdale, 1961 Gitane Gran Sport, 1974 Zeus track, 1988 Masi Gran Corsa, 1974 Falcon, 1980 Palo Alto, 1973 Raleigh Gran Sport, 1974 Legnano. Susan: 1976 Windsor Profesional.
Larry:1958 Drysdale, 1961 Gitane Gran Sport, 1974 Zeus track, 1988 Masi Gran Corsa, 1974 Falcon, 1980 Palo Alto, 1973 Raleigh Gran Sport, 1974 Legnano. Susan: 1976 Windsor Profesional.
#20
Freewheel Medic
Join Date: Oct 2005
Location: An Island on the Coast of GA!
Posts: 12,886
Bikes: Snazzy* Schwinns, Classy Cannondales & a Super Pro Aero Lotus (* Ed.)
Mentioned: 140 Post(s)
Tagged: 0 Thread(s)
Quoted: 1453 Post(s)
Liked 2,197 Times
in
963 Posts
The key give-away is the difference in the flange height from the top of the outer bearing race/retaining ring to the top face of the smallest sprocket. Your picture clearly shows the difference.
__________________
Bob
Enjoying the GA coast all year long!
Thanks for visiting my website: www.freewheelspa.com
Bob
Enjoying the GA coast all year long!
Thanks for visiting my website: www.freewheelspa.com
Likes For pastorbobnlnh:
#22
Senior Member
Thread Starter
Join Date: Apr 2011
Location: Maryland, USA
Posts: 2,442
Bikes: Drysdale/Gitane/Zeus/Masi/Falcon/Palo Alto/Raleigh/Legnano
Mentioned: 34 Post(s)
Tagged: 0 Thread(s)
Quoted: 987 Post(s)
Liked 641 Times
in
407 Posts
I'm certain the top picture is of a regular spaced Suntour Perfect 6-speed. The lower picture is definitely of the Ultra or compact spaced Suntour ProCompe 6-speed. Perfect and ProCompe bodies share the same dimensions and there are three different bodies for each of the three configurations. The key give-away is the difference in the flange height from the top of the outer bearing race/retaining ring to the top face of the smallest sprocket. Your picture clearly shows the difference.
__________________
Larry:1958 Drysdale, 1961 Gitane Gran Sport, 1974 Zeus track, 1988 Masi Gran Corsa, 1974 Falcon, 1980 Palo Alto, 1973 Raleigh Gran Sport, 1974 Legnano. Susan: 1976 Windsor Profesional.
Larry:1958 Drysdale, 1961 Gitane Gran Sport, 1974 Zeus track, 1988 Masi Gran Corsa, 1974 Falcon, 1980 Palo Alto, 1973 Raleigh Gran Sport, 1974 Legnano. Susan: 1976 Windsor Profesional.
Likes For tiger1964:
#23
Senior Member
Join Date: Jan 2004
Location: Madison, WI USA
Posts: 6,157
Mentioned: 50 Post(s)
Tagged: 0 Thread(s)
Quoted: 2364 Post(s)
Liked 1,751 Times
in
1,193 Posts
* The special tool I mentioned for removing the FW is a steel cap that shipped with each Phil hub, but which most Phil owners have lost. It goes over the left side of the hub before you stick the skewer through, and transfers the pull of the skewer to the hub shell rather than to the axle, so the FW can't pull the axle to the right. Even though I have that Phil tool, I don't bother with it usually, I just make sure to barely crack the FW loose before loosening the skewer, to avoid shifting the axle over. But I'm a daredevil with a deathwish so don't follow my example, use the Phil cup-tool-thingy if you have one!


Oh, and more on topic -- is freewheel relative position really relevant to axle cut length? To my mind, that length is the OLD, plus a little less than 2x the dropout thickness. Freewheel position is determined by spacer stacking (which in turn determines wheel dish), once the axle's been cut. Or is there something I'm missing?
Last edited by madpogue; 04-01-24 at 10:42 AM.
#24
Senior Member
Join Date: Apr 2005
Location: Ann Arbor, MI
Posts: 16,880
Bikes: 1980 Masi, 1984 Mondonico, 1984 Trek 610, 1980 Woodrup Giro, 2005 Mondonico Futura Leggera ELOS, 1967 PX10E, 1971 Peugeot UO-8
Mentioned: 49 Post(s)
Tagged: 0 Thread(s)
Quoted: 1858 Post(s)
Liked 664 Times
in
506 Posts
I thought there would already be a topic but a Search... none that I find.
What should I be looking for in the lateral space from the centerline of the smallest freewheel cog to the outboard surface of the axle locknut? This impacts clearance for the cog and particularly room to ensure the chain can get on and off that last cog. In another topic, I am (as part of a rebuild) "upgrading" a friend's bike from 5 cogs to 6 and, of course, this means changing the axle spacing (and redishing the wheel, and likely cold-setting the frame, and...) So, I got a longer axle and, last year, investing the $$$ assortment of axle spacers from Wheels Manufacturing, I think I'll be good in terms of supplies needed. And, prepared to cut the axle. But, first, how to ensure not too much or too little? With the new freewheel on the (Record high-flange) hub as-is, the last cog is about flush with the "mounting surface" of the outboard locknut, so that ain't going to work. A quick check of a few bikes here give me varying results, from centerline of cog to end of locknut varies 6mm to 10mm. Is there guideline?
Obviously, only want to cut once. I am tempted to simply add spacers, spring out the dropouts until I jam in the wheel, take a look and, once I am happy with the look, cut the axle and set the frame. This seems crude...
And, of course, this affects chainline.
What should I be looking for in the lateral space from the centerline of the smallest freewheel cog to the outboard surface of the axle locknut? This impacts clearance for the cog and particularly room to ensure the chain can get on and off that last cog. In another topic, I am (as part of a rebuild) "upgrading" a friend's bike from 5 cogs to 6 and, of course, this means changing the axle spacing (and redishing the wheel, and likely cold-setting the frame, and...) So, I got a longer axle and, last year, investing the $$$ assortment of axle spacers from Wheels Manufacturing, I think I'll be good in terms of supplies needed. And, prepared to cut the axle. But, first, how to ensure not too much or too little? With the new freewheel on the (Record high-flange) hub as-is, the last cog is about flush with the "mounting surface" of the outboard locknut, so that ain't going to work. A quick check of a few bikes here give me varying results, from centerline of cog to end of locknut varies 6mm to 10mm. Is there guideline?
Obviously, only want to cut once. I am tempted to simply add spacers, spring out the dropouts until I jam in the wheel, take a look and, once I am happy with the look, cut the axle and set the frame. This seems crude...
And, of course, this affects chainline.
#25
Senior Member
Join Date: Dec 2016
Posts: 589
Mentioned: 12 Post(s)
Tagged: 0 Thread(s)
Quoted: 192 Post(s)
Liked 566 Times
in
197 Posts
In the C&V days, racers could get a neutral support wheel. (Is this still done anywhere? I'm out of touch, but I doubt it).
For someone else's wheel to shift properly, the freewheel spacing had to be standardized. For USA racers, what I'm most familiar with, but also probably elsewhere, Campy's standard was THE standard. Maybe that was different in France? In the '70s and earlier, French hubs often (usually) had more space there than Campy, just another reason not to use French stuff for racing. I bet the pro teams that used French hubs respaced them to the Campy dimension, but that's just a guess.
The spec I'm talking about is what's labeled as dimension "A" in this diagram from Sutherland's:

The Campy spec, from the shoulder at the end of the freewheel thread to the outer face of the cone locknut, was 30 mm for 5-sp, and 35 mm for 6-sp. Some brands of freewheel moved the cogs right or left a little, relative to that shoulder on the hub, compared to other brands, so complete compatibility was not assured. But it was good to stick to those numbers. The equivalent number for French hubs was 34 mm for a 5-sp, lots of extra dish for no good reason. Campy rules, Normandy drools.
.
For someone else's wheel to shift properly, the freewheel spacing had to be standardized. For USA racers, what I'm most familiar with, but also probably elsewhere, Campy's standard was THE standard. Maybe that was different in France? In the '70s and earlier, French hubs often (usually) had more space there than Campy, just another reason not to use French stuff for racing. I bet the pro teams that used French hubs respaced them to the Campy dimension, but that's just a guess.
The spec I'm talking about is what's labeled as dimension "A" in this diagram from Sutherland's:

The Campy spec, from the shoulder at the end of the freewheel thread to the outer face of the cone locknut, was 30 mm for 5-sp, and 35 mm for 6-sp. Some brands of freewheel moved the cogs right or left a little, relative to that shoulder on the hub, compared to other brands, so complete compatibility was not assured. But it was good to stick to those numbers. The equivalent number for French hubs was 34 mm for a 5-sp, lots of extra dish for no good reason. Campy rules, Normandy drools.
.
Likes For El Chaba:


