


Rounded flats on drive side bb cup
 11-02-24 | 09:22 AM
#1
Thread Starter
Junior Member

Joined: Aug 2024
Posts: 114
Likes: 78
From: Brooklyn, NY
Bikes: 1988 Pinarello Cadore, 1985 Mercian King of Mercia
Rounded flats on drive side bb cup
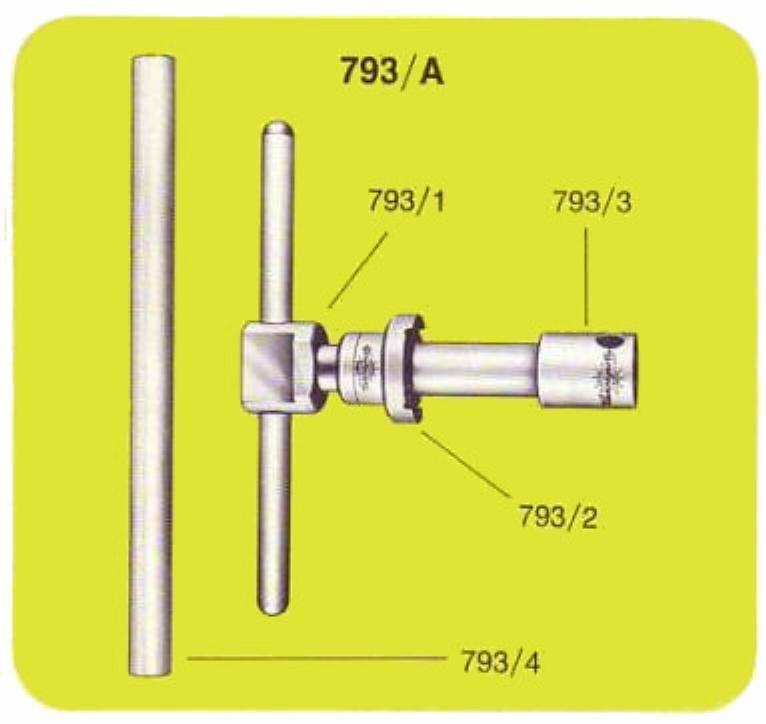
UPDATE: BB removed by LBS with campy 793/A. I may re-use the cup after filing it down, but for now it’s gonna sit in the parts bin since I have another bb I can use. Reason for removing was to use on another bike, as I was selling this frame but wanted the bb.
Is this fubar, able to even be removed, re-usable? Flats stripped when I attempted to remove with too much force. Non-drive side came out fine, and rest of bb is perfect.

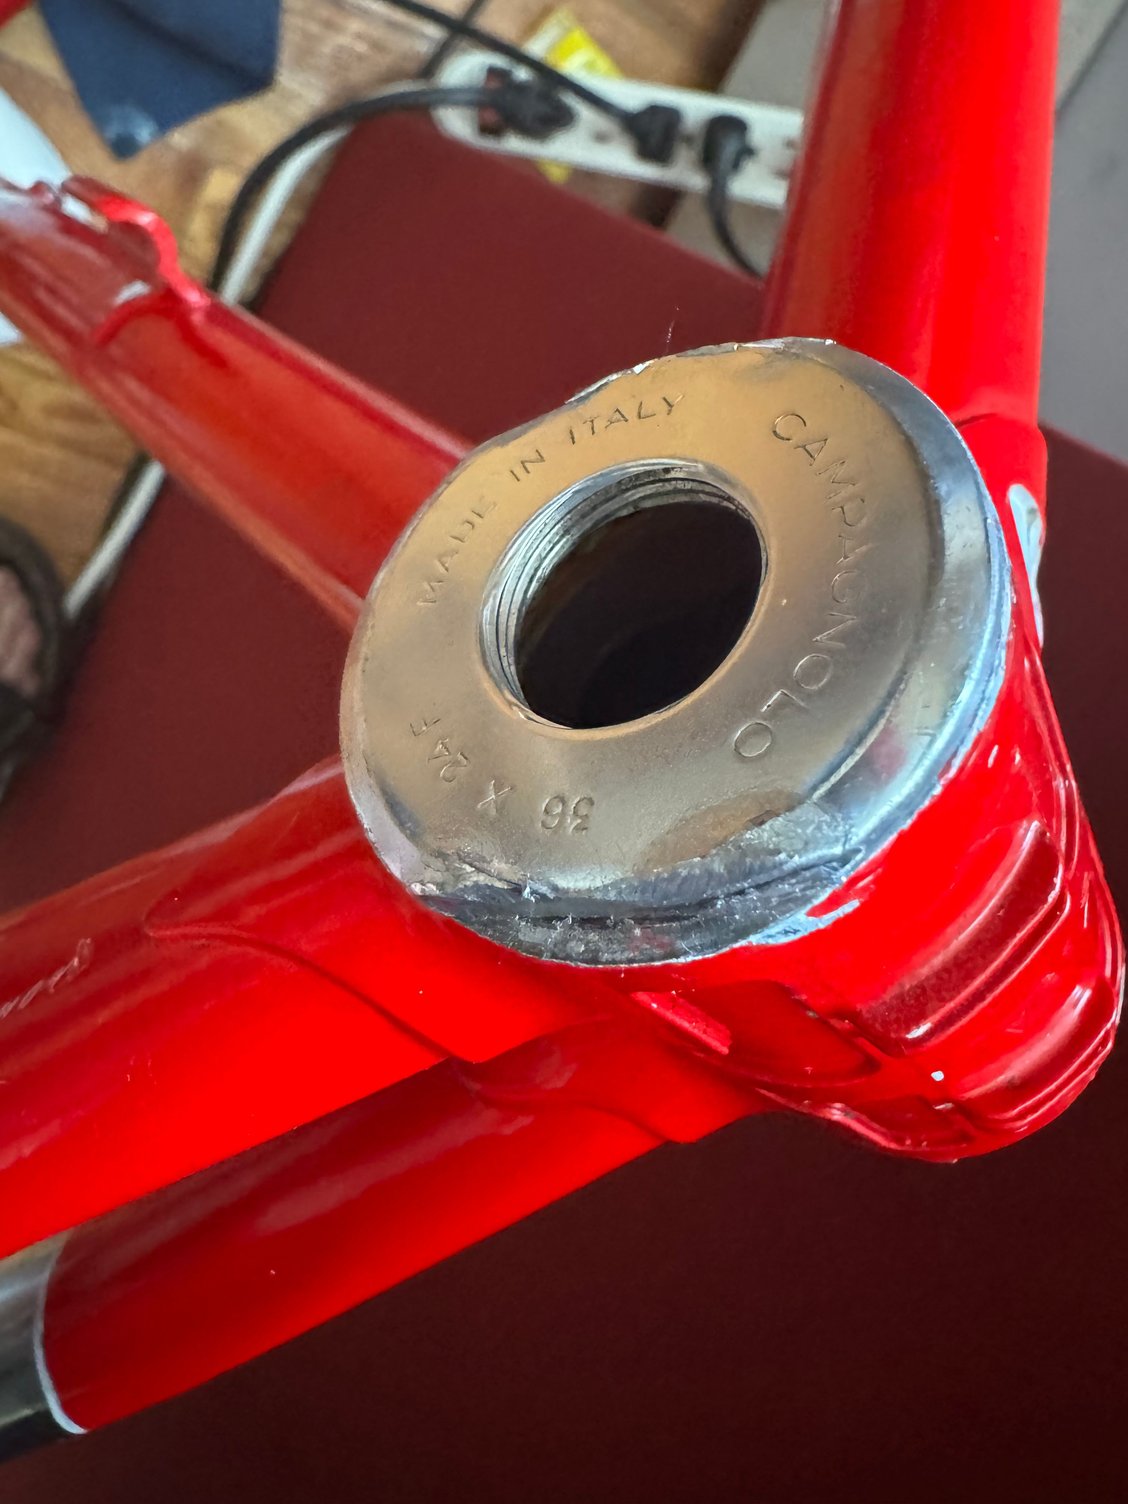
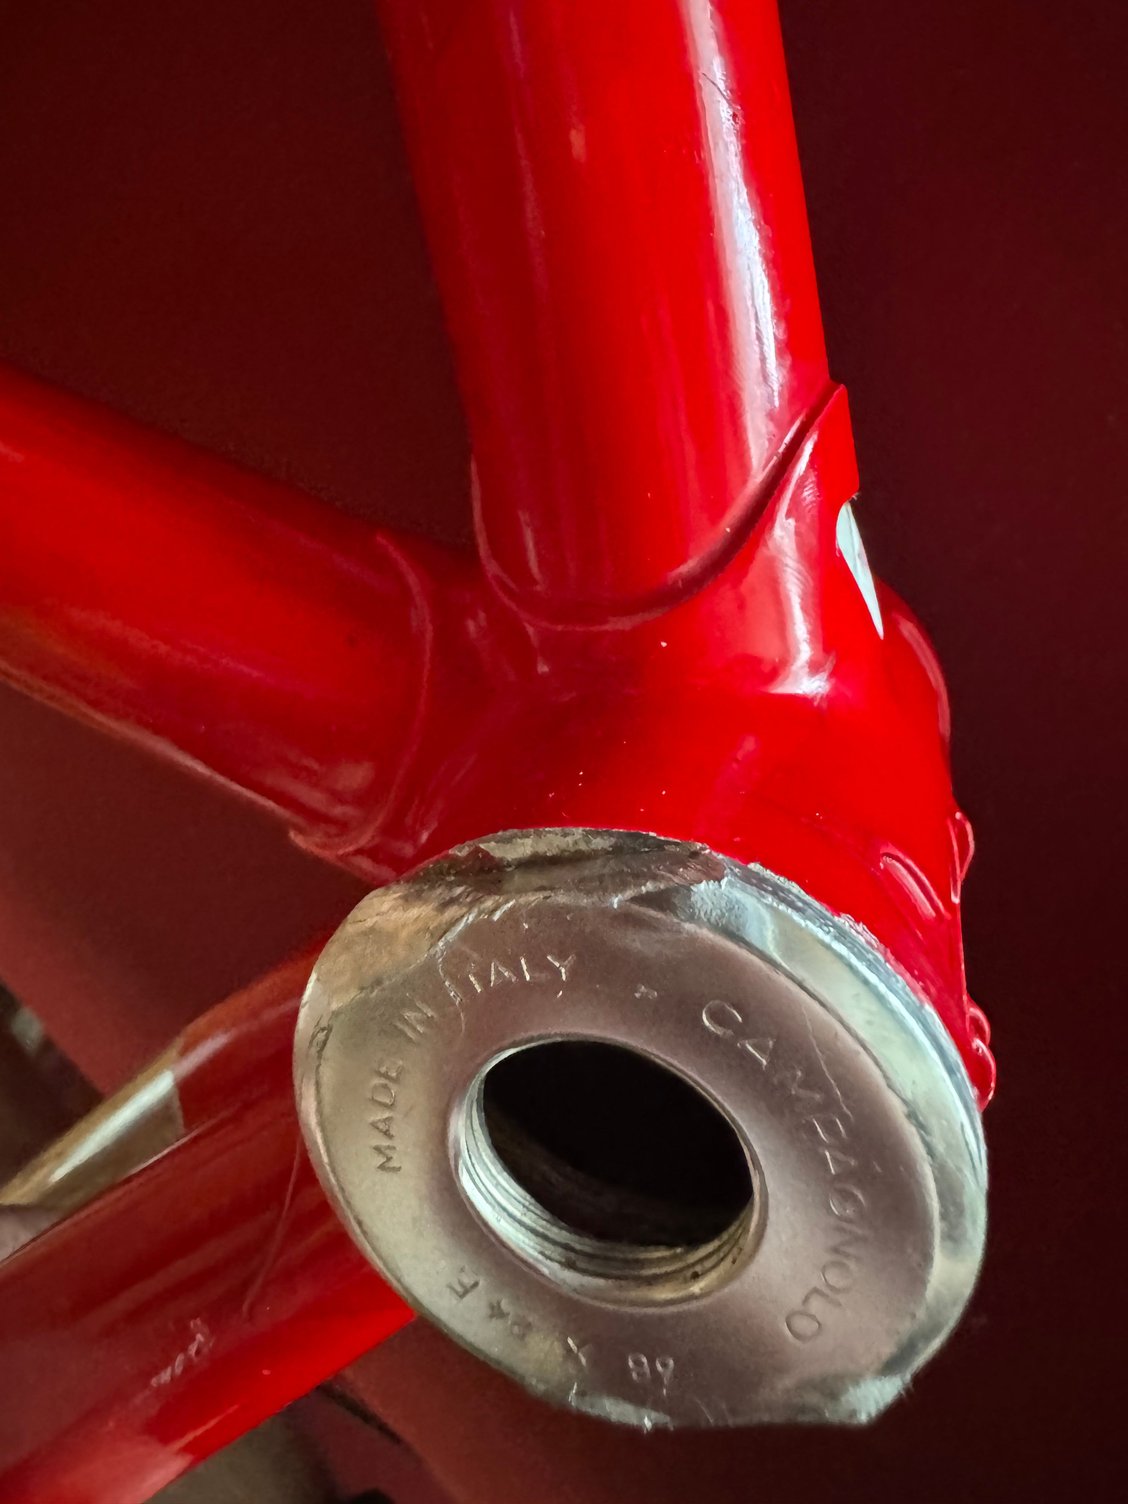
Is this fubar, able to even be removed, re-usable? Flats stripped when I attempted to remove with too much force. Non-drive side came out fine, and rest of bb is perfect.
Last edited by jondom22; 11-02-24 at 05:17 PM.
 11-02-24 | 09:33 AM
#2

aged to perfection

Joined: Jun 2009
Posts: 2,242
Likes: 1,660
From: PacNW
Bikes: Dinucci Allez 2.0, Richard Sachs, Alex Singer, Serotta, Masi GC, Raleigh Pro Mk.1, Hetchins, etc
there's a way.
Get a large bolt, nut, and assortment of washers to approximate the Sheldon Brown tool.
Quoting sheldon here - pic below
The tool consists of a large bolt, a nut or two, and a few washers. I use a 5/8-inch 18 TPI hex bolt 1 1/2inches long, with a nut, a flat washer, and four lockwashers. The 5/8-inch size is the largest standard size that will fit through the hole in the cup. This bolt and nut both take a 15/16-inch wrench. With my 1/2 inch drive Craftsman six-point socket set, the 15/16-inch socket is also the largest size that will fit into a normal bottom bracket shell.

Then tighten it down and use a big wrench or your bench vise to back the cup out.
Be sure you know which way it is threaded. Italian will be right hand thread (lefty loosey)
/markp
Get a large bolt, nut, and assortment of washers to approximate the Sheldon Brown tool.
Quoting sheldon here - pic below
The tool consists of a large bolt, a nut or two, and a few washers. I use a 5/8-inch 18 TPI hex bolt 1 1/2inches long, with a nut, a flat washer, and four lockwashers. The 5/8-inch size is the largest standard size that will fit through the hole in the cup. This bolt and nut both take a 15/16-inch wrench. With my 1/2 inch drive Craftsman six-point socket set, the 15/16-inch socket is also the largest size that will fit into a normal bottom bracket shell.
Then tighten it down and use a big wrench or your bench vise to back the cup out.
Be sure you know which way it is threaded. Italian will be right hand thread (lefty loosey)
/markp
Last edited by mpetry912; 11-02-24 at 09:36 AM.



 11-02-24 | 09:57 AM
#4
Garage tetris expert

Joined: May 2016
Posts: 1,338
Likes: 1,369
From: Texas Hill Country
Bikes: A few. Ok, a lot
If you have access to a bench-mounted vice, clamp the cup in the jaws and turn the frame (from the head tube end). As others have mentioned, be sure to triple check the correct direction to loosen.
11-02-24 | 10:37 AM
#5
aged to perfection
Joined: Jun 2009
Posts: 2,242
Likes: 1,660
From: PacNW
Bikes: Dinucci Allez 2.0, Richard Sachs, Alex Singer, Serotta, Masi GC, Raleigh Pro Mk.1, Hetchins, etc
per the markings on the cup, it's Italian thread so convention RH threads. lefty loosey
my opinion is that the wrench flats are shot. Use the bolt method - it never fails.
/markp
my opinion is that the wrench flats are shot. Use the bolt method - it never fails.
/markp
11-02-24 | 10:39 AM
#6


feros ferio

Joined: Jul 2000
Posts: 22,411
Likes: 1,876
From: www.ci.encinitas.ca.us
Bikes: 1959 Capo Modell Campagnolo; 1960 Capo Sieger (2); 1962 Carlton Franco Suisse; 1970 Peugeot UO-8; 1982 Bianchi Campione d'Italia; 1988 Schwinn Project KOM-10;
1. The Sheldon Brown nut-washers-bolt method (see above) is the best.
2. You could always use a Dremel to reshape the flats on the cup.
3. Sometimes applying just a bit of (in your Italian case) clockwise force, followed immediately by an abrupt jerk anticlockwise will do the trick.
4. I wonder if a prior owner applied Loctite to the threads, as I have had to do on a couple of French and Italian bikes I have owned. (There is a good reason the Brits, Swiss, and everyone else use a LH thread on the drive side.)
2. You could always use a Dremel to reshape the flats on the cup.
3. Sometimes applying just a bit of (in your Italian case) clockwise force, followed immediately by an abrupt jerk anticlockwise will do the trick.
4. I wonder if a prior owner applied Loctite to the threads, as I have had to do on a couple of French and Italian bikes I have owned. (There is a good reason the Brits, Swiss, and everyone else use a LH thread on the drive side.)
__________________
"Far and away the best prize that life offers is the chance to work hard at work worth doing." --Theodore Roosevelt
Capo: 1959 Modell Campagnolo, S/N 40324; 1960 Sieger (2), S/N 42624, 42597
Carlton: 1962 Franco Suisse, S/N K7911
Peugeot: 1970 UO-8, S/N 0010468
Bianchi: 1982 Campione d'Italia, S/N 1.M9914
Schwinn: 1988 Project KOM-10, S/N F804069
"Far and away the best prize that life offers is the chance to work hard at work worth doing." --Theodore Roosevelt
Capo: 1959 Modell Campagnolo, S/N 40324; 1960 Sieger (2), S/N 42624, 42597
Carlton: 1962 Franco Suisse, S/N K7911
Peugeot: 1970 UO-8, S/N 0010468
Bianchi: 1982 Campione d'Italia, S/N 1.M9914
Schwinn: 1988 Project KOM-10, S/N F804069
11-02-24 | 11:06 AM
#7

Senior Member


Joined: Apr 2009
Posts: 3,785
Likes: 5,636
From: Seattle
So I'd try the Sheldon bolt first and if it doesn't come free right away, then try heat. A hair blow-dryer will suffice if you put it on high and let the heat soak in for a long time. A heat gun, typically used for shrinking heat-shrink tubing, is hotter and works faster but those can damage paint, so don't go for maximum heating. Propane blow-torch is a no-no! Rusty farm equipment yes, nice painted bike frame no.
There's always the option to just leave it in, and clean/regrease in-situ. Put off removing it, until the bearing race is pitted -- maybe by then you'll be ready for a repaint anyway, so you can even melt it out. I'm not joking, alu parts can actually be melted out of a steel frame, doesn't hurt the steel or the braze if done carefully. I've never had to do it on a BB cup though, only stems and seatposts.
11-02-24 | 11:34 AM
#8
Thread Starter
Junior Member
Joined: Aug 2024
Posts: 114
Likes: 78
From: Brooklyn, NY
Bikes: 1988 Pinarello Cadore, 1985 Mercian King of Mercia
Took to my LBS, they got it out with a big headset press type thing and a pipe on the end for extra leverage. I guess similar concept to the Sheldon brown mechanism. BB shell threads are clean thankfully, was just wedged in there for 35 years and in storage.
BB cup races are super clean (white marks are just reflection from the ceiling light). Threads are good, but the flats are rounded, more so on one side. Is it salvageable (it’s early c-record that takes 3/16” bearings so a little harder to find as just a cup).
photos below:

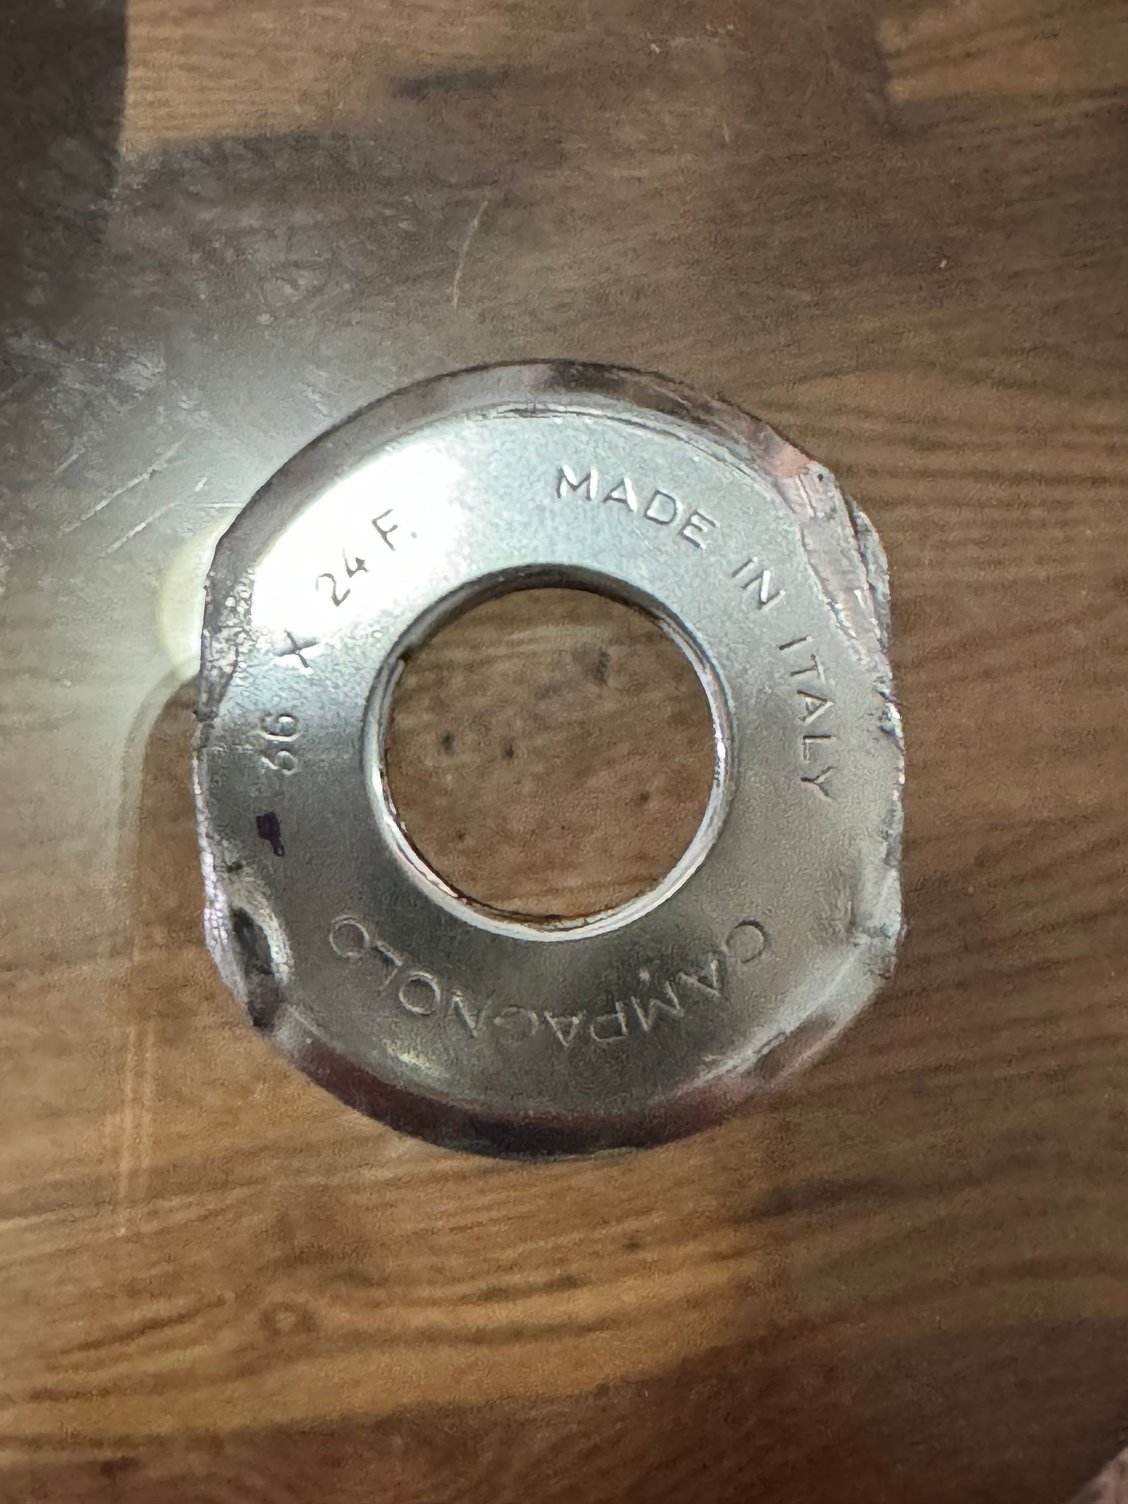
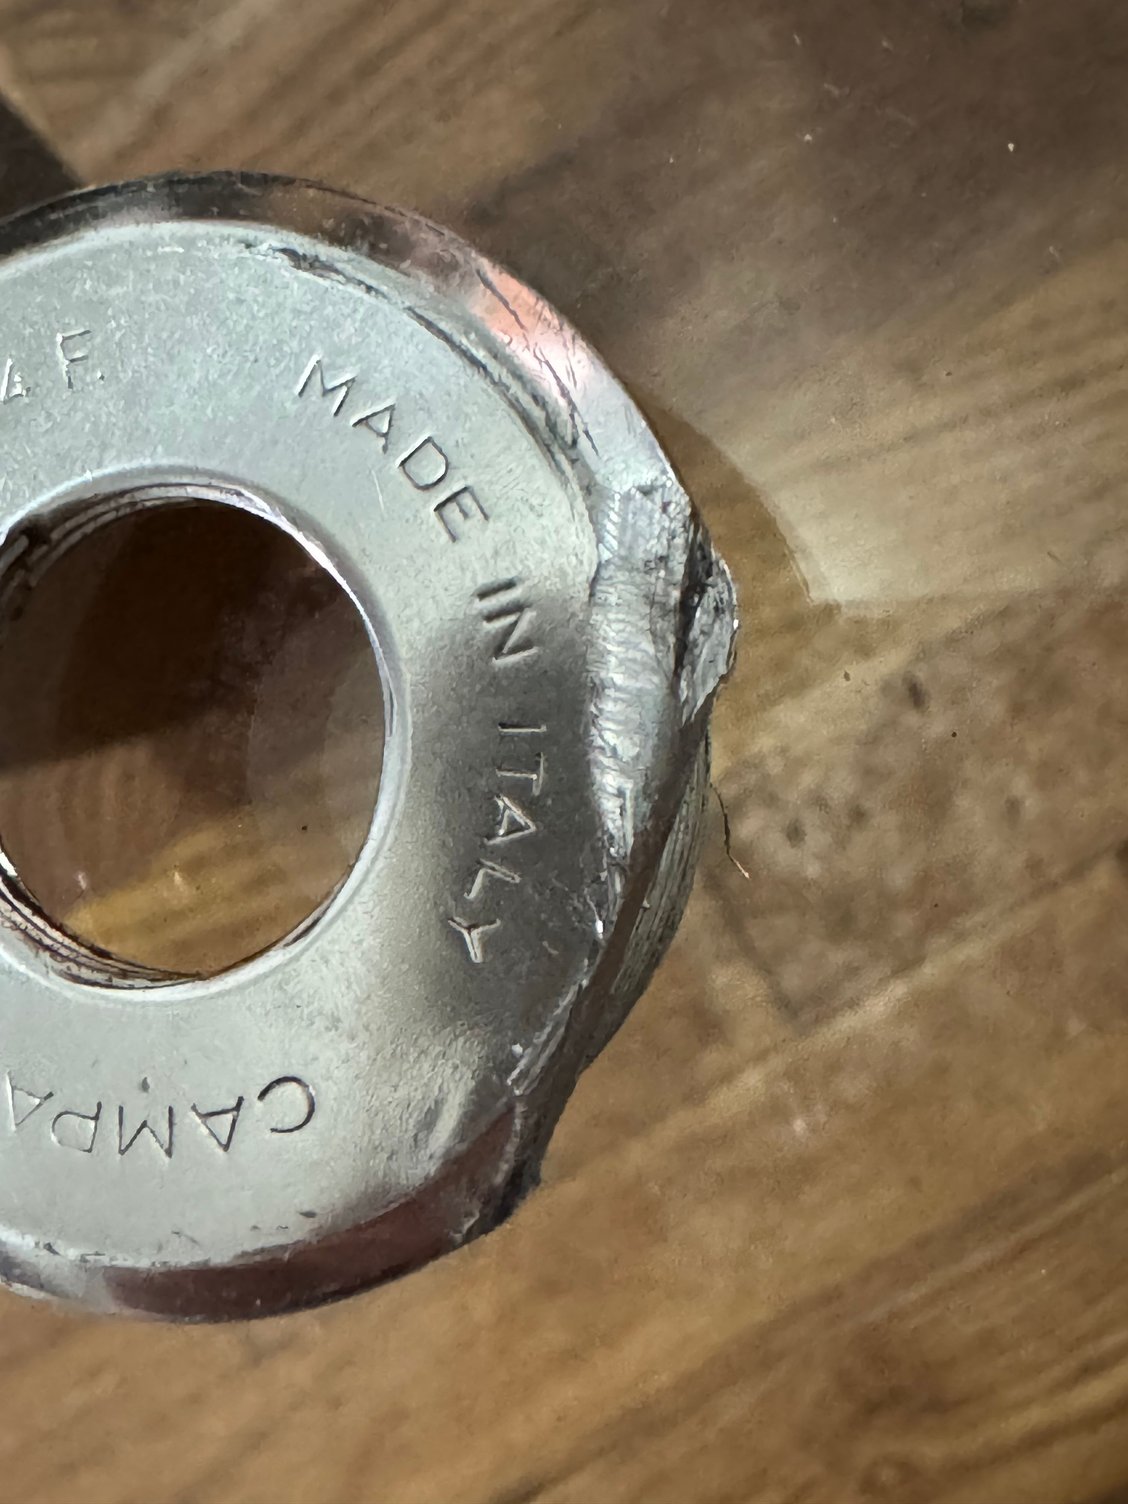
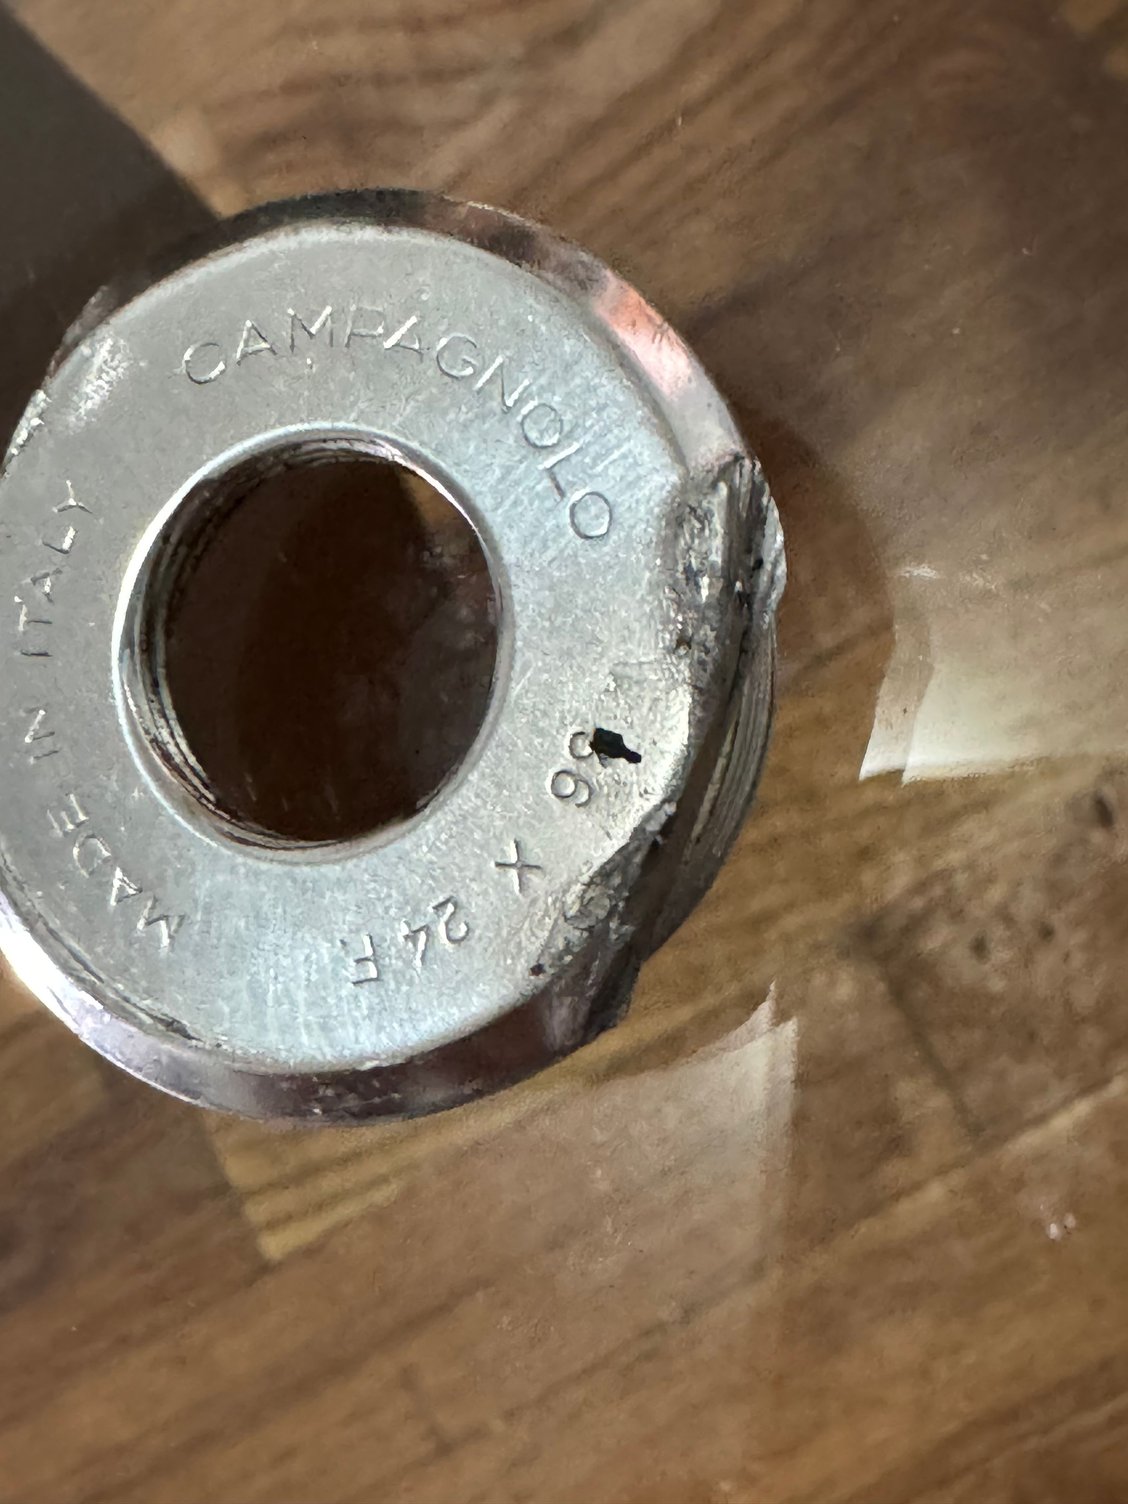

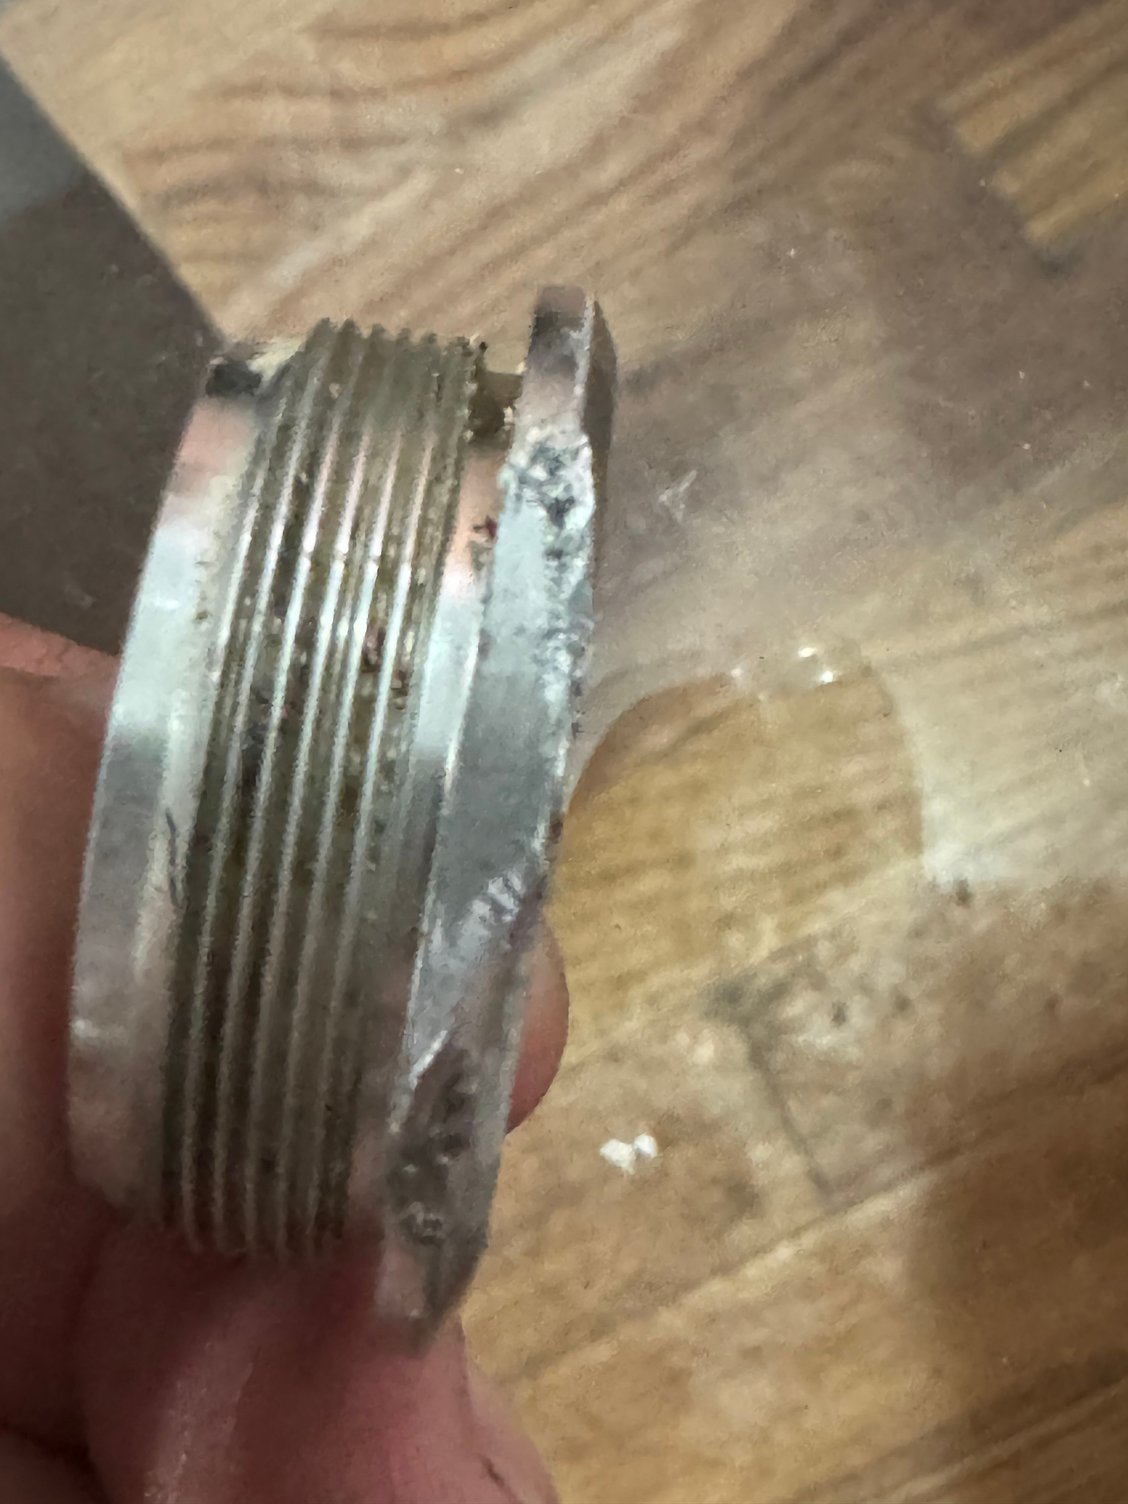
BB cup races are super clean (white marks are just reflection from the ceiling light). Threads are good, but the flats are rounded, more so on one side. Is it salvageable (it’s early c-record that takes 3/16” bearings so a little harder to find as just a cup).
photos below:
 11-02-24 | 12:33 PM
#9

Passista

Joined: Jul 2005
Posts: 8,258
Likes: 1,218
Bikes: 1998 Pinarello Asolo, 1992 KHS Montaña pro, 1980 Raleigh DL-1, IGH Hybrid, IGH Utility
You could try restoring the flats with a file, but I doubt it would work because being an Italian BB it needs to be installed very tight.
11-02-24 | 12:47 PM
#10

Wheelman
Joined: Aug 2021
Posts: 1,666
Likes: 1,659
From: Putney, London UK
Bikes: 1982 Holdsworth Avanti (531), 1961 Holdsworth Cyclone, 1953 Holdsworth Whirlwind
I've just removed a fixed cup using the Sheldon Brown method.
It had been in place for about 71 years.
Soaked it in penetrtaing oil for 4 days and then used 4 foot of scaffolding pole as a cheater bar.
Got the scaffolding pole from a builder working on the house next door, asked and got it for free.
Do yourself a favour and get one
 11-02-24 | 02:20 PM
#13
Senior Member

Joined: Jan 2019
Posts: 2,031
Likes: 1,067
From: Toledo Ohio
Bikes: 1964 Huffy Sportsman, 1972 Fuji Newest, 1973 Schwinn Super Sport (3), 1982 Trek 412, 1983 Trek 700, 1989 Miyata 1000LT, 1991 Bianchi Boardwalk, plus others
That is why I leave well enough well alone if the bearing tracks are good!
 11-02-24 | 03:07 PM
#14

Old fart
Joined: Nov 2004
Posts: 26,402
Likes: 5,333
From: Appleton WI
Bikes: Several, mostly not name brands.
BB cup races are super clean (white marks are just reflection from the ceiling light). Threads are good, but the flats are rounded, more so on one side. Is it salvageable (it’s early c-record that takes 3/16” bearings so a little harder to find as just a cup).
11-02-24 | 03:17 PM
#15

Insane Bicycle Mechanic

Joined: Mar 2008
Posts: 10,163
Likes: 1,128
From: other Vancouver
 11-02-24 | 04:25 PM
#17

Senior Member
Joined: Apr 2007
Posts: 12,567
Likes: 2,740
From: Thunder Bay, Ontario, Canada - burrrrr!
Bikes: 1958 Rabeneick 120D, 1968 Legnano Gran Premio, 196? Torpado Professional, 2000 Marinoni Piuma
This is an easy, half hour, repair. File the once flat flats flat again. Do your best to get the reflatted flats parallel to one another. Use a 12" or 15" adjustable wrench for torque. Then get a big bolt (I used a 5/8" coarse thread bolt, nut and appropriate washers). Feed the big bolt into a washer, then into the non-drive side of the cup and through the cup on the other side. Fit the adjustable, snug the bolt nut finger tight and washer up against the wrench and bob's your uncle - almost. Of all the stuck bb cups, this method has failed me only once. Bonne chance...

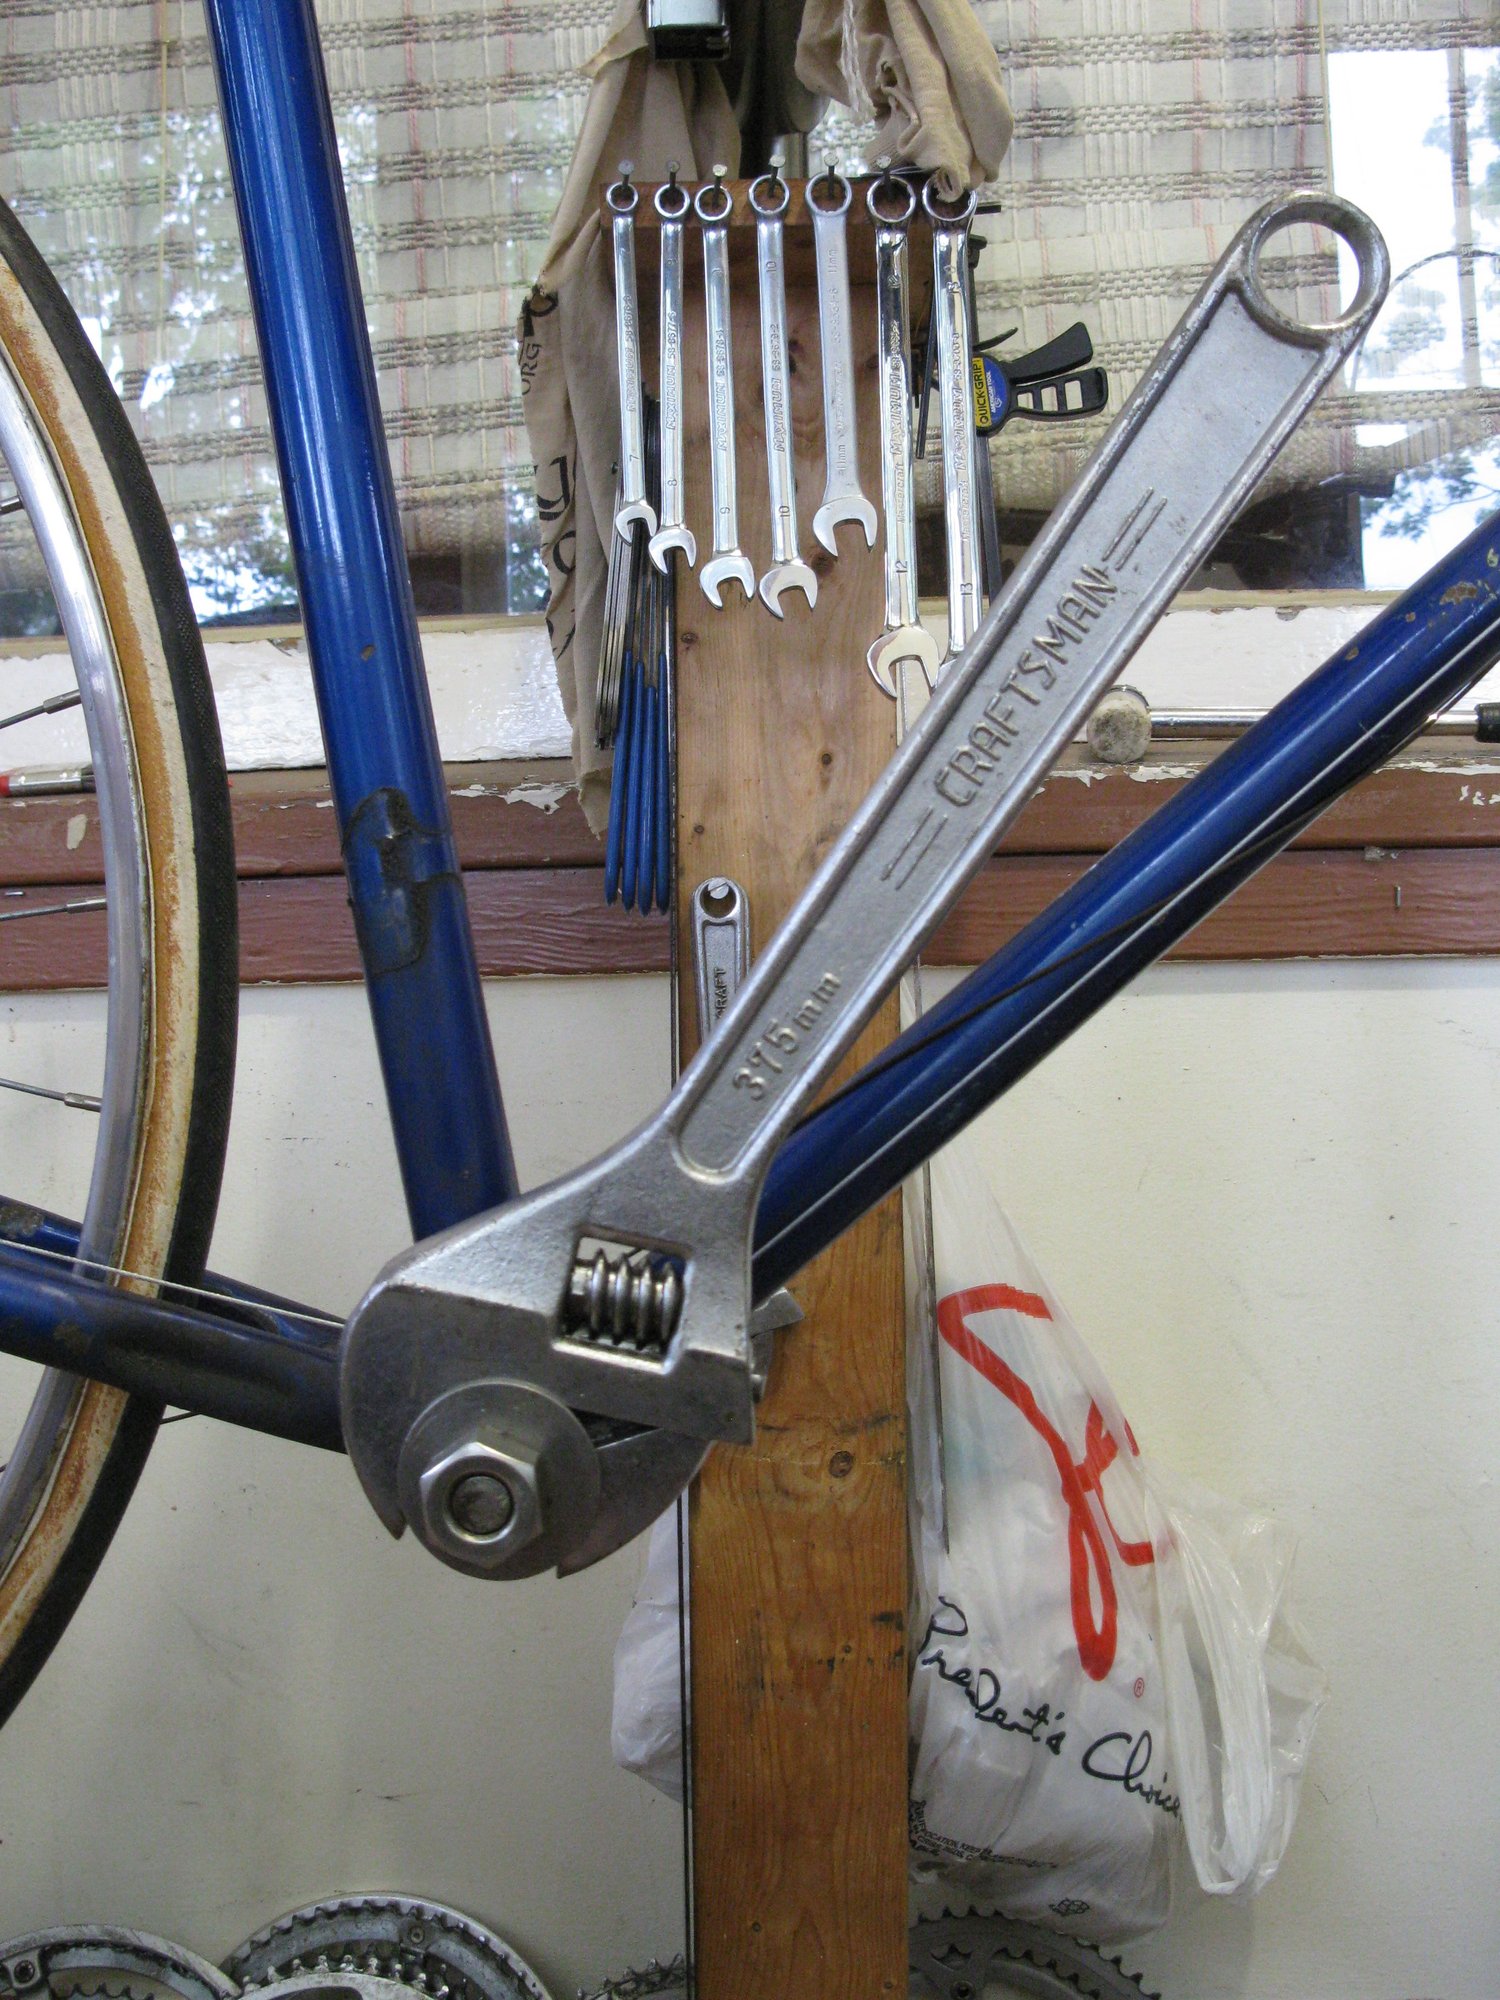
And for everyone who might run into the tight cup syndrome, always always start with the big bolt procedure or you just might be the next guy or gal to screw up the flats. Trust me on this.
And for everyone who might run into the tight cup syndrome, always always start with the big bolt procedure or you just might be the next guy or gal to screw up the flats. Trust me on this.
__________________
"98% of the bikes I buy are projects".
"98% of the bikes I buy are projects".
11-02-24 | 04:28 PM
#18

Senior Member
Joined: Jul 2023
Posts: 2,027
Likes: 1,250
From: "Driftless" WI
Bikes: 1972 Motobecane Grand Record, 2023 Specialized Tarmac SL7,'26 Spesh Diverge, '22 Kona Dew+
 but as others've posted, there's enough of the rim left intact onto which you can carefully file new flats for next time.
Still, I'd be looking for a replacement simply out of a lack of trust in just how long that cup will hold up to your usage habits.
May want to have your LBS reface that BB end too, it looks a little abused in your pic.
Last edited by spclark; 11-02-24 at 04:35 PM.
11-02-24 | 04:54 PM
#19

Senior Member
Joined: Jan 2015
Posts: 5,836
Likes: 3,421
From: Los Angeles
Bikes: 82 Medici, 85 Ironman, 2011 Richard Sachs
Note to self: Avoid C-Record BB with that ridiculous tapered face of the fixed cup.
__________________
I don't do: disks, tubeless, e-shifting, or bead head nymphs. But I do hate all e-bikes.
I don't do: disks, tubeless, e-shifting, or bead head nymphs. But I do hate all e-bikes.
11-02-24 | 05:12 PM
#20
Thread Starter
Junior Member
Joined: Aug 2024
Posts: 114
Likes: 78
From: Brooklyn, NY
Bikes: 1988 Pinarello Cadore, 1985 Mercian King of Mercia
Something like this?
Well, they call it a "fixed cup" for a reason: there's no compelling need to remove it from the frame for routine maintenance. Just clean it up in place the next time you repack the bottom bracket. If/when it becomes worn enough to justify replacement, take it back to that shop with the proper tool, or use the bolt method others have described above, to remove it.
Well, they call it a "fixed cup" for a reason: there's no compelling need to remove it from the frame for routine maintenance. Just clean it up in place the next time you repack the bottom bracket. If/when it becomes worn enough to justify replacement, take it back to that shop with the proper tool, or use the bolt method others have described above, to remove it.
I was taking it off a frame I’m selling and was planning on using the bb for another bike of mine. Had no prob taking off a chorus Italian threaded fixed cup of the same vintage from my other bike, didn’t expect this c-record one to seize up and strip the flats like that, but I didn’t know it was aluminum vs. steel one like the chorus. Lesson learned : /
11-02-24 | 05:44 PM
#22

SE Wis
Joined: Apr 2005
Posts: 11,555
Likes: 4,332
From: Milwaukee, WI
Bikes: '68 Raleigh Sprite, '02 Raleigh C500, '84 Raleigh Gran Prix, '91 Trek 400, 2013 Novara Randonee, 1990 Trek 970
11-02-24 | 05:53 PM
#23

Paramount Fan
Joined: Dec 2006
Posts: 502
Likes: 445
From: Vermont
Bikes: Marinoni, Paramounts, Raleigh Pros, Colnago, DeRosa, Gios, Masis, Pinarello, R. Sachs, Look, Falcon, D. Moulton, Witcomb, Woodrup, Atala, Motobecane, Bianchis, Fat City, Frejus, Follis, Waterford, Litespeed, d'Autremont, others, mostly '70s-'80s
The tool the LBS used was probably something like the old Kingsbridge fixed cup tool, which is a shop version of Sheldon's BB&N (Big Bolt & Nut). I have always been glad that I bought mine decades ago, as it has never failed. Be careful if using an adjustable wrench held tight against the BB, as many of these have a taper to the jaws and are difficult to keep fully engaged with the flats. I have used the Kingsbridge tool to get out frozen adjustable cups. I've had frames handed to me where the mechanic can't get enough purchase with a pin spanner to get the adjustable cup out. What I'll do is to pull the fixed cup by putting a flat wrench on it (if I have the size), and holding the wrench against the BB by adding a Regina freewheel body, held in place by a crankarm bolt and large washers. Once I get the fixed cup out, I'll use the Kingsbridge tool on the adjustable cup. I've had to use a cheater bar to get the tool clamped down tight enough, but it's never failed or destroyed the cup.
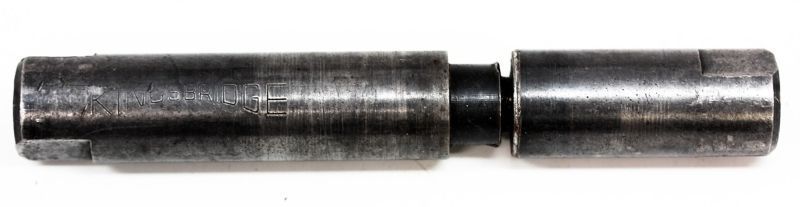
Long end goes into the BB shell. You turn the tool on whichever side will turn the cup in the required direction, clockwise.
Long end goes into the BB shell. You turn the tool on whichever side will turn the cup in the required direction, clockwise.
11-02-24 | 06:27 PM
#24

Senior Member

Joined: Oct 2015
Posts: 16,174
Likes: 9,551
From: PDX
Bikes: Merz x 5 + Specialized Merz Allez x 2, Strawberry/Newlands/DiNucci/Ti x3, Gordon, Fuso/Moulton x2, Bornstein, Paisley,1958-74 Paramounts x3, 3rensho, 74 Moto TC, 73-78 Raleigh Pro's x5, Marinoni x2, 1960 Cinelli SC, 1980 Bianchi SC, PX-10 X 2
Fixed cup = no adjustment, not leave in place forever or because you don't want to deal with it.
 11-02-24 | 06:28 PM
#25
Senior Member
Joined: Oct 2015
Posts: 16,174
Likes: 9,551
From: PDX
Bikes: Merz x 5 + Specialized Merz Allez x 2, Strawberry/Newlands/DiNucci/Ti x3, Gordon, Fuso/Moulton x2, Bornstein, Paisley,1958-74 Paramounts x3, 3rensho, 74 Moto TC, 73-78 Raleigh Pro's x5, Marinoni x2, 1960 Cinelli SC, 1980 Bianchi SC, PX-10 X 2
Ya that’s the tool they used.
I was taking it off a frame I’m selling and was planning on using the bb for another bike of mine. Had no prob taking off a chorus Italian threaded fixed cup of the same vintage from my other bike, didn’t expect this c-record one to seize up and strip the flats like that, but I didn’t know it was aluminum vs. steel one like the chorus. Lesson learned : /
I was taking it off a frame I’m selling and was planning on using the bb for another bike of mine. Had no prob taking off a chorus Italian threaded fixed cup of the same vintage from my other bike, didn’t expect this c-record one to seize up and strip the flats like that, but I didn’t know it was aluminum vs. steel one like the chorus. Lesson learned : /

