


Campagnolo Rally angle difference
 12-10-24 | 04:41 AM
#1

Thread Starter
Vintage lover
Joined: Jan 2023
Posts: 22
Likes: 13
From: Copenhagen, Denmark
Bikes: 1960's Velo Lang, 1953 Harthiner Sport and a few others
Campagnolo Rally angle difference
Hi
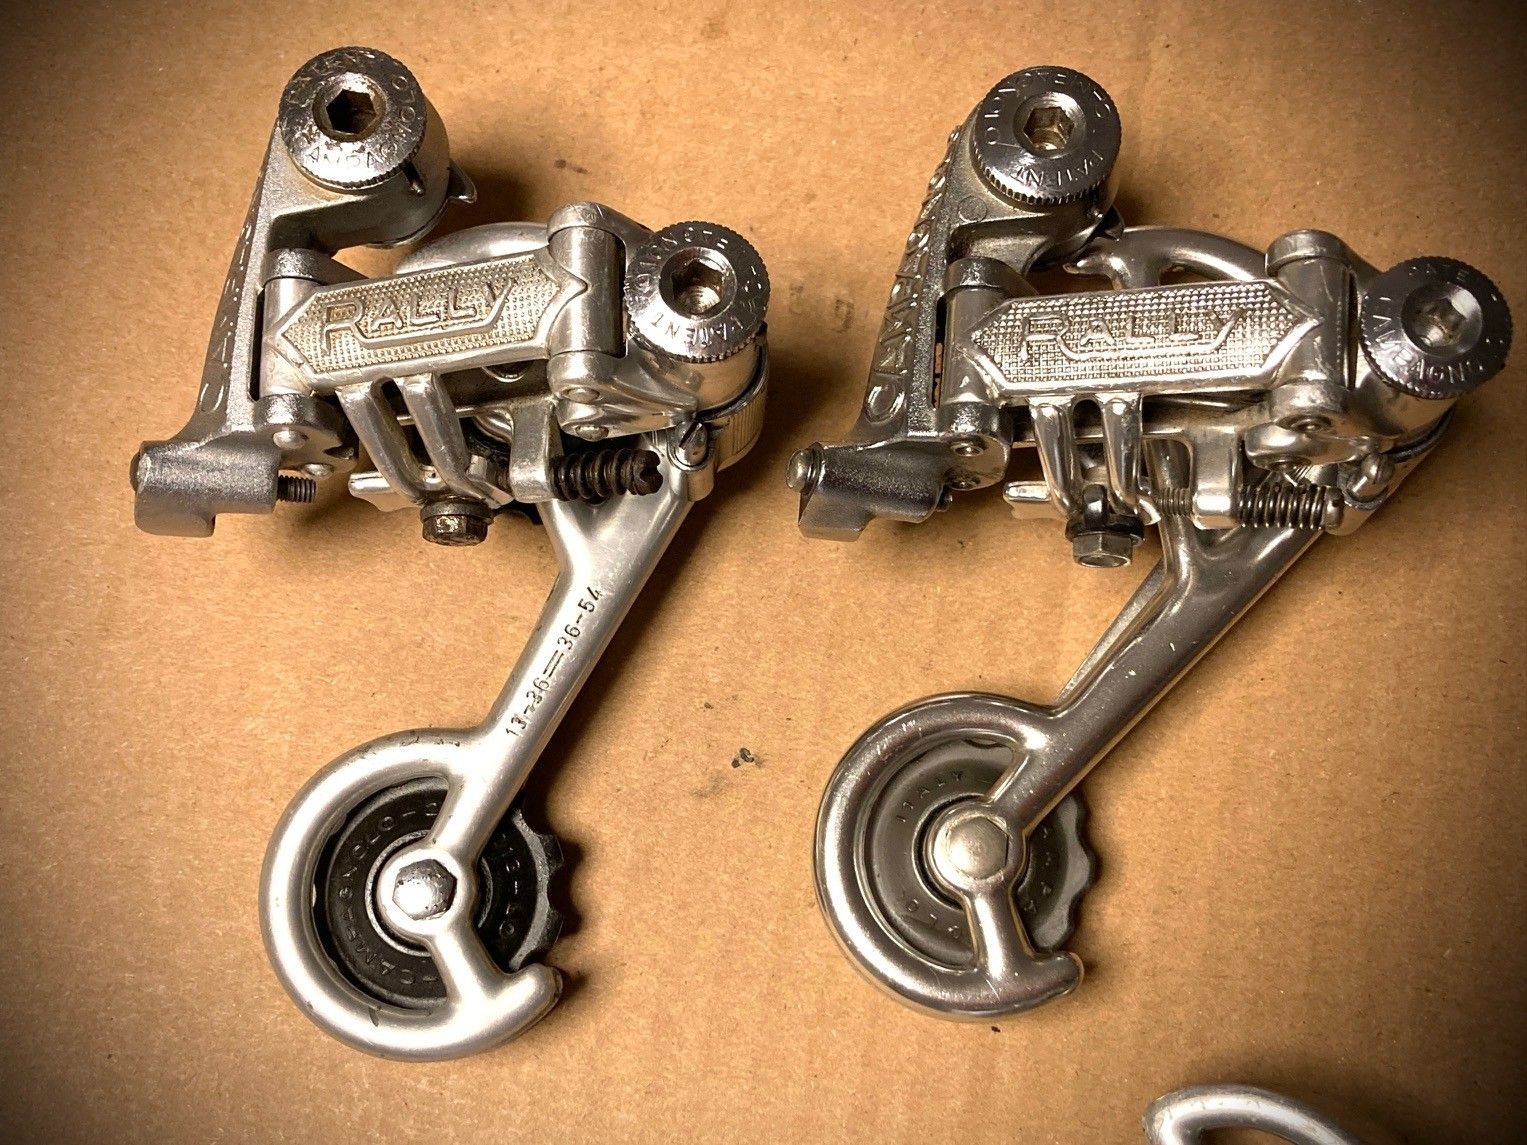
I have a question regarding my Campagnolo Rally rear derailleurs. Why is the left one looking different?
I mean the angle, of the arm. On the left model the arm is behind the derailleur, and on the model to the right it goes down - is it correct, or can it be changed?
- And why is there a difference between them? Does it matter?
Thank you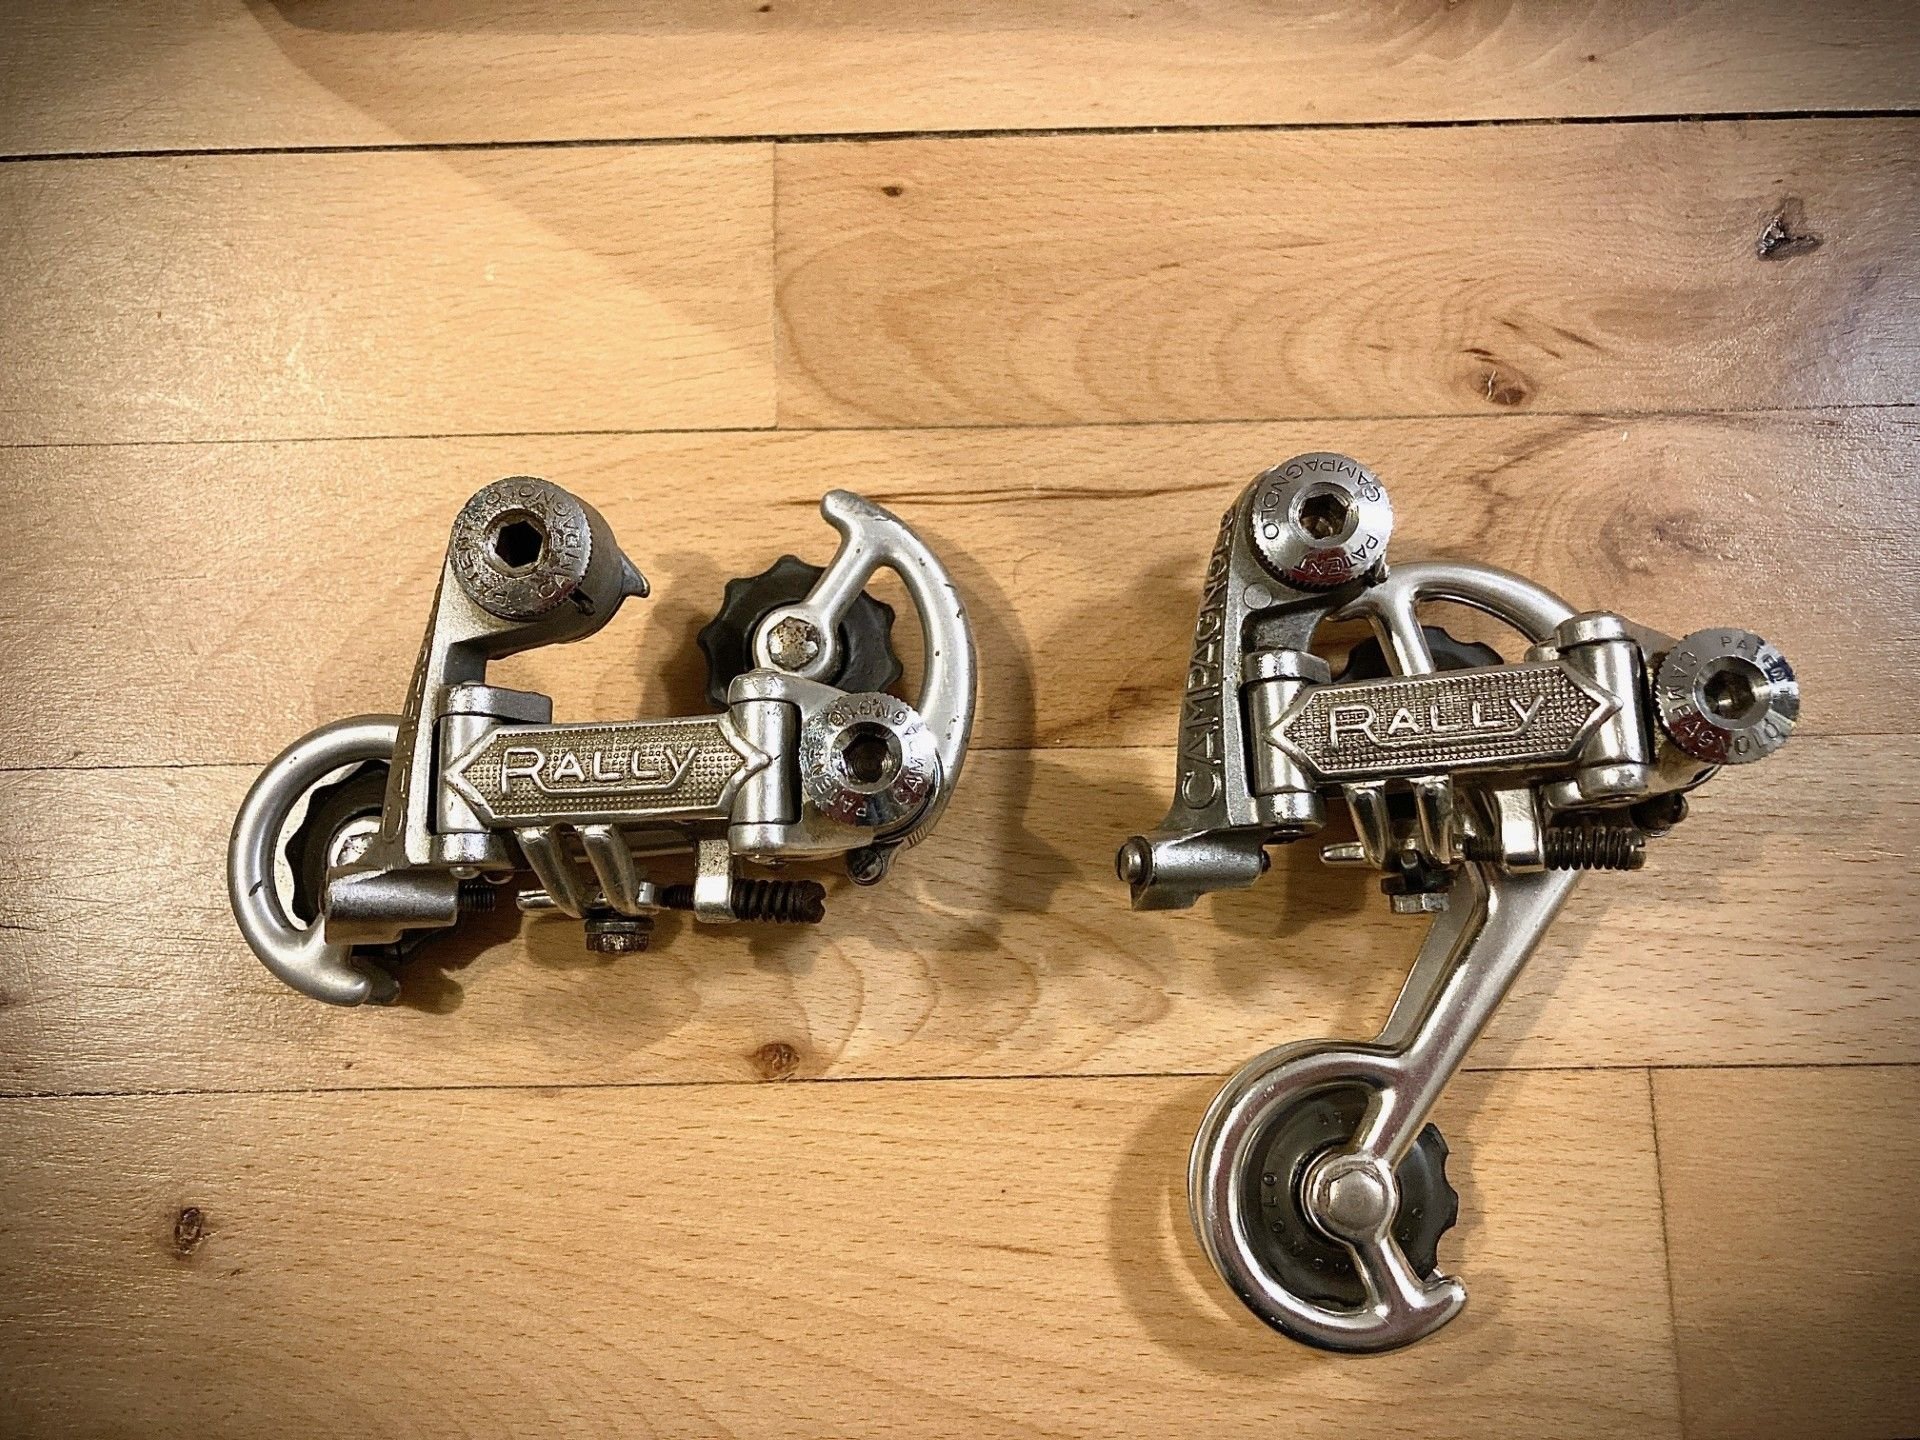


I have a question regarding my Campagnolo Rally rear derailleurs. Why is the left one looking different?
I mean the angle, of the arm. On the left model the arm is behind the derailleur, and on the model to the right it goes down - is it correct, or can it be changed?
- And why is there a difference between them? Does it matter?
Thank you
 12-10-24 | 05:46 AM
#2

Senior Member


Joined: Apr 2009
Posts: 3,785
Likes: 5,636
From: Seattle
To answer that question might take just two minutes* of manipulating them, and likely taking some parts off, partial disassembly — taking them apart just enough to see what's different or wrong. Not something we can do over the internet though.
Here's my best guess though: There are two holes in the cage to take the tail end of the rotation spring. There are also two holes in the spring cover that contains the rotation-stop screw. The tail of the spring should go through the same holes in the spring cap and in the cage. Like if the spring goes through the left hole in the spring cover, then use the left hole in the cage also.
The mech with the unusual (probably incorrect) angle is the older one. You know how to tell which one is older right? We can explain, if not. Anyway on that one, if it's still at a wonky angle after the previous step, try fitting the cage onto the "other" hole, whichever one it's not in now. Just spitballin' here.
Do you know you need to preload the cage-rotation spring, before you put the rotation stop screw back in? There's no way for us to tell from a photo if that has been done.
With that stop screw out, you rotate the bottom of the cage forward like feeding out chain, this makes the spring push back the other way. After you've preloaded it enough that the rotation stop screw location becomes available, put the screw in. Now the cage wants to rotate back the opposite way from your preload, so the stop screw is pressed firmly against the bottom parallelogram "knuckle".
BTW, your older mech has the original top knuckle that is not reinforced below the upper pivot, so it's more prone to breaking there, like if the bike falls over or you shift into the spokes. Treat that one with extra care if you put it on a bike. Unfortunately the reinforced ones, like your newer one, break there a lot too. It's not until you get into really late Rally models (that looked completely different) that you get one with a properly designed upper knuckle. And made of aluminum like God intended, not that weak and heavy Zamak of the first couple generations, a notoriously bad decision on Campy's part.
Going even further from the question you asked:
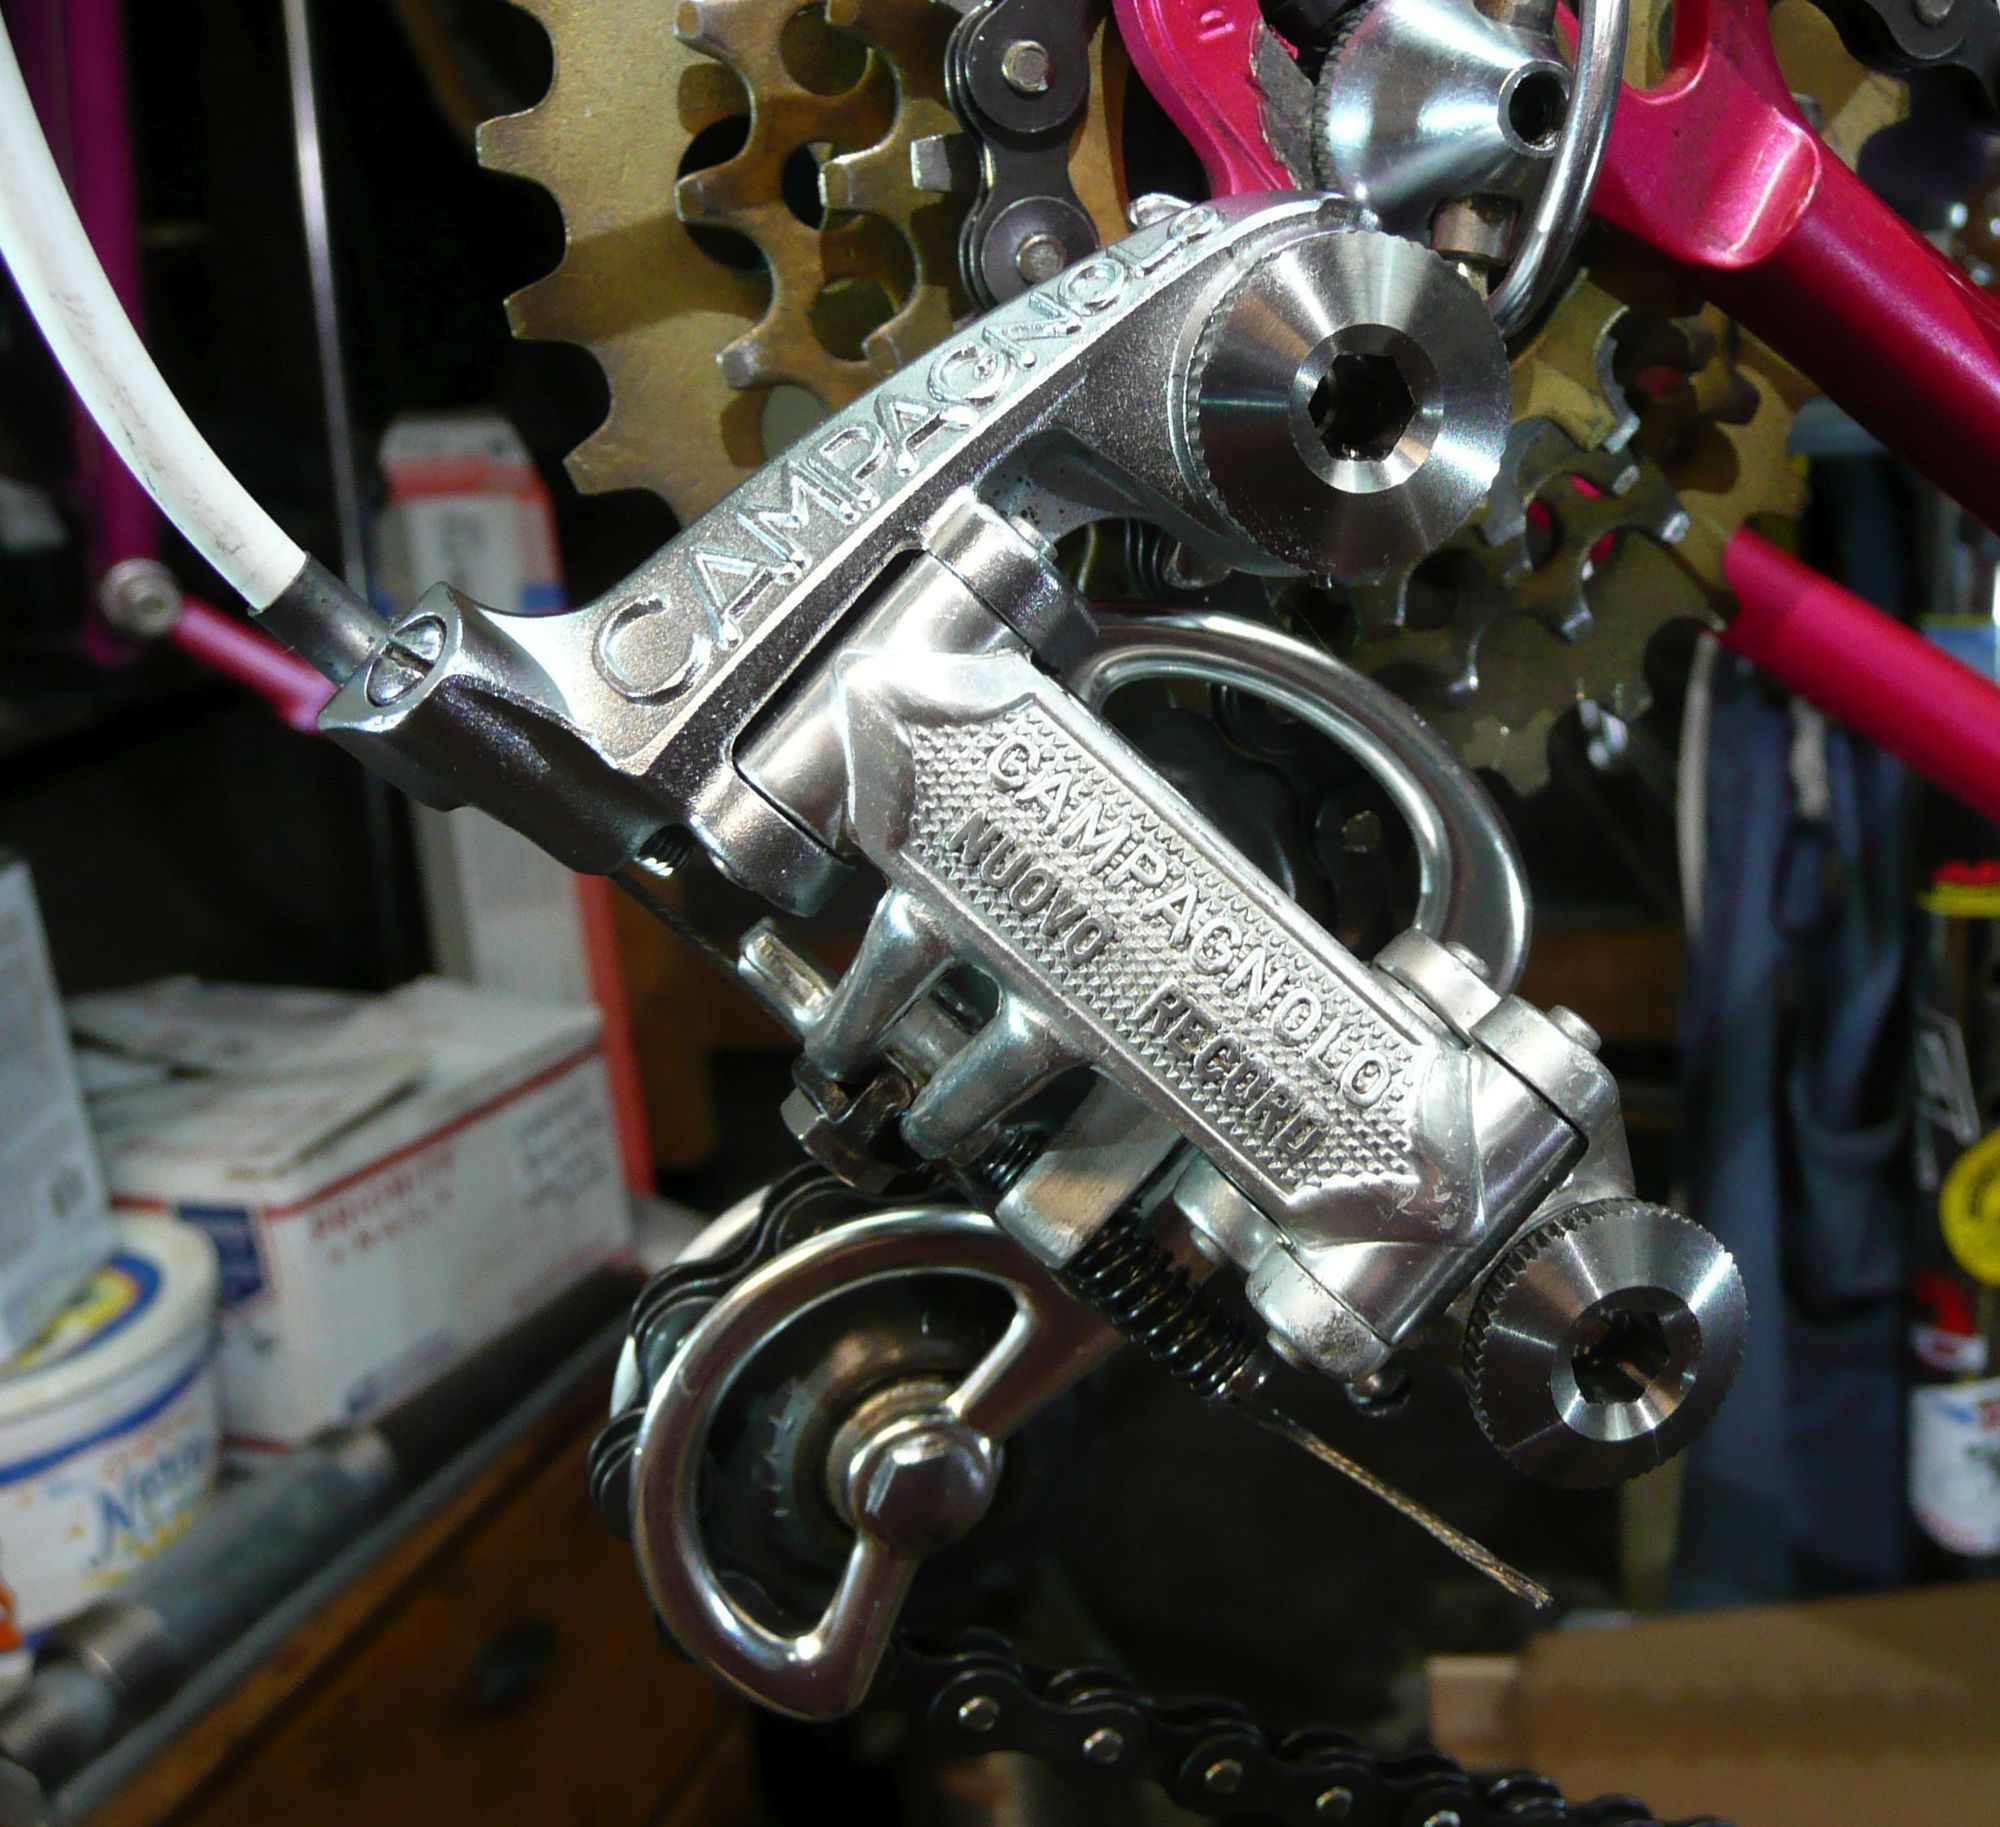
I see the chrome on one or two of your pivot bolt heads is a bit scratched/rusty. Evapo-rust followed by polishing will make them look a lot better (if you care), but not like new, and replacements are pretty much nonexistent. Another option, if you're fancy, is titanium replacement bolts from Jim Merz (if he still has any). I got some 'cuz yeah I'm fancy, and they're beautiful.
Here's my best guess though: There are two holes in the cage to take the tail end of the rotation spring. There are also two holes in the spring cover that contains the rotation-stop screw. The tail of the spring should go through the same holes in the spring cap and in the cage. Like if the spring goes through the left hole in the spring cover, then use the left hole in the cage also.
The mech with the unusual (probably incorrect) angle is the older one. You know how to tell which one is older right? We can explain, if not. Anyway on that one, if it's still at a wonky angle after the previous step, try fitting the cage onto the "other" hole, whichever one it's not in now. Just spitballin' here.
Do you know you need to preload the cage-rotation spring, before you put the rotation stop screw back in? There's no way for us to tell from a photo if that has been done.
With that stop screw out, you rotate the bottom of the cage forward like feeding out chain, this makes the spring push back the other way. After you've preloaded it enough that the rotation stop screw location becomes available, put the screw in. Now the cage wants to rotate back the opposite way from your preload, so the stop screw is pressed firmly against the bottom parallelogram "knuckle".
BTW, your older mech has the original top knuckle that is not reinforced below the upper pivot, so it's more prone to breaking there, like if the bike falls over or you shift into the spokes. Treat that one with extra care if you put it on a bike. Unfortunately the reinforced ones, like your newer one, break there a lot too. It's not until you get into really late Rally models (that looked completely different) that you get one with a properly designed upper knuckle. And made of aluminum like God intended, not that weak and heavy Zamak of the first couple generations, a notoriously bad decision on Campy's part.
Going even further from the question you asked:
I see the chrome on one or two of your pivot bolt heads is a bit scratched/rusty. Evapo-rust followed by polishing will make them look a lot better (if you care), but not like new, and replacements are pretty much nonexistent. Another option, if you're fancy, is titanium replacement bolts from Jim Merz (if he still has any). I got some 'cuz yeah I'm fancy, and they're beautiful.



 12-10-24 | 08:00 AM
#3
Thread Starter
Vintage lover
Joined: Jan 2023
Posts: 22
Likes: 13
From: Copenhagen, Denmark
Bikes: 1960's Velo Lang, 1953 Harthiner Sport and a few others
Hi Bulgie
Thank you for the explanation. I will try to explain as well as possible in English.
Your Rally looks great with the titanium bolts, your model looks a little different with the Record letters on it, is it modified with parts from other campagnolo models?
First, I have read and seen pictures online that the difference between the two is: the reinforcement at the back, (the one without is the oldest, as you also mention) and then I can see that the oldest has campagnolo letters on the back and has numbers engravedon the arm, the new one doesn't have it. Thats the only things I know.
The "newest" model of the two rally´s, I know it has never been taken apart, as it has been sitting on a one owner bike from 1983 that has been in a garage for 40 years.
- It feels right and have a great tension / pre-load.
The slightly older model I had bought second hand, and I thought the angle of the arm looked a little wrong, without being an expert, but I bought it anyway. I don't know the history, so it may very well have been taken apart over the years.
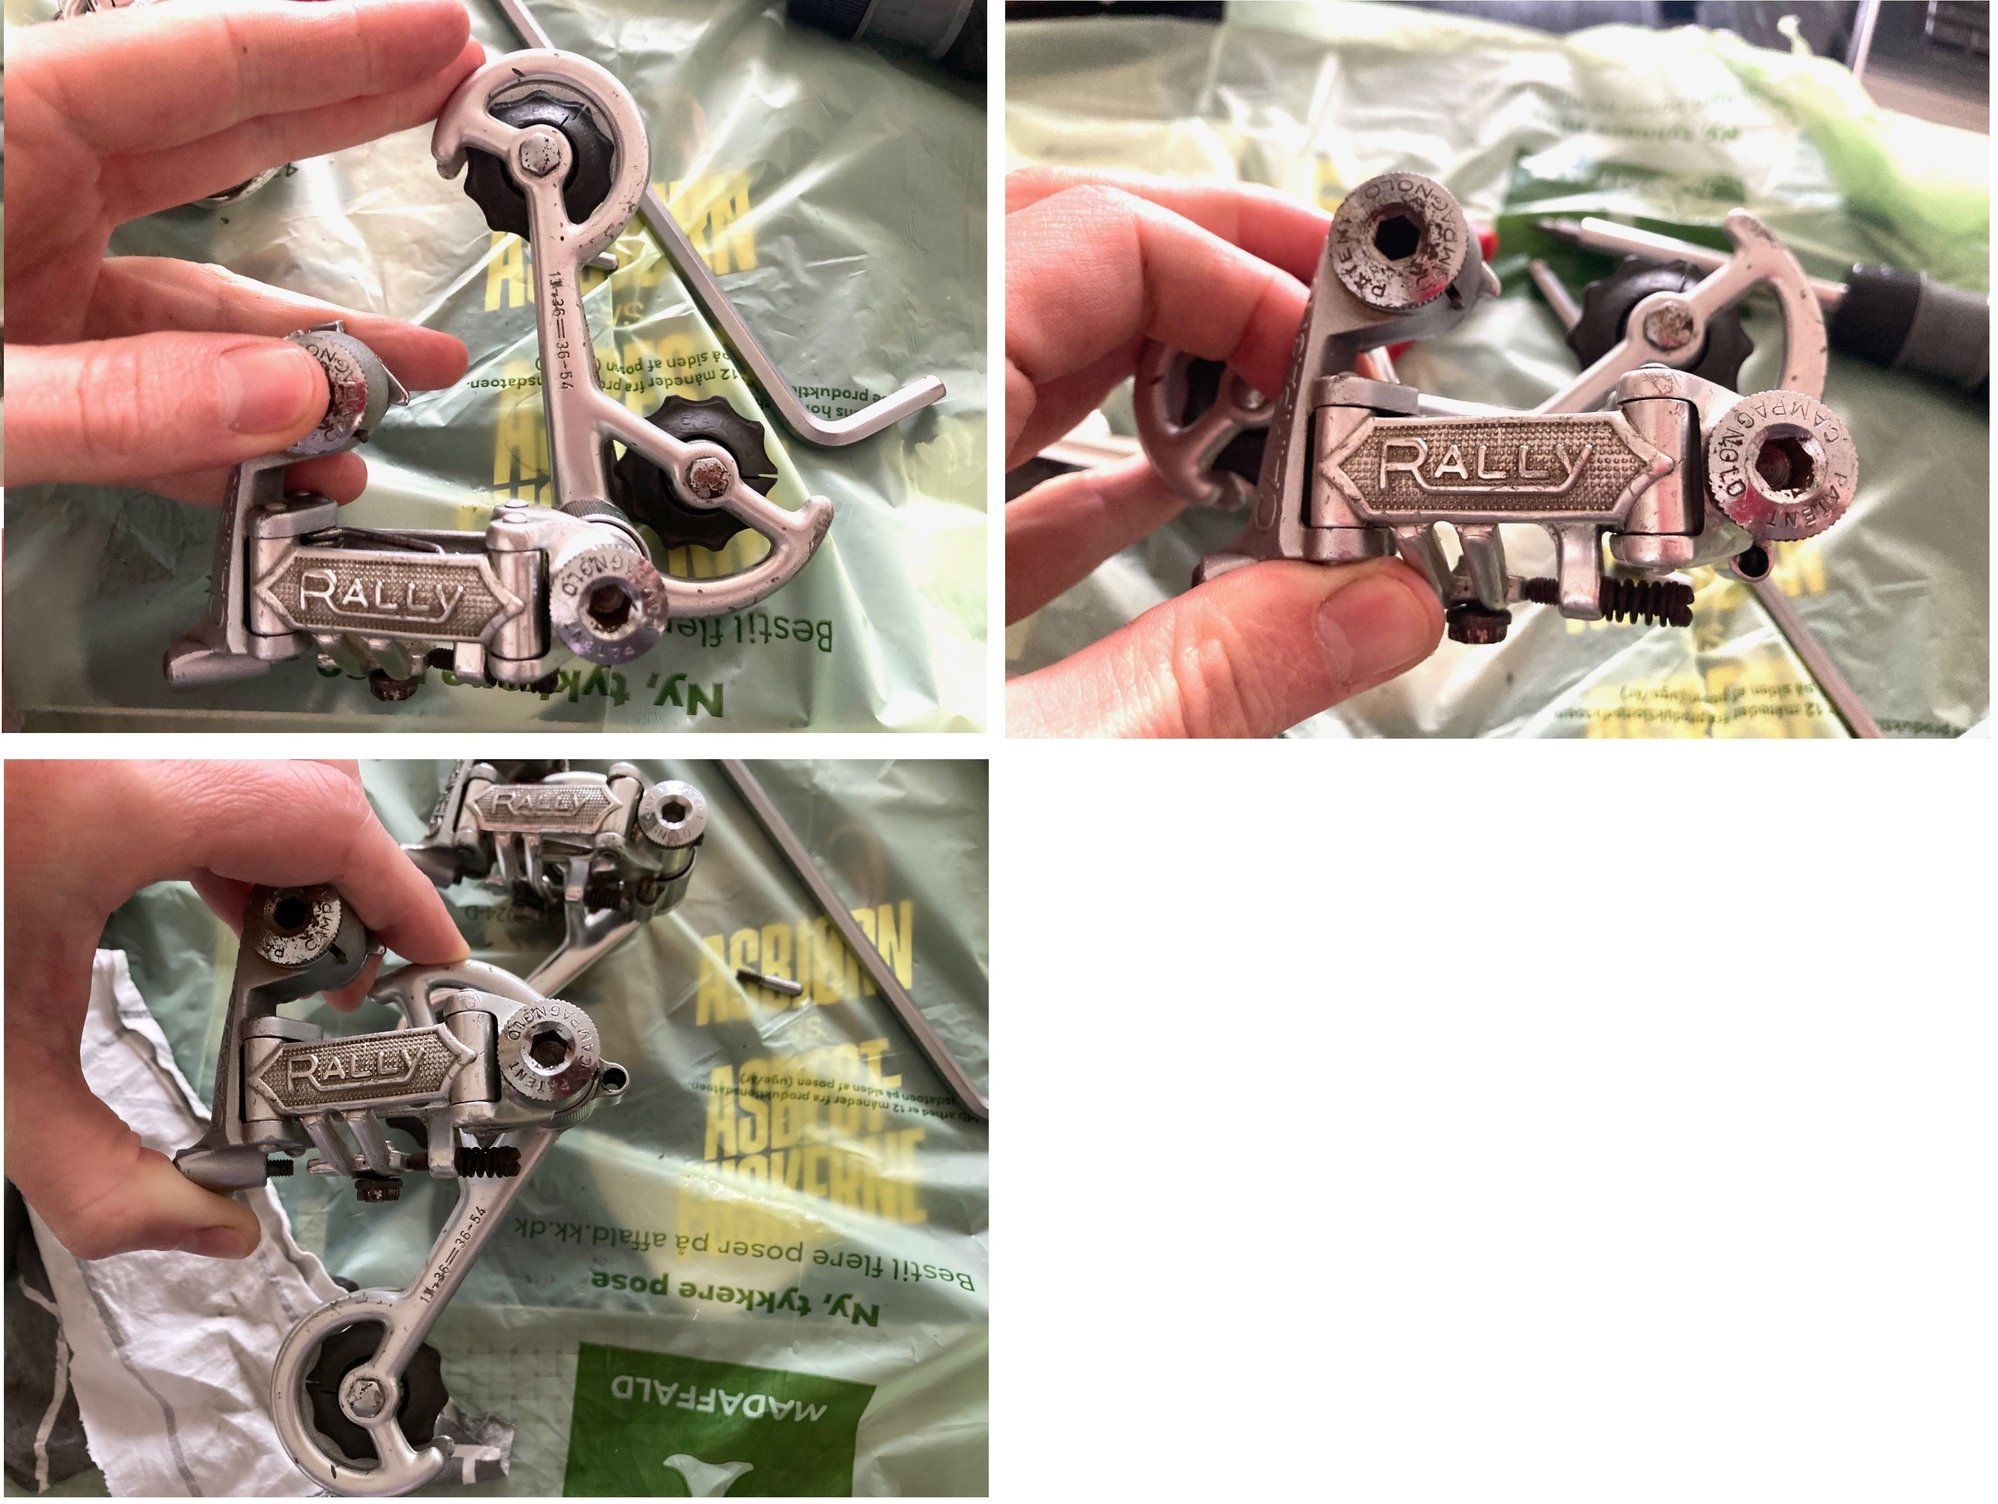
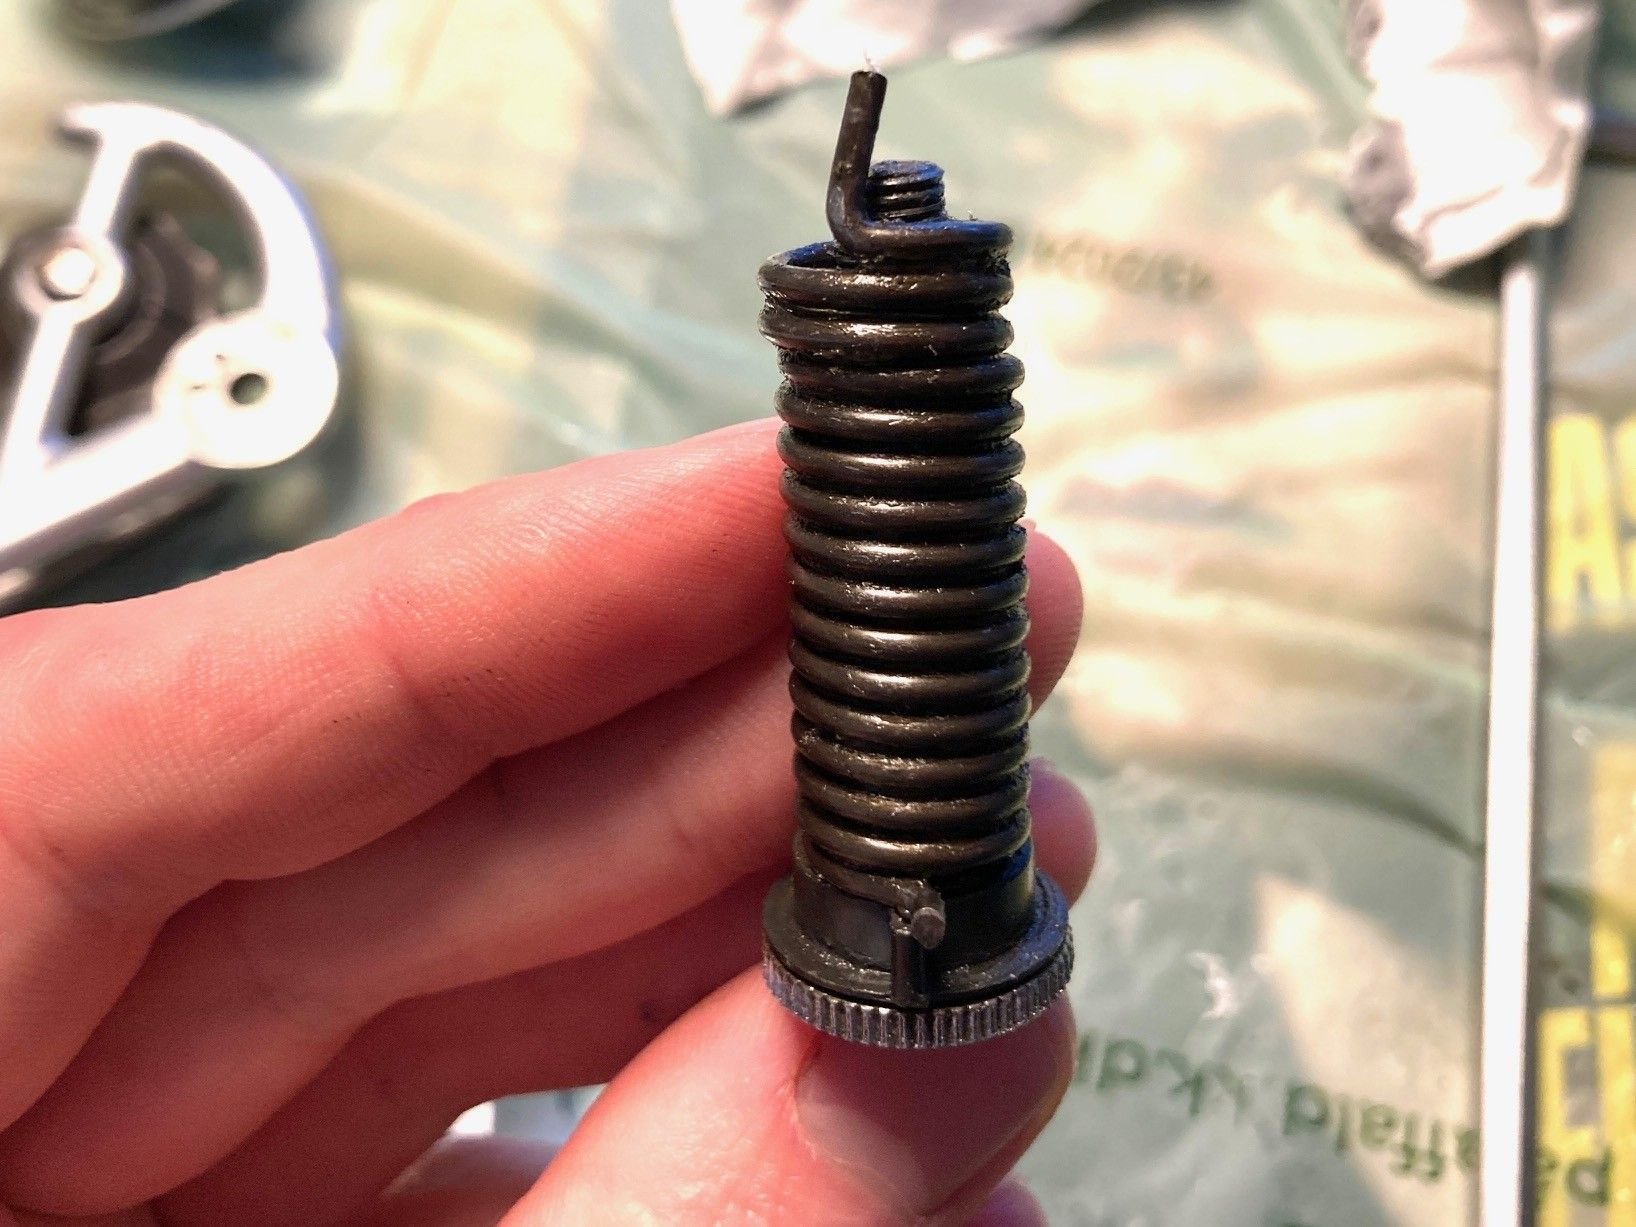
I just tried to take it apart. It feels like it have to much pressure / load compared to the other rally, although the arm does not turn all the way down as it should, if I move it more forwards its very hard, I think the arm with the spring has been turned to much around or 1-1½ turn? Otherwise it totally loose, but still not in the right position.
I tried to change it in the hole, and it does not help. I can't get the arm to turn downwards and fit the correct place where the stop-screw is.
The arm has a lot of pre-load, or otherwise is complety loose.. The spring looks i bit worn out??
.


Thank you for the explanation. I will try to explain as well as possible in English.
Your Rally looks great with the titanium bolts, your model looks a little different with the Record letters on it, is it modified with parts from other campagnolo models?
First, I have read and seen pictures online that the difference between the two is: the reinforcement at the back, (the one without is the oldest, as you also mention) and then I can see that the oldest has campagnolo letters on the back and has numbers engravedon the arm, the new one doesn't have it. Thats the only things I know.
The "newest" model of the two rally´s, I know it has never been taken apart, as it has been sitting on a one owner bike from 1983 that has been in a garage for 40 years.
- It feels right and have a great tension / pre-load.
The slightly older model I had bought second hand, and I thought the angle of the arm looked a little wrong, without being an expert, but I bought it anyway. I don't know the history, so it may very well have been taken apart over the years.
I just tried to take it apart. It feels like it have to much pressure / load compared to the other rally, although the arm does not turn all the way down as it should, if I move it more forwards its very hard, I think the arm with the spring has been turned to much around or 1-1½ turn? Otherwise it totally loose, but still not in the right position.
I tried to change it in the hole, and it does not help. I can't get the arm to turn downwards and fit the correct place where the stop-screw is.
The arm has a lot of pre-load, or otherwise is complety loose.. The spring looks i bit worn out??
.
 12-10-24 | 09:21 AM
#6

Old fart

Joined: Nov 2004
Posts: 26,401
Likes: 5,333
From: Appleton WI
Bikes: Several, mostly not name brands.
Hi
I have a question regarding my Campagnolo Rally rear derailleurs. Why is the left one looking different?
I mean the angle, of the arm. On the left model the arm is behind the derailleur, and on the model to the right it goes down - is it correct, or can it be changed?
- And why is there a difference between them? Does it matter?
Thank you
I have a question regarding my Campagnolo Rally rear derailleurs. Why is the left one looking different?
I mean the angle, of the arm. On the left model the arm is behind the derailleur, and on the model to the right it goes down - is it correct, or can it be changed?
- And why is there a difference between them? Does it matter?
Thank you
 12-10-24 | 09:52 AM
#7
Thread Starter
Vintage lover
Joined: Jan 2023
Posts: 22
Likes: 13
From: Copenhagen, Denmark
Bikes: 1960's Velo Lang, 1953 Harthiner Sport and a few others
 12-10-24 | 10:05 AM
#8

To answer that question might take just two minutes* of manipulating them, and likely taking some parts off, partial disassembly — taking them apart just enough to see what's different or wrong. Not something we can do over the internet though.
Here's my best guess though: There are two holes in the cage to take the tail end of the rotation spring. There are also two holes in the spring cover that contains the rotation-stop screw. The tail of the spring should go through the same holes in the spring cap and in the cage. Like if the spring goes through the left hole in the spring cover, then use the left hole in the cage also.
The mech with the unusual (probably incorrect) angle is the older one. You know how to tell which one is older right? We can explain, if not. Anyway on that one, if it's still at a wonky angle after the previous step, try fitting the cage onto the "other" hole, whichever one it's not in now. Just spitballin' here.
Do you know you need to preload the cage-rotation spring, before you put the rotation stop screw back in? There's no way for us to tell from a photo if that has been done.
With that stop screw out, you rotate the bottom of the cage forward like feeding out chain, this makes the spring push back the other way. After you've preloaded it enough that the rotation stop screw location becomes available, put the screw in. Now the cage wants to rotate back the opposite way from your preload, so the stop screw is pressed firmly against the bottom parallelogram "knuckle".
BTW, your older mech has the original top knuckle that is not reinforced below the upper pivot, so it's more prone to breaking there, like if the bike falls over or you shift into the spokes. Treat that one with extra care if you put it on a bike. Unfortunately the reinforced ones, like your newer one, break there a lot too. It's not until you get into really late Rally models (that looked completely different) that you get one with a properly designed upper knuckle. And made of aluminum like God intended, not that weak and heavy Zamak of the first couple generations, a notoriously bad decision on Campy's part.
Going even further from the question you asked:
I see the chrome on one or two of your pivot bolt heads is a bit scratched/rusty. Evapo-rust followed by polishing will make them look a lot better (if you care), but not like new, and replacements are pretty much nonexistent. Another option, if you're fancy, is titanium replacement bolts from Jim Merz (if he still has any). I got some 'cuz yeah I'm fancy, and they're beautiful.
Here's my best guess though: There are two holes in the cage to take the tail end of the rotation spring. There are also two holes in the spring cover that contains the rotation-stop screw. The tail of the spring should go through the same holes in the spring cap and in the cage. Like if the spring goes through the left hole in the spring cover, then use the left hole in the cage also.
The mech with the unusual (probably incorrect) angle is the older one. You know how to tell which one is older right? We can explain, if not. Anyway on that one, if it's still at a wonky angle after the previous step, try fitting the cage onto the "other" hole, whichever one it's not in now. Just spitballin' here.
Do you know you need to preload the cage-rotation spring, before you put the rotation stop screw back in? There's no way for us to tell from a photo if that has been done.
With that stop screw out, you rotate the bottom of the cage forward like feeding out chain, this makes the spring push back the other way. After you've preloaded it enough that the rotation stop screw location becomes available, put the screw in. Now the cage wants to rotate back the opposite way from your preload, so the stop screw is pressed firmly against the bottom parallelogram "knuckle".
BTW, your older mech has the original top knuckle that is not reinforced below the upper pivot, so it's more prone to breaking there, like if the bike falls over or you shift into the spokes. Treat that one with extra care if you put it on a bike. Unfortunately the reinforced ones, like your newer one, break there a lot too. It's not until you get into really late Rally models (that looked completely different) that you get one with a properly designed upper knuckle. And made of aluminum like God intended, not that weak and heavy Zamak of the first couple generations, a notoriously bad decision on Campy's part.
Going even further from the question you asked:
I see the chrome on one or two of your pivot bolt heads is a bit scratched/rusty. Evapo-rust followed by polishing will make them look a lot better (if you care), but not like new, and replacements are pretty much nonexistent. Another option, if you're fancy, is titanium replacement bolts from Jim Merz (if he still has any). I got some 'cuz yeah I'm fancy, and they're beautiful.
12-10-24 | 05:57 PM
#9
Senior Member
Joined: Apr 2009
Posts: 3,785
Likes: 5,636
From: Seattle
But no thanks, I have enough derailers now.
 12-10-24 | 06:05 PM
#10
Senior Member
Joined: Apr 2009
Posts: 3,785
Likes: 5,636
From: Seattle
Hi Bulgie
Thank you for the explanation. I will try to explain as well as possible in English.
Your Rally looks great with the titanium bolts, your model looks a little different with the Record letters on it, is it modified with parts from other campagnolo models?
First, I have read and seen pictures online that the difference between the two is: the reinforcement at the back, (the one without is the oldest, as you also mention) and then I can see that the oldest has campagnolo letters on the back and has numbers engravedon the arm, the new one doesn't have it. Thats the only things I know.
The "newest" model of the two rally´s, I know it has never been taken apart, as it has been sitting on a one owner bike from 1983 that has been in a garage for 40 years.
- It feels right and have a great tension / pre-load.
The slightly older model I had bought second hand, and I thought the angle of the arm looked a little wrong, without being an expert, but I bought it anyway. I don't know the history, so it may very well have been taken apart over the years.
I just tried to take it apart. It feels like it have to much pressure / load compared to the other rally, although the arm does not turn all the way down as it should, if I move it more forwards its very hard, I think the arm with the spring has been turned to much around or 1-1½ turn? Otherwise it totally loose, but still not in the right position.
I tried to change it in the hole, and it does not help. I can't get the arm to turn downwards and fit the correct place where the stop-screw is.
The arm has a lot of pre-load, or otherwise is complety loose.. The spring looks i bit worn out??
.
Thank you for the explanation. I will try to explain as well as possible in English.
Your Rally looks great with the titanium bolts, your model looks a little different with the Record letters on it, is it modified with parts from other campagnolo models?
First, I have read and seen pictures online that the difference between the two is: the reinforcement at the back, (the one without is the oldest, as you also mention) and then I can see that the oldest has campagnolo letters on the back and has numbers engravedon the arm, the new one doesn't have it. Thats the only things I know.
The "newest" model of the two rally´s, I know it has never been taken apart, as it has been sitting on a one owner bike from 1983 that has been in a garage for 40 years.
- It feels right and have a great tension / pre-load.
The slightly older model I had bought second hand, and I thought the angle of the arm looked a little wrong, without being an expert, but I bought it anyway. I don't know the history, so it may very well have been taken apart over the years.
I just tried to take it apart. It feels like it have to much pressure / load compared to the other rally, although the arm does not turn all the way down as it should, if I move it more forwards its very hard, I think the arm with the spring has been turned to much around or 1-1½ turn? Otherwise it totally loose, but still not in the right position.
I tried to change it in the hole, and it does not help. I can't get the arm to turn downwards and fit the correct place where the stop-screw is.
The arm has a lot of pre-load, or otherwise is complety loose.. The spring looks i bit worn out??
.
The weird mismatch between your cage and the spring cover angle may mean one of those parts has its holes drilled in the wrong place. (Did they change the location of those holes, from the older to newer production? I wasn't aware, if that's the case.) Take the other one apart too and see if you can see which part is different from the others. Drilling one new hole in the right place will probably fix it. Drilling the spring cover will be eaiser, since the cage has that steel nut that's pressed in place, wich causes the drill to come through partly in the steel and partly in the soft alloy. That makes the drill want to wander, potentially catching or snapping from the side load. Obviously do-able, but I'd still choose to drill the spring cap.
12-11-24 | 07:22 PM
#11
Senior Member

Joined: Sep 2014
Posts: 1,363
Likes: 456
From: Baton Rouge La
Specier I have two Rally derailleurs. They look just like the two in your first picture. The angle of the cage is different - just like yours.
On the one that looks like yours on the left I:
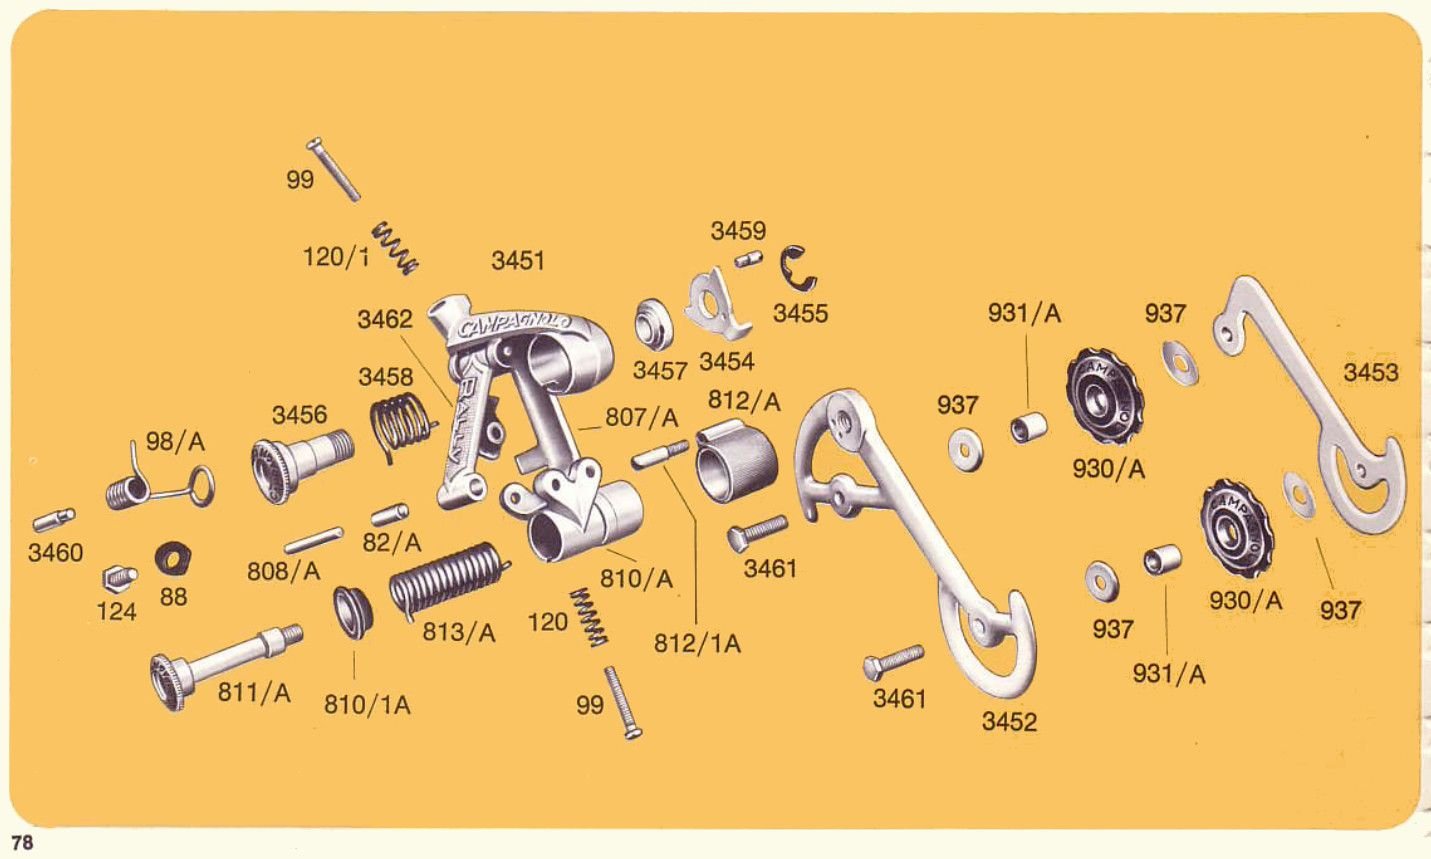
1. Rotating the cage away from the stop, removed the stop screw 812/1A, and let the cage completely unwind, clockwise viewed from the front, pushing the parallelogram out of the way as it unwinds.
2. Removed cage by removing bolt 811/A.
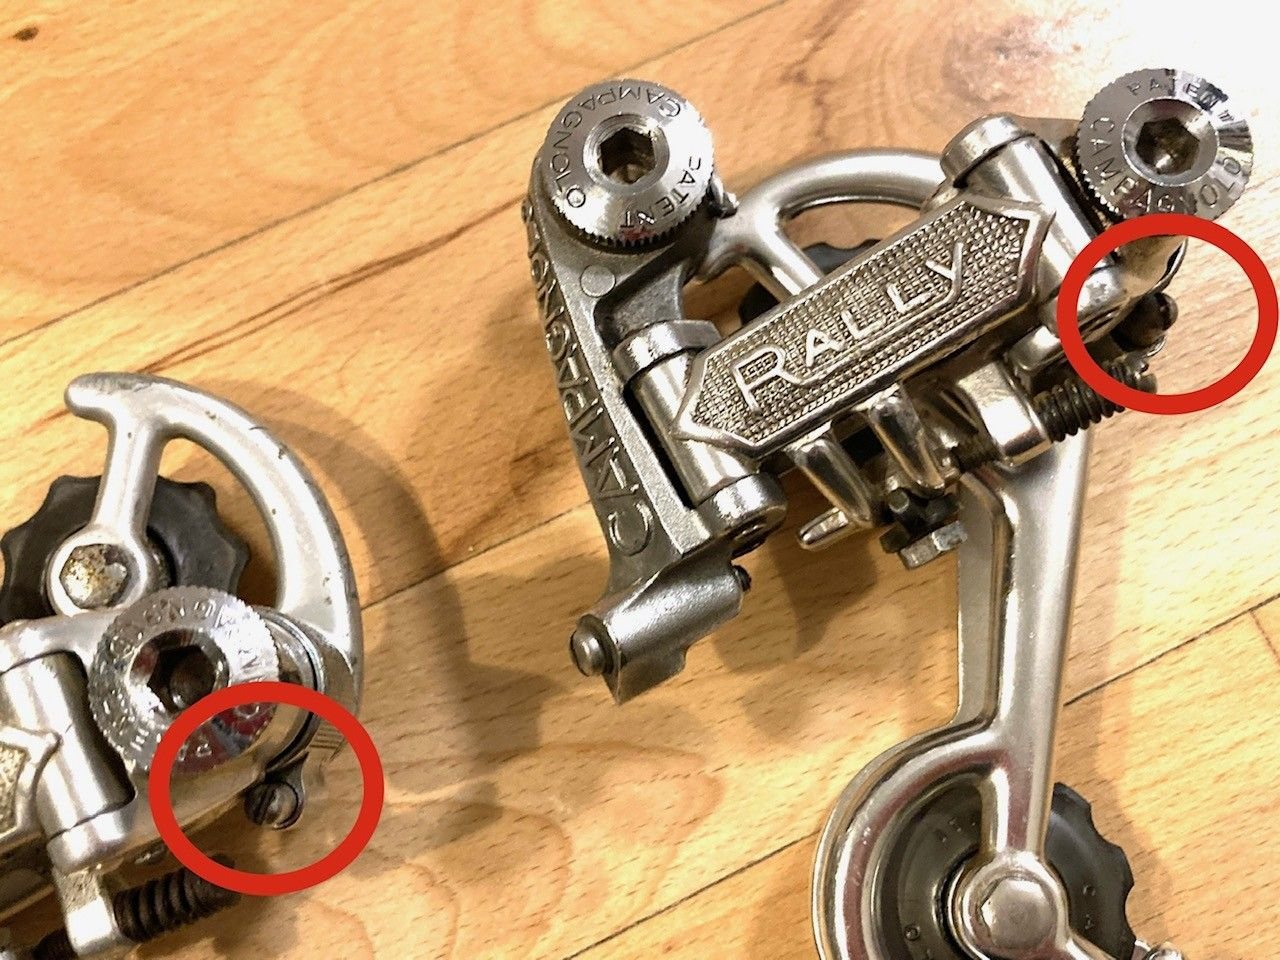
3. Re-assembled it, with the spring in the top hole, when viewed from the back in your second picture on the right. Mine was in the lower hole to begin with.
4. Wound the cage about 1/2 turn counter clockwise, viewed from the front, and installed the stop screw as soon as it cleared the stop.
Now it looks like yours in your first picture on the right.
Hope this somehow helps.
Looking at my spring cover from the back, the spring is in the lower hole - when oriented as in your second picture on he right. The holes in my spring cover are oriented the same as yours in relation to the stop screw as show in the first picture of your second post.
Changing which hole the spring is in, in the cage, changes the angle of the cage approximately 45 degrees, in relation to the stop.
Changing which hole the spring is in, in the spring cover, changes the cage spring tension.
On the one that looks like yours on the left I:
1. Rotating the cage away from the stop, removed the stop screw 812/1A, and let the cage completely unwind, clockwise viewed from the front, pushing the parallelogram out of the way as it unwinds.
2. Removed cage by removing bolt 811/A.
3. Re-assembled it, with the spring in the top hole, when viewed from the back in your second picture on the right. Mine was in the lower hole to begin with.
4. Wound the cage about 1/2 turn counter clockwise, viewed from the front, and installed the stop screw as soon as it cleared the stop.
Now it looks like yours in your first picture on the right.
Hope this somehow helps.
Looking at my spring cover from the back, the spring is in the lower hole - when oriented as in your second picture on he right. The holes in my spring cover are oriented the same as yours in relation to the stop screw as show in the first picture of your second post.
Changing which hole the spring is in, in the cage, changes the angle of the cage approximately 45 degrees, in relation to the stop.
Changing which hole the spring is in, in the spring cover, changes the cage spring tension.
Last edited by Hobbiano; 12-11-24 at 08:09 PM. Reason: addition
12-12-24 | 04:40 PM
#12
Thread Starter
Vintage lover
Joined: Jan 2023
Posts: 22
Likes: 13
From: Copenhagen, Denmark
Bikes: 1960's Velo Lang, 1953 Harthiner Sport and a few others
Sorry I don't have time to fully analyze all that, but I will say that bent spring can be replaced, probably easier than straightening it. It's the same spring as on NR, Nuovo Gran Sport, "980" and a couple others. Shouldn't be hard to find a usable replacement, like cannibalizing a crashed/bent NR.
The weird mismatch between your cage and the spring cover angle may mean one of those parts has its holes drilled in the wrong place. (Did they change the location of those holes, from the older to newer production? I wasn't aware, if that's the case.) Take the other one apart too and see if you can see which part is different from the others. Drilling one new hole in the right place will probably fix it. Drilling the spring cover will be eaiser, since the cage has that steel nut that's pressed in place, wich causes the drill to come through partly in the steel and partly in the soft alloy. That makes the drill want to wander, potentially catching or snapping from the side load. Obviously do-able, but I'd still choose to drill the spring cap.
The weird mismatch between your cage and the spring cover angle may mean one of those parts has its holes drilled in the wrong place. (Did they change the location of those holes, from the older to newer production? I wasn't aware, if that's the case.) Take the other one apart too and see if you can see which part is different from the others. Drilling one new hole in the right place will probably fix it. Drilling the spring cover will be eaiser, since the cage has that steel nut that's pressed in place, wich causes the drill to come through partly in the steel and partly in the soft alloy. That makes the drill want to wander, potentially catching or snapping from the side load. Obviously do-able, but I'd still choose to drill the spring cap.
also trying to buy a new spring as it is definitely worn out .
12-12-24 | 04:59 PM
#13
Thread Starter
Vintage lover
Joined: Jan 2023
Posts: 22
Likes: 13
From: Copenhagen, Denmark
Bikes: 1960's Velo Lang, 1953 Harthiner Sport and a few others
Specier I have two Rally derailleurs. They look just like the two in your first picture. The angle of the cage is different - just like yours.
On the one that looks like yours on the left I:
1. Rotating the cage away from the stop, removed the stop screw 812/1A, and let the cage completely unwind, clockwise viewed from the front, pushing the parallelogram out of the way as it unwinds.
2. Removed cage by removing bolt 811/A.
3. Re-assembled it, with the spring in the top hole, when viewed from the back in your second picture on the right. Mine was in the lower hole to begin with.
4. Wound the cage about 1/2 turn counter clockwise, viewed from the front, and installed the stop screw as soon as it cleared the stop.
Now it looks like yours in your first picture on the right.
Hope this somehow helps.
Looking at my spring cover from the back, the spring is in the lower hole - when oriented as in your second picture on he right. The holes in my spring cover are oriented the same as yours in relation to the stop screw as show in the first picture of your second post.
Changing which hole the spring is in, in the cage, changes the angle of the cage approximately 45 degrees, in relation to the stop.
Changing which hole the spring is in, in the spring cover, changes the cage spring tension.
On the one that looks like yours on the left I:
1. Rotating the cage away from the stop, removed the stop screw 812/1A, and let the cage completely unwind, clockwise viewed from the front, pushing the parallelogram out of the way as it unwinds.
2. Removed cage by removing bolt 811/A.
3. Re-assembled it, with the spring in the top hole, when viewed from the back in your second picture on the right. Mine was in the lower hole to begin with.
4. Wound the cage about 1/2 turn counter clockwise, viewed from the front, and installed the stop screw as soon as it cleared the stop.
Now it looks like yours in your first picture on the right.
Hope this somehow helps.
Looking at my spring cover from the back, the spring is in the lower hole - when oriented as in your second picture on he right. The holes in my spring cover are oriented the same as yours in relation to the stop screw as show in the first picture of your second post.
Changing which hole the spring is in, in the cage, changes the angle of the cage approximately 45 degrees, in relation to the stop.
Changing which hole the spring is in, in the spring cover, changes the cage spring tension.
thanks for the detailed description. well explained

I will try to follow your description
I am waiting for a new spring from eBay, and it will probably help with the tension. and if i can get the arm in place with your guide then it will be good
so far I would like to thank you all for the nice messages and suggestions

I will update as soon I had tried and let you know
Last edited by Specier; 12-12-24 at 05:47 PM.
12-19-24 | 04:25 AM
#14
Thread Starter
Vintage lover
Joined: Jan 2023
Posts: 22
Likes: 13
From: Copenhagen, Denmark
Bikes: 1960's Velo Lang, 1953 Harthiner Sport and a few others
I have taken apart both rally rear derailleurs, I had an second hand nuovo record in the basement, I took the spring and put it in the rally and followed the steps to assemble it as described -It helped!
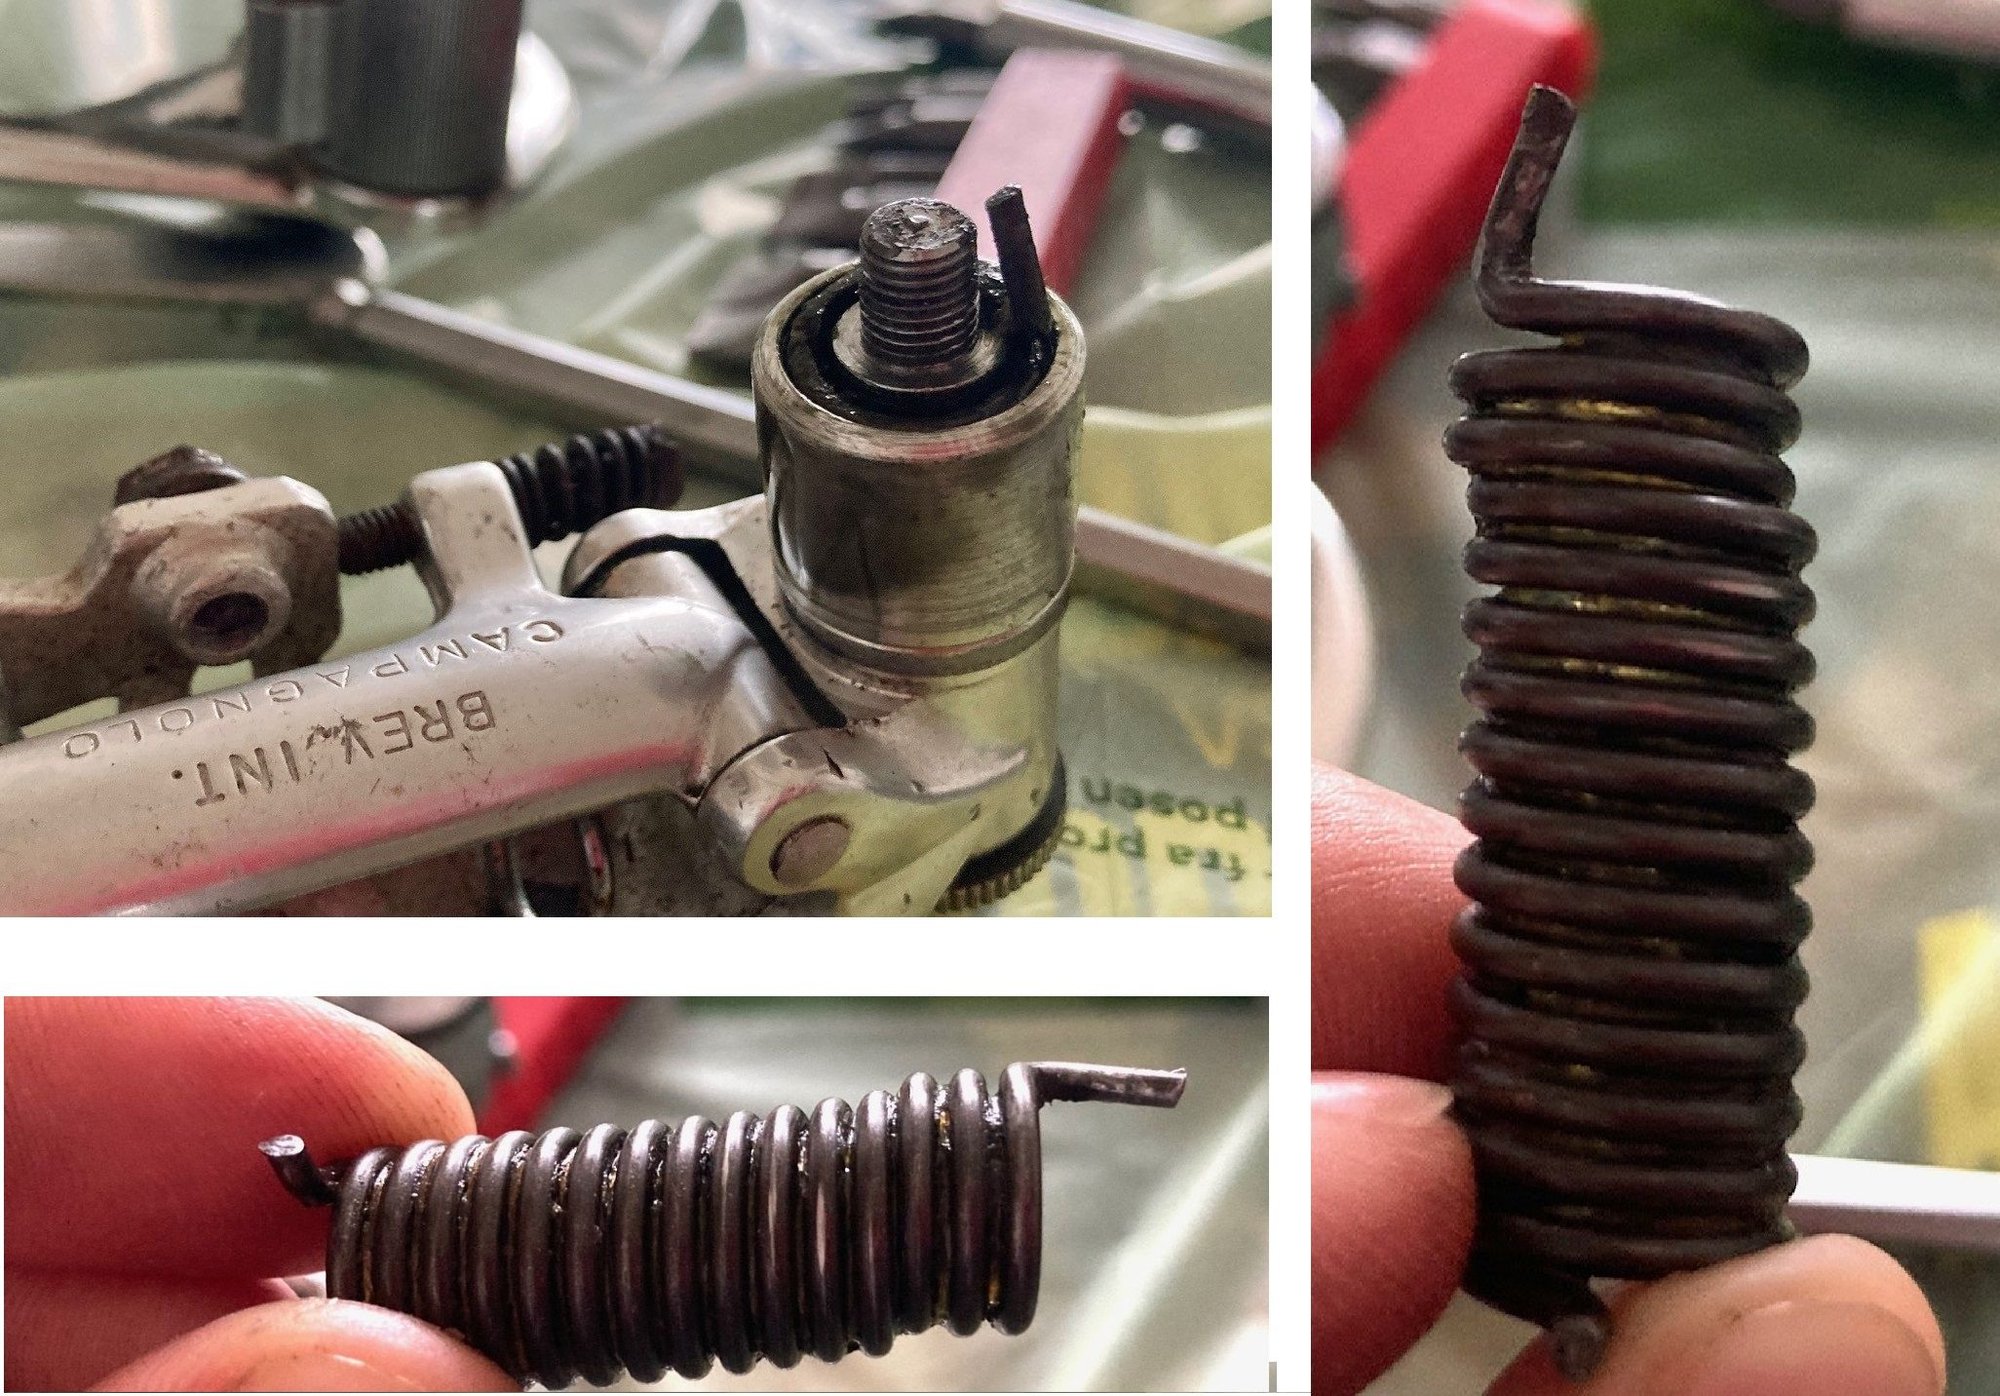
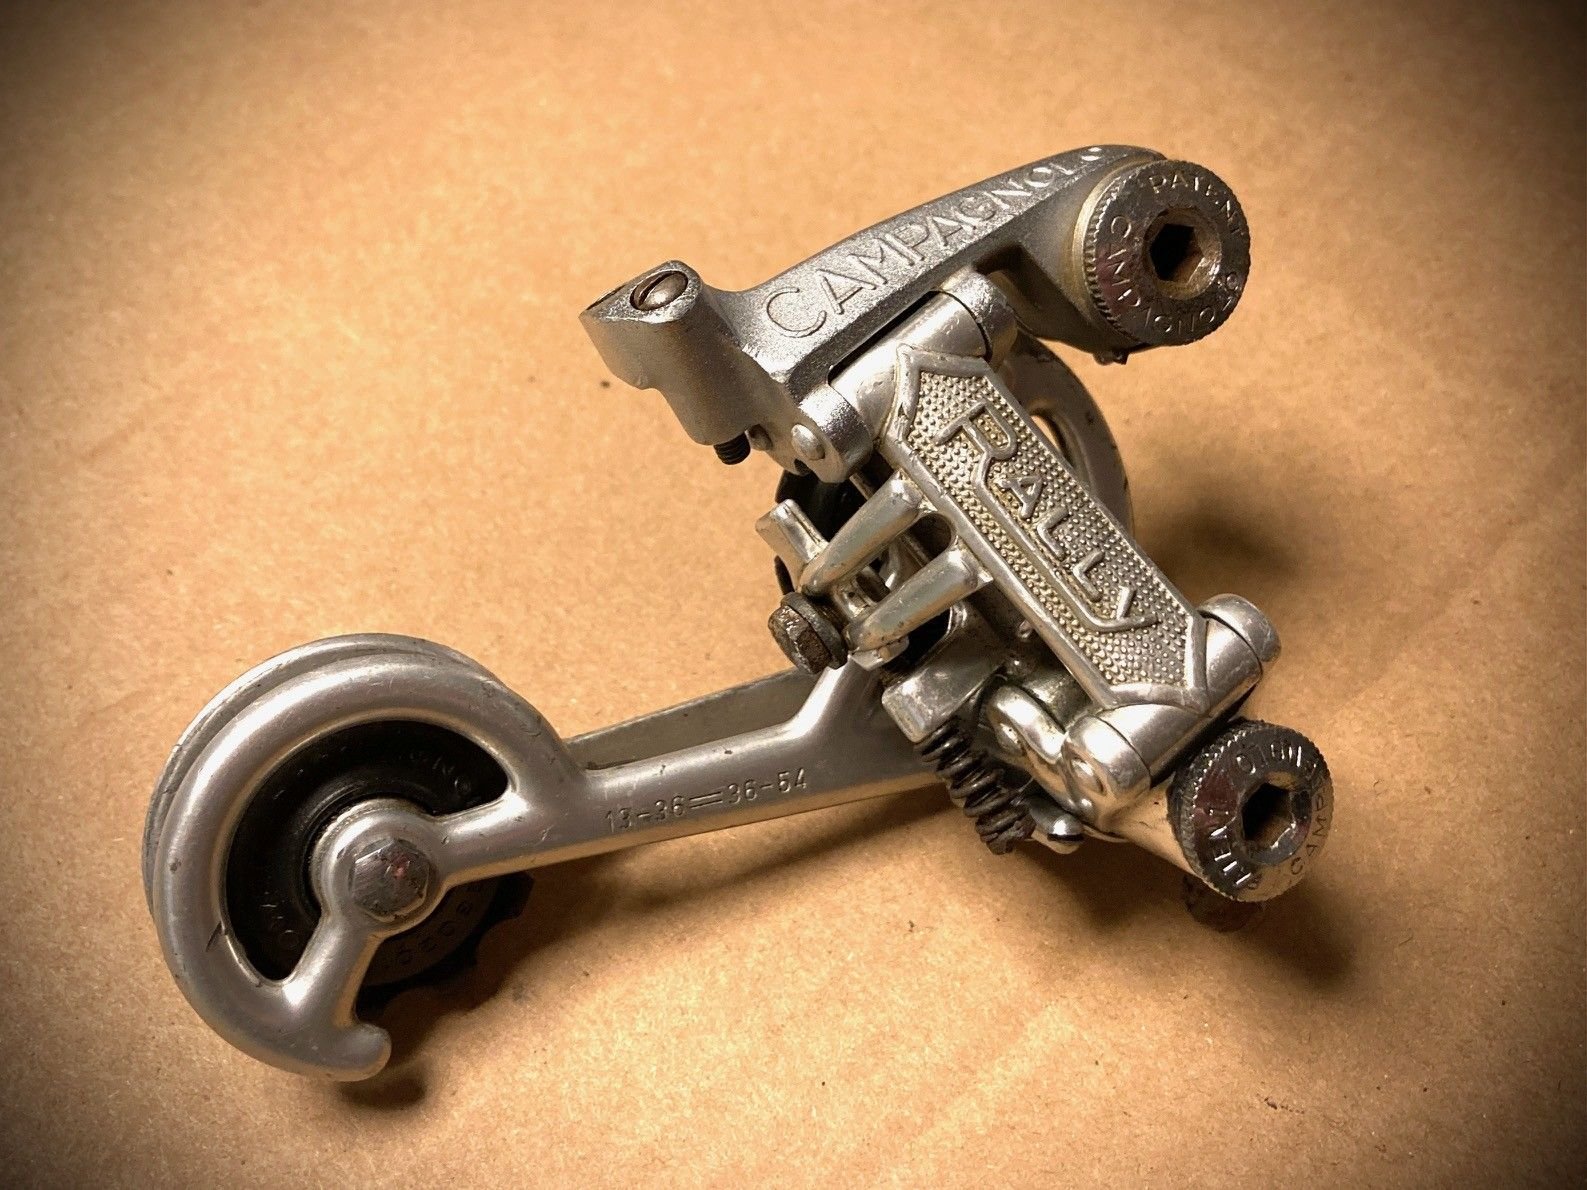
I think the old spring must have been damaged as you can see on the picture below. They are not quite the same, the end of the spring does not start in the same position
- it doesn't have quite as much spring tension as my other rally, but a lot better than before !!
I think its okay for a used spring. When I get a NOS spring, it will probably be like new
I would like to say thank you for the many answers, help and description to assemble it correctly, also the good suggestions!


I think the old spring must have been damaged as you can see on the picture below. They are not quite the same, the end of the spring does not start in the same position
- it doesn't have quite as much spring tension as my other rally, but a lot better than before !!
I think its okay for a used spring. When I get a NOS spring, it will probably be like new
I would like to say thank you for the many answers, help and description to assemble it correctly, also the good suggestions!
