


Ill-advised tools you’ve made that sort of work…

 09-13-25 | 07:13 PM
#27
Senior Member

Joined: Apr 2011
Posts: 669
Likes: 32
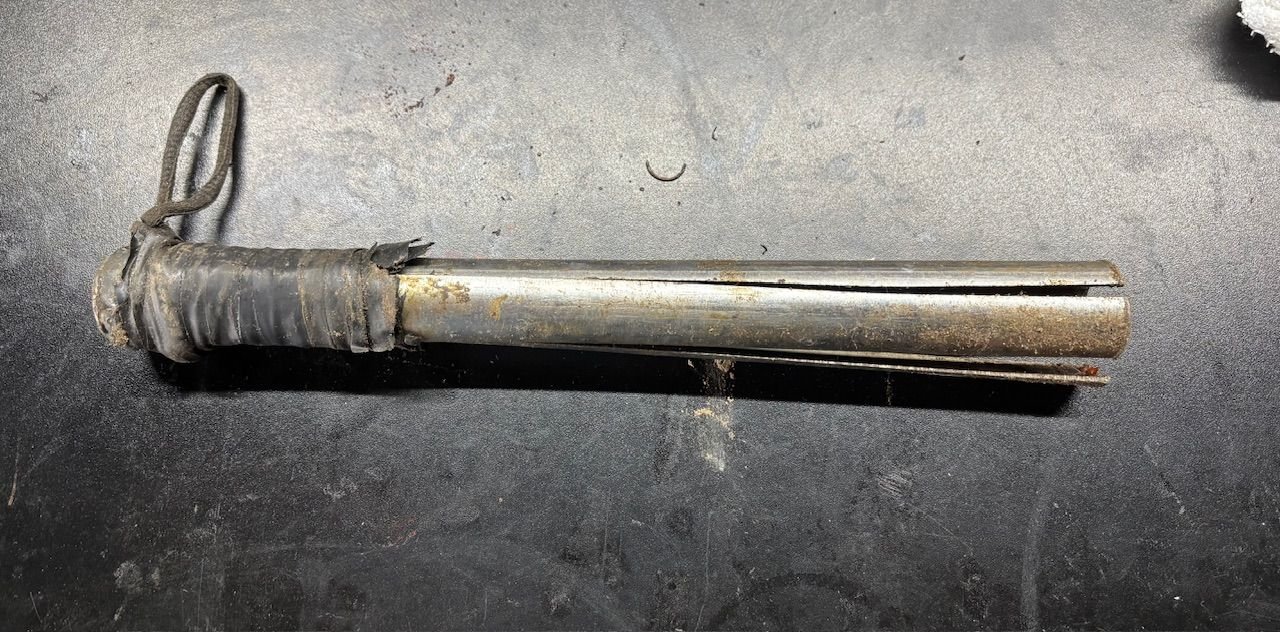
I did the homemade headset press out of threaded rod, bolts and some oversize washers, but forgot about removing the old cups - the most appropriate thing I had at the time was the shaft of a beach umbrella, which seems to fit the brief. I was not in a mood for wasting time, and thought there was a slim chance 1) I could continue to use the shaft with the umbrella, and 2) my wife might not notice what I had done, I may get out of it with a clean pair of heels. Neither of those things happened. Aside from being incredibly unwieldy, since I had to whack the end that was around 4 feet away from the frame,when pressing against the inner edge of the headset cup, the material was very soft so the umbrella shaft just split and mushroomed as I worked. Because it was so soft and flaring, it scratched the inside of the head tube, and damaged the cups on the way out, and took a huge amount of time and noise to remove the cups. Because I had spent around 15 minutes wailing on the umbrella shaft, both ends were damaged and shortened by a few centimetres and there was not a hope of sliding the other umbrella part into it. There must be a term for this, I successfully failed with regards the tool use, but I did get the cups out, destroying everything in the process?
09-13-25 | 09:11 PM
#28

Senior Member

Joined: Nov 2005
Posts: 4,066
Likes: 2,153
From: NW Ohio
Bikes: 1984 Miyata 310, 1986 Schwinn Sierra, 1987 Ross Mt. Hood, 1988 Schwinn LeTour, 1988 Trek 400T, 1981 Fuji S12-1977 Univega Grand Rally, S LTD, 1973 Sears Free Spirit 531, 197? FW Evans
I used a pipe wrench to non-destructively remove a mallard freewheel from a hub. I didn't have a proper freewheel tool, so I took out the axle, then placed the top jaw of the pipe wrench inside the splines so the corners of the wrench grabbed and tightened the bottom jaw against the middle cog, bridging a pair of teeth. I held the rim between my legs and leaned into the pipe wrench and broke it loose. The tight fit of the pipe wrench against the splines and the cog prevented any damage to the freewheel.
09-13-25 | 11:00 PM
#29

Senior Member

Joined: Dec 2016
Posts: 2,977
Likes: 1,849
From: Long Island, NY
Bikes: Trek 800 x 2, Schwinn Heavy Duti, Schwinn Traveler, Schwinn Le Tour Luxe, Schwinn Continental, Cannondale M400 and Lambert, Schwinn Super Sport
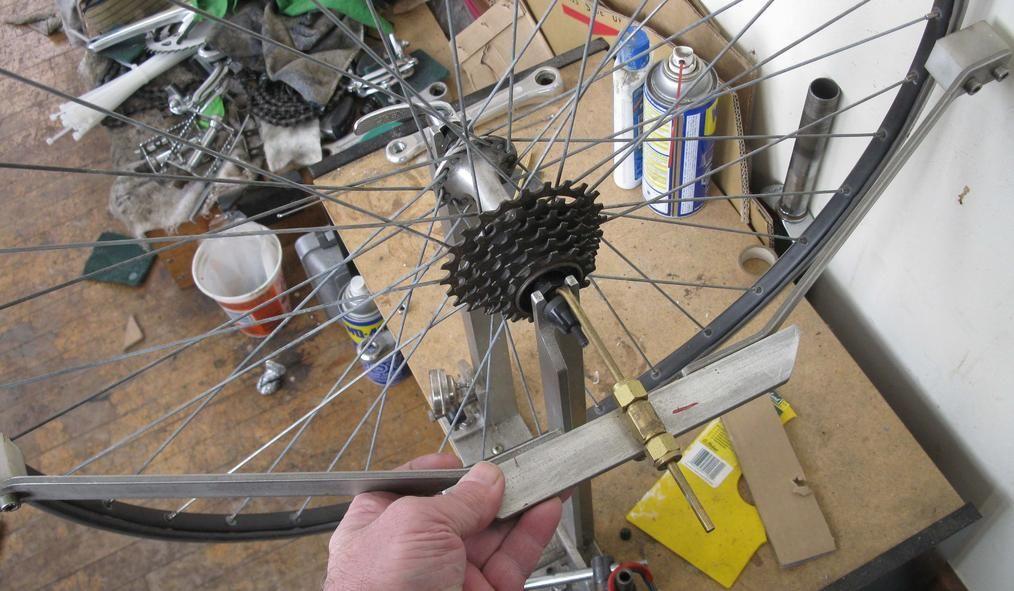
While Park, Minora, Unior, CyclePro, Wheel Fanantyc all make respectable dishing tools, yours can check the dish while the wheel is on the truing stand. This is an improvement over the dishing tools on the market, as far as I know. All of these tools require the wheel to be removed from the stand to check dish. Perhaps there is something that can do it while the wheel is on the truing stand, but I haven't seen any of these tool companies claim that! For instance, the Park uses a piece of steel bent into a "L" shape. It may be able to do this, but Park makes no claim that the wheel can be checked in the stand.
Anyway, I like it. As far as I'm concerned this is an improvement over existing dishing tools. And the compression fittings seem to be a good way to put some pressure on the brass rod or tube.
The only thing ill-advised is that if you had a Patent Lawyer they might tell you it was ill-advised to post it on the interwebs.
 01-02-26 | 11:22 PM
#30
Senior Member


Joined: Jan 2008
Posts: 15,105
Likes: 4,754
From: Beaverton, OR
Bikes: Yes
In another thread a week or two ago Bianchigirll mentioned bench blocks. I have to admit, I had never even heard of a bench block before, but upon watching a video about their use I immediately realized this would solve a recurring problem I have, plus, as an added benefit, it would give me a good reason to finally buy the Dremel plunge router accessory. I got the router accessory as a Christmas gift, and today I took the time to make my first bench block. It's a bit rough and will probably need some refinement, but I think at least the concept is sound.

Do you recognize the purpose? It's not Eroica compliant, but the part it will be used to repair is about 25 years old.
I'll be using it to knock out the pivot pin to swap the brake blade on second generation Campagnolo ergo shifters. If you don't use them, you might be surprised at how often that comes up.
Do you recognize the purpose? It's not Eroica compliant, but the part it will be used to repair is about 25 years old.
I'll be using it to knock out the pivot pin to swap the brake blade on second generation Campagnolo ergo shifters. If you don't use them, you might be surprised at how often that comes up.
__________________
My Bikes
My Bikes
01-03-26 | 03:09 AM
#31
Senior Member

Joined: Feb 2020
Posts: 4,035
Likes: 2,356
Many chainstays are NOT identical - the drive side has a dimple to clear the chainring.
Even identical ones may be brazed or fitted differently.
That means that given equal force one will move more than the other, and the triangle may be the correct width but it will be offset (usually to the drive side as that stay is weaker).
The better method uses a lever against the seat tube, one side at a time.
Not only better, but if the traingle is already offset to one side or another it can fix that.
 01-03-26 | 03:37 AM
#33

Senior Member


Joined: Oct 2015
Posts: 16,174
Likes: 9,552
From: PDX
Bikes: Merz x 5 + Specialized Merz Allez x 2, Strawberry/Newlands/DiNucci/Ti x3, Gordon, Fuso/Moulton x2, Bornstein, Paisley,1958-74 Paramounts x3, 3rensho, 74 Moto TC, 73-78 Raleigh Pro's x5, Marinoni x2, 1960 Cinelli SC, 1980 Bianchi SC, PX-10 X 2
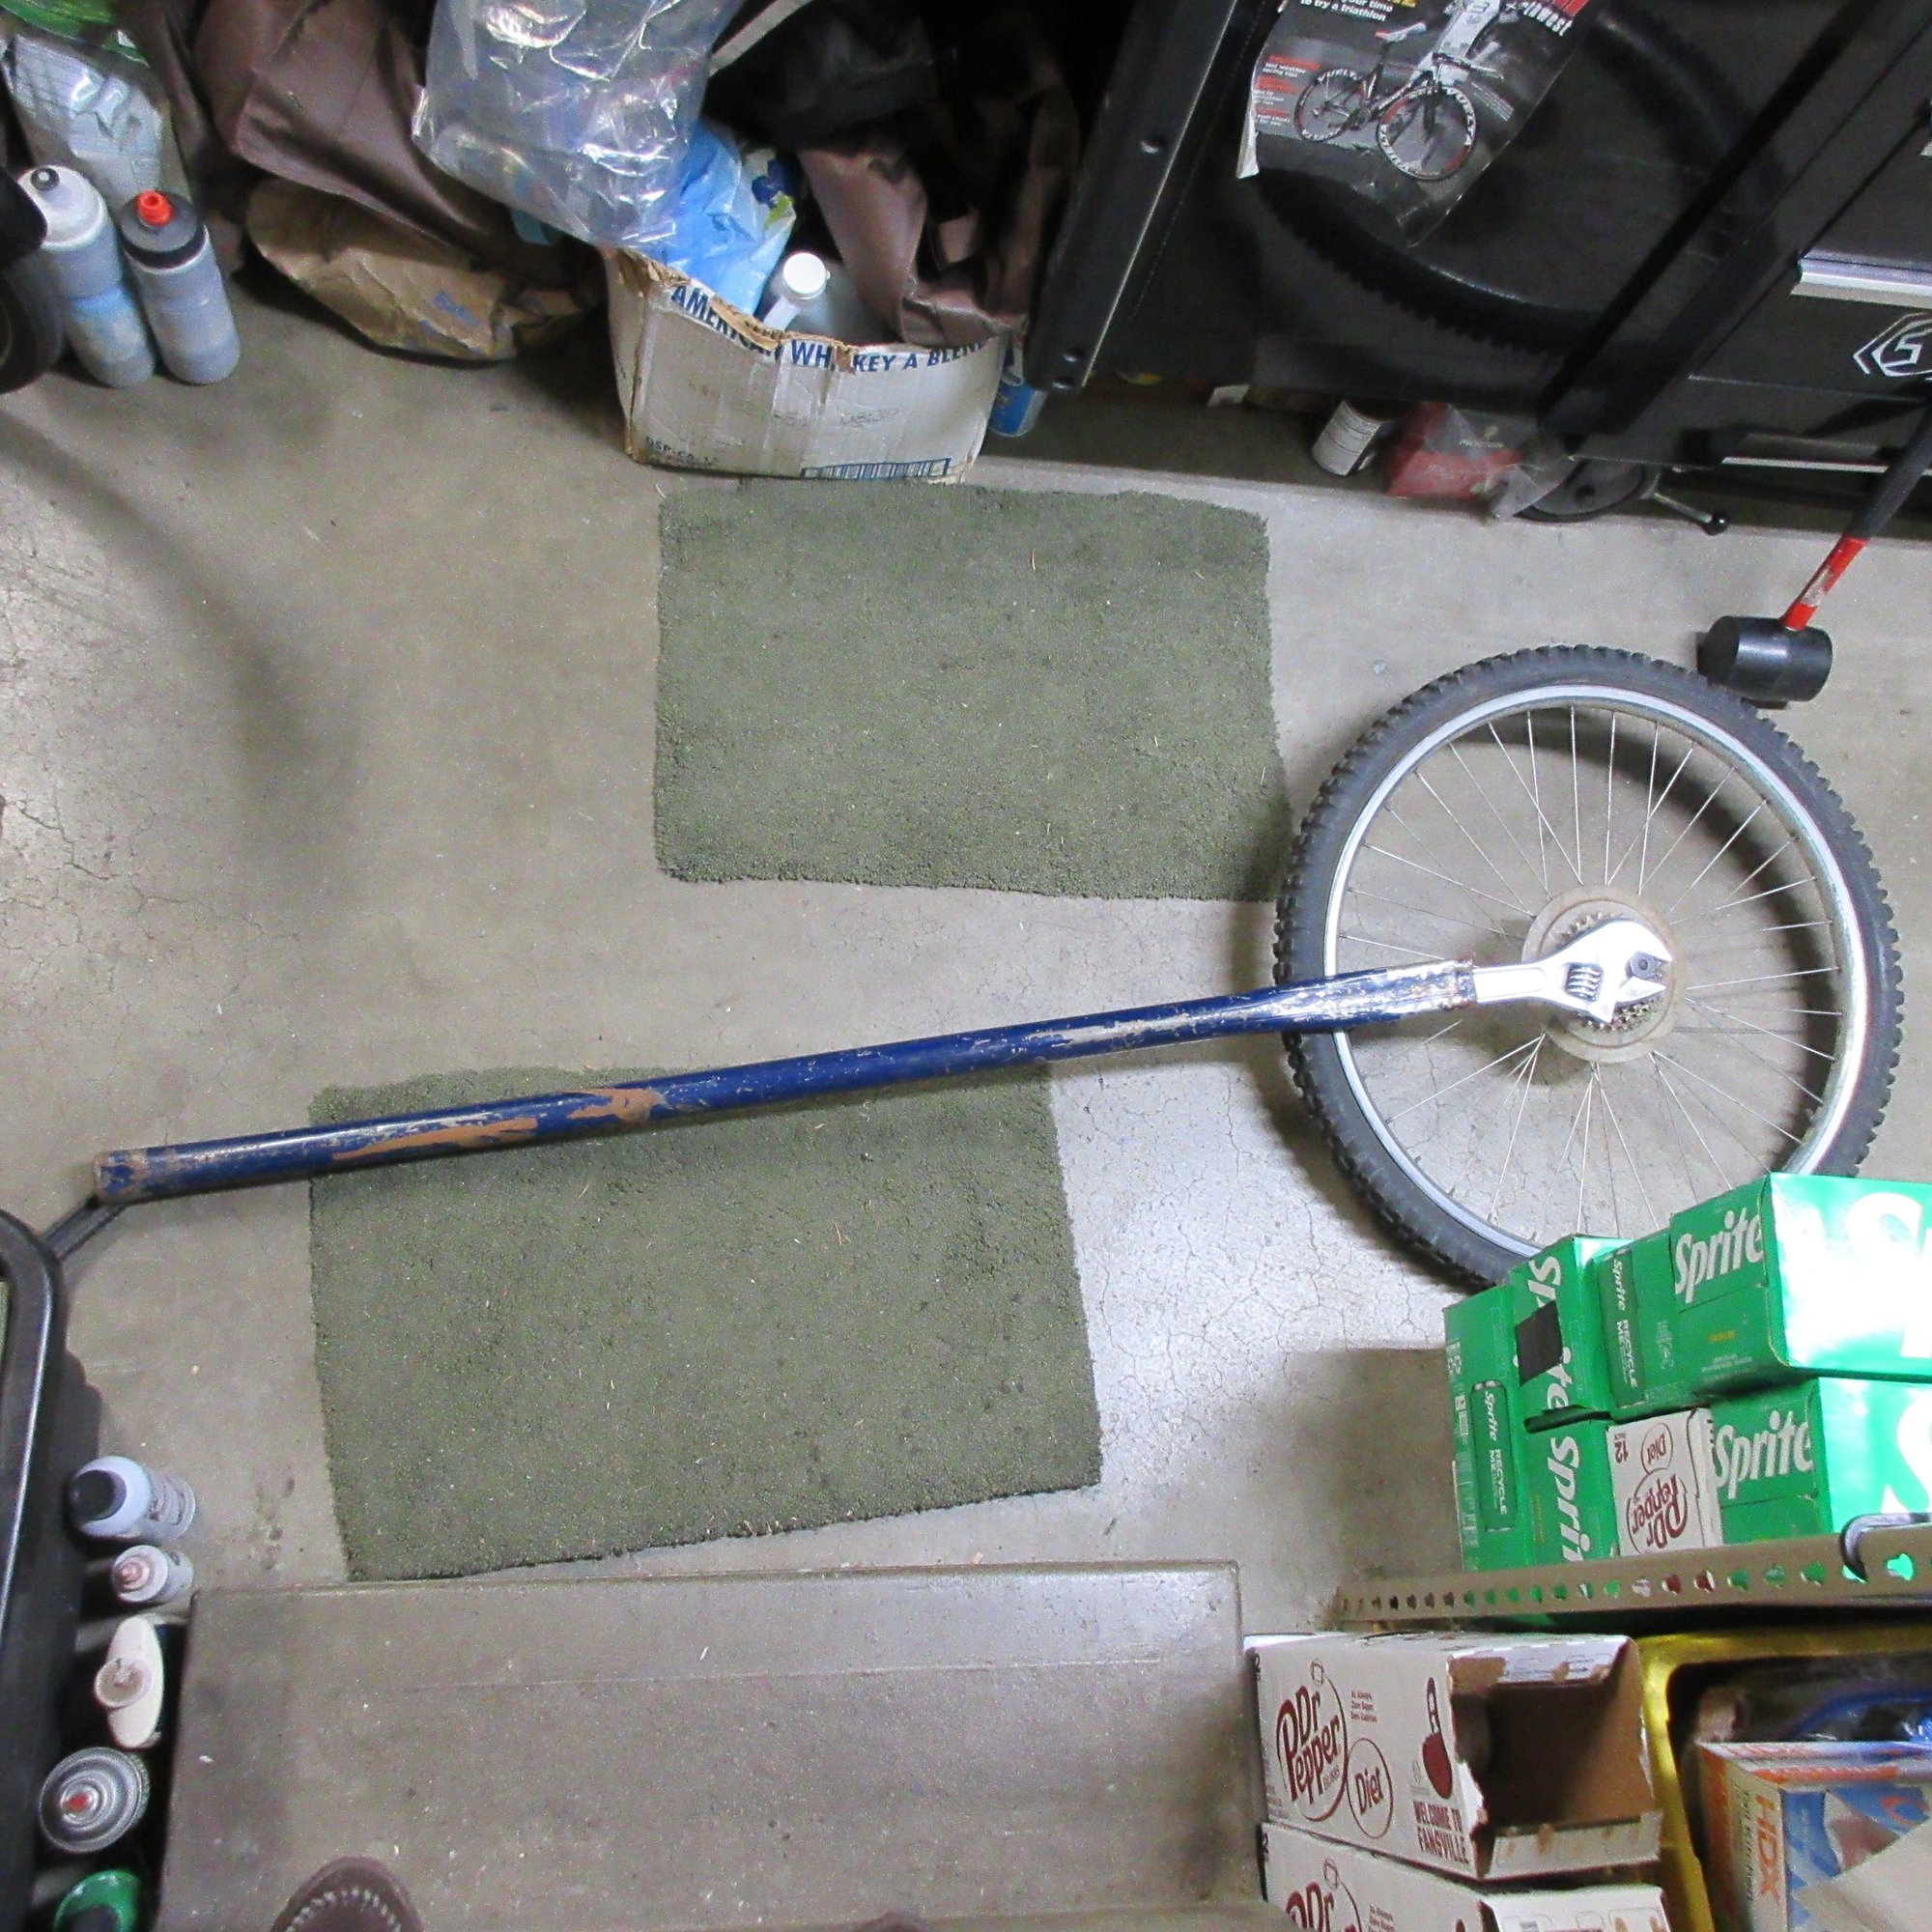
I used a pipe wrench to non-destructively remove a mallard freewheel from a hub. I didn't have a proper freewheel tool, so I took out the axle, then placed the top jaw of the pipe wrench inside the splines so the corners of the wrench grabbed and tightened the bottom jaw against the middle cog, bridging a pair of teeth. I held the rim between my legs and leaned into the pipe wrench and broke it loose. The tight fit of the pipe wrench against the splines and the cog prevented any damage to the freewheel.
It was amazing how much more leverage it can get butted up against the step.
And it works great on fixed cups in the grass on the lawn with the clamp in place, never fails.


Last edited by merziac; 01-03-26 at 04:11 AM.

 01-03-26 | 11:59 AM
#35
[Classified] Member
Joined: Jul 2017
Posts: 424
Likes: 351
For those unfortunates who have a Campy Power Torque crankset, here's a substitute for the 14mm crankbolt Allen. Take apart a crank puller and us the "0.55 Hex Socket" end as a 14mm Allen wrench substitute. Put it in the bolt, and carefully use a 14mm wrench to turn the bolt. Seems that Allen sets come in size kits from 12mm-13mm-15mm-16mm but no 14mm....

01-03-26 | 01:14 PM
#36

Ride, Wrench, Swap, Race
Joined: Jan 2010
Posts: 9,831
Likes: 1,809
From: Northern California
Bikes: Cheltenham-Pedersen racer, Boulder F/S Paris-Roubaix, Varsity racer, '52 Christophe, '62 Continental, '92 Merckx, '75 Limongi, '76 Presto, '72 Gitane SC, '71 Schwinn SS, etc.
For those unfortunates who have a Campy Power Torque crankset, here's a substitute for the 14mm crankbolt Allen. Take apart a crank puller and us the "0.55 Hex Socket" end as a 14mm Allen wrench substitute. Put it in the bolt, and carefully use a 14mm wrench to turn the bolt. Seems that Allen sets come in size kits from 12mm-13mm-15mm-16mm but no 14mm....

I similarly found myself short of the needed Allen key size to remove a (not 10mm, perhaps 12mm?) hollow bolt holding a freehub body onto some inexpensive(Fulcrum?) wheel.
I found that a 3/8" square-drive extension fit the inside of the 12-point bolt head snugly enough to apply prodigious torque sufficient to remove the factory-tightened bolt..
After considering having a decent batch of tools (fashioned from flat stock) made, to fit onto the eight-sided, 38mm Stronglight fixed cup, I instead found a 1-1/2" 12-point socket at the pawn shop that already had it's end ground square (the better to grab the thin, 8-sided flange).
The socket fit well enough to apply quite-generous torque using a 1/2"-drive breaker bar.
For giggles (and to fill in my ever-expanding socket-size inventory for use mainly on trucks),I later tried a slightly-smaller 1-7/16" socket that turned up at Goodwill, but which was far too small to fit onto the 8-sided flange.
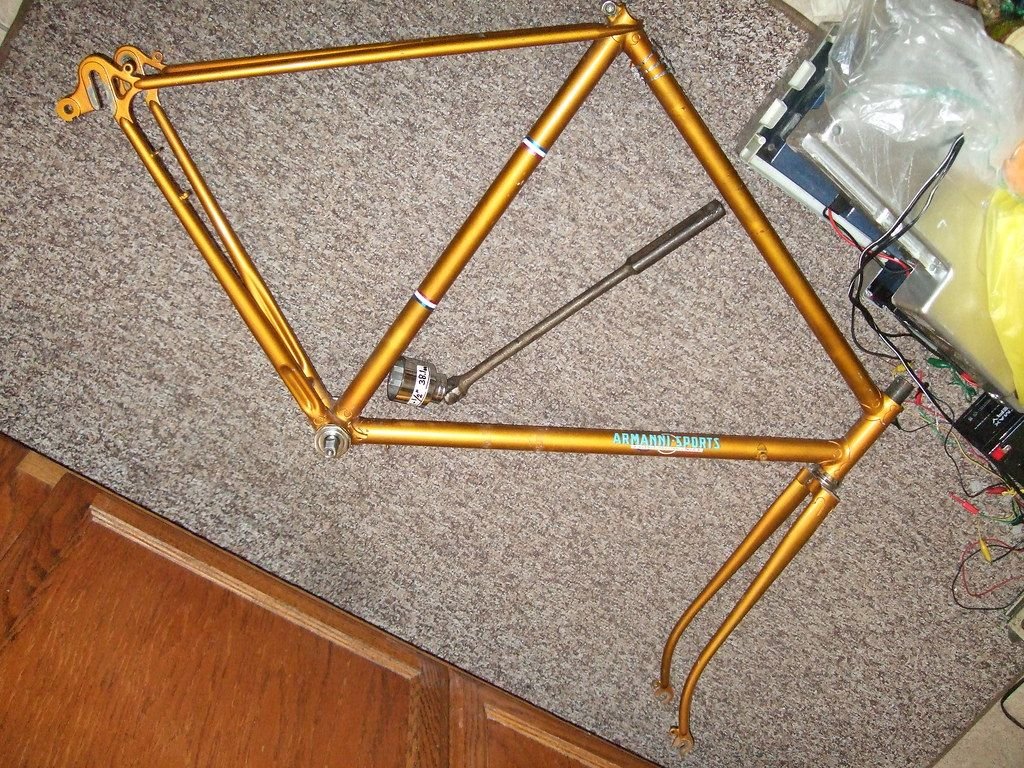
On another occasion, wanting to remove the cogs from a Sunrace freewheel body, I needed a tool to engage at least two of the four spline lugs of the internally-splined lock ring.
I found it easiest to simply use the aft end of an old chain whip, narrowing the width slightly to perhaps 32mm or so.
Using a 12" Crescent wrench allowed application of more than sufficient torsional torque to the whip handle, while another, bigger chain whip held the outer body from turning.
On a related note, pounding in a slightly-oversized Torx bit into a blodgered hex socket opening can transmit generous removal and re-installation torque.
Going ever-further into left field, I found that a #12 SAE screw/bolt is a desired (only) 1/2 millimeter larger than a (stripped) M5 bolt hole, allowing for only minimal oversizing of the hole on your water bottle bosses or derailer arm.
01-03-26 | 01:58 PM
#37

Senior Member
Joined: Feb 2008
Posts: 5,319
Likes: 4,828
From: Peoria, IL
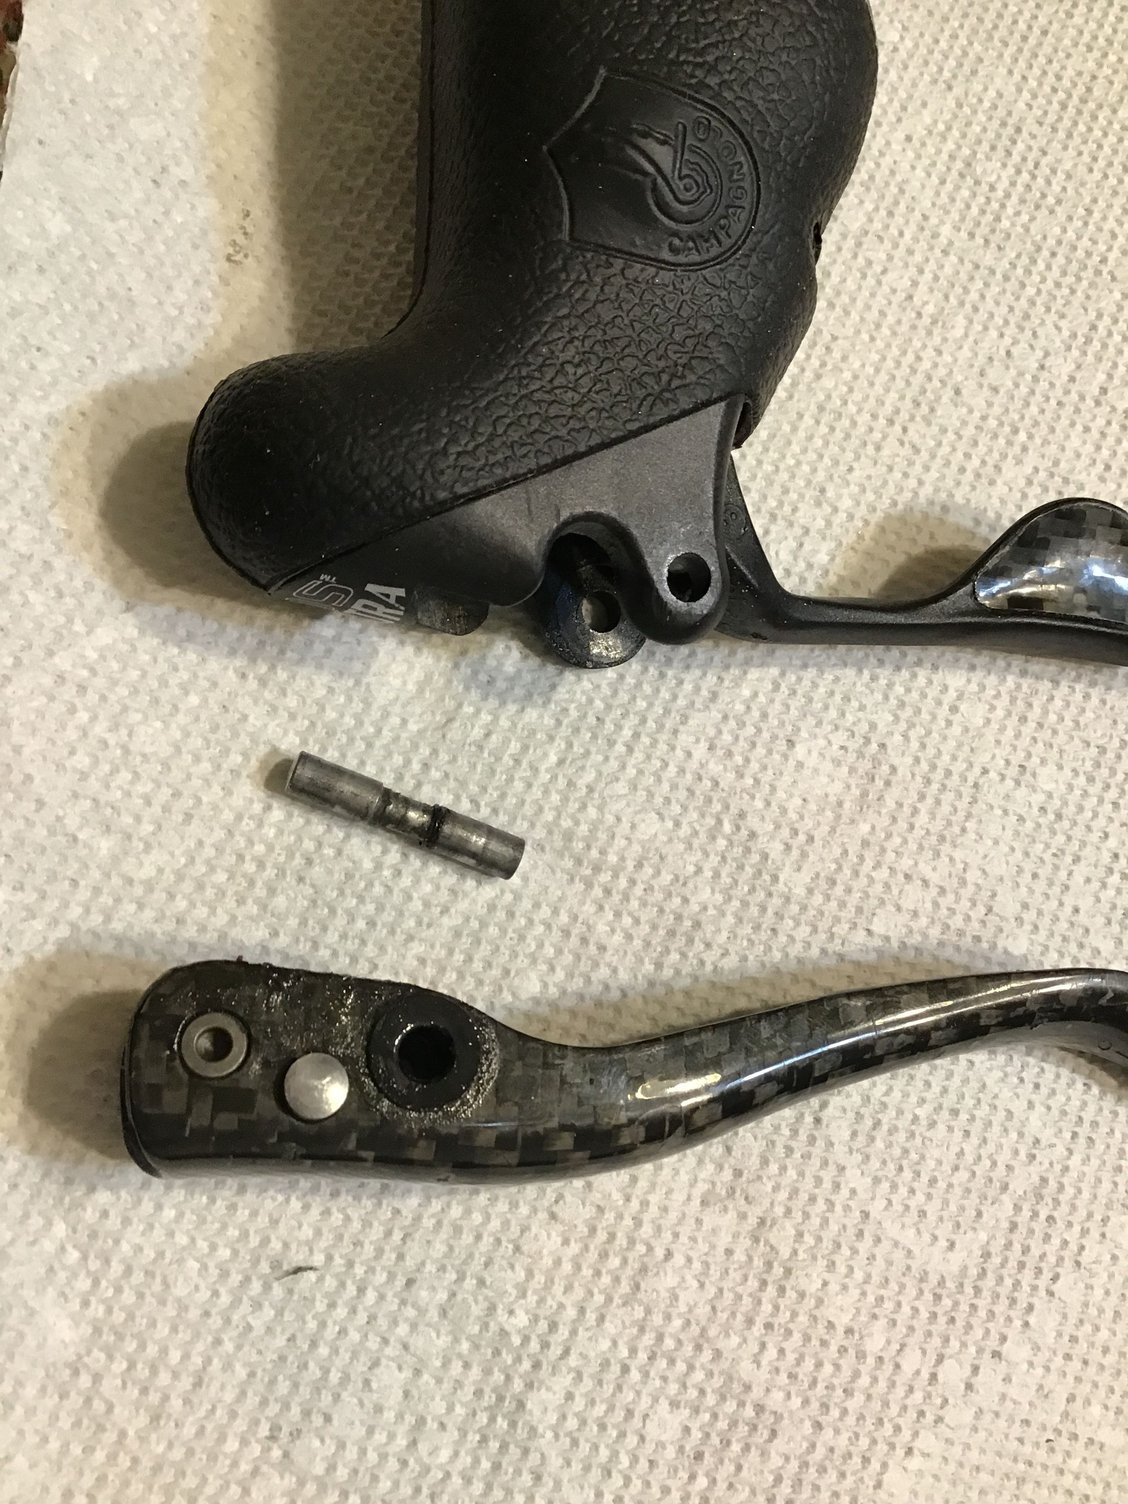
In another thread a week or two ago Bianchigirll mentioned bench blocks. I have to admit, I had never even heard of a bench block before, but upon watching a video about their use I immediately realized this would solve a recurring problem I have, plus, as an added benefit, it would give me a good reason to finally buy the Dremel plunge router accessory. I got the router accessory as a Christmas gift, and today I took the time to make my first bench block. It's a bit rough and will probably need some refinement, but I think at least the concept is sound.
Do you recognize the purpose? It's not Eroica compliant, but the part it will be used to repair is about 25 years old.
I'll be using it to knock out the pivot pin to swap the brake blade on second generation Campagnolo ergo shifters. If you don't use them, you might be surprised at how often that comes up.
Do you recognize the purpose? It's not Eroica compliant, but the part it will be used to repair is about 25 years old.
I'll be using it to knock out the pivot pin to swap the brake blade on second generation Campagnolo ergo shifters. If you don't use them, you might be surprised at how often that comes up.
Steve in Peoria
 01-03-26 | 02:14 PM
#38

Bike Sorceress
Joined: Apr 2008
Posts: 1,235
Likes: 460
From: MPLS
Bikes: Yes
After realizing the full extend of your dishing tool I am going to say that this Wheel Dishing Tool is darned well designed, compression fittings and all. As far as I am aware, all other dishing tools need to remove the wheel from the stand to check dish.
While Park, Minora, Unior, CyclePro, Wheel Fanantyc all make respectable dishing tools, yours can check the dish while the wheel is on the truing stand. This is an improvement over the dishing tools on the market, as far as I know. All of these tools require the wheel to be removed from the stand to check dish. Perhaps there is something that can do it while the wheel is on the truing stand, but I haven't seen any of these tool companies claim that! For instance, the Park uses a piece of steel bent into a "L" shape. It may be able to do this, but Park makes no claim that the wheel can be checked in the stand.
While Park, Minora, Unior, CyclePro, Wheel Fanantyc all make respectable dishing tools, yours can check the dish while the wheel is on the truing stand. This is an improvement over the dishing tools on the market, as far as I know. All of these tools require the wheel to be removed from the stand to check dish. Perhaps there is something that can do it while the wheel is on the truing stand, but I haven't seen any of these tool companies claim that! For instance, the Park uses a piece of steel bent into a "L" shape. It may be able to do this, but Park makes no claim that the wheel can be checked in the stand.
I don't have any pictures of contraptions I've come up with, but I can describe a few:
Probably the most impressive, a device for removing a very stuck stem. Start with a 8' wide trailer with rails on the sides. Lay the frame, fork, stem, and handlebars all assembled on it's side in the middle of the trailer. Tie a ratchet strap around the stem and one of the trailer's side rails, tie another ratchet strap around the other rail and the fork. Cinch the straps tight, wedge a 2x4 between the fork blades, use the handlebar and 2x4 as levers to force the stem to rotate, ratchet the straps tight again, use the 2x4 and handlebars to force the stem to rotate, repeat till stem comes out. Basically a torture rack for bikes.
Front derailleur braze-on alignment tool. Take a quick release skewer, ditch the nut and springs. Find some spacers to slide over the skewer, the ones that come with fenders to get around disc brakes work great. Thread the skewer through the spacers, the braze-on mount, and into a front derailleur. Position the derailleur so it is in the middle of the range of rotation in the mount, then tighten down the skewer. Bend the assembly until the cage lines up with the chainrings.
Take an M5 bolt, thread a nut onto it, take a concave piece of V-brake pad hardware and file a groove into it. Now you have a riv-nut tool that works great with funky aero tube shapes.
The last two actually worked so well that I'm not even sure it is right to call them ill-advised.
01-03-26 | 03:26 PM
#39
Senior Member
Joined: Jan 2008
Posts: 15,105
Likes: 4,754
From: Beaverton, OR
Bikes: Yes
I was taking the shifty bits out of some 10 speed Campy levers and had some trouble getting the pin out too. Put a little oil on them and let them set a while, but still used a drift punch and a small hammer. I think I supported the lever with a socket while knocking out the pivot pin, though. It's definitely not as easy as some of my vintage levers!
Steve in Peoria
Steve in Peoria
__________________
My Bikes
My Bikes
01-04-26 | 04:37 PM
#40
Senior Member
Joined: May 2019
Posts: 3,978
Likes: 3,218
From: Bloomington, IN
Bikes: Paramount, Faggin, Ochsner, Rossin, Ciocc
Well Jdawg,
Since you brought up my name, I'll toss a couple of home brewed tools into the mix. These are my pedal wrenches and a bottom bracket removal tool.
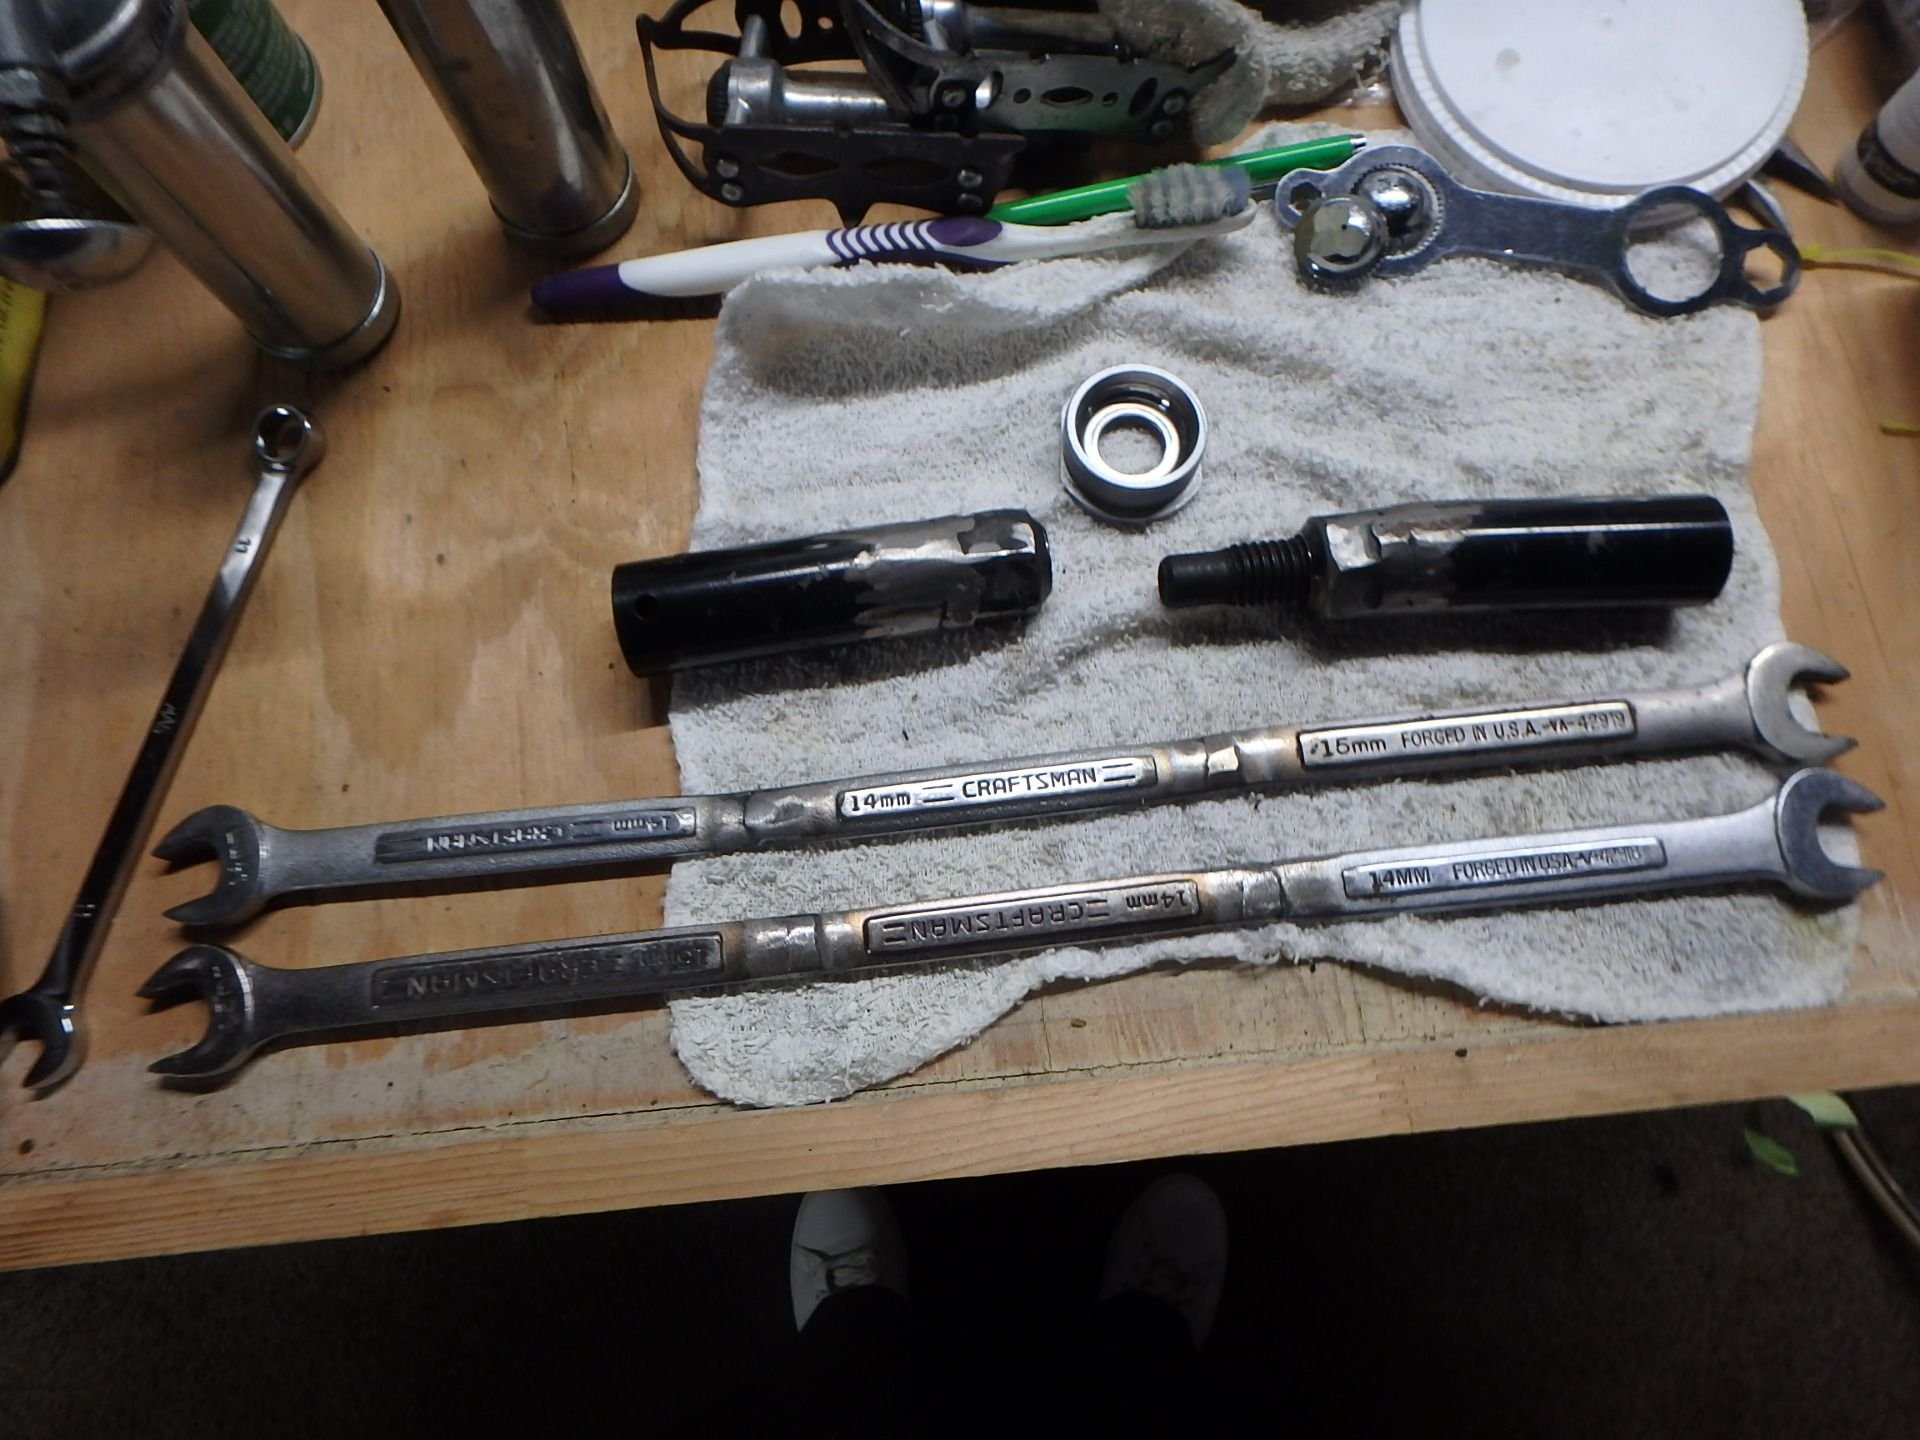
The pedal wrenches are on the bottom, and the top tool is the junk yard bb removal tool.
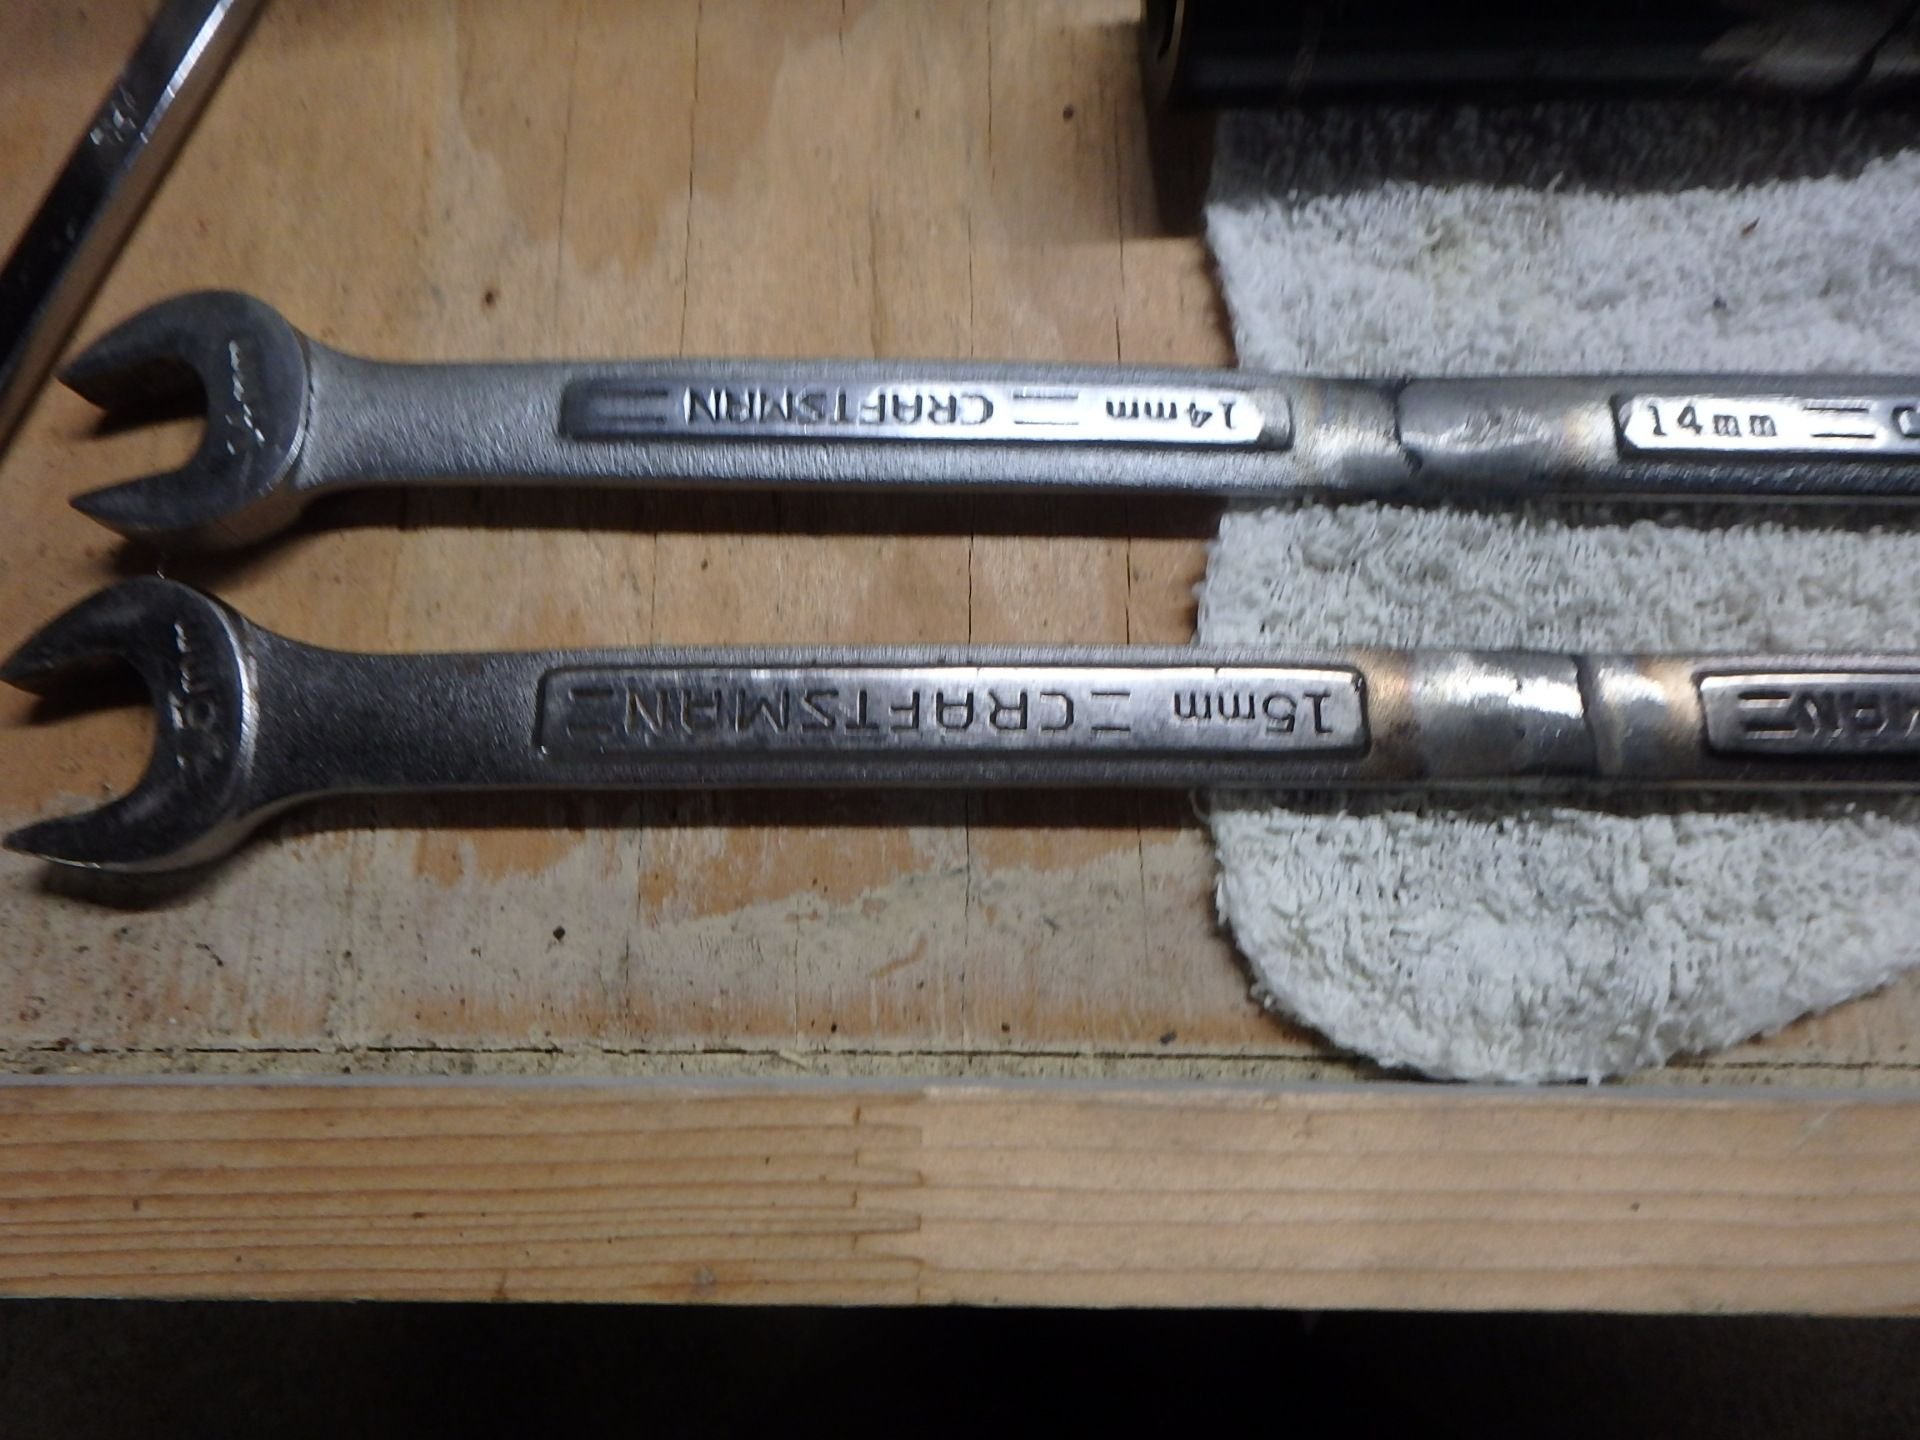
The wrenches are 14/15 and I like to have two so I can work from both sides at once. note the welds where it took three wrenches to make one.
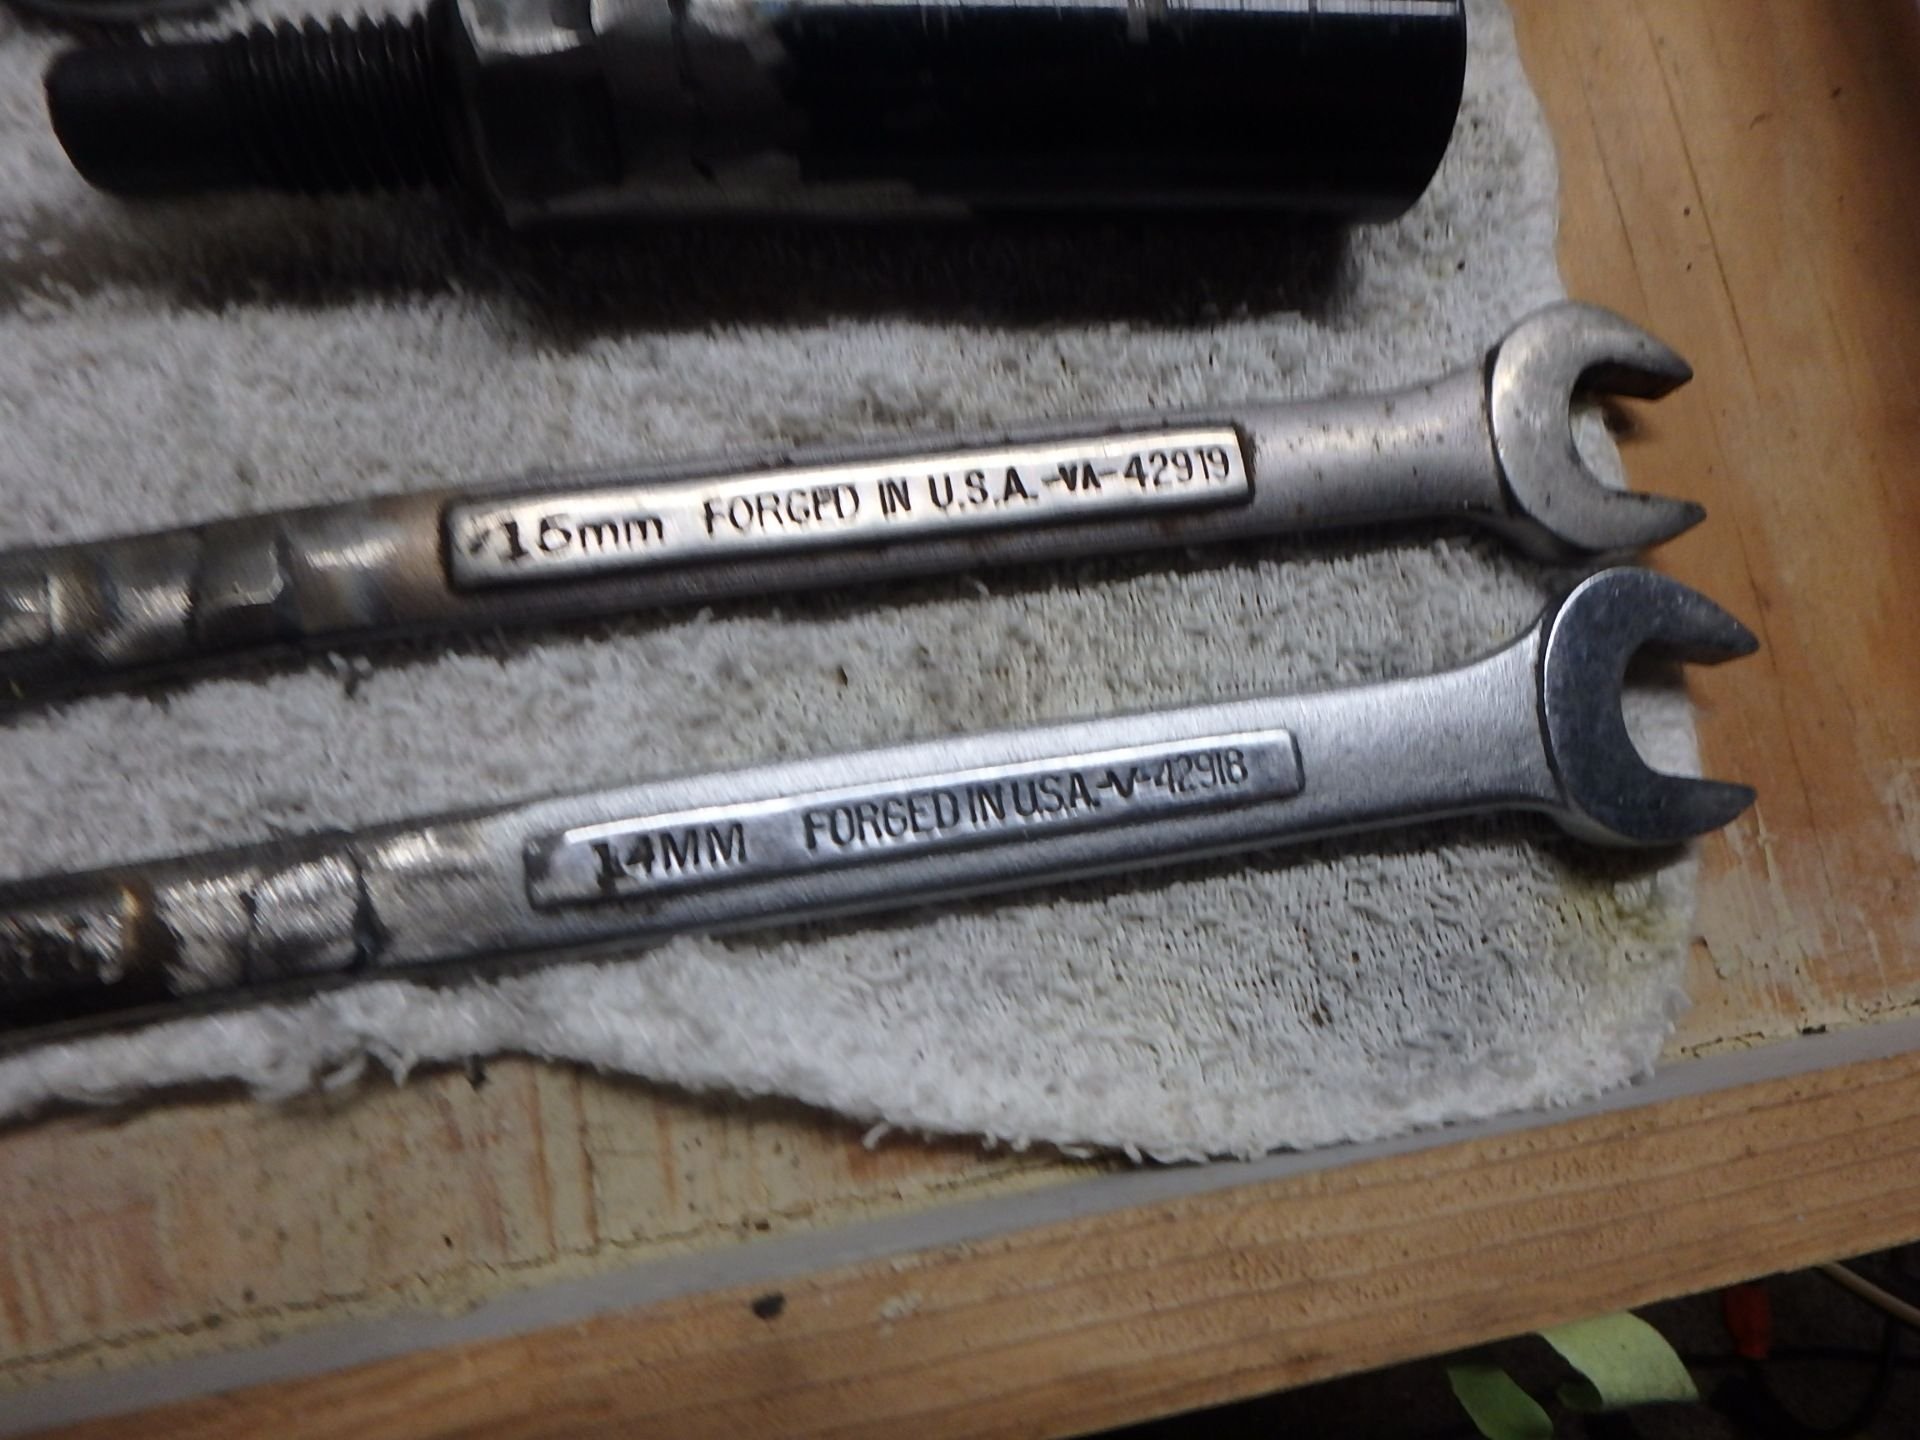
The other end of the wrenches. They are likely 18 inches in length, so the have plenty of leverage.

The bb tool is modeled after an old VAR tool that clamped the center of the races. This tool was made using a race car lug nut and a race car stud welded into two 1/2 inch drive sockets. I can put my two foot breaker bar in the ends and loosen even the toughest cups.
Smiles, MH
Since you brought up my name, I'll toss a couple of home brewed tools into the mix. These are my pedal wrenches and a bottom bracket removal tool.
The pedal wrenches are on the bottom, and the top tool is the junk yard bb removal tool.
The wrenches are 14/15 and I like to have two so I can work from both sides at once. note the welds where it took three wrenches to make one.
The other end of the wrenches. They are likely 18 inches in length, so the have plenty of leverage.
The bb tool is modeled after an old VAR tool that clamped the center of the races. This tool was made using a race car lug nut and a race car stud welded into two 1/2 inch drive sockets. I can put my two foot breaker bar in the ends and loosen even the toughest cups.
Smiles, MH
 01-04-26 | 07:09 PM
#41

Thread Starter
Edumacator
Joined: Jan 2018
Posts: 9,695
Likes: 5,178
From: Goose Creek, SC
Bikes: More than the people who ride them...oy.
Those are awesome Dave! I am actually a little afraid of the pedal wrenches.
__________________
1987 Crest C'dale, 1987 Basso Gap, 1992 Rossin EL, 1990 Van Tuyl, 1985 Trek 670, 2003 Pinarello Surprise, 1990ish MBK Atlantique, 1987 Peugeot Isoard, 1987 Nishiki Tri-A, 1981 Faggin, 1996 C'dale M500, 1984 Mercian Pro, 1982 AD SuperLeicht, 1985 Massi ?, 1988 Daccordi Griffe , 1989 Fauxsin MTB, 1981 Ciocc Mockba, 1992 Bianchi Giro, 1977 Colnago Super, 1971 Raleigh Internat'l, 1998 Corratec U+D, 1991 Peugeot Slimestone, 1987 Bianchi Volpe, 1995 Trek 750
1987 Crest C'dale, 1987 Basso Gap, 1992 Rossin EL, 1990 Van Tuyl, 1985 Trek 670, 2003 Pinarello Surprise, 1990ish MBK Atlantique, 1987 Peugeot Isoard, 1987 Nishiki Tri-A, 1981 Faggin, 1996 C'dale M500, 1984 Mercian Pro, 1982 AD SuperLeicht, 1985 Massi ?, 1988 Daccordi Griffe , 1989 Fauxsin MTB, 1981 Ciocc Mockba, 1992 Bianchi Giro, 1977 Colnago Super, 1971 Raleigh Internat'l, 1998 Corratec U+D, 1991 Peugeot Slimestone, 1987 Bianchi Volpe, 1995 Trek 750
01-04-26 | 07:12 PM
#42
Thread Starter
Edumacator
Joined: Jan 2018
Posts: 9,695
Likes: 5,178
From: Goose Creek, SC
Bikes: More than the people who ride them...oy.
Probably the most impressive, a device for removing a very stuck stem. Start with a 8' wide trailer with rails on the sides. Lay the frame, fork, stem, and handlebars all assembled on it's side in the middle of the trailer. Tie a ratchet strap around the stem and one of the trailer's side rails, tie another ratchet strap around the other rail and the fork. Cinch the straps tight, wedge a 2x4 between the fork blades, use the handlebar and 2x4 as levers to force the stem to rotate, ratchet the straps tight again, use the 2x4 and handlebars to force the stem to rotate, repeat till stem comes out. Basically a torture rack for bikes.
__________________
1987 Crest C'dale, 1987 Basso Gap, 1992 Rossin EL, 1990 Van Tuyl, 1985 Trek 670, 2003 Pinarello Surprise, 1990ish MBK Atlantique, 1987 Peugeot Isoard, 1987 Nishiki Tri-A, 1981 Faggin, 1996 C'dale M500, 1984 Mercian Pro, 1982 AD SuperLeicht, 1985 Massi ?, 1988 Daccordi Griffe , 1989 Fauxsin MTB, 1981 Ciocc Mockba, 1992 Bianchi Giro, 1977 Colnago Super, 1971 Raleigh Internat'l, 1998 Corratec U+D, 1991 Peugeot Slimestone, 1987 Bianchi Volpe, 1995 Trek 750
1987 Crest C'dale, 1987 Basso Gap, 1992 Rossin EL, 1990 Van Tuyl, 1985 Trek 670, 2003 Pinarello Surprise, 1990ish MBK Atlantique, 1987 Peugeot Isoard, 1987 Nishiki Tri-A, 1981 Faggin, 1996 C'dale M500, 1984 Mercian Pro, 1982 AD SuperLeicht, 1985 Massi ?, 1988 Daccordi Griffe , 1989 Fauxsin MTB, 1981 Ciocc Mockba, 1992 Bianchi Giro, 1977 Colnago Super, 1971 Raleigh Internat'l, 1998 Corratec U+D, 1991 Peugeot Slimestone, 1987 Bianchi Volpe, 1995 Trek 750
