


Fool for a Pretty Face?
 03-05-26 | 04:00 PM
#1
Thread Starter
Senior Member

Joined: Apr 2005
Posts: 971
Likes: 401
From: Northern CA
Bikes: Cannondale tandems: '92 Road, '97 Mtn. Mongoose 10.9 Ti, Kelly Deluxe, Tommaso Chorus, Cdale MT2000, Schwinn Deluxe Cruiser, Torker Unicycle, among others.
Fool for a Pretty Face?
OK C&V pros, I have a question for ya...
I'm restoring a very, very nice 1979 Mercian for a friend. It's immaculate. It's a thing of beauty. Not NOS, but close. I'm sorry I don't have a nice pic of it to share. I began work and forgot to snap right and left-side pics beforehand. I will be sure to provide post-restoration pics later.
I am not a seasoned vintage bicycle restorer. But I am a seasoned wrench who began making a mess of things in about 1975 when the ball bearings from my coaster brake hub fell out and disappeared all over the garage floor! I've improved my "game" since then and spent 45 years in and out of the bike biz selling, wrenching, shilling, training and having fun.
This bike has been such a dream to work on. I can't get enough of it!

(God I love Superbe rear derailleurs! Especially those with the open cages.)
Anyway, I'm conducting a complete overhaul of the bike. I'll strip it to an almost bare frame to clean it fully and give it the love it needs. I plan to wax the paint, unless this is a big no-no. I will also treat the insides of the tubes with JP Wiegle and/or Fluid Film. The owner plans to ride it. He's a very avid cyclist who climbed The Stelvio last fall. I expect to see him climb. Mt. Hamilton next time the Eroica group goes up.
The BB is in excellent shape with no damage. But my question is this: should I face the BB shell? It appears unfaced, as a friend noticed the faces lacks witness marks all the way around from the cups (damn good eye; he's a long time wrench and engineer, so he's on point). He says face it. I agree. I do like a "pretty face!"
BUT, this will affect the bike's condition and change it. So before committing a C&V faux pas, I figured I'd ask the veterans here.
What say you? TIA for any advice.
Oh and if anyone has any other "restoration" suggestions, I'm all ears.
Many thanks!
I'm restoring a very, very nice 1979 Mercian for a friend. It's immaculate. It's a thing of beauty. Not NOS, but close. I'm sorry I don't have a nice pic of it to share. I began work and forgot to snap right and left-side pics beforehand. I will be sure to provide post-restoration pics later.
I am not a seasoned vintage bicycle restorer. But I am a seasoned wrench who began making a mess of things in about 1975 when the ball bearings from my coaster brake hub fell out and disappeared all over the garage floor! I've improved my "game" since then and spent 45 years in and out of the bike biz selling, wrenching, shilling, training and having fun.
This bike has been such a dream to work on. I can't get enough of it!
(God I love Superbe rear derailleurs! Especially those with the open cages.)
Anyway, I'm conducting a complete overhaul of the bike. I'll strip it to an almost bare frame to clean it fully and give it the love it needs. I plan to wax the paint, unless this is a big no-no. I will also treat the insides of the tubes with JP Wiegle and/or Fluid Film. The owner plans to ride it. He's a very avid cyclist who climbed The Stelvio last fall. I expect to see him climb. Mt. Hamilton next time the Eroica group goes up.
The BB is in excellent shape with no damage. But my question is this: should I face the BB shell? It appears unfaced, as a friend noticed the faces lacks witness marks all the way around from the cups (damn good eye; he's a long time wrench and engineer, so he's on point). He says face it. I agree. I do like a "pretty face!"
BUT, this will affect the bike's condition and change it. So before committing a C&V faux pas, I figured I'd ask the veterans here.
What say you? TIA for any advice.
Oh and if anyone has any other "restoration" suggestions, I'm all ears.
Many thanks!
 03-06-26 | 04:51 PM
#2

Senior Member


Joined: Jun 2008
Posts: 2,081
Likes: 799
From: Ridgewood, Queens
Bikes: Zunow, 3Rensho, Look KG196
Facing the BB shell won�t affect the value or appearance. The faced part of the BB shell gets covered by the bottom bracket cups. Go for it, if the bike indeed needs it.
__________________
Check out www.djcatnap.com for articles on vintage Japanese & French bicycle restorations, components and history.
Check out www.djcatnap.com for articles on vintage Japanese & French bicycle restorations, components and history.

 03-06-26 | 06:40 PM
#5
Senior Member


Joined: Oct 2015
Posts: 16,078
Likes: 9,430
From: PDX
Bikes: Merz x 5 + Specialized Merz Allez x 2, Strawberry/Newlands/DiNucci/Ti x3, Gordon, Fuso/Moulton x2, Bornstein, Paisley,1958-74 Paramounts x3, 3rensho, 74 Moto TC, 73-78 Raleigh Pro's x5, Marinoni x2, 1960 Cinelli SC, 1980 Bianchi SC, PX-10 X 2
I would not remove any material without a dang good reason. 
If there isn't a very good reason, leave it alone, period.
If there isn't a very good reason, leave it alone, period.
03-07-26 | 11:19 AM
#6
Senior Member
Joined: Apr 2009
Posts: 2,863
Likes: 1,892
From: NorCal
I have to admit that I'm not much for compressing paint and prefer metal to metal where those situations occur. I'd use some #400 wet/dry on a sanding block to shine those babies up. But that would just be me. YMMV of course.
Y'all have a nice day. It's gonna be 78 and sun here. Time to test ride the new tires.
Y'all have a nice day. It's gonna be 78 and sun here. Time to test ride the new tires.
03-21-26 | 01:30 PM
#7
Thread Starter
Senior Member
Joined: Apr 2005
Posts: 971
Likes: 401
From: Northern CA
Bikes: Cannondale tandems: '92 Road, '97 Mtn. Mongoose 10.9 Ti, Kelly Deluxe, Tommaso Chorus, Cdale MT2000, Schwinn Deluxe Cruiser, Torker Unicycle, among others.
Well, the adage, "trust but verify" applies here. So I put the facing tool to the shell and sure enough, it was NOT flat or parallel. It definitely needed to be faced, despite Shafer's assurances. Glad I "verified!" Not a HUGE deal in the end.
Thanks for the replies. Sorry I didn't reply sooner.
After some more thought on the matter, and additional inspection of the BB shell, I'm going to face it. I'd expect this to ADD value to the bike as far as its "condition" is concerned. And facing will obviously add mechanical and durability value in the long run. It will also help avoid premature failure of the original bottom bracket. I obviously want this to remain as stock as possible.
Thanks for everyone's input.
I'll snap pics of the facing process and share what I learn and see. I've been sidetracked with some other projects, so I've been slow in returning to this project. Hope to make progress this weekend.
03-21-26 | 01:34 PM
#8
Thread Starter
Senior Member
Joined: Apr 2005
Posts: 971
Likes: 401
From: Northern CA
Bikes: Cannondale tandems: '92 Road, '97 Mtn. Mongoose 10.9 Ti, Kelly Deluxe, Tommaso Chorus, Cdale MT2000, Schwinn Deluxe Cruiser, Torker Unicycle, among others.
But since all high end bikes should indeed be faced post welding/alignment/blasting/painting, it really should not matter. If the shell had had its faces scraped of paint and properly milled 47 year ago or today is ultimately irrelevant in my book. It should always be done as part of professional assembly; failing to do so is a disservice to the consumer - and bike itself!
So not to be a contrarian here, but I did want to at least add a little more of my opinion on the matter.
Thanks again for the comments!
03-29-26 | 09:56 PM
#9
Thread Starter
Senior Member
Joined: Apr 2005
Posts: 971
Likes: 401
From: Northern CA
Bikes: Cannondale tandems: '92 Road, '97 Mtn. Mongoose 10.9 Ti, Kelly Deluxe, Tommaso Chorus, Cdale MT2000, Schwinn Deluxe Cruiser, Torker Unicycle, among others.
You only really know until...
... you put the tool to the BB shell.
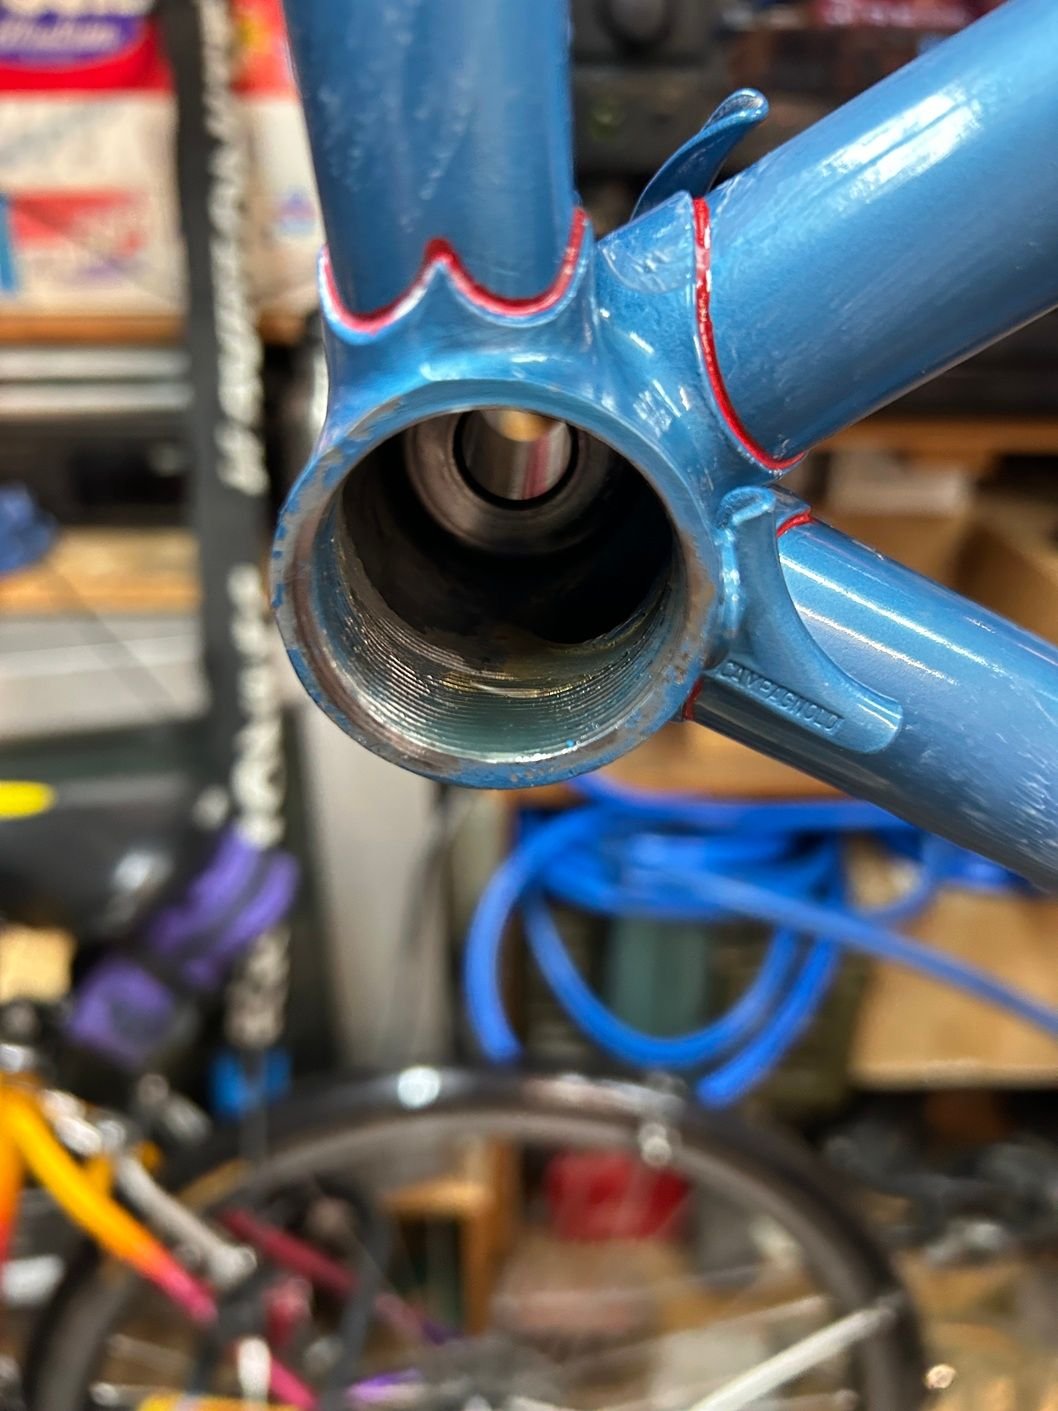
Initial cutting. Whenever you remove paint & metal in only one area or on only one side, you know the face isn't flat.
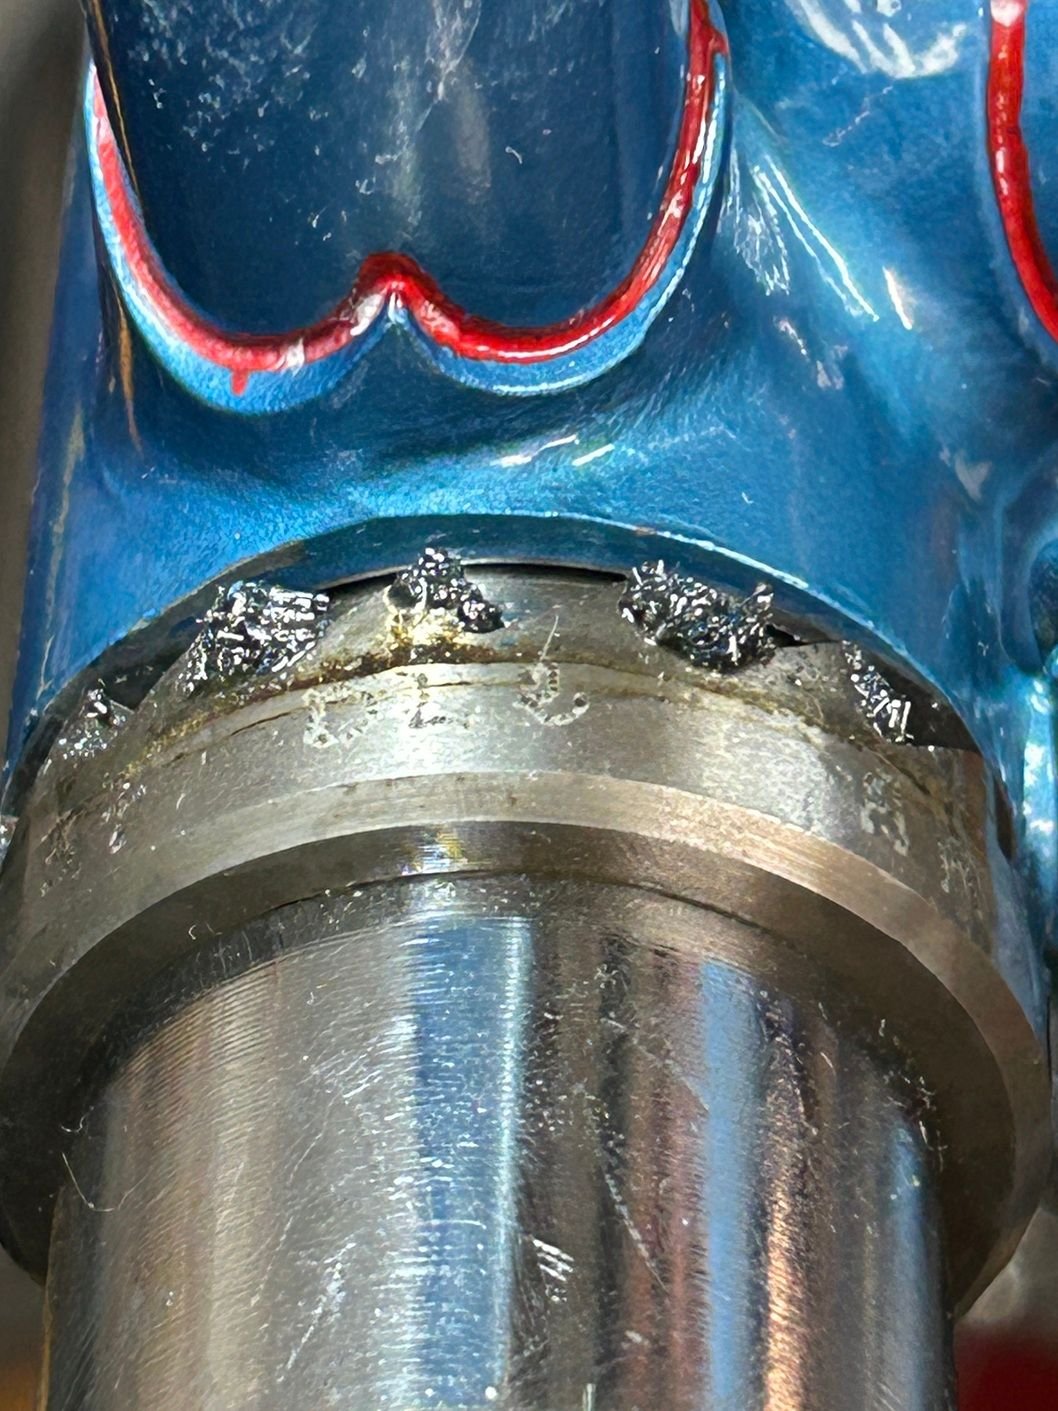
I don't really understand why, but it often takes a WHILE until the tool really begins to cut. And once it did, it cut really well. Took a fair amount of milling to get the face flat.

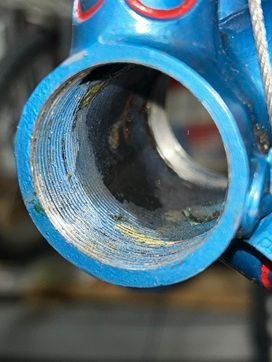
Ahhhh, so much better! As long as you have at LEAST a strip of bare metal, there's no need to go any further. Sure, I COULD have kept milling until the face was FULLY flat and all the paint was gone, but that means you're having to cut a LOT more material for zero improvement. As long as your cup is bottoming out on steel, there's no need for the ALL of the wall thickness to be perfectly flat. The other side was in just as much need for facing. This BB wasn't faced as it should have been.
Now, the BB shows no sign of wear, despite it being almost 50 years old (AFAIK). But the bike apparently hardly got ridden, so premature bearing failure was probably still in the cards for this OEM BB if I hadn't faced the shell.
Glad to have been able to get back on this bike project today.
PS Sorry the pics are so huge. I resized them to 35%, but they're still too big. Next time, I'll crop too.
Initial cutting. Whenever you remove paint & metal in only one area or on only one side, you know the face isn't flat.
I don't really understand why, but it often takes a WHILE until the tool really begins to cut. And once it did, it cut really well. Took a fair amount of milling to get the face flat.
Ahhhh, so much better! As long as you have at LEAST a strip of bare metal, there's no need to go any further. Sure, I COULD have kept milling until the face was FULLY flat and all the paint was gone, but that means you're having to cut a LOT more material for zero improvement. As long as your cup is bottoming out on steel, there's no need for the ALL of the wall thickness to be perfectly flat. The other side was in just as much need for facing. This BB wasn't faced as it should have been.
Now, the BB shows no sign of wear, despite it being almost 50 years old (AFAIK). But the bike apparently hardly got ridden, so premature bearing failure was probably still in the cards for this OEM BB if I hadn't faced the shell.
Glad to have been able to get back on this bike project today.
PS Sorry the pics are so huge. I resized them to 35%, but they're still too big. Next time, I'll crop too.
Last edited by LV2TNDM; 03-30-26 at 06:45 PM.
03-30-26 | 07:11 PM
#10
Thread Starter
Senior Member
Joined: Apr 2005
Posts: 971
Likes: 401
From: Northern CA
Bikes: Cannondale tandems: '92 Road, '97 Mtn. Mongoose 10.9 Ti, Kelly Deluxe, Tommaso Chorus, Cdale MT2000, Schwinn Deluxe Cruiser, Torker Unicycle, among others.
Yesterday and today saw more progress. Despite the bike's apparent quality build and a seat post free to move, the quill stem wouldn't move. Despite the owner's multiple attempts to free it.
So three weeks ago I spent some time on it. After failing to free the wedge and the stem with several hammer blows on the stem bolt (separated by a handy piece of hard wood), I left the bike to sit for two weeks with PB Blaster in the steerer tube with the frame inverted. I could see up the steerer tube that there was ample white lithium grease on the wedge and in the tube. But it was pretty darn dry and hard. So I removed as much as I could from underneath before applying the Blaster.
Oh and I had an idea. "What can I use to plug the steerer tube to keep the Blaster from leaking out?"

Velox rubber bar end plug to the rescue! Love it!
As I was finishing up, it occurred to me that this 56cm frame had about the perfect length top/steerer tubes where I could most likely remove the stem binder bolt and thread it in from under the fork crown and use it to "pull" the wedge free. But was it long enough to reach the wedge from the underside? I guess I'd have to find out.
Well, that was three weeks ago. Last night I went back to work on the stem. Saw that my PB Blaster was still sitting within the tube and "marinating" the stem (however effectively), so I went to seeing if I could free the wedge. Hammer blows once again failed to free it. I put clean rags on my padded hammer handle and used it as a wedge between the fork blades just below the crown. I pulled on the bars and nada! Still wouldn't break free.
Luckily, I remembered my epiphany from three weeks ago and gave the "reverse wedge pull" a try. Found my smooth chrome Park cone wrenches and found the wedge bolt fit PERFECTLY through the holes in the wrenches! Love it when this happens. And to be sure I did no damage to the paint on the underside of the crown, I put some Gorilla duct tape on the side of the cone wrench that would be pushing against the crown.

Worked like a charm! Didn't even require much torque to pull the wedge free. Once it was, the stem easily came out. So glad there was no galvanic corrosion issue. So psyched this stem issue was resolved without having to go all brute-force on the thing.
Ironically, I did find that both fork tips were twisted when I put the dropout tools on 'em. I bet the bike was in a crash and the wheel spun around hard and bent the fork blades. Got 'em straight with a little muscle.
Today was "tube prep day" where I pulled the well-greased seat post to look down the length of the seat tube. Definitely some rust; a consistent, but not too concerning layer all the way down (below where the post fit). Putting my flex hone on my 24" drill bit extender returned the tube to pristine shape with mirror-like sheen down to the BB.
Man it's nice when stuff works!
After blowing out the tubes with a length of SIS housing and compressed air, I treated the "closed" tubes with JP Wiegle and the seat tube with Fluid Film.
The restoration continues...
So three weeks ago I spent some time on it. After failing to free the wedge and the stem with several hammer blows on the stem bolt (separated by a handy piece of hard wood), I left the bike to sit for two weeks with PB Blaster in the steerer tube with the frame inverted. I could see up the steerer tube that there was ample white lithium grease on the wedge and in the tube. But it was pretty darn dry and hard. So I removed as much as I could from underneath before applying the Blaster.
Oh and I had an idea. "What can I use to plug the steerer tube to keep the Blaster from leaking out?"
Velox rubber bar end plug to the rescue! Love it!
As I was finishing up, it occurred to me that this 56cm frame had about the perfect length top/steerer tubes where I could most likely remove the stem binder bolt and thread it in from under the fork crown and use it to "pull" the wedge free. But was it long enough to reach the wedge from the underside? I guess I'd have to find out.
Well, that was three weeks ago. Last night I went back to work on the stem. Saw that my PB Blaster was still sitting within the tube and "marinating" the stem (however effectively), so I went to seeing if I could free the wedge. Hammer blows once again failed to free it. I put clean rags on my padded hammer handle and used it as a wedge between the fork blades just below the crown. I pulled on the bars and nada! Still wouldn't break free.
Luckily, I remembered my epiphany from three weeks ago and gave the "reverse wedge pull" a try. Found my smooth chrome Park cone wrenches and found the wedge bolt fit PERFECTLY through the holes in the wrenches! Love it when this happens. And to be sure I did no damage to the paint on the underside of the crown, I put some Gorilla duct tape on the side of the cone wrench that would be pushing against the crown.
Worked like a charm! Didn't even require much torque to pull the wedge free. Once it was, the stem easily came out. So glad there was no galvanic corrosion issue. So psyched this stem issue was resolved without having to go all brute-force on the thing.
Ironically, I did find that both fork tips were twisted when I put the dropout tools on 'em. I bet the bike was in a crash and the wheel spun around hard and bent the fork blades. Got 'em straight with a little muscle.
Today was "tube prep day" where I pulled the well-greased seat post to look down the length of the seat tube. Definitely some rust; a consistent, but not too concerning layer all the way down (below where the post fit). Putting my flex hone on my 24" drill bit extender returned the tube to pristine shape with mirror-like sheen down to the BB.
Man it's nice when stuff works!
After blowing out the tubes with a length of SIS housing and compressed air, I treated the "closed" tubes with JP Wiegle and the seat tube with Fluid Film.
The restoration continues...
