


Austro Daimler Inter-10
 01-03-07 | 09:30 AM
#1


Austro Daimler Inter-10
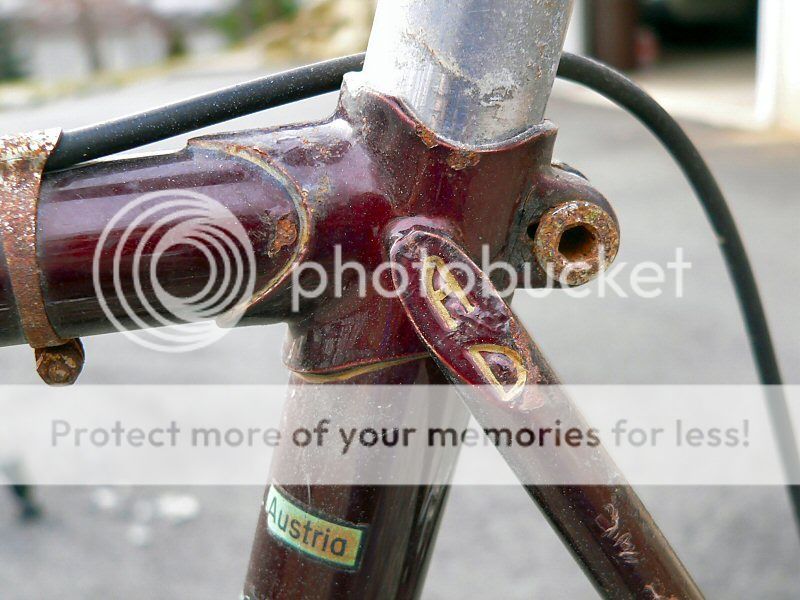
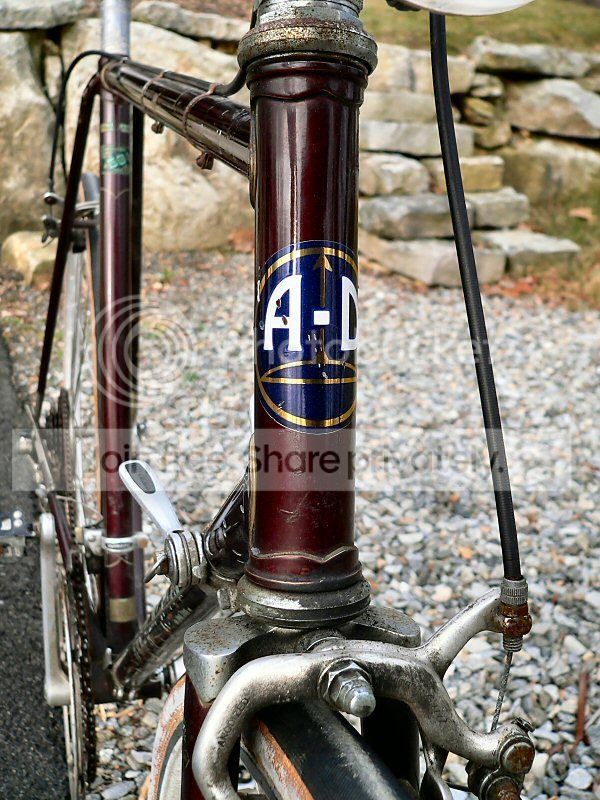
Found this AD Inter-10 for a decent price. It was dark, so I couldn't see the full extent of the paint damage. A shame, as it is a very attractive paint scheme, complete with pinstriping, lug accents, chromed fork crown, fork ends and dropouts.
I was able to ride it a short distance (despite it's poor mechanical condition), and it felt nice and smooth. I've been looking for a sport touring frame with longish chainstays and a stable fork rake, and this fits the bill. It also has a longer top tube than most frames I've found, which is perfect for my long torso. To add to the benefits, it looks like it is full Reynolds butted 531. I'm certain the main tubes and fork are 531, and it seems the stays are, but I could be wrong.
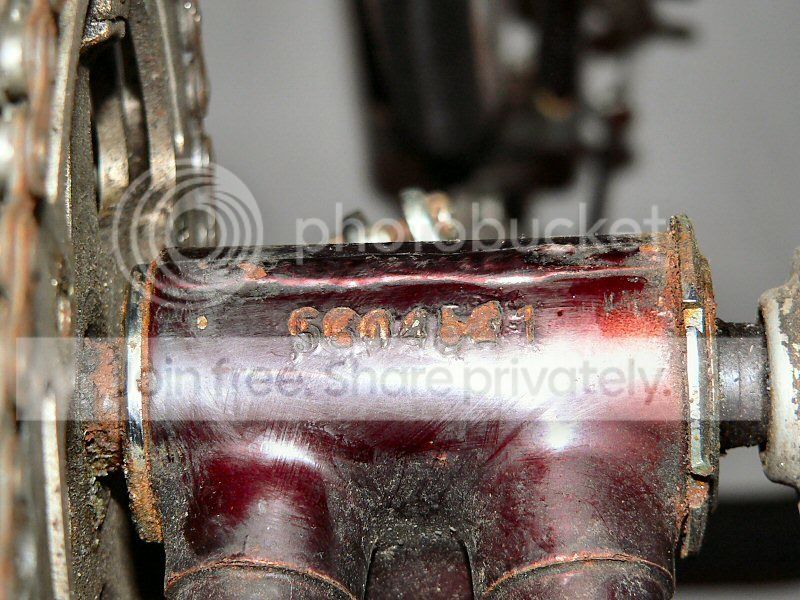
Does anyone know the age of this bike (I'm guessing mid 70s), and possibly the BB threading? I think the SN on the BB is 5604521. I'm a little worried as there is obvious rust coming from between the bottom bracket shell and cups, but at least it isn't bubbling terribly. I found date codes on the Shimano components, but they don't match up with date codes I've found online (ZL and ZH). I'm pretty sure the components aren't 2001 vintage!
Also, does the fork look tweaked to anyone? The stem contacts the headset toward the front of the bike, with a small gap toward the rear. I can't really see any gap at the bottom part of the headset assembly as I haven't disassembled the bike.
I'm partially cursing myself for picking up this rust bucket rather than waiting for something similar in better shape. But it's such a unique bike, and I seem to have bike adoption syndrome. I'm considering painting it inexpensively with a solid color and building it up as my main ride. However, the lack of ANY braze-ons is a little disconcerting. If I had the money, I'd restore the paint to look original, but that seems overkill on a mid-level bike. Oh well, add it to my collection of need-to-be-painted bikes.

I was able to ride it a short distance (despite it's poor mechanical condition), and it felt nice and smooth. I've been looking for a sport touring frame with longish chainstays and a stable fork rake, and this fits the bill. It also has a longer top tube than most frames I've found, which is perfect for my long torso. To add to the benefits, it looks like it is full Reynolds butted 531. I'm certain the main tubes and fork are 531, and it seems the stays are, but I could be wrong.
Does anyone know the age of this bike (I'm guessing mid 70s), and possibly the BB threading? I think the SN on the BB is 5604521. I'm a little worried as there is obvious rust coming from between the bottom bracket shell and cups, but at least it isn't bubbling terribly. I found date codes on the Shimano components, but they don't match up with date codes I've found online (ZL and ZH). I'm pretty sure the components aren't 2001 vintage!
Also, does the fork look tweaked to anyone? The stem contacts the headset toward the front of the bike, with a small gap toward the rear. I can't really see any gap at the bottom part of the headset assembly as I haven't disassembled the bike.
I'm partially cursing myself for picking up this rust bucket rather than waiting for something similar in better shape. But it's such a unique bike, and I seem to have bike adoption syndrome. I'm considering painting it inexpensively with a solid color and building it up as my main ride. However, the lack of ANY braze-ons is a little disconcerting. If I had the money, I'd restore the paint to look original, but that seems overkill on a mid-level bike. Oh well, add it to my collection of need-to-be-painted bikes.
Last edited by JunkYardBike; 09-06-07 at 10:21 PM.


 01-03-07 | 09:48 AM
#3

feros ferio

Joined: Jul 2000
Posts: 22,417
Likes: 1,882
From: www.ci.encinitas.ca.us
Bikes: 1959 Capo Modell Campagnolo; 1960 Capo Sieger (2); 1962 Carlton Franco Suisse; 1970 Peugeot UO-8; 1982 Bianchi Campione d'Italia; 1988 Schwinn Project KOM-10;
The components are nothing special, but the frame alone should be well worth the price of admission. Although I have a passion for Austrian bikes made from Reynolds 531 tubing, I concur that a full repaint might be overkill -- see how it cleans up first. Capo used English/ISO BB threading, but I have heard conflicting reports regarding the BB shreading of various Steyr-Daimler-Puch models. Perhaps PuchUltima can help us out ...
__________________
"Far and away the best prize that life offers is the chance to work hard at work worth doing." --Theodore Roosevelt
Capo: 1959 Modell Campagnolo, S/N 40324; 1960 Sieger (2), S/N 42624, 42597
Carlton: 1962 Franco Suisse, S/N K7911
Peugeot: 1970 UO-8, S/N 0010468
Bianchi: 1982 Campione d'Italia, S/N 1.M9914
Schwinn: 1988 Project KOM-10, S/N F804069
01-03-07 | 10:11 AM
#4
Originally Posted by Scooper
Where are the pictures? 
01-03-07 | 10:17 AM
#5
I should add some specs to help with dating:
Shimano 600 RD
Shimano 600 brake calipers
Shimano 60 FD
Shimano I-don't-know shifters and brake levers
SR Apex 52/42 crankset
Normandy Luxe Competition high flange hubs
Weinmann 27" alloy rims
Shimano forged dropouts
Tange BB
SR stem and bars
So, no...not high end components
Shimano 600 RD
Shimano 600 brake calipers
Shimano 60 FD
Shimano I-don't-know shifters and brake levers
SR Apex 52/42 crankset
Normandy Luxe Competition high flange hubs
Weinmann 27" alloy rims
Shimano forged dropouts
Tange BB
SR stem and bars
So, no...not high end components
Last edited by JunkYardBike; 01-03-07 at 10:34 AM.
01-03-07 | 10:22 AM
#6
Originally Posted by John E
The components are nothing special, but the frame alone should be well worth the price of admission. Although I have a passion for Austrian bikes made from Reynolds 531 tubing, I concur that a full repaint might be overkill -- see how it cleans up first. Capo used English/ISO BB threading, but I have heard conflicting reports regarding the BB shreading of various Steyr-Daimler-Puch models. Perhaps PuchUltima can help us out ...
I found the posts by you and Puchultima to be very helpful prior to picking this up. In fact, it was the posts on BF that persuaded me to get it despite the poor condition (that and the near perfect geometry)! I've also looked at Mark Bulgier's website, but this specific model does not appear to be there. Looks close to the 1976 model on his posted brochures.
Last edited by JunkYardBike; 01-03-07 at 10:28 AM.
01-03-07 | 11:55 AM
#7

Senior Member
Joined: Oct 2004
Posts: 2,947
Likes: 1
From: Absecon, NJ
Bikes: Puch Luzern, Puch Mistral SLE, Bianchi Pista, Motobecane Grand Touring, Austro-Daimler Ultima, Legnano, Raleigh MountainTour, Cannondale SM600
With a little TLC that bike ought to be a pretty nice ride. The components might not be top-shelf, but they are certainly respectable. My guess is the BB is English thread.
01-03-07 | 12:47 PM
#8


I agree, given all the JP components, this is likely one that got a BSC BB threading. I had an earlier one, same paint and other details, including Shimano dropouts, but had (nearly) all French components and a FR or Swiss BB...I guessed mine was a '74.The fork blades seem a little "off" to me, but it's so hard to judge from just one pic, in any case I doubt that they are unrepairable. I'd just concentrate on getting the fork straight, clean/derust everything and touch-up the chips with nail polish...then just ride it as a "rider" and don't sweat the cosmetics.
01-04-07 | 12:40 AM
#10

Go Team BH!
Joined: Jan 2006
Posts: 238
Likes: 1
From: just outside B-ham, AL
Bikes: Austro Daimler Ultima
My Ultima is a 1976. The pin-stripping and decals seem to be the same design, so that Inter-10 is probably about the same year. I hope you can fix it up, as it will be a nice bike (again) if you do.
Best wishes.
Best wishes.
01-04-07 | 04:10 AM
#11
Guest
Posts: n/a
I bought two almost new Puchs two years ago from my LBS. Both came with BSA threaded BBs and a mix of components that was typical for the mid sixties. They had Campa-cranks and BBs, Shimano 600 brakes and darailleurs, Campa and Gipiemme seat-posts and Dura Ace hubs. One had a Crane rear mech, dura-Ace front mech setup. It was a "couple", one mens Steyer Daimler Puch AD-SL Reynold 531 and one ladies Mixte Brigadier. The ladies came with the crane derailleur. Both bikes came with french moustache bars and straight Weinmann brakelevers. It seems that a wealthy couple had bought the bikes in the 70ies but have never ridden them. Someone brought it to the LBS when buying a new bike.
The pinstriping on my AD-SL is identical to that on your bike although mine has a Puch sticker instead of the AD sticker on the headtube. This might be because AD was Puchs brand for marketing their bikes in the US. So it looks like the brakes on your bike are the origiginal ones as well as the cranks. I would go for a careful preservation of the frame by removing rust without touching decals and paint too much. The fork really looks like being misaligned so you should try aligning or replacing it. A full chrome fork would make a nice replacement and should be easy to obtain on ebay.
The pinstriping on my AD-SL is identical to that on your bike although mine has a Puch sticker instead of the AD sticker on the headtube. This might be because AD was Puchs brand for marketing their bikes in the US. So it looks like the brakes on your bike are the origiginal ones as well as the cranks. I would go for a careful preservation of the frame by removing rust without touching decals and paint too much. The fork really looks like being misaligned so you should try aligning or replacing it. A full chrome fork would make a nice replacement and should be easy to obtain on ebay.
01-04-07 | 08:39 AM
#12
Thanks for all the responses. I stripped the bike last night, and it turns out the BB is BSC or BSA or ISO or whatever you choose to call it!  I should have looked before I asked: Tange 1.37 x 24 is stamped right on the cups.
At any rate, the adjustable cup and lockring came off easily, and the threads are great. No rust on that side. The fixed cup, however, is being stubborn. Water seems to have entered through the drive side spindle hole. The cup and bearings were swimming in a soup of rust. Peering in from the left side of the BB, it doesn't appear the rust is bad, but there may be enough that it's keeping the fixed cup frozen in place. I drenched it in WD-40 several times over the course of a couple hours, but it still won't budge. I tried securing the flats in a vice, but it kept popping out when I applied torque. I finally gave up, but sprayed more WD-40 and another penetrating oil in all the cracks. I'll give it a go again today.
As far as preserving the paint - I think that would be a tall order. I'd say a good 5-10% of the frame has surface rust, and most of the decals are gone. Some of the most visually appealing areas, such as the AD stamp on the seatstay pictured above, would need to be sanded and cleaned. I can clean and touch it up, but it won't look very good. But as others have said, it will make a decent rider.
Actually, now that it's stripped, I'm having sacreligious thoughts. I do like the looks of a stripped frame, and this bike has absolutely no brazeons...a fixed gear nut's dream!
I should have looked before I asked: Tange 1.37 x 24 is stamped right on the cups.At any rate, the adjustable cup and lockring came off easily, and the threads are great. No rust on that side. The fixed cup, however, is being stubborn. Water seems to have entered through the drive side spindle hole. The cup and bearings were swimming in a soup of rust. Peering in from the left side of the BB, it doesn't appear the rust is bad, but there may be enough that it's keeping the fixed cup frozen in place. I drenched it in WD-40 several times over the course of a couple hours, but it still won't budge. I tried securing the flats in a vice, but it kept popping out when I applied torque. I finally gave up, but sprayed more WD-40 and another penetrating oil in all the cracks. I'll give it a go again today.
As far as preserving the paint - I think that would be a tall order. I'd say a good 5-10% of the frame has surface rust, and most of the decals are gone. Some of the most visually appealing areas, such as the AD stamp on the seatstay pictured above, would need to be sanded and cleaned. I can clean and touch it up, but it won't look very good. But as others have said, it will make a decent rider.
Actually, now that it's stripped, I'm having sacreligious thoughts. I do like the looks of a stripped frame, and this bike has absolutely no brazeons...a fixed gear nut's dream!
01-04-07 | 09:07 AM
#13
Senior Member
Joined: Oct 2004
Posts: 2,947
Likes: 1
From: Absecon, NJ
Bikes: Puch Luzern, Puch Mistral SLE, Bianchi Pista, Motobecane Grand Touring, Austro-Daimler Ultima, Legnano, Raleigh MountainTour, Cannondale SM600
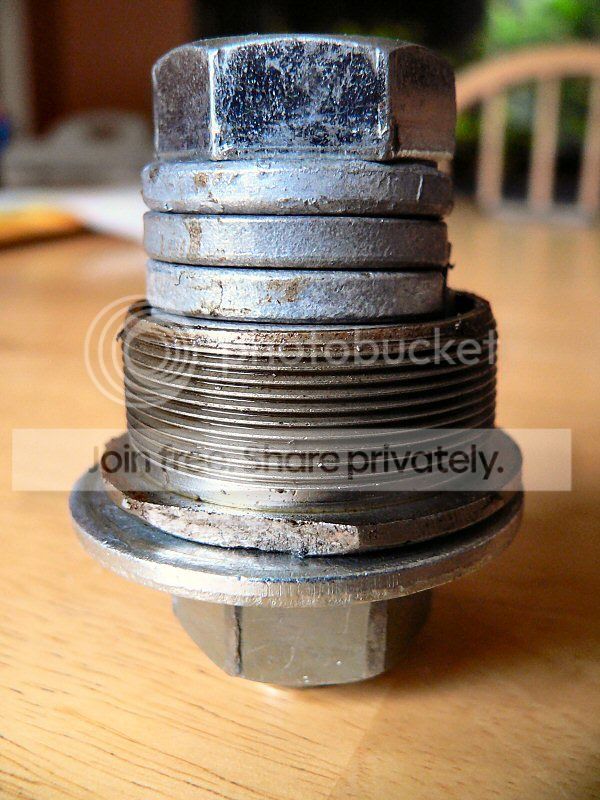
If the fixed cup keeps giving you grief, try this approach: Put the rest of the bottom bracket back on the bike and put the fixed cup wrench over the spindle. Get yourself a good sized sturdy washer with an outer diameter larger than the wrench and the center that will fit just over the spindle. Get a short section of sturdy pipe with an inner diameter a little bit bigger than the spindle diameter and outer diameter big enough not to slip through the inside of the large washer. The pipe length needs to be long enough to take up the distance of the spindle. Top it off with a washer larger than the pipe. Thread on the spindle nut or bolt to snug everything up, pressing the fixed cup wrench firming onto the flats. That should help give you leverage to crack the cup free without the worry of the wrench slipping off the flats. I probably didn't do a very good job explaining it, but hopefully you can get the picture.
01-04-07 | 09:22 AM
#14
feros ferio
Joined: Jul 2000
Posts: 22,417
Likes: 1,882
From: www.ci.encinitas.ca.us
Bikes: 1959 Capo Modell Campagnolo; 1960 Capo Sieger (2); 1962 Carlton Franco Suisse; 1970 Peugeot UO-8; 1982 Bianchi Campione d'Italia; 1988 Schwinn Project KOM-10;
You probably are a step ahead of me on this, but make sure you are trying to turn the fixed cup CLOCKWISE. Otherwise, follow Nick's advice or the very similar procedure outlined by Sheldon Brown. When I wanted to get the 1959 Capo repainted, the OEM fixed cup put up such a fight that I had to let Jim "CyclArtist" Cunningham use his professional BB tool and his floor-mounted vise-on-a-post.
__________________
"Far and away the best prize that life offers is the chance to work hard at work worth doing." --Theodore Roosevelt
Capo: 1959 Modell Campagnolo, S/N 40324; 1960 Sieger (2), S/N 42624, 42597
Carlton: 1962 Franco Suisse, S/N K7911
Peugeot: 1970 UO-8, S/N 0010468
Bianchi: 1982 Campione d'Italia, S/N 1.M9914
Schwinn: 1988 Project KOM-10, S/N F804069
"Far and away the best prize that life offers is the chance to work hard at work worth doing." --Theodore Roosevelt
Capo: 1959 Modell Campagnolo, S/N 40324; 1960 Sieger (2), S/N 42624, 42597
Carlton: 1962 Franco Suisse, S/N K7911
Peugeot: 1970 UO-8, S/N 0010468
Bianchi: 1982 Campione d'Italia, S/N 1.M9914
Schwinn: 1988 Project KOM-10, S/N F804069
01-04-07 | 11:59 AM
#15
Senior Member
Joined: Oct 2004
Posts: 2,947
Likes: 1
From: Absecon, NJ
Bikes: Puch Luzern, Puch Mistral SLE, Bianchi Pista, Motobecane Grand Touring, Austro-Daimler Ultima, Legnano, Raleigh MountainTour, Cannondale SM600
Originally Posted by John E
You probably are a step ahead of me on this, but make sure you are trying to turn the fixed cup CLOCKWISE. Otherwise, follow Nick's advice or the very similar procedure outlined by Sheldon Brown.
Here's the link:
https://sheldonbrown.com/tooltips/bbcups.html
01-04-07 | 08:21 PM
#16
Junior Member
Joined: Oct 2005
Posts: 132
Likes: 6
From: Hopkinton, NH
Bikes: Too many.
Nice AD. I have had mine (alas not 531) and I love the feel and fit....25 years later I still want it to work but boy I wish it had some brazeons! If you do paint it......research putting downtube shifter posts first. A 531 frame may be worth the money. I have read hear you can do some DIY water bottle threads. Mine does have 3 cable "barrels" on the top tube. But you are right, they put little on it and it would be a great fixie!
Enjoy and keep us posted!
Enjoy and keep us posted!
01-05-07 | 12:59 PM
#17
Got it!
Involved using my leg to tighten it down enough, but it finally gave. Reynolds 531 is reputedly stiff, but I assure you it was flexing quite a bit. If it realigned, I hope it was in the right direction!
Not really much rust at all, and the BB shell looks great.
I have a couple frames I've considered painting (the threads are on C&V), but I'm glad I waited. I think this frame is the right fit, but I should probably heed the advice of unworthy1 to just clean it up and ride it. Then, if I really like it, I can strip, paint and rebuilt.
The other issue is the fork alignment, though. I guess I could ride it as is and see how it handles. But there's a framebuilder in Eastern PA, just 1.5 hours from me (saves on shipping!) who will strip and powdercoat for $150. He also welds braze-ons. All told though, if the frame and fork need aligning, and I have brake, shifter, derailleur, and water bottle braze-ons added, I'll probably be looking at $250-$300.
If not that, I have a LOT of work to do removing all of the surface rust. I've seen some post on BF regarding bathing a frame in an oxalic acid solution. Maybe I'll try that.
Involved using my leg to tighten it down enough, but it finally gave. Reynolds 531 is reputedly stiff, but I assure you it was flexing quite a bit. If it realigned, I hope it was in the right direction!
Not really much rust at all, and the BB shell looks great.
Originally Posted by AD-SLE
If you do paint it......research putting downtube shifter posts first.
The other issue is the fork alignment, though. I guess I could ride it as is and see how it handles. But there's a framebuilder in Eastern PA, just 1.5 hours from me (saves on shipping!) who will strip and powdercoat for $150. He also welds braze-ons. All told though, if the frame and fork need aligning, and I have brake, shifter, derailleur, and water bottle braze-ons added, I'll probably be looking at $250-$300.
If not that, I have a LOT of work to do removing all of the surface rust. I've seen some post on BF regarding bathing a frame in an oxalic acid solution. Maybe I'll try that.
01-10-07 | 04:45 AM
#18
Guest
Posts: n/a
Since there are many nice DT band-on shifters and cable clamps around I would not consider braze-ons there. That way you can maintain the fixed speed option. The only thing I would add is braze-on water bottle threads. But i would only strip the paint when most of the stickers are gone and the rest of the paint is clearly unsightly. Try polish, wax and some oil first and see how it looks and rides.
01-10-07 | 12:23 PM
#19
Originally Posted by JunkYardBike
I've seen some post on BF regarding bathing a frame in an oxalic acid solution. Maybe I'll try that.
Here's a cheap source for oxalic acid. The 7 lb tub will probably treat 10 bikes, more or less at the rate I'm using it.
https://www.chemistrystore.com/oxalic_acid.htm
01-10-07 | 01:06 PM
#20
Originally Posted by McDave
That bike is a perfect candidate for an oxalic acid bath
On the Amsoil HD, how do you keep it from making contact with the BB threads and headtube faces, etc? Is it easy to control, or do those areas need to be masked first?
By the way, can people see the original pics I posted? For some reason, I can't, but they are definitely there in my photobucket account, I didn't move them, and other images I've linked to seem to be working on BF.
01-10-07 | 06:29 PM
#21
Originally Posted by JunkYardBike
On the Amsoil HD, how do you keep it from making contact with the BB threads and headtube faces, etc? Is it easy to control, or do those areas need to be masked first?
By the way, can people see the original pics I posted? For some reason, I can't, but they are definitely there in my photobucket account, I didn't move them, and other images I've linked to seem to be working on BF.
Last edited by McDave; 01-10-07 at 06:59 PM.
01-10-07 | 06:59 PM
#22
One more question, McDave. Is it necessary to open rust bubbles that have formed under the paint, or will the oxalic acid find its way to the source, loosen it, and cause the paint to flake off easily when brushed? There's quite a bit of subterranean surface rust (for lack of a better term) that I would rather not attack with a wire brush or razor if the acid bath will do a cleaner job. Thanks for all your help.
01-10-07 | 07:42 PM
#23
Originally Posted by JunkYardBike
One more question, McDave. Is it necessary to open rust bubbles that have formed under the paint, or will the oxalic acid find its way to the source, loosen it, and cause the paint to flake off easily when brushed? There's quite a bit of subterranean surface rust (for lack of a better term) that I would rather not attack with a wire brush or razor if the acid bath will do a cleaner job. Thanks for all your help.
But next time I would go ahead and "pop" any bubbles then use the *scratchless* scotchbrite pad from time to time while it's soaking to help speed up the process. No need to use anything harsh like a brush, razor, or even steel wool. You're just wiping off a white powder that comes off easily.
Too bad about the chrome. I wouldn't give up on all of it though until giving the oxalic acid a chance. Some of it, like the headset, may be salvagable with some polishing.
Last edited by McDave; 01-10-07 at 10:35 PM.
