


1983 Motobecane Mirage


 08-09-07 | 12:08 PM
#27
Senior Member
Joined: Jun 2007
Posts: 60
Likes: 0
Mirage Makeover
NICE transformation!
I like those quasi-cruiser kinda funky handlebars. What types of brake (levers) did you put on? They don't look like you salvaged them from the original bike.
My very first post on this forum was to inquire how to secure the TWO front anchoring arms of my Blackburn Al cage (looks a lot like yours) onto the frame, when there are no corresponding braze-ons to anchor them.
A sort-of solution was to buy these 'P'-type clamps, but the geometry is still off (ie, no nice straight-line symmetry with horizontal). The best I could do was to bend the front arms ~ 45 deg down.
A close-up of the front end of your rack would be appreciated: I think you have a later model rack.
The one I put on was new, but ~ 10 years old.
08-09-07 | 12:18 PM
#28
Senior Member
Joined: Jun 2007
Posts: 60
Likes: 0
Nice Moto Mirage Sport
If I had the room, I would have bid on this. Am including the link, because I think this is one of the nicest bikes I've seen in a long time.
Sort of the poorer guy's version of finding that mythical '65 Corvette in a barn: barely ever ridden, carefully stored, no rust, all original, everything intact, real nice color scheme:
https://cgi.ebay.com/Motobecane-Mirag...dZ1QQcmdZViewI
(Hope this opens)
Sort of the poorer guy's version of finding that mythical '65 Corvette in a barn: barely ever ridden, carefully stored, no rust, all original, everything intact, real nice color scheme:
https://cgi.ebay.com/Motobecane-Mirag...dZ1QQcmdZViewI
(Hope this opens)
08-09-07 | 12:41 PM
#29

Pedal pusher...
Joined: Oct 2006
Posts: 7,766
Likes: 1
From: Los Angeles
Bikes: I've got a bunch...
Ok...I was lucky enough to find this vintage rack with this "period" kind of arrangement to attach to the rear brake area of the bike...
My new bars are Soma Moustache and the brake levers are Gran Compe ....
My new bars are Soma Moustache and the brake levers are Gran Compe ....
__________________
May you live long, live strong, and live happy!
May you live long, live strong, and live happy!
08-09-07 | 08:21 PM
#30
Senior Member
Joined: Sep 2006
Posts: 264
Likes: 2
Mirages are great because they have a classic look and cost next to nothing today... besides the Soma bars (and Alice did a cool version of the Grant Petersen Nitto, but on a Soma... nice!) there are the flat bars from Jitensha Studio... I really like them.

08-12-07 | 01:49 PM
#31
Thread Starter
Senior Member
Joined: Jul 2007
Posts: 75
Likes: 0
From: IN - Indianapolis
Update on my conversion to a fixie:
I'm planning on using a Campy 700 wheel built with a Shimano 600 hub that came with the Centurion I used to have. It has an 8 ring cogset (all one piece) on it.
I read somewhere (Sheldon Brown most likely) that one of the ways you can get an idea of whether or not your chainline is close is to hang the bike vertically on the wall and drape the chain over the front ring and see how it hangs.
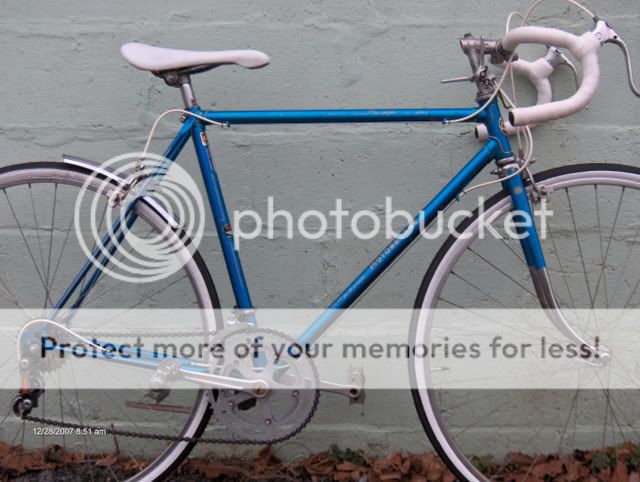
So I hung the bike up next to my wife's Bianchi Europa:
Bike hanging vertically on the wall
Adjusted it to make sure I had it hanging straight up and down (this photo taken before I had it exactly plumb):
Checking plumbness with a level
And hung the chain to see where it might line up on the cogset. This picture also shows the gold flake paint job pretty well now that I've wiped down the frame a bit:
Chain hitting the cogset
Since I don't have the tool that allows me to hold the freewheel still while I take a chain whip to the cogset, off I went to the LBS. $3.99 later, I had the cogset off. I decided that I would just let them do it instead of investing in the tools...
Came back home and rehung the bike to see how far I'll need to redish the wheel:
Chain hitting hub after removing cogset
I've also realized that the orignal stem that I removed was 20mm and the Nitto stem I'm planning on using is 20.2mm. I've already started sanding it down, but still have some work to do before it will fit.
I'm planning on using a Campy 700 wheel built with a Shimano 600 hub that came with the Centurion I used to have. It has an 8 ring cogset (all one piece) on it.
I read somewhere (Sheldon Brown most likely) that one of the ways you can get an idea of whether or not your chainline is close is to hang the bike vertically on the wall and drape the chain over the front ring and see how it hangs.
So I hung the bike up next to my wife's Bianchi Europa:
Bike hanging vertically on the wall
Adjusted it to make sure I had it hanging straight up and down (this photo taken before I had it exactly plumb):
Checking plumbness with a level
And hung the chain to see where it might line up on the cogset. This picture also shows the gold flake paint job pretty well now that I've wiped down the frame a bit:
Chain hitting the cogset
Since I don't have the tool that allows me to hold the freewheel still while I take a chain whip to the cogset, off I went to the LBS. $3.99 later, I had the cogset off. I decided that I would just let them do it instead of investing in the tools...
Came back home and rehung the bike to see how far I'll need to redish the wheel:
Chain hitting hub after removing cogset
I've also realized that the orignal stem that I removed was 20mm and the Nitto stem I'm planning on using is 20.2mm. I've already started sanding it down, but still have some work to do before it will fit.
10-11-07 | 10:03 AM
#32
Senior Member
Joined: Jun 2007
Posts: 60
Likes: 0
Hey Moto guy:
Too long since a proper response. Thanks for the amazingly detailed photos of your Moto fixie project, along with the step-by-step, play-by-play. The pics play up beautifully the real nice metallic finish of these bikes!
If you are still inclined, I (as I am sure others) would really enjoy seeing/hearing further coverage of this project! Thanks, BJK
10-14-08 | 10:50 AM
#34
Thread Starter
Senior Member
Joined: Jul 2007
Posts: 75
Likes: 0
From: IN - Indianapolis
Finally an update! Sorry I don't have "better" photos to share - yet. Just haven't taken any of the finished product.
Was able to sand the stem down enough to get it to work. Redished the rear wheel myself and slapped on a rear cog (don't recall the size - will have to check). With the hub I have, there wasn't enough room for a lock ring, so I'm running it without one.
Added a rear rack (Topeak) and had to use P-clamps to attach it. No problems there. Using the MTX bag with the fold down panniers for my commuting and it works great. Able to carry all my clothes, my laptop, lunch, tools etc without any issues. Pretty sure the heaviest my bag has weighed was last week when I had all of the above plus 3 lbs of steaks I picked up on the way home - 23 pounds.
Have used it for over 50 commutes to work (25 miles round trip) over the course of the summer and haven't had any issues. Running a front brake only and since I'm not trying to set land speed records with it and ride cautiously around others on the MUP trail, I haven't needed anything else. Rarely need to use back pressure to help me slow down (which is good considering the lack of a lock ring)...
Next upgrade might be fenders, although very likely I'll be switching over to my mountain bike for winter commuting purposes and the upgrades to this bike might be put off until spring.
Here are a few "artistic shots" taken during my commute. Will get some of the actual bike posted soon - of course I promised that awhile ago, didn't I?
View from your seatpost collar
View from side of the road
Speeding past our Habitat for Humanity Warehouse Mural
10-14-08 | 01:17 PM
#35
Senior Member
Joined: Jun 2007
Posts: 60
Likes: 0
Hey Moto Guy!
Thanks for remembering me. I have to say I've never seen such a goofball, oddball bunch of 'project' pics in my life, but they serve a better purpose: your bike is in ACTION, not some damn status symbol hanging from your ceiling: good for you!
I especially dig the first shot: looks like a nice, not-so-hectic piece of road, that goes on some way into the distance: I had to recheck your locale: Indy: man, I'd like to do some biking there, rather than constantly dodging a-holes here in NYC.
Again, love the gold paint, the MOTO graphics from that particular year.
Please, when you can, fire off a few more conservative shots, just to appreciate your work: whole bike, drive-train side, rear hub work, etc.
I remember that the first pics you sent, of the project underway, were like a tutorial for those of us who have not taken on such a project.
Congrats, BRO, and enjoy your MOTO!
10-15-08 | 11:29 AM
#36
Thread Starter
Senior Member
Joined: Jul 2007
Posts: 75
Likes: 0
From: IN - Indianapolis
Yeah, definitely went from the early "before" to the late "after" photos and haven't posted anything between. Has been that type of year...will get some posted soon.
Definitely not spending much time in the corner of the garage - it is out pounding the pavement on a (nearly) daily basis. Those shots were taken on a Rails to Trails conversion that runs right into our downtown area - and conveniently also runs adjacent to my neighborhood so I have most of my 12 mile commute on it and not on our roads...
Has been that type of year...will get some posted soon.Definitely not spending much time in the corner of the garage - it is out pounding the pavement on a (nearly) daily basis. Those shots were taken on a Rails to Trails conversion that runs right into our downtown area - and conveniently also runs adjacent to my neighborhood so I have most of my 12 mile commute on it and not on our roads...
10-15-08 | 07:11 PM
#37

Senior Member
Joined: Jul 2006
Posts: 244
Likes: 0
From: Dover, NH USA
Bikes: 1986 Bridgestone 500, 1981 Motobecane Super Mirage
Curious what tires you're running on it? I'm considering a speedier tire for my Super Mirage of similar vintage.
 [/IMG]
10-16-08 | 10:27 AM
[/IMG]
10-16-08 | 10:27 AM
#39
Thread Starter
Senior Member
Joined: Jul 2007
Posts: 75
Likes: 0
From: IN - Indianapolis
Curious what tires you're running on it? I'm considering a speedier tire for my Super Mirage of similar vintage.
Bike - $50
Tires - $70
Rack/bag - $80
Gotta love how some of my accessories are more than what I paid for the bike!
10-16-08 | 04:13 PM
#40
Senior Member
Joined: Jun 2007
Posts: 60
Likes: 0
Hey Tolfan: Nice set-up.
A quick run-down for us would be nice: year, model, components?
I've always made the point that the paint and finish quality of the 'vintage' Moto's are pretty amazing, given their kinda 'lower-end' standing in the cycling world.
Smunders gold/champagne metallic-flake scheme is the best case-in-point of my claim.
Go to his first pic postings at the start of this thread: the color and sparkle is pretty amazing.
10-17-08 | 12:41 PM
#41
Steel80's

Joined: Feb 2007
Posts: 685
Likes: 43
From: NJ
Bikes: Breezer Venturi, Schwinn Peloton(s), Marin Lucas Valley
Looks like you've done right by that old Mirage. I also scrounged up a gold one from about the same year, but it was a basket case. It turned into my first fixed-gear project and is now Piper Cub rustoleum yellow. I've probably put close to 1k miles on it over the last couple of years. Though it's battleship heavy, I've always been struck by the comfortable, smooth ride. It makes a great commuter.
10-18-08 | 09:27 AM
#42
Senior Member
Joined: Jun 2007
Posts: 60
Likes: 0
Looks like you've done right by that old Mirage. I also scrounged up a gold one from about the same year, but it was a basket case. It turned into my first fixed-gear project and is now Piper Cub rustoleum yellow. I've probably put close to 1k miles on it over the last couple of years. Though it's battleship heavy, I've always been struck by the comfortable, smooth ride. It makes a great commuter.
Is this 'battleship heavy'? Yeah, compared to carbon or aluminum, but not really that much heavier than my 1981 Raleigh Supercourse, which is 531 main tubes.
Every time I read someone talking about 'gas pipe', or your great new description, I kinda have to scratch my head a little.
If you use the bike to commute (unless it's some extreme distance), it seems to me that a somewhat heavier machine is a good thing, in terms of tracking, crash resistance, etc.
Either way, your going to get in a pretty good workout on a Moto.
