


Head Badge Application Question
 05-20-09 | 09:56 AM
#1
Thread Starter
peddling fool
Joined: Oct 2007
Posts: 506
Likes: 1
From: Philadelphia PA
Bikes: Mid 50's Frejus, Late 50's Frejus, Early 1960s Frejus Professional, Mid 1960's Frejus Professional, Early 70's Gloria (branded), 76 Blue Pogliaghi
Head Badge Application Question
The local vintage bike shop couldn't help me out with this, or they were not really willing to make the effort to really try.
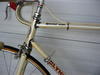
I purchased a 1960's Frejus frame, where the headbadge was removed. Are there headbadge bolts/rivets available? I can go the route of just using glue - but didn't think it was rocket science. Mainly, I wanted to apply the headbadge correctly - not worry about it falling off down the road.
I appreciate any recommendations. The size of the rivets would be pretty small, so any interesting suggestions (homemade/hardware store) would be great. Glue suggestions would also help - anything better than crazy glue?
In case you're interested in the frame/headbadge - here's a link which may be helpful to see what I'm referencing...
Thanks!
https://cgi.ebay.com/ws/eBayISAPI.dll...lenotsupported

 05-20-09 | 10:24 AM
#3

Senior Member


Joined: Dec 2006
Posts: 7,474
Likes: 553
There was a thread about this a couple months ago. The best answer (I thought) was to use a type of rivet that has a spiral "thread" on the shank. It bites the hole as you tap it in. Sorry I can't remember what they're called, but the search function will probably find the thread.
[edit] drive screws. here's the thread:https://www.bikeforums.net/showthread...ight=headbadge
[edit] drive screws. here's the thread:https://www.bikeforums.net/showthread...ight=headbadge
Last edited by due ruote; 05-20-09 at 10:29 AM.
05-20-09 | 10:56 AM
#4

Cat 6
Joined: Dec 2007
Posts: 7,522
Likes: 236
From: Mountain Brook, AL
If you decide on glue, I put my Trek badge on with something I had bought at an auto store, called "Pit Stop". It's white, sticks well, has some thickness, but not nearly as thick as the double-sided tape I found. I just found it to be a cleaner look than the thicker tape, and the metal badge nestled up to the tube ala Superglue just didn't feel right.
05-20-09 | 11:25 AM
#5
South Carolina Ed
Joined: Mar 2007
Posts: 3,908
Likes: 320
From: Greer, SC
Bikes: Holdsworth custom, Macario Pro, Ciocc San Cristobal, Viner Nemo, Cyfac Le Mythique, Giant TCR, Tommasso Mondial, Cyfac Etoile
I just went through this with my Holdsworth. I wanted to use rivets but couldn't find any small enough. Then I bought some brass screws of various types and sizes at the hardware store, but couldn't get them to turn into the little holes. I didn't want to oversize the holes by drilling, so I cut off some shiny nail heads (spiraled ones that come with carpet-to-floor strips), glued the badge on the back with clear sealant and applied it to the head tube, and then used a toothpick to smear sealant in the badge holes and then through the head tube holes, and stuck in the nail heads. While less than ideal, it looks perfect and seems well attached. I had read that others ended up doing the same thing. BTW, I found there is very little clearance between the steering tube and the inside of the head tube, which limits possibilities.
05-20-09 | 11:36 AM
#6
Senior Member
Joined: Nov 2005
Posts: 5,768
Likes: 10
Bikes: Cinelli, Paramount, Raleigh, Carlton, Zeus, Gemniani, Frejus, Legnano, Pinarello, Falcon
I've used small pop rivets. Might be able to cut a small nail head off with a little of the shaft and peen it over inside the headtube.
05-20-09 | 11:48 AM
#7
Senior Member
Joined: Oct 2008
Posts: 2,929
Likes: 2
Whatever you do consider these:
1. Do no damage.
Do not enlarge the holes, flare the edges of the holes in the head tube, thread the holes,...
2. Make it removable by the next guy.
It should either be soluble or sliceable. Silicone adhesives strong enough and can be sliced off using a wire/fishing line slipped between the head tube and the badge. Alcohol or water as a lubricant helps a lot. Certain adhesives are soluble and can be dissolved away, releasing the badge.
05-20-09 | 01:20 PM
#8
car guy, recovering
Joined: Nov 2008
Posts: 1,255
Likes: 9
From: Mount Vernon, NY
Bikes: Olympia Competizione & Special Piuma, Frejus track circa 1958, Dahon Helios, many others
Try Big Flats Rivet Company: https://www.bigflatsrivet.com/index.html
Find the largest size drill bit that will fit in the hole. If the hole is a shade under 3/32" (common size for little rivets) you can either drill out the hole or tap the rivet in. Use aluminum rivets. If they are loose you can either buck them by deforming them inside the head tube or put them in with a drop of loctite. A little trim adhesive (or rim glue)
on the badge itself will keep it on and the rivets will locate it accurately.
05-20-09 | 07:19 PM
#9
Thread Starter
peddling fool
Joined: Oct 2007
Posts: 506
Likes: 1
From: Philadelphia PA
Bikes: Mid 50's Frejus, Late 50's Frejus, Early 1960s Frejus Professional, Mid 1960's Frejus Professional, Early 70's Gloria (branded), 76 Blue Pogliaghi
Thanks All for the responses - this is helpful.
I have time, which is a good thing since I'm nursing a broken elbow after a spill a few weeks back on some wet Philly trolley tracks...It's good to have projects to keep busy.
I am likely going the route of drive screws if I can locate some. Reading the thread from a few weeks ago was helpful. I didn't think of the apoxy used to seal fish tanks, and double sided automative tape look's like a good, easy option.
Thanks Again - Great suggestions (as usual) - much to consider!
05-20-09 | 10:32 PM
#10

Bottecchia fan

Joined: Aug 2003
Posts: 3,520
Likes: 12
From: Colorado Springs, CO
Bikes: 1959 Bottecchia Milano-Sanremo (frame), 1966 Bottecchia Professional (frame), 1971 Bottecchia Professional (frame), 1973 Bottecchia Gran Turismo, 1974 Bottecchia Special, 1977 Bottecchia Special (frame), 1974 Peugeot UO-8
I posted this same comment to the other thread as well but figured I put it in both threads just to be thorough, belt and suspenders style - I have never - and I mean never ever - seen an original equipment headbadge attached with slotted screws. I won't say they don't exist but I've never seen one. That is problematic when you talk about using screws to re-attach a headbadge.
The adhesives solve the problem of attaching the badge and many can be removed but then you still have the problem of the covering the holes. I like the idea of the fake heads but I think the best solution would be to take careful measurements of the hole and how much space you have between the head tube and the steerer tube and get a drive screw just long enough to stick out a bit on the inside. That way you can still push it back out from the inside should you ever need to remove it. Now mind you I've never actually tried this but I will test it on the frame in the garage - without the actual headbadge and before I have it painted
The adhesives solve the problem of attaching the badge and many can be removed but then you still have the problem of the covering the holes. I like the idea of the fake heads but I think the best solution would be to take careful measurements of the hole and how much space you have between the head tube and the steerer tube and get a drive screw just long enough to stick out a bit on the inside. That way you can still push it back out from the inside should you ever need to remove it. Now mind you I've never actually tried this but I will test it on the frame in the garage - without the actual headbadge and before I have it painted
__________________
1959 Bottecchia Milano-Sanremo(frame), 1966 Bottecchia Professional (frame), 1971 Bottecchia Professional (frame),
1973 Bottecchia Gran Turismo, 1974 Bottecchia Special, 1977 Bottecchia Special (frame),
1974 Peugeot UO-8, 1988 Panasonic PT-3500, 2002 Bianchi Veloce, 2004 Bianchi Pista
1959 Bottecchia Milano-Sanremo(frame), 1966 Bottecchia Professional (frame), 1971 Bottecchia Professional (frame),
1973 Bottecchia Gran Turismo, 1974 Bottecchia Special, 1977 Bottecchia Special (frame),
1974 Peugeot UO-8, 1988 Panasonic PT-3500, 2002 Bianchi Veloce, 2004 Bianchi Pista
05-20-09 | 11:42 PM
#11
Bottecchia fan
Joined: Aug 2003
Posts: 3,520
Likes: 12
From: Colorado Springs, CO
Bikes: 1959 Bottecchia Milano-Sanremo (frame), 1966 Bottecchia Professional (frame), 1971 Bottecchia Professional (frame), 1973 Bottecchia Gran Turismo, 1974 Bottecchia Special, 1977 Bottecchia Special (frame), 1974 Peugeot UO-8
Ok the burning question was keeping me awake and I needed to pull the headbadge eventually anyway so I went out and pulled the headbadge from the Bottecchia sitting in the garage. It was quite easy. For the record, it was attached at the factory with brass drive screws. They protruded just a bit into the head tube. I took a big flat-blade screwdriver and gently pushed on the back of the drive screws. They popped out about a couple of millimeters or so, enough that I could use a pair of wire cutters to leverage the screw out the rest of the way without damaging the badge (no I wasn't cutting on the screws, the wire cutters just had a perfect shape to get behind the head of the screw without scratching the badge) . So I'm planning to put it back in the same way. The dimensions (roughly, my cheap micrometer isn't that acurate) are:
overall length: 4.6mm
head diameter: 3.1mm
shaft diameter: 2.0mm
I think that is this standard drive screw size:
Decimal Size .075"
Shank Type Spiral
Head Diameter .127"
Head Height .049"
Recommended Hole Size (Drill No.) .067
Length 1/8" (not counting the head)
Unfortunately I've only seen steel, stainless steel and zinc plated drive screws online so far.
__________________
1959 Bottecchia Milano-Sanremo(frame), 1966 Bottecchia Professional (frame), 1971 Bottecchia Professional (frame),
1973 Bottecchia Gran Turismo, 1974 Bottecchia Special, 1977 Bottecchia Special (frame),
1974 Peugeot UO-8, 1988 Panasonic PT-3500, 2002 Bianchi Veloce, 2004 Bianchi Pista
1959 Bottecchia Milano-Sanremo(frame), 1966 Bottecchia Professional (frame), 1971 Bottecchia Professional (frame),
1973 Bottecchia Gran Turismo, 1974 Bottecchia Special, 1977 Bottecchia Special (frame),
1974 Peugeot UO-8, 1988 Panasonic PT-3500, 2002 Bianchi Veloce, 2004 Bianchi Pista
Last edited by Kommisar89; 05-20-09 at 11:45 PM.
05-21-09 | 07:37 AM
#13
Thread Starter
peddling fool
Joined: Oct 2007
Posts: 506
Likes: 1
From: Philadelphia PA
Bikes: Mid 50's Frejus, Late 50's Frejus, Early 1960s Frejus Professional, Mid 1960's Frejus Professional, Early 70's Gloria (branded), 76 Blue Pogliaghi
Trustshoes generously offered to send me a set of 1/4" and 3/16" small sized thread-in bolts (brass I think). Source is jewelry and metal working shops. It's really nice of him to offer these up...Please answer all his posts
I am going to give it a shot - and I will let you all know how it turns out.
Some of us think our vintage headbadges are like Jewelry... Maybe this make's sense.
I am going to give it a shot - and I will let you all know how it turns out.
Some of us think our vintage headbadges are like Jewelry... Maybe this make's sense.
