


Velo-Cheapo 2010 - The entries are in
 03-17-10, 08:58 AM
#1

Rustbelt Rider
Thread Starter

Join Date: Oct 2008
Location: Canton, OH
Posts: 9,104
Bikes: 1990 Trek 1420 - 1978 Raleigh Professional - 1973 Schwinn Collegiate - 1974 Schwinn Suburban
Mentioned: 20 Post(s)
Tagged: 0 Thread(s)
Quoted: 261 Post(s)
Liked 372 Times
in
177 Posts
Velo-Cheapo 2010 - The entries are in
Let me start out by applauding all of the entrants in advance. A lot of work, creativity and accounting went into these builds and the results are fantastic. This year the winner gets a beautiful Cheapo inspired trophy.
Here is the format for this years contest. I am going to post make a post in this thread for each entry. Each post will have 1 picture of the bike, a link to the rest and then the build story.
The photo album with all of the entries can be found HERE.
Without further ado, lets get these posted!
Here is the format for this years contest. I am going to post make a post in this thread for each entry. Each post will have 1 picture of the bike, a link to the rest and then the build story.
The photo album with all of the entries can be found HERE.
Without further ado, lets get these posted!
Last edited by mkeller234; 03-17-10 at 10:03 AM.
 03-17-10, 09:03 AM
#2
Rustbelt Rider
Thread Starter
Join Date: Oct 2008
Location: Canton, OH
Posts: 9,104
Bikes: 1990 Trek 1420 - 1978 Raleigh Professional - 1973 Schwinn Collegiate - 1974 Schwinn Suburban
Mentioned: 20 Post(s)
Tagged: 0 Thread(s)
Quoted: 261 Post(s)
Liked 372 Times
in
177 Posts
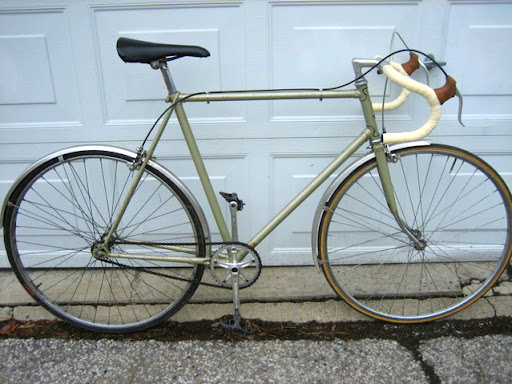
Entry 01
While doing some riding with my 10 year old daughter this summer, she commented on wanting a road bike. While in a LBS later in summer she saw a nice 650B or 24� kids Felt road bike. We both agreed it was cool except for the $750 price tag. I informed her if I was spending that kind of money; I was going to be the one getting a new bike. I decided to start keeping my eyes open for a small frame road bike � in my price range, which is a close to $0 as possible. Fast forward to fall and a mechanic at work asked me to look at some bikes he picked up at a yard sale for $15.
He had a mid � sixties Robin Hood ladies 3 speed, a 70�s Takara, a couple of BMX bikes and a small '87 Schwinn Sprint. All were pretty rough. I filled him in on what he had and my opinion of what he should do with them. I checked out the Sprint because it looked so small. The tires were so dry rotted I couldn�t even read the size but determined them to be 27�. It had a large flat seat on it and some bars that looked to be from a stationary bike. The brake handles were the old drop bar units that had been bent straight for the bars.
It was rough, but appeared undamaged and would be a starting point. Five dollars exchanged hands and I rolled it down to my end of the building.
It became a long term project until one Saturday morning while taking my daughter to choir I saw a bike at a yard sale. After dropping her off I turned around and checked it out. It was an �86 Raleigh USA mixte. Already owning a �84 Gran Prix, I knew that these were good values, with sealed hubs and BB and decent tubing. It had the alloy wheels, decent level drive train, and brakes I was looking for.
After a short negotiation I was $40 poorer, but had a healthy donor. Closer inspection showed that this bike had been ridden very little � if at all.
I stripped the donor Raleigh of all its components and threw the frame on CL. A young lady was so enamored of it, especially the purple color, that she gave me $20 rather than the agreed upon price of $15! A Craig's List first!
I ran all the parts through the wash tank and proceeded to spend numerous hours polishing all the aluminum bits while checking their condition. I did swap the light action RD, which had low miles on it, onto my workhorse commuter Trek. The Trek�s Rd was still functioning fine so it would become part of the build. In the mean time I assessed what else would be needed for the build.
The Sprint was stripped to the frame and all the parts assessed. With the donor bike in hand, the frame appeared to be the only part I would be reusing. At this point I decided that with the frame already at 126mm spacing to go six speed and indexed due to my daughters lack of friction experience. I had also decided to paint the frame on the Sprint as it looked pretty rough. I polled my daughter and she wanted red & black like her MTB. Not wanting to do a lot of taping and 2 color, I talked her into black with red accessories. I decided that red and black tape and red cable housing would look good and if I found time I would tape off the lugs and paint them red.
About this time the Velo-Cheapo contest was announced. Figuring I was building this bike anyway, I tossed my hat in the ring. The deadline fit into my schedule as I had decided to have the bike ready by her birthday, Feb. 28th. I also wasn't going to try to thrift too much, as this was going to be ridden by my baby, so safe & functional ruled.
Now I needed to accumulate or sort out the rest of the needed parts. I checked the web and found some original decals on Flea bay. While checking out a new headset at some of the LBSs I also found a set of used Shimano light action indexed stem shifters at a price I could live with. After some price checking I decided the cost of an alloy seat post was not worth the benefit. Having choices on freewheels, I decided to go all Shimano and removed the Suntour 6 speed off the Raleigh wheel and installed a used UG I had previously replaced on my Trek and kept around. The brakes, crank, and bottom bracket would come off the donor bike as they were in good shape. A guy at work gave me some aero brake levers from a previous flat bar conversion.
I disassembled the wheels and bottom bracket and replacing all the bearings and greasing them up. I couldn�t bring myself to use the expensive �Phil� grease though. Cleaning and polishing of all the aluminum parts was tedious, but turned out looking nice. I filled in all the lettering on these with a red paint pen to add some more red to the bike. I also found a seat at the Salvation Army. The color didn't fit my scheme, but it was sized right for her petite derriere.
The stripped frame was taken and sand blasted to remove the old paint and surface rust. It then went down to the paint shop to get a coat of gloss black. Unfortunately the spray booth went down and created a 2 week delay in getting the frame ready. There went my timeline for finishing by her birthday and Velo-Cheapo. I was relieved to get the PM extending the deadline for the contest, but Emily would have to settle for pictures in a card for her birthday. We�re still in winter�s grip here, so she wouldn�t be riding it for a while anyway. I got the frame with the base coat back on Feb. 25th. I then went to work on adding the decals so it could go back for clear coat. Installing the 20 year old NOS decals was not as easy I imagined. The small ones went on without a hitch, but I managed to tear some of the bigger ones. I realigned them as best I could, and they turned out pretty good for my first attempt. Better to practice on a Velo-Cheapo than on some expensive project. The frame returned from clear coat on March 8th and I let it sit for a day to dry more.
Assembly then started, but not without hitches. The screws I used to replace the head badge rivets were too long and interfered with the fork. This was remedied with a pair of side cutters. I needed some extra spacers out of the junk bin to mount the brakes, but once again nothing out of the ordinary when doing a C&V build from various bikes. The frame didn't have a hanger, so I had snagged one from an Alvit I had around, but that turned out to not clear the freewheel when used. I had to take another from a Suntour VGT I had.
The rest of the assembly went uneventfully with minor tweaking and adjustment. I added some personalization to the top tube by adding some red vinyl lettering with her name in place of the "SPRINT". I also added her name to the front of the forks in honor of the Raleigh donor�s heritage. Final red touches were red heat shrink on cable ends and valve caps.
Emily now has a Roadie and with any luck it'll fit her this summer!
Future additions for comfort and practicality will be a rear rack and a bottle cage. I'll eventually move her bell, computer, and mirror off the outgrown trailer bike. Total Cost $128.04
Velo - Cheapo bike build accounting for Entry 002
ITEM
COST
COMMENT
Original Bike
$5.00
Bought from co-worker, 1987 Schwinn Sprint 18"
Donor Bike
$40.00
Yard Sale, 1986 Raleigh Olympian Mixte. Barely ridden
New headset
$20.00
Ben's Cycle
Used cable stop
$2.00
Ben's Cycle
New Cone
$2.00
Crank Daddy's
New Red cable housing
$11.90
Crank Daddy's
Used 6 sp. index shifters
$10.00
Corey the bike fixer
Stainless Hardware
$3.44
True Value Hdw
Bar tape
$9.00
REI
New Bearings
$2.46
Bulk buy ( used 56@.044ea)
Seat
$2.49
Salvation Army Store
Decals
$19.75
Ebay
Rims, Tubes, & Tires
$0.00
From Donor Bike
BB, Crank, & Pedals
$0.00
From Donor Bike
Brake Levers & Calipers
$0.00
From Donor Bike
Chain & Freewheel
$0.00
From Donor Bike
Stem & Bars
$0.00
From Donor Bike
Derailleurs & cables
$0.00
From Donor Bike
Paint
$0.00
My Freebie, Painters at work did it.
Total
$128.04
Last edited by mkeller234; 03-17-10 at 09:24 AM.
03-17-10, 09:09 AM
#3
Rustbelt Rider
Thread Starter
Join Date: Oct 2008
Location: Canton, OH
Posts: 9,104
Bikes: 1990 Trek 1420 - 1978 Raleigh Professional - 1973 Schwinn Collegiate - 1974 Schwinn Suburban
Mentioned: 20 Post(s)
Tagged: 0 Thread(s)
Quoted: 261 Post(s)
Liked 372 Times
in
177 Posts
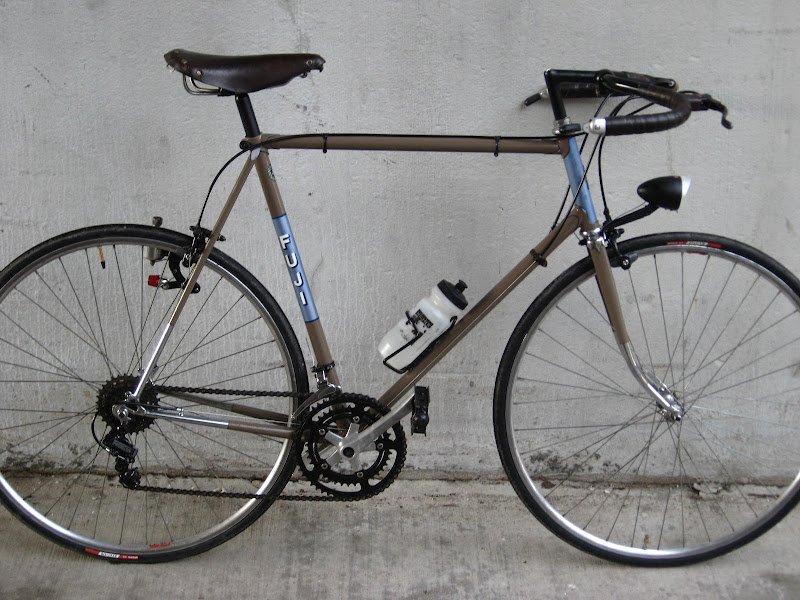
Entry 02

This build started with a trash-picked Raleigh Capri (from the dumpster of an LBS). Not a big surprise to find this frameset in the trash as it’s heavy (410 steel tubing), small, and remaining parts were heavily covered in grime and rust. However, it did have the advantage of lugged construction and a decent overall finishing.
Once the contest was underway, I knew I needed a theme for this build. I considered a fancy fixie or rando roadie, but given the parameters for low budget and creativity (as well as inventorying the parts I had on hand), I decided to go for the French single-speed city bike theme. Essentially the entire bike was then built around a set of demi-balloon hammered alloy fenders that I won in eBay a while back from a Belgian seller. I was happy to see that another plus to the Capri was that it actually had clearance at the chainstays and fork crown to fit these fenders. The rest of the parts were meant to fit that French theme: upright bars, Pivo stem, Guidionnet levers, Stronglight TS crankset w/ a 42-tooth ring, Lyotard pedals, Mafac Racer brakes. For wheels, I went with a non-French set of 700c Weinmann concave rims laced to Japanese hubs (w/ cheapo PerformanceBike 700 x 35 tires), but they didn’t cost much, and the rear was already dished for single-speed applications.
Before stripping the frame, I wanted to fit as many components as possible and make the final build that much easier.
That trial confirmed overall fit and told me what parts I still needed to acquire. The rest of the process included stripping the frame’s paint with Aircraft stripper (about a quarter aerosol can’s worth), priming with grey spray primer (one coat), and then about five cuts of a latex enamel applied by brush. The brush technique was my first and likely last attempt at such artistry as it was quite a challenge to keep out the brushstrokes, but at least it was do-able to apply paint in a cold winter basement (and let the coats dry in a warm winter attic).
For the final color, I wanted something akin to Rene Herse blue though it’s more gray than blue. Final touches include Belgian chainguard w/ image of St. Christopher, Soubitz front generator lamp, Mafac hangers, French leather saddle, “Roberta” Belgian headbadge, and shellaced natural cork handlebar wrap that was left over from another project. The final budget of $178.05 is not as low as it possibly could have been with the substitution of other parts in the bin, but the devil is in the details.Budget and Build List
Item
Cost
Source
Frameset/seatpost/headset
Free
dumpster find
Wheels—Weinmann 700c concave rims, Sanshin hubs
$8.00
from iBob list member ($70 total - $62 shipping)
Brakes—Mafac Racer
Free
from local friend
Brake levers--Guidonnet
$0.00
eBay (bought 3 pairs for $36, re-sold two of them for $66 total)
Handlebars-- Nitto Albatross
$14.19
eBay
Stem--Pivo
$5.00
eBay
Soubitz bottle generator and light
$9.95
eBay
Tires—Forte Metro 700 x 35mm
$17.98
Performance Bicycle
Tubes (2)
$5.00
eBay
Crankset—Stronglight T S
$20.00
eBay
Bottom bracket—Shimano UN26
$11.99
eBikeStop.com
Pedals--Lyotard
$0.00
Removed from a flipper
Chain—KMC
$4.78
BikePartsUSA
Single-speed freewheel—14T
$4.89
Niagara Cycle Works
Saddle
$20.01
eBay
Brake cables (2)
$3.88
Icycles.com
Brake housing (4 ft @ .80/ft)
$3.20
Icycles.com
Headbadge
$7.01
eBay
Fenders
$12.38
eBay
Chainguard
$3.99
eBay
Chainguard hardware
$9.50
Velo-Orange
Fender stay and hardware
$6.30
Velo-Orange
Materials (paint remover, paint, etc.)
$10.00
Various sources
Total
$178.05
Last edited by mkeller234; 03-18-10 at 06:35 AM.
03-17-10, 09:13 AM
#4
Rustbelt Rider
Thread Starter
Join Date: Oct 2008
Location: Canton, OH
Posts: 9,104
Bikes: 1990 Trek 1420 - 1978 Raleigh Professional - 1973 Schwinn Collegiate - 1974 Schwinn Suburban
Mentioned: 20 Post(s)
Tagged: 0 Thread(s)
Quoted: 261 Post(s)
Liked 372 Times
in
177 Posts
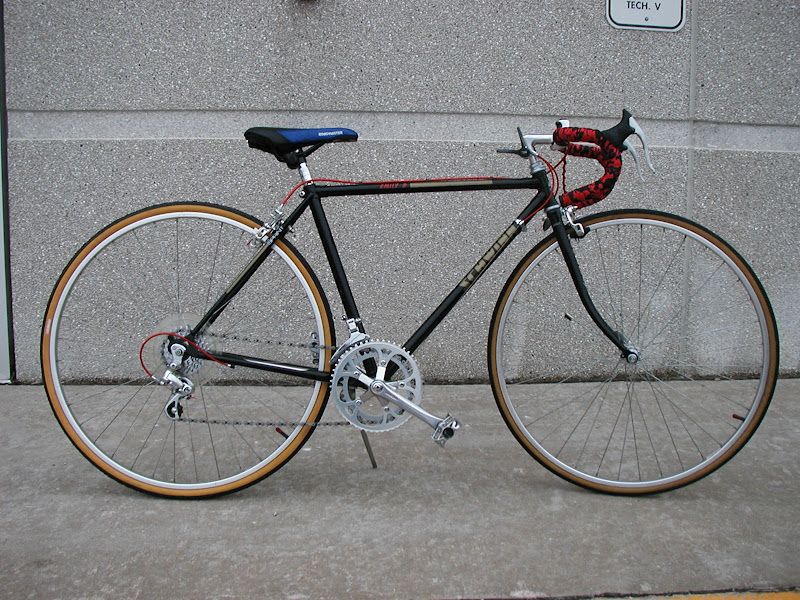
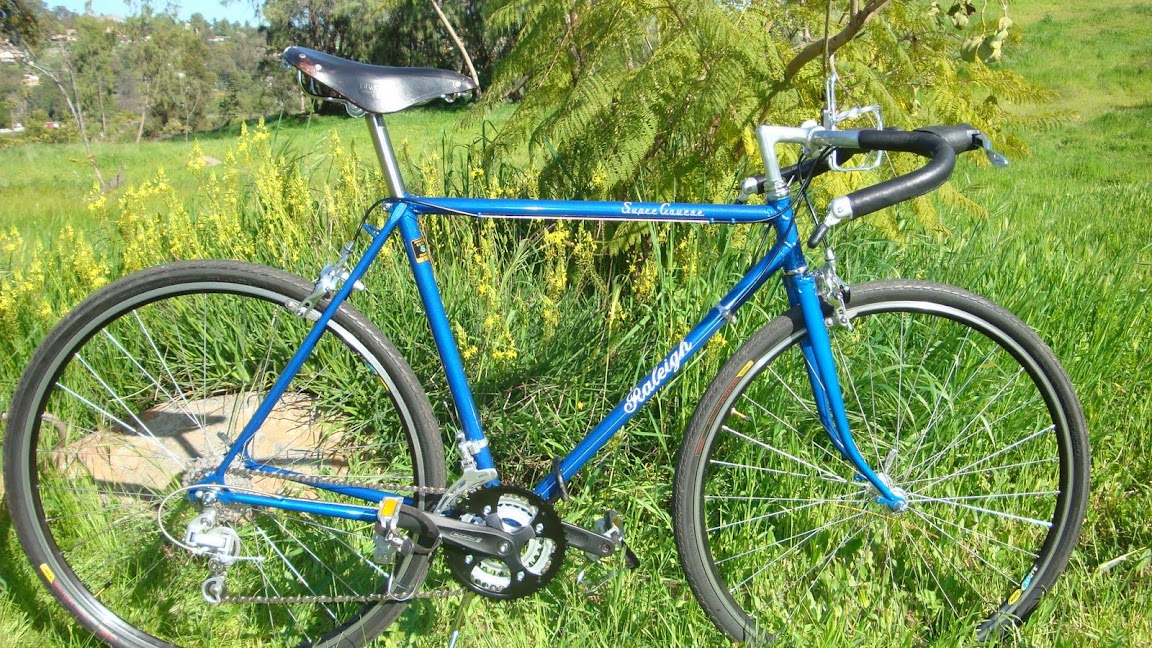
Entry 03
"The North Branch Path Rider"
*
Around Christmas/New Years I was looking at ebay listings and came upon a Fuji that looked darn nice. I had been conversing with another forum member on occasion since we had met on one the rides organized thru Bikeforums. Knowing he was a Fuji aficionado, I contacted him in regards to this Fuji. He thought the price a bit high and mentioned he had a Fuji frame that I could HAVE FOR FREE. We made arrangements to meet and on a snowy day in January I became the recipient of a Fuji America frame. So The start of my velo-cheapo was a gift from a fellow forumite. I really do thank him (who can be name later) for his generosity.
*
The Fuji America was painted in the classic dark blue with metallic blue panel on the seattube and headtube. The paint was in very poor condition. With some input from my wife, who is very good with color, a paint color was selected. I masked the light metallic blue panels and brush painted the frame with a color that I mixed from several High Gloss enamel paints. Three coats were applied till I got the right shade of brown/taupe. I pinstriped the lugs and details with a fine brush in a dark blue. I also touched up The FUJI lettering on the seattube.
*
With the painting complete I started compiling my components. First purchase was a wheelset that my brother bought for me at the Madison Wisconsin Swap in January. A bargain at $20. Araya aero rims/ Sanshin hubs with tires and a freewheel.*Most of the rest of the bike was built from my parts bin. Most of those parts were accumulated over the last year flipping bikes.
*
The real turning point in the build came when I couldnt find a seatpost to fit the frame. Finally I tried a seatpost from a mountain bike that I had picked up on garbage day, at the curb, and had been sitting in back of my garage for 2 years. It fit! The real kicker was the seatpost was black, and man did it look nice next to the frames new color. I decided that was going to be the theme of my bike, black components. I spray painted pedals, brakes, chainrings, stem, etc. And with this being a 1979 model the black components kind of fit with the era. *
*
I chose a moustache bar as I like the hand positions they offer. It was already black. A Schwinn generator light set-up was added. A very old Wrights saddle from ebay and the bike came together nicely.
*
The bike morphed into*a great bike path rider. I live across the street from one of the nicest County bike trails in*the Chicago area.*Most of my riding is on this path. Its great to be able to take a ride after work, with no worries of car traffic. Its 15 miles out and back to the Chicago Botanic Gardens(the end of the path). I often find myself coming back when its nearing dark so the generator will come in*handy. This bike is the perfect bike path cruiser.
*
*
The frame, since it was free, is my free item.
*
Parts I bought:
Paint - 1/2 pt Ben Moore High Gloss enamel.......................$* 4.00
*********** Lowes black semi-gloss spray paint......................$* 4.00
Cables - Bell.................................................................** 5.00
Tires and 1 tube / Performance.......................................***23.00
Saddle - ebay -*Wrights - old and tearing at the rivets.......***16.00
Bars - Moustache from LBS............................................***18.00
Wheels - Swap Meet find Araya/Sanshin...........................** 20.00
*
Parts I had w/estimated values:
Suntour VX rear derailleur, SR Crankset, Dia-Compe Brakes, SR Stem
from a Trek purchased for $25......................................... *25.00
*
SunTour Barcons from a flip bike*- fair market.....................* 30.00
Pedals -*beyond cheapo rattraps*.....................................***3.00
Brake levers - from a Schwinn.........................................*** 3.00
Generator lighting from garbage find.................................
Bottle cage from my wife's bike........................................*** 4.00
Bar wrap from Hancock Fabrics (biggest bargain)................***** .82
*
*************************************************** TOTAL....................$155.82
*
The pictures were taken today on a ride that included riding into a 20 mph northerly headwind. An air temp of 45 degrees. COLD!!! The bike rides great.
Last edited by mkeller234; 03-17-10 at 09:36 AM.
03-17-10, 09:15 AM
#5
Rustbelt Rider
Thread Starter
Join Date: Oct 2008
Location: Canton, OH
Posts: 9,104
Bikes: 1990 Trek 1420 - 1978 Raleigh Professional - 1973 Schwinn Collegiate - 1974 Schwinn Suburban
Mentioned: 20 Post(s)
Tagged: 0 Thread(s)
Quoted: 261 Post(s)
Liked 372 Times
in
177 Posts
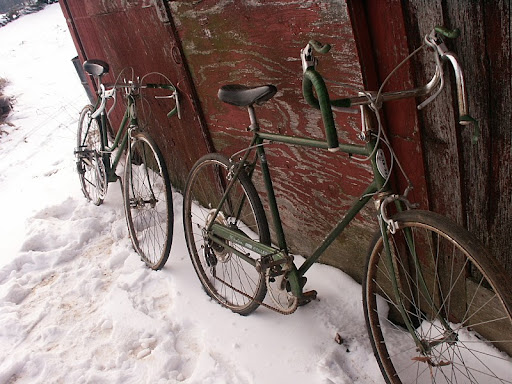
Entry 04

I Found this frame a few years ago and built my first fixie, The frame was green before I rattle caned it black. It was so light and*no braze ons but rear derailer hanger which I would*not cut off. Someday I may want to make it a road bike again. When the bb went on it that day arrived. Had a hell of a time getting it apart pics to show the fun times but an arc welder*and vice solved that problem. The Dura Ace derailers were yard sale grabs mother selling sons bike stuff he moved out and she hasnt a clue. ya ya I know. Everything else was free but the wheels. So the prices are what Id charge at the yard.* OKYDOKY*Here we go.*
*
Frame: $5.00
Handle Bars And Levers $5.00*
Brakes: $5.00*
Saddle and Post: $10.00
Derailers: $20.00
Adapter: $15.00
Shifters $5.00
Cranks $30.00
Chain: $1.00
Decal: $1.00
Bar Tape: $10.00
Wheels:*FREE*
*
Total:*$107.00*
Last edited by mkeller234; 03-17-10 at 09:23 AM.
03-17-10, 09:15 AM
#6
Rustbelt Rider
Thread Starter
Join Date: Oct 2008
Location: Canton, OH
Posts: 9,104
Bikes: 1990 Trek 1420 - 1978 Raleigh Professional - 1973 Schwinn Collegiate - 1974 Schwinn Suburban
Mentioned: 20 Post(s)
Tagged: 0 Thread(s)
Quoted: 261 Post(s)
Liked 372 Times
in
177 Posts
Entry 05
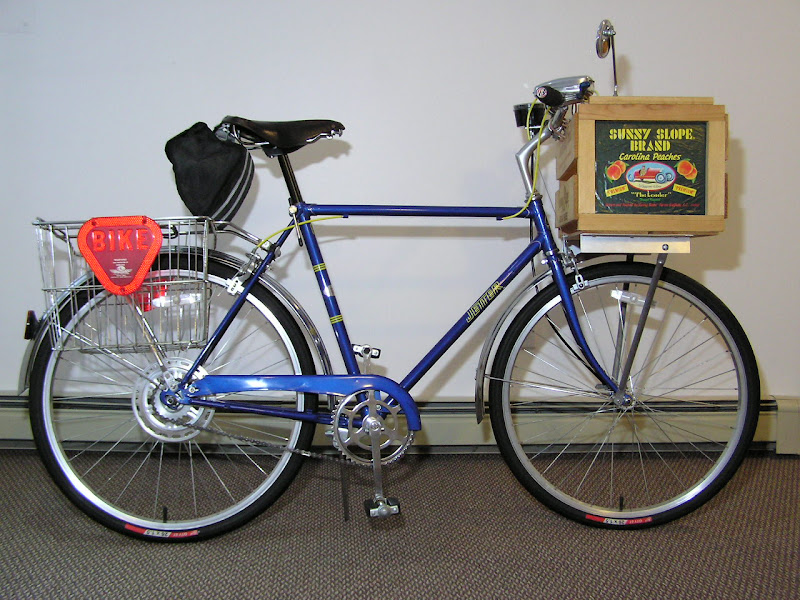
The Peach Krate
When I decided to throw my hat in the ring and enter the 2010 Velo Cheapo Build-Off, I had a few different options. *But I decided to use the frameset from a 590mm wheeled 3 speed Jetter I had found at the dump in the summer of 2009. *It was the first Jetter I had seen. *Google and BF searches only yielded a 10 speed version. *So they are relatively rare, but basically an entry level bike.
The head badge reads Somerset, NJ. *The frame is marked as made in Taiwan. *The LBS sticker is from Biddleford, ME. *The bike was missing the saddle seat post, brake calipers and levers. The BB was seized, and the Shimano IGH was toast. *The front wheel and hub were not worth repair.
But the frame--- well it was nearly pristine under all the normal dirt and grime. *The blue paint was deep, the stamped lugs nicely outlined in a matching yellow, the chrome fenders while not perfect, still could turn heads. *If the cottered cranks could be salvaged and the chain guard used, well it had the potential to build a nice utility bike!
My goal was to spend $0, zip, nadda, not one cent. *I would use first, parts from the dump, second, trades for dump parts, and third, left over scraps from other builds. *Lets say, I succeeded!
Jetter frame, fork, fenders, chain guard, headset, BB, cranks, pedals, dump find: $0
Brooks B-15, handlebars, rear rack, brake calipers, brake levers, brake shoes, chain, dump finds: $0
26" MTB wheels, tires, tubes, rim liners, dump finds: $0
Stem, freewheel, lights, bell, mirrors, reflectors, speedometer, and saddle bag, trades with Bfers: $0
Seat post, cables, grips, left overs from past builds more then a year old: $0
The Peach Crate (and hardware), something I picked up at the grocery 15+ years ago: $0
Last edited by mkeller234; 03-17-10 at 09:22 AM.
03-17-10, 09:21 AM
#7
Rustbelt Rider
Thread Starter
Join Date: Oct 2008
Location: Canton, OH
Posts: 9,104
Bikes: 1990 Trek 1420 - 1978 Raleigh Professional - 1973 Schwinn Collegiate - 1974 Schwinn Suburban
Mentioned: 20 Post(s)
Tagged: 0 Thread(s)
Quoted: 261 Post(s)
Liked 372 Times
in
177 Posts
Entry 06

It was my good fortune to be given the Legnano for nothing.* The bike, �as found�, was in rough shape and sporting a non-original fork set.* Rust covered much of the chrome plating but pitting was restricted to the non-original forks.* I planned to build it up as a City Bike for short around town riding.
*
The paint was shot having been painted with a roller, or some other equally unsophisticated applicator.* The components were a miserable mismatch of Asian, Italian and English with most oxidized past the point of using.* The build begins�
*
I decided to spend money on paint, art and consumables (cables) only.* The total cost, including art, was just a tad under $70.00.
*
Virtually all other pieces, with two exceptions, were acquired for nothing.* I know that might be hard to believe, but it is the truth.* The two exceptions were the Brooks saddle which I bought for $75.00 several years ago and have been using it on personal bikes ever since.* The other item paid for was the seat post clamp bolt, a special item sold to me by a BF member for $10.00.* I paid $20.00 to cover the part and shipping.
*
The fork set was plucked from a Bianchi I found at the dump.* The bike had been uglied up and had holes drilled in the frame set.* But the chrome forks were in good shape.* Sadly, the steering stem was on the short side but would work if I used side pull brakes, eliminating the brake cable guide often stacked with the head set.
*
The rest of the components selected, for the Legnano, were those of a cosmetically challenged nature.* Without more repair, most of what I used would prove of little worth on the vintage market.* I did, however, clean and or modify to disguise cosmetic issues and ensure safety and dependability in operation.
*
The handlebars, Barcons and brake levers presented their share of problems when it came to fitting the shifter cables.* They had to run under the handlebar grips and under the brake levers also.* Some lever modification was required to make it all work.
*
The paint was the biggest expense, followed by the art I ordered.* Some of the art was no good (dried out) and I did not figure the cost of those decals into the build, since I did not use them.
*
I tried my hand a pin striping for the first time.* I used a paint pen that I purchased on sale for three dollars (figured into paint/art costs).* I could use more practice but this is the way to go with striping.
*
If you allow the Brooks saddle as my �free item�, then my total cost to put this old Legnano on the road was $90.00 and even that is a bit of an exaggeration.* I would certainly understand if you choose to not allow my entry because of my cost claims.* That is fine with me since winning is not really a concern.* I just wanted to have some fun and I did.
Last edited by mkeller234; 03-17-10 at 09:29 AM.
03-17-10, 09:27 AM
#8
Rustbelt Rider
Thread Starter
Join Date: Oct 2008
Location: Canton, OH
Posts: 9,104
Bikes: 1990 Trek 1420 - 1978 Raleigh Professional - 1973 Schwinn Collegiate - 1974 Schwinn Suburban
Mentioned: 20 Post(s)
Tagged: 0 Thread(s)
Quoted: 261 Post(s)
Liked 372 Times
in
177 Posts
Entry 07

Wheels - $125
Tires - $80
BB/crank - $65
Chain - $25
Pedals - $35
Metal - $40
Paint - $6 spray bomb
Seat mesh - $5
Brakes - $180
Pulleys - $20
Derailleurs - $60
Levers - $25
Total ~$700
Considerably more expensive than my usual builds, but this one used all Avid/SRAM/Truvativ for a sponsorship bid that's still in the works. I started the build in Feb 2009 and the idea was to build a trike that minimized the drawbacks (IMO), and maximized the advantages of other designs. I wanted to make an all-around flexible trike that could commute, run errands, do ultras and race. Obviously there'd be compromises, but so far, it's been pretty successful. I use it to commute for about 50km per day, and it holds its own on the track. I'm building a couple others now, one with 700's, and another with 451's, each with a few mods and tweaks over the original.
03-17-10, 09:32 AM
#9
Rustbelt Rider
Thread Starter
Join Date: Oct 2008
Location: Canton, OH
Posts: 9,104
Bikes: 1990 Trek 1420 - 1978 Raleigh Professional - 1973 Schwinn Collegiate - 1974 Schwinn Suburban
Mentioned: 20 Post(s)
Tagged: 0 Thread(s)
Quoted: 261 Post(s)
Liked 372 Times
in
177 Posts
Entry 08
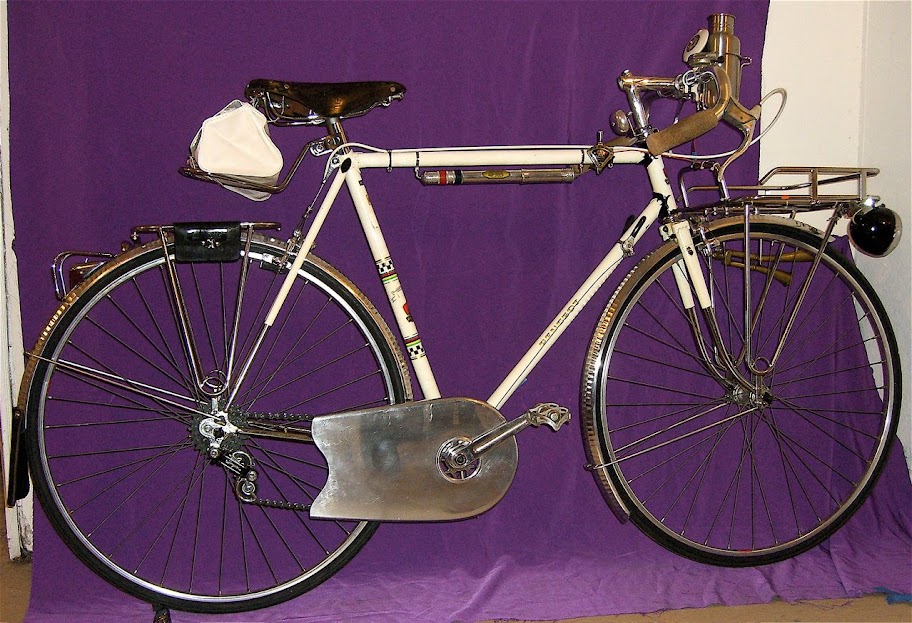
1969 Peugeot PX-10 Porteur / Commuteur concept.
Interesting facts:
Vintage Sturmey Archer headlights were completely hacked and combined with modern Night Sun hallogen lighting. *The new SS water bottle was used to house the batteries, and filled with "Great Stuff" to secure. *Super bright.
The Sturmey Archer quadrant shifter is wired to be the Highbeam/Lowbeam/Off switch.
The rear lights also have been hacked with LCD lighting and have switches built in.
Antique horn to be powered by an additional SS waterbottle hacked as a pressurized canister.
All wiring for headlights will be drilled and run through hollow tubes of porteur rack.
Intended as a commute to work vehicle... with a civilized French carefree and snooty, but agreeable manner.
Frame ************ $ 150.00
Wheels borrowed from 1980 Peugeot Super Competition, Mavic ****** $ 50.00 est.
Tires / tubes *********** $ 50.00 est.
Honjo Fenders ************* $ 90.00
Velo Orange leather washers ************* $ 9.00
Velo Orange/Nitto Montmartre handlebar ************* ********************** $ 42.00
Velo Orange stainless steel Porteur rack with rail ************ ********************** $ 160.00
Bottle Cage Clamp ************************ ********************** $ 3.00
Velo Orange retro water bottle cage ******************************************************** $ 18.50
Japanese Bell on retro mount ************* $ 20.75
Velo Orange stainless steel rear constructeur rack ********************************* *$ 80.00
ViVa Saddle Bag Support ** ******************************** $ 58.00
Leather Mud Flap ************************************************************************************* $ 12.00
Spanninga light bracket ************* $ 5.00
VO light bracket for rack * ********************** $ 6.50
Canti brake rack mounting bolt ******** ************* $ 15.00
Nitto 8mm x 35mm stem *bolt * ****************$ *2.75
Stainless Steel Water ***** ********************** $ 15.00
1930's Sturmey Archer quadrant shifter ********************** $ 50.00
Cork grips ************* $ 10.00
Antique glass reflector bolts for porteur rack ************* $ 24.00
Vintage Ad Hoc tourisme pump ************* $ 45.00
1950's NOS French aluminum chain guard ************* $ 260.00
NOS Mavic tool pouch with tools ************* $ 45.00
Vintage French rear fender mounted light ************* $ 15.00
Vintage French rear fender mounted light guard ************* $ 15.00
Vintage 1950's chrome Swiss rear light ************* $ 25.00
Modern LCD guts to hack Swiss rear light ********************************************** $ 15.00
2- 1950's Sturmey Archer front headlights from earlier purchases ******** $ 50.00
Modern Halogen rechargable battery unit (Night Sun) to hack lights **** $ 30.00
Vintage white rear bag ********************** $*26.00
Vintage Peugeot handlebar bell ************* $ 20.00
Antique brass horn ************* $ 35.00
Antique 1930's timepiece ************* $ 65.00
Total: ************$ *1,500.00 *REALLY CHEAP!!!!!
03-17-10, 09:35 AM
#10
Rustbelt Rider
Thread Starter
Join Date: Oct 2008
Location: Canton, OH
Posts: 9,104
Bikes: 1990 Trek 1420 - 1978 Raleigh Professional - 1973 Schwinn Collegiate - 1974 Schwinn Suburban
Mentioned: 20 Post(s)
Tagged: 0 Thread(s)
Quoted: 261 Post(s)
Liked 372 Times
in
177 Posts
Entry 9

The Build:
I started with a neglected Austro Daimler 10 speed bought at the Trexlertown Swap as a nearly complete bike (missing the rear derailleur and with an unusable chain) as my Freebie and Base for this build. See Pic 1 for how it looked originally.
At the time I didn't know my plans for this bike so I fixed the bike up enough for a test ride by putting much cleaner Mafac Racer brakes on rather than bother to clean up the Shimano 600 Calipers that came on the frame. The existing Brake cable inners were reused, new white Housing was put on and a Cable stop was put on that hangs off the seat post clamp bolt.
The bike rode terribly on its couple of test rides. The hubs needed adjustment and the Bottom bracket needed servicing.
Still, I liked the look and cleaned it up with ScratchX and Mothers Carnuba wax and took pictures in the Fall that show off the unique paint job on this bike. See Pic 2.
For Velo de Cheapo I decided to breathe some new life into this bike by tuning it up properly and fitting a 3 speed sturmey archer hub.
The front Hub, Headset and Bottom bracket were disassembled, bearings cleaned and re-used and packed with fresh grease. The stem and Handlebars were scrubbed with scotch brite pads and polished with Simichrome polish.
For the rear wheel I used a Sturmey Archer 3 speed wheel I bought on eBay over a year ago and never got around to using. The Hub was built to a heavy chromed steel rim. I disassembled the existing rear wheel from the Austro Daimler and kept and polished up its Weinmann alloy rim again with Scotch Brite and Simichrome polish. I disassembled the 3 speed hub from its Steel rim and rebuilt it to the Weinmann rim using the spokes that were originally on the Sturmey Archer Hub.
The original SR Double crankset was polished and reassembled with only the Large 52T chainring. The chainring was mounted to the inside of the crank spider where the small ring would normally go to improve chainline with the Single Cog Sturmey Archer now in the rear. You can't see it very well in the Pictures but the Chain is a deep red that nearly matches the frame color.
I took a cue from forum member Sixty-Fiver and mounted the 3 speed control in the �Old-School Brifter� style. See pic 3.
The saddle that came on the Austro-Daimler was in bad shape so I replaced it with a Brooks B66 that came off a Miyata 110 that I bought at a garage sale for $20 just for the saddle. See Pic 4
Also in Pic 4 you can see the application for the leather strap and snaps. The frame has no cable guides whatsoever and only came with 2 grungy cable clips. I decided to fashion cable clips out of the � leather strap and some all purpose snaps. These are used on the Top tube, Down tube and on the chainstay for the 3 speed shifter cable. At the same time I also fashioned new Toe clip Straps from the same leather which you can see in pic 5.
Thats all for the Austro-Daimler 3 speed, hope you have enjoyed. Please see pics 6-10 for the final show.
Price
Description
FREEBIE
1976-77 Austro Daimler Inter 10 Acquired at Trexlertown PA Swap Meet
$40.00
Sturmey Archer AW 3 Speed Wheel & Shifter � eBay
$50.00
2 Bontrager Race Lite Tires
$9.00
2 Inner tubes to fit Tires
$15.00
Set of Mafac Racer Brake Calipers
$5.00
Sturmey Archer Shift Cable
$10.00
Cable Housing � White
$6.00
1/2� Leather Saddle String
$2.50
7 All purpose Snaps
$12.00
Red BMX Chain
$20.00
1984 Miyata 110 w/ Brooks B.66 Saddle
$4.00
Half a tube of Grease
$2.50
� bottle of scratchX
$1.50
Some Carnuba Wax
$.75
Simichrome Polish
$.75
Scotch Brite Pad
$3.00
Rear brake cable stop
Total: $182.00
03-17-10, 09:38 AM
#11
Rustbelt Rider
Thread Starter
Join Date: Oct 2008
Location: Canton, OH
Posts: 9,104
Bikes: 1990 Trek 1420 - 1978 Raleigh Professional - 1973 Schwinn Collegiate - 1974 Schwinn Suburban
Mentioned: 20 Post(s)
Tagged: 0 Thread(s)
Quoted: 261 Post(s)
Liked 372 Times
in
177 Posts
Entry 10
Here is my entry, an old Raleigh frame that I found at the scrap yard in the summer of 2008. I don't know the model but I am sure someone on the forums will chime in with that information...
It was just a frame and fork but what drew my eye was the Shimano 600 crank that was attached to it plus the in-good-shape SR stem. Luckily the seat post was not stuck either so, for $10, I snagged it. It lay in my "get to it one day pile" until I found a donor bike in the spring of 2009, a very rusty Raleigh Grand Prix, also at the scrap yard. What drew my eye to this bike was a very nice set of SKS aluminum fenders. The rest of the bike had okay-ish parts and I figured that for $10, I would be able to find a use for them. Well, I stripped everything off of the Grand Prix and donated the frame/fork/headset/BB/derailleurs to my local co-op and those parts lay in the "get to it one day pile" too until the Velo-Cheapo contest started and I saw a good use for everything.
The brake set was a freebie from a BF member. He had the levers and calipers sitting doing nothing so left them on the porch for me back in August or so.
The rear tire and the bar-tape are the only things that are new on the bike; the tire was $6.96 after taxes and the bar tape was on sale at PBK for $8.21 shipped. The cable top-tube clamps were $2.14 at the co-op and the BMX freewheel was $5.65, also at the co-op. Everything else was $20 (the original frame/fork plus the donor bike), taxes in. So, that brings the total to $42.96
The bike rides very well and, if I ever find a nice 27" aluminum rear wheel, I bet that this bike would weigh only about 16 lbs or so. I realize that the rear brake cable is a little short but I didn't have anything in my parts bin that would work so I just left it as it came from the Grand Prix. The seat is a little worse for wear but I stuck some black electrical tape on the parts that were really bad and it has been fine.
03-17-10, 09:41 AM
#12
Rustbelt Rider
Thread Starter
Join Date: Oct 2008
Location: Canton, OH
Posts: 9,104
Bikes: 1990 Trek 1420 - 1978 Raleigh Professional - 1973 Schwinn Collegiate - 1974 Schwinn Suburban
Mentioned: 20 Post(s)
Tagged: 0 Thread(s)
Quoted: 261 Post(s)
Liked 372 Times
in
177 Posts
Entry 11
1971 Raleigh Super Course
It has been my pleasure for the past 1-1/2 months to rehabilitate a 1971 Raleigh Super Course.
Beginnings
The frame came to me in a sad state of disrepair. It was listed in a Craigslist ad for $20, with no photo. When I first saw it, I couldn�t be sure it was worth my time, but decided that for $20, even if it didn�t turn out well, I wasn�t out much. The frame was in dire need of new paint. Someone had already started on the fork. The frame was true with no noticeable dings or dents.
[See Photo1]
There was surface rust, but nothing that appeared to compromise the frame integrity.
[See SCPhoto2]
The chrome on both the stays/dropouts, and the forks was pitted with rust and in some places beginning to bubble.
Since the paint and chrome was beyond rehabilitation I decided to refinish and re-decal the frame. This forced me to spend more than I wished, but since the frame was essentially my age (I�m a 1970 model), it is my size, and cycling has rejuvenated me, I felt like the bike deserved the same chance. It went through full rust treatment, sandblasting, and powder coating.
Coating & Decals
Here is the frame with its new �Saturn Blue� powder coat, new head-badge, and decals.
[See SCPhoto3]
The decals and color aren�t true to the original, and the chrome was removed and not reapplied, but since the bike was basically a blank canvas I took the liberty of making it what I wanted it to be. I may lose some points in the eyes of �originalists� but it makes the bike more desirable in my eyes. And it will be one of a kind when it�s finished.
The Build � Wheel, Tire, & Brake Selection
I decided to build the bike as an �all around rider� city and trail bike. I�ve got road bikes, I�ve got a mountain bike, and I wanted this to be something different and in between. I went with size 700 wheels, and because of the clearance mounted wide tires and long reach brakes.
[See SCPhoto4]
The Build � Drive Train
Because of the intended use, I wanted gearing that was lower than a road bike, yet would still allow relatively high-speed road cruising. I went with an 8 speed rear cassette (11-28), and a Suntour V-GT long cage derailleur. The first crankset (46-36-24) looked good but I found that the front derailleur (when mounted to shift properly) interfered with the chainstay and when I tried to get into the small chainring. I moved then to a cheap modern mountain crank (48-38-28). Next to the vintage Suntour Mountech derailleur I really don�t like how the new crankset looks, but I feel like I got the right gearing and the combination works like they were made for each other.
[See SCPhoto5]
The Build � Bars and Stem
Again because of the intended use, I looked for bars which would offer some variety of hand position, but were a little less aggressive than drop bars. I also wanted shifters which were close at hand but without the expense of modern trigger shifting.
I opted for moustache bars, with friction bar-end shifters mounted on an old SR road stem. As a wrap, I stitched together some leather scraps I had, cut them to 3� width, lined them with wool felt scraps from my mother-in-law for padding, and punched holes every 1/8th of an inch for threading.
[See SCPhoto6]
Once I had one long piece of 3� wide leather wrap made, I cut it in half, and beginning at the bar-end shifter stitched them over the bars, shifter cable, and aero brake cables. There are seams in random places but the felt lining keeps me from feeling them. Overall I really like the effect.
[See SCPhoto7]
The Build � Saddle
I love Brooks Saddles. But they are expensive and I�m cheap, so I keep an eye out for them at bargain prices and occasionally I�m lucky. For this build I found a gently worn B15. It�s a little shorter than the B17 but just as comfortable. The slight scrapes, and brittle plastic �Brooks� tag on the back give it a little character and fit the bike just right.
[See SCPhoto8]
The saddle is mounted on a steel seat post from a donor bike which also contributed a bottom bracket, headset, pedals, and one of the derailleurs.
The Build � Finished Product
Okay, this is the part I�ve been waiting to get to for nearly two months. I finally got the bike together, and yesterday took it for the shakedown trail ride. After a little tweaking, minor adjusting, and another short ride today, I�ve decided I really like this bike.
It rides great, it is comfortable and smooth. Best of all, its something that I�ve created from scratch (almost), and with mostly old bits and pieces. I really like that feeling. Here�s the bike in all its glory.
[See SCPhoto9, & SCPhoto10]
Even if this bike isn�t a prize winner (the cost may kill any hopes of that), I�ve decided that it�s a keeper for my growing stable. I love the lugs, the feel of the frame, and now especially the way it looks and rides. I�m sure I�ll enjoy it for many years to come.
The Build � Costs
Now for the part I�ve been dreading�.The table below lists all the cost for the items used and what the source was. I�ve left shipping out as agreed in build rules (also didn�t include tax I hope that�s OK), and also did not include the cost of a few tools purchased to harvest parts from donor bikes (I love that I�m getting all the cool tools and learning how to use them).
Part Description
Source
Cost
1971 Raleigh Super Course � Reynolds 531Frame, with Fork
Craigslist
$20.00
Sandblasting & Powder Coating
Local Powder Coat Shop
$90.00
New Raleigh Head-Badge
E-Bay
$7.00
Raleigh, Super Course Decals
E-Bay
$14.00
Headset, Bottom Bracket, Seatpost, Front Derailleur, Pedals
Donor Bike
$15.00
Nashbar Moustache Handle Bars
Bike Nashbar
$14.99
Leather Bar Wrap (scraps, wool felt scraps)
Me, Mother in law
$0.50
SR Stem
Local Used Bike Shop
$3.00
Tektro R100 Aero Brake Handles
Niagra Cycle
$19.99
Tektro 556 Long Reach Brakes
E-Bay
$17.87
Used Brooks B15 Saddle
E-Bay
$40.00
Used Suntour Bar-end Shifters
E-Bay
$32.23
FSA Square Taper Mtn Crankset (48-38-28)
Bike Island
$34.95
Rear Derailleur Suntour V-GT
Free Donor Bike
My Freebie
8 Speed Chain
Niagra Cycle
$6.78
Brake Cables
Niagra Cycle
$2.34
Shifter Cables & Liner
Niagra Cycle
$4.38
Bottle Cage and Bar Clamp
Bike Nashbar
$5.98
Total Build Costs
$329.01
Wow, $329.01. This really wasn�t �Cheapo� at all. I could have saved $111.00 if I�d left the frame in ratty condition with no new head-badge or decals�.but I couldn�t bring myself to do it. The rest were real, necessary costs to get the items I needed to make it functional. Perhaps others could do it cheaper, but that�s my story and I�m sticking to it.
Thanks for letting me participate. Now, may the best, most ingenious, clever builder win! I can�t wait to see the other builds.
03-17-10, 09:44 AM
#13
Rustbelt Rider
Thread Starter
Join Date: Oct 2008
Location: Canton, OH
Posts: 9,104
Bikes: 1990 Trek 1420 - 1978 Raleigh Professional - 1973 Schwinn Collegiate - 1974 Schwinn Suburban
Mentioned: 20 Post(s)
Tagged: 0 Thread(s)
Quoted: 261 Post(s)
Liked 372 Times
in
177 Posts
Entry 12
Velo-Cheapo, the thought intrigued me. I like bikes and I'm cheap, sounds like a plan. I have too many old bikes around and this is a good excuse to fix one up to sell this spring. I decided to make a choice between an old women's Varsity and a Huffy 10-speed. I bought the Huffy for 10 bucks to practice painting on, but since I don't have a heated painting booth I decided to go with the Varsity. I dug it out and also an old Collegiate as a donor bike.
Cost for Varsity 5 bucks but it has really blistered gum-wall tires. Cost of Collegiate 15 bucks, I paid too much but it was the first electro-forged frame I came across and I really wanted one after reading about them. The tires on this are ok, I think they'll work for the Varsity. I hoped to get enough bar tape and the green plastic brakes ends off of the Collegiate to restore the Varsity, but Varsities tape was just too badly gnawed up on the edge of the bar. Looks like I'd be using the old cheap-O standby Hockey Tape. I bought the hockey tape for $1.99 a roll and wrapped one set of bars already with the tape. Looks like there's enough to do another set. Cost of tape for this build ...about a buck.
I Did most of the work in my basement, my normal bike workshop is out in my barn, but it's too cold in February to work out there without heat. Although I did move outside to the back porch to clean my bearings with kerosene during a balmy February evening. Flexy magnet is good for pulling bearings and parts out of the kerosene. I used to use gasoline, but decided it was too dangerous, tried kerosene and was unimpressed. Next time I'll just use dish soap and water & rags.
I tore all the components off and gave the frame and fork a bath, but haven't remembered to pick up some touch-up paint while I'm in town. The gum-walls really stuck to the rims and I went round and round with a flat blade screwdriver to gently scrape the tire remnants off before cleaning the rims up with some steel wool.
The wheels cleaned up nicely. This would be the day of my undoing. I realized how much I liked high-flange hubs and also how much they would cost for other projects vs. just using the ones I already had that were in fantastic shape. The races were beautiful, the hubs attractive enough for my tastes. Great! now I won't be able sell the bike with these rims and I don't have time to find and do up a different set for this bike.
Got some grease from a friend who works in a factory. They use 55-gal drums and the pump can't pull all the grease out of the bottom, so I got some for free. I use a high-tech device for a bearing grease applicator, plastic butter knives. The knives are wiped clean before returning to the tub for more grease. I don't want to contaminate my grease either.
I had to flip the bike over to check the wheels for runout. I don't have any stand, but out in my barn I have a 2x4 extending off the side of the workbench that's covered in bubble wrap that I use.
Next I went to work on the shifters. I really like the long levers and 'S' in the old Schwinn shifters. They cleaned up nicely with the steel wool. And speaking of steel wool, I bought a pack of 3 fine wool pads from a closeout store nearby. Since this is Velo-Cheapo, there are standards and honor to be preserved, so I put a magnet at my feet to catch the metal particles that fell as I worked on various parts. After sweeping the floor with the magnet I found that I could sort of mush the wool back together and use it again as a first pass on some flatter parts of the bike. It doesn't hold together all that well, but hey I stretched that wool like nobody's business.
Then I started in on the brakes. I had a set of pads out in my bins that I could have just slapped right on, but the old Schwinn pads were set up so you could easily remove the rubber from the holder. Given that this is velo cheapo and all, I sorted through my bins and came up with good rubber that was mounted on rusty old holders. I deglazed the brake rubber with a scrap of sandpaper I had laying around from another project. Cleaned the calipers with steel wool, and the nuts with a wire wheel on my dremel...er dremel compatible multi-use tool. I'd like to polish these up some, but I haven't gotten around to picking up some metal polish yet.
Well time ran out and other things are taking priority, but I had fun participating in the build. I might be too cheap to sell the bike though. The shifters and brakes may get scavenged for a different project later this summer, and/or the hubs might stolen for a 700-C conversion for one of my other 10-speeds. The hubs are a 'bird-in-the-hand', they're in really good shape and I'd pay more for new ones than I can get for selling this bike as a bike.
Looks like I chose the wrong bike, I wouldn't have wanted to scavenge any of the huffy's parts.
03-17-10, 09:46 AM
#14
Rustbelt Rider
Thread Starter
Join Date: Oct 2008
Location: Canton, OH
Posts: 9,104
Bikes: 1990 Trek 1420 - 1978 Raleigh Professional - 1973 Schwinn Collegiate - 1974 Schwinn Suburban
Mentioned: 20 Post(s)
Tagged: 0 Thread(s)
Quoted: 261 Post(s)
Liked 372 Times
in
177 Posts
Entry 13
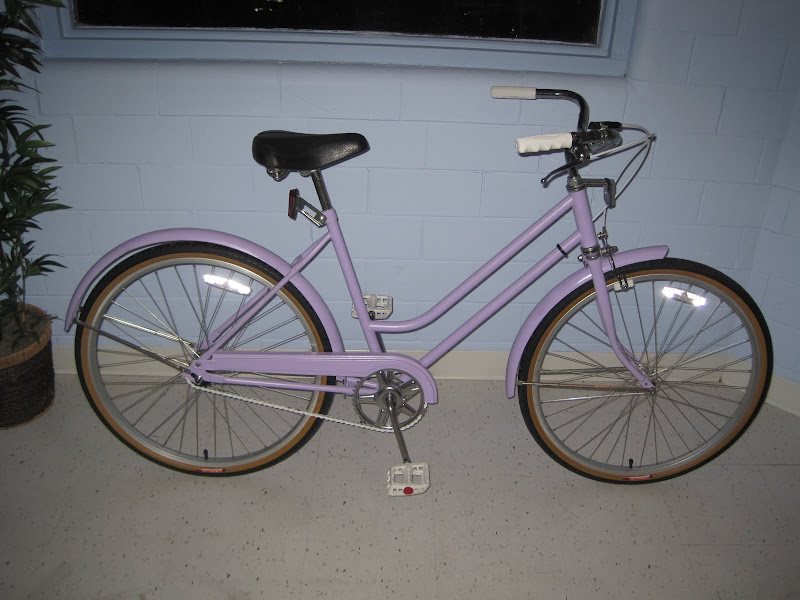
A Girly Rebuild of a Huffy 3-Speed
I picked up a pink Huffy Bay Point 3-speed in a step-through frame at a yard sale last fall. 'Gimme a ten,' said the grumpy homeowner, who was not pleased that I didn't also buy his rusty adult trike. At that point I was thinking the Huffy would be a decent flipper for a line of basic transportation bikes we'd been planning to offer in the shop.
Once the Velo Cheapo 2010 was announced, I decided the Huffy would be a good candidate for a miserly rebuild. I didn't have a great theme, like 'Porteur' or 'Gitanedem' from last year's contest, so I decided mine would be 'A Girly Rebuild of a Huffy 3-Speed.' No need to reinvent the wheel here.
The Huffy had a great rosy pink color, but with many dings and scratches. (The finish was much worse than the photo shows). I got impatient and tried to touch up the dings with nail polish, but although the color was close, the nail polish was too glossy and looked horrible. Might've worked for Sheldon Brown in a practical sense, but it was not going to cut it cosmetically for this audience.
A couple years ago, I found a pair of little-used Specialized Globe 3-speeds on Craigslist for $120, probably from the late 90s or early 00s. Looking back, they were cheap, rickety rides, but they did have newer alloy wheelsets with Shimano 3-speed hubs. On test rides, the wheels rolled very smoothly with little resistance and a satisfying clack from the freewheel pawls when coasting. Of the two, the step-through frame, having suffered a mild collision, became the donor of a modern 3-speed wheelset (26 x 1.5 with Femco alloy rims and Shimano 3-speed coaster brake hub), a 3-speed shifter, Specialized gumwall tires, and tubes. I would have gladly used more of the Specialized parts, but not everything would move over to the Huffy (e.g., the larger diameter seat post, different bottom bracket).
Since the Huffy and Specialized both had Shimano 3-speed hubs and the same rear wheel spacing, the donor rear wheel fit well into the Huffy frame laterally. The donor front wheel was definitely a bit wider than the Huffy's, so spreading the fork blades required a bit of persuasion (and cursing). The decimal sized 26 x 1.5 wheels (ISO 559) are significantly smaller than the Huffy's 26 x 1 3/8 (ISO 590), so they did fit, but there was suddenly more fender clearance than was really needed : )
Since the donor wheels fit the frame, it was time to begin. Because I'd effed up the finish using nail polish, I realized than the dreaded 'rattlecan job' was in my future. After reading numerous warnings about the durability of a spray paint finish, I accepted it as part of the Velo Cheapo ethos and got to work. I looked around in all the usual spots for a good spray paint shade, visiting an auto parts store, Home Depot and Lowe's before realizing that the dreaded Wal-Mart had the most 'girly' colors. I made sure to get my wife's opinion of the possible choices, and together we chose 'Gumdrop' from Krylon, a kind of candy-ish lavender shade, sort of in between purple and the original rosy pink.
You know the rattlecan drill: lots of sanding, a few thin coats of primer, several thin coats of paint. I was only able to work on my bike on Sunday nights, so my coats had basically a week to dry before the next would be applied.
In the meantime I set about looking for parts to complement the gumdrop color. I thought white would coordinate well, so I looked around for white accessories and parts. I attempted to trade some new and used bike saddles for white accessories on the 'ISO/For Trade' thread but instead found a buyer for my saddles. Of course, money became tight, so I had to apply those funds to my mortgage payment rather than buy bike parts. Soon enough, I was able to get a white KMC 1/8" chain and white grips from an LBS, and I found white BMX brake pads and a white Odyssey 1/2" threaded BMX pedals on eBay. I really wanted a white saddle, but was not able to locate anything reasonably priced that fit the bill. I had a factory second white saddle from a child's Fuji that I thought I'd try as my freebie, but there's no way any adult female would sit on that. I replaced the old gray cable housings with white to complete the ensemble.
Because of the heavy winter snow storms, the deadline was extended from March 1st to the 15th. Then life got crazy for a couple weeks, so I was unable to continue for a few weeks. I hurriedly resumed my build the last two weekends ahead of the revised March 15 deadline, juggling it with more important things on my list.
Given the fragile paint job, I tried to be careful building up the bike. The frame got dinged up along the way, so I touched it up as I went, vowing never to use spray paint again. I'm no Dr. Deltron, I tell ya.
The build went pretty smoothly, with no insurmountable challenges. I had to locate a clamp for the coaster brake, since the Huffy had come with front and rear calipers. The only one I had came from a 1950s Sears bike that was covered in paint and rust and had to be sanded vigorously. I also had no cable stop for the 3-speed cable, so I fashioned a crude one out of a stepped ferrule and a cable tie. The smaller wheel diameter was not optimal, since the curvature of the fenders did not correspond very well. I was able to finesse the front fender, but I had to accept the rear fender curvature as part of the Velo Cheapo charm.
Of course, I finished up late at night on Sunday the 14th, missing a brief period of sunshine that day to take photos in natural light. Oh well. Knowing that the C&V crowd takes very good photos of their bikes, I was not excited about taking pictures inside my shop at night. I did my best with my point-and-shoot $200 Canon, trying to get good photos without the flash and experimenting with different settings. In the end, though, the flash photos turned out the best, so here they are. BE GENTLE.
A Girly Rebuild of a Huffy 3-Speed - Costs
Huffy Bayview Cruiser - frame/fork/most parts - $10.00
Wheels/tires/tubes/3-speed shifter/cable from Specialized (bike cost - $60) - $30.00
White 1/8" KMC chain LBS - $8.00
White brake pads eBay - $4.00
Old saddle from 90s Schwinn MTB* - $4.00
White Sunlite grips LBS - $4.00
White Odyssey BMX pedals eBay - $15.00
Caged bearings for American BB - $3.00
Steel brake lever and 2 plastic cable guides leftover from set* - $3.00
Brake cable - $1.00
Rustoleum Auto Primer - 2 cans - $8.00
Krylon Spray paint - 2 cans - $6.00
Decrepit coaster brake clamp from 50s Sears bike* - $0.25
White lined brake housing for shifter/brake - bulk* - $2.00
Housing ferrules for brake and shifter - 3* - $0.15
Vintage stepped housing ferrule from parts bin* - $0.10
Cable ties - 2* - $0.25
TOTAL - $98.75
* Fair market value/estimated cost
03-17-10, 09:48 AM
#15
Rustbelt Rider
Thread Starter
Join Date: Oct 2008
Location: Canton, OH
Posts: 9,104
Bikes: 1990 Trek 1420 - 1978 Raleigh Professional - 1973 Schwinn Collegiate - 1974 Schwinn Suburban
Mentioned: 20 Post(s)
Tagged: 0 Thread(s)
Quoted: 261 Post(s)
Liked 372 Times
in
177 Posts
Entry 14
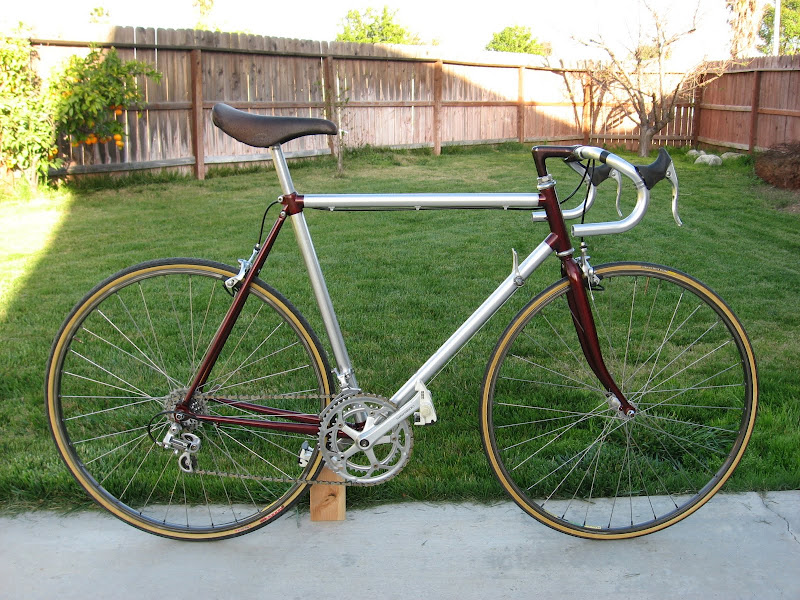
It is made from a Univega VivaTech 1050 aluminum bonded to steel frame with the Shimano 600 grouppo and Mavic wheels from an '87 Schwinn Super Sport.
The Univega frameset had seen better days and came with what must have been a cast iron triple crank. I then stripped and sprayed the frame with a dark silver flake and then a top coat of candy red which resulted in the rich maroon color. I wanted to leave as much aluminum exposed and like the unique combo of steel and aluminum revealing the "beginning of the end" of mass production steel frames.
The frame sat bare awaiting a build until a Schwinn Super Sport was picked up (for too much money) showing bad rust along the top tubes and lugs. After a long protracted battle with the Schwinn, I managed to free the full Shimano 600 grouppo, which was actually in very nice condition. I took everything from the Super Sport for the Univega; wheels with tires and tubes that still worked, stem and bars and pedals. I used an old saddle that has seen better days just for the brown leather. I was not able to find leather or brown bar tape in time to complete the bars so I had to leave them bare.
Here is the photo documentation attached to this email.
Costsheet
Univega Frameset (CL): $20
Schwinn Super Sport complete bike (CL): $70
Concor saddle (bent rails): Freebie
Bell bike cable set (WalMart): $6
Primer (used 1/2): $3
Silver paint (used 1/2): $3
Candy Red (used 1/2): $3
_____________________
Total = $105
Specsheet
Frameset: Univega VivaTech 1050 Aluminum bonded to steel rear triangle
Cranks: Shimano 600
Pedals: Look
Rear Derailleur: Shimano SIS
Front Derailleur: Shimano 105
Brakes: Shimano 600
Brakes: Shimano 600
Shifters: Shimano 600
Stem: Nitto
Handlebars: Cinelli
Seatpost: Sakae
Saddle: San Marco Concor America
Hubs: Shimano 600 F/R, 6 speed Shimano freewheel
Rims: Mavic
Tires: R/Schwinn special


 03-17-10, 09:51 AM
#17
Rustbelt Rider
Thread Starter
Join Date: Oct 2008
Location: Canton, OH
Posts: 9,104
Bikes: 1990 Trek 1420 - 1978 Raleigh Professional - 1973 Schwinn Collegiate - 1974 Schwinn Suburban
Mentioned: 20 Post(s)
Tagged: 0 Thread(s)
Quoted: 261 Post(s)
Liked 372 Times
in
177 Posts
Entry 15
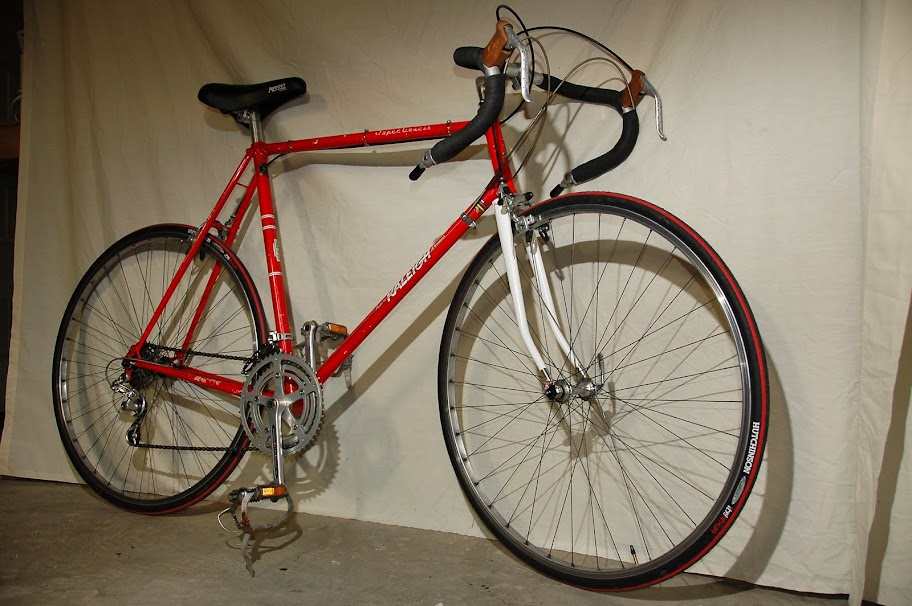
At first when I thought about building up a cheap vintage, I figured it wasn't going to happen. Around here (NYC area), people tend to charge way too much for bikes, and nothing ever seems to magically pop up at tag sales. So, ironically enough, the day after I read the "Velo Cheapo" thread on the forum I encountered an ad for a Raleigh Super Course "in good condition" for 75 bucks. Immediately I emailed the seller. Turns out there was a lot of interest, but because I emailed first, the bike was mine. Needless to say I was pretty psyched about the find.
So, where to start on the bike? What direction to take with the project? I felt it would be a shame to turn this once easily race able bike (the PO said they used to race it in Texas) into a grocery getter. In that spirit, I decided to make the bike a fast way to get from point A to B, or something to use in group road rides.
Of course, first things first I cleaned the whole bike. There was VERY little rust overall, and the frame had a few nicks and one big scratch. After inspecting the bike, it seemed that everything was original except the brakes, which had been replaced from Weinmann centerpull to newer Weinmann sidepull. Oh, and, of course, no Brooks to be found. Checked the serial and it's a 1979. The paint was pretty faded looking in some spots, not sure if that was from a previous life in Texas or just an instance of poor quality control. All the stickers looked in good shape overall. The hubs spun free, and the wheels needed little truing. I was even able to use the original chain just fine! The only problem was the headset- it was pretty rough. I bought new bearings and rebuilt it.
After the initial cleaning, I looked towards my ultimate goal of a very budget yet racy bike. To go fast on the cheap, I figured the easiest thing to do would be lighten the rolling weight (and the tires/tubes were old and starting to fall apart). So I ordered up some Hutchinson tires and generic light tubes from Price Point. I calculated a 224g weight savings. Also, needless to say, the new tires improved the way it rode. I went with new items for tires because I felt buying used tires was an odd thing to do... and the tubes were darn cheap.
At that point, I was a little bit stuck. I wanted to put a personal touch on the bike. I looked at the fork paint and it was kinda rough, so I repainted the fork (hopefully no kittens died in the process). I used primer and clear that I already had. After some deliberation, I took a risk and went for white. I outlined the lugs with a paint marker. The end result ended up looking surprisingly good! I think that the paint contrast gives it a somewhat modern twist.
In the end, I ended up with a great riding bike. It shifts reliably, and the gear range gets me up and down any hill around. It doesn't look half bad, either. And, of course, the final budget was pretty good on my wallet. I think this one's a keeper.
PRICES:
1979 Raleigh Super Course: $75.00
Hutchinson Fusion 2 tire [x2]: $39.96
Price Point Light Tubes [x2]: $7.96
Paint: $3.79
Marker: $1.50
Bearings: $2.38
Total: $130.59
03-17-10, 09:57 AM
#18
Rustbelt Rider
Thread Starter
Join Date: Oct 2008
Location: Canton, OH
Posts: 9,104
Bikes: 1990 Trek 1420 - 1978 Raleigh Professional - 1973 Schwinn Collegiate - 1974 Schwinn Suburban
Mentioned: 20 Post(s)
Tagged: 0 Thread(s)
Quoted: 261 Post(s)
Liked 372 Times
in
177 Posts
Entry 16

The Guv
The Plan
I liked the look of the Pashley Guv�nor. I checked it out on the web and I liked it more. I saw one in the flesh at the London Bike Show and I wanted one. Trouble is I don�t really need one. What do I like about it? Well it�s the �look�. I think it looks really cool. What don�t I like? The hub brakes really. A real Path Racer of the 30s-50s era wouldn�t have had those. And those modern Mountain Bike type brake levers look all wrong to my eyes. Cotterless chainset? Nah! Weren�t even invented then. And the price! Unbelievable for such a simple bike. Worst of all though the apostrophe in the name! I do like the clean lines and simplicity of the machine and the lazy frame angles and the funky flipped North Road bars.
Two problems: cost and possible resistance to yet another new bike from �her indoors�. So a sneaky plan was hatched. The Guv�nor replica would have to be smuggled in �One piece at a time� and �Wouldn�t cost me a dime�. In this way she that must be obeyed might never notice it and if she did, I would have the defence that I hadn�t spent any money on it. How could she complain?
The Components
She who must be obeyed, went on a trip to see her mother for the weekend. This was the opportunity to get the biggest piece: the frame, home. There was a cycle jumble that Saturday. My son and I decided to visit �to get rid of some of this old bike junk from the garage dear�. A vintage Raleigh Frame and forks was spied in disgusting condition and painted a horrible brown metallic named �coffee� by the Raleigh marketers back in 1971. The seller had found the bike complete in a shed and was going to sell it on, but the wheels were rotten and dangerous, so he decided to part it out. It had a cottered chainset: therefore 26tpi bottom bracket and headset and virtually unsaleable. We negotiated the price of �5 for the frame and forks, including replacement headset and seat post. The Guv was born. Various other �bargains� were snapped up at the sale and we came back as usual with more bike junk than we had in the first place. When she returned she was suspicious �What junk have you bought? She accused. I had to think fast.�Just an old frame for a fiver dear. To save ruining my good bike over the winter�. I think I got away with it�
Christmas arrived and the opportunity to spend legitimately. Our distant relatives usually send money so we can get our own Christmas presents. A couple of the inconsiderate lot sent gifts instead and some sent no money (blaming the credit crunch). Anyway she�s no idea of the cost of bike bits so the opportunity to get an order off arose. When the goods arrived, I could say I bough them with my Christmas money. So Santa brought me a repro Raleigh �Heron� cottered chainset; replacement 26tpi bottom bracket spindle and cups and the North Road bars so essential for �the look�. These are all stupidly cheap from India via some Indian guys in the UK who import reproduction Raleigh Roadsters. For the brakes, I had decided in Weinmann centre pulls. Why? Because the side pulls of the era are so awful and I think the Vainquers look rather pretty and are very effective for vintage brakes. Ebay delivered some new old stock new ones less a few vital nuts and washers that had been cannibalised from them over the years. However, my spares box provided the missing bits. To operate these brakes on North Road bars I would need some straight bar type brake levers. Modern ones would not do, so ebay (finally) produced the �Red Spot� ones I desired. They were a bit rough, but being soft alumium, polished up like new in a few minutes.
The big missing link was the wheels. I had decided on single speed as a 3 speed hub would bump up the cost. We live near the beach and the idea was to ride this bike along the flat 9 miles of promenade at my disposal, so no gears required, provided that is, I ignored the one hill I had to navigate to get to the beach! Also the sand clogs up derailleurs and wears out chains, so a single speed with a sturdy 1/8 � chain and steel chainset and cog, would be low maintenance. So for the wheels. Where could I get the 27x1 -1/4� wheels I needed? 700C would never do as they would look to small in the frame and my beautiful NOS vintage brakes wouldn�t fit. They are available new, but remember this bike �wouldn�t cost me a dime�. So I put the word out. A report was received of an old Raleigh Mixte in a dumpster. Fantastic! Except it was 200 miles away! The �finder� however reported that his daughter lived just one mile from my house and he would be visiting soon and would bring the wheels with him. A clandestine meeting was arranged and a small donation was made for the 27x 1-1/4�wheels and tyres.
He did say they were �a bit rough, but would probably clean up OK� and the tyres and brake blocks were unworn, so the bike, like most dumped bikes, had seen very little use. They were all wrapped up to protect his car, so I didn�t examine them until I got home. The hubs ran smooth, the rims were true, but were very rusty chrome plated steel and probably unusable. Oh dear!
27x 1-1/4� rims are not widely available. I found a dealer who had some used ones in stock, but they were 32/40 spokes which didn�t match my hubs and would make it more difficult to achieve a hub gear upgrade in the future. So drastic action was required. Out came my trusty Spokey and the wheels were dismantled. The chrome and rust was stripped off the rims with a sanding disk on my angle grinder. The rims were then hand sanded smooth and sprayed black using Plastikote enamel which is very durable. I replaced all the spoke nipples with new ones and rebuilt the wheels. They look great and set off the brown wall tyres very well.
The spares bin provided most of the rest of the parts. Pedals are Lyotard off a Peugeot Mixte pulled out of a dumpster. Ditto the quill stem. An obvious missing part was the saddle. I had a several rescued from old bikes long since scrapped, but I wanted a decent saddle for this project as I plan to use it as my winter training bike. A local bike shop keeps a stock of saddles removed from new bikes as buyers often specify a preference for a particular seat. They are �negotiable� in price as the shop gets them for free, but I was pleased to pay �10 for mine. A 16T freewheel was available (removed from a child�s bike in the dumpster), but I later swapped this for an 18T one to save my knees!
Essential new parts required were inner tubes, chain and cables. Apart from my repro chainset and the North Road bars, these are the only new parts fitted.
Next step was the trial build to make sure it all fitted together and worked OK. No real problems apart from loose cotter pins (more of that later).
So what about paint? I didn�t like the horrible brown, although it did match the rust very well, so a bare metal repaint was required.
Trial Assembly
I have rebuilt a few bikes now and know that �dry run� is essential to iron out any assembly issues before spending many hours painting the bike.
The bottom bracket was well worn. This is a good sign. This bike had been ridden for many thousands of miles to wear out the original Raleigh BB spindle. Raleigh components of the 60s/70s were built to last a lifetime. This means that the bike must be a good ride. Nobody is going to ride a bike year after year and mile after mile if it�s no good. Originally I had tried to fit a cotterless chainset, but the BB shell is wider than standard 68mm, so the adjustable bearing cup screwed in too far and I couldn�t fit the lock ring. I just couldn�t find a spindle with the correct distance between
the cones, so a new spindle and 26TPI cups were ordered along with the chromed steel Raleigh �Heron� cottered chainset.
The guy who sold me the frame gave me a selection of replacement headsets, all well used. The only thing wrong with any of them was the �crown race� that attaches to the forks. Fortunately these are standard size so was easy to fix.
The rest of the build went like a dream. Old stock parts on an old bike. It just fitted together perfectly! The only minor issue was the chainline. The BB spindle supplied was longer than the original, which threw the chainline out a little, so I put a spare bottom bracket lock ring behind the freewheel which gave a perfect chainline!
The Test Ride
A quick ride down the street confirmed that the Raleigh would be a good ride. I tried it initially on a spare pair of 700C wheels (with no brakes!), but the 27 inch wheels made the bike feel much nicer. This frame�s geometry was designed for 27�! The bars were a bit loose and the brakes needed adjusting, but he rode great! So she was stripped down for paint.
The Rebuild
Paint
The paint was stripped of the frame and forks using chemical paint stripper, a hot air gun and loads of sandpaper. Tough stuff that Raleigh stove enamelling.
The precious Raleigh brass head badge was carefully removed, polished and repainted. A childhood spent building model airplanes helped develop painting skills. Fortunately, the rust was only surface rust and was removed using phosphoric acid. The frame was primed and resprayed �Mercury Metallic Grey� from Ford and clearcoated with Plastikote which is tougher and shinier than auto paint. As the bike started life as a Raleigh Mercury, I felt this would be the right colour. The frame then spent a week indoors for the paint to harden. I made new decals on my computer and printed them on vinyl stock are clearcoated them to protect them from the weather. They were then attached to frame and clearcoated again.
Final Assembly
It was a very smooth assembly. New cables and chain added toe clips and she was ready for the ride. A trip to the bakery was the first ride. A few tools, a pump and a puncture repair kit and away we went. Half a mile down the road, the left hand cotter pin came loose and the crank was knocking. I got to the shops and back, about 3 miles and it was very loose. I pressed the cotter pins in very hard and tapped them with a hammer too and all was well. The next day it was off to the shops again � same problem � half a mile it was knocking. I breezed into a bike shop and asked for 9.5mm cotter pins (not expecting them to even know what they are). The guy says �How many do you want?� I said �two please one for each side� and he said that�s good because that is all we have. I didn�t have much confidence as these pins looked exactly the same as the ones that came from India. Anyways I fitted them, pressing them in really hard this time and set of for a 12 mile ride. They were fine until I got nearly home and an ominous creaking was heard from the LH crank. I got home and gave the cotter a good bash with a hammer and tightened the nut. It�s been OK since. However in the meantime I have ordered some expensive ones from the Raleigh Chopper Owners club. Hopefully these guys understand cotter pins!
Further Development
Although this is supposed to be a simple bike, I think it looks �wrong� without mudguards (fenders). My son had discarded a pair from his super light aluminium & carbon racing bike, but his bike is 700C with 23mm tyres and the Raleigh has 27� wheels and 32mm tyres. He had cut the stays short when fitting and they were never going to fit the Raleigh. So I trawled a few bike shops to see if they had replacement stays. The answer was �No�. So I thought I could maybe extend them by fabricating some brackets, so I offered up the front one to measure up. It fitted! Then I remembered a sign of a Raleigh frame was that they put the mudguard mounting eyes and inch or so higher than the dropouts. The rear one fitted too with a bit of �easing� so the Guv now has mudguards.
Now single speed is OK, but was beginning to take its toll on my old knees. It�s not the hills I can manage those. It�s starting off from a standstill, so I thought a Sturmey Archer 3 speed hub would make it easier. So I put a shout out. One guy came back and said he had �a ton of them� in his shed and he �never paid more than a fiver for them�. He looked through the shed and find me a �good un�. He was as good as his word and sorted out a hub, packaged it up and�then forgot to post it! So the Guv is still waiting for the 3 speed.
Functionality
The Guv is a stylish old bike which is nice to ride. Very comfortable and quite light for a utility bike. It takes me to the shops, the park and my regular 10mile training ride.
The Guv goes to The Beach
To The Park
And into The Country
Cost Schedule
Frame & Forks etc
�5.00
Wheels & Tyres
�- Dumpster
Mudguards
�- Dumpster
Saddle
�10.00
Brakes
�10.49
Ebay Brake Levers
�5.50
Pedals
�- Dumpster
Chain
�7.00
Freewheel
�- Dumpster
Handlebars
�12.00
Stem
�- Dumpster
Handgrips
�- Dumpster
Chainset
�12.00
Cables
�10.00
Paint etc
�- Freebie (Found in Garage)
Total
�72 or $106
03-17-10, 09:58 AM
#19
Rustbelt Rider
Thread Starter
Join Date: Oct 2008
Location: Canton, OH
Posts: 9,104
Bikes: 1990 Trek 1420 - 1978 Raleigh Professional - 1973 Schwinn Collegiate - 1974 Schwinn Suburban
Mentioned: 20 Post(s)
Tagged: 0 Thread(s)
Quoted: 261 Post(s)
Liked 372 Times
in
177 Posts
Thats all of them. Good luck to the entrants!
__________________
|^^^^^^^^^^^^^^| ||
|......GO.BROWNS........| ||'|";, ___.
|_..._..._______===|=||_|__|..., ] -
"(@)'(@)"""''"**|(@)(@)*****''(@)
|^^^^^^^^^^^^^^| ||
|......GO.BROWNS........| ||'|";, ___.
|_..._..._______===|=||_|__|..., ] -
"(@)'(@)"""''"**|(@)(@)*****''(@)
03-17-10, 10:17 AM
#21
Senior Member

wow, hats off to all the contestants for putting together such interesting and nice builds on the cheap. i wish i could accomplish this task, but i always spend way more than i plan! good luck to all!
03-17-10, 10:31 AM
#22
Senior Member
Fantastic! I was'nt expecting to see these for another week or so. Great job in compiling and posting all the entrants. Some great stuff.


 03-17-10, 10:47 AM
#25
Senior Member
Wow, this was worth the wait! I'm glad I pulled out (lack of parts is my excuse this time!), I don't think I could have competed! The diversity is really impressive. They are all interesting and I am surprised to admit I can't pick a favorite yet. Good job everyone. I like seeing the variety in interpretation of cheap and what goes with each theme.