


Campagnolo Hub bearing cup Replacement....Pictures
 04-20-11, 07:33 PM
#1

Senior Member
Thread Starter
Join Date: May 2010
Location: Hurricane Alley , Florida
Posts: 3,903
Bikes: Treks (USA), Schwinn Paramount, Schwinn letour,Raleigh Team Professional, Gazelle GoldLine Racing, 2 Super Mondias, Carlton Professional.
Mentioned: 10 Post(s)
Tagged: 0 Thread(s)
Quoted: 78 Post(s)
Liked 30 Times
in
22 Posts
Campagnolo Hub bearing cup Replacement....Pictures
Hello everyone,
Every so often I see threads about how to remove or install bearing cups on Campagnolo hubs. I've also read how someone needs to Harvest cups from donor hubs so they can try to fix other hubs. They get reaponses like cut them out, drill them out, unlace the wheel, heat the hub.......lots of suggestions. All seemed wrong to me, so I made a bearing cup puller and self centering cup installer. Look at the before and after pictures.
Wheel belongs to a good friend, who lives close by.
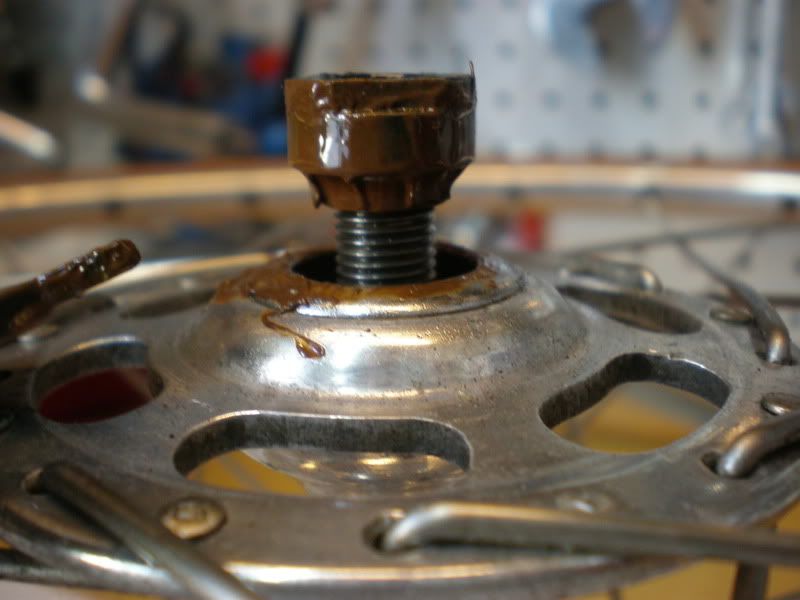
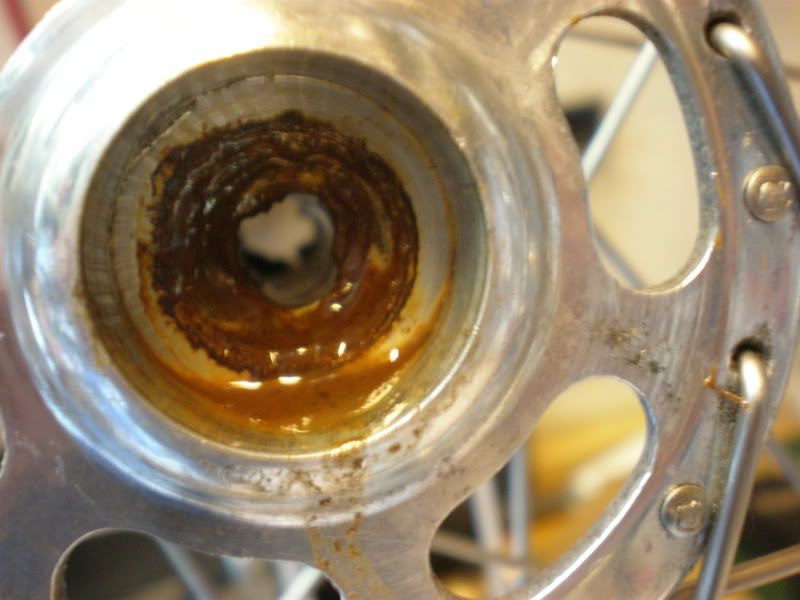
This is how I got the wheels, bearings as rough any.

Not looking good
Surprisingly the cones were smooth and unmarked

Pretty nasty
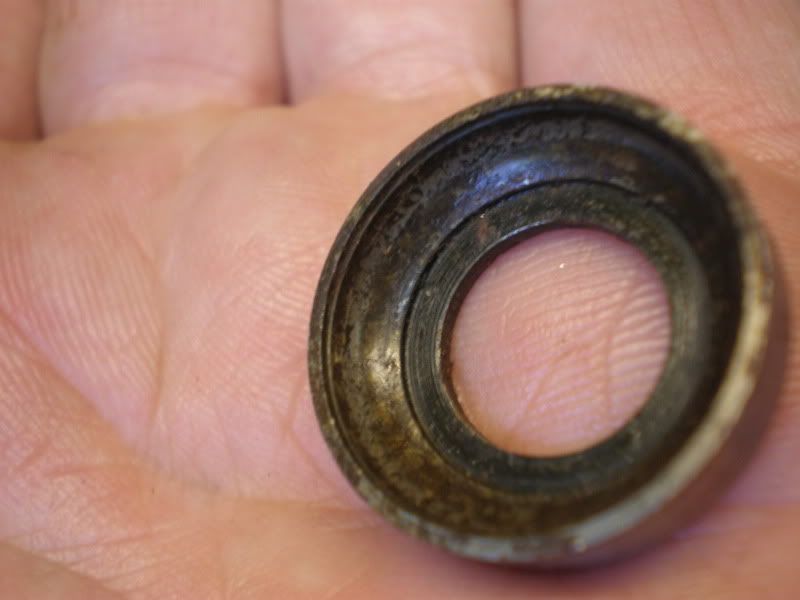
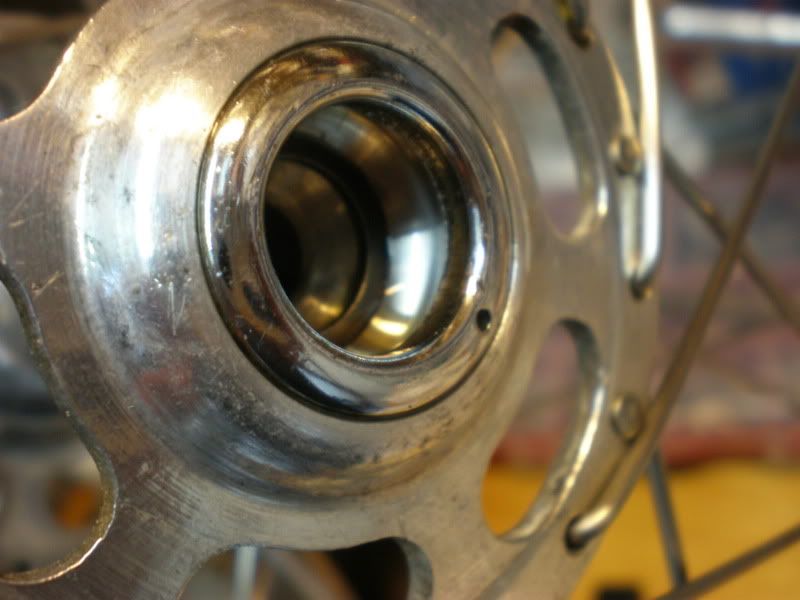
Pitted cup
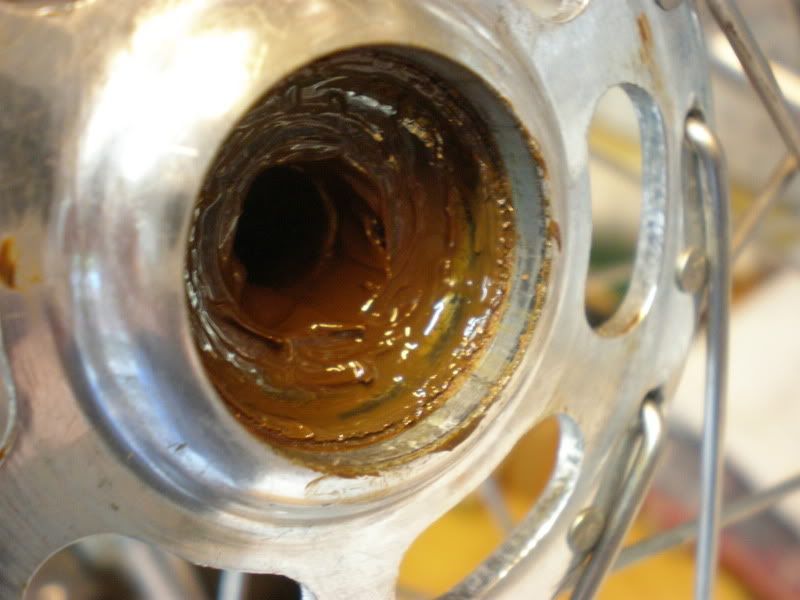
Cup Removed
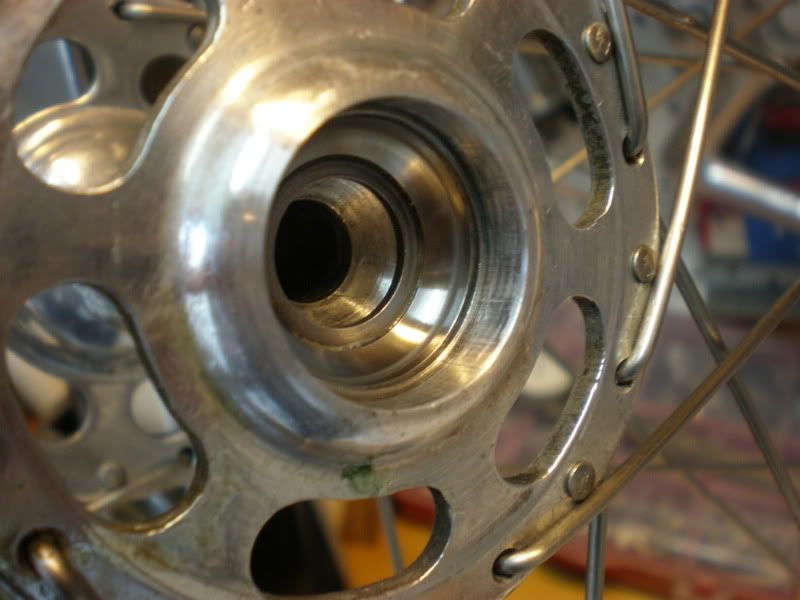
Bearing cup location dirty but in great shape
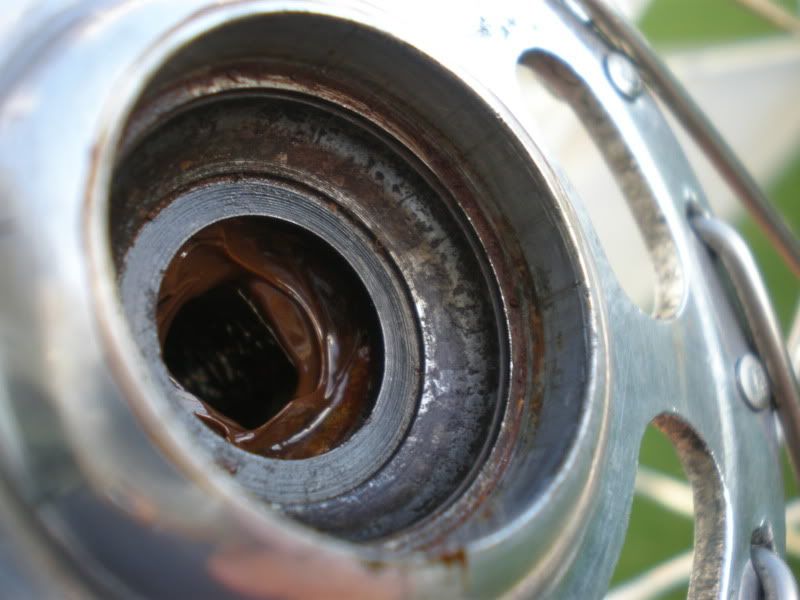
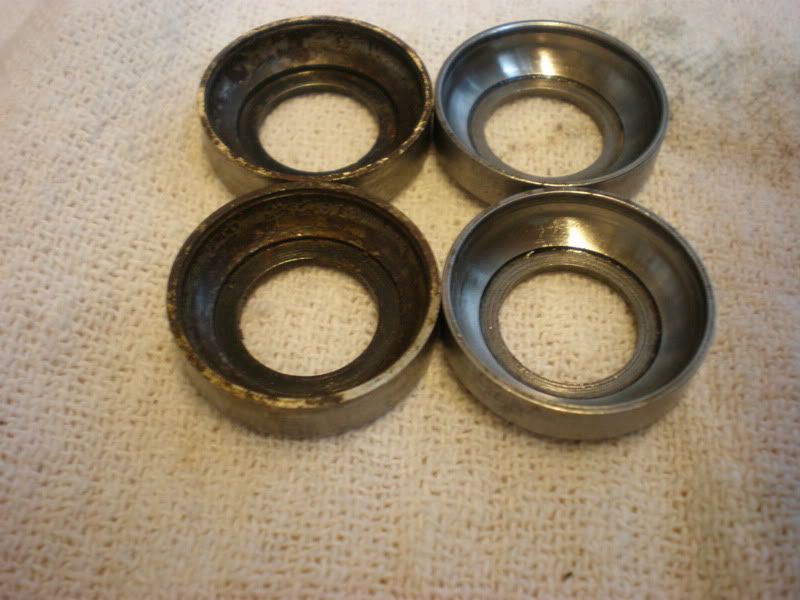
Replacement cups ready for measuring
Every so often I see threads about how to remove or install bearing cups on Campagnolo hubs. I've also read how someone needs to Harvest cups from donor hubs so they can try to fix other hubs. They get reaponses like cut them out, drill them out, unlace the wheel, heat the hub.......lots of suggestions. All seemed wrong to me, so I made a bearing cup puller and self centering cup installer. Look at the before and after pictures.
Wheel belongs to a good friend, who lives close by.
This is how I got the wheels, bearings as rough any.
Not looking good
Surprisingly the cones were smooth and unmarked
Pretty nasty
Pitted cup
Cup Removed
Bearing cup location dirty but in great shape
Replacement cups ready for measuring
 04-20-11, 07:34 PM
#2
Senior Member
Thread Starter
Join Date: May 2010
Location: Hurricane Alley , Florida
Posts: 3,903
Bikes: Treks (USA), Schwinn Paramount, Schwinn letour,Raleigh Team Professional, Gazelle GoldLine Racing, 2 Super Mondias, Carlton Professional.
Mentioned: 10 Post(s)
Tagged: 0 Thread(s)
Quoted: 78 Post(s)
Liked 30 Times
in
22 Posts
More .....
Cups installed
Wheel almost ready for new bearing balls..

Dust caps installed ready to be returned to my friend.
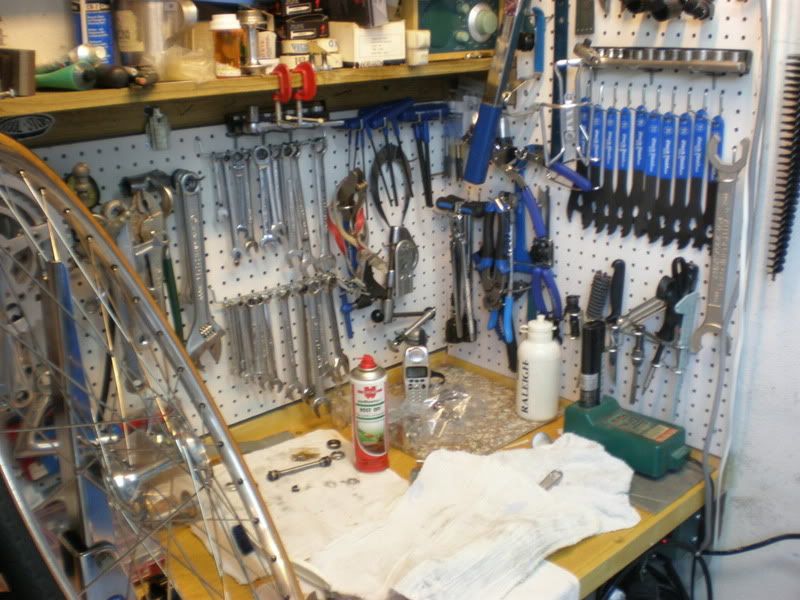
Bike cave/workshop

Wheel is done, ready for road duty. I'm sure most any cup can be removed without damaging the hub, or unlacing the wheel. No heat or cold was used for this repair.
Mike
Cups installed
Wheel almost ready for new bearing balls..
Dust caps installed ready to be returned to my friend.
Bike cave/workshop
Wheel is done, ready for road duty. I'm sure most any cup can be removed without damaging the hub, or unlacing the wheel. No heat or cold was used for this repair.
Mike
Last edited by Michael Angelo; 04-20-11 at 07:41 PM.
04-20-11, 08:15 PM
#3
Freewheel Medic

Join Date: Oct 2005
Location: An Island on the Coast of GA!
Posts: 12,885
Bikes: Snazzy* Schwinns, Classy Cannondales & a Super Pro Aero Lotus (* Ed.)
Mentioned: 140 Post(s)
Tagged: 0 Thread(s)
Quoted: 1452 Post(s)
Liked 2,195 Times
in
962 Posts
Mike,
If you don't provide some pictures of the tool(s) you made, we can only guess you used black magic to remove those cups. How did you do this?
If you don't provide some pictures of the tool(s) you made, we can only guess you used black magic to remove those cups. How did you do this?
__________________
Bob
Enjoying the GA coast all year long!
Thanks for visiting my website: www.freewheelspa.com
Bob
Enjoying the GA coast all year long!
Thanks for visiting my website: www.freewheelspa.com
 04-20-11, 08:20 PM
#4
www.theheadbadge.com

Join Date: Sep 2005
Location: Southern Florida
Posts: 28,513
Bikes: https://www.theheadbadge.com
Mentioned: 124 Post(s)
Tagged: 0 Thread(s)
Quoted: 2422 Post(s)
Liked 4,395 Times
in
2,092 Posts
I don't know how to thank you, Mike. That saves the original front hub from the '61 Paramount - the only original thing on the bike save for the headset and frame itself. You are an artisan at your craft.
Looks like the Paramount will be put back into rider service once again soon as I can swap the worn-out 151 BCD chainring; the last of the issues that put it in temporary retirement.
Take care,
-Kurt
Looks like the Paramount will be put back into rider service once again soon as I can swap the worn-out 151 BCD chainring; the last of the issues that put it in temporary retirement.
Take care,
-Kurt
__________________


Last edited by cudak888; 04-20-11 at 09:16 PM.
04-20-11, 08:23 PM
#5
Senior Member
Thread Starter
Join Date: May 2010
Location: Hurricane Alley , Florida
Posts: 3,903
Bikes: Treks (USA), Schwinn Paramount, Schwinn letour,Raleigh Team Professional, Gazelle GoldLine Racing, 2 Super Mondias, Carlton Professional.
Mentioned: 10 Post(s)
Tagged: 0 Thread(s)
Quoted: 78 Post(s)
Liked 30 Times
in
22 Posts
Hocus pocus.....I'll take pictures of the tools I made. Not to different from what I use everyday at work. If anyone needs this type of work done.....
04-20-11, 08:30 PM
#6
Velophile

Join Date: Mar 2009
Location: Seattle, WA
Posts: 1,092
Bikes: See Signature.
Mentioned: 0 Post(s)
Tagged: 0 Thread(s)
Quoted: 10 Post(s)
Likes: 0
Liked 12 Times
in
3 Posts
There is something beautiful about servicing hubs. I did it for the first time a few months ago. It was intimidating at first but essentially very easy.
Thanks for sharing. I hope it encourages folks to try it themselves.
Thanks for sharing. I hope it encourages folks to try it themselves.
__________________
2009 Specialized Roubaix, 2013 Specialized Rockhopper 29er, 1996 Guerciotti PRX, 2016 Jamis Renegade Expat !
2009 Specialized Roubaix, 2013 Specialized Rockhopper 29er, 1996 Guerciotti PRX, 2016 Jamis Renegade Expat !
 04-20-11, 09:02 PM
#8
www.theheadbadge.com
Join Date: Sep 2005
Location: Southern Florida
Posts: 28,513
Bikes: https://www.theheadbadge.com
Mentioned: 124 Post(s)
Tagged: 0 Thread(s)
Quoted: 2422 Post(s)
Liked 4,395 Times
in
2,092 Posts
The axle and cones came from the donor as well, hence why they were in decent shape. I knew the rotten 1960 races would eat the rest up, so I parked the '61 Paramount with this front hub until something could be done about it. Mind you, my '61 had probably been a Homeless Hot Rod before I wound up with it - the wheels weren't even true enough to spin in the frame.

-Kurt
__________________
Last edited by cudak888; 04-20-11 at 09:14 PM.
04-21-11, 03:09 AM
#9
Senior Member
Thread Starter
Join Date: May 2010
Location: Hurricane Alley , Florida
Posts: 3,903
Bikes: Treks (USA), Schwinn Paramount, Schwinn letour,Raleigh Team Professional, Gazelle GoldLine Racing, 2 Super Mondias, Carlton Professional.
Mentioned: 10 Post(s)
Tagged: 0 Thread(s)
Quoted: 78 Post(s)
Liked 30 Times
in
22 Posts
Loose screws has them, but they are really expensive. I see them on ebay alot, also expensive. They only cost effective way if to find a donor hub. Also it's much easier to replace cups on unlaced hubs.
04-21-11, 03:45 AM
#10
Freewheel Medic
Join Date: Oct 2005
Location: An Island on the Coast of GA!
Posts: 12,885
Bikes: Snazzy* Schwinns, Classy Cannondales & a Super Pro Aero Lotus (* Ed.)
Mentioned: 140 Post(s)
Tagged: 0 Thread(s)
Quoted: 1452 Post(s)
Liked 2,195 Times
in
962 Posts
Can we change your name to Merlin Angelo? Are you certain you did not cast some Harry Potter spell on those hubs? I can only imagine a few ways to make this work and they all have hurdles I can't figure how to jump over.
__________________
Bob
Enjoying the GA coast all year long!
Thanks for visiting my website: www.freewheelspa.com
Bob
Enjoying the GA coast all year long!
Thanks for visiting my website: www.freewheelspa.com
04-21-11, 04:36 AM
#11
Senior Member
Thread Starter
Join Date: May 2010
Location: Hurricane Alley , Florida
Posts: 3,903
Bikes: Treks (USA), Schwinn Paramount, Schwinn letour,Raleigh Team Professional, Gazelle GoldLine Racing, 2 Super Mondias, Carlton Professional.
Mentioned: 10 Post(s)
Tagged: 0 Thread(s)
Quoted: 78 Post(s)
Liked 30 Times
in
22 Posts
And did I mention the tools are non-maring?? Look at the pictures again, not one scratch. And being Large flange hubs, the sides of the flanges are prone to bending if the tool presses against them while removing the cups. Again, no damage done. It took me longer to clean the junk out of the bearing cavity than to pull and press the cups.
Mike
Mike
04-21-11, 04:41 AM
#12
Senior Member

Join Date: Apr 2005
Location: Wherever
Posts: 16,748
Mentioned: 92 Post(s)
Tagged: 0 Thread(s)
Quoted: 556 Post(s)
Likes: 0
Liked 132 Times
in
78 Posts
Neat pictures. Always difficult to do a series of "how to" pics while including the actual how to, as your hands are full of tool during the critical steps. Would love to see your puller and press set-up though.

 04-21-11, 06:54 AM
#14
Senior Member
Thread Starter
Join Date: May 2010
Location: Hurricane Alley , Florida
Posts: 3,903
Bikes: Treks (USA), Schwinn Paramount, Schwinn letour,Raleigh Team Professional, Gazelle GoldLine Racing, 2 Super Mondias, Carlton Professional.
Mentioned: 10 Post(s)
Tagged: 0 Thread(s)
Quoted: 78 Post(s)
Liked 30 Times
in
22 Posts
Just read that post, that procedure seems a bit violent. But seems to work. I didn't use a slide hammer. I use a threaded bearing cup puller. And a threaded cup installer. Maybe I should market them as a set? What would a tool that does this kind of job be worth?
04-21-11, 07:38 AM
#15
Senior Member

Join Date: Aug 2003
Location: Tampa, Florida
Posts: 13,954
Mentioned: 40 Post(s)
Tagged: 0 Thread(s)
Quoted: 413 Post(s)
Likes: 0
Liked 109 Times
in
78 Posts
A pullers a puller and they can be found for every inexpensive prices and what more do you need than a socket to drive the race in?
04-21-11, 08:04 AM
#16
Senior Member
Thread Starter
Join Date: May 2010
Location: Hurricane Alley , Florida
Posts: 3,903
Bikes: Treks (USA), Schwinn Paramount, Schwinn letour,Raleigh Team Professional, Gazelle GoldLine Racing, 2 Super Mondias, Carlton Professional.
Mentioned: 10 Post(s)
Tagged: 0 Thread(s)
Quoted: 78 Post(s)
Liked 30 Times
in
22 Posts
Mike
Last edited by Michael Angelo; 04-21-11 at 08:08 AM.
04-21-11, 08:29 AM
#17
www.theheadbadge.com
Join Date: Sep 2005
Location: Southern Florida
Posts: 28,513
Bikes: https://www.theheadbadge.com
Mentioned: 124 Post(s)
Tagged: 0 Thread(s)
Quoted: 2422 Post(s)
Liked 4,395 Times
in
2,092 Posts
04-21-11, 08:52 AM
#18
Gone World Hepster

Join Date: Oct 2005
Location: Lincoln, NE
Posts: 1,211
Mentioned: 0 Post(s)
Tagged: 0 Thread(s)
Quoted: 4 Post(s)
Likes: 0
Liked 7 Times
in
4 Posts
Mike, I'd like to see photos and read a detailed description of the removal/re-install process. I sent a couple of races to fellow member kroozer a couple of weeks ago and I'm sure he'd love to hear all the details before he tackles the job.
Last edited by 23skidoo; 04-21-11 at 08:55 AM.
04-21-11, 09:01 AM
#19
Senior Member
Join Date: Aug 2003
Location: Tampa, Florida
Posts: 13,954
Mentioned: 40 Post(s)
Tagged: 0 Thread(s)
Quoted: 413 Post(s)
Likes: 0
Liked 109 Times
in
78 Posts
Cause it's custom made not to hurt the hub in any way, works on small and large flange, laced or unlaced hubs. Also removes cups from donor hubs the same way. No heat, no vise used and no hammer to drive anything in. ALso works great on rear hubs, clears the threaded protion of the freewheel thread, not damaging those in any way either.
Mike
Mike
BTW...nice Var cotter tool and nice work area in general!!!
04-21-11, 09:04 AM
#20
www.theheadbadge.com
Join Date: Sep 2005
Location: Southern Florida
Posts: 28,513
Bikes: https://www.theheadbadge.com
Mentioned: 124 Post(s)
Tagged: 0 Thread(s)
Quoted: 2422 Post(s)
Liked 4,395 Times
in
2,092 Posts
We'll see what the results will be, Jim - you can bet that I'll put the Paramount back to work.
-Kurt
-Kurt
__________________
04-21-11, 09:26 AM
#21
Senior Member
Join Date: Apr 2005
Location: Wherever
Posts: 16,748
Mentioned: 92 Post(s)
Tagged: 0 Thread(s)
Quoted: 556 Post(s)
Likes: 0
Liked 132 Times
in
78 Posts
[QUOTE=miamijim;12536786]The only issue I've found with that technique is that the hubs sheels get work as the races is pulled out and then re-installed, I've encountered a few loose races due to this and a few loose sealed barings as well. Heat simply expands the aluminum a touch, alot isnt needed, just enough to expand the diameter.
I have to take issue just a tad, Jim. Properly removed and installed, using the right tools, which it sounds like Mike's custom tools are ...shouldn't work the metal in the shells at all. But straight in and straight out is the key. I also question the heat theory, though I'm no expert practitioner. I would think heating an aluminum hub shell would indeed expand the material, theoretically shrinking the bore and not enlarging it. Make sense? Perhaps not.
I have to take issue just a tad, Jim. Properly removed and installed, using the right tools, which it sounds like Mike's custom tools are ...shouldn't work the metal in the shells at all. But straight in and straight out is the key. I also question the heat theory, though I'm no expert practitioner. I would think heating an aluminum hub shell would indeed expand the material, theoretically shrinking the bore and not enlarging it. Make sense? Perhaps not.
04-21-11, 09:52 AM
#22
Senior Member

Join Date: Apr 2007
Location: Thunder Bay, Ontario, Canada - burrrrr!
Posts: 11,674
Bikes: 1958 Rabeneick 120D, 1968 Legnano Gran Premio, 196? Torpado Professional, 2000 Marinoni Piuma
Mentioned: 210 Post(s)
Tagged: 0 Thread(s)
Quoted: 1372 Post(s)
Likes: 0
Liked 1,751 Times
in
938 Posts
I would think heating an aluminum hub shell would indeed expand the material, theoretically shrinking the bore and not enlarging it. Make sense? Perhaps not.
As for the application of heat, done properly, no issues. However alloy, without the slightest change in color, or warning, will go from solid to liquid, in the blink of an eye. Also, though the Record hub might not be anodized, many hubs are. My guess is the direct flame heat would prove unfriendly to the anodized surface.
None the less, it is wise to learn how to preform such procedures and I applaud those who try. I applaud, even more, those who understand the concept of sharing and helping others.
But straight in and straight out is the key.
__________________
"98% of the bikes I buy are projects".
"98% of the bikes I buy are projects".
04-21-11, 10:45 AM
#23
Senior Member
Thread Starter
Join Date: May 2010
Location: Hurricane Alley , Florida
Posts: 3,903
Bikes: Treks (USA), Schwinn Paramount, Schwinn letour,Raleigh Team Professional, Gazelle GoldLine Racing, 2 Super Mondias, Carlton Professional.
Mentioned: 10 Post(s)
Tagged: 0 Thread(s)
Quoted: 78 Post(s)
Liked 30 Times
in
22 Posts
The puller rests as close to the bearing cup register as possible. So as not to strain the flanges in any way. The bearing cups in Kurts wheels were very rusted and pitted, needing a good cleaning and crud removal before any attempt at removing. In fact as I tightened the puller I kept the cup lubed with MP50, very similar to WD40. Today I'll try to remove some Normady Hub bearing cups. I'll take a picture of that too. I may have to make another small adapter so it rests in a safe place on the hub flange.
Mike
Mike
Last edited by Michael Angelo; 04-21-11 at 10:51 AM.
04-21-11, 11:11 AM
#24
Senior Member
Join Date: Apr 2005
Location: Wherever
Posts: 16,748
Mentioned: 92 Post(s)
Tagged: 0 Thread(s)
Quoted: 556 Post(s)
Likes: 0
Liked 132 Times
in
78 Posts
Thanks Randy,
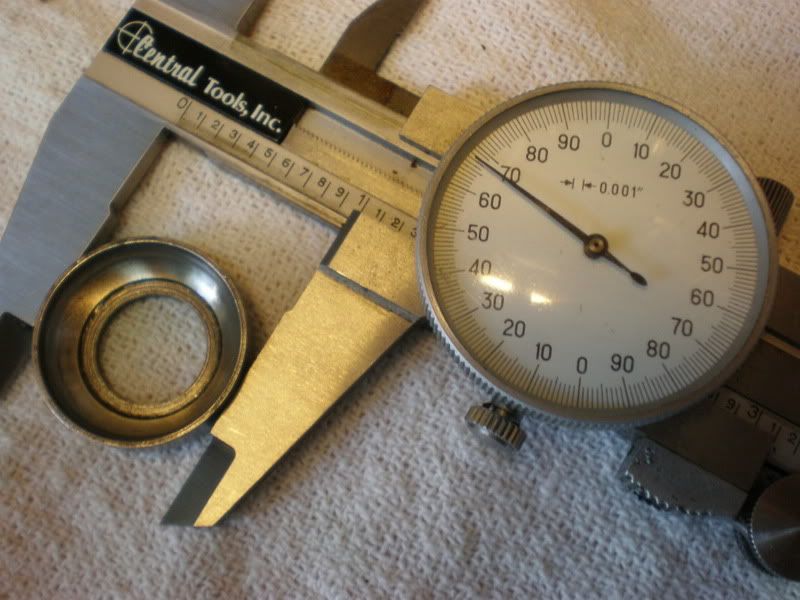
I was curious about the heat application and its ramifications, and this helps. I too applaud Mike's contribution here. Fascinating stuff. Eager to see the custom tools he fabricated for the job. Interested also in his pic of measuring the new race. Had it been a bit oversize for a proper fit, what is the next step? Mount the hub in a lathe and take a half a 'thou skim cut off the interior of the shell? Spooky thought. Thanks. RB.
I was curious about the heat application and its ramifications, and this helps. I too applaud Mike's contribution here. Fascinating stuff. Eager to see the custom tools he fabricated for the job. Interested also in his pic of measuring the new race. Had it been a bit oversize for a proper fit, what is the next step? Mount the hub in a lathe and take a half a 'thou skim cut off the interior of the shell? Spooky thought. Thanks. RB.
04-21-11, 11:20 AM
#25
master of bottom licks
Join Date: Apr 2008
Location: Lou-evil, Canned-Yucky USA
Posts: 2,210
Mentioned: 3 Post(s)
Tagged: 0 Thread(s)
Quoted: 111 Post(s)
Likes: 0
Liked 2 Times
in
2 Posts
Don't want to derail this thread away from an awesome tool idea but maybe it wouldn't have been necessary if the bearings were packed with grease instead of caramel.