


$16 Cotter Press
 04-28-11 | 02:50 PM
#1

Thread Starter
Cottered Crank
Joined: Aug 2010
Posts: 3,401
Likes: 15
From: Chicago
Bikes: 1954 Raleigh Sports 1974 Raleigh Competition 1969 Raleigh Twenty 1964 Raleigh LTD-3
$16 Cotter Press
Start with a Harbor Freight Chain Breaker.
Take it all apart and get your drill press out.
Drill out the parts shown:

Toss the bits that have the X next to them into your junk drawer.
Put it back together as a cotter press. Don't forget to grease the threads:
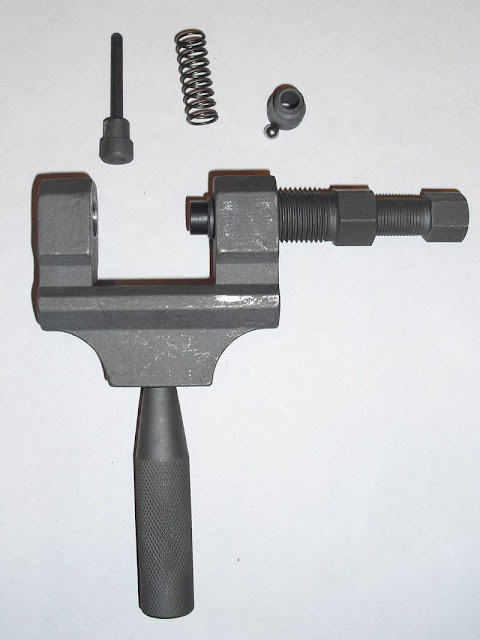
You will have 2 pushers that go in from the inner side. One is a spare in case the thin part breaks. I doubt it. It's got to be stronger than the cotter threaded part and because of the way it is built should not twist inside the tool.
Place tool over cotter/crank and tighten outer bolt until the pusher touches down:
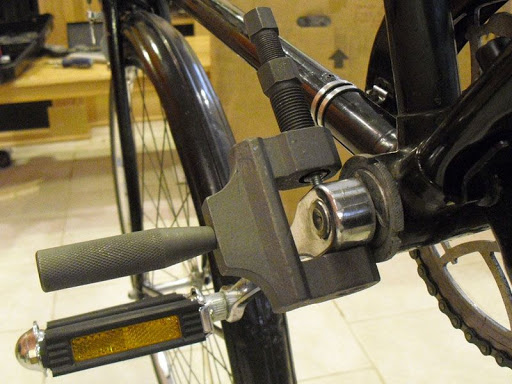
Press out cotter using inner bolt:
Take it all apart and get your drill press out.
Drill out the parts shown:
Toss the bits that have the X next to them into your junk drawer.
Put it back together as a cotter press. Don't forget to grease the threads:
You will have 2 pushers that go in from the inner side. One is a spare in case the thin part breaks. I doubt it. It's got to be stronger than the cotter threaded part and because of the way it is built should not twist inside the tool.
Place tool over cotter/crank and tighten outer bolt until the pusher touches down:
Press out cotter using inner bolt:

 04-28-11 | 03:09 PM
#3
Thread Starter
Cottered Crank
Joined: Aug 2010
Posts: 3,401
Likes: 15
From: Chicago
Bikes: 1954 Raleigh Sports 1974 Raleigh Competition 1969 Raleigh Twenty 1964 Raleigh LTD-3
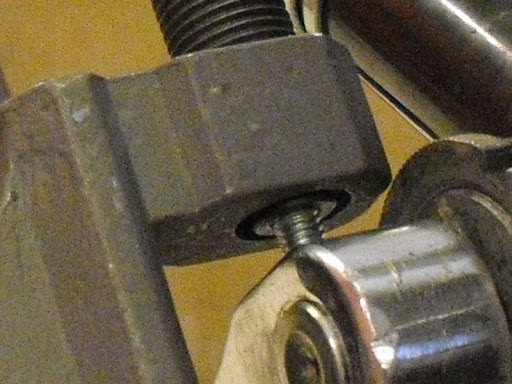
Just to be sure I wasn't clear above, the hole that is drilled out to 31/64" is NOT the part that the larger bolts thread into but the part that the little cup threaded into at the far side of the chain breaker. This has to be drilled out so that the cotter dumb end fits into it and has somewhere to move into when it is pressed out.
I drilled mine out to 31/64 because it it looked "about right."
The mouth of the big bolt has to be drilled out to 21/64 because that is the size of the collar of the "pushers" which will get put back into the outer bolt from the other end. If the hole is left small the pusher will not go in far enough because of the collar and there isn't enough room to fit onto the crank.
DO NOT try and just use the pusher in the way the chain breaker uses it. It will fall off the threaded part of the cotter and destroy the threads. I tried doing this while I was messing around and almost ruined the cotter in one of my bikes before I noticed what was happening. One you drill out the receiver cup threads it is ruined for use as a chain breaker anyhow. Might as well finish out the mod and drill the big bolt too.
The pusher has a dimple in it because it is designed to use that little ball bearing with the chain breaker. It happens to fit over the cotter perfectly and many of the better cotters have a dome built into them so they work with a cotter press with a dimpled end on it.


 04-28-11 | 04:05 PM
#9

Dolce far niente


Joined: Dec 2004
Posts: 10,710
Likes: 33
From: Southwest Idaho
I did this a while ago.
Just a caveat - there wasn't enough clearance to get it over the cotter of a Peugeot mixte I was working on. Yet another reason to hate the French.
Just a caveat - there wasn't enough clearance to get it over the cotter of a Peugeot mixte I was working on. Yet another reason to hate the French.
__________________
"Love is not the dying moan of a distant violin, it�s the triumphant twang of a bedspring."
S. J. Perelman
"Love is not the dying moan of a distant violin, it�s the triumphant twang of a bedspring."
S. J. Perelman
04-28-11 | 04:48 PM
#10
Ride heavy metal.
Joined: Sep 2009
Posts: 1,538
Likes: 2
From: Teenage Wasteland, USA
Bikes: '74 Raleigh LTD-3, '76 Motobecane Grand Jubile, '83 Fuji TSIII (customized commuter), '10 Mercier Kilo WT (fixed obsession), '83 Bianchi Alloro, '92 Bridgestone MB-1 (project), '83 Specialized Expedition (project), '79 Peugeot UO-8 (sold)
What did you use to drill out the chainbreaker?
04-28-11 | 05:06 PM
#11
1991 PBP Anciens

Joined: Nov 2009
Posts: 1,070
Likes: 1,200
From: Elburn, Illannoy
Bikes: 1964 Dunelt, 196? Dunelt Flyer, 1968 Raleigh Superbe, 1969 Robin Hood, 197? Gitane, 1970 Gitane Mexico, 1973 Raleigh SuperCourse, 1970 Raleigh Sports, 1970 Huffy Sportsman, 1981 Miyata 710, 1990 Miyata 600GT, 1999 Trek 830AL, 2007 Rivendell Bleriot,
I needed a reason to run to Harbor Freight.
04-28-11 | 05:22 PM
#12
Thread Starter
Cottered Crank
Joined: Aug 2010
Posts: 3,401
Likes: 15
From: Chicago
Bikes: 1954 Raleigh Sports 1974 Raleigh Competition 1969 Raleigh Twenty 1964 Raleigh LTD-3
I think that it would be possible to grind a bit of a notch on the bottom to allow the cotter a little more clearance -it would make this tool look a little more like the bikesmith version. I'm sure the jaw length is big enough for most any crank, it's just teasing the bits onto the crank and over the bits of the cotter that stick out. It's probably necessary to unscrew the pusher part entirely to get it over some cranks/cotters and then screw it back in. Kind of a PITA since the pusher will want to fall out of the end of the bolts as nothing is holding it in. I wouldn't say that this version is quite as nice as the BikeSmith one but I bet it works just as well once you get it teased onto the work.
04-28-11 | 05:26 PM
#13

Thrifty Bill
Joined: Jan 2008
Posts: 23,642
Likes: 1,106
From: Mans of NC & SW UT Desert
Bikes: 86 Katakura Silk, 87 Prologue X2, 88 Cimarron LE, 1975 Sekai 4000 Professional, 73 Paramount, plus more
Just a thrift tip toyounew Harbor Freight shoppers. Always download a 20% off coupon and a free item with a purchase of at least 19.95, even if you don't want the free item, donate it to the thrift store of your choice. HF accepts computer printed coupons. I keep a stack of them in my car.
04-28-11 | 05:28 PM
#14
Thread Starter
Cottered Crank
Joined: Aug 2010
Posts: 3,401
Likes: 15
From: Chicago
Bikes: 1954 Raleigh Sports 1974 Raleigh Competition 1969 Raleigh Twenty 1964 Raleigh LTD-3
I used a 1/2" hand drill moter in a vise. I wouldn't suggest you do this unless you have some experience running a drill for fabricating stuff. I'm an electrician so I've done more of it than I'd like to admit out in the field -often using my feet as a vise. I did have the help of a step-drill (unibit) to help me get it close and then I cleaned it up with the appropriate bit the rest of the way.
A drill press with a good press vise would be best but it CAN be done without it. I don't take any responsibility for broken/bent bits and/or wrists if you don't heed this warning
A drill press with a good press vise would be best but it CAN be done without it. I don't take any responsibility for broken/bent bits and/or wrists if you don't heed this warning
04-28-11 | 05:31 PM
#15
Thread Starter
Cottered Crank
Joined: Aug 2010
Posts: 3,401
Likes: 15
From: Chicago
Bikes: 1954 Raleigh Sports 1974 Raleigh Competition 1969 Raleigh Twenty 1964 Raleigh LTD-3
Just a thrift tip toyounew Harbor Freight shoppers. Always download a 20% off coupon and a free item with a purchase of at least 19.95, even if you don't want the free item, donate it to the thrift store of your choice. HF accepts computer printed coupons. I keep a stack of them in my car.
 04-29-11 | 07:55 AM
#18

aka Tom Reingold


Joined: Jan 2009
Posts: 44,160
Likes: 6,381
From: New York, NY, and High Falls, NY, USA
Bikes: 1962 Rudge Sports, 1971 Raleigh Super Course, 1971 Raleigh Pro Track, 1974 Raleigh International, 1975 Viscount Fixie, 1982 McLean, 1996 Lemond (Ti), 2002 Burley Zydeco tandem
I've been on the fence for quite a while about buying the bikesmith cotter press. Now I would be absolutely stupid not to get/make this.
__________________
Tom Reingold, tom@noglider.com
New York City and High Falls, NY
Blogs: The Experienced Cyclist; noglider's ride blog
�When man invented the bicycle he reached the peak of his attainments.� � Elizabeth West, US author
Please email me rather than PM'ing me. Thanks.
Tom Reingold, tom@noglider.com
New York City and High Falls, NY
Blogs: The Experienced Cyclist; noglider's ride blog
�When man invented the bicycle he reached the peak of his attainments.� � Elizabeth West, US author
Please email me rather than PM'ing me. Thanks.
04-29-11 | 08:30 AM
#19
Thread Starter
Cottered Crank
Joined: Aug 2010
Posts: 3,401
Likes: 15
From: Chicago
Bikes: 1954 Raleigh Sports 1974 Raleigh Competition 1969 Raleigh Twenty 1964 Raleigh LTD-3
The chainbreaker I used for this conversion was bought and promptly lost in a pile of crap and was still in its original packaging as I had never even opened it up. I had been thinking of this conversion for a while now and was looking for the thing off and on for weeks if not months. I have a really nice professional motorcycle chain breaker (that also works well on cotters although it is a pita to set up as it comes in a plastic case and only fits inside the case when it is all disassembled) so I really didn't need to buy this although it WAS cheap. Now I have a dedicated cotter press that can be stored with my bike tools
 04-30-11 | 01:57 PM
#21

Senior Member
Joined: Apr 2009
Posts: 10,303
Likes: 60
From: Detroit
If you come up against a recalcitrant cotter, the c-clamp will yield first. (been there done that).
__________________
- Auchen
- Auchen
04-30-11 | 02:34 PM
#22
Thread Starter
Cottered Crank
Joined: Aug 2010
Posts: 3,401
Likes: 15
From: Chicago
Bikes: 1954 Raleigh Sports 1974 Raleigh Competition 1969 Raleigh Twenty 1964 Raleigh LTD-3
The C-clamp method works with an older quality C-clamp. I wouldn't try it with some of the newer cheapo chinese cast C-clamps. Those will snap if you just drop one unloaded onto a wood workbench from more than 12" inches. Drop one on a concrete floor and they shatter into multiple pieces.
the other problem with a C-clamp is the thread pitch. A C-clamp has a very coarse thread pitch of like 6-8 threads per inch where a good press like the wheelsmith or even this Harbor Freight conversion will have something on the order of 25-30 tpi or more. That is just leverage. With more TPI you have a ton more leverage for each thousandth of an inch you need to move the cotter until it gives way.
the other problem with a C-clamp is the thread pitch. A C-clamp has a very coarse thread pitch of like 6-8 threads per inch where a good press like the wheelsmith or even this Harbor Freight conversion will have something on the order of 25-30 tpi or more. That is just leverage. With more TPI you have a ton more leverage for each thousandth of an inch you need to move the cotter until it gives way.
05-03-11 | 07:00 AM
#23
Thread Starter
Cottered Crank
Joined: Aug 2010
Posts: 3,401
Likes: 15
From: Chicago
Bikes: 1954 Raleigh Sports 1974 Raleigh Competition 1969 Raleigh Twenty 1964 Raleigh LTD-3
Update:
I just used this press on a '72 lady Sports with a TON of rust on it. The cranks and spindle were a bit rusted and (I really don't see this that often) rusted cotters. The bike was left outside for years and the rims were so badly rusted that OA isn't even putting a dent in them.
The cotters came right out using this press without any effort or fuss at all. I don't think I put more than 40-50 ft/lbs into the 3/8" ratchet wrench I was using with a 14mm socket to operate the inner bolt on the "cotter press."
The time to set this press up is minimal compared to my Motion-Pro chain tool.
Because of the modifications and the way it works the "pusher" will just fall out of the outer bolt when the tool is not mounted so I store it inside the tool installed backwards (the way it went into the tool before it was modified to be a cotter press.) The only set-up required to use this tool is to remove the bolts and pull the pusher out of inside of the two. Place the press over the crank & cotter. Reverse the pusher and screw the bolts/pusher back into the tool being careful not to let the pusher fall out onto the ground. Once the pusher and the outside bolt seats onto the cotter you can tighten the inner bolt by hand until it hits resistance. At this point the tool is ready to use. Turn the inner bolt with a 14mm socket (or combo box/open-end wrench) about 4-5 turns and the cotter pops right out.
The converted tool works even better than I had hoped. Maybe I'll make a video the next time I pull off some old cotters. I've got the 60's-era Flying Jet to do next. That should be another good test of the tool. So far I've removed 3 cotters and all of them were smooth as butter.
05-03-11 | 12:20 PM
#24
aka Tom Reingold
Joined: Jan 2009
Posts: 44,160
Likes: 6,381
From: New York, NY, and High Falls, NY, USA
Bikes: 1962 Rudge Sports, 1971 Raleigh Super Course, 1971 Raleigh Pro Track, 1974 Raleigh International, 1975 Viscount Fixie, 1982 McLean, 1996 Lemond (Ti), 2002 Burley Zydeco tandem
What did mechanics use in the heyday of cotters? I am under the impression that they used hammers, but maybe not.
__________________
Tom Reingold, tom@noglider.com
New York City and High Falls, NY
Blogs: The Experienced Cyclist; noglider's ride blog
�When man invented the bicycle he reached the peak of his attainments.� � Elizabeth West, US author
Please email me rather than PM'ing me. Thanks.
Tom Reingold, tom@noglider.com
New York City and High Falls, NY
Blogs: The Experienced Cyclist; noglider's ride blog
�When man invented the bicycle he reached the peak of his attainments.� � Elizabeth West, US author
Please email me rather than PM'ing me. Thanks.
05-03-11 | 12:28 PM
#25

Senior Member
Joined: Jun 2008
Posts: 1,880
Likes: 2
From: SoCal
Bikes: Lemond, Gios, Fuji, Trek, too many to write
