


Adventures in Chainguard Mounting
 06-27-11 | 02:44 PM
#1

Thread Starter
Senior Member
Joined: Dec 2010
Posts: 216
Likes: 1
From: Detroit, MI
Bikes: 1973 Schwinn Collegiate, 1983 Fuji Royale II Mixte
Adventures in Chainguard Mounting
I've been unusually busy lately so bicycles got put to the side while I was neck deep in work and planning for Boston.
But I found the time this weekend to do this:
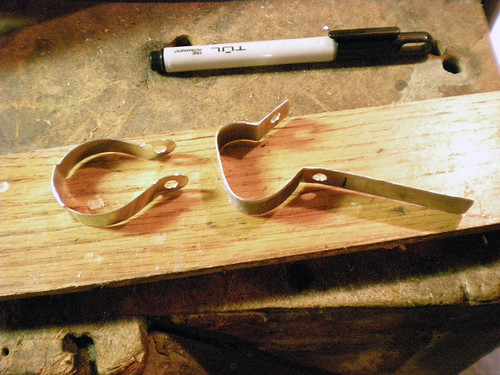
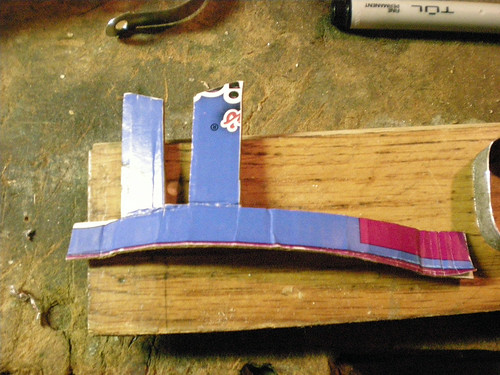
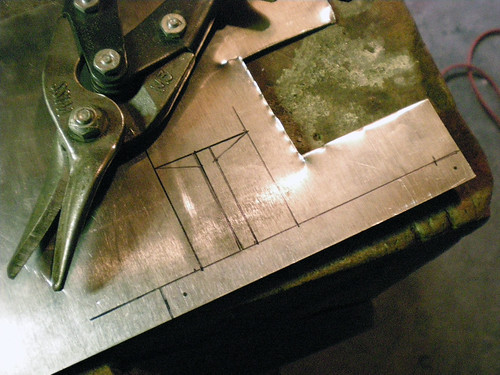
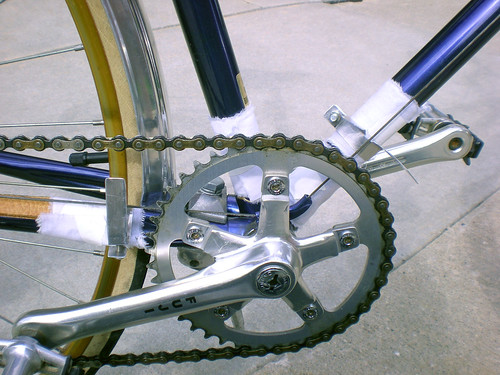
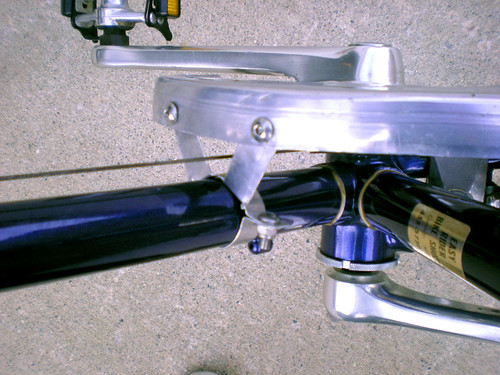
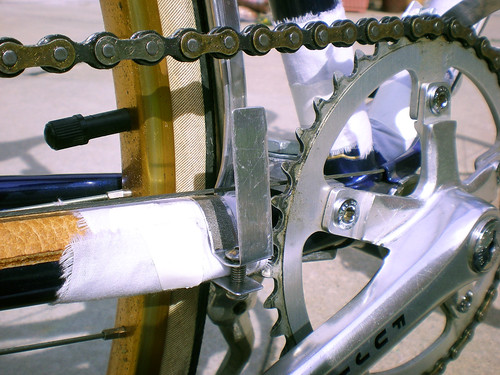
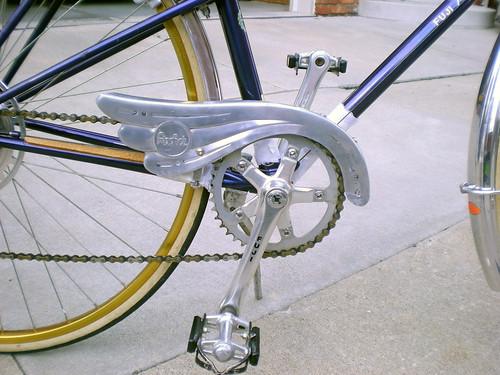
Considering I honestly did not expect this to work on my first try, I'm pretty happy, even though it's a bit of a sloppy looking fit. I think I might take a second stab this next weekend when I'm painting the guard.
But I found the time this weekend to do this:
Considering I honestly did not expect this to work on my first try, I'm pretty happy, even though it's a bit of a sloppy looking fit. I think I might take a second stab this next weekend when I'm painting the guard.




 06-27-11 | 03:43 PM
#6
Thread Starter
Senior Member
Joined: Dec 2010
Posts: 216
Likes: 1
From: Detroit, MI
Bikes: 1973 Schwinn Collegiate, 1983 Fuji Royale II Mixte
Thanks! Hey it's getting close to July, do you still think I might be able to borrow that Raleigh?
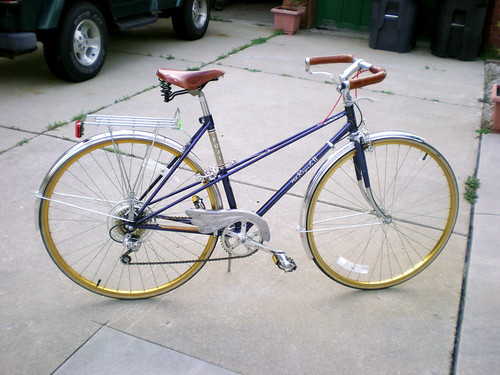
It's not the prettiest shot, I was going to wait till I'd painted it and ride out to the docks for the "full reveal". But since you asked, haha.
Good I'm glad! I did a lot of scouring the net before I made these and I was pretty disappointed I couldn't find a lot of images or resources.
It's not the prettiest shot, I was going to wait till I'd painted it and ride out to the docks for the "full reveal". But since you asked, haha.
Good I'm glad! I did a lot of scouring the net before I made these and I was pretty disappointed I couldn't find a lot of images or resources.
 06-27-11 | 03:49 PM
#8
Thread Starter
Senior Member
Joined: Dec 2010
Posts: 216
Likes: 1
From: Detroit, MI
Bikes: 1973 Schwinn Collegiate, 1983 Fuji Royale II Mixte
I don't know that this is more ridged. It's pliable aluminum. I sort of pushed it around into place a lot when I assembled it and I'm not certain it will stay yet. These brackets are a bit too long, so the crank arm is only clearing by millimeters. I'll have to fabricate a new set at some point.
06-27-11 | 04:01 PM
#9

Senior Member
Joined: May 2009
Posts: 2,741
Likes: 151
From: Kitchener, ON
Great work. I might try and use stainless flat bar when I get around to mounting mine. I had planned to start with some front derailleur ataptors but using more than one gets pricey, and one is still left making something to go from the adaptor to the chaincase/guard so might as well just make it all from scratch. Thanks for posting this and that's a sweet looking bike as is.
06-27-11 | 05:30 PM
#10

Photographer
Joined: May 2006
Posts: 3,118
Likes: 102
From: The other Cape, Cape Ann
One of my favorite bikes on C&V.
Scott
Scott
__________________
ClassicFuji.posthaven.com.archive
IG @scottryder.surf.cycle
IG @scottryder.fine.art
ClassicFuji.posthaven.com.archive
IG @scottryder.surf.cycle
IG @scottryder.fine.art
06-27-11 | 05:57 PM
#11

multimodal commuter
Joined: Nov 2006
Posts: 19,810
Likes: 597
From: NJ, NYC, LI
Bikes: 1940s Fothergill, 1959 Allegro Special, 1963? Claud Butler Olympic Sprint, Lambert 'Clubman', 1974 Fuji "the Ace", 1976 Holdsworth 650b conversion rando bike, 1983 Trek 720 tourer, 1984 Counterpoint Opus II, 1993 Basso Gap, 2010 Downtube 8h, and...
Good job! When you say "clearing by just a few mm" bear in mind the only important word is "clearing." As long as it's clearing, it's clearing. If you have it where you want it, it will in all likelihood stay there.
06-27-11 | 06:01 PM
#12
Senior Member
Joined: Oct 2008
Posts: 2,929
Likes: 2
I don't know that this is more ridged. It's pliable aluminum. I sort of pushed it around into place a lot when I assembled it and I'm not certain it will stay yet. These brackets are a bit too long, so the crank arm is only clearing by millimeters. I'll have to fabricate a new set at some point.
I think this will be a problem for you when you use the bike, so be ready for it. Professionally made bracketry is usually stiff, either from having out of plane stiffening formed into it during stamping or from being made from thick, stiff material.
Because you are fabricating a one-of bracket (like I also need to do), you can either bend the edges up to create stiffeners or you can secondarily bond stiffeners onto your flat-pattern bracket (use epoxy for adequate strength and weather resistance). After fabricating the bracketry, you can spray paint everything to match the frame.
Can you shoot and post a shot of the mounting brackets taken froom the non-drive side, please? I'd like to see the overall effect. The guard hides the brackets ell from the viewing angles the phtotos were taken from. I'd like to see it from the other directions.
In thinking about my own bracketry design, I was going to attach the front bracket by cutting a large diameter hole and capturing the sheet metal bracket between the bottom bracket's fixed cup and the frame, rather than using a band clamp around the seat tube as you've done. There's lots of ways to do things.
Thanks for the great pics.
Last edited by Mike Mills; 06-27-11 at 06:07 PM.
06-27-11 | 06:08 PM
#13
Senior Member
Joined: Oct 2008
Posts: 2,929
Likes: 2
Unless and until you bump it with your foot. Then it will rub. Soft aluminum does not spring back.
06-27-11 | 06:11 PM
#14
Senior Member
Joined: Oct 2008
Posts: 2,929
Likes: 2
More tips -
For a really finished appearance, trim your mounting screws flush with the end of the lock nuts. The protruding threads will not be visible (cleaner appearance).
Design the brackets so the mounting hardware is underneath the tube rather than on its top side. It'll be less visible underneath.
Consider using smaller hardware (nuts & bolts). Even a #4 hardware would have plenty of strength but it is a lot smaller and the bands can be made correspondingly smaller, etc.
When you custom design, you are in total control. It's great!
For a really finished appearance, trim your mounting screws flush with the end of the lock nuts. The protruding threads will not be visible (cleaner appearance).
Design the brackets so the mounting hardware is underneath the tube rather than on its top side. It'll be less visible underneath.
Consider using smaller hardware (nuts & bolts). Even a #4 hardware would have plenty of strength but it is a lot smaller and the bands can be made correspondingly smaller, etc.
When you custom design, you are in total control. It's great!
Last edited by Mike Mills; 06-28-11 at 01:20 AM.
06-27-11 | 07:50 PM
#15

holyrollin'
Joined: Jun 2005
Posts: 1,324
Likes: 9
From: L.B.N.J.U.S.A.
Bikes: Raleigh, Rudge, James 3spds., and a cast of many
I think this will be a problem for you when you use the bike, so be ready for it. Professionally made bracketry is usually stiff, either from having out of plane stiffening formed into it during stamping or from being made from thick, stiff material.
Because you are fabricating a one-of bracket (like I also need to do), you can either bend the edges up to create stiffeners or you can secondarily bond stiffeners onto your flat-pattern bracket (use epoxy for adequate strength and weather resistance).
Because you are fabricating a one-of bracket (like I also need to do), you can either bend the edges up to create stiffeners or you can secondarily bond stiffeners onto your flat-pattern bracket (use epoxy for adequate strength and weather resistance).
And OP, that is a seriously beautiful bike. Well done!
06-28-11 | 12:44 AM
#17
Thread Starter
Senior Member
Joined: Dec 2010
Posts: 216
Likes: 1
From: Detroit, MI
Bikes: 1973 Schwinn Collegiate, 1983 Fuji Royale II Mixte
Wow thank you for all the tips Mike. Trimming the screws is something I'll hopefully do eventually. I'll definitely have the two arm bracket bolt underneath next time. I'm with limited tools here so I don't know how much more I can do. There's a reason I used tin snips instead of a jeweler saw, haha. How do you bend the edges up?
I haven't been able to truly test it's stability until the single stack bolts for the chainwheel come in. Once I have those I'll be able to give it a good ride and see how much knocking about I end up doing.
And thanks everyone for the complements on the bike. The paint color is one of my favorite things about it. I was never big on having a blue bike before I realized just how much depth and variance of color this paint has.
I haven't been able to truly test it's stability until the single stack bolts for the chainwheel come in. Once I have those I'll be able to give it a good ride and see how much knocking about I end up doing.
And thanks everyone for the complements on the bike. The paint color is one of my favorite things about it. I was never big on having a blue bike before I realized just how much depth and variance of color this paint has.
07-03-11 | 06:12 PM
#18
Thread Starter
Senior Member
Joined: Dec 2010
Posts: 216
Likes: 1
From: Detroit, MI
Bikes: 1973 Schwinn Collegiate, 1983 Fuji Royale II Mixte
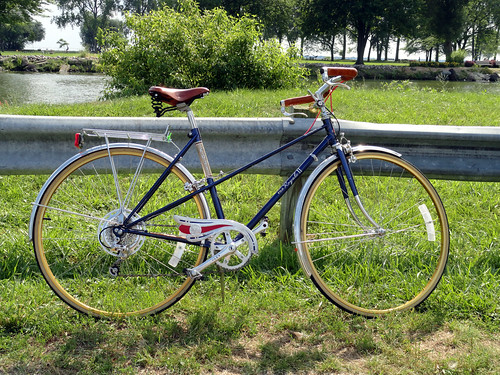
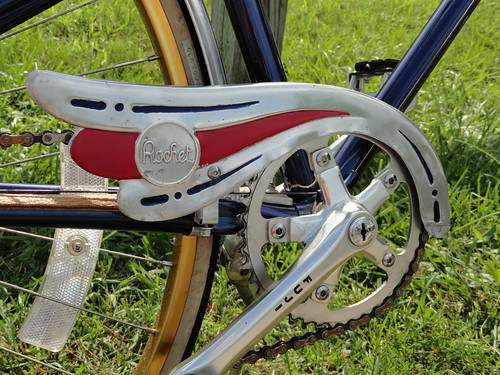
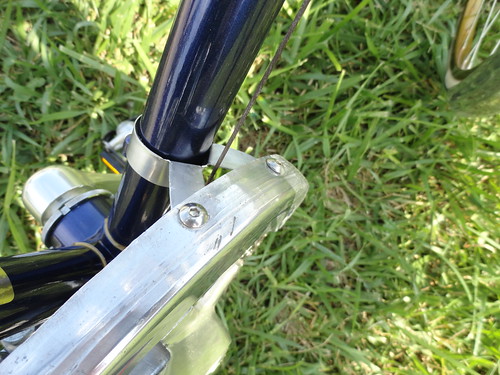
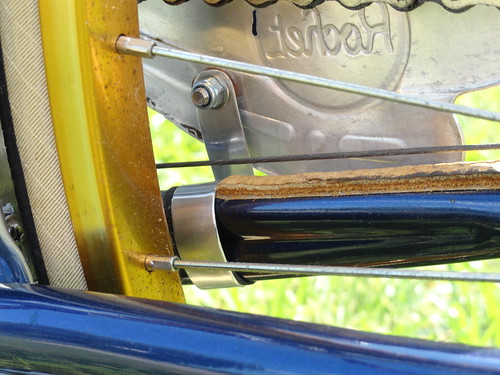
Well. It's a good thing I decided to remake the brackets since I snapped one of the arms of the down tube bracket when flattening it out again. I bent the first set in and out of shape way to many times even though I knew a stress crack was inevitable. The new set's only been bent once and is a slightly smaller, better fit. I've also lined the inside with strips cut from a broken rim strip I found, and got a little fancy with the edges. Thanks again Mike for the tips, I think this set came out much better.
I've probably only ridden 10 -15 miles, but it hasn't budged an inch. I think I'm good to go.
Oh, I also painted it. The paint is in no way even remotely perfect but I like it well enough. The original paint was a bit uneven too.

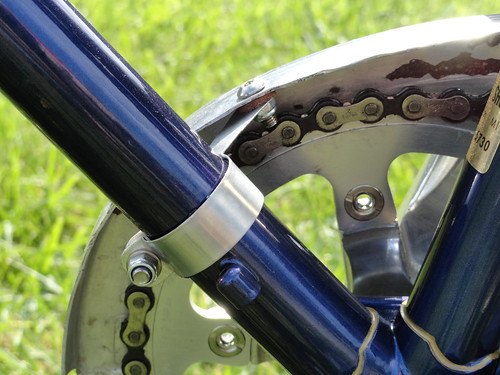
And just wanted to throw this up here, thanks Southpaw for inspiring me on what to do with the empty shifter mount:
I've probably only ridden 10 -15 miles, but it hasn't budged an inch. I think I'm good to go.
Oh, I also painted it. The paint is in no way even remotely perfect but I like it well enough. The original paint was a bit uneven too.
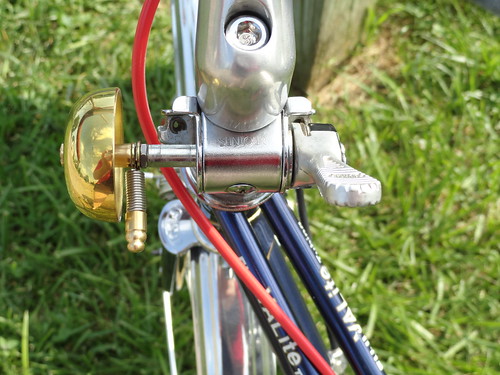
And just wanted to throw this up here, thanks Southpaw for inspiring me on what to do with the empty shifter mount:
Last edited by katezila; 07-03-11 at 08:20 PM.
 07-03-11 | 07:03 PM
#20
holyrollin'
Joined: Jun 2005
Posts: 1,324
Likes: 9
From: L.B.N.J.U.S.A.
Bikes: Raleigh, Rudge, James 3spds., and a cast of many
I like the placement better this time around. Nice job on the brackets! Looks pro.
The use of elastic stop nuts (nylon locknuts) is ideal on short fasteners like these. On long ones they wear you out when installing and removing.
The use of elastic stop nuts (nylon locknuts) is ideal on short fasteners like these. On long ones they wear you out when installing and removing.

 07-04-11 | 06:14 AM
#24

Senior Member


Joined: May 2010
Posts: 3,904
Likes: 36
From: Hurricane Alley , Florida
Bikes: Treks (USA), Schwinn Paramount, Schwinn letour,Raleigh Team Professional, Gazelle GoldLine Racing, 2 Super Mondias, Carlton Professional.
Beautiful Bike, nice color combo. What did you use under the clamps to protect the paint?
07-04-11 | 08:46 AM
#25
Thread Starter
Senior Member
Joined: Dec 2010
Posts: 216
Likes: 1
From: Detroit, MI
Bikes: 1973 Schwinn Collegiate, 1983 Fuji Royale II Mixte
Michael Angelo I just wrapped and tapped some short rags the first go around, and then when the brackets were more or less finished, I had a 1/4 inch wide rim strip that I cut liners from and attached with rubber cement. I don't think the rubber cement held very well, but it held well enough.

