


How far is "too far gone"?
 07-24-12 | 09:52 PM
#1

Thread Starter
Running on plenty

Joined: Dec 2007
Posts: 209
Likes: 67
From: Sydney, Australia
Bikes: Too many to list
How far is "too far gone"?
I know this is likely to involve some really rubbery argument, but what are users take on frames that are "too far gone"?
The ride in question is an Australian built 531 frame, possibly by a known maker, but I'm checking that further for now. Came with a 27.2 post, and weighed in at 2.8kg frame + fork + headset. It was a basket case parts-wise, after being stored with little or no care for an indeterminate length of time. I always find flash photos make rust look absolutely hideous, but I didnt have a chance to take daylight shots of this before I stripped it back.
All I've done is stripped the paint off with gel chem and a scraper, and hit it with 400 grit paper to take off a few remnants. I will still give it a once over with 240 grit, and 400 again if its worth saving, before painting it.
BB from behind, before:

After:

TT before:

After (without flash):

DT/ST junction before:

After:

Underside DT after:

Its the spidering on the upper side of the DT (does this have a proper name??) that worries me most, I think.
HT before:

HT after (opposite from above, this side was worse):

For interest, the RD and FD looked like this:

The BB lockring was much the same, but the cups were fine.
I'm actually leaning towards binning it, to be honest. There's a few more pics here: https://picasaweb.google.com/slartyb...eat=directlink
Jim
The ride in question is an Australian built 531 frame, possibly by a known maker, but I'm checking that further for now. Came with a 27.2 post, and weighed in at 2.8kg frame + fork + headset. It was a basket case parts-wise, after being stored with little or no care for an indeterminate length of time. I always find flash photos make rust look absolutely hideous, but I didnt have a chance to take daylight shots of this before I stripped it back.
All I've done is stripped the paint off with gel chem and a scraper, and hit it with 400 grit paper to take off a few remnants. I will still give it a once over with 240 grit, and 400 again if its worth saving, before painting it.
BB from behind, before:
After:
TT before:
After (without flash):
DT/ST junction before:
After:
Underside DT after:
Its the spidering on the upper side of the DT (does this have a proper name??) that worries me most, I think.
HT before:
HT after (opposite from above, this side was worse):
For interest, the RD and FD looked like this:
The BB lockring was much the same, but the cups were fine.
I'm actually leaning towards binning it, to be honest. There's a few more pics here: https://picasaweb.google.com/slartyb...eat=directlink
Jim

 07-24-12 | 09:58 PM
#3
Full Member

Joined: Aug 2009
Posts: 287
Likes: 70
I have saved frames that looked like that and they ended up riding fine. I soaked them in an OA bath and frame saved the inside of the tubes. It will never look perfect as the rust will leave some pitting but I think structurally it will be ok.
__________________
Bikes are cool, even the dumb ones.
Bikes are cool, even the dumb ones.
07-24-12 | 09:59 PM
#4
Se�or Member
Joined: Jul 2009
Posts: 1,637
Likes: 3
From: Boston Burbs
Bikes: Bedford, IF, Hampsten, DeSalvo, Intense Carbine 27.5, Raleigh Sports, Bianchi C.u.S.S, Soma DC Disc, Bill Boston Tandem
How do the inside of the tubes and bottom bracket shell look?
If it were me, I would probably knock back as much of the rust as I could (OA), coat the frame with a rust inhibitor and build it up as a beater/commuter.
I would not invest in a proper paint job.
If it were me, I would probably knock back as much of the rust as I could (OA), coat the frame with a rust inhibitor and build it up as a beater/commuter.
I would not invest in a proper paint job.
07-24-12 | 10:00 PM
#5

Banned.
Joined: Jul 2009
Posts: 12,292
Likes: 4,863
From: PAZ
Bin it? Not hardly - that's just surface rust. However, if you don't get it all off, it's just going to come back from under your new paint. You need to hit it again with some coarse grit and continue until it's completely gone.
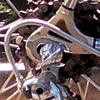
Look at it this way: there's not a whole lot of pitting going on, so that's a good thing. Check out the couple of photos below. Pitting all over this Guerciotti frame, but it's not a goner by a long shot - I've just got a crapload of Bondo work ahead of me


Good luck!
DD
Look at it this way: there's not a whole lot of pitting going on, so that's a good thing. Check out the couple of photos below. Pitting all over this Guerciotti frame, but it's not a goner by a long shot - I've just got a crapload of Bondo work ahead of me
Good luck!
DD
 07-24-12 | 10:04 PM
#6
Thread Starter
Running on plenty
Joined: Dec 2007
Posts: 209
Likes: 67
From: Sydney, Australia
Bikes: Too many to list
Hmmm, maybe I've been thinking about this negatively, huh? There's no rust blooms inside the tubes or BB shell, and nothing that feels like its eating away at the tubing. Whoever owned it appears to have lubed the headset and seat tube with some sort of black sludge, so maybe thats helped.
Even though its 531 and well made, it was only ever going to get a home rattle can job.
Jim
Even though its 531 and well made, it was only ever going to get a home rattle can job.
Jim
07-24-12 | 10:27 PM
#7
Senior Member

Joined: Oct 2011
Posts: 10,051
Likes: 2,508
From: Fairplay Co
Bikes: Current 79 Nishiki Custum Sport, Jeunet 620, notable previous bikes P.K. Ripper loop tail, Kawahara Laser Lite, Paramount Track full chrome, Raliegh Internatioanl, Motobecan Super Mirage. 59 Crown royak 3 speed
Since this is a nice 531 frame with only surface rust it is far frome being to gone. With a OA bath and litte sanding that frame should be just fine to paint and build up with a little work. If your just looking to do a rattle can job you could clean it up spray it with rust converter and just paint it just use some good quality etching primer.
Last edited by zukahn1; 07-24-12 at 10:30 PM.
07-24-12 | 10:55 PM
#9

Gone World Hepster
Joined: Oct 2005
Posts: 1,211
Likes: 11
From: Lincoln, NE
07-24-12 | 11:00 PM
#10
Thread Starter
Running on plenty
Joined: Dec 2007
Posts: 209
Likes: 67
From: Sydney, Australia
Bikes: Too many to list
I like it, but I also like my face firmly attached to my...face. I dont want to go eating tarmac for the sake of a $50 chance pickup, if you get me.
240, 400, etch primer, rattle can. I think I have my weekend planned.
Jim
240, 400, etch primer, rattle can. I think I have my weekend planned.
Jim
07-24-12 | 11:03 PM
#11
Banned.
Joined: Jul 2009
Posts: 12,292
Likes: 4,863
From: PAZ
DD
07-25-12 | 07:57 AM
#12


Rust pits can be filled with a skim coat of plastic filler after all of the rust has been removed with acid.
07-29-12 | 05:35 PM
#13
Thread Starter
Running on plenty
Joined: Dec 2007
Posts: 209
Likes: 67
From: Sydney, Australia
Bikes: Too many to list
I got some time on the weekend to get some sanding done. The rusty bits cleared up nicely, without no pitting aside from one minor spot on the DT. I didn't bother to fill it in, the primer did a decent job of it, and it is only destined to be a beater for a while.
Sanded:

I did a little more around the cable guides after this, these were the worst areas showing surface rust:

Superbe Pro dropouts under the paint (and fork tips):

Detail sanding...what fun...

Primed:

Rattled fork:

Should be able to start the frame next weekend, and clear the fork at the same time.
Jim
Sanded:
I did a little more around the cable guides after this, these were the worst areas showing surface rust:
Superbe Pro dropouts under the paint (and fork tips):
Detail sanding...what fun...
Primed:
Rattled fork:
Should be able to start the frame next weekend, and clear the fork at the same time.
Jim
07-29-12 | 06:12 PM
#14
Banned.
Joined: Jul 2009
Posts: 12,292
Likes: 4,863
From: PAZ
Lookin' good, Jim - and I love the pics of the bare frame details. Wish there was a way to ensure a clearcoat over bare metal would endure through the years!
Eagerly anticipating the finished/built-up bike
DD
Eagerly anticipating the finished/built-up bike
DD
07-29-12 | 07:28 PM
#15
likes to ride an old bike
Joined: Dec 2010
Posts: 669
Likes: 1
From: Madison
Looking good! If they're not rare specimens, I love bikes in this condition. Very fun projects that turn out good riders for cheap -- and you don't need to beat yourself up if you do an imperfect job.


 08-04-12 | 04:22 AM
#17

Senior Member

Joined: Sep 2005
Posts: 3,005
Likes: 305
From: Hervey Bay, Qld, Australia.
Bikes: Colnago (82, 85, 89, 90, 91, 96, 03), 85 Cinelli, 90 Rossin, 83 Alan, 82 Bianchi, 78 Fountain, 2 x Pinarello, Malvern Star (37), Hillman (70's), 80's Beretto Lo-Pro Track, 80's Kenevans Lo-Pro, Columbus Max (95), DeGrandi (80's) Track.
You're doing a great job familyguy. I agree, it looks like a real fun project and I look forward to the next instalment. I really like the blue even though it is a little darker in the flesh as you point out. I think this colour opens up all sorts of possibilities regarding the final aesthetics. Well done.
08-04-12 | 04:50 AM
#18
Senior Member
Joined: May 2010
Posts: 3,904
Likes: 36
From: Hurricane Alley , Florida
Bikes: Treks (USA), Schwinn Paramount, Schwinn letour,Raleigh Team Professional, Gazelle GoldLine Racing, 2 Super Mondias, Carlton Professional.
Looks good, I would have a it sand blasted. I like the color looks like my 1972 Carlton Professional I'll be building up soon.
 08-04-12 | 07:36 AM
#20

Cottered Crank
Joined: Aug 2010
Posts: 3,401
Likes: 15
From: Chicago
Bikes: 1954 Raleigh Sports 1974 Raleigh Competition 1969 Raleigh Twenty 1964 Raleigh LTD-3
It's just surface rust with what doesn't look like very much pitting. 99.9% of the metal is still there and hasn't been compromised.
I don't sand anything unless the paint is really flaking. I just brush it off and clean it really well with Dawn blue dish soap to get the oils out of the rust which will inhibit the OA from getting in and doing its job.
Let it soak and do the work for you. OA will turn the rust into a salt which will either float away on its own or be easily brushed off with a scrubby pad or a brass brush. You will be amazed at what is just surface rust or blooming scabs that will pop right off and leave a pretty good surface behind.
With a little surface-filling bondo the pitting can be made smooth for painting. Either rattle-can or spring for a $100 powder-coat. I'd say that just about any 531 or other higher-end steel tubing deserves a $100 powder coat but that is just me. Rattle-can just chips too easily and is too soft.
But that blue looks nice. Put it out in the hot sun to cook for a few days or a week and get a chance of hardening up.
 08-25-12 | 04:55 AM
#22
Thread Starter
Running on plenty
Joined: Dec 2007
Posts: 209
Likes: 67
From: Sydney, Australia
Bikes: Too many to list
Finished painting it, cleared it, got the Primax needle bearing headset put back into it:

Missing the top nut from the headset, so I'll have to locate something suitable to replace it. This is going to be a fixed-gear-road conversion for starters, which may turn into "a while", I think.
Parked it behind my '79 Fuji Finest II for a comparison. Geometry is markedly different.

Jim
Missing the top nut from the headset, so I'll have to locate something suitable to replace it. This is going to be a fixed-gear-road conversion for starters, which may turn into "a while", I think.
Parked it behind my '79 Fuji Finest II for a comparison. Geometry is markedly different.
Jim
08-25-12 | 06:43 AM
#23
Senior Member
Joined: Apr 2006
Posts: 3,232
Likes: 739
From: Sacramento, CA
Bikes: '64 Bianchi CDM, '62ish Altenburger Cinelli Mod B, '63-64 Cinelli SC, 69 Rene Herse Competition, '71 Gitane SC, '73 Cinelli SC, '73-74 Colnago Super,, '73-74 Cinelli SC, '78ish counterfeit Confente, '82 Medici Gran Turismo, '67ish Mondia Speciale
Great project! Thanks for keeping us posted.....
08-25-12 | 08:17 AM
#24

MIKE is my name!
Joined: Mar 2012
Posts: 2,846
Likes: 21
From: finland,baltimore
Bikes: hans lutz, , puch mistral ultima,2x Austro Daimler Smoked chrome Ultima,Austro Daimler Mixte,Austro Daimler 531 mixte, flying arrow,F Moser,
looks great- I am itching to paint a bike, have not done one myself for a few years.
you should be proud.
mike
you should be proud.
mike
