


Reflector bracket help and front rack installation help
 08-09-12 | 03:26 AM
#1
Thread Starter
Senior Member
Joined: Apr 2007
Posts: 166
Likes: 0
From: Madison, WI
Reflector bracket help and front rack installation help
Hi all -
This is a pretty newbie question and I should probably know the answer, but I have never installed one of these Nitto Marks racks before on a bike with a quill stem setup that I have to get into. Nor, in all honesty have I ever installed a headset or stem before.. I have to remove the reflector and bracket because it interferes with tongue/mount for the rack top bag I hope to use. Once I find a wrench to fit the large nut top most nut, I think I can get to the reflector bracket.
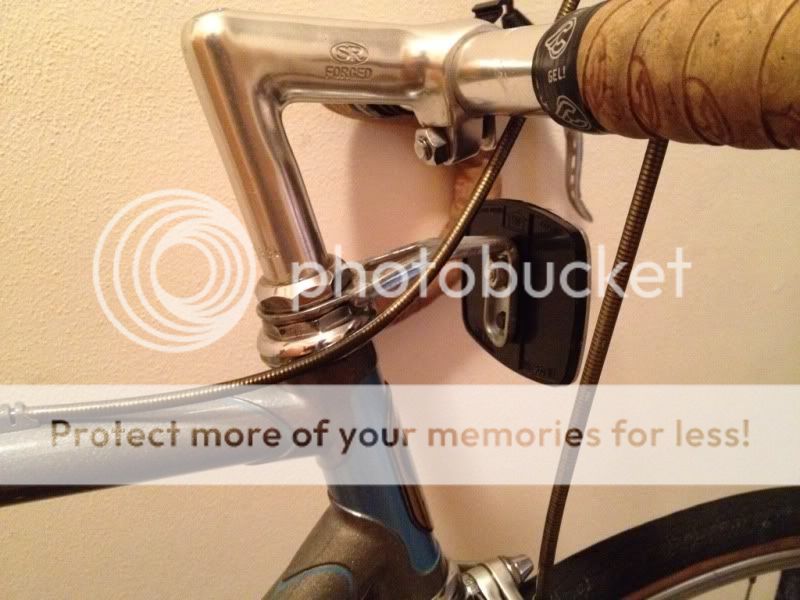
OT: I apologize for the hideous (imho) black gel tape ends.... I plan to finish it off some twine that will be a better match to the bike and look . My first bar tape installation as well :-) - took me about 5 attempts before it worked out. Not sure I am a fan of the corky gel. I think I prefer the Brooks leather tape, as it is not a squishy. I will have to try and save my penny's and find some on sale. I did take shoe polish to darken it up to match the Brooks saddle on this bike, but the tone did not get there. Perhaps I will try some stain and see how that works.
1. When/if I get that nut off and remove the bracket, do I have to make up that vertical space that bracket took up with a washer of some kind?
2. I am using the cobble'esq P clamps to mount struts to the fork. Any recommendation on how far down on the fork I should go? I assume I will need to cut them to size once I have them mounted properly.
3. How far down should a quill stem be inserted to be considered "safe"? I was thinking I may raise it some to to make the bars a bit to more level to the seat and try it.
4. Lastly - any words of wisdom while I have the brakes off, stem or reflector assembly off? Taking off the brakes was easier than I thought once I figured out the front bolt did not hold it on :-).
I installed the canti version of this rack (M12?) on my LHT with little trouble, other than the need to massage the supports to make it level. This one is just a bit different. Thanks in advance to any/all help.
Tom
This is a pretty newbie question and I should probably know the answer, but I have never installed one of these Nitto Marks racks before on a bike with a quill stem setup that I have to get into. Nor, in all honesty have I ever installed a headset or stem before.. I have to remove the reflector and bracket because it interferes with tongue/mount for the rack top bag I hope to use. Once I find a wrench to fit the large nut top most nut, I think I can get to the reflector bracket.
OT: I apologize for the hideous (imho) black gel tape ends.... I plan to finish it off some twine that will be a better match to the bike and look . My first bar tape installation as well :-) - took me about 5 attempts before it worked out. Not sure I am a fan of the corky gel. I think I prefer the Brooks leather tape, as it is not a squishy. I will have to try and save my penny's and find some on sale. I did take shoe polish to darken it up to match the Brooks saddle on this bike, but the tone did not get there. Perhaps I will try some stain and see how that works.
1. When/if I get that nut off and remove the bracket, do I have to make up that vertical space that bracket took up with a washer of some kind?
2. I am using the cobble'esq P clamps to mount struts to the fork. Any recommendation on how far down on the fork I should go? I assume I will need to cut them to size once I have them mounted properly.
3. How far down should a quill stem be inserted to be considered "safe"? I was thinking I may raise it some to to make the bars a bit to more level to the seat and try it.
4. Lastly - any words of wisdom while I have the brakes off, stem or reflector assembly off? Taking off the brakes was easier than I thought once I figured out the front bolt did not hold it on :-).
I installed the canti version of this rack (M12?) on my LHT with little trouble, other than the need to massage the supports to make it level. This one is just a bit different. Thanks in advance to any/all help.
Tom
 08-09-12 | 03:46 AM
#2

Bianchi Goddess


Joined: Apr 2009
Posts: 28,907
Likes: 4,147
From: Shady Pines Retirement Fort Wayne, In
Bikes: Too many to list here check my signature.
To properly adjust the headset you really need two 32mm headset wrenches or one HS wrench and big adjustable.
Yes you will need a washer to makeup for the missing reflector bracket.
I would just overhaul the HS at that point and maybe put in new bearings.
There should be a minimum insertion or max height mark on the stem, you want to be sure that is below the top of the nut.
Put the clamps where ever they need to be to make the rack as level as possible. Front racks don't tolerate alot of weight (handling) and slanted one attract attention.
__________________
�One morning you wake up, the girl is gone, the bikes are gone, all that's left behind is a pair of old tires and a tube of tubular glue, all squeezed out"
Sugar "Kane" Kowalczyk
�One morning you wake up, the girl is gone, the bikes are gone, all that's left behind is a pair of old tires and a tube of tubular glue, all squeezed out"
Sugar "Kane" Kowalczyk
08-10-12 | 05:47 AM
#4
Bianchi Goddess
Joined: Apr 2009
Posts: 28,907
Likes: 4,147
From: Shady Pines Retirement Fort Wayne, In
Bikes: Too many to list here check my signature.
I bet they have oodles of them over at the Yellow Jersey. https://www.yellowjersey.org/
__________________
�One morning you wake up, the girl is gone, the bikes are gone, all that's left behind is a pair of old tires and a tube of tubular glue, all squeezed out"
Sugar "Kane" Kowalczyk
�One morning you wake up, the girl is gone, the bikes are gone, all that's left behind is a pair of old tires and a tube of tubular glue, all squeezed out"
Sugar "Kane" Kowalczyk
08-10-12 | 06:35 AM
#5
Senior Member
Joined: Feb 2011
Posts: 807
Likes: 10
You have three options. The first is to use a spacer as others have mentioned. Second is to remove the reflector bracket and tighten down the top nut. This will only work if the steerer is cut a little bit shorter than normal. If the top nut bottoms out before it is tight enough, it won't work. The third option is to cut or file a few mm from the steerer. To help keep the cut square, use a cutting guide like Park sells. A template will also work as well. Wrap a piece of paper around the steerer a few millimeters from the top so that the paper lines up with itself where it overlaps. Tape it in place and cut and file to the edge of the paper. That will give you a square cut. Remove burrs from the inside and outside and you are ready to go

Thread
Thread Starter
Forum
Replies
Last Post
luv2bikeguy
Bicycle Mechanics
1
05-30-16 05:19 PM
gramphighgate
Bicycle Mechanics
2
06-12-14 04:33 PM
