


Another shout-out for Rootboy and his tire savers! - Now sold by Compass Bicycles
 10-24-13, 08:25 AM
#51

Senior Member

Join Date: Apr 2005
Location: Wherever
Posts: 16,748
Mentioned: 92 Post(s)
Tagged: 0 Thread(s)
Quoted: 556 Post(s)
Likes: 0
Liked 132 Times
in
78 Posts
Thank you Dawes-man. In our communications, both Jan are are are quite surprised they're selling so well on his site. We both figured it would reach a "saturation" point, where everyone who wanted them, a small niche to be sure, would get them and sales would drop precipitously. So far, knock on wood, that hasn't happened. Yet. 
 10-24-13, 08:31 AM
#52
Senior Member
Join Date: Apr 2005
Location: Wherever
Posts: 16,748
Mentioned: 92 Post(s)
Tagged: 0 Thread(s)
Quoted: 556 Post(s)
Likes: 0
Liked 132 Times
in
78 Posts
Sure, the stack in the picture is:
1. Brake caliper
2. Washer
3. Tire saver
4. Brake nut
5. Lock nut
Swap 2 and 4 placing the tire saver loop between the nuts. It is difficult to control the adjustment with the caliper and washer stack for proper brake caliper action without including the tire save loop. This way you can adjust the brake nut for the proper adjustment and then torque the lock nut against the loop as needed.
This will cause another challenge in that the loop will rotate with the lock nut as you tighten it down. I try to complensate by off-setting the loop such that it will rotate to the proper orientation when I tighten the nut. This may require a couple of iterations until it is close to being in the right place. I don't settle for perfection so I adjust the "legs" from the loop to be symetrical around the tire and use them to lift the loop barely above the tread. Since the transition from the loop to the "legs" is under the nut, it is not noticably visable at a glance. You have to make an effort to see it. If you are a perfectionist, you will be very frustrated! But take heart, your nuts will not be symetrical either, with respect to the orientation of the flats of each nut to the other! Not to mention having the arc of the tire saver parallel to the tread profile and centered to the bike!
10-24-13, 08:36 AM
#54
Senior Member
Join Date: Apr 2005
Location: Wherever
Posts: 16,748
Mentioned: 92 Post(s)
Tagged: 0 Thread(s)
Quoted: 556 Post(s)
Likes: 0
Liked 132 Times
in
78 Posts
BTW Skip, I'm going to experiment more with flattening the loop. It definitely makes them more user friendly. It helps with them not turning when the nut is tightened also. On my wrap-around fender version I hit the loop with a 3/8 Stanley flat nosed punch, on an anvil. Then I have to take them over to the Scotchbrite deburring wheel to smooth out the tool and anvil marks and make them look nice. It adds a few steps, and some time, but might be worth it. Thanks.
10-24-13, 08:44 AM
#56
Senior Member

lol...as if that would make any difference at all!
10-24-13, 10:24 AM
#57
Senior Member
Join Date: May 2008
Location: Fredericksburg, Va
Posts: 9,579
Bikes: '65 Frejus TDF, '73 Bottecchia Giro d'Italia, '83 Colnago Superissimo, '84 Trek 610, '84 Trek 760, '88 Pinarello Veneto, '88 De Rosa Pro, '89 Pinarello Montello, '94 Burley Duet, 97 Specialized RockHopper, 2010 Langster, Tern Link D8
Mentioned: 73 Post(s)
Tagged: 0 Thread(s)
Quoted: 1609 Post(s)
Liked 2,216 Times
in
1,103 Posts
Ah. I see, thanks. The other member wrote me to ask if they could be mounted between the star washer and the fork crown, or, between the star washer and the bolt boss. But I figured, though it might work, one would likely lose the function of the star washer by doing that. It's clear I need to experiment with some method of using these on recess nut brakes. Not having a bike which uses recess nuts is problematic. I was thinking that a small washer placed on the flange of the recess nut between the flange on the nut and the fork crown might work. But then, of course, one loses the sleek appearance and function of the recess nut. And the brake pivot bolt used on recess brakes may not be long enough for that approach anyway. Hmmm....
I don't see an elegant solution mounting on the recessed nut side either. I believe the clamping surface of the nut is in the recess anyway, so there isn't room for the loop to fit, just a complete washer. If a recessed nut were redesigned to inlcude a threaded stud where the hex hole is then it would mimic a nutted brake configuration.
Bolt lenght is an issue on both sides. Flatening the loop allows for slightly more thread engagement of the acorn or locking nut. This is the primary reason in flattened the loop to begin with! Did I fail to mention that!
Now that I think about it, what is esthetically appealing is the tire saver placed such that it is under the brake bridge in the back and under the fork in the front. With either type of brake mounting one of the two configurations exists but not both. I don't remember and I can't check right now, if the front recessed nut goes through the fork crown and clamps on the front side of the steering hole or not. If so, mounting the tire saver there would work as long as the distance from the loop to the bend was long enough. If someone reading this detail knows, we would appreciate it, otherwise, I will check when I get home and let you know. I suspect that it does not. The recess in the fork crown is probably like the rear bridge, a counter bored hole. If not, the steerer tube would have to be milled to be flat for the recessed nut.
10-24-13, 10:27 AM
#58
Senior Member
Join Date: May 2008
Location: Fredericksburg, Va
Posts: 9,579
Bikes: '65 Frejus TDF, '73 Bottecchia Giro d'Italia, '83 Colnago Superissimo, '84 Trek 610, '84 Trek 760, '88 Pinarello Veneto, '88 De Rosa Pro, '89 Pinarello Montello, '94 Burley Duet, 97 Specialized RockHopper, 2010 Langster, Tern Link D8
Mentioned: 73 Post(s)
Tagged: 0 Thread(s)
Quoted: 1609 Post(s)
Liked 2,216 Times
in
1,103 Posts
I don't have a set of your tire savers as I am supplied from 1973 bulk purchase. The material mine are made of are like bailing wire, that is quite soft without much spring. If your material is much the same, then you might be able to flatten the loops in a press and use washers with the desired thickness as stops on either side instead of using a punch and hammer. It would reduce time and provide uniformity between parts.
10-24-13, 11:05 AM
#59
Senior Member
Join Date: Apr 2005
Location: Wherever
Posts: 16,748
Mentioned: 92 Post(s)
Tagged: 0 Thread(s)
Quoted: 556 Post(s)
Likes: 0
Liked 132 Times
in
78 Posts
It would be interesting to know what brand your are/were. I tried bending a set of my old Bicycle Research wires and they're harder than the back of your head. Seems almost like piano wire, which is similar to spring steel. Actually, my material for the top portion is just brass. I tried using stainless for it but couldn't bend that stuff for s**t. Until, that is, the great Frank the Welder (what happened to that guy?) sent me some pieces of 1/16th stainless welding rod. It was just enough softer than the stock I had tried using that I could bend it for the tire rubbing pieces. But no way I can bend it into mounting loops, let alone my little keeper ring I bend for the "neck". That's how I ended up with two-toned tire savers. 
So, it doesn't take too much to flatten the brass, but it ends up destroying the finish so I have to refinish them. A "press" ? Ha. that's a good one. :) You mean, like a hydraulic or pneumatic press? I do have a 5 ton Jet bearing press but that doesn't have enough oomph to flatten brass, as small as it is. Would need a punch press. Way over my pay grade, I'm afraid.
Thanks for all your input on this. I'm still brain storming. But now I'm going to make sure I ask customers if they have nutted brakes or recess mount.

Last edited by rootboy; 10-24-13 at 11:09 AM.
01-13-14, 08:48 AM
#60
Senior Member

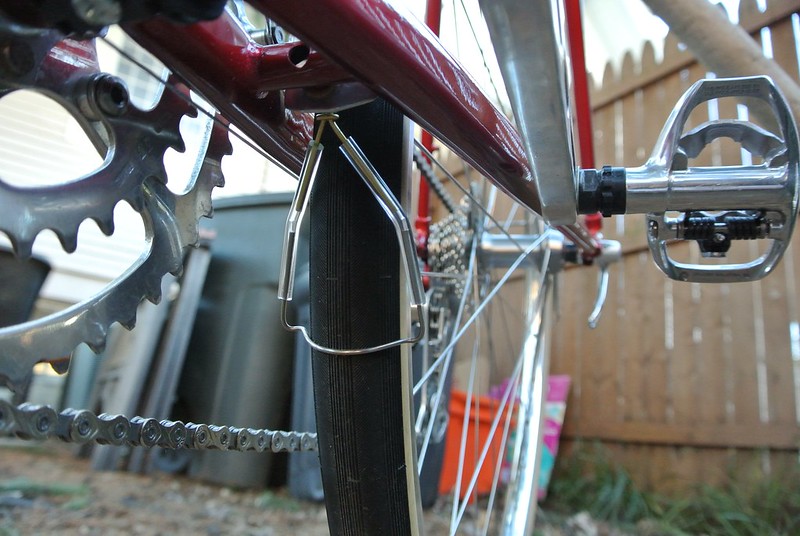
Installed a set of Scott's Tire Savers on a recent build. These are super cool, handmade accessories.
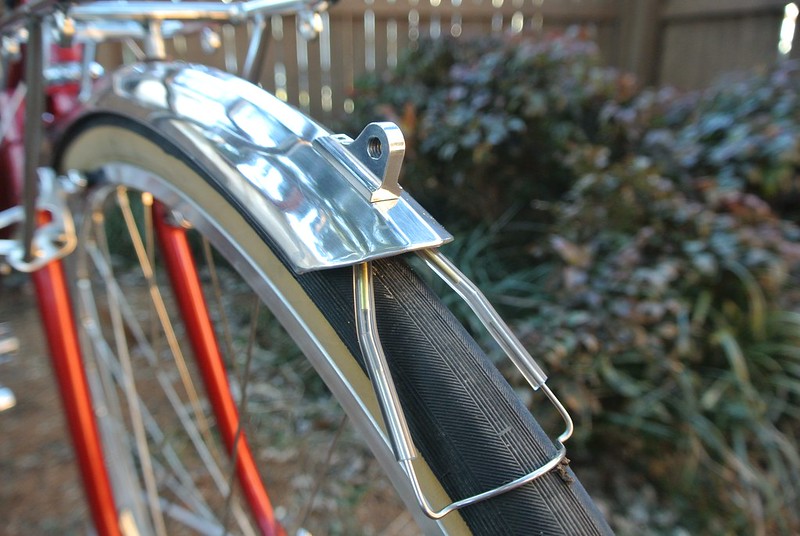 Untitled by ColonelJLloyd, on Flickr
Untitled by ColonelJLloyd, on Flickr
Untitled by ColonelJLloyd, on FlickrUntitled by ColonelJLloyd, on Flickr
__________________
Bikes on Flickr
I prefer email to private messages. You can contact me at justinhughes@me.com
Bikes on Flickr
I prefer email to private messages. You can contact me at justinhughes@me.com
01-13-14, 09:50 AM
#61
Senior Member
Join Date: Apr 2005
Location: Wherever
Posts: 16,748
Mentioned: 92 Post(s)
Tagged: 0 Thread(s)
Quoted: 556 Post(s)
Likes: 0
Liked 132 Times
in
78 Posts
Thanks Colonel. Those look pretty nifty on that build. As you know, you can shorten up that front one if you like.
BTW, I like that little machined light bracket.
BTW, I like that little machined light bracket.
01-13-14, 09:55 AM
#62
Senior Member
Join Date: May 2008
Location: Fredericksburg, Va
Posts: 9,579
Bikes: '65 Frejus TDF, '73 Bottecchia Giro d'Italia, '83 Colnago Superissimo, '84 Trek 610, '84 Trek 760, '88 Pinarello Veneto, '88 De Rosa Pro, '89 Pinarello Montello, '94 Burley Duet, 97 Specialized RockHopper, 2010 Langster, Tern Link D8
Mentioned: 73 Post(s)
Tagged: 0 Thread(s)
Quoted: 1609 Post(s)
Liked 2,216 Times
in
1,103 Posts
How about pics of the complete bike! Why isnt the fender mounted to the chain stay bridge?
 01-13-14, 10:40 AM
#64
Senior Member
Yeah, I think I will do that.
Most of the pics didn't turn out well; I'll have to take some more. When I do I'll post them in the VO Pass Hunter thread. The rear fender is mounted to the dropouts with stays and directly to the seat stay bridge and chain stay bridge.
Most of the pics didn't turn out well; I'll have to take some more. When I do I'll post them in the VO Pass Hunter thread. The rear fender is mounted to the dropouts with stays and directly to the seat stay bridge and chain stay bridge.
__________________
Bikes on Flickr
I prefer email to private messages. You can contact me at justinhughes@me.com
Bikes on Flickr
I prefer email to private messages. You can contact me at justinhughes@me.com
Last edited by ColonelJLloyd; 01-13-14 at 10:43 AM.
01-13-14, 10:57 AM
#65
Senior Member

1) Sprinkle broken glass along a route.
2) Ride that route say 10 times (or a hundred times) on a bike without tire savers.
3) Count up the number of flats.
4) Ride same route the same number of times on the same bike with tire savers.
5) Count up the number of flats.
6) Compare results.
2) Ride that route say 10 times (or a hundred times) on a bike without tire savers.
3) Count up the number of flats.
4) Ride same route the same number of times on the same bike with tire savers.
5) Count up the number of flats.
6) Compare results.
3a) Change tires!
01-13-14, 11:31 AM
#66

Senior Member
Join Date: Jan 2006
Location: Berwyn PA
Posts: 6,408
Bikes: I hate bikes!
Mentioned: 39 Post(s)
Tagged: 0 Thread(s)
Quoted: 431 Post(s)
Liked 710 Times
in
233 Posts
Yeah, I think I will do that.
Most of the pics didn't turn out well; I'll have to take some more. When I do I'll post them in the VO Pass Hunter thread. The rear fender is mounted to the dropouts with stays and directly to the seat stay bridge and chain stay bridge.
Most of the pics didn't turn out well; I'll have to take some more. When I do I'll post them in the VO Pass Hunter thread. The rear fender is mounted to the dropouts with stays and directly to the seat stay bridge and chain stay bridge.
01-13-14, 11:46 AM
#68
Senior Member
Yes, it is. You can order it directly from Mitch Pryor ($30 shipped) or your LBS can order it from Merry Sales.
__________________
Bikes on Flickr
I prefer email to private messages. You can contact me at justinhughes@me.com
Bikes on Flickr
I prefer email to private messages. You can contact me at justinhughes@me.com

