


Show us your DIY Gear
 03-10-12 | 11:49 AM
#26
Senior Member
Joined: Jul 2011
Posts: 1,141
Likes: 5
From: Erie Penna.
Everyone should have one Fredly bike I say. Here is my hero.https://www.smithsonianmag.com/history-archaeology/Fred-Birchmores-Amazing-Bicycle-Trip-Around-the-World.html
Most of my bikes are rather plain one of the nice things about a touring bike is you can Fred it up.
 03-11-12 | 08:19 PM
#27
Senior Member
Joined: Jul 2009
Posts: 686
Likes: 4
From: Central Illinois
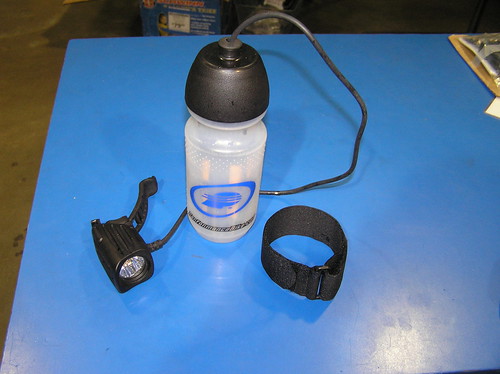
No, not rechargeable. That was the feed to my 55 watt automotive headlight.
Carried the battery on a trailer. But it didn't take too long to get tired of that.
Sometimes I do miss having that much light, though.
Carried the battery on a trailer. But it didn't take too long to get tired of that.
Sometimes I do miss having that much light, though.
03-13-12 | 12:02 PM
#29
Senior Member

Joined: May 2003
Posts: 353
Likes: 0
From: Gainesville, FL
My accessories from old bike wouldn't fit on new bike's handlebars so I ordered a mount from Aspire Velotech. The airzound trigger wouldn't fit in the space between the accessories tube and the handlebar so I got a little creative. Just replaced the tube with PVC and spray painted it black. I also put in a couple elbows to get the airzound trigger where I need while preparing to brake.


03-14-12 | 04:57 PM
#30

Senior Member
Joined: Aug 2005
Posts: 935
Likes: 46
From: Las Vegas, NV
Bikes: '04 LeMond Buenos Aires, '82 Bianchi Nuova Racing, De Rosa SLX, Bridgestone MB-1, Guerciotti TSX, Torpado Aelle, LeMond Tourmalet 853, Bridgestone Radac
I recently switched to trekking/butterfly bars and have been trying to come up with a way to attach a mirror. I finally figured it out this morning.
I sacrificed a right-hand bar end from a set I haven't used in years to attach a Mirrycle MTB mirror, cutting the curved part of the bar end off and omitting the 2nd arm of the Mirrycle. This isn't the finished product because I'm holding off taping the bar until I'm certain I have the positioning just right.

I sacrificed a right-hand bar end from a set I haven't used in years to attach a Mirrycle MTB mirror, cutting the curved part of the bar end off and omitting the 2nd arm of the Mirrycle. This isn't the finished product because I'm holding off taping the bar until I'm certain I have the positioning just right.
Last edited by Eric S.; 03-14-12 at 11:49 PM.
03-23-12 | 01:42 PM
#31

Commander, UFO Bike
Joined: Dec 2008
Posts: 1,438
Likes: 23
From: Subject to change
Bikes: Giant, Trek
My accessories from old bike wouldn't fit on new bike's handlebars so I ordered a mount from Aspire Velotech. The airzound trigger wouldn't fit in the space between the accessories tube and the handlebar so I got a little creative. Just replaced the tube with PVC and spray painted it black. I also put in a couple elbows to get the airzound trigger where I need while preparing to brake.


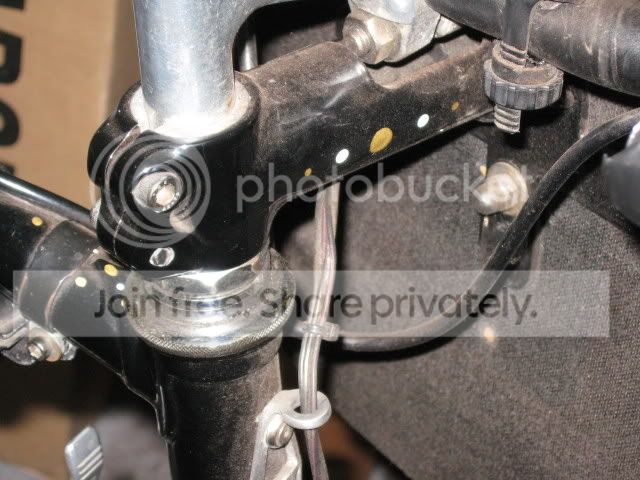
I used a dowel (painted and trimmed to fit inside the bar extender) and extended the thing by about 18 inches.
BTW: Modified the NR TriNewt Battery to fit inside a waterbottle cage...
It was an easier and cleaner mount than the supplied velcro, as well as protecting it from theft, weather, and impact.
Last edited by K'Tesh; 03-23-12 at 01:54 PM.
03-23-12 | 04:01 PM
#32
Conservative Hippie
Joined: Mar 2005
Posts: 4,268
Likes: 0
From: Wakulla Co. FL
Probably most have seen this:
https://www.bikeforums.net/showthread...ided-Panniers?
https://www.bikeforums.net/showthread...ided-Panniers?
03-23-12 | 05:40 PM
#33
Senior Member
Joined: Feb 2012
Posts: 139
Likes: 1
It looks like you have your panniers on the wrong sides. They should be on the side where the bottow of the pannier has the angle next to or near your pedal so it helps your heel to clear and not hit the pannier.


Last edited by IndianaShawn; 03-23-12 at 10:21 PM.
03-24-12 | 10:08 AM
#34
Senior Member
Joined: Jul 2011
Posts: 1,141
Likes: 5
From: Erie Penna.
Thanks for looking you can see more about them by searching on bikebin.
03-24-12 | 10:22 AM
#35
Banned
Joined: Jun 2010
Posts: 43,586
Likes: 1,380
From: NW,Oregon Coast
Bikes: 8
I DIY'd a way to mount my Rack mount B&M taillight, on my Bike Friday, without a rear-rack.
Using Old Zefal Mudguard struts and hardware,
fabricated to use the back of the seat post, low water bottle mounts..
Old touring bike .. handle bar bottle cage mounting brackets,
let me turn a strap on to the bars bag
into one that stood off a ways in front of the handlebar..
no DIY solution to failed digital cameras though..
Last edited by fietsbob; 03-24-12 at 10:26 AM.
03-26-12 | 12:12 PM
#36
Commander, UFO Bike
Joined: Dec 2008
Posts: 1,438
Likes: 23
From: Subject to change
Bikes: Giant, Trek

 03-26-12 | 05:20 PM
#38

Senior Member


Joined: Nov 2011
Posts: 7,951
Likes: 688
From: Port Angeles, WA
Bikes: A green one, "Ragleigh," or something.
I did the fredly home-made wooden fenders, too. Since I have a table saw and a planer, it was no prob getting the three thicknesses down to a very bendable 3/32 or so. (no steam needed) Twelve small clamps, waterproof woodglue and an old 27" rim to bend it around. Leave it on a day or so and the fender springs back just enough so there is clearance for the tire. Was pretty easy. Cut to width, sand and varnish and voila, all that's left is to fabricate a mount.
You'll notice my fender stays are wood, too. Not as tough and fixable as metal, but with the mounting ends treated with clear epoxy glue, they are tougher than you'd think. Also, $3 for a dowel and a few screws beats the hell out $18 for fender hardware from velo orange, in my book.
There are lots of DIY wood fender tips available online for anyone who wants more details.
(click for more largeness)
Last edited by Lascauxcaveman; 03-26-12 at 05:41 PM. Reason: added detail
03-26-12 | 05:35 PM
#39
Senior Member
Joined: Nov 2011
Posts: 7,951
Likes: 688
From: Port Angeles, WA
Bikes: A green one, "Ragleigh," or something.
Made of 1/8" plywood and some fir scrap, I think it weighs a little over 2 pounds. Glued and stapled together. The lid slides back to remove, and the notches fit snugly enough so it doesn't rattle or fall off. Also to reduce rattling, it mounts over a couple slices of 1/2" scrap foam rubber, so the box doesn't actually touch the metal of the rack it sits on. If the load is too bulky to fit under the lid, just take it off and stuff it in alongside. The thing easily holds more weight than I care to carry up that high on a bike. When empty, it's still kind of noisy, so when I know I'm not going to need to haul anything for awhile, I take it off. Easy enough (takes 2 minutes, max) because it's mounted with three wingnuts.
Last edited by Lascauxcaveman; 04-23-12 at 02:20 PM. Reason: more detail
03-26-12 | 09:35 PM
#40
Senior Member
Joined: Sep 2007
Posts: 3,741
Likes: 12
From: Gaseous Cloud around Uranus

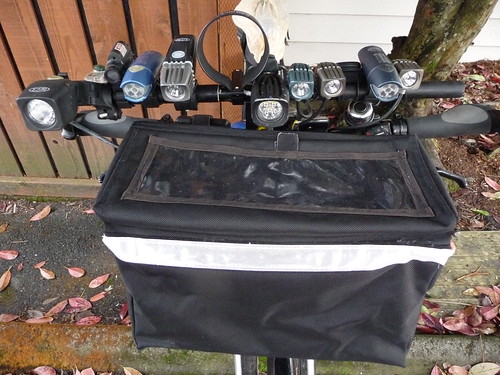
Made brackets for my lights.....

Made a bracket for the front mount of my rear rack......
Added a second stem for the handlebar bag......
Made a new "HOG" headbadge with a wiring loom for the headlights.

My first attempt at tent making,in the middle of making a second.
03-27-12 | 12:52 PM
#41
Senior Member
Joined: Nov 2011
Posts: 7,951
Likes: 688
From: Port Angeles, WA
Bikes: A green one, "Ragleigh," or something.
This is more a "kludge" than a DYI, but I found another reason not to cut a steertube. A friend of mine moving out of state sold me this mostly unused Trek 4300 for a hundred bucks, and I loved the frame right away because unlike my other MTB, it's large enough for me. But the handlebars were up way too high, so 'slammed' them best I could (without flipping the stem) by having the stem and spacers trade places and they feel much better, even though I've now got a dork-tastic couple inches of steertube sticking up.


While grocery shopping this morning, I had this nice little convention-giveway backpack with me, and set it down on the front rack while fishing my gloves out of it, and got the idea to wrap the backpack straps under the handlebars and over the steertube end to hold it in place, so the bag wouldn't fall off and bruise my bananas. Huh. Nice and snug. A perfect fit. Tie the dangly ends of the straps around the head tube and the thing riding solid enough for practical grocery hauling.
It's not very aero, but hills are much more a factor than headwinds where I live. I *really* hate riding more than a mile or two while wearing a backpack on my back, so I always like to figure out a way to put my loads on the bike instead. But I guess now I don't have to sweat what kind of rack bag I'm going to need to get for this bike : )
03-28-12 | 08:55 AM
#42
Senior Member
Joined: Jun 2008
Posts: 576
Likes: 2
From: Central NJ
Bikes: MGX MTB, Fuji Supreme, Miyata 90 and a Trek 700 in the works
How do you bend it?
Thanks
03-28-12 | 10:48 AM
#43
Senior Member
Joined: Jul 2011
Posts: 1,141
Likes: 5
From: Erie Penna.
I made all the attachment stuff out of hardware store aluminum, flat and round stock. The type you see in bins at Lowes etc. it comes in 4 and 6 foot lengths. I picked the material and also the process so that it would be well suited for touring, if something breaks on the road it wouldn’t be hard to make a repair and bolt it back together. I also tried to do things in a way just about anyone slightly handy could copy without special tools. You will need a hacksaw and a file and a bench vice, hammer and scraps of wood.
All the cuts were made with a hacksaw and the free end was left long to have something to lever against and then trimmed after the bends were made. I cut a scrap of wood to act as a form rounded the corners and then sandwiched the aluminum between the form block and a scrap block so the vice wouldn’t cut into the softer material. I then hammered it around the corner and trim it off while it’s still clamped.
Things like the bag hook were made from 1/4 rod two bends to make a “C” shape then I clamped that in the vice to a broom handle and made the two hooks and trimmed them. The whole thing then slipped thru the belt strap thing on the camera bag. That little bag facing the rider is great and doesn’t seem to get in the way riding. I like to use the front rack for my Military Sleep System to strap to and a normal front bag would take up that space. The MMS is not heavy, more bulky so it’s perfect up front.
Some of the stuff that had to be a little stronger I use ether 5/16 or 3/8 round rod and bend as above and then flatten the ends in the vice or you can do it by forging it cold with a hammer against the vice top like an anvil. Most of the bolts on the bike are 5mm so smashing it about 50% allows a wider area and a flat surface to drill a mounting hole thru.
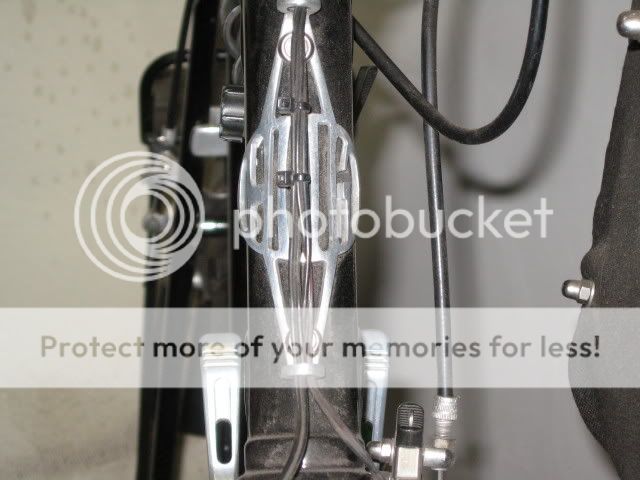
The front rack was an experiment in using the 1/8 x 3/4 strip aluminum. It’s really easy to work with and that rack is way stronger than need be, and not that heavy. It now has a double front stay (will attach a picture) and I could give a person a lift on it I think.
I have plans on changing the front rack a little and building a mate for it as a rear rack. I hope to find the time to do that this summer. No real reason other than to say I made the rear rack and have them look like a set.
Hope this helps you out and when I build the rear rack I will try and remember to take a few photos.

.
03-28-12 | 02:23 PM
#45
Senior Member
Joined: Jun 2009
Posts: 109
Likes: 0
From: Pennsylvania
Nothing groundbreaking here, either, but I found a clean fix for mounting my magicshine tailight to my rear rack. Like the dinotte light, it too is designed to be mounted to a round surface such as seatpost. My trunk bag, however, hides the seatpost and my rear rack had the standard flat little mouning surface designed for clip on or screw on tailights. I first tried a piece of pvc pipe kept in place with some picture hanging wire and hole drilled into it. It was functual but it tended to bounce. Screws probably would've worked better but I still didn't like the appearance. I then tried one of the small half cylinder building blocks (from my son). I covered it and secured it using black "sticky ass tape". Very clean and much more functual.
03-28-12 | 11:38 PM
#46


Tandem Vincitur
Joined: Sep 2005
Posts: 3,317
Likes: 2
From: Northern California
Bikes: BMC Pro Machine SLC01, Specialized Globe, Burley Rock 'N Roll tandem, Calfee Dragonfly tandem.

 03-29-12 | 05:33 AM
#47
Senior Member
Joined: Jul 2011
Posts: 1,141
Likes: 5
From: Erie Penna.
Before the days of computers I used to do my work on a huge 4’x6’ 2” thick redwood drawing board that was built about 1920. When the world became computerized it took up a lot of space and the wood top I built into a beautiful kitchen island. The supporting structure was this big pedestal that I tripped over in the shed forever. I’m big on repurposing things when I can.
I know no one would have that exact base to make a wash rack out of. I would use both an old drop bar and also a quill type stem and find a pipe with a hole to fit the stem in. You could also drill a hole in a post to fit a stem. I never toss a junk bike without stripping a few goodies off it you never know when they will come in handy.
Here is the table top as an off topic side note. Building a kitchen from scratch is fun to do everyone should try it at least once.

.
04-02-12 | 05:14 AM
#48
Senior Member
Joined: Jun 2008
Posts: 576
Likes: 2
From: Central NJ
Bikes: MGX MTB, Fuji Supreme, Miyata 90 and a Trek 700 in the works
Hi thanks for asking.
I made all the attachment stuff out of hardware store aluminum, flat and round stock. The type you see in bins at Lowes etc. it comes in 4 and 6 foot lengths. I picked the material and also the process so that it would be well suited for touring, if something breaks on the road it wouldn’t be hard to make a repair and bolt it back together. I also tried to do things in a way just about anyone slightly handy could copy without special tools. You will need a hacksaw and a file and a bench vice, hammer and scraps of wood.
All the cuts were made with a hacksaw and the free end was left long to have something to lever against and then trimmed after the bends were made. I cut a scrap of wood to act as a form rounded the corners and then sandwiched the aluminum between the form block and a scrap block so the vice wouldn’t cut into the softer material. I then hammered it around the corner and trim it off while it’s still clamped.
Things like the bag hook were made from 1/4 rod two bends to make a “C” shape then I clamped that in the vice to a broom handle and made the two hooks and trimmed them. The whole thing then slipped thru the belt strap thing on the camera bag. That little bag facing the rider is great and doesn’t seem to get in the way riding. I like to use the front rack for my Military Sleep System to strap to and a normal front bag would take up that space. The MMS is not heavy, more bulky so it’s perfect up front.
Some of the stuff that had to be a little stronger I use ether 5/16 or 3/8 round rod and bend as above and then flatten the ends in the vice or you can do it by forging it cold with a hammer against the vice top like an anvil. Most of the bolts on the bike are 5mm so smashing it about 50% allows a wider area and a flat surface to drill a mounting hole thru.
The front rack was an experiment in using the 1/8 x 3/4 strip aluminum. It’s really easy to work with and that rack is way stronger than need be, and not that heavy. It now has a double front stay (will attach a picture) and I could give a person a lift on it I think.
I have plans on changing the front rack a little and building a mate for it as a rear rack. I hope to find the time to do that this summer. No real reason other than to say I made the rear rack and have them look like a set.
Hope this helps you out and when I build the rear rack I will try and remember to take a few photos.
.
Thanks again and looking fwd to the rear rack pics.
04-10-12 | 12:59 PM
#49
Senior Member
Joined: Nov 2011
Posts: 7,951
Likes: 688
From: Port Angeles, WA
Bikes: A green one, "Ragleigh," or something.
Here's another cheap cleaning/repair stand. Basically just two lengths of 2x4, cut and glued/nailed together, bolted down to the workbench with long 5/16" bolts. A hole of somewhat larger diameter than your fattest downtube is drilled in the hinged end as shown. Standard wood working clamp holds the bike snug in place.
The 2x4 on the right side has a bevel cut along the length that sits on the work bench, so you can mount it tilted on the work bench, or flat. First photo is just the stand, bolted in the flat position, second photo shows it in use in the tilted position. You can see a line on the end of the right side 2x4 that shows the bevel angle I cut it along the bottom, except for the last 6" or so. (Click photos to enlarge)


Pros:
Cheap
Rock solid
Takes most any size tube, depending on how much you want to pad around it
Cons:
Limited choice of tilt angles
No height adjustment
Obv., you need to already have a workbench
Next time I find myself with a scrap 2x4 in the right length, I'll probably build one that tilts the other way, so I can angle it both ways. Had I planned ahead, I could have made this one a double-ender, with just the addition of another hinge.
The 2x4 on the right side has a bevel cut along the length that sits on the work bench, so you can mount it tilted on the work bench, or flat. First photo is just the stand, bolted in the flat position, second photo shows it in use in the tilted position. You can see a line on the end of the right side 2x4 that shows the bevel angle I cut it along the bottom, except for the last 6" or so. (Click photos to enlarge)
Pros:
Cheap
Rock solid
Takes most any size tube, depending on how much you want to pad around it
Cons:
Limited choice of tilt angles
No height adjustment
Obv., you need to already have a workbench
Next time I find myself with a scrap 2x4 in the right length, I'll probably build one that tilts the other way, so I can angle it both ways. Had I planned ahead, I could have made this one a double-ender, with just the addition of another hinge.
Last edited by Lascauxcaveman; 04-10-12 at 01:10 PM. Reason: more details
04-11-12 | 05:47 PM
#50
Junior Member
Joined: Jun 2011
Posts: 154
Likes: 48
Bikes: Soma Double Cross DC, Bridgestone T-700 (1985)
What I finally ended up doing was to mount a piece of wood (painted black to match the frame) on to my rear rack and then mount the bracket onto the piece of wood. I sawed off the the part of the bracket that would normally attach to the frame and used two screws to mount the sawed end of the bracket flush to the piece of wood. The piece of wood attached to the rack using two j-bolts (see first picture). I also had room to mount a rear flashing light. It took more work and time than I had thought.
Last edited by truthseeker14; 04-11-12 at 06:06 PM.