


Attaching Tubus Logo Evo to Surly Disc Trucker: Not so simple
 04-14-14, 10:48 PM
#1
Senior Member
Thread Starter
Join Date: Oct 2006
Location: San Diego
Posts: 251
Bikes: Gunnar, Surly
Mentioned: 0 Post(s)
Tagged: 0 Thread(s)
Quoted: 0 Post(s)
Likes: 0
Liked 0 Times
in
0 Posts
Attaching Tubus Logo Evo to Surly Disc Trucker: Not so simple
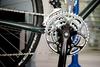
Just brought home my new commuter yesterday: 2013 Disc Trucker. Attempted to attach Tubus Logo Evo and it looks like it is going to require bending the aluminum struts. I didn't need to bend the struts when installing the Tubus Logo on my Civia Bryant. I really don't want to try bend these myself; it looks like they need two bends. Seems unfortunate. Anyone have recommendations? - JP

 04-15-14, 08:43 AM
#3
Senior Member
Thread Starter
Join Date: Oct 2006
Location: San Diego
Posts: 251
Bikes: Gunnar, Surly
Mentioned: 0 Post(s)
Tagged: 0 Thread(s)
Quoted: 0 Post(s)
Likes: 0
Liked 0 Times
in
0 Posts
The attachment points on the Surly are longitudinal and the attachment points on the rack are, too, but they don't align. So, two bends are needed to the aluminum struts. I can't imagine they expect everyone to bend these (somehow identically), so I must be missing something. (Lots of people would tell you that!). - JP
04-15-14, 09:29 AM
#4
Banned
maybe the QR mount will, do the trick? . tubus - Schnellspanner-Adapter HR-Tr�ger
or https://www.tubus.com/product.php?xn=35
the other mod is spreading the base with longer bolts and spacers , so as to clear the disc caliper ..
You really only have to do that to the left side..
have you taken rack and bike by any of the many SF bike shops for 1st hand help. ?
I work better when things are in front of me .
Last edited by fietsbob; 04-15-14 at 12:38 PM.
04-15-14, 12:20 PM
#5
Senior Member
Thread Starter
Join Date: Oct 2006
Location: San Diego
Posts: 251
Bikes: Gunnar, Surly
Mentioned: 0 Post(s)
Tagged: 0 Thread(s)
Quoted: 0 Post(s)
Likes: 0
Liked 0 Times
in
0 Posts
Thanks for the troubleshooting ideas -- the aluminum "struts" are where the (steel) rack attaches to the seat stays (at the top). There are inboard and outboard mounting options on the Surly frame (!) and neither lines up with the rack. The rack fits and bolts easily at the drop-outs. I think I just need to accept that most people bend these struts and get myself a vice and go for it! - JPA
04-15-14, 12:37 PM
#6
Banned
wooden jaw faces so you dont nick the surface, colored, in the process..
though if close but symmetrical, I'd tighten the hardware and the tension of the ends
will make the mounting a bit more rigid ..
though if close but symmetrical, I'd tighten the hardware and the tension of the ends
will make the mounting a bit more rigid ..
Last edited by fietsbob; 04-15-14 at 12:41 PM.
04-15-14, 12:48 PM
#7
ride for a change
Join Date: Nov 2006
Location: Minneapolis, MN
Posts: 2,221
Bikes: Surly Cross-check & Moonlander, Pivot Mach 429, Ted Wojcik Sof-Trac, Ridley Orion. Santa Cruz Stigmata
Mentioned: 0 Post(s)
Tagged: 0 Thread(s)
Quoted: 0 Post(s)
Likes: 0
Liked 1 Time
in
1 Post
On my Tubus Fly I had to hand bend the connecting strut to install it on my cross check. I shaped it to curve from the center of the rack to the inside of one of the braze on's on the seat stays. I did it by hand in my bench vice, took it slow, it curved nicely. It has been strong and perfect ever since.
04-15-14, 04:46 PM
#8
DancesWithSUVs

Join Date: Apr 2005
Location: Griffin Cycle Bethesda,MD
Posts: 6,983
Mentioned: 0 Post(s)
Tagged: 0 Thread(s)
Quoted: 7 Post(s)
Likes: 0
Liked 2 Times
in
2 Posts
This. Racks aren't universal because frame's vary so widely.
__________________

C'dale BBU('05 and '09)/Super Six/Hooligan8and 3,Kona Dew Deluxe,Novara Buzz/Safari,Surly Big Dummy,Marin Pt Reyes,Giant Defy 1,Schwinn DBX SuperSport,Dahon Speed Pro TT,Brompton S6L/S2E-X
C'dale BBU('05 and '09)/Super Six/Hooligan8and 3,Kona Dew Deluxe,Novara Buzz/Safari,Surly Big Dummy,Marin Pt Reyes,Giant Defy 1,Schwinn DBX SuperSport,Dahon Speed Pro TT,Brompton S6L/S2E-X
04-15-14, 04:59 PM
#9
Senior Member
Join Date: Nov 2013
Location: Napa, California
Posts: 470
Mentioned: 0 Post(s)
Tagged: 0 Thread(s)
Quoted: 1 Post(s)
Likes: 0
Liked 3 Times
in
1 Post
You mean the horizontal struts up top? Yeah, nearly any rack installation needs those bent if you want things to be nice and level.
04-15-14, 08:53 PM
#10
Full Member
The way I see it, there are 4 ways to mount the struts at the rack.
1. to the top of the provided plate
2. underneath the provided plate
3. to the outside from the hole where the plate mounts after removing the plate
4. to the inside as above
Seems like one of those should get you pretty close.
The struts are easy to bend with a crescent wrench if you keep the bend near the flat end.
04-16-14, 07:24 AM
#11
Senior Member

Join Date: Mar 2006
Location: Montgomery County, Pennsylvania
Posts: 6,489
Mentioned: 0 Post(s)
Tagged: 0 Thread(s)
Quoted: 1 Post(s)
Likes: 0
Liked 6 Times
in
2 Posts
I've bent the horizontal struts on my Tubus Logo Titan with no ill effects. I suspect with the aluminum you'll just have to be careful and slow.
__________________
A conclusion is the place where you got tired of thinking. - S. Wright
Favorite rides in the stable: Indy Fab CJ Ti - Colnago MXL - S-Works Roubaix - Habanero Team Issue - Jamis Eclipse carbon/831
A conclusion is the place where you got tired of thinking. - S. Wright
Favorite rides in the stable: Indy Fab CJ Ti - Colnago MXL - S-Works Roubaix - Habanero Team Issue - Jamis Eclipse carbon/831
04-17-14, 12:01 AM
#12
Junior Member

Join Date: May 2013
Location: Salt Lake City, UT, USA
Posts: 198
Bikes: 2011 Raleigh Sojourn, 2012 Marin Four Corners, 2013 Soma Saga, 2014 Scott Spark 940, 2017 Brompton H6E, 2016 Trek FX 7.2
Mentioned: 0 Post(s)
Tagged: 0 Thread(s)
Quoted: 10 Post(s)
Likes: 0
Liked 1 Time
in
1 Post
I put both "struts" as you call them in a vise at the same time. I line them up so that they are sitting at the same height and the mounting holes are concentric. Then I just take a soft mallet and go to town while keeping in mind Tubus' recommendation that no one bend should be more than like 15 degrees or something. doing them side by side at the same time will ensure you get the same bends in the same locations.
04-17-14, 12:57 AM
#13
Senior Member
Thread Starter
Join Date: Oct 2006
Location: San Diego
Posts: 251
Bikes: Gunnar, Surly
Mentioned: 0 Post(s)
Tagged: 0 Thread(s)
Quoted: 0 Post(s)
Likes: 0
Liked 0 Times
in
0 Posts
Thanks, everyone! I just made ONE small bend at the end of each strut with a covered crescent wrench and then cut the struts to avoid needing another bend. Perfect.


04-17-14, 06:04 AM
#14
Senior Member
Join Date: Mar 2006
Location: Montgomery County, Pennsylvania
Posts: 6,489
Mentioned: 0 Post(s)
Tagged: 0 Thread(s)
Quoted: 1 Post(s)
Likes: 0
Liked 6 Times
in
2 Posts
Looks good.
__________________
A conclusion is the place where you got tired of thinking. - S. Wright
Favorite rides in the stable: Indy Fab CJ Ti - Colnago MXL - S-Works Roubaix - Habanero Team Issue - Jamis Eclipse carbon/831
A conclusion is the place where you got tired of thinking. - S. Wright
Favorite rides in the stable: Indy Fab CJ Ti - Colnago MXL - S-Works Roubaix - Habanero Team Issue - Jamis Eclipse carbon/831

