


Replacement struts for Tern cargo rack
 08-12-25 | 12:51 AM
#1
Thread Starter
Senior Member

Joined: Jan 2017
Posts: 1,245
Likes: 162
Replacement struts for Tern cargo rack
My original post seems to have disappeared?
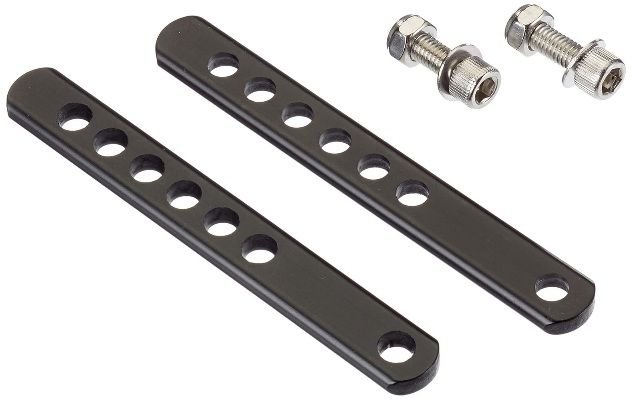
I'm looking at laser cutting services and I could get them in stainless steel for around 12 to $15 shipped. There is a choice of either 3 or 4mm thickness. The original aluminum strut was 4.6 mm.
I was planning to put in the same number of holes as the original to keep it adjustable height. But do you think 3 mm would be too thin? steel is three times heavier than aluminum. 4 mm would definitely be much stronger but heavy, around 2.6 times the original.
Chat AI claims that the 3mm stainless steel will be around 80% of the original stiffness while the 4mm stainless steel will be twice as stiff as the original aluminum. I'm thinking about stability under full load.
The original strut width this around 14.5 mm, and the maximum width of the C profile is 15.3 mm. So the width can only be increased to 15 mm.
Shortening the length and removing one hole from the top end only reduces the overall weight by 6%.
Otherwise for the same weight, there's still the option of the XLC replacement struts for around $8. With the same risk of the aluminum fracturing again in the future.
Last edited by tomtomtom123; 08-12-25 at 01:27 AM.
 08-13-25 | 12:02 AM
#2
Highly Enriched Driftium


Joined: Apr 2017
Posts: 6,708
Likes: 2,173
Hmm... aluminum is more susceptible to fatigue, but for the same weight, is a lot stiffer, because beam stiffness is (IIRC?) a cube ^^3 function of thickness, so even at 1/3 the stiffness modulus of steel, is 27/3 = 9 times as stiff. But steel is stiffer and handles fatigue better. I don't think they are fatiguing due to column buckling, but rather, lateral bending, the weight on the rack pushing left and right while rocking the bike. Gonna think on this more...
If you don't need all the holes, leave out the ones you don't need. The strut broke, not at the bolt hole, but at the open hole below it, at the natural stress concentration that the hole provided. Thinking more...
Go either thick high-strength aluminum, at least as thick as originally, or stainless steel only a little less thick. You need the stiffness that the thickness provides, unless you use a different section shape than just flat, for more stiffness. Thinking more...
I think I might take a piece of stainless steel hydraulic tubing, hammer or vice it flat at both ends, drill one hole at each end for mounting. Cylindrical closed section for the bulk of length will provide better stiffness. However, there may be stress concentration at transition from round to flat. Thinking more...
Last edited by Duragrouch; 08-13-25 at 12:14 AM.
08-13-25 | 12:41 AM
#3
Junior Member

Joined: Apr 2011
Posts: 146
Likes: 80
From: Vancouver BC
Bikes: 2000 Raleigh M20, 2010 Dahon Eco3, 1995 Gary Fisher Montare, 2024 SoloRock Dash
Hey, tomtomtom - I answered you yesterday, after which the thread vanished. Like Duragrouch, I pointed out that failure happened where a piece designed to operate as a strut (axial load) was being loaded as a beam (from the side) - and had a big hole in it. What I pointed out was that turning the strut upside down - single hole at the top - would have eliminated the weak point - putting solid strut at the point of lateral load. So for one thing it would be good to advise people with the rack whose struts haven't failed yet to do that (and cut off the lower end beyond the hole they're actually using, if it interferes with anything).
For you: although the broken struts & the replacements you've found are both too short to use with your current panniers, if you bolt them together you can make a long-enough strut with no hole at the danger point - and avoid the need for new bags.
Here's the URL of the mysteriously vanished thread: https://www.bikeforums.net/folding-b...argo-rack.html
Thread # 1311831, as I found from browser history. When I clicked that link after the thread disappeared, I got an "invalid thread" message, and the URL in my browser address bar changed the "folding-bikes" to "trash".
Last edited by Antifriction; 08-13-25 at 12:48 AM.
08-13-25 | 12:53 AM
#4
Thread Starter
Senior Member
Joined: Jan 2017
Posts: 1,245
Likes: 162
Actually it's an online CNC factory that gives an instant quote of around $15. So I'm thinking if I should future proof it to clear disc brake caliper mounting bolts, by adding standoffs, if I swap frames to the Dahon Launch. But without anything to reference measurements with, I will probably keep the strut flat. The launch also seems to have the caliper far back so maybe no contact with the struts.
Why did Tern use 6.2mm holes for the M5 eyelets on the dropout flange? Are there frames that have M6 eyelets? I'm thinking of reducing the hole to 5.2mm to improve stability of the rack.
The weak point is the hole just below where it clears the C shape profile, but the holes are 10mm intervals and that's just 2 holes apart, so if I want to keep it adjustable, there is always a hole at the point.
I have to carry everything with me, so I don't have any power tools. I only have small portable hand tools, at least enough to rebuild a bike. So that's why I'm looking at the online CNC/laser services.
08-13-25 | 01:01 AM
#5
Junior Member
Joined: Apr 2011
Posts: 146
Likes: 80
From: Vancouver BC
Bikes: 2000 Raleigh M20, 2010 Dahon Eco3, 1995 Gary Fisher Montare, 2024 SoloRock Dash
What you need is a bar with two holes in it. Aluminum is soft; a hand drill can do it, it's a yawn for a machine shop, & CNC is wild overkill.
08-13-25 | 01:04 AM
#6
Thread Starter
Senior Member
Joined: Jan 2017
Posts: 1,245
Likes: 162
I pointed out that failure happened where a piece designed to operate as a strut (axial load) was being loaded as a beam (from the side) - and had a big hole in it. What I pointed out was that turning the strut upside down - single hole at the top - would have eliminated the weak point - putting solid strut at the point of lateral load. So for one thing it would be good to advise people with the rack whose struts haven't failed yet to do that (and cut off the lower end beyond the hole they're actually using, if it interferes with anything).
For you: although the broken struts & the replacements you've found are both too short to use with your current panniers, if you bolt them together you can make a long-enough strut with no hole at the danger point - and avoid the need for new bags.
For you: although the broken struts & the replacements you've found are both too short to use with your current panniers, if you bolt them together you can make a long-enough strut with no hole at the danger point - and avoid the need for new bags.
The C also 15.3 mm wide while the original strut is only 14.5 mm, so there's a lot of wiggle before tightening the bolts. The part I'm going to make will be 15.0 mm.
So I think it's not only the lateral force that caused the strut to break, but also the bending/rotational force applied by the C shape profile in the plane of travel.
The strut can't be doubled up because it sits on the inside of the C shape profile which would reduce the spacing in between the struts.
Last edited by tomtomtom123; 08-13-25 at 01:13 AM.
08-13-25 | 01:09 AM
#7
Thread Starter
Senior Member
Joined: Jan 2017
Posts: 1,245
Likes: 162
I wanted to repair my suitcase wheel attachment by drilling a through hole and bolting it, But they wouldn't let me borrow the drill. So they just sold me one nail that I had to hammer through the plastic. And then finding the right size screw took a while. You ask them for a specific size and then they bring out 10 different screws one at a time that don't actually match what you asked for.
Last edited by tomtomtom123; 08-13-25 at 01:17 AM.

 08-14-25 | 10:26 PM
#9
Highly Enriched Driftium
Joined: Apr 2017
Posts: 6,708
Likes: 2,173
Actually it's an online CNC factory that gives an instant quote of around $15. So I'm thinking if I should future proof it to clear disc brake caliper mounting bolts, by adding standoffs, if I swap frames to the Dahon Launch. But without anything to reference measurements with, I will probably keep the strut flat. The launch also seems to have the caliper far back so maybe no contact with the struts.
Why did Tern use 6.2mm holes for the M5 eyelets on the dropout flange? Are there frames that have M6 eyelets? I'm thinking of reducing the hole to 5.2mm to improve stability of the rack.
The weak point is the hole just below where it clears the C shape profile, but the holes are 10mm intervals and that's just 2 holes apart, so if I want to keep it adjustable, there is always a hole at the point.
I have to carry everything with me, so I don't have any power tools. I only have small portable hand tools, at least enough to rebuild a bike. So that's why I'm looking at the online CNC/laser services.
I don't know where you are, but a low-cost resource for parts can be a local high school (highest level primary school, in some languages) with a metal shop, especially vocational metals. A high school was a great resource for me for a truck repair that didn't need to be quick, they told me where to get the parts wholesale price, and did the labor for about 1/3 what anyone else would charge, and the money went toward the class dragrace car.
09-22-25 | 02:00 AM
#10
Thread Starter
Senior Member
Joined: Jan 2017
Posts: 1,245
Likes: 162
I got the stainless steel struts but they're super stiff. Will this be a problem for the mounting holes in the aluminum frame? I'm worried whether the dropout plate or the holes or the threads will crack if the strut is not able to bend and reduce the impact load like the aluminum struts.
I made the mistake of not double checking or asking chat GPT to show me how it calculated its recommended thickness of 3.8 mm for stainless steel without holes for the equivalent stiffness of 4.6 mm aluminum with holes. Now it's telling me 2.7 mm. And that my strut at 4mm is actually three times stiffer than the original.
I'm wondering if I should take an angle grinder and cut a 1 mm deep channel into the stainless steel to reduce its stiffness. Or is this fine and I should leave it alone?
Last edited by tomtomtom123; 09-22-25 at 02:15 AM.
09-22-25 | 02:34 AM
#11
Senior Member
Joined: Feb 2017
Posts: 2,529
Likes: 567
I think that if it will eventually fail somewhere, it will be at the top rack side of the struts = the thin aluminum plate of the rack on which the struts are mounted will fail, not the much thicker dropout of the bike frame.
09-23-25 | 09:39 PM
#12
Highly Enriched Driftium
Joined: Apr 2017
Posts: 6,708
Likes: 2,173
I got the stainless steel struts but they're super stiff. Will this be a problem for the mounting holes in the aluminum frame? I'm worried whether the dropout plate or the holes or the threads will crack if the strut is not able to bend and reduce the impact load like the aluminum struts.
I made the mistake of not double checking or asking chat GPT to show me how it calculated its recommended thickness of 3.8 mm for stainless steel without holes for the equivalent stiffness of 4.6 mm aluminum with holes. Now it's telling me 2.7 mm. And that my strut at 4mm is actually three times stiffer than the original.
I'm wondering if I should take an angle grinder and cut a 1 mm deep channel into the stainless steel to reduce its stiffness. Or is this fine and I should leave it alone?
Of greater concern is one hole through the strut looks threaded. If same at the lowest hole, that needs to be a close clearance hole, not threaded, in order to tighten at the frame dropout threaded holes. Unless the upper hole there is to attach something else.
EDIT: With that thickness, make sure your attaching bolt is long enough, to use full thread depth at the dropout. I use bolts that are long enough to poke out the other side, at minimum to grab to unscrew it in case the bolt snaps off flush on the outside (has happened before that, was lucky to get the broken bolt out), and even better, long enough for a nut on the inside to help keep the bolt tight.
Last edited by Duragrouch; 09-23-25 at 09:54 PM.
09-24-25 | 02:34 AM
#13
Thread Starter
Senior Member
Joined: Jan 2017
Posts: 1,245
Likes: 162
The threaded hole was meant to be future-proof in case I switched to a frame that only has one eyelet so that I can attach the mud guard strut to the hole.
The mounting hole is not threaded, but I made it 5 mm instead of 6 mm that the original strut had. I noticed that the original aluminum strut with a 6mm hole had indentations from the bolt threats that seem to imply that the 6mm hole being too large for the M5 bolt allowed it to shift around on the bolt.
The mounting hole is not threaded, but I made it 5 mm instead of 6 mm that the original strut had. I noticed that the original aluminum strut with a 6mm hole had indentations from the bolt threats that seem to imply that the 6mm hole being too large for the M5 bolt allowed it to shift around on the bolt.
09-24-25 | 11:25 AM
#15


The mounting hole is not threaded, but I made it 5 mm instead of 6 mm that the original strut had. I noticed that the original aluminum strut with a 6mm hole had indentations from the bolt threats that seem to imply that the 6mm hole being too large for the M5 bolt allowed it to shift around on the bolt.
__________________

C'dale BBU('05 and '09)/Super Six/Hooligan8and 3,Kona Dew Deluxe,Novara Buzz/Safari,Surly Big Dummy,Marin Pt Reyes,Giant Defy 1,Schwinn DBX SuperSport,Brompton S6L/S2E-X/M6L-X/S12 T Line

C'dale BBU('05 and '09)/Super Six/Hooligan8and 3,Kona Dew Deluxe,Novara Buzz/Safari,Surly Big Dummy,Marin Pt Reyes,Giant Defy 1,Schwinn DBX SuperSport,Brompton S6L/S2E-X/M6L-X/S12 T Line
09-25-25 | 10:18 AM
#16
Thread Starter
Senior Member
Joined: Jan 2017
Posts: 1,245
Likes: 162
Or maybe that was the 305/349 frames that only has one hole on the left side. I can't remember.
09-25-25 | 10:22 AM
#17
Thread Starter
Senior Member
Joined: Jan 2017
Posts: 1,245
Likes: 162
Well it seems all of the racks from the various brands that use the same strut design with adjustable height by multiple holes, which probably came from the same factory, all have 6mm holes either to save on tooling cost or else for the odd chance of a frame that has M6 eyelets instead of M5.
09-26-25 | 01:50 AM
#18
Highly Enriched Driftium
Joined: Apr 2017
Posts: 6,708
Likes: 2,173
The threaded hole was meant to be future-proof in case I switched to a frame that only has one eyelet so that I can attach the mud guard strut to the hole.
The mounting hole is not threaded, but I made it 5 mm instead of 6 mm that the original strut had. I noticed that the original aluminum strut with a 6mm hole had indentations from the bolt threats that seem to imply that the 6mm hole being too large for the M5 bolt allowed it to shift around on the bolt.
The mounting hole is not threaded, but I made it 5 mm instead of 6 mm that the original strut had. I noticed that the original aluminum strut with a 6mm hole had indentations from the bolt threats that seem to imply that the 6mm hole being too large for the M5 bolt allowed it to shift around on the bolt.
While you could have used a backing nut for the fender strut bolt, the thickness of your strut allows threading, and if you wanted, adding a backing nut anyway, helps prevent it coming loose.
Yeah a bolt clearance hole should typically be 1/32" larger which is 0.79 mm, so 5.79mm, but I prefer a closer slip fit, especially with smaller holes; A closer slip fit keeps the bolt a bit straighter when loaded in lateral bending. If I was making it, I would drill it 5mm and see if the bolt fit before going any larger. Typically, drill bits run out a bit and the hole is automatically a touch bigger than the drill bit.
09-26-25 | 03:02 AM
#19
Senior Member
Joined: Feb 2017
Posts: 2,529
Likes: 567
The threaded hole was meant to be future-proof in case I switched to a frame that only has one eyelet so that I can attach the mud guard strut to the hole.
The mounting hole is not threaded, but I made it 5 mm instead of 6 mm that the original strut had. I noticed that the original aluminum strut with a 6mm hole had indentations from the bolt threats that seem to imply that the 6mm hole being too large for the M5 bolt allowed it to shift around on the bolt.
The mounting hole is not threaded, but I made it 5 mm instead of 6 mm that the original strut had. I noticed that the original aluminum strut with a 6mm hole had indentations from the bolt threats that seem to imply that the 6mm hole being too large for the M5 bolt allowed it to shift around on the bolt.
If I understand well, the rack is not a Tern cargo rack dedicated by Tern for your bike but a generic rack adaptable to many bikes?
09-26-25 | 08:05 AM
#20
Thread Starter
Senior Member
Joined: Jan 2017
Posts: 1,245
Likes: 162
The XLC struts I got from Amazon look identical except reduced by 2 hole lengths and just 0.3mm thicker and wider compared to the ones from tern.
