


Changing Zizzo Liberte bottom bracket
 05-11-26 | 08:13 PM
#1
Thread Starter
Junior Member
Joined: Oct 2025
Posts: 152
Likes: 101
Changing Zizzo Liberte bottom bracket
working this to some previous advice.
Quote:
Originally Posted by A2022
It has a hollow spindle, but you’ll have to coach me through this since I know nothing about it. At least I have a basic bike tool kit.
Wonderful!
Buy replacement bearings (make sure same spline size and pattern, and spindle diameter), you'll have choice of colors, and bearing wrench for them. Mine are cheap and plenty durable, but key for durability is maintaining the preload on them.
Take the chain off the chainrings, can still stay on the bike.
Loosen the bolts on the left crank arm. Unscrew and remove the cap on the end of the hollow spindle, it is standard right-hand thread, and may be allen or have a special wrench like mine came with. Remove arm.
Slide right crank arm out, enough to clean the contact surface between the inside of the crank and the right external bearing. Clean both surfaces, doesn't need to be surgical clean, just need to remove any dirt and grit. Clean same surface on left arm and bearing. This is good practice for when you just want to retorque the bearings to maintain proper preload, *critical*, which you should do when any bearing slack is detected, by trying to laterally wiggle the arms near the pedals.
If you are replacing the external bearings, this is when you would do it. You need the correct wrench. Good chance the splines are ISO External, that is the most common, but verify. Buy a quality wrench, read reviews. Mine is all metal, and double-ended and double sided, so has 4 different spline patterns, didn't need immediately, but I'm set for the future. The threading is OPPOSITE of pedals, so left-hand on drive side and right hand on non-drive (left) side. Remove bearings on each side, being careful to look for arrows for "tightening" and go opposite. If really hard to turn, they may be blue loctited; Boil some water and pour over each side right before wrenching, that will soften the loctite. Clean threads and BB shell face. Replace with new bearings. NOTE!!! The fine threads are very easy to cross thread. Here is how to avoid that: Place new drive-side bearing on hollow spindle, threads inward (to face the BB shell threads). Insert into bike (just holding it, not screwing it in). Place non-drive side bearing on spindle, threads inward. Hold each bearing pushed inward gently. The spindle will keep each bearing in alignment as you gently get the threads started by hand. Don't force things, it should thread in easy if aligned. There should be arrows on each bearing to indicate tightening direction, but again left on right, right on left, but be careful, the bearing might say R to indicate Right (drive) side, not thread direction which is LEFT. Remove spindle. Tighten to torque indicated, you may need to covert to english and guestimate your hand force based on wrench length, unless you get a cup wrench with no arm and use a torque wrench.
Slide spindle back in. Put left arm back on, loose, make sure position is 180 degrees opposite of right arm. Torque end cap to indicated value, should be printed on cap. Tighten left arm bolts using torque wrench, alternating as you torque them up.
Done.
The bearings will burnish in, the fine grinding marks on the races becoming smooth. Check for bearing slack weekly over the next months, when slack is detected, follow clean and retorquing procedure, and those bearings will last a LONG time.
EDIT: Some hollow spindle cranks have a little safety strip of metal to keep the left arm on if the bolts come loose. If so, consult maker's instructions online.
**********
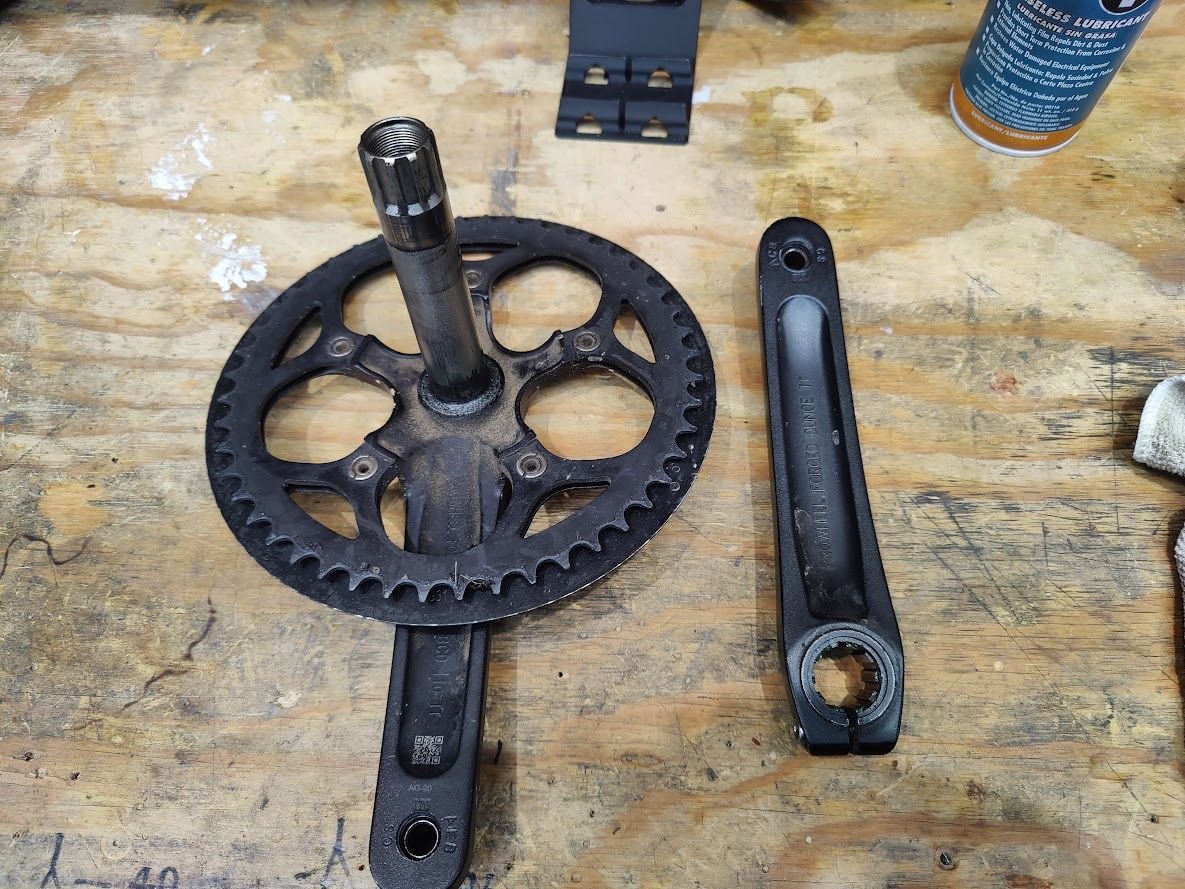
I pulled the shaft out and took some photos.


Quote:
Originally Posted by A2022
It has a hollow spindle, but you’ll have to coach me through this since I know nothing about it. At least I have a basic bike tool kit.
Wonderful!
Buy replacement bearings (make sure same spline size and pattern, and spindle diameter), you'll have choice of colors, and bearing wrench for them. Mine are cheap and plenty durable, but key for durability is maintaining the preload on them.
Take the chain off the chainrings, can still stay on the bike.
Loosen the bolts on the left crank arm. Unscrew and remove the cap on the end of the hollow spindle, it is standard right-hand thread, and may be allen or have a special wrench like mine came with. Remove arm.
Slide right crank arm out, enough to clean the contact surface between the inside of the crank and the right external bearing. Clean both surfaces, doesn't need to be surgical clean, just need to remove any dirt and grit. Clean same surface on left arm and bearing. This is good practice for when you just want to retorque the bearings to maintain proper preload, *critical*, which you should do when any bearing slack is detected, by trying to laterally wiggle the arms near the pedals.
If you are replacing the external bearings, this is when you would do it. You need the correct wrench. Good chance the splines are ISO External, that is the most common, but verify. Buy a quality wrench, read reviews. Mine is all metal, and double-ended and double sided, so has 4 different spline patterns, didn't need immediately, but I'm set for the future. The threading is OPPOSITE of pedals, so left-hand on drive side and right hand on non-drive (left) side. Remove bearings on each side, being careful to look for arrows for "tightening" and go opposite. If really hard to turn, they may be blue loctited; Boil some water and pour over each side right before wrenching, that will soften the loctite. Clean threads and BB shell face. Replace with new bearings. NOTE!!! The fine threads are very easy to cross thread. Here is how to avoid that: Place new drive-side bearing on hollow spindle, threads inward (to face the BB shell threads). Insert into bike (just holding it, not screwing it in). Place non-drive side bearing on spindle, threads inward. Hold each bearing pushed inward gently. The spindle will keep each bearing in alignment as you gently get the threads started by hand. Don't force things, it should thread in easy if aligned. There should be arrows on each bearing to indicate tightening direction, but again left on right, right on left, but be careful, the bearing might say R to indicate Right (drive) side, not thread direction which is LEFT. Remove spindle. Tighten to torque indicated, you may need to covert to english and guestimate your hand force based on wrench length, unless you get a cup wrench with no arm and use a torque wrench.
Slide spindle back in. Put left arm back on, loose, make sure position is 180 degrees opposite of right arm. Torque end cap to indicated value, should be printed on cap. Tighten left arm bolts using torque wrench, alternating as you torque them up.
Done.
The bearings will burnish in, the fine grinding marks on the races becoming smooth. Check for bearing slack weekly over the next months, when slack is detected, follow clean and retorquing procedure, and those bearings will last a LONG time.
EDIT: Some hollow spindle cranks have a little safety strip of metal to keep the left arm on if the bolts come loose. If so, consult maker's instructions online.
**********
I pulled the shaft out and took some photos.
 05-11-26 | 08:35 PM
#2

Senior Member

Joined: Jun 2022
Posts: 2,333
Likes: 1,274
From: The Ring of Fire, the Global South, Asia-Pacific, the Tropics...
Bikes: Several, all affordably priced, none exalted cult artifacts or hype jobs
My earlier wager is confirmed: It's a standard English BSA bottom bracket. In fact, it's the same BB that's on my Thrill Volare minivelo.
Suggested replacement parts:
Forget replacing the bearings. Replace the entire unit instead.
Suggested replacement parts:
Forget replacing the bearings. Replace the entire unit instead.
Last edited by Ron Damon; 05-12-26 at 04:23 PM.
 05-12-26 | 01:14 AM
#3
Highly Enriched Driftium


Joined: Apr 2017
Posts: 6,754
Likes: 2,187
OP: Prowheel; That's the exact bearings that are on my 2X upgrade crank that was a super deal. Mine are still going strong, 4 years and a lot of miles later.
Forget replacing the bearings. Replace the entire unit instead.
You'll need a Hollowtech 2 (HT2) BB wrench to unscrew the current BB and screw on the new part. When installing the new unit, the axial compression is key so as to not damage the bearings from too much or too little pressure. It's not rocket science or brain surgery either so I'll spare you the service manual dissertation.
Pro tip from the work-bench: the size of the threading on the two suggested BB is different. Make sure the wrench fits the one you choose. Better yet, buy a wrench with both sizes.
"Replace the entire unit": Do you mean crank and all, or by unit you mean the entire bearing cups? Yeah, I wouldn't try to press out the bearings from the aluminum cups, I'd buy whole new external bearings, they were engineered to be low cost.
Axial compression (preload): The torque value will be printed on the end cap for the spindle. It's really low, and if you don't have a torque wrench that goes that low, convert the number to inch-pounds (your search engine will do that or take you to a website that does), and exert pressure on the end of your allen wrench accordingly. Mine says metric and english which is 6-13 inch-pounds, so if I aim for 9 inch-pounds and my allen wrench is 3" long, I'll push or pull with 3 pounds of force to multiply out to 9 total. Remember: This will need retorquing after the bearings burnish-in, typically a few months of daily riding. Some premium bearings, like DuraAce, at least at one time, came factory-burnished.
"Buy a wrench with both sizes": When I bought mine, it was nominally more to get one with 4 sizes, however this is a dogbone wrench; If you buy a cup style to fit a square-drive torque wrench, you can only have two sizes, I think. With my dogbone-style wrench, I calculated what my hand force should be, just like with the end cap, and torqued into place accordingly, not that difficult.
After in place, I put a small dot of red nail polish on both cups at the 12 O'clock position when the bike is standing up. That gives a clue if a cup is coming loose. I also did that on my rack bolts, after one came loose and sheared off.
EDIT: Man that weld is close. When you have the old bearings out, make sure that none of that weld is over the edge onto the flat face of the bottom bracket shell, that would goof things up.
EDIT: Those bearings look a little weird to me. IIRC, on mine, you could see the separate inner race rotating with respect to the fixed outer race, with a seal between them. On yours, there appears to be a big rubber seal over everything, which sounds good, except the inner crank surface is moving and rubbing there, and is held tight against the bearing by the end torque cap. That might be a different setup. Maybe that whole rubber seal rotates.
Forget replacing the bearings. Replace the entire unit instead.
You'll need a Hollowtech 2 (HT2) BB wrench to unscrew the current BB and screw on the new part. When installing the new unit, the axial compression is key so as to not damage the bearings from too much or too little pressure. It's not rocket science or brain surgery either so I'll spare you the service manual dissertation.
Pro tip from the work-bench: the size of the threading on the two suggested BB is different. Make sure the wrench fits the one you choose. Better yet, buy a wrench with both sizes.
Axial compression (preload): The torque value will be printed on the end cap for the spindle. It's really low, and if you don't have a torque wrench that goes that low, convert the number to inch-pounds (your search engine will do that or take you to a website that does), and exert pressure on the end of your allen wrench accordingly. Mine says metric and english which is 6-13 inch-pounds, so if I aim for 9 inch-pounds and my allen wrench is 3" long, I'll push or pull with 3 pounds of force to multiply out to 9 total. Remember: This will need retorquing after the bearings burnish-in, typically a few months of daily riding. Some premium bearings, like DuraAce, at least at one time, came factory-burnished.
"Buy a wrench with both sizes": When I bought mine, it was nominally more to get one with 4 sizes, however this is a dogbone wrench; If you buy a cup style to fit a square-drive torque wrench, you can only have two sizes, I think. With my dogbone-style wrench, I calculated what my hand force should be, just like with the end cap, and torqued into place accordingly, not that difficult.
After in place, I put a small dot of red nail polish on both cups at the 12 O'clock position when the bike is standing up. That gives a clue if a cup is coming loose. I also did that on my rack bolts, after one came loose and sheared off.
EDIT: Man that weld is close. When you have the old bearings out, make sure that none of that weld is over the edge onto the flat face of the bottom bracket shell, that would goof things up.
EDIT: Those bearings look a little weird to me. IIRC, on mine, you could see the separate inner race rotating with respect to the fixed outer race, with a seal between them. On yours, there appears to be a big rubber seal over everything, which sounds good, except the inner crank surface is moving and rubbing there, and is held tight against the bearing by the end torque cap. That might be a different setup. Maybe that whole rubber seal rotates.
Last edited by Duragrouch; 05-12-26 at 01:46 AM.
05-12-26 | 01:30 AM
#4
Senior Member
Joined: Jun 2022
Posts: 2,333
Likes: 1,274
From: The Ring of Fire, the Global South, Asia-Pacific, the Tropics...
Bikes: Several, all affordably priced, none exalted cult artifacts or hype jobs
Oh, God. Here we go again with the 2x conversion upgrade. I wager that before the thread goes dead, we'll hear also about the Deltec cable hack or the Cannondale from the 1990s.
Last edited by Ron Damon; 05-12-26 at 04:19 PM.
05-12-26 | 01:42 AM
#5
Highly Enriched Driftium
Joined: Apr 2017
Posts: 6,754
Likes: 2,187
05-12-26 | 01:50 PM
#6
Thread Starter
Junior Member
Joined: Oct 2025
Posts: 152
Likes: 101
Well, there it is. I think the BBR60 will work just fine. I also ordered a socket instead of using the box end since I prefer sockets. The hot water trick made the second one easier, though it probably wasn’t essential. I just wanted to confirm.


05-12-26 | 10:15 PM
#7
Highly Enriched Driftium
Joined: Apr 2017
Posts: 6,754
Likes: 2,187
Bob's your uncle!
If no loctite used, the hot water also expands the bottom bracket shell, as aluminum has a high coefficient of thermal expansion, and that helps loosen things a bit too.
I used just a touch of aluminum anti-seize on the threads when I installed my bearings, as protection against seizing due to corrosion or galling. Doesn't take much, as when assembled, the male and female threads will occupy most of the void between them.
Yeah, reuse the plastic tube if the new bearings don't come with one, it helps keep water and dirt out of the bearings. On most bikes, the seat tube is often open to the bottom bracket shell, and rain and dirt can get in there. The folder, the seat tube bypasses the BB shell aft, however there might be a water path through the main tube to the diagonal tube to the BB shell.
Nice compact but thorough tool kit!
Last edited by Duragrouch; 05-12-26 at 10:23 PM.
