


Adding some braze-ons to a cromoly frame & fork
 05-23-25 | 09:04 PM
#1
Thread Starter
Newbie
Joined: May 2025
Posts: 61
Likes: 32
Adding some braze-ons to a cromoly frame & fork
Hi!
Never done any frame work before but I do weld and have done a limited amount of silver brazing in the past with a small oxy-propane setup I have - mostly various stainless connector hardware for a camper trailer I made a while back.
Am toying with the idea of building out an old rigid mountain bike into a light bikepacker/commuter, I'd want to add some mid-fork eyelets at least and maybe also add some posts for mounting a frame pump. Honestly mainly want to give myself a change to practice brazing because I've always been a little too scared to attempt in the past.
I don't totally understand how worried (if at all?) I need to be about messing up heat treatment while brazing. My reading has gotten me far enough to suggest that some cromoly alloys are not really heat treated so there's nothing to mess up, and maybe that the brazing temp (so long as I don't heat excessively) is not hot enough to mess with any heat treatement? I'm not so worried about ruining a junky old frame practicing, but I really don't want to compromise a fork and not find out till I'm screaming down a hill with a fully loaded bike. Watched some youtube videos and did some reading but nothing really specifically sez "do braze this alloy, don't braze that one" (which leads me to think that probably it's all OK?)
I'll be silver brazing so presumably I'll be on the lower end of the temperature spectrum unless I really muck things up.
What's the deal? What do I need to know (or where do I figure out what I need to know?) Am I going to be just fine brazing in one or two pair of eyelets on a junky 80's MTB fork?
 05-23-25 | 09:40 PM
#2

Senior Member


Joined: Apr 2009
Posts: 3,719
Likes: 5,504
From: Seattle
Go for it! If you get it too hot, the silver braze will be ruined before the steel will. (I don't know if that's any consolation!) Even heat-treated bike steel can handle braze-ons.
If possible, practice on some similar gauge junk before trying it on a bike you want to ride. Depending on your flame size, you may be shocked at how quickly it comes up to temperature.
Use the right paste flux* for your filler, then let the flux be your guide to the right temperature. When it melts to a clear viscous liquid, that's getting hot enough to where you can apply the filler. Don't apply the filler until the steel is hot enough to wick the silver in by capillary action. But a little too hot and you "use up" the flux. When the flux turns black it's no longer working and you must stop, clean it all off and try again.
* Your LWS (local welding shop) might have decent flux for silver, like Harris, or you can order Gasflux brand. I'm familiar with their Type G ("the white stuff"), never tried Type H ("black") but I hear it's better for higher temperature and/or longer duration, harder to burn it up? Probably someone here can advise you on that. For braze-ons, the heat cycle should be very short so white flux is more than enough.
Here's a short video by Brian Champan showing what to shoot for. Don't be discouraged if yours doesn't go this well on your first try!
https:// flic.kr/p/2a8ZaSP
EDIT: this forum won't let me post a link to a Flickr video, it tries to replace the link with a picture, but it's a video. Apparently not allowed.
So I detached the https:// from the front, delete the extra space to go there if interested
Last edited by bulgie; 05-24-25 at 03:55 PM. Reason: Link to Flickr doesn't work!
05-24-25 | 05:00 AM
#3
Senior Member

Joined: Jan 2013
Posts: 2,383
Likes: 941
From: South Jersey
It will be fine. Get some 56% silver and the correct flux, like this https://www.amazon.com/Harris-Solder...8084130&sr=8-7
I mostly just use a MAPP gas torch to do my bottle bosses and cable guides. Heat the boss, not the tube. The tube will pick up plenty of heat from heating the boss.
I mostly just use a MAPP gas torch to do my bottle bosses and cable guides. Heat the boss, not the tube. The tube will pick up plenty of heat from heating the boss.
05-24-25 | 08:48 AM
#4
Senior Member
Joined: Feb 2012
Posts: 19,349
Likes: 5,466
From: Rochester, NY
Bikes: Stewart S&S coupled sport tourer, Stewart Sunday light, Stewart Commuting, Stewart Touring, Co Motion Tandem, Stewart 3-Spd, Stewart Track, Fuji Finest, Mongoose Tomac ATB, GT Bravado ATB, JCP Folder, Stewart 650B ATB
My understanding is that pretty much all steel production uses heat during the alloying/production process, whether it's called "heat treating" I'll leave to the experts. Brazing with a silver (56% being the most common) can result in a very strong attachment with nearly zero steel strength loss, UNLESS one overheats the joint while trying to braze. Which is why we suggest enough practice to be able to recognize this and do something about it before it gets too much.
When practicing I also suggest going too far with the heat to find out what that looks like and how to correct for it before it gets too bad. I am generally more comfortable being driven in a car by someone who has played in a snowy parking lot than one who is afraid of skidding and never learned about it. Andy
When practicing I also suggest going too far with the heat to find out what that looks like and how to correct for it before it gets too bad. I am generally more comfortable being driven in a car by someone who has played in a snowy parking lot than one who is afraid of skidding and never learned about it. Andy
__________________
AndrewRStewart
AndrewRStewart
05-24-25 | 09:24 AM
#5
Thread Starter
Newbie
Joined: May 2025
Posts: 61
Likes: 32
Awesome, have some weldcode 56CF silver filler, I forget what kind of flux but bought it and used it for stainless so that seems like it should be fine? Was thinking I'd use stainless bosses at least for the mid-fork rack mount. Torch is a teeny lil jewlry torch so should be pretty easy to heat with precision.
Last edited by lukerh; 05-24-25 at 09:27 AM.
05-24-25 | 09:28 AM
#6
Thread Starter
Newbie
Joined: May 2025
Posts: 61
Likes: 32
My understanding is that pretty much all steel production uses heat during the alloying/production process, whether it's called "heat treating" I'll leave to the experts. Brazing with a silver (56% being the most common) can result in a very strong attachment with nearly zero steel strength loss, UNLESS one overheats the joint while trying to braze. Which is why we suggest enough practice to be able to recognize this and do something about it before it gets too much.
When practicing I also suggest going too far with the heat to find out what that looks like and how to correct for it before it gets too bad. I am generally more comfortable being driven in a car by someone who has played in a snowy parking lot than one who is afraid of skidding and never learned about it. Andy
When practicing I also suggest going too far with the heat to find out what that looks like and how to correct for it before it gets too bad. I am generally more comfortable being driven in a car by someone who has played in a snowy parking lot than one who is afraid of skidding and never learned about it. Andy
05-24-25 | 10:18 AM
#7
Randomhead
Joined: Aug 2008
Posts: 25,930
Likes: 4,825
From: Happy Valley, Pennsylvania
My lws barely knows what brazing is, but they have always had both varieties of harris silver flux for some reason. No silver filler though. Told me the silver flux was good for brass. Okay... I wish they had type B.
05-31-25 | 06:42 PM
#8
Thread Starter
Newbie
Joined: May 2025
Posts: 61
Likes: 32
PLOT TWIST
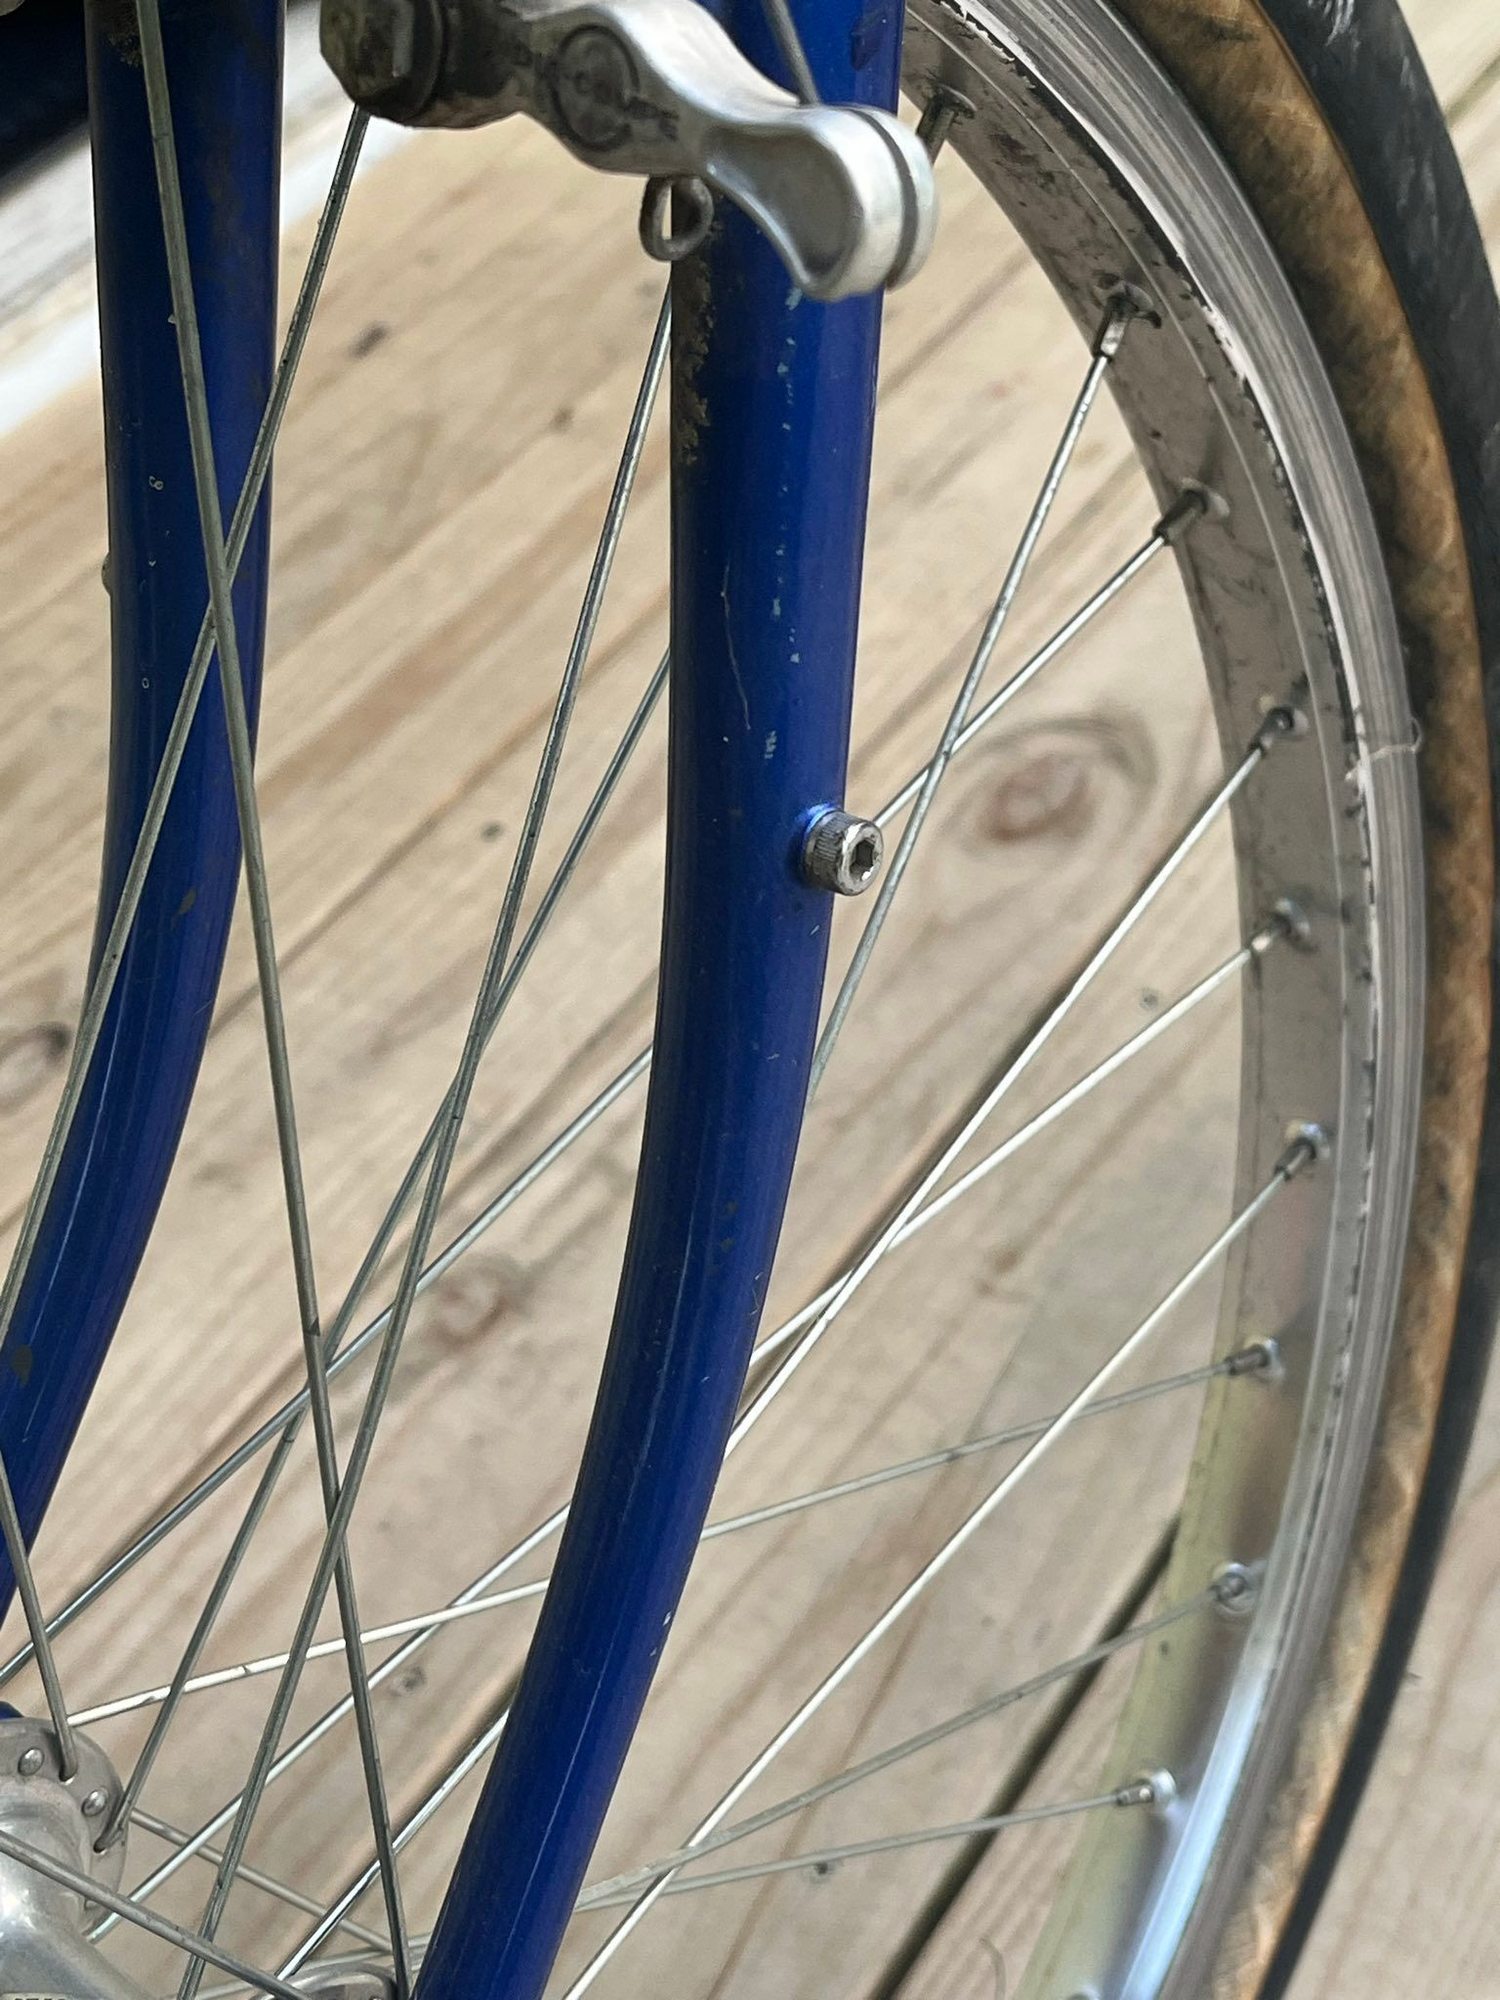
Finally got my hands on the bike in question and it already has lowrider bosses (yay! pictures on the listings didn't show the forks clearly and I didn't notice) but they are of the threaded water-bottle type rather than the all-the-way-through type. My first inclination is to just leave them be and use them as they are, but also I do plan to use this bike for bikepacking with a porteur (with the arms attached to these eyelets) and probably lowriders (have an old pair of salsa downunders I was planning on using) as well. My general understanding is that the threaded water bottle type is considered not as strong but also it's not clear to me if there's any real risk of using these fully laden. It seems to me that if those hourglass-shaped eyelets that are brazed onto the surface of tubes can handle a whole rack there's no reason that these couldn't.
I'm going to repaint the whole frame anyways (because I'm brazing pump pegs on the frame and also the paint is pretty trashed elsewhere on both the fork and frame) so it would be a convenient time to drill these out and braze in the tubular all-the-way-through type. Should I bother? Am I right to be worried about loading up big heavy racks with these or is that silly superstition?
Has anyone ever actually experienced frame or rack failure because of this type of eyelet?
06-01-25 | 09:13 AM
#10
Senior Member
Joined: Feb 2012
Posts: 19,349
Likes: 5,466
From: Rochester, NY
Bikes: Stewart S&S coupled sport tourer, Stewart Sunday light, Stewart Commuting, Stewart Touring, Co Motion Tandem, Stewart 3-Spd, Stewart Track, Fuji Finest, Mongoose Tomac ATB, GT Bravado ATB, JCP Folder, Stewart 650B ATB
There have been thousands of bikes with similar mid blade H2O bosses for rack mounts that are still running just fine. The dozen or so of forks I've done this with worked fine for low rider self supported touring over dirt roads for hundreds of miles, besides the day to day riding. If the boss is nicely brazed I doubt there would be an issue. However if one's concerns are so big I suggest bypassing the M5 mounting bolts that nearly all racks are made for and go to M6 fasteners Of course this might mean making one's own racks...
IME the drive for a unthreaded through tube for a boss was started by Blackburn and their CL-1 low rider front rack that removed the rack brace loop that previously was spanning the tow rack sides, over the tire. W/o that loop/brace a rack will be far more wiggly under loads and steering motions. The CL-1 rack has a second horizontal rail that contacts the blades inside, thus providing some triangulation to the rack's mounting. I've discussed the benefits/drawbacks to these through tube bosses before and I don't think there has been any final conclusion that I had read that really answers the question to which mounting is "better".
I have read of a very few blades that failed at the mid boss location. Usually a front end impact causing the blade to fold back at this point. I don't remember hearing of a crack at the point starting though.
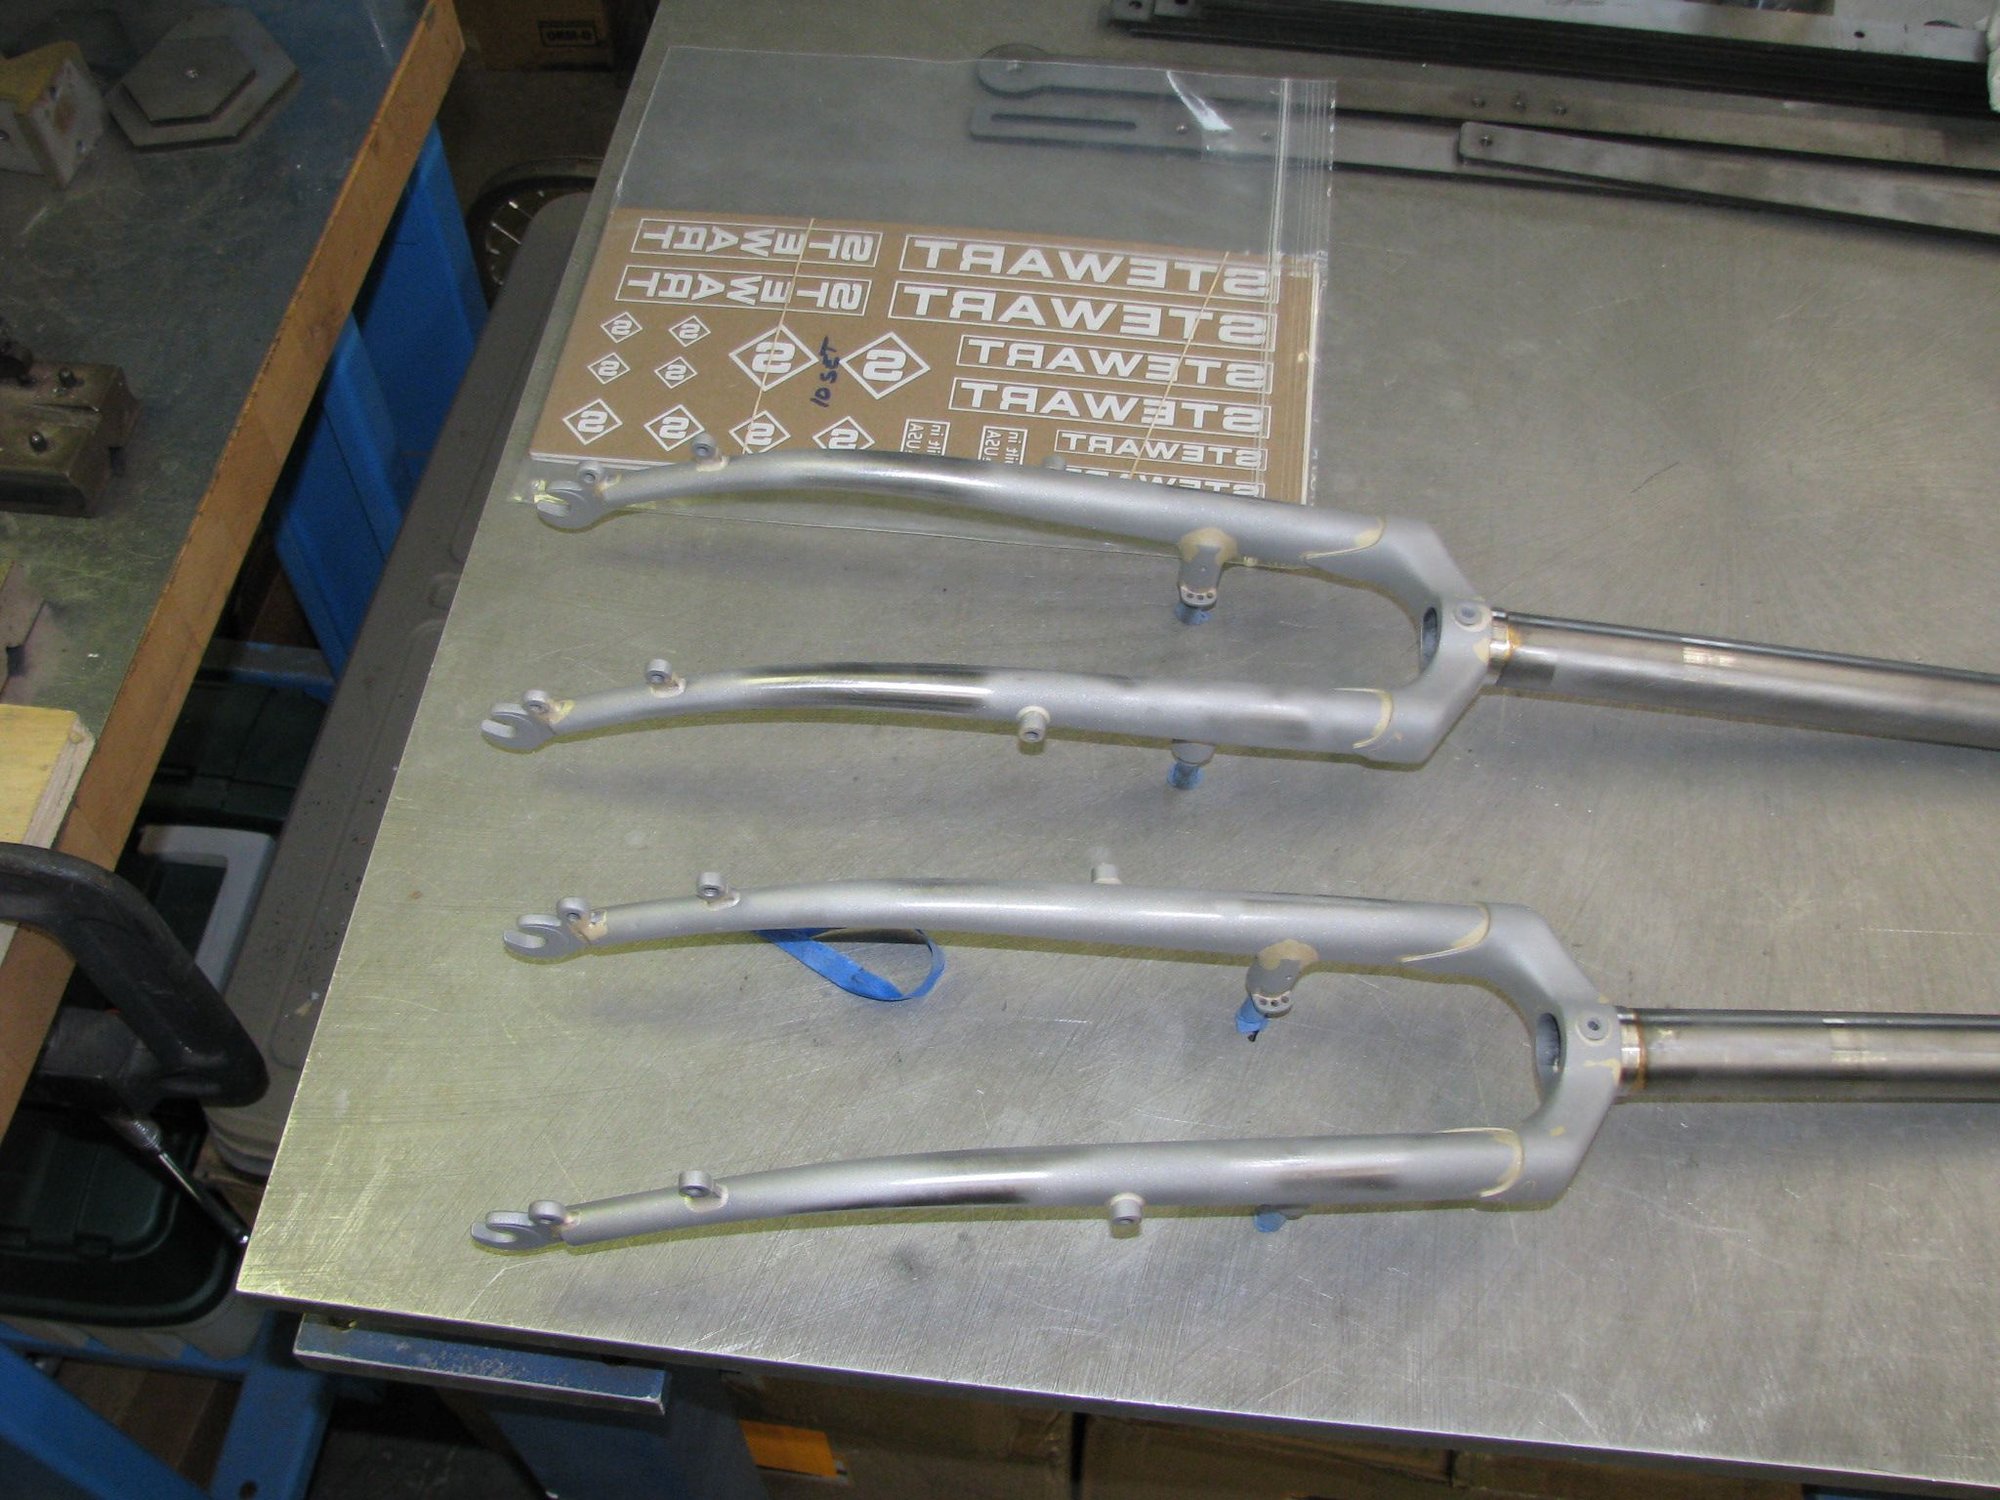
My early mid blade bosses were just as the photo shows. A H2O boss in a drilled hole. Found quickly that the horizontal rails really want to be stood off the blade so pannier hooks have space to overlap the rails. Of course there's short stand off spacers provided in the new rack kit and they work well enough, assuming the bolts are kept tight what with the increased bending loads the bolts see after the spacers are installed. But this issue wasn't what I wanted so I explored various boss mounts as i replaced my, and the wife's, touring bikes. nest up was a seat stay rack boss (those hourglass shaped ones) brazed onto the blade. Much like Frakenstien electrodes. The height/length of the boss provided the stand off clearance. This design has worked quite well but the surface only contact did make me wonder and for my most recent touring build I made a M5 boss that has a spicket that fits into a hole in the blade and also has slightly larger a base. These changes create more contact area for the silver to flow into. Here's a couple of shots of this. Andy

Of course this might mean making one's own racks...IME the drive for a unthreaded through tube for a boss was started by Blackburn and their CL-1 low rider front rack that removed the rack brace loop that previously was spanning the tow rack sides, over the tire. W/o that loop/brace a rack will be far more wiggly under loads and steering motions. The CL-1 rack has a second horizontal rail that contacts the blades inside, thus providing some triangulation to the rack's mounting. I've discussed the benefits/drawbacks to these through tube bosses before and I don't think there has been any final conclusion that I had read that really answers the question to which mounting is "better".
I have read of a very few blades that failed at the mid boss location. Usually a front end impact causing the blade to fold back at this point. I don't remember hearing of a crack at the point starting though.
My early mid blade bosses were just as the photo shows. A H2O boss in a drilled hole. Found quickly that the horizontal rails really want to be stood off the blade so pannier hooks have space to overlap the rails. Of course there's short stand off spacers provided in the new rack kit and they work well enough, assuming the bolts are kept tight what with the increased bending loads the bolts see after the spacers are installed. But this issue wasn't what I wanted so I explored various boss mounts as i replaced my, and the wife's, touring bikes. nest up was a seat stay rack boss (those hourglass shaped ones) brazed onto the blade. Much like Frakenstien electrodes. The height/length of the boss provided the stand off clearance. This design has worked quite well but the surface only contact did make me wonder and for my most recent touring build I made a M5 boss that has a spicket that fits into a hole in the blade and also has slightly larger a base. These changes create more contact area for the silver to flow into. Here's a couple of shots of this. Andy
__________________
AndrewRStewart
AndrewRStewart
06-01-25 | 09:43 AM
#11

Senior Member
Joined: May 2010
Posts: 5,603
Likes: 2,468
From: Bastrop Texas
Bikes: Univega, Peu P6, Peu PR-10, Ted Williams, Peu UO-8, Peu UO-18 Mixte, Peu Dolomites
"Adding some braze-ons to a chromed cromoly frame & fork" or "Adding some braze-ons to a chromed cromoly frame & fork?"
I am sure you know that silver solder has a hard time sticking to chrome...
I am sure you know that silver solder has a hard time sticking to chrome...
__________________
 No matter where you're at... There you are... Δf:=f(1/2)-f(-1/2)
06-01-25 | 12:52 PM
#12
Thread Starter
Newbie
Joined: May 2025
Posts: 61
Likes: 32
There have been thousands of bikes with similar mid blade H2O bosses for rack mounts that are still running just fine. The dozen or so of forks I've done this with worked fine for low rider self supported touring over dirt roads for hundreds of miles, besides the day to day riding. If the boss is nicely brazed I doubt there would be an issue. However if one's concerns are so big I suggest bypassing the M5 mounting bolts that nearly all racks are made for and go to M6 fasteners Of course this might mean making one's own racks...
IME the drive for a unthreaded through tube for a boss was started by Blackburn and their CL-1 low rider front rack that removed the rack brace loop that previously was spanning the tow rack sides, over the tire. W/o that loop/brace a rack will be far more wiggly under loads and steering motions. The CL-1 rack has a second horizontal rail that contacts the blades inside, thus providing some triangulation to the rack's mounting. I've discussed the benefits/drawbacks to these through tube bosses before and I don't think there has been any final conclusion that I had read that really answers the question to which mounting is "better".
I have read of a very few blades that failed at the mid boss location. Usually a front end impact causing the blade to fold back at this point. I don't remember hearing of a crack at the point starting though.
Of course this might mean making one's own racks...IME the drive for a unthreaded through tube for a boss was started by Blackburn and their CL-1 low rider front rack that removed the rack brace loop that previously was spanning the tow rack sides, over the tire. W/o that loop/brace a rack will be far more wiggly under loads and steering motions. The CL-1 rack has a second horizontal rail that contacts the blades inside, thus providing some triangulation to the rack's mounting. I've discussed the benefits/drawbacks to these through tube bosses before and I don't think there has been any final conclusion that I had read that really answers the question to which mounting is "better".
I have read of a very few blades that failed at the mid boss location. Usually a front end impact causing the blade to fold back at this point. I don't remember hearing of a crack at the point starting though.
Seems like I could throw together a tubus tara clone real easy that would eliminate the need for through-holes
Last edited by lukerh; 06-01-25 at 01:01 PM.
07-08-25 | 11:10 AM
#13
Thread Starter
Newbie
Joined: May 2025
Posts: 61
Likes: 32
Finally getting back around to dealing with this and had a couple questions, I'm feeling REAL nervous about torching my frame and I'm hoping someone can either talk me out of my anxiety or talk me out of a bad mistake. I'm hoping to add frame pump pegs to the bike (of the long bent prong kind not the short-stub-on-the-headtube kind) to the aft of the seat tube.
I have silver filler (56%) and also bronze filler (Gasflux C-04) available to me. I've been practicing and I'm fairly comfortable with both, but I'm worried that if I use the silver filler, I won't have enough of a fillet to support the peg (the lower peg is going above the derailleur on what is presumably a thin section of the butted tubing), and I'm worried with the bronze filler I'll overheat and screw up the tubing somehow.
Which filler would you use for the pegs? If I use bronze, how at-risk am I for overheating the frame and giving it the opportunity to crack somewhere?
07-08-25 | 12:25 PM
#14
semi-retired framebuilder
Joined: Dec 2007
Posts: 145
Likes: 580
From: Halifax, Nova Scotia, Canada
Bikes: twenty-three at last count
I’ve routinely used silver to braze these on, and haven’t ever had an issue. My preferred technique, which does take some practice to get stuff aligned nicely, is to heat up the spot on the tubing; melt on a small dollop of silver; hold the pump peg with needlenose around its neck, heat it up (well fluxed of course) until it’s at the brazing temperature then hold it onto the tubing while remelting the silver around and under it. I don’t look to get a fancy fillet around it. Best to practice a number of times on scrap until you get the hang of it. Or fabricate some kind of jig to hold it in place and braze as per usual, but I’ve not bothered with this.
07-08-25 | 01:05 PM
#15
Senior Member
Joined: Apr 2009
Posts: 3,719
Likes: 5,504
From: Seattle
I�ve routinely used silver to braze these on, and haven�t ever had an issue. My preferred technique, which does take some practice to get stuff aligned nicely, is to heat up the spot on the tubing; melt on a small dollop of silver; hold the pump peg with needlenose around its neck, heat it up (well fluxed of course) until it�s at the brazing temperature then hold it onto the tubing while remelting the silver around and under it. I don�t look to get a fancy fillet around it. Best to practice a number of times on scrap until you get the hang of it. Or fabricate some kind of jig to hold it in place and braze as per usual, but I�ve not bothered with this.
Hold the BO in needle-nose pliers, hold the pliers in a vise with the BO sticking up.
Melt a drop of silver on the end of the BO
Hold the BO+silver against the tube by hand (steady your arm against another nearby frame tube)
Heat until the silver flows, most heat directed at the BO since the tube is sensitive and mission-critical, BO is not.
The other Mark B has the skill and experience to make his way 100% reliable but I think my way is better for a newb. Maybe better for anyone since you only heat the tube once.
I have used my method for various BOs including pump pegs, maybe around a thousand times. It takes less time than it took to type it out.
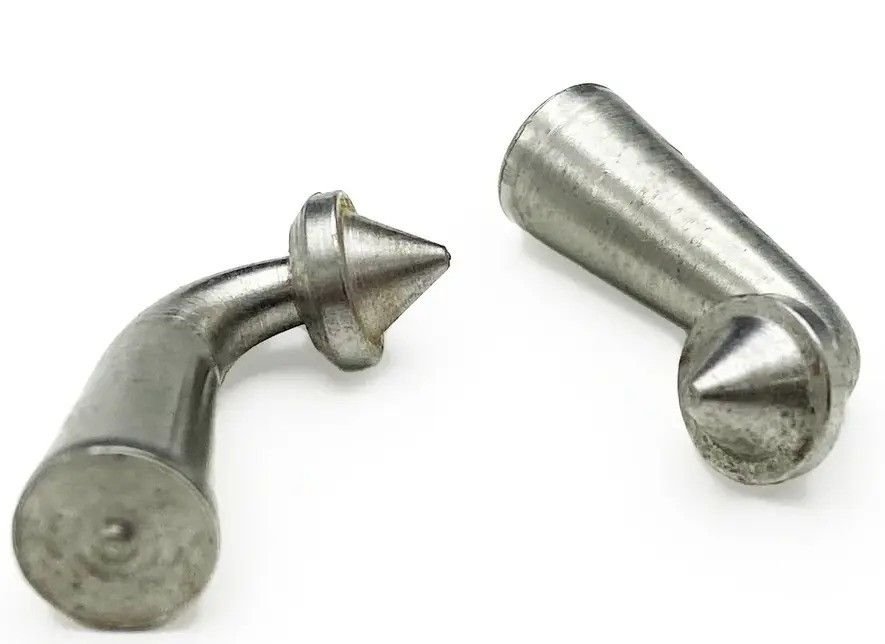
With the pegs in your photo, I would take a sec to miter the bottom to fit the curve of the tube. Silver wants as much surface area in contact as you can give it.
07-08-25 | 03:01 PM
#16
Senior Member
Joined: Feb 2012
Posts: 19,349
Likes: 5,466
From: Rochester, NY
Bikes: Stewart S&S coupled sport tourer, Stewart Sunday light, Stewart Commuting, Stewart Touring, Co Motion Tandem, Stewart 3-Spd, Stewart Track, Fuji Finest, Mongoose Tomac ATB, GT Bravado ATB, JCP Folder, Stewart 650B ATB
For most braze ons going on thin wall tubes I use 56% silver. But for some I will use CO4 bronze. like second drop out eyelets, stay rack bosses, canti bosses. Andy
__________________
AndrewRStewart
AndrewRStewart
07-16-25 | 05:21 PM
#17
Thread Starter
Newbie
Joined: May 2025
Posts: 61
Likes: 32
I did it! seems like I didn't wreck anything either!
Ended up using silver to make things easier for myself. Mitered the posts using a half-round file to get them close, then sandpaper wrapped around the tube for a precise fit.
I put a blob of silver on the end of each post, then used pliers to place them on while heating (mostly the post) with a torch. The first time around, I let them freeze while the pliers were still on, but in both cases I failed to get the post perfectly flush up against the tube (it's hard to feel and you can't really eyeball it) They were both attached, but not sitting flat on the tube. I re-fluxed, clamped the bike in the stand so that the tube was level, and then re-heated the posts just until the filler melted again (without holding the post at all). The posts just kinda plopped into place (due to the good miter job) and they have a nice silver fillet all around.
Next step is painting!
Thanks MUCH for all the advice, much less scary once I was actually doing it.
