


Custom rack building first try - braze or weld? Materials?
 05-29-25 | 08:02 AM
#1
Thread Starter
Newbie
Joined: May 2025
Posts: 61
Likes: 32
Custom rack building first try - braze or weld? Materials?
Want to have a go at making a rack for the build I'm cooking up, wondering if anyone can give me any tips on materials to use, techniques that might be best. Probably will start with a simple front randonneur type of thing.
Tubing: probably stainless on account of price? 1/4, 5/16, 3/8? What wall thickness would be a good place to start? I'm not pinching grams here so if a thicker wall makes construction a lot easier I'm happy with that
What about notching the tubing for joins? Seems like if I weld I could get away with eyeballing it with a cut-off wheel on a grinder and a little sanding if things don't line up quite right?
If I braze, I understand that my regular 56% alloy is maybe not appropriate for this - I see some references in older posts to Fillet Pro which is (seemingly) not available any more? Any other filler options? Does my notching need to be super precise if I'm fillet brazing? I've read some things that seem to suggest nickel silver (what alloy?) or 40% silver for fillet brazing stainless but unclear how well that will/will not work.
Also in general, if you were me, would you weld or braze? I have more experience welding but also seems a lot harder to really ruin things brazing (i.e. blowing a hole in thin tiny tubing with the welder). My weld beads would be ugly but probably perfectly fine structurally.
Tubing: probably stainless on account of price? 1/4, 5/16, 3/8? What wall thickness would be a good place to start? I'm not pinching grams here so if a thicker wall makes construction a lot easier I'm happy with that
What about notching the tubing for joins? Seems like if I weld I could get away with eyeballing it with a cut-off wheel on a grinder and a little sanding if things don't line up quite right?
If I braze, I understand that my regular 56% alloy is maybe not appropriate for this - I see some references in older posts to Fillet Pro which is (seemingly) not available any more? Any other filler options? Does my notching need to be super precise if I'm fillet brazing? I've read some things that seem to suggest nickel silver (what alloy?) or 40% silver for fillet brazing stainless but unclear how well that will/will not work.
Also in general, if you were me, would you weld or braze? I have more experience welding but also seems a lot harder to really ruin things brazing (i.e. blowing a hole in thin tiny tubing with the welder). My weld beads would be ugly but probably perfectly fine structurally.
 05-29-25 | 10:06 AM
#2

Senior Member

Joined: Sep 2009
Posts: 1,390
Likes: 118
From: EagleRiver AK
Building with CrMo tubing and bronze brazing rod instead of stainless steel and silver is going to be much cheaper for the materials. For a first time attempt at such a project, probably not great idea to practice with expensive materials. Use the money saved to get a good tubing bender.
Older thread with many recommendations;
Newbie brazing together a rack: Rack tubing suggestions and ideas
Older thread with many recommendations;
Newbie brazing together a rack: Rack tubing suggestions and ideas
 05-29-25 | 11:05 AM
#3
Thread Starter
Newbie
Joined: May 2025
Posts: 61
Likes: 32
Building with CrMo tubing and bronze brazing rod instead of stainless steel and silver is going to be much cheaper for the materials. For a first time attempt at such a project, probably not great idea to practice with expensive materials. Use the money saved to get a good tubing bender.
05-29-25 | 03:09 PM
#4
Randomhead
Joined: Aug 2008
Posts: 25,930
Likes: 4,825
From: Happy Valley, Pennsylvania
For what length tubing? I use 0.035 wall 5/16" welded 304 from McMaster Carr, and it's $17 for 6'. 4130 is just over $30 for 6'
I started a thread about tube benders Tubing benders for racks
I started a thread about tube benders Tubing benders for racks
05-29-25 | 03:16 PM
#5

Senior Member


Joined: Apr 2009
Posts: 3,787
Likes: 5,636
From: Seattle
Notch with a round file the same diameter as the mating tube. A few strokes and you're done, an angle grinder would not be faster. Chainsaw sharpening files are handy because they don't taper, but a regular "rat tail" round file is fine too.
Silver brazing stainless is much harder than brass brazing on steel. For a beginner, high likelihood of ruining it. Doesn't even need to be 4130 for a small rack like you envision. Honestly unless you're a "natural" or savant, your joints are going to be the weak point, so you don't need the strongest tube. See if you can get cheap low-carbon tube, doesn't even need to be seamless.
Here's a great resource for rack building, from inspired amateur builder Alex Wetmore:
Alex Wetmore is always busy with something? » Rack Building Basics
One more bit of advice, think about adding redundancy to your design such that no single-point failure can make the rack fall onto the front tire, throwing you head-first off the bike. A joint that seems strong enough can fail later from fatigue from vibration.
Silver brazing stainless is much harder than brass brazing on steel. For a beginner, high likelihood of ruining it. Doesn't even need to be 4130 for a small rack like you envision. Honestly unless you're a "natural" or savant, your joints are going to be the weak point, so you don't need the strongest tube. See if you can get cheap low-carbon tube, doesn't even need to be seamless.
Here's a great resource for rack building, from inspired amateur builder Alex Wetmore:
Alex Wetmore is always busy with something? » Rack Building Basics
One more bit of advice, think about adding redundancy to your design such that no single-point failure can make the rack fall onto the front tire, throwing you head-first off the bike. A joint that seems strong enough can fail later from fatigue from vibration.
 05-29-25 | 03:45 PM
#6
Thread Starter
Newbie
Joined: May 2025
Posts: 61
Likes: 32
For what length tubing? I use 0.035 wall 5/16" welded 304 from McMaster Carr, and it's $17 for 6'. 4130 is just over $30 for 6'
I started a thread about tube benders Tubing benders for racks
I started a thread about tube benders Tubing benders for racks
05-29-25 | 07:03 PM
#7

Junior Member
Joined: Oct 2022
Posts: 170
Likes: 158
From: Appleton, WI
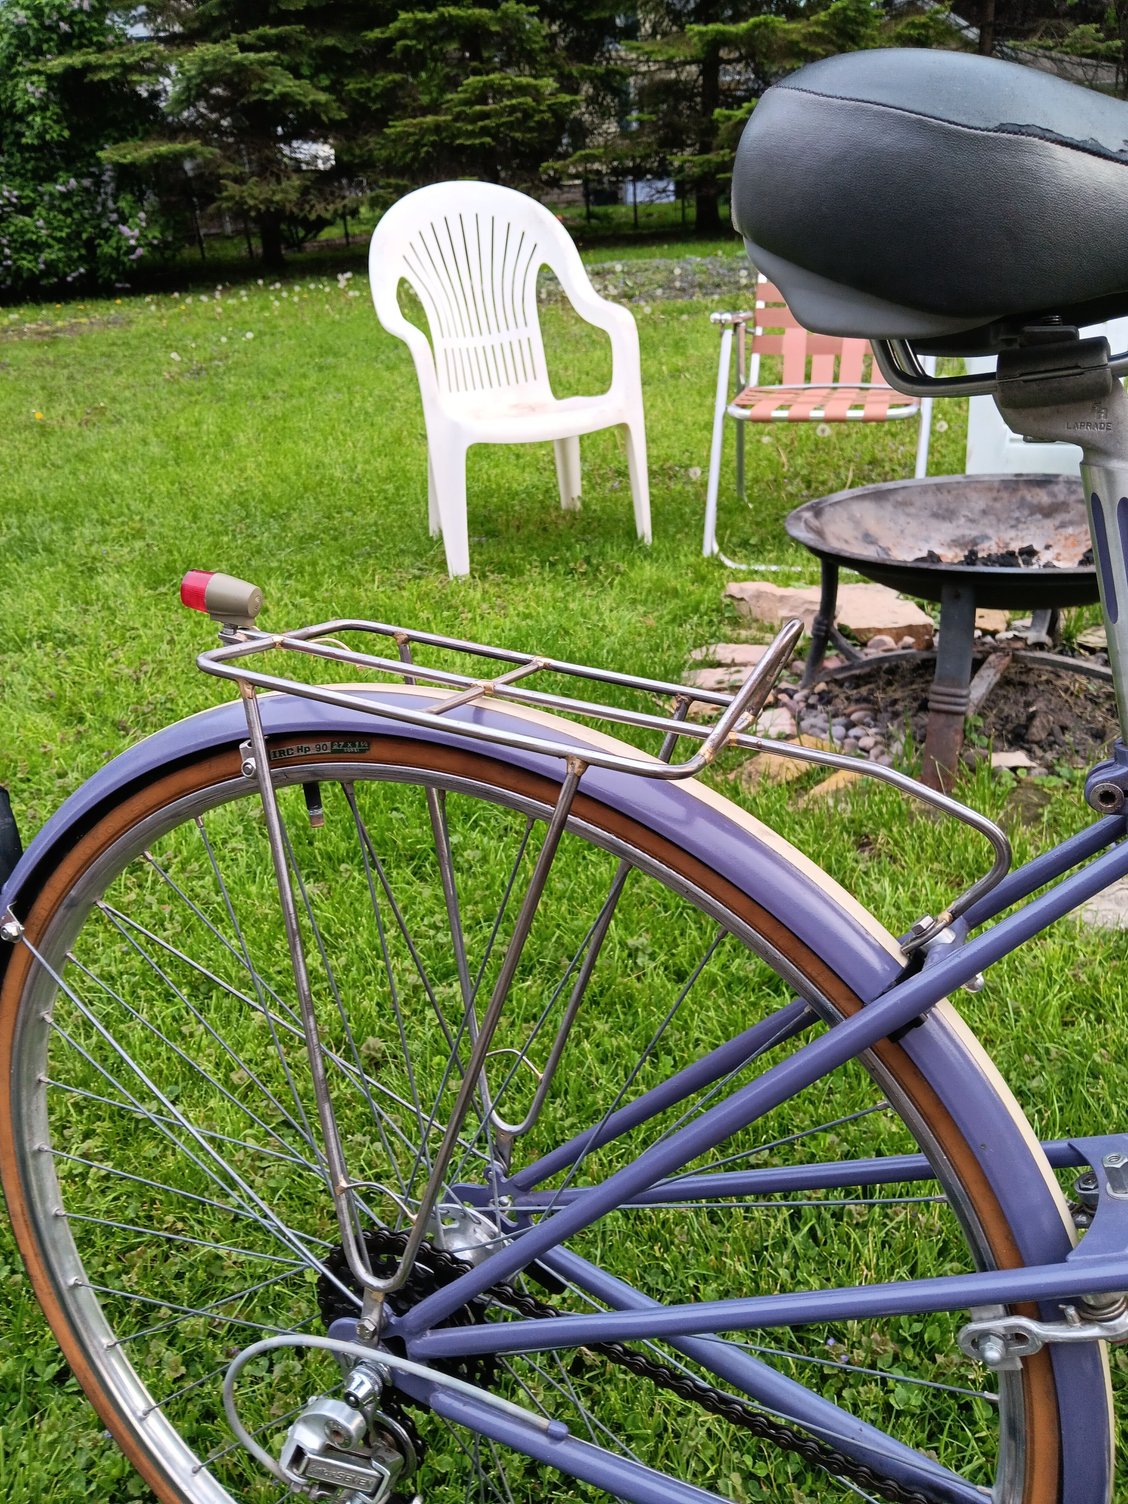
I just made my first racks for my daughters mixte. Unable to find any reasonably priced tubing, I used solid 1/4" cold rolled steel rod. Very cheap at under $1 per foot. Obviously tubing would be better but this is fine for these light duty racks and not as heavy as I thought they would be. These are bronze filet brazed. They just need some filing and paint yet.


 05-29-25 | 07:50 PM
#8
Thread Starter
Newbie
Joined: May 2025
Posts: 61
Likes: 32
I just made my first racks for my daughters mixte. Unable to find any reasonably priced tubing, I used solid 1/4" cold rolled steel rod. Very cheap at under $1 per foot. Obviously tubing would be better but this is fine for these light duty racks and not as heavy as I thought they would be. These are bronze filet brazed. They just need some filing and paint yet.
05-30-25 | 03:45 AM
#9
Highly Enriched Driftium

Joined: Apr 2017
Posts: 6,879
Likes: 2,242
robobike316 , those are lovely!
A thought: If the long vertical struts loaded in compression under weight are the weak point, 4130 steel is no advantage over grade-zip cold-rolled, because buckling strength of a column is a function of its *stiffness*, not strength. Stiffness is based on:
- geometric section modulus
- material elastic (Young's) modulus (generally uniform across steel strengths)
- unconstrained length
- end conditions ("pin", "ball", or constrained in rotation)
A thought: If the long vertical struts loaded in compression under weight are the weak point, 4130 steel is no advantage over grade-zip cold-rolled, because buckling strength of a column is a function of its *stiffness*, not strength. Stiffness is based on:
- geometric section modulus
- material elastic (Young's) modulus (generally uniform across steel strengths)
- unconstrained length
- end conditions ("pin", "ball", or constrained in rotation)
05-30-25 | 01:21 PM
#11
Randomhead
Joined: Aug 2008
Posts: 25,930
Likes: 4,825
From: Happy Valley, Pennsylvania
I just made my first racks for my daughters mixte. Unable to find any reasonably priced tubing, I used solid 1/4" cold rolled steel rod. Very cheap at under $1 per foot. Obviously tubing would be better but this is fine for these light duty racks and not as heavy as I thought they would be. These are bronze filet brazed. They just need some filing and paint yet.
05-30-25 | 04:40 PM
#12
Junior Member
Joined: Oct 2022
Posts: 170
Likes: 158
From: Appleton, WI
Here is the rod I used on these racks. It's a local company, so no shipping for me.
https://www.speedymetals.com/pc-23-8227-18r25.aspx
https://www.speedymetals.com/pc-23-8227-18r25.aspx
06-07-25 | 06:28 PM
#13

Newbie
Joined: Sep 2021
Posts: 35
Likes: 48
From: San Diego, CA
Bikes: Rocky Mountain Instinct, DVR SS MTB
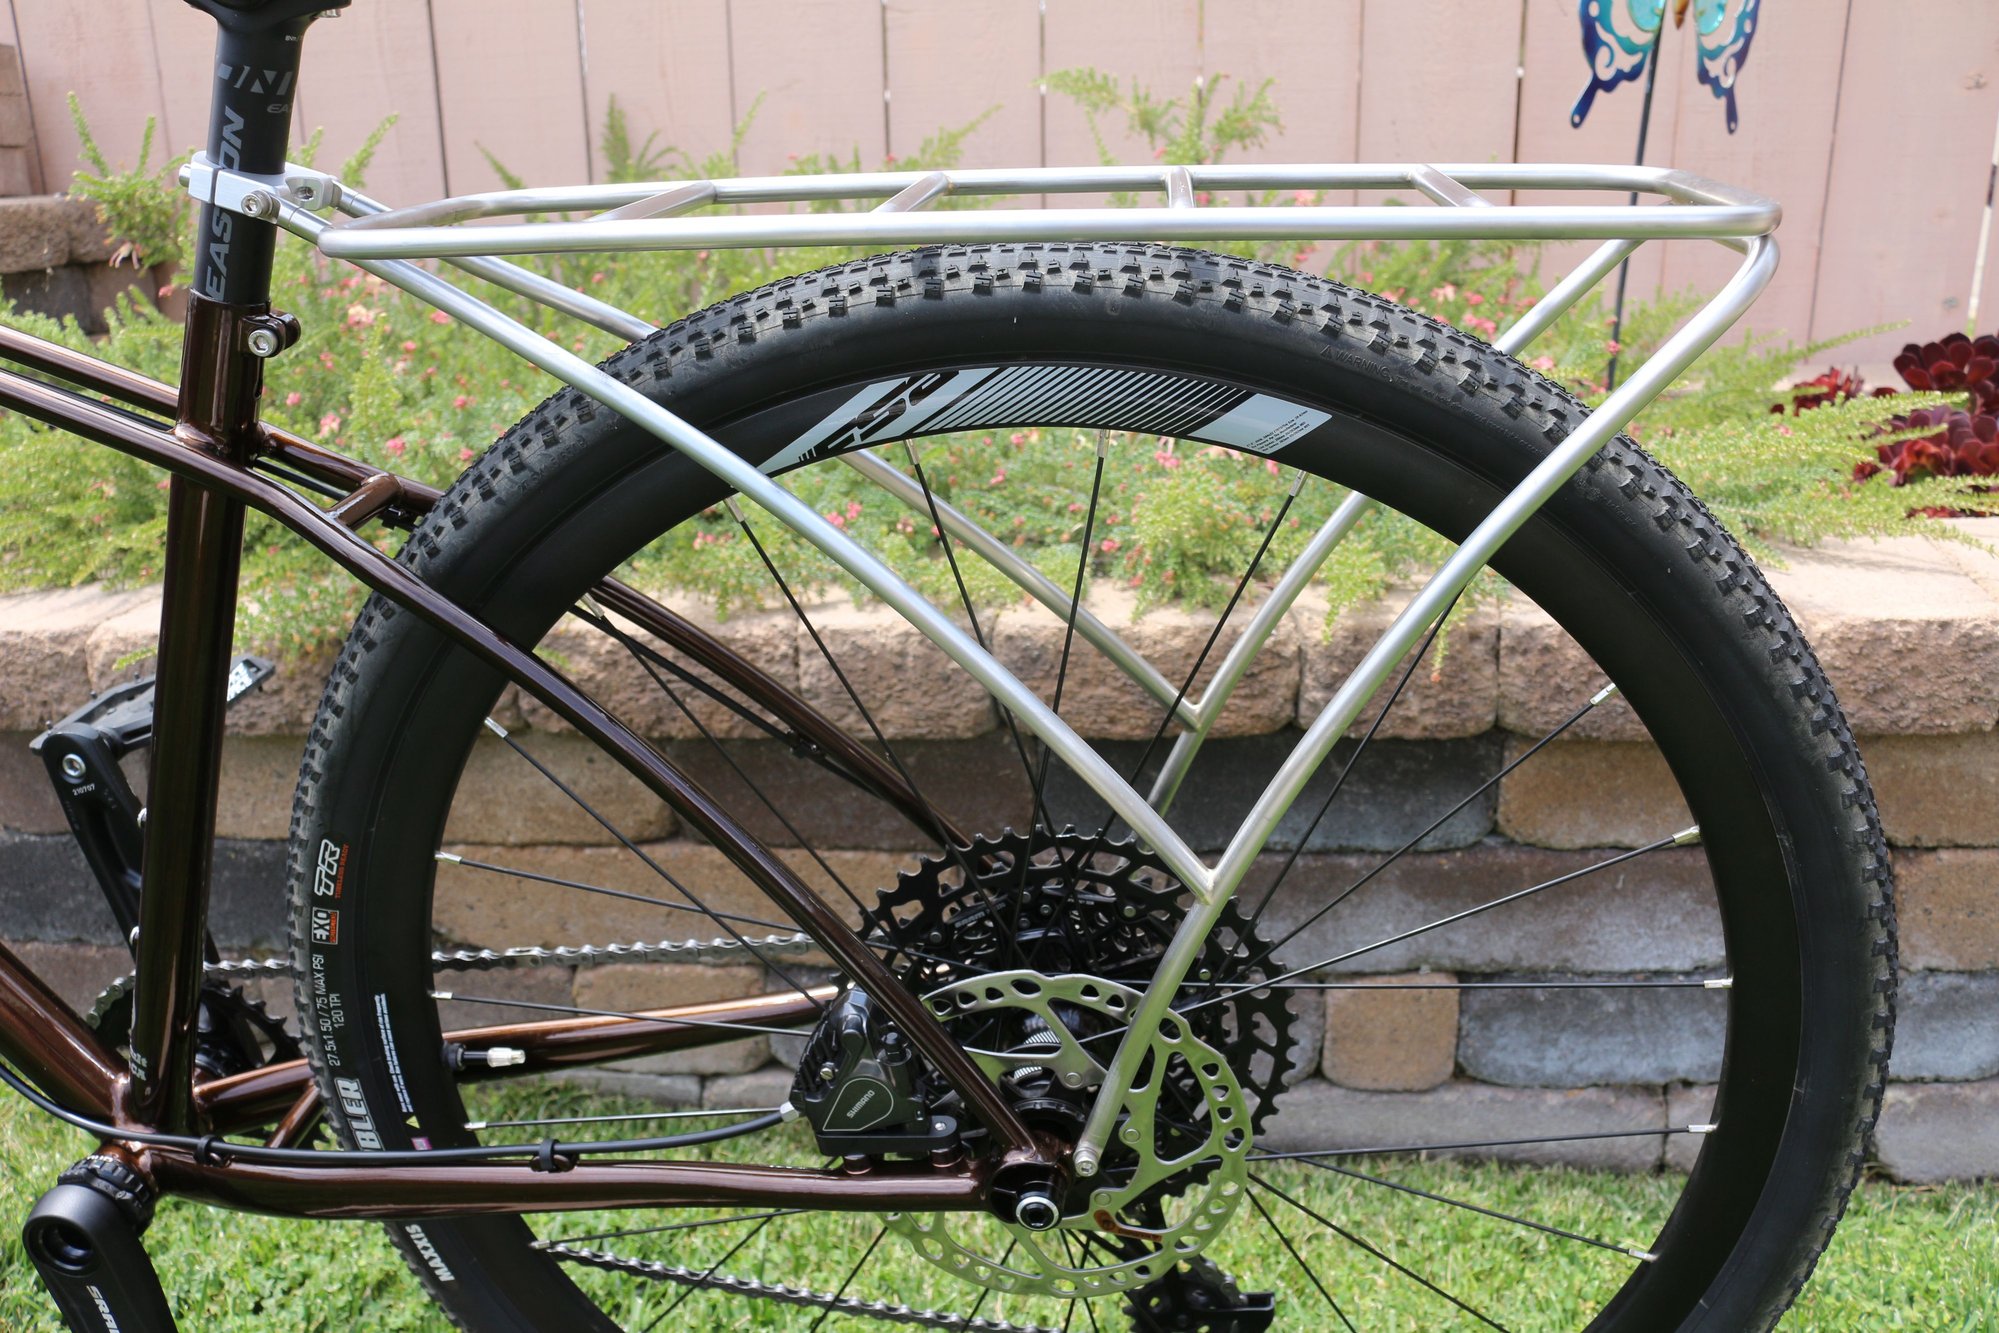
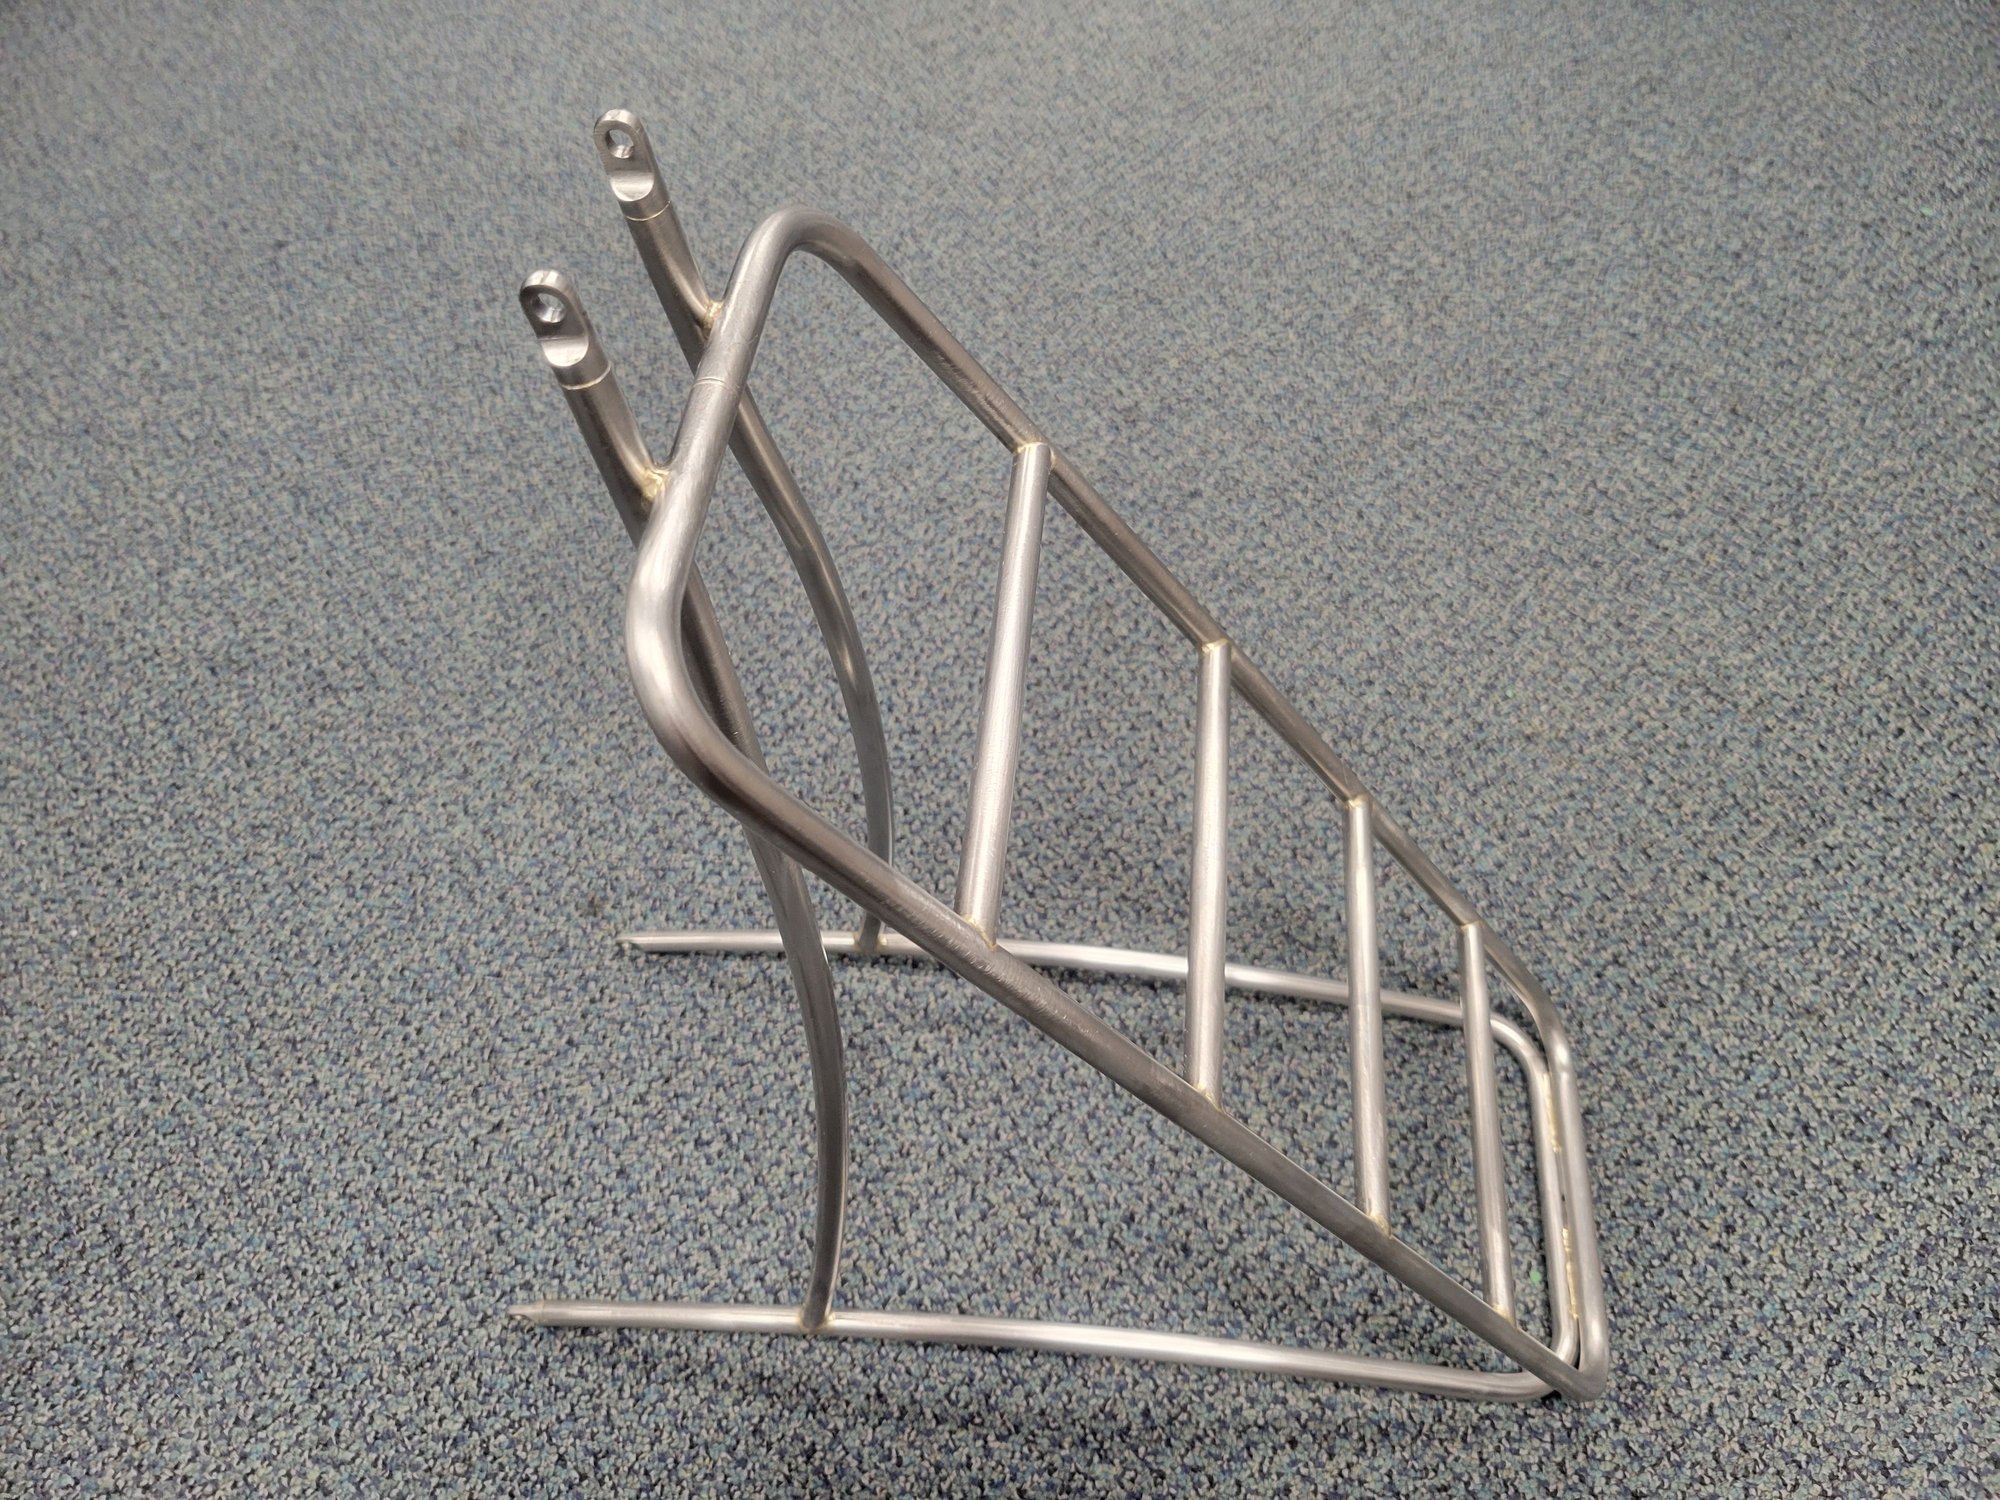
I used 3/8" x .035" wall stainless for this rack. Mostly because I had access to a nice bender in that size. Zoro can have decent prices at times (https://www.zoro.com/zoro-select-38-...76/?q=G0953276 ) When I made the rack back in 2022, it was $18/6 foot stick. I used Fillet Pro on most of the joints and silver on the end pieces. I used the mill to notch the cross bars to make them all the same length. The other miters were just done with a rat tail...
 06-07-25 | 08:52 PM
#14
Thread Starter
Newbie
Joined: May 2025
Posts: 61
Likes: 32
I used 3/8" x .035" wall stainless for this rack. Mostly because I had access to a nice bender in that size. Zoro can have decent prices at times (https://www.zoro.com/zoro-select-38-...76/?q=G0953276 ) When I made the rack back in 2022, it was $18/6 foot stick. I used Fillet Pro on most of the joints and silver on the end pieces. I used the mill to notch the cross bars to make them all the same length. The other miters were just done with a rat tail...
haven’t started building yet but I decided to go 3/8 .028 cromoly to give myself the most options. Right now I’m planning to braze with gasflux C-04 but i spose i could switch to the tig welder if i feel like the brazing is going poorly (might try tig brazing too just for fun?). Price was ~$33 a six foot stick which i think is enough for a rack.
i also drew up some rack tabs similar to the ones framebuildersupply sells and sent them off for laser cutting - used sendcutsend and was actually cheaper than pre-mades from framebuildersupply, great service so far, and could get them in cromoly instead of cold rolled (I’m sure that doesn’t really matter)
Last edited by lukerh; 06-07-25 at 08:57 PM.
06-07-25 | 09:10 PM
#15
Newbie
Joined: Sep 2021
Posts: 35
Likes: 48
From: San Diego, CA
Bikes: Rocky Mountain Instinct, DVR SS MTB
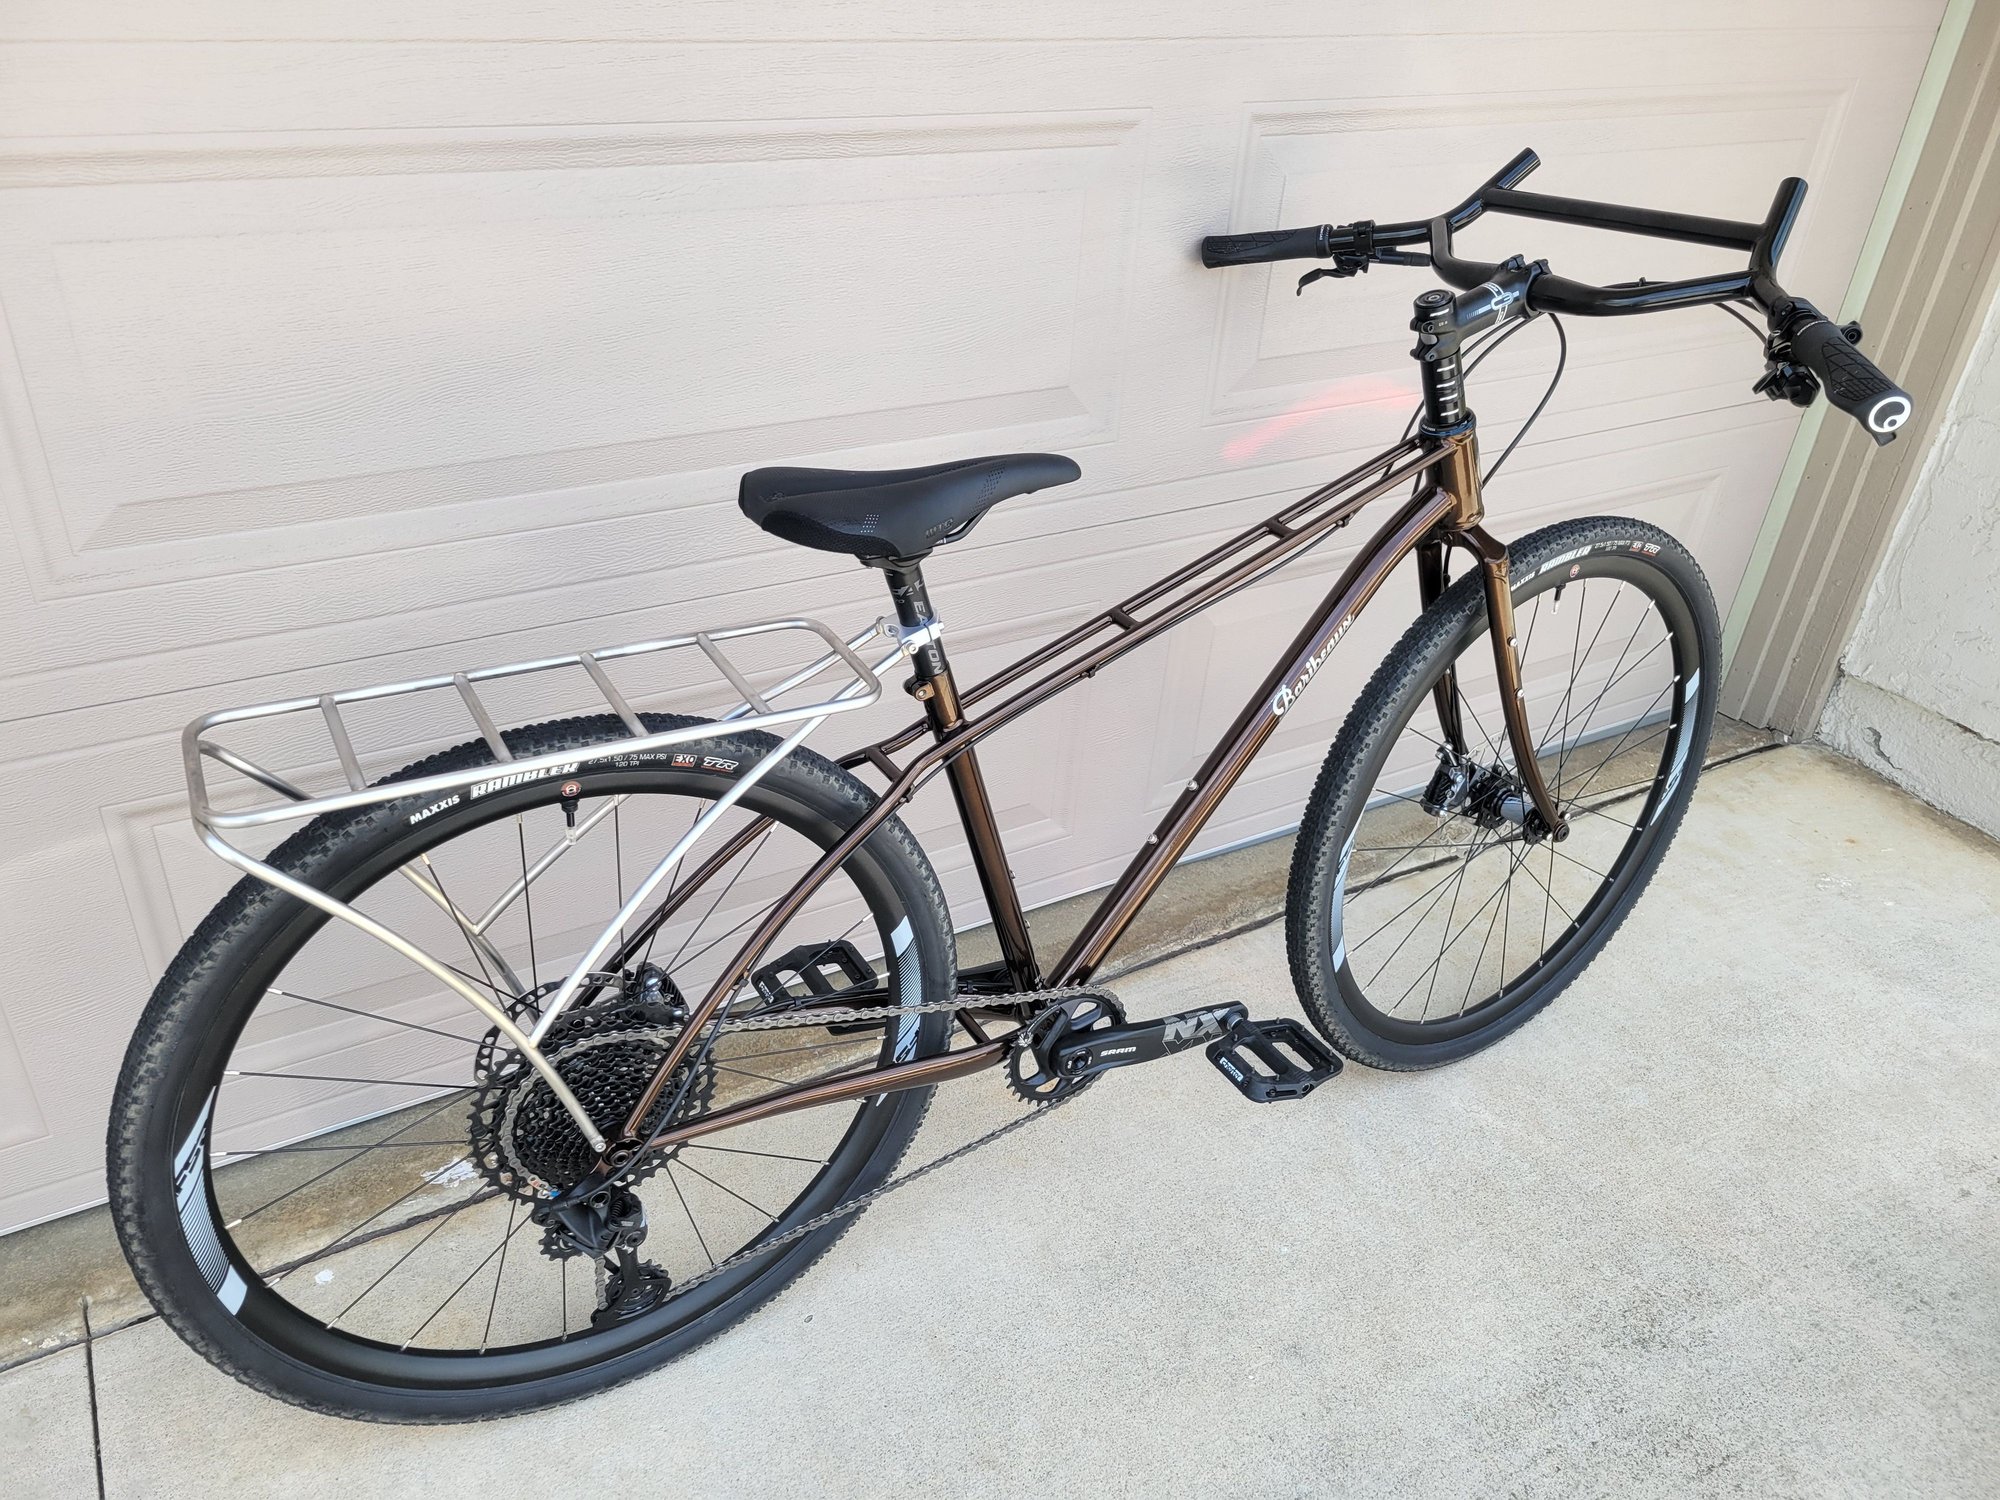
Gorgeous!! How did you make the big-radius bends on the supports? Did you bend it around something or just bend it by hand till they look good?
haven’t started building yet but I decided to go 3/8 .028 cromoly to give myself the most options. Right now I’m planning to braze with gasflux C-04 but i spose i could switch to the tig welder if i feel like the brazing is going poorly (might try tig brazing too just for fun?). Price was ~$33 a six foot stick which i think is enough for a rack.
i also drew up some rack tabs similar to the ones framebuildersupply sells and sent them off for laser cutting - used sendcutsend and was actually cheaper than pre-mades from framebuildersupply, great service so far, and could get them in cromoly instead of cold rolled (I’m sure that doesn’t really matter)
haven’t started building yet but I decided to go 3/8 .028 cromoly to give myself the most options. Right now I’m planning to braze with gasflux C-04 but i spose i could switch to the tig welder if i feel like the brazing is going poorly (might try tig brazing too just for fun?). Price was ~$33 a six foot stick which i think is enough for a rack.
i also drew up some rack tabs similar to the ones framebuildersupply sells and sent them off for laser cutting - used sendcutsend and was actually cheaper than pre-mades from framebuildersupply, great service so far, and could get them in cromoly instead of cold rolled (I’m sure that doesn’t really matter)
 06-08-25 | 03:45 PM
#17
Senior Member
Joined: Apr 2009
Posts: 3,787
Likes: 5,636
From: Seattle
There's been speculation that Fillet Pro was just another ~38% silver, available from several makers. Certainly you can make nice fillets with any 38% filler, whether it's identical to Fillet Pro or not.
Changing the subject, I like howDevin Rickey attached the rack to the seatpost, a trick I used on my wife's grocery-getter about 15 years ago.
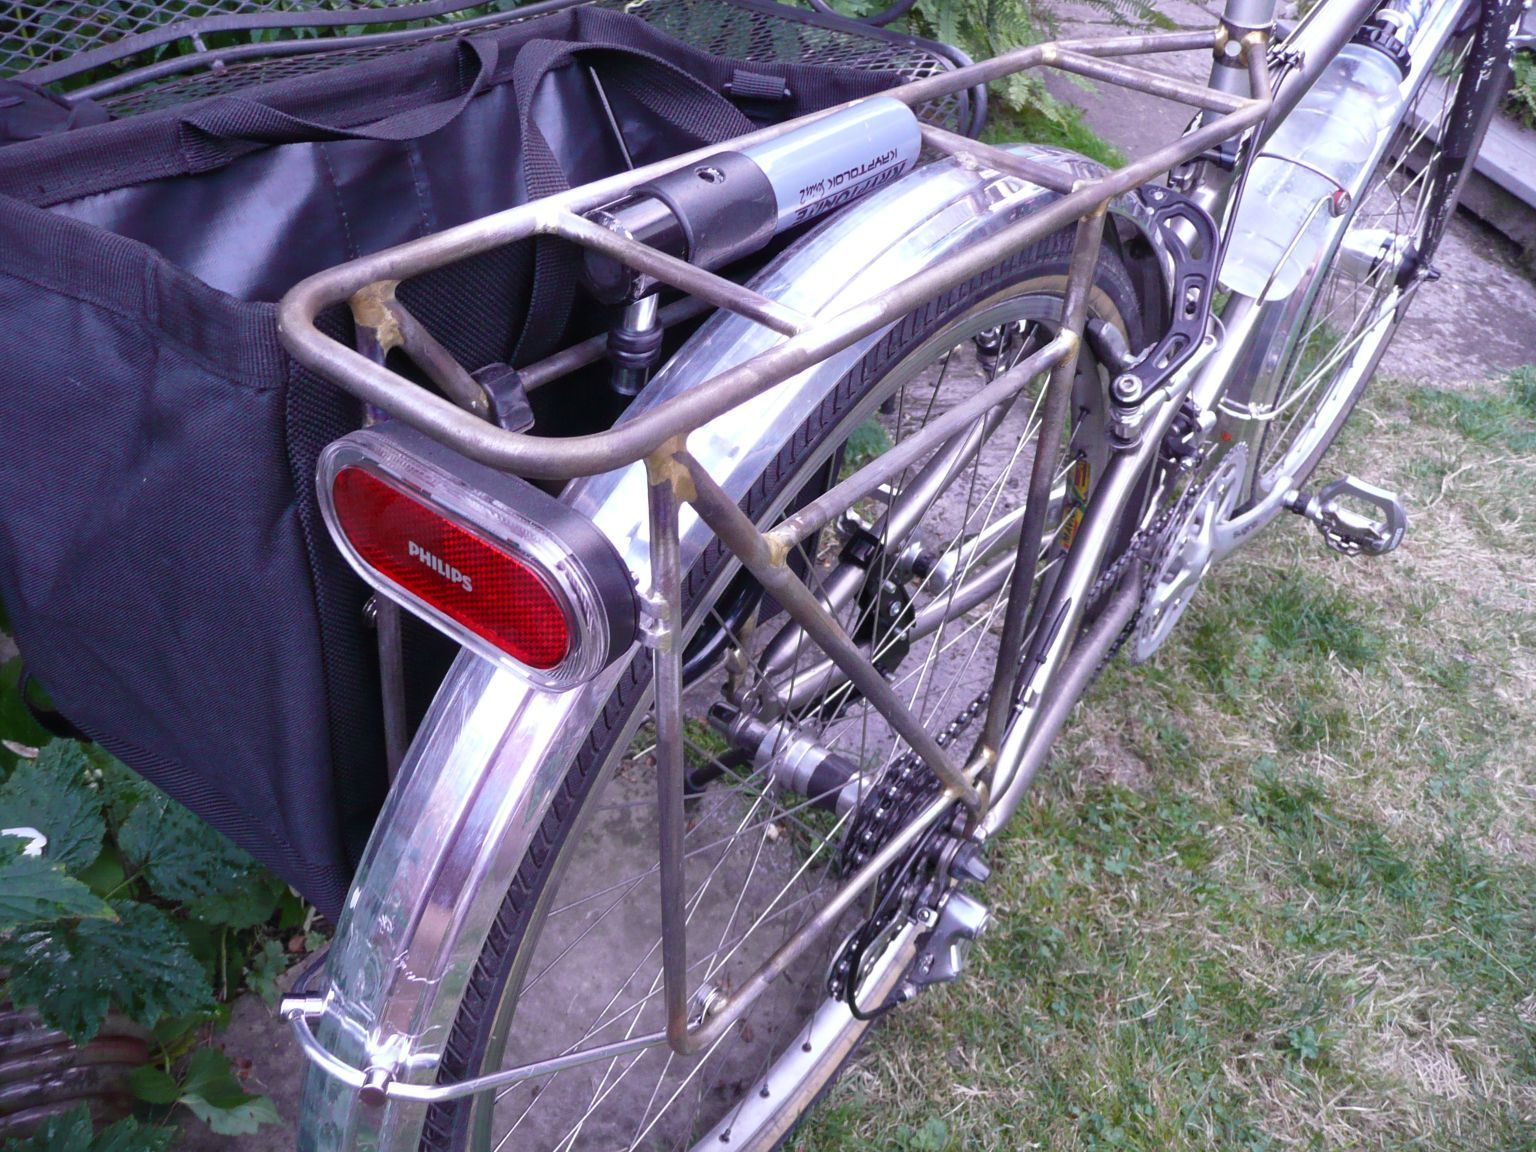
That one's Cr-Mo of course as you can tell from the rust. I never did get around to painting it, so it's even rustier now. Not pretty, but it is functional.
Having to loosen two seatpost clamps to adjust the seat height is a slight disadvantage, but maybe makes it less likely that the seat/post will get stolen outside the grocery store?
Changing the subject, I like howDevin Rickey attached the rack to the seatpost, a trick I used on my wife's grocery-getter about 15 years ago.
That one's Cr-Mo of course as you can tell from the rust. I never did get around to painting it, so it's even rustier now. Not pretty, but it is functional.
Having to loosen two seatpost clamps to adjust the seat height is a slight disadvantage, but maybe makes it less likely that the seat/post will get stolen outside the grocery store?
06-08-25 | 07:57 PM
#18
Newbie
Joined: Sep 2021
Posts: 35
Likes: 48
From: San Diego, CA
Bikes: Rocky Mountain Instinct, DVR SS MTB
I have been reading up a bit on what comes next with Cycle Designs no longer being around... I really liked Wade! It is too bad we are losing that resource. I will probably try some of the Gas Flux 38 that Firsthand is selling. I suspect they stock that as a replacement for Fillet Pro.
Last edited by Devin Rickey; 06-09-25 at 08:26 PM.
06-17-25 | 03:41 PM
#19
Thread Starter
Newbie
Joined: May 2025
Posts: 61
Likes: 32
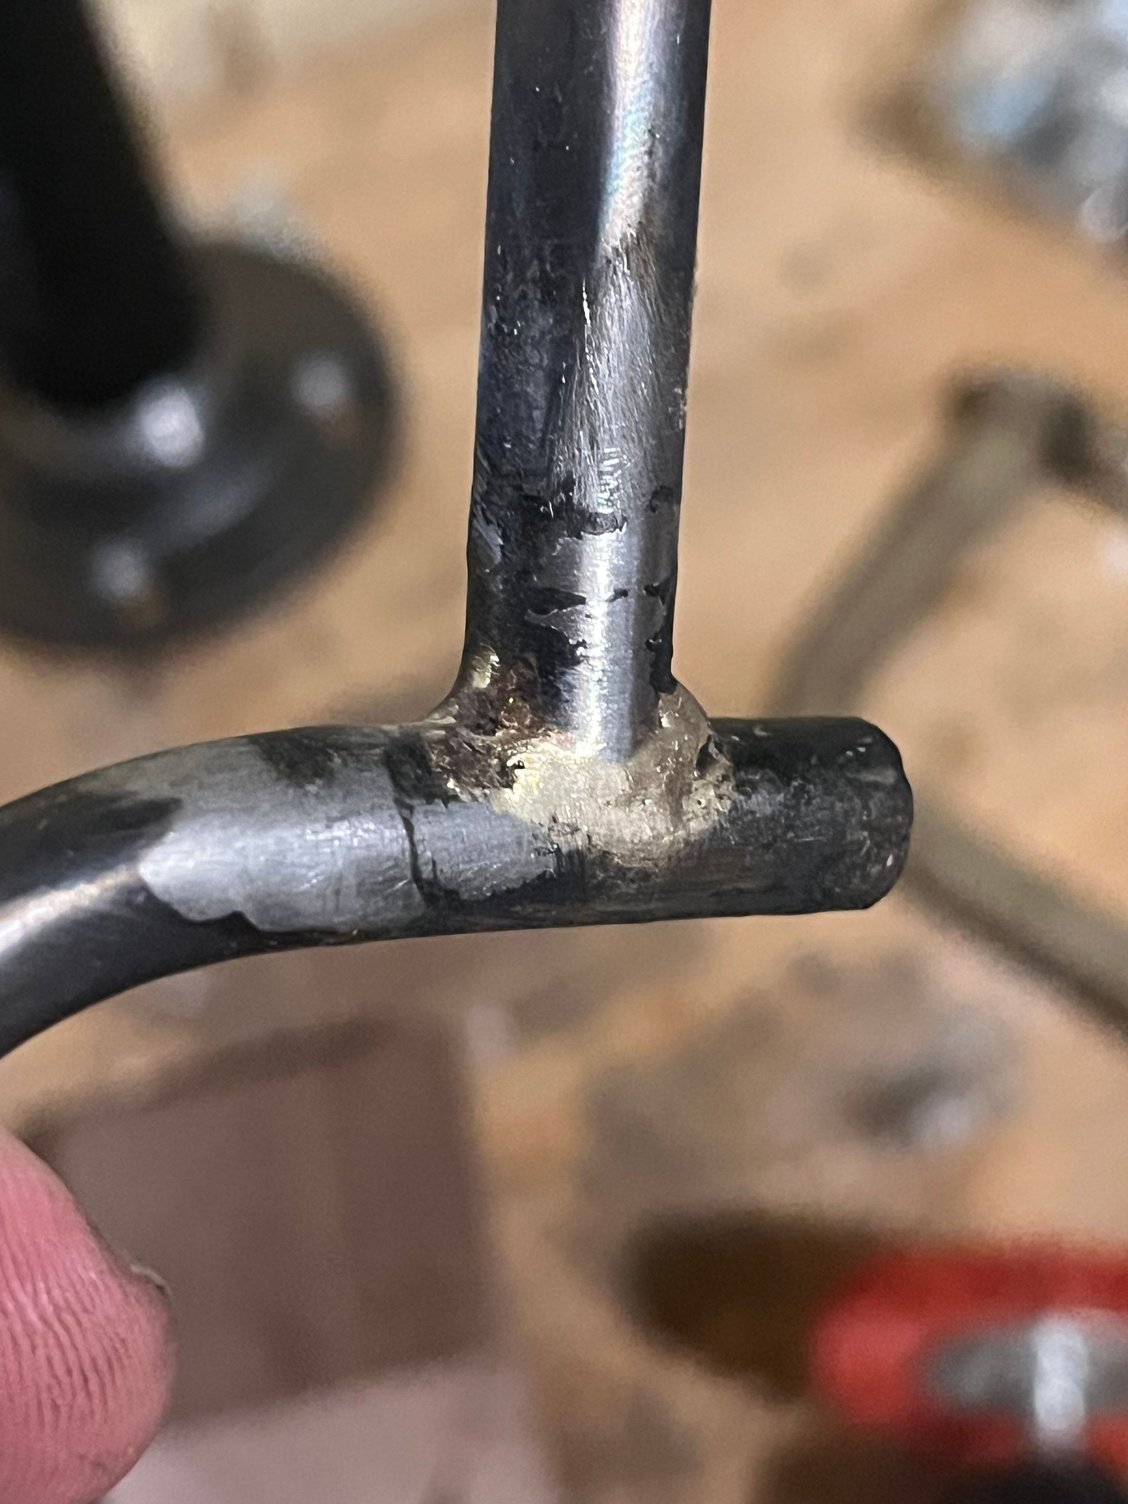
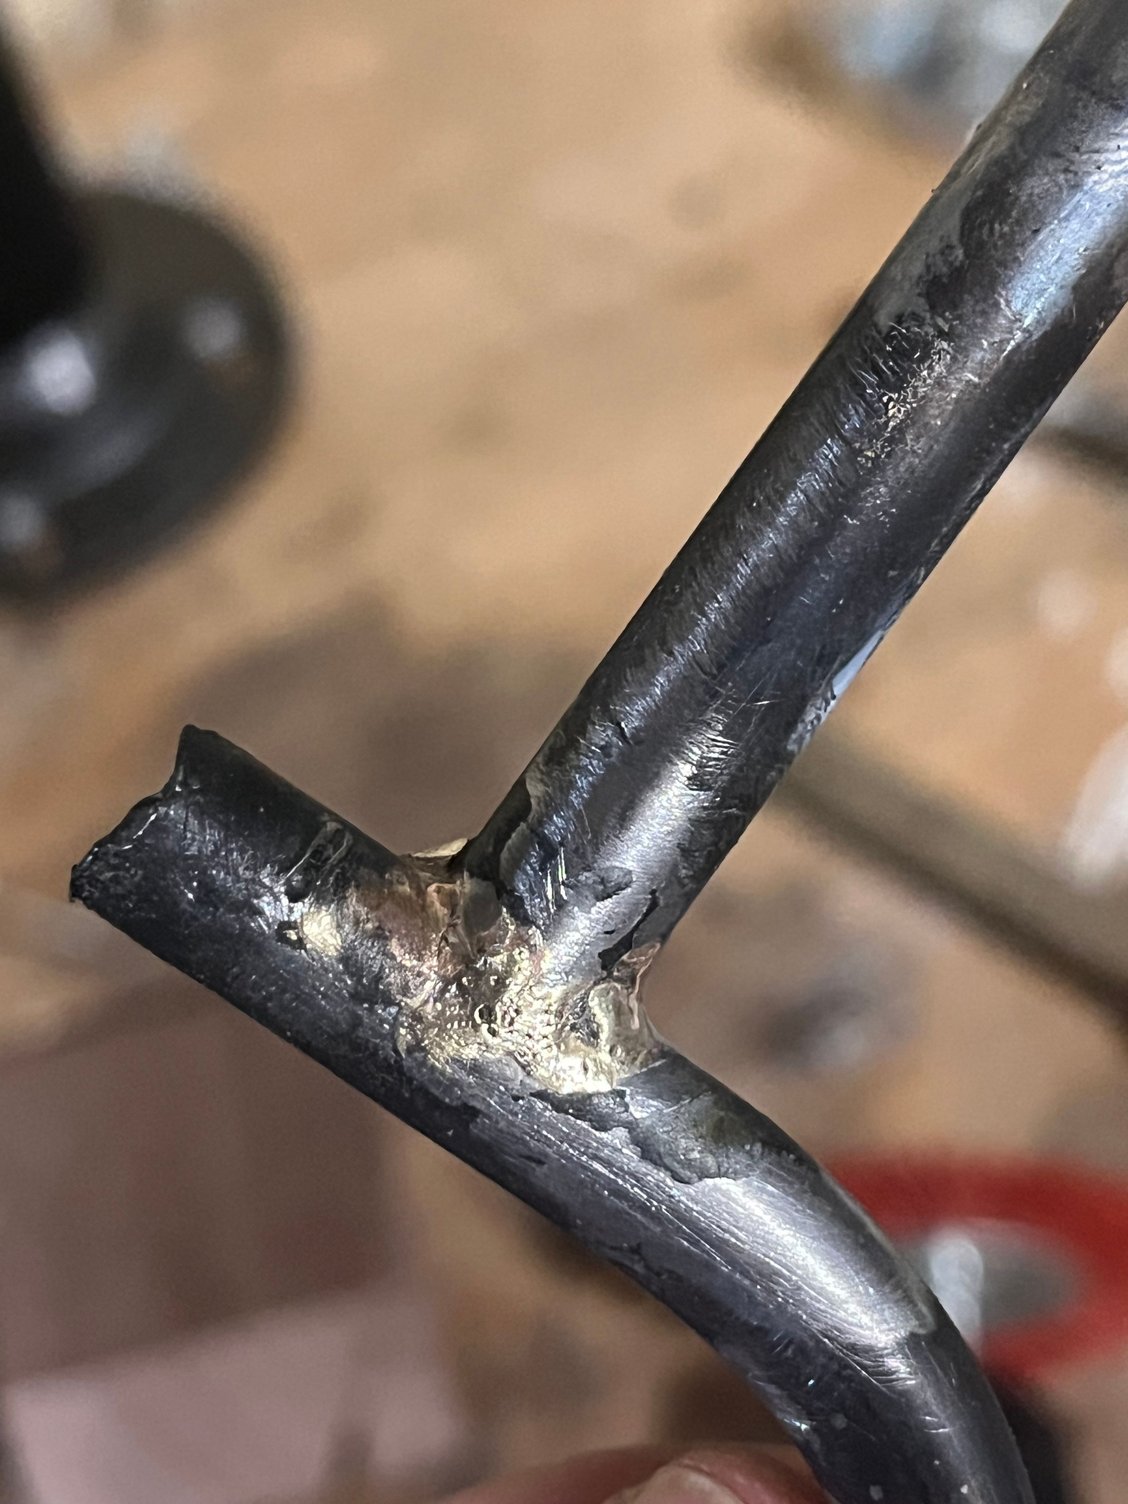
finally got my stuff together, set up the torch again, did a test braze. I think I maybe overheated it a little keeping the torch on it to build up the fillet - but overall seems pretty good. There’s some porosity on one side, not sure if that’s from overheat or not enough flux
06-17-25 | 05:22 PM
#20

Senior Member

Joined: Feb 2012
Posts: 19,373
Likes: 5,515
From: Rochester, NY
Bikes: Stewart S&S coupled sport tourer, Stewart Sunday light, Stewart Commuting, Stewart Touring, Co Motion Tandem, Stewart 3-Spd, Stewart Track, Fuji Finest, Mongoose Tomac ATB, GT Bravado ATB, JCP Folder, Stewart 650B ATB
I use a torch too little to be fluent with it right off when I do light it up. I'll often have a small something that I want to join before i go and braze the real project, as a warm up of sorts.
No expert here but the first side looks to be well wetted out, albeit with a lumpy fillet. The second side looks like it was too cool as there's inconsistent wetting out yet the porosity and what I think is signs of zinc boiling off suggests too hot. The blackened flux supports the too much heat too.
When I build up a fillet I am working the temp very close to the melt/solidify range and find I have to flick the flame on and off fairly quickly once the flux has gone glossy to maintain this heat range. Developing this technique is pretty important IMO, not that I am very good at it Andy
Andy
No expert here but the first side looks to be well wetted out, albeit with a lumpy fillet. The second side looks like it was too cool as there's inconsistent wetting out yet the porosity and what I think is signs of zinc boiling off suggests too hot. The blackened flux supports the too much heat too.
When I build up a fillet I am working the temp very close to the melt/solidify range and find I have to flick the flame on and off fairly quickly once the flux has gone glossy to maintain this heat range. Developing this technique is pretty important IMO, not that I am very good at it
Andy
__________________
AndrewRStewart
AndrewRStewart
06-17-25 | 08:01 PM
#21
Thread Starter
Newbie
Joined: May 2025
Posts: 61
Likes: 32
Ahh thank you those are excellent tips, makes sense the black junk is burned flux. Speaking of tips i also used the big one (it’s a #7 for a gentec jewelers torch if that tells you anything) but i think it generally had way more heat than i needed so I’ll probably switch to my smaller one which i assume will still have more than enough.
also i was just brazing this sitting on a firebrick because i didn’t want to make a fixture. So the heating was not at all even or smooth.
I assume i should be paying close attention also to the color of the steel? Seems like something in the dark red/cherry red range? Definitely went orange sometimes.
also i was just brazing this sitting on a firebrick because i didn’t want to make a fixture. So the heating was not at all even or smooth.
I assume i should be paying close attention also to the color of the steel? Seems like something in the dark red/cherry red range? Definitely went orange sometimes.
06-17-25 | 08:47 PM
#22
Senior Member
Joined: Feb 2012
Posts: 19,373
Likes: 5,515
From: Rochester, NY
Bikes: Stewart S&S coupled sport tourer, Stewart Sunday light, Stewart Commuting, Stewart Touring, Co Motion Tandem, Stewart 3-Spd, Stewart Track, Fuji Finest, Mongoose Tomac ATB, GT Bravado ATB, JCP Folder, Stewart 650B ATB
While I do pay attention to the steel's colors when heated the flux is sometimes the better indicator to temps, certainly as one approaches the brazing temp. Between eye glass tints and shop lighting the colors the steel emits can be hard to discern sometimes. When i brazed in really bright light or outside the brightness seemed to drown out the red colors. It was others on line that told me to watch the flux, a lesson I had already learned but needed to be reminded of.
When I set up the parts to braze together I'm pretty aware of how I want to move the torch and how that access will be. If I can't fixture the parts with good flame access I will sometimes do a small tack and reposition the work for the follow up completion. Andy
When I set up the parts to braze together I'm pretty aware of how I want to move the torch and how that access will be. If I can't fixture the parts with good flame access I will sometimes do a small tack and reposition the work for the follow up completion. Andy
__________________
AndrewRStewart
AndrewRStewart
06-17-25 | 10:10 PM
#23
Senior Member
Joined: Apr 2009
Posts: 3,787
Likes: 5,636
From: Seattle
When one tube is mitered (aka notched or coped) to another, there's no single angle you can fillet-braze the whole joint at without moving it. It's not like sweating a copper plumbing pipe. You need to be able to use gravity to help rather than fight you.
That can be done in as few as two orientations if you have no choice, like flipping the part over once halfway through, but that's far from ideal. Ideally you want full freedom in three dimensions, to where each dab of filler is applied with the angle "just right", moving it frequently in small increments. How to actually do all this angle manipulation is a bit of an artform, hard to explain but like second nature after you've done it enough. Beginners should do a dry-run with the torch off, to confirm for themselves that they are able to easily get the joint to "just right" all the way around, with a minimum of faffing about (and letting the joint cool in the meantime).
For most FBs, that's done in a Park stand or equivalent, with a tube 1" or larger clamped in the jaws, jaws set loosely enough that you can rotate the part within the jaws by pushing on it, but tight enough to stay where you push it. Then the arm with the clamp is also free to rotate, on an axis at right angles to the first.
When the tubes are small, as with a rack, the thing that you clamp in the Park stand could be the fork steerer, if you're building a front rack, or maybe the toptube if it's a rear rack. When It's something that doesn't attach to a fork or frame, I'd still try to find some way of jigging it to a tube that can be clamped in a Park stand. That can be an ad-hoc thrown-together mess of steel wire, spring clamps, toe straps, bubble gum and duct tape, just make sure the tube clamped in the stand is long enough to use it as a lever for rotating the stand.
Do you know Paul Brodie's Youtube channel? He has lots of videos that show fillet brazing. I just went on his channel homepage and searched on "fillet", lots of hits, here are two that look good:
If a picture is worth a thousand words, then a video is like 30,000 words a second. He talks pretty slow sometimes, but I don't know of any better resource short of going to Niles Michigan for a Doug Fattic course.
That can be done in as few as two orientations if you have no choice, like flipping the part over once halfway through, but that's far from ideal. Ideally you want full freedom in three dimensions, to where each dab of filler is applied with the angle "just right", moving it frequently in small increments. How to actually do all this angle manipulation is a bit of an artform, hard to explain but like second nature after you've done it enough. Beginners should do a dry-run with the torch off, to confirm for themselves that they are able to easily get the joint to "just right" all the way around, with a minimum of faffing about (and letting the joint cool in the meantime).
For most FBs, that's done in a Park stand or equivalent, with a tube 1" or larger clamped in the jaws, jaws set loosely enough that you can rotate the part within the jaws by pushing on it, but tight enough to stay where you push it. Then the arm with the clamp is also free to rotate, on an axis at right angles to the first.
When the tubes are small, as with a rack, the thing that you clamp in the Park stand could be the fork steerer, if you're building a front rack, or maybe the toptube if it's a rear rack. When It's something that doesn't attach to a fork or frame, I'd still try to find some way of jigging it to a tube that can be clamped in a Park stand. That can be an ad-hoc thrown-together mess of steel wire, spring clamps, toe straps, bubble gum and duct tape, just make sure the tube clamped in the stand is long enough to use it as a lever for rotating the stand.
Do you know Paul Brodie's Youtube channel? He has lots of videos that show fillet brazing. I just went on his channel homepage and searched on "fillet", lots of hits, here are two that look good:
If a picture is worth a thousand words, then a video is like 30,000 words a second. He talks pretty slow sometimes, but I don't know of any better resource short of going to Niles Michigan for a Doug Fattic course.
06-18-25 | 05:21 AM
#24
Senior Member
Joined: Dec 2011
Posts: 2,921
Likes: 253
From: NE Ohio
Bikes: 1992 Serotta Colorado II,Co-Motion Speedster, Giant Escape Hybrid, 1977 Schwinn Super Le Tour
Yep, Doug is a fantastic teacher!
Take his course if you can. His instruction and manual are great. Just rode frame #3 yesterday for it's maiden voyage!
Take his course if you can. His instruction and manual are great. Just rode frame #3 yesterday for it's maiden voyage!