


brazing fixture for brake pivot braze-ons
 10-04-25 | 05:53 AM
#1

Thread Starter
Senior Member


Joined: Apr 2009
Posts: 3,795
Likes: 5,658
From: Seattle
brazing fixture for brake pivot braze-ons
A modest contribution — probably everyone here has made one, and this one is not better. I just took the pic, so I'm going to share it. I'm an ex-framebuilder, hardly have anything new to show here! Constructive criticism welcome.
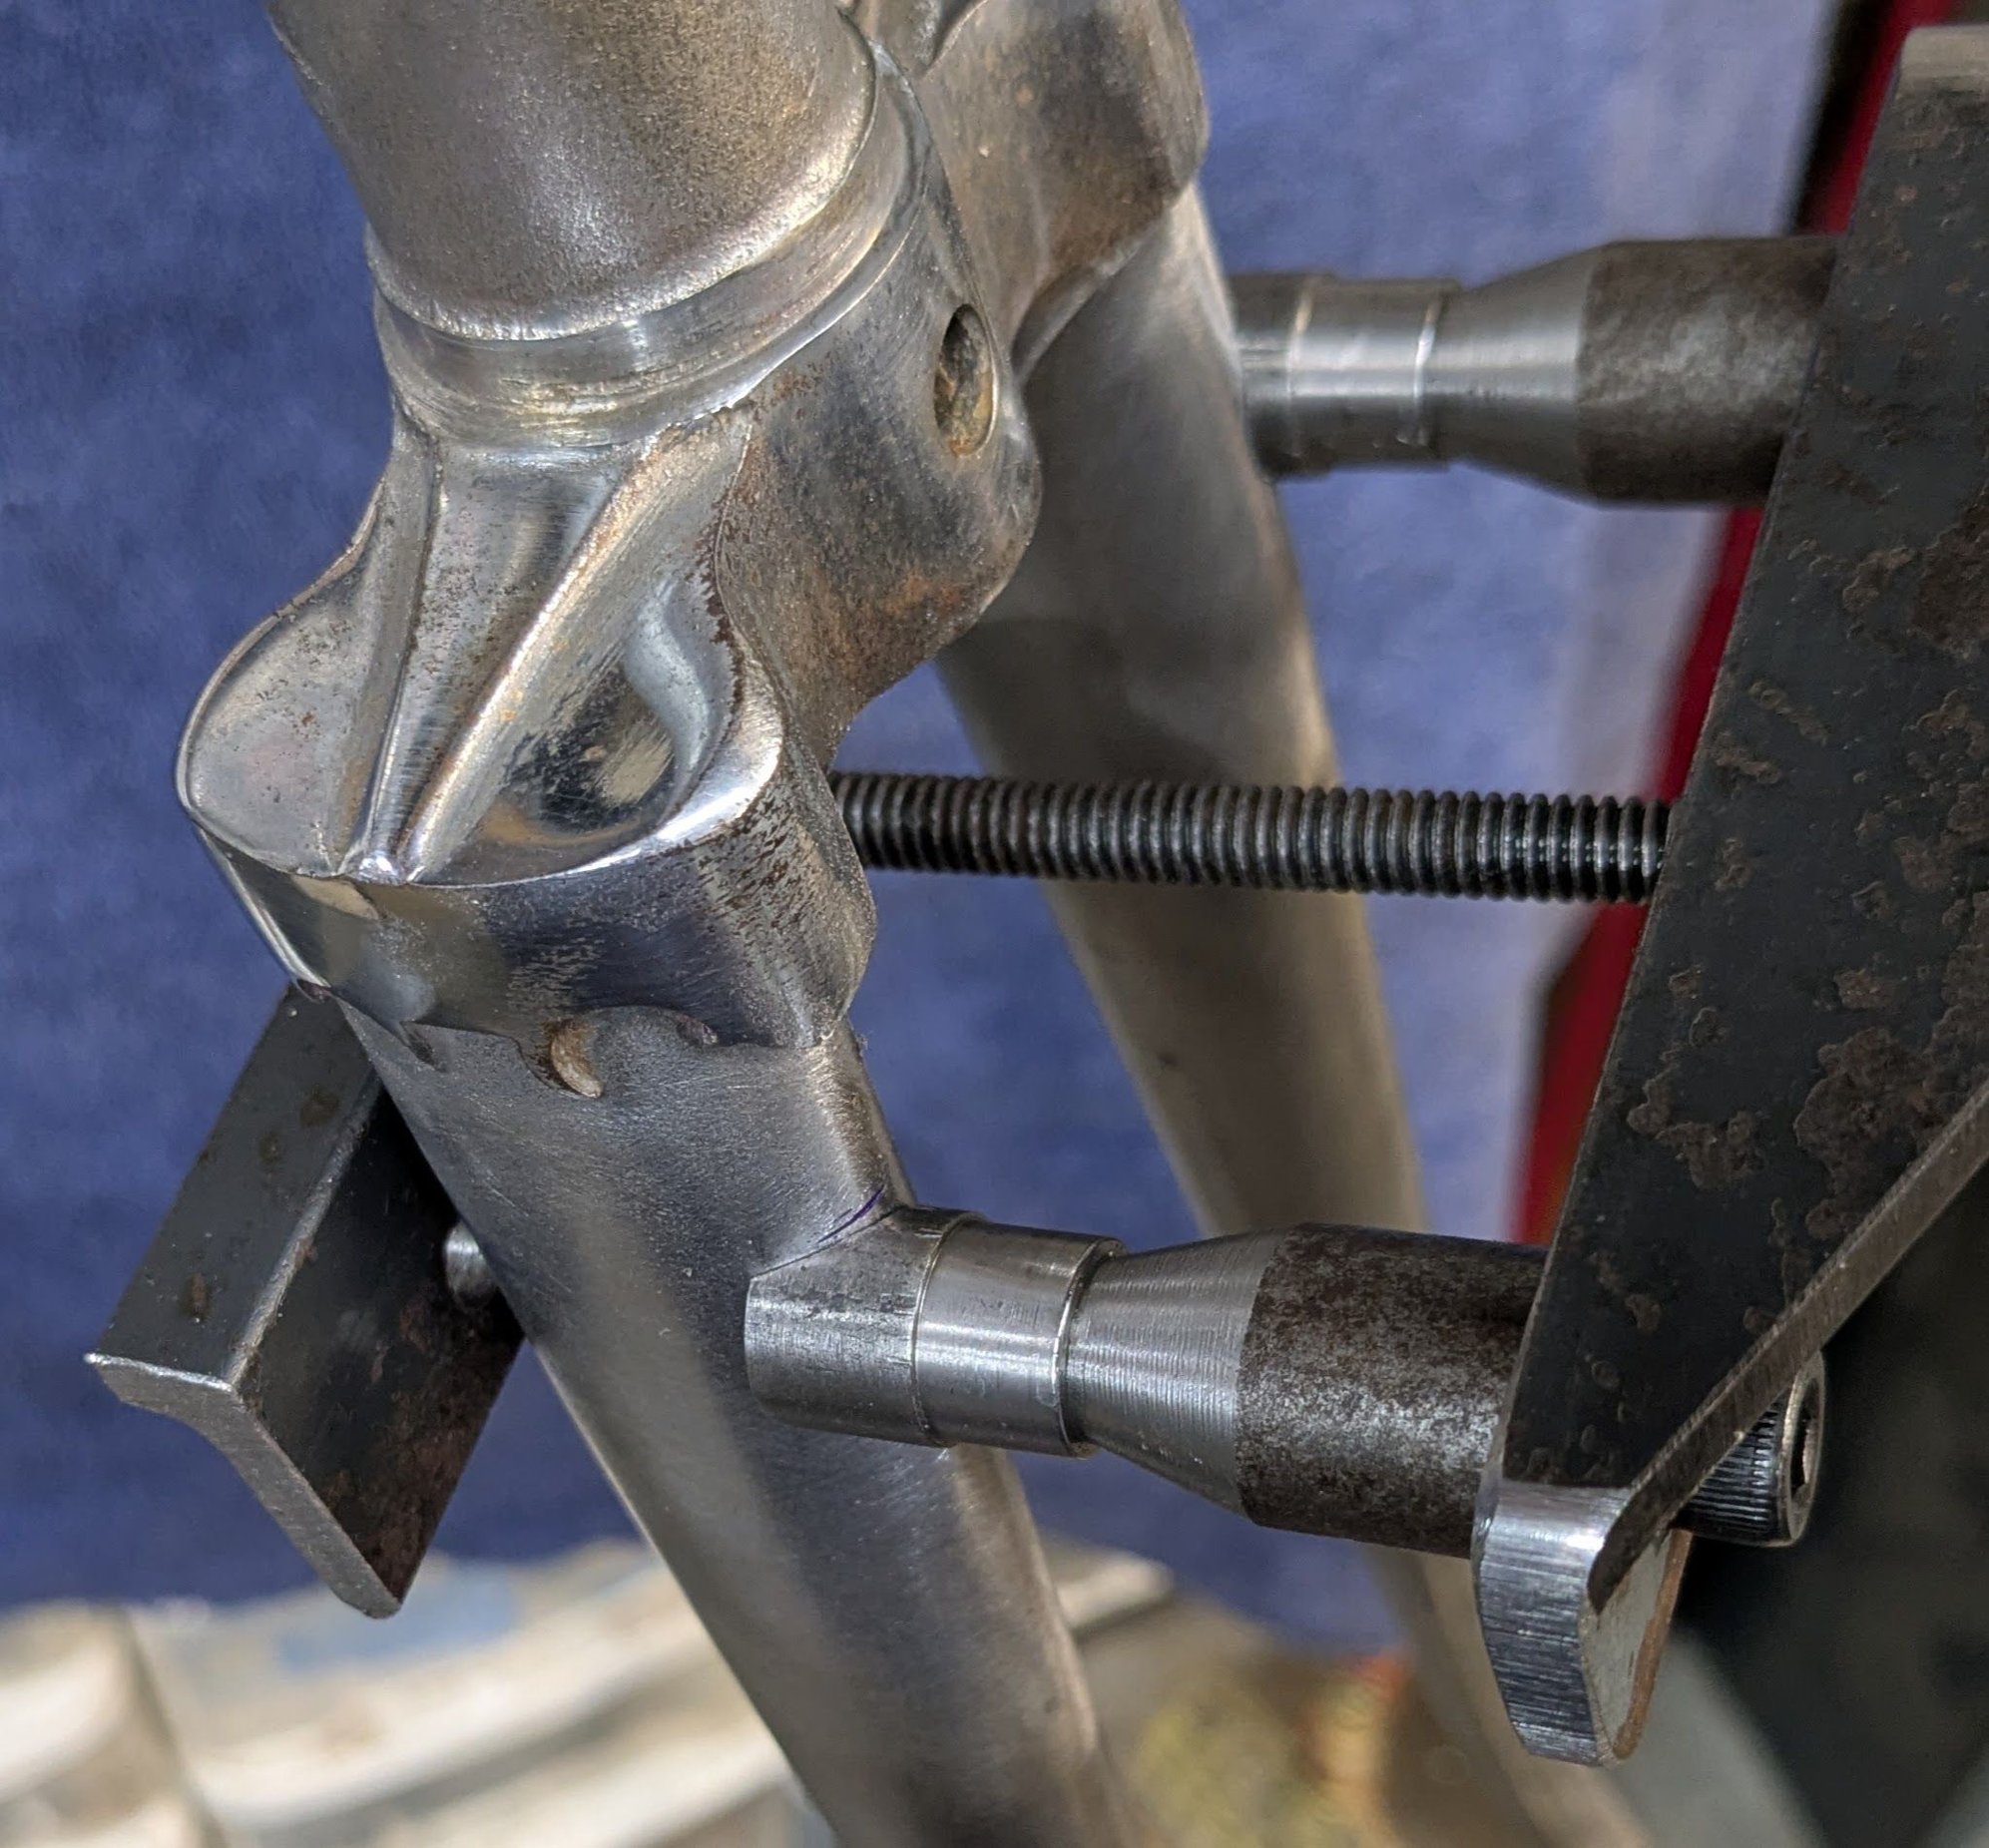
The things with a cone turned on them are spacers to put the angle-iron thing further away, mostly for being able to see what you're doing. They're a close fit on the bearing surfaces of the pivots, where the brakes will go, which are hidden up inside the spacers. The spacers are wider where they hit the angle-iron, to ensure they're very square to the angle-iron and thus parallel to each other. The taper is optional, just there so they don't get in the way of the flame or my ability to see what I'm doing while brazing. The ID of the spacers is bored to 8.0 mm to ensure the brake pivots are very parallel to each other.
On canti brakes, extreme parallelness isn't so important, but with centerpulls it gets more important, to ensure the front and rear arms don't rub against each other. Because centerpull pivots are finicky, I like to tack, then confirm by mounting the actual brakes, before final brazing.
This fork is getting Mafac RAID brakes, which have a wide (75 mm) spacing between the pivots. That's why the bosses aren't centered on the blades. The offset outward means I'll have to fill the gap on the outside of each boss, not a problem for anyone who has brazed tab-style dropouts. Maybe I'll file a fish-mouth shape there like it's an Alex Singer... nah, this bike isn't worth it. This is not a custom frame that'll have my name on it, just a retrofit on a '50s Frenchie, so I won't worry about making it look perfect. Just strong.
The whole enchilada:

I could have used a plain hex nut or bolt head to clamp the thing on. That would require picking up a wrench to install or remove, and the minuscule amount that would slow me down will never justify the extra time I took to make the T-handle. Low return-on-investment! I'm just in the habit of making tools quicker to use, from back when I did lots of these. I might make little T-handles for the two screws that attach the pivots to the angle-iron too, but that's probably a step too far, even for me. At some point you have to just shut up and braze the damn pivots on.
Of course a real production fixture would index off the dropouts, so you don't have to measure the height. But that's definitely not going to happen, since every bike I'll use this on will be a one-off. No batches of identical frames, ever.
The things with a cone turned on them are spacers to put the angle-iron thing further away, mostly for being able to see what you're doing. They're a close fit on the bearing surfaces of the pivots, where the brakes will go, which are hidden up inside the spacers. The spacers are wider where they hit the angle-iron, to ensure they're very square to the angle-iron and thus parallel to each other. The taper is optional, just there so they don't get in the way of the flame or my ability to see what I'm doing while brazing. The ID of the spacers is bored to 8.0 mm to ensure the brake pivots are very parallel to each other.
On canti brakes, extreme parallelness isn't so important, but with centerpulls it gets more important, to ensure the front and rear arms don't rub against each other. Because centerpull pivots are finicky, I like to tack, then confirm by mounting the actual brakes, before final brazing.
This fork is getting Mafac RAID brakes, which have a wide (75 mm) spacing between the pivots. That's why the bosses aren't centered on the blades. The offset outward means I'll have to fill the gap on the outside of each boss, not a problem for anyone who has brazed tab-style dropouts. Maybe I'll file a fish-mouth shape there like it's an Alex Singer... nah, this bike isn't worth it. This is not a custom frame that'll have my name on it, just a retrofit on a '50s Frenchie, so I won't worry about making it look perfect. Just strong.
The whole enchilada:
I could have used a plain hex nut or bolt head to clamp the thing on. That would require picking up a wrench to install or remove, and the minuscule amount that would slow me down will never justify the extra time I took to make the T-handle. Low return-on-investment! I'm just in the habit of making tools quicker to use, from back when I did lots of these. I might make little T-handles for the two screws that attach the pivots to the angle-iron too, but that's probably a step too far, even for me. At some point you have to just shut up and braze the damn pivots on.
Of course a real production fixture would index off the dropouts, so you don't have to measure the height. But that's definitely not going to happen, since every bike I'll use this on will be a one-off. No batches of identical frames, ever.
 10-05-25 | 01:01 AM
#3
Senior Member

Joined: Dec 2019
Posts: 1,196
Likes: 394
Very nice! I just use a bit of flat bar with two holes drilled in it 80mm apart and then bolt the posts into that. Then sit that on top of the fork with a "third hand" tool (a heavy lump of metal with a couple of legs at the back and a sort of beak at the front), and then TIG tack it.
10-05-25 | 05:42 AM
#4
Thread Starter
Senior Member
Joined: Apr 2009
Posts: 3,795
Likes: 5,658
From: Seattle
Very nice! I just use a bit of flat bar with two holes drilled in it 80mm apart and then bolt the posts into that. Then sit that on top of the fork with a "third hand" tool (a heavy lump of metal with a couple of legs at the back and a sort of beak at the front), and then TIG tack it.
Yours is a common way to hold canti / V posts for brazing, and I've done a ton that way myself. But I usually see more slop in the angle with that setup, more chance for the pivot axes to get out of parallel. Good enough for canti-V but problematic for centerpull. You're indexing off the inside thread in the boss, plus that thin outer edge of the post between the M6 thread and the 8 mm OD, only 1 mm wide. Threads are not great for precisely locating a part. So for a centerpull that needs them to be very parallel, I wanted a bigger surface of the post to be held rigidly parallel, indexing off the whole journal (bearing surface) of the post.
I realize I'm chasing the last little bit, and maybe no brake cares if they're that straight. To be honest it's been a long time since I've done this and I don't remember exactly how picky the brakes are. I just remember some builders or garage hobbyists have tried and failed with centerpulls, the symptom being the two arms rub against each other. I wanted to rule that out as best I can.
10-05-25 | 12:25 PM
#5
Senior Member
Joined: Dec 2019
Posts: 1,196
Likes: 394
Yours is a common way to hold canti / V posts for brazing, and I've done a ton that way myself. But I usually see more slop in the angle with that setup, more chance for the pivot axes to get out of parallel. Good enough for canti-V but problematic for centerpull. You're indexing off the inside thread in the boss, plus that thin outer edge of the post between the M6 thread and the 8 mm OD, only 1 mm wide. Threads are not great for precisely locating a part. So for a centerpull that needs them to be very parallel, I wanted a bigger surface of the post to be held rigidly parallel, indexing off the whole journal (bearing surface) of the post.
I realize I'm chasing the last little bit, and maybe no brake cares if they're that straight. To be honest it's been a long time since I've done this and I don't remember exactly how picky the brakes are. I just remember some builders or garage hobbyists have tried and failed with centerpulls, the symptom being the two arms rub against each other. I wanted to rule that out as best I can.
I realize I'm chasing the last little bit, and maybe no brake cares if they're that straight. To be honest it's been a long time since I've done this and I don't remember exactly how picky the brakes are. I just remember some builders or garage hobbyists have tried and failed with centerpulls, the symptom being the two arms rub against each other. I wanted to rule that out as best I can.
 10-05-25 | 05:18 PM
#6
Senior Member

Joined: Feb 2012
Posts: 19,373
Likes: 5,516
From: Rochester, NY
Bikes: Stewart S&S coupled sport tourer, Stewart Sunday light, Stewart Commuting, Stewart Touring, Co Motion Tandem, Stewart 3-Spd, Stewart Track, Fuji Finest, Mongoose Tomac ATB, GT Bravado ATB, JCP Folder, Stewart 650B ATB
Some centerpull calipers had a tab on one arm that engaged a slot in the other arm. Often the tab was covered with a red plastic cap. With a bolt on caliper the pivots are "pretty" aligned WRT to each other and that tab fits in the slot well with no hinderance during use. If the pivots were, say during brazing on the pivots, misaligned WRT each other I can easily see that tab no longer fitting within the slot as intended and through the complete caliper's clamping range. Andy (who grew up liking Weinmann over Mafac...)
__________________
AndrewRStewart
AndrewRStewart
10-05-25 | 08:29 PM
#7
Thread Starter
Senior Member
Joined: Apr 2009
Posts: 3,795
Likes: 5,658
From: Seattle
Someone will correct me if there's evidence that were used on prazed pivots from the get-go.
I have to apologize for forgetting sometimes that this isn't the C&V forum. I'm pretty strictly vintage myself, but I know that's not normal... Everyone else wants through-axles and disc brakes, so any kind of centerpull (brazed or not) is far from the mainstream.
10-05-25 | 08:36 PM
#8

Senior Member
Joined: Aug 2010
Posts: 3,189
Likes: 62
From: The Thumb, MI
I mean weren't the French builders(Herse, Singer etc)using brazed on bosses for center pulls moons ago? I cant recall seeing them using standard bolt on centerpull Mafacs. I thought that's where Heine took the idea from and why he offers the mounts and his own centerpulls.
10-05-25 | 11:09 PM
#9
Thread Starter
Senior Member
Joined: Apr 2009
Posts: 3,795
Likes: 5,658
From: Seattle
I mean weren't the French builders(Herse, Singer etc)using brazed on bosses for center pulls moons ago? I cant recall seeing them using standard bolt on centerpull Mafacs. I thought that's where Heine took the idea from and why he offers the mounts and his own centerpulls.
For a boutique builder, the requirement for the braze-ons to be trčs parallel is more of a feature than a bug. The whole thing is a show-off move. Well, the brakes do work a little better on braze-ons, it's not pure puffery, but let's be honest, it's mostly for bragging rights, right? Look how much extra work I'm willing to do for a tiny improvement.
10-06-25 | 10:06 AM
#10
Senior Member
Joined: Aug 2012
Posts: 683
Likes: 283
From: Seattle
If I remember correctly from the Hirose videos, he used what appeared to be something like 1" hex bar with holes drilled at various spacing for his post fixtures. The shaft of the boss sat into the hole to provide the alignment you're seeking here. I remember seeing a dozen or so hanging from his wall. It's been several years since I have watched any of those videos so my memory might be fuzzy. I like the tapered spacer idea.
__________________
https://www.flickr.com/photos/54319503@N05/
https://www.draper-cycles.com
https://www.flickr.com/photos/54319503@N05/
https://www.draper-cycles.com
10-06-25 | 04:11 PM
#11
Thread Starter
Senior Member
Joined: Apr 2009
Posts: 3,795
Likes: 5,658
From: Seattle
If I remember correctly from the Hirose videos, he used what appeared to be something like 1" hex bar with holes drilled at various spacing for his post fixtures. The shaft of the boss sat into the hole to provide the alignment you're seeking here. I remember seeing a dozen or so hanging from his wall. It's been several years since I have watched any of those videos so my memory might be fuzzy. I like the tapered spacer idea.
I have one like that, clever design though I don't remember for sure who made it or how I got it. Maybe from Corrie Martin, who made my frame jig. If it's Corrie's then I got it for free, because he threw in some stuff after we'd agreed on a price for the jig.

Don't look at the dummy axle, I know it's in upside-down!
Looks like it was never used, and that's a good thing since the aluminum post holders would probably melt. (I tend to braze with a large flame. Git 'er done!) I guesss this could be used for tacking, then take it off to fully braze?
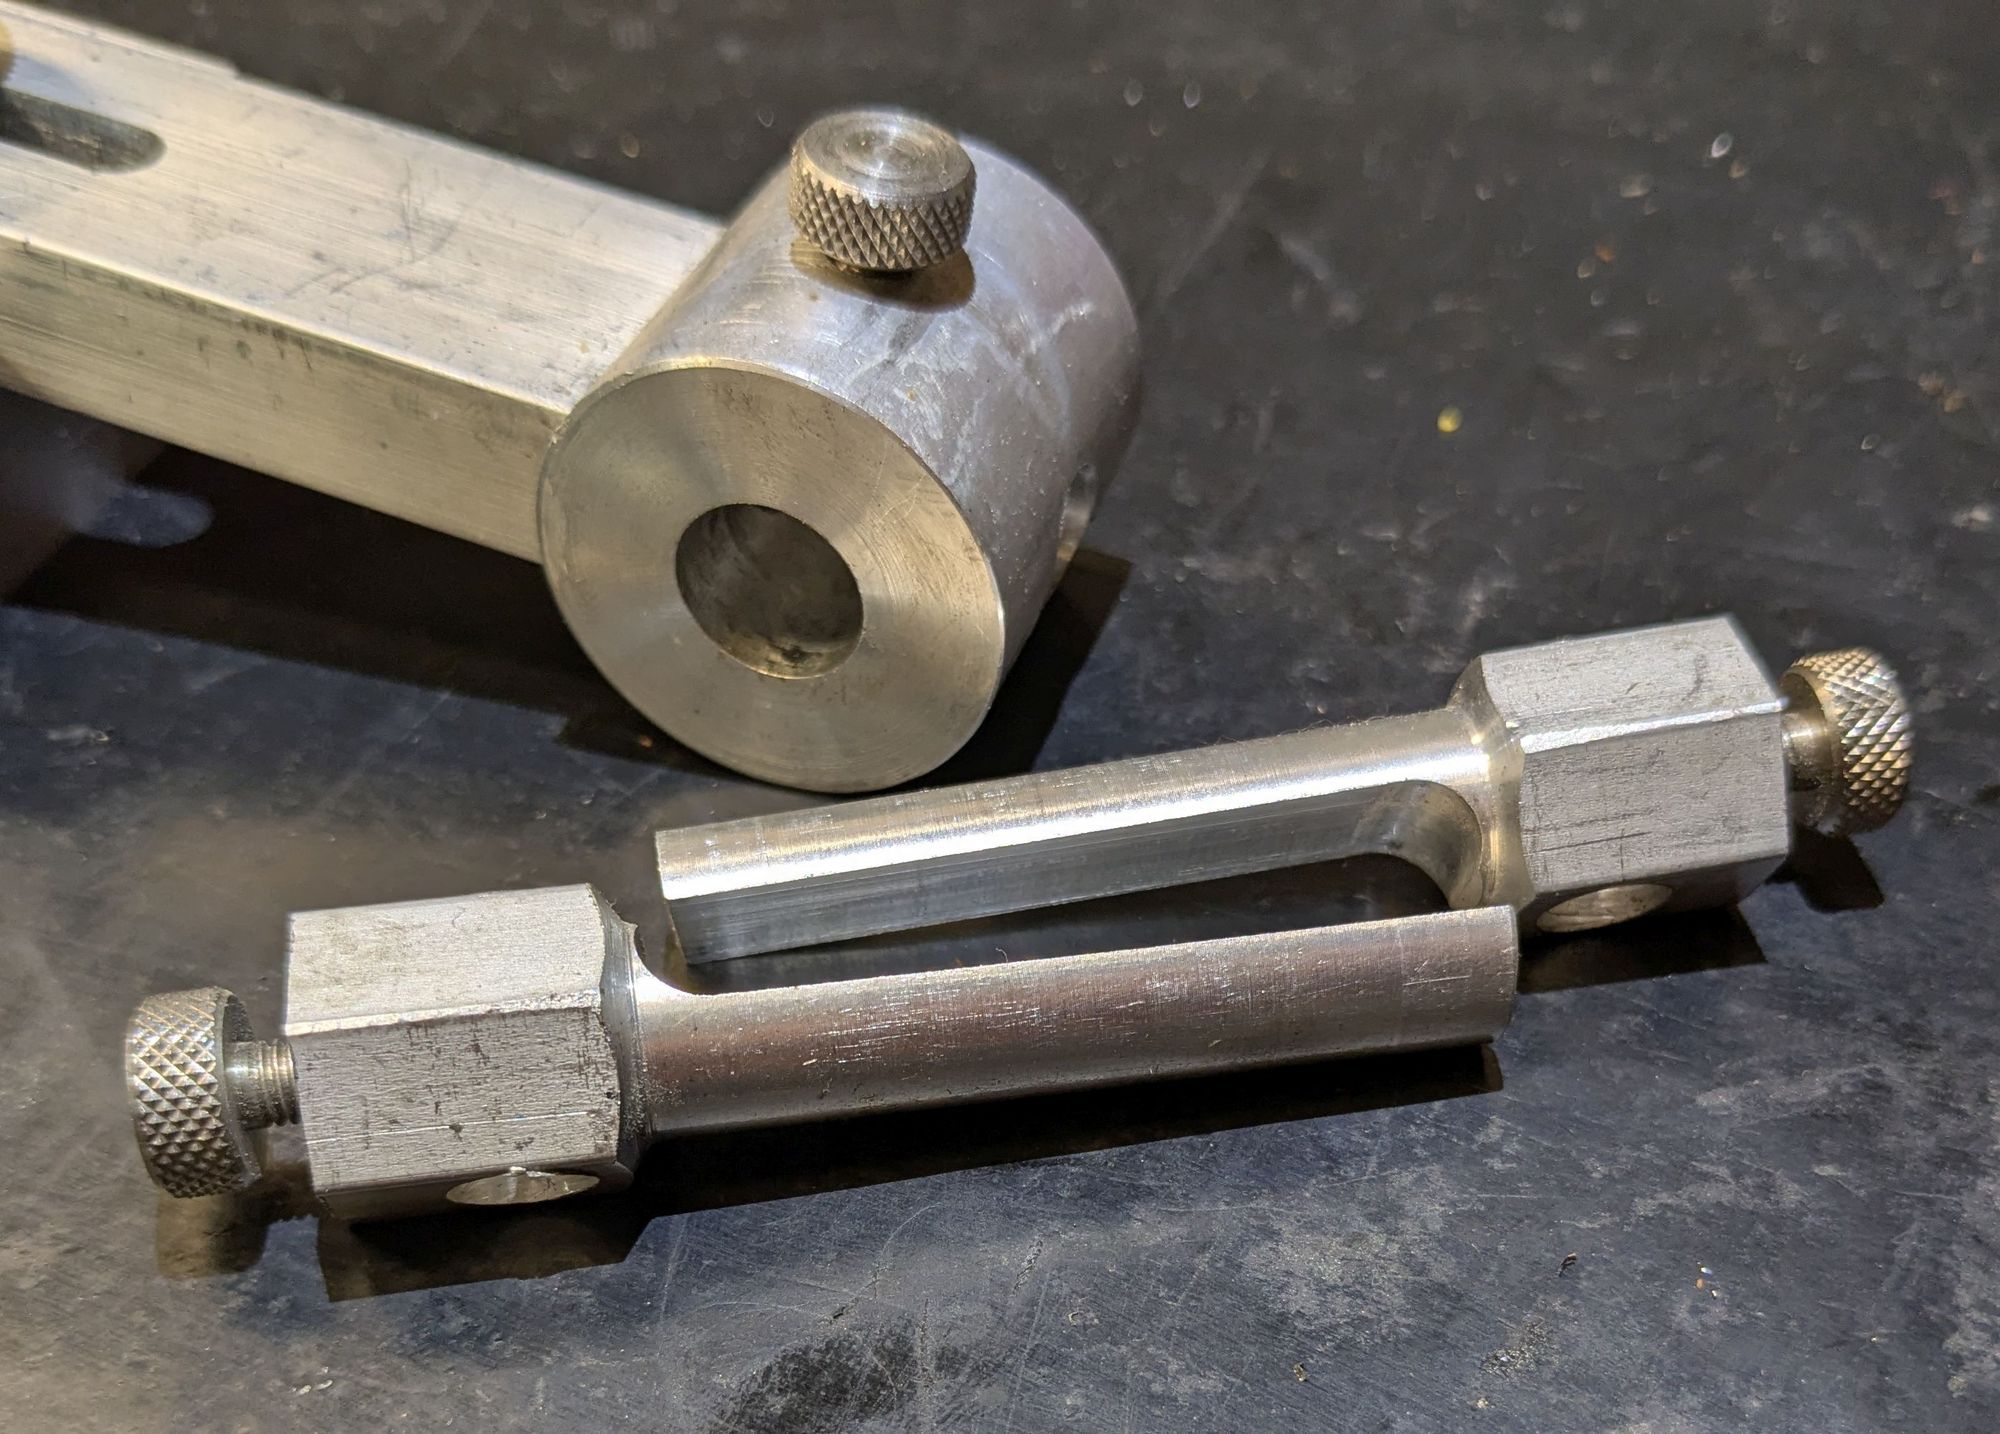
Check out the clever way it's infinitely-adjustable for width, fixed in place with a single thumb-screw. He probably knurled the screw heads himself too.
I could re-make those hex parts out of steel if I was worried about the Al melting, but that takes some precision machining to make them add together to make a cylindrical part where they go through the main body.
This pointer for the height is also cute, just a sharpened brass brazing rod. Little bit of parallax error if you don't look at it perpendicular, but that's nit-picking.
 10-07-25 | 02:42 AM
#12
Senior Member
Joined: Aug 2012
Posts: 683
Likes: 283
From: Seattle
I made one similar to this. I think Nova sold one that used this width adjustability trick (which I copied). I came across an Anvil FOG (or whatever they call it) and that's been good. I see what you're saying about the mass so close to the brazing area. Hirose used a strong flame and wasn't afraid of heat.
__________________
https://www.flickr.com/photos/54319503@N05/
https://www.draper-cycles.com
https://www.flickr.com/photos/54319503@N05/
https://www.draper-cycles.com
