


How to build a lugged steel frame, with pics
 05-05-08 | 09:37 PM
#151


Old & Getting Older Racer
Joined: Jan 2006
Posts: 5,343
Likes: 12
From: SoCal
Bikes: Bicycle Transportation: 2022 Hyundai Kona Electric, 2019 Kia Niro Plug-In Hybrid

In all of my years of cycling, this is the best documented building of a frame that I have ever seen. Great job!
I won't even say anything about your stem height -- oops!
 Just kidding!
I hope to see this bike in person.

__________________
Thanks.
Cleave
"Real men still wear pink."
Visit my blog at https://cleavesblant.wordpress.com/
Lightning Velo Cycling Club: https://www.lightningvelo.org/
Learn about our Green Dream Home at https://www.lawville.org/
Thanks.
Cleave
"Real men still wear pink."
Visit my blog at https://cleavesblant.wordpress.com/
Lightning Velo Cycling Club: https://www.lightningvelo.org/
Learn about our Green Dream Home at https://www.lawville.org/

 05-06-08 | 10:11 AM
#154

Thread Starter
Senior Member


Joined: Jul 2005
Posts: 1,671
Likes: 23
From: Woodland Hills, Calif.
I'm sure we'll see each other along the road somewhere before too long.
05-07-08 | 08:36 AM
#155

Senior Member
Joined: Jun 2004
Posts: 3,164
Likes: 579
From: Torrance, CA
Bikes: Homebuilt steel
These are actually two very different types of welding.
When using a paste flux in this type of welding, the paste is applied to both sides of the metal to be joined (think of sweat soldering copper water pipes) the filler material is wicked into the weld joint thru capillary action. This is why when you look at the pictures of the welded joints you only see a very thin line of the filler material.
When you use a inline fluxer, the only area cleaned by the flux is the area contacted by the flame. This allows for a very precise weld bead. It looks like a tig weld. This would be inappropriate for welding a lugged frame. If you want to weld a fillet welded frame, a inline fluxer would work great.
...actually, welding and brazing is different; welding involves melting the tubes being joined but brazing does not and is done at a much lower temperature.
Regarding Gas Flux, lots of professional framebuilders use the system for brazing lugged frames. Less clean up work which is important for some. Not positive but I think they smear a small amount of flux inside the lug before plugging everything together to make sure everything is covered before using the Gas Flux to protect the outside of the joint.
05-07-08 | 09:05 AM
#157
Thread Starter
Senior Member
Joined: Jul 2005
Posts: 1,671
Likes: 23
From: Woodland Hills, Calif.
05-07-08 | 11:09 AM
#158
Senior Member
Joined: Feb 2008
Posts: 218
Likes: 0
From: Lakewood, Washington
Bikes: 1972 Schwinn Sports Tourer, Peugeot PX10E
You are correct, I should have said "joining metals" "welding" was just easier, and I have been doing it for over 30 years. I have my own inline fluxing system that I mainly use for race car fabrication. I have never attempted to make a bike frame, but I would like someone to show me how to use my inline fluxer to assemble a lugged frame.
__________________
1st bike - 1962 Schwinn Varsity (bought new and wish I still had it, left it in Siagon, Viet Nam 1965)
1962 Schwinn Varsity (could be a twin of my first bike)
1969 Peugeot PX10E
1972 Schwinn Sports Tourer (bought new)
1982 Peugeot PH19 Mixte
1989 Novara Aspen
1st bike - 1962 Schwinn Varsity (bought new and wish I still had it, left it in Siagon, Viet Nam 1965)
1962 Schwinn Varsity (could be a twin of my first bike)
1969 Peugeot PX10E
1972 Schwinn Sports Tourer (bought new)
1982 Peugeot PH19 Mixte
1989 Novara Aspen
05-07-08 | 05:28 PM
#160

Running on plenty

Joined: Dec 2007
Posts: 209
Likes: 67
From: Sydney, Australia
Bikes: Too many to list
I jumped over here from a link on an Australian cycling site...and I'm quite simply blown away. Fantastic from start to finish! It makes the task of framebuilding seem a little less daunting seeing every step documented so well, and the finished product is a superb looking bike that I'm sure is great to ride. I like the minimalist bottle cages a lot, they really suit a steel bike with the narrower tube diameters.
I wouldnt want to be standing near you the day you scratch it though...all that work marred by leaning it against a wall and having it fall over...I tell you, the air would be thick with cursing if that happened to something I'd put that much work into.
Thanks for the excellent post, and may you enjoy your ride for years to come.
Jim
05-07-08 | 07:35 PM
#161

Spit out the back
Joined: Aug 2005
Posts: 1,116
Likes: 4
From: Silverlake, CA
You know, if he breaks it, he can always make another.
05-08-08 | 08:57 AM
#162
Thread Starter
Senior Member
Joined: Jul 2005
Posts: 1,671
Likes: 23
From: Woodland Hills, Calif.
I jumped over here from a link on an Australian cycling site...and I'm quite simply blown away. Fantastic from start to finish! It makes the task of framebuilding seem a little less daunting seeing every step documented so well, and the finished product is a superb looking bike that I'm sure is great to ride. I like the minimalist bottle cages a lot, they really suit a steel bike with the narrower tube diameters.
I wouldnt want to be standing near you the day you scratch it though...all that work marred by leaning it against a wall and having it fall over...I tell you, the air would be thick with cursing if that happened to something I'd put that much work into.
Thanks for the excellent post, and may you enjoy your ride for years to come.
Jim
I wouldnt want to be standing near you the day you scratch it though...all that work marred by leaning it against a wall and having it fall over...I tell you, the air would be thick with cursing if that happened to something I'd put that much work into.
Thanks for the excellent post, and may you enjoy your ride for years to come.
Jim
You're right about scratches and nicks, I hate'm but every bike gets them in time.
My commuter, built about 8 years ago has quite a "patina" by now. I just make sure to keep
some touch up paint handy.
05-10-08 | 04:41 AM
#164
Senior Member
Joined: Jan 2005
Posts: 1,213
Likes: 8
Thanks for putting this thread here, as opposed to on a blog (you probably ought to blog this as well). After all was built, did you end up with any problems? Anything redone? Anything that you' like to improve for the next build?
Thanks,
Danny
Thanks,
Danny
05-10-08 | 11:58 PM
#165

Senior Member
Joined: Mar 2007
Posts: 402
Likes: 0
From: Encino, CA
Bikes: Scott Addict LTD ; A Fixed gear
I saw it today in person. It is a very nice Blue color - remind me a car custom paint job.
And, as always, Steave is fast on this bike, especially now that he went for 10 speed gears.
And, as always, Steave is fast on this bike, especially now that he went for 10 speed gears.
05-12-08 | 09:08 AM
#166
Thread Starter
Senior Member
Joined: Jul 2005
Posts: 1,671
Likes: 23
From: Woodland Hills, Calif.
matches my other two (current) bikes. You can always find things to improve on even if it's only
cosmetic but this bike will be ridden pretty hard so it's better to not be too picky.
05-16-08 | 12:41 PM
#167
Senior Member
Joined: Jan 2005
Posts: 1,213
Likes: 8
No problems and nothing re-done. I've built enough of thses things that I know what I like. The geometry
matches my other two (current) bikes. You can always find things to improve on even if it's only
cosmetic but this bike will be ridden pretty hard so it's better to not be too picky.
matches my other two (current) bikes. You can always find things to improve on even if it's only
cosmetic but this bike will be ridden pretty hard so it's better to not be too picky.
It's truly beautiful and you should be very proud of it. I'd buy it from you in a split moment, if I could.
Danny
05-21-08 | 01:06 AM
#168

Needs to Ride More
Joined: Jan 2008
Posts: 764
Likes: 2
From: Long Beach, CA
Bikes: 1996 Bianchi EL/OS, 1991 Miyata QuickCross
I just read through this whole thread and all I have to say is....WOW. This inspires me to try this myself (in the future and if I were a bit more mechanically inclined). The only thing I have to add is that I think it would look even more beautiful with some more white on it (bar tape, brake hoods, saddle) but other than that I am in awe.
05-21-08 | 12:54 PM
#169
iPwn.
Joined: May 2008
Posts: 148
Likes: 0
From: Sackville (School)/Saint John, New Brunswick, Canada
Bikes: 2004 Norco Wolverine (Blue) set up with Semi-Slicks. Mid-1970's Raleigh, converted to single seed, (soon to be) all white.
this thread makes me want to cry. hot dang that bike is beautiful. you have inspired me!
05-21-08 | 04:16 PM
#170
Thread Starter
Senior Member
Joined: Jul 2005
Posts: 1,671
Likes: 23
From: Woodland Hills, Calif.
05-23-08 | 09:09 AM
#171
Thread Starter
Senior Member
Joined: Jul 2005
Posts: 1,671
Likes: 23
From: Woodland Hills, Calif.
Since this frame has rack bosses, it needed a rack.
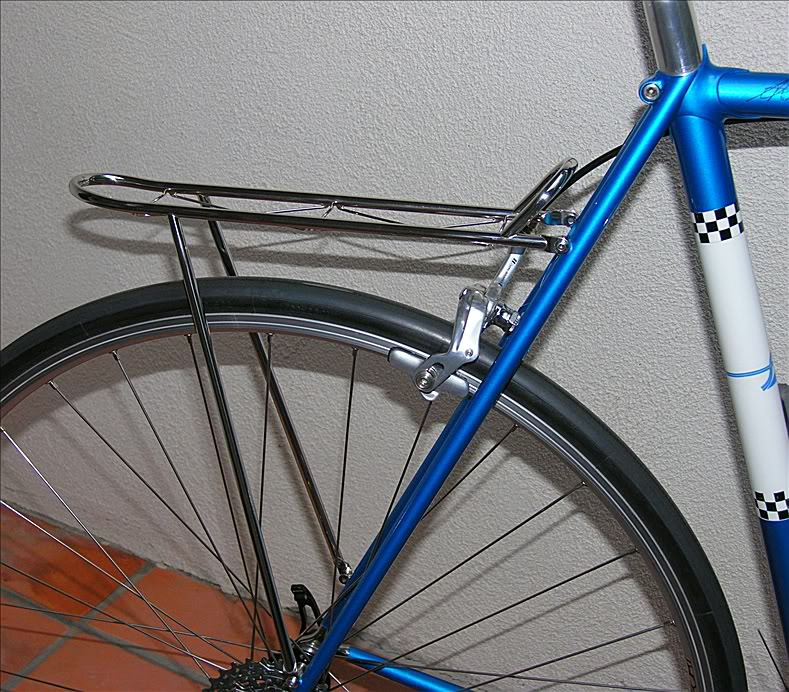
This is not your usual Fred rack.
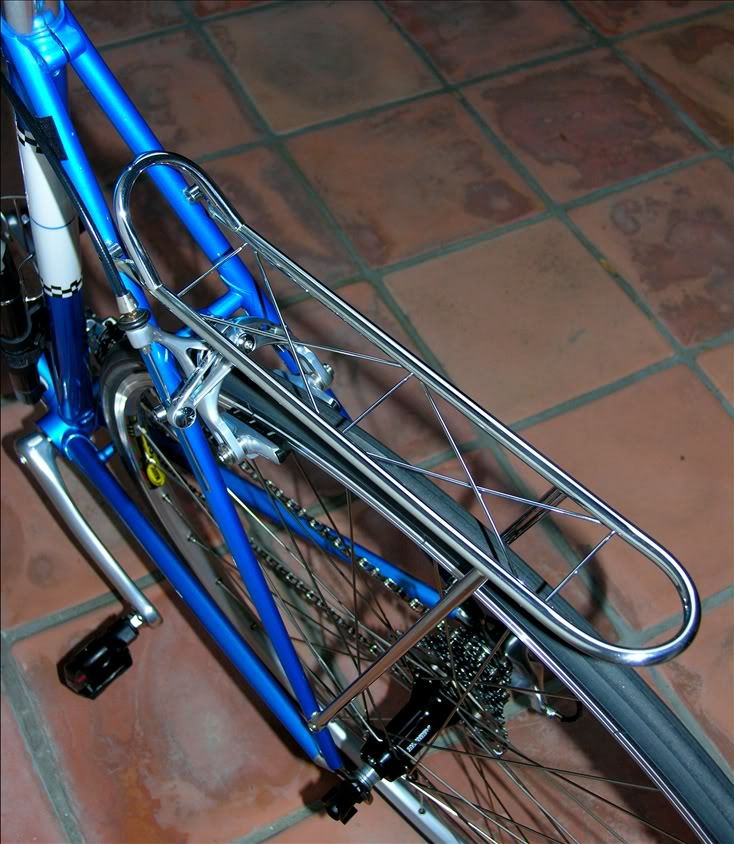
Made of 5/16" x .028" wall stainless tubing and a few old DT spokes...
This is not your usual Fred rack.
Made of 5/16" x .028" wall stainless tubing and a few old DT spokes...
Last edited by Cassave; 12-02-22 at 12:55 PM.
05-25-08 | 10:50 PM
#172

Senior Member
Joined: Oct 2005
Posts: 2,768
Likes: 15
From: Bellingham, WA
Absolutely stunning. I especially liked that you made your own rack and bottle cages; it adds quite a bit to the uniqueness, IMO. I've wanted to try this myself since I was 15 years old, and I swear I'm going to some day...soon. Thanks for the great thread!


