


Rigid insert replacement for Specialized Future Shock
 04-06-23 | 01:58 AM
#1

Thread Starter
Full Member
Joined: Sep 2019
Posts: 393
Likes: 266
Rigid insert replacement for Specialized Future Shock
Two available online options, both 7075 and somewhat similar in design. Multiple reasons to do something like this, but I'm more interested in user experiences.
1) eBay - 7075 rigid insert
https://www.ebay.com/itm/32540639380...cAAOSwLDxjY~R8
Tensile test: https://docs.google.com/presentation...e&delayms=3000
2) Future Shock "Delete"
https://www.thebikesauce.com/product...gid-delete-kit
Anyone using either? Particularly interested in comments from people who have given this hack a shot.
After the Specialized recall a few years ago, the single bolt torque spec for the collar changed from 6.2nm to 4nm. Not exactly sure why... but once I receive these units I'll see if 4nm plus ample carbon paste is sufficient for hopping curbs.
Remembering Terpstra at Roubaix in 2017...
�Whereas the majority of Specialized-sponsored riders at Paris-Roubaix opted for the standard Future Shock suspension cartridge shown here, Quick-Step Floors rider Niki Terpstra instead requested a special one-piece aluminum plug with no suspension travel whatsoever.
Once Terpstra gave his stamp of approval on the idea, Cote said that Specialized�s engineers then set about a full finite element analysis to develop a part that would more ably survive the rigors of Paris-Roubaix cobblestones. Specifically, the tube walls grew substantially thicker in the most highly stressed areas, and the shape also grew more sophisticated as compared to that comparatively roughly hewn prototype. Larger-diameter radii were also added where needed so as not to produce any dangerous stress concentrations where a crack might initiate.
�It was the same materials in both: 7075-T6 aluminum,� Cote explained. �But the product that was re-engineered had tube walls that were over 2mm thicker in the area with the highest stress, where the actual failure occurred.�
Unfortunately, a miscommunication between Specialized and the team allowed Terpstra to continue riding that initial prototype instead of the more finalized version he should have been using. Given those undersized tube walls � plus the fact that his fully rigid machine bore the full brunt of the cobbles as compared to other riders using the Future Shock suspension system � a crack formed at the base of that prototype plug and eventually propagated to the point where the tube could no longer take the pounding.�
 04-06-23 | 04:17 PM
#2
Thread Starter
Full Member
Joined: Sep 2019
Posts: 393
Likes: 266
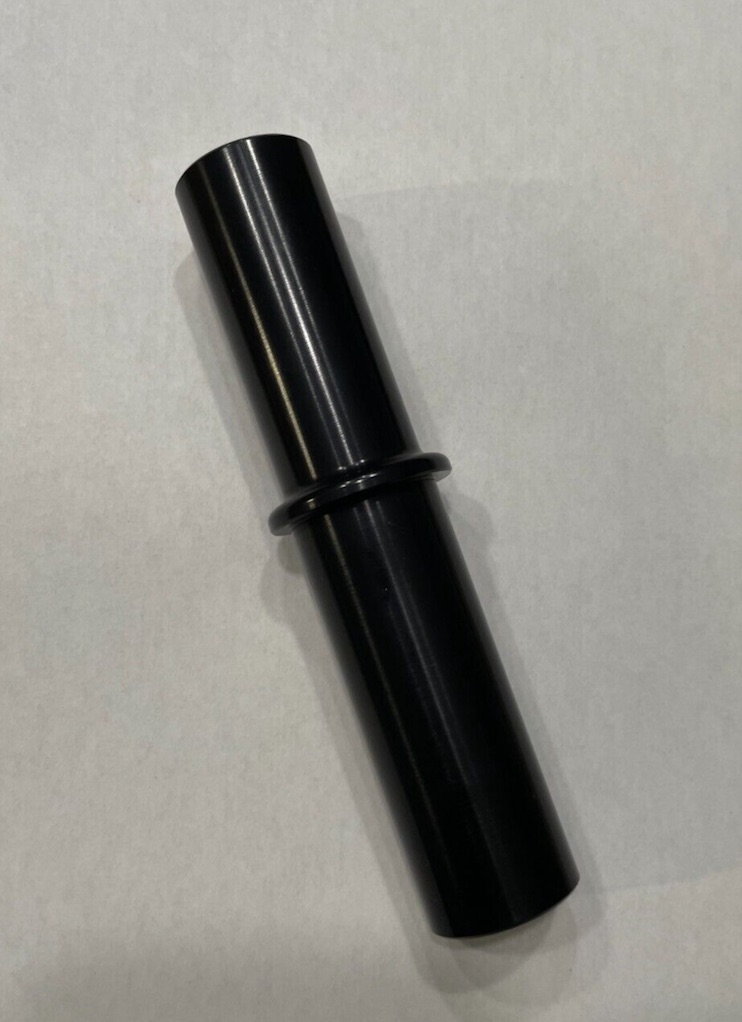
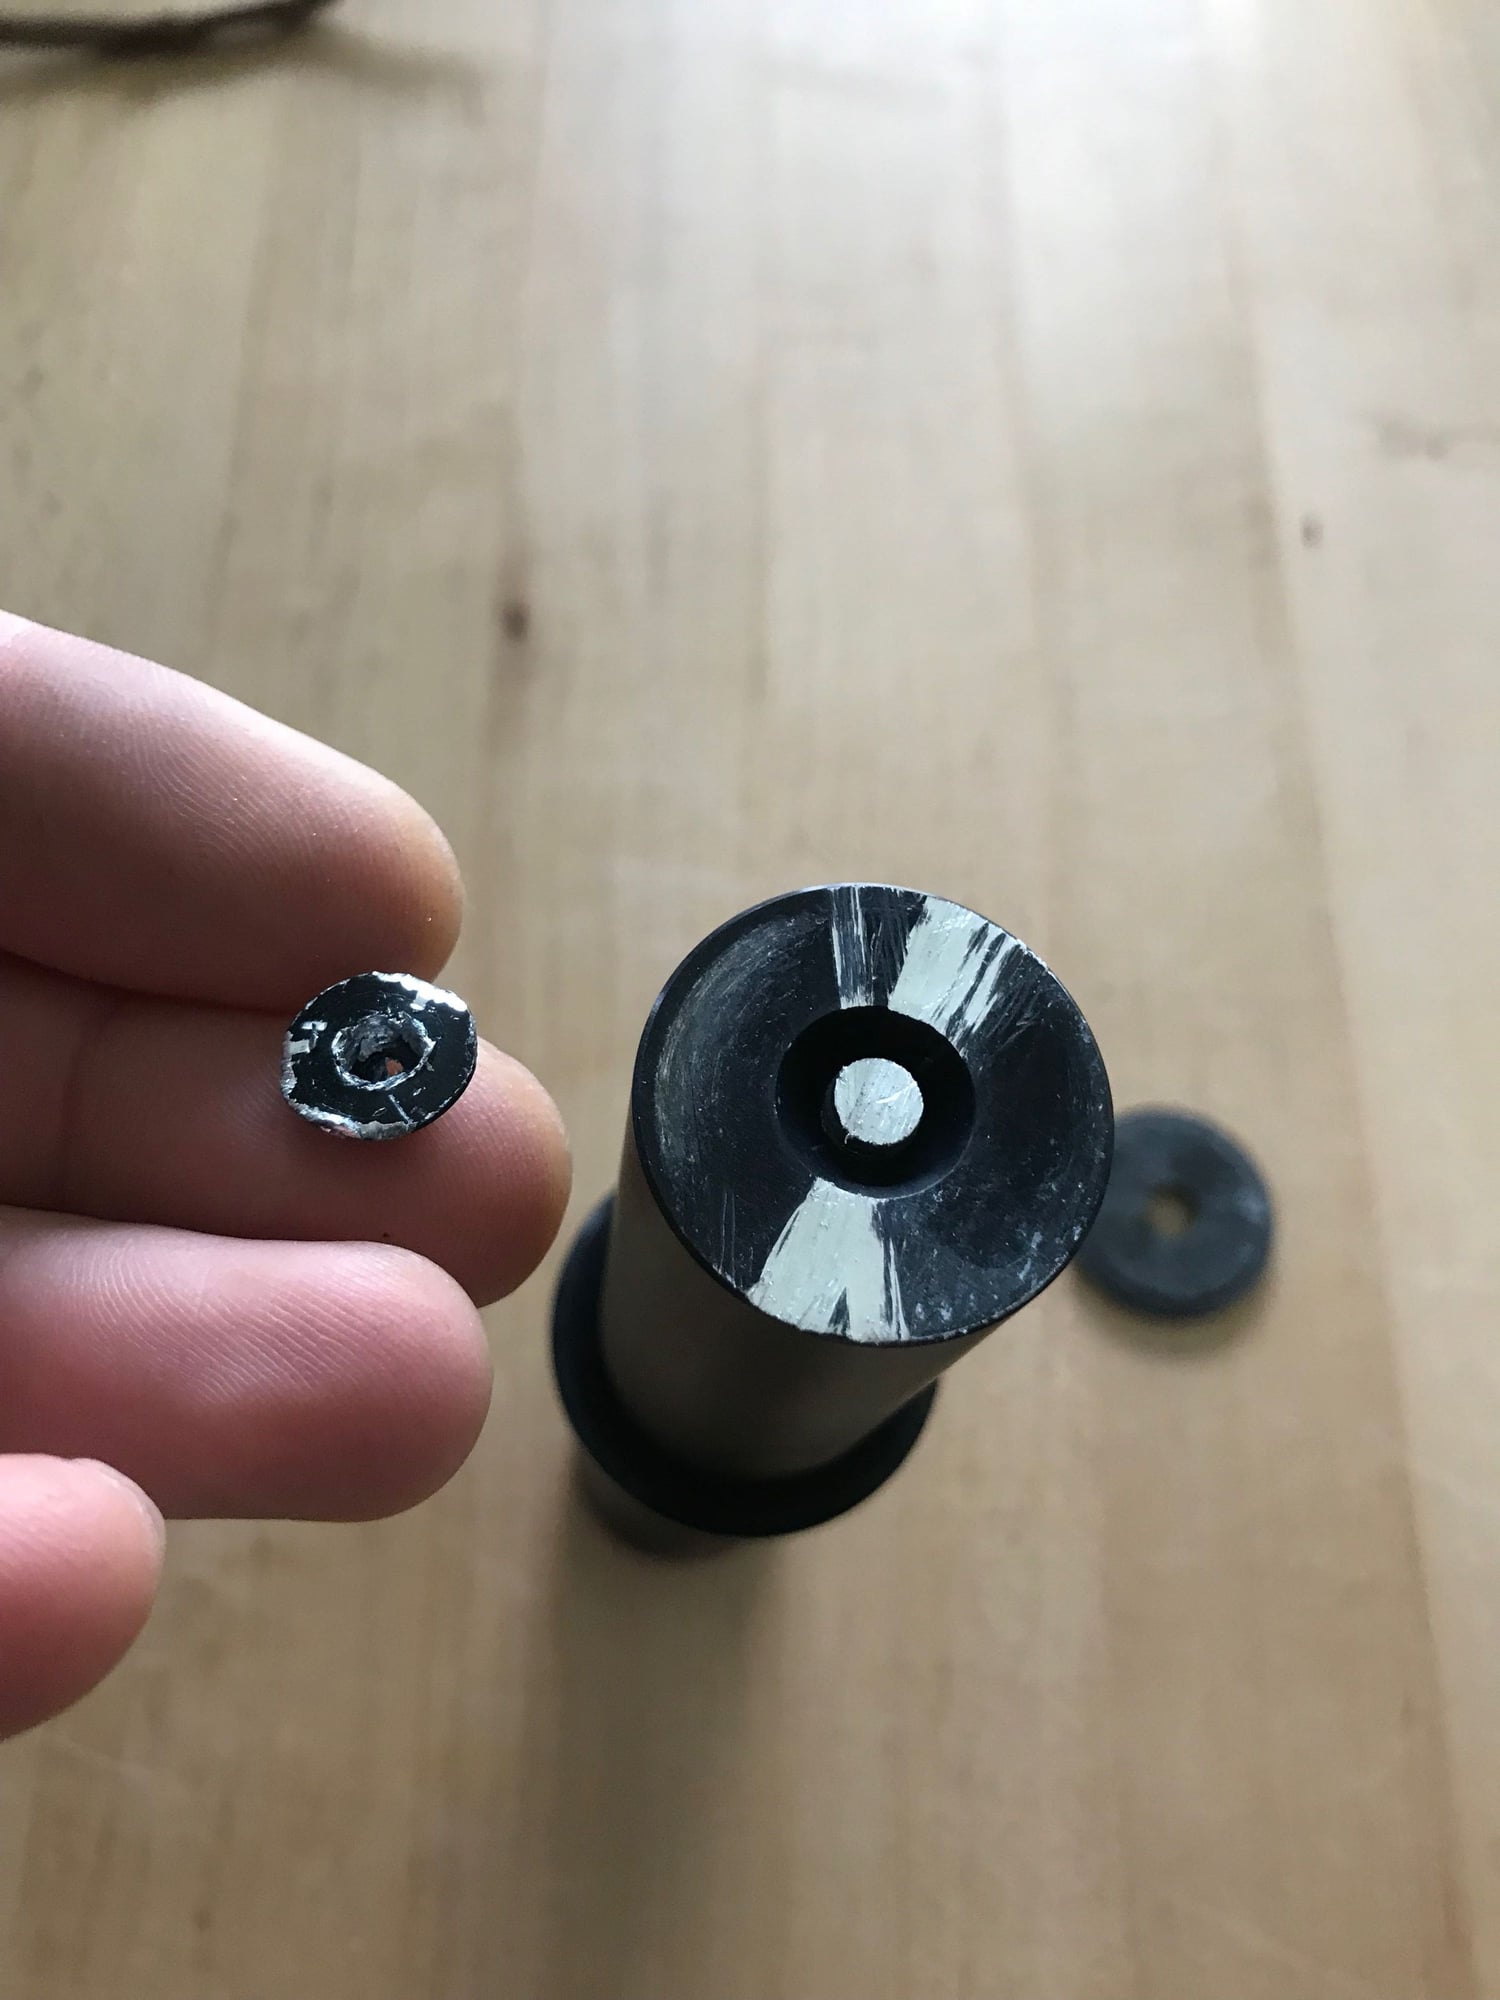
eBay unit arrived today. At first glance the construction is impressive and the lower, larger diameter end of the element fits perfectly into the carbon steerer tube of my Diverge. With a bit of carbon paste, the revised collar torque spec of 4nm won't be an issue at all.
The top cap bolt seemed to be cemented in place upon arrival and when I tried unscrewing it with the appropriate hex key I rather quickly stripped the soft aluminum head of the m6 bolt. Fortunately, there was enough space for my hack saw to cut it in half so as to remove the included carbon cap.
I may end up cutting down the plug a bit (and inserting a star nut) once I sort out the stem and spacer combo I'll be using.
04-07-23 | 08:24 PM
#3
Senior Member

Joined: May 2020
Posts: 679
Likes: 518
From: North Florida
Bikes: 2019 Specialized Diverge, 2021 Cervelo Caledonia
After you've tried it out, report back on how it affects ride quality. I have a Diverge and have had no problems with the Future Shock, and like the way the bike rides. I have no inclination to replace it. But I have no idea how much of the ride quality is due to the Future Shock because I've never ridden without it. I'd be interested in hearing how much of a difference it makes from someone who's ridden the same bike with and without it.
04-08-23 | 07:13 AM
#4
Senior Member
Joined: Dec 2009
Posts: 1,808
Likes: 188
From: Denver area (Ken Caryl Valley)
Bikes: 2022 Moots RCS, 2014 BMC SLR01 DA Mech, 2020 Santa Cruz Stigmata, Ibis Ripmo, Trek Top Fuel, Specialized Epic Pro, Pivot Les Fat
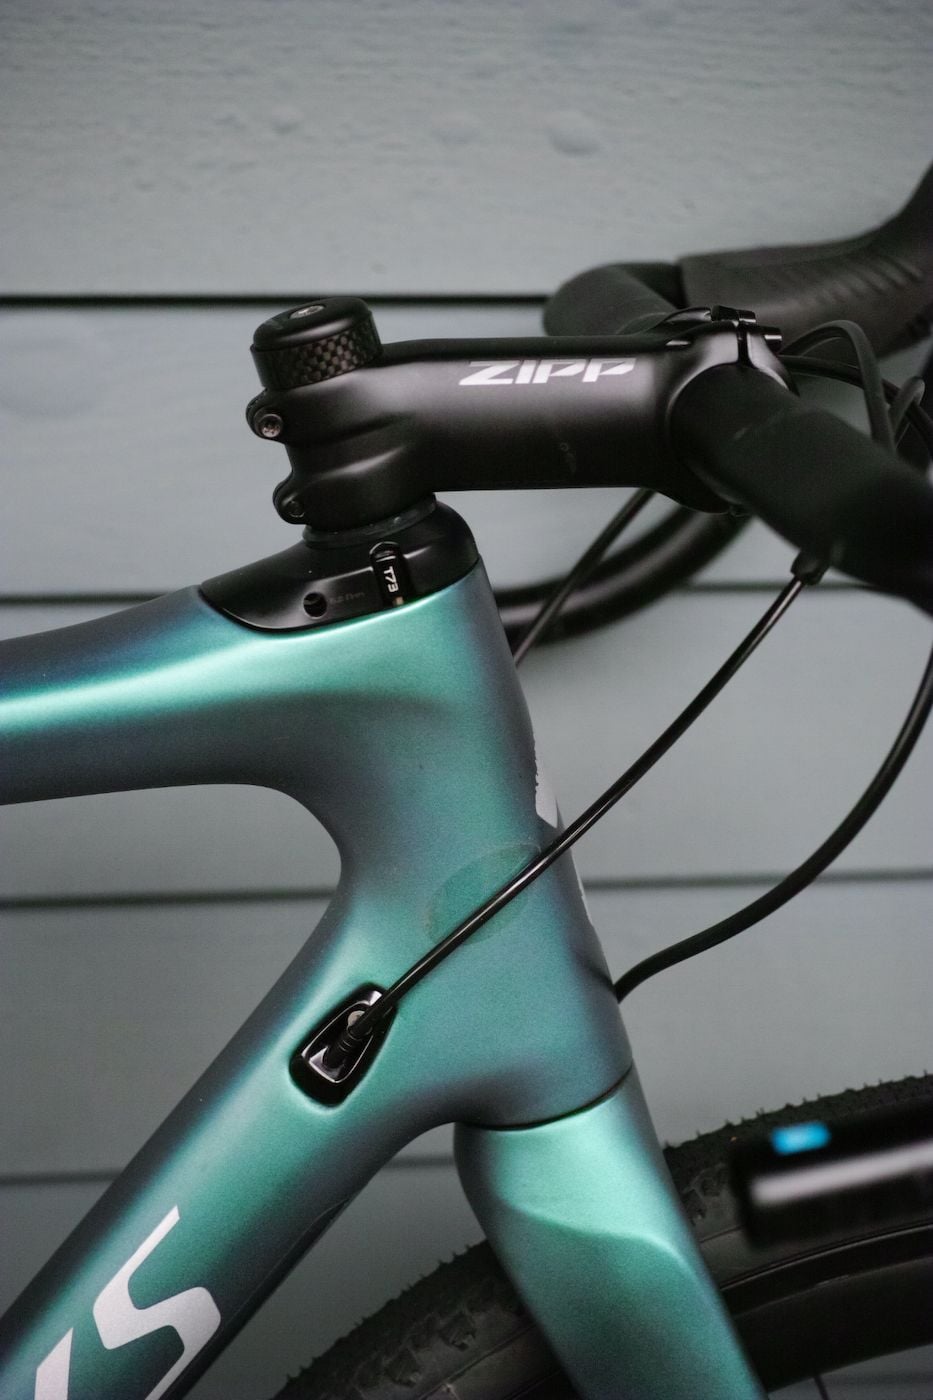
I have several bikes and I certainly prefer the smoother front-end of the Specialized on most rides and the damped Future Shock 2.0 (not the 1.0 which I dislike) is the primary reason I look at those bikes. I also have a shock stem on the gravel bike and I still prefer the Future Shock, if comparing the two. At one point I was thinking that Specialized would provide a lockout like the option pictured above but there may not be much demand.
04-08-23 | 05:25 PM
#5
Thread Starter
Full Member
Joined: Sep 2019
Posts: 393
Likes: 266
Based on a quick test the rigid insert transforms the ride, particularly on punchy climbs and sprints. Frame stiffness and geo seems on par with my Roubaix, even with considerably wider tires.
Drivers for making the switch:
- Stiffen up the front end for out-of-the-saddle efforts
- Get more aero with lower stem and bars
- Lighten up the build by ~1.5-lbs
This isn't exactly a weight weenie project, even if the frame itself weighs ~950g, but dipping under 17-lbs with 38mm Rene Herse rubber and lighter/shallower carbon wheels will be fun. Previous 1x build was 18-lbs on the nose with Zipp 404s and Schwalbe 35mm G-One Speeds. FS weighed 360g, so the swap to the 7075 plug will save 1/2-lb alone. Also changed the seatpost to the moderately flexy S-Works Pave, which saved 200g over the original Command XCP dropper.
Will update with a pic once I dial in the front end with the replacement rigid insert I'm getting. Kudos to the eBay seller. He knows his stuff!
04-08-23 | 05:37 PM
#6
Thread Starter
Full Member
Joined: Sep 2019
Posts: 393
Likes: 266
After you've tried it out, report back on how it affects ride quality. I have a Diverge and have had no problems with the Future Shock, and like the way the bike rides. I have no inclination to replace it. But I have no idea how much of the ride quality is due to the Future Shock because I've never ridden without it. I'd be interested in hearing how much of a difference it makes from someone who's ridden the same bike with and without it.
I have several bikes and I certainly prefer the smoother front-end of the Specialized on most rides and the damped Future Shock 2.0 (not the 1.0 which I dislike) is the primary reason I look at those bikes. I also have a shock stem on the gravel bike and I still prefer the Future Shock, if comparing the two. At one point I was thinking that Specialized would provide a lockout like the option pictured above but there may not be much demand.
 04-08-23 | 05:53 PM
#7
Senior Member
Joined: Dec 2009
Posts: 1,808
Likes: 188
From: Denver area (Ken Caryl Valley)
Bikes: 2022 Moots RCS, 2014 BMC SLR01 DA Mech, 2020 Santa Cruz Stigmata, Ibis Ripmo, Trek Top Fuel, Specialized Epic Pro, Pivot Les Fat
I liked the FS with narrower (say 32mm ish) tires for smoothing out hits, but with 38s (40psi rear, 35psi front) it felt unnecessary and even counterproductive when climbing, etc. Definitely have some more testing to do.
Lockout would have been practical. Maybe in a future future shock?
Lockout would have been practical. Maybe in a future future shock?
 11-27-23 | 01:56 PM
#9
Newbie
Joined: Nov 2023
Posts: 1
Likes: 0
The photo above looks quite nice. Did you have to cut the rod in anyway? I couldn�t tell from the photo if you just relied on top mounted spacers to keep the stem down. If so any brand of recommended spacers? Did the rod come with instructions to install or did you have to figure it out yourself
11-27-23 | 03:29 PM
#10


Senior Member

Joined: Jul 2006
Posts: 5,721
Likes: 100
From: Katy Texas
Bikes: Specialized Roubaix
I stayed away from the Roubaix because of the future shock, I like the way it looks. How did you draw the stem down on the steering tube. It does look clean.

__________________
George
George
12-03-23 | 04:47 PM
#11
Senior Member

Joined: Jan 2014
Posts: 2,106
Likes: 1,027
From: The banks of the River Charles
Bikes: 2025 Black Mountain Cycles Mod Zero, 2025 Surly Ogre, 2022 Salsa Beargrease, 2020 Seven Evergreen, 2019 Honey Allroads Ti, 2018 Seven Redsky XX
The future of the Future Shock is to delete it 
03-27-25 | 12:16 AM
#12
A member to remember
Joined: Oct 2022
Posts: 244
Likes: 135
From: Ventura County, CA
Bikes: Tallboy, Domane, old 90s MTB beater/grocery-getter, and a couple of franken-gravel experiments based on the Sirrus x 5.0.
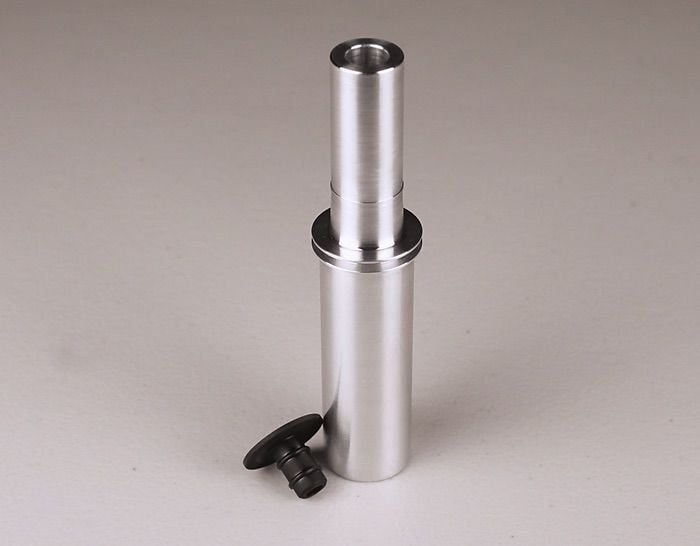
Well, I'm reviving a 15 month old thread because I've been playing around with rigid Future Shock replacements on my Specialized Sirrus X 5.0. I initially bought one of the ultralight Ebay units described earlier in this thread, but despite the finite element analysis provided, the 2mm wall thickness just weirded me out a bit, so I decided to fire up the lathe in my garage and crank out one of my own. The much greater wall thickness as shown below is comparable to that used in the initial FSD kit developed by the Bike Sauce:

Basically I just bought a 1-1/4" rod of 7075 aluminum, cut it down to 150mm, turned a couple of outer diameters to fit headset and stem then bored a 3/4" hole down the center - raw material and finished product shown:

Another reason to do this is to fit the stem I want to use which has a slightly larger than usual stack of 45mm. The end result fits well.

The thicker walls do come with a weight penalty - my replacement shaft weighs 170g, similar to the Bike Sauce unit but much heavier than the Ebay unit at 110g. Though it may damage my weight weenie credentials I'm willing to sacrifice the 60g for increased confidence bashing around on mixed terrain.
Basically I just bought a 1-1/4" rod of 7075 aluminum, cut it down to 150mm, turned a couple of outer diameters to fit headset and stem then bored a 3/4" hole down the center - raw material and finished product shown:
Another reason to do this is to fit the stem I want to use which has a slightly larger than usual stack of 45mm. The end result fits well.
The thicker walls do come with a weight penalty - my replacement shaft weighs 170g, similar to the Bike Sauce unit but much heavier than the Ebay unit at 110g. Though it may damage my weight weenie credentials I'm willing to sacrifice the 60g for increased confidence bashing around on mixed terrain.
05-04-25 | 04:37 PM
#13
A member to remember
Joined: Oct 2022
Posts: 244
Likes: 135
From: Ventura County, CA
Bikes: Tallboy, Domane, old 90s MTB beater/grocery-getter, and a couple of franken-gravel experiments based on the Sirrus x 5.0.
And, going even further off the deep end, I decided to teach myself how to do Finite Element Analysis to evaluate the strength of the FSD I built (and where I could get away with removing material to lighten it.
The problem was that not only am I not a mechanical engineer, but I've never done a Finite Element Analysis in my life. But fortunately we live in the age of free Open Source software packages and abundant YouTube tutorials. Who needs a fancy degree when you can watch videos for a week and fake it. So I downloaded FreeCad and taught myself just enough to design parts and model stresses. Here are some results:
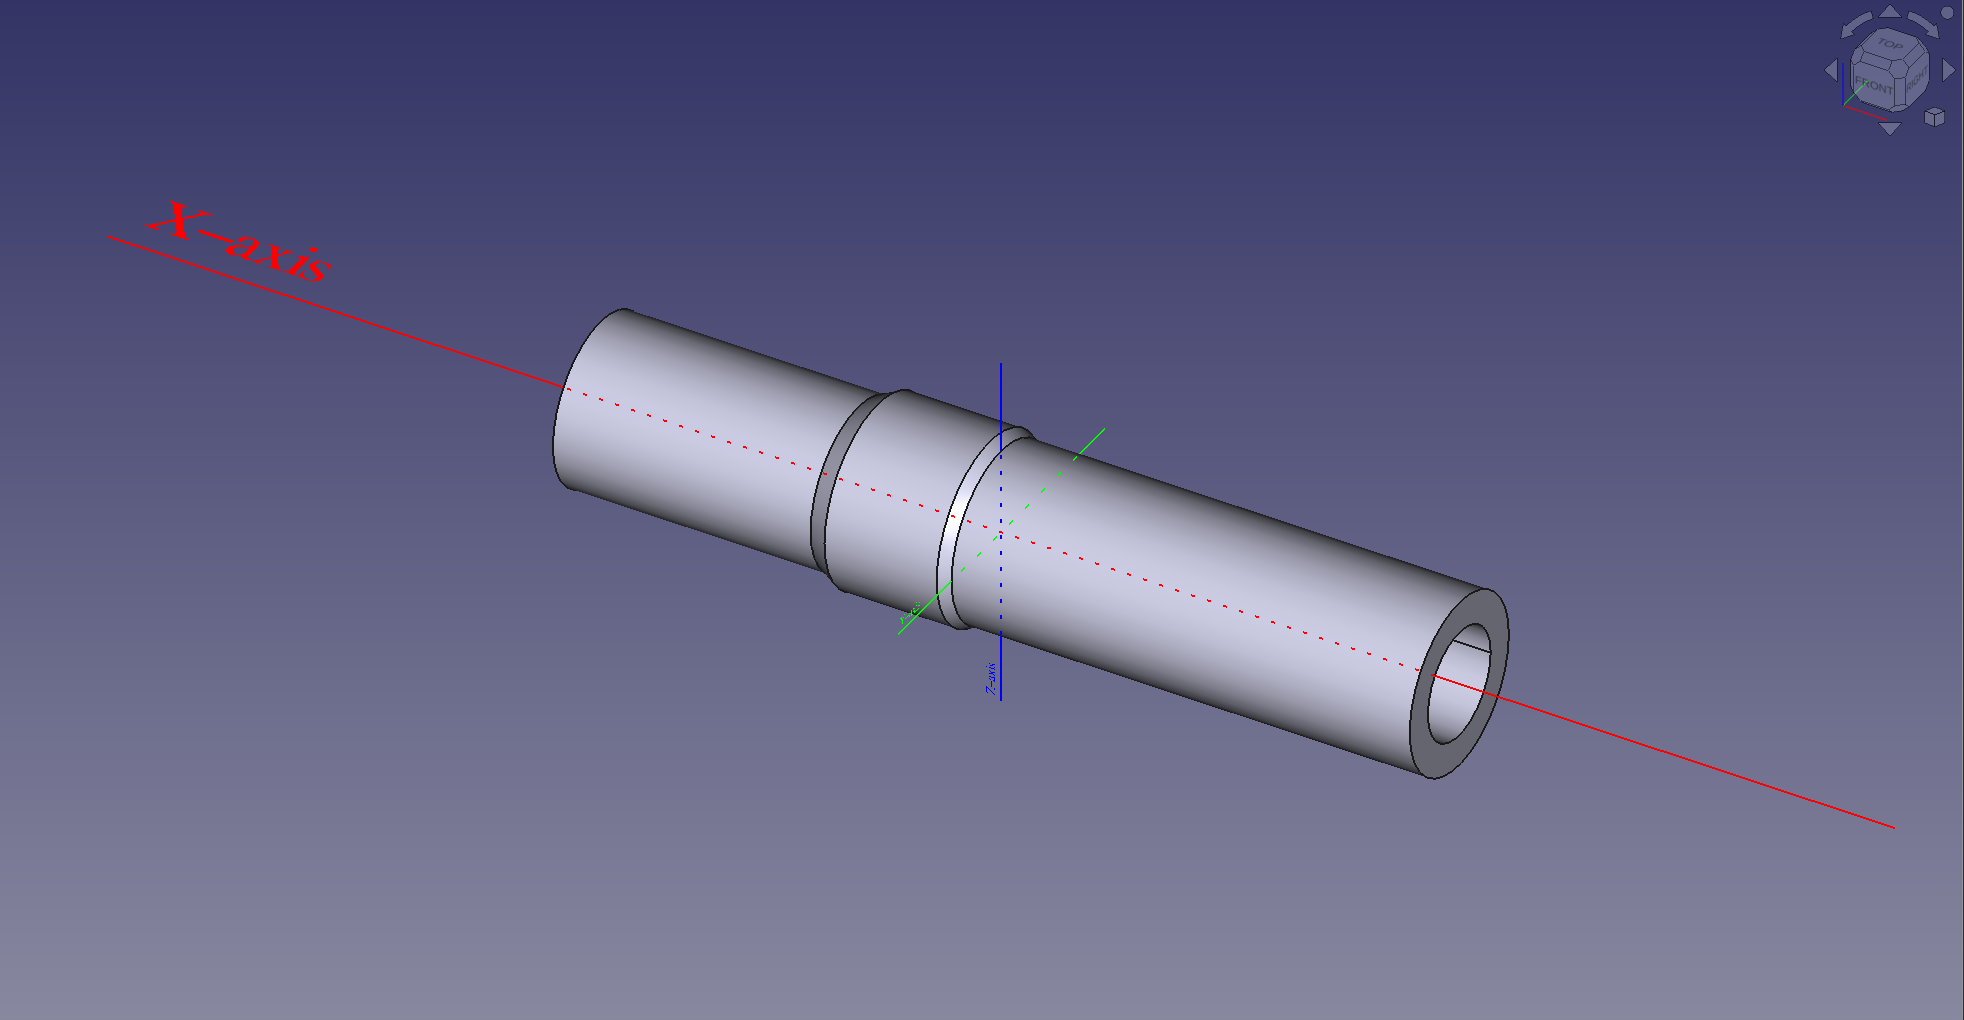
My initial design was basically a 150mm cylinder of 7075 Aluminum, 28.6mm in diameter on the upper 45mm where the stem mounts and 30mm in diameter on the lower 80mm where it mounts in the Future Shock compatible head set. Finally, and rather arbitrarily I bored a 3/4" hole down the center as shown:
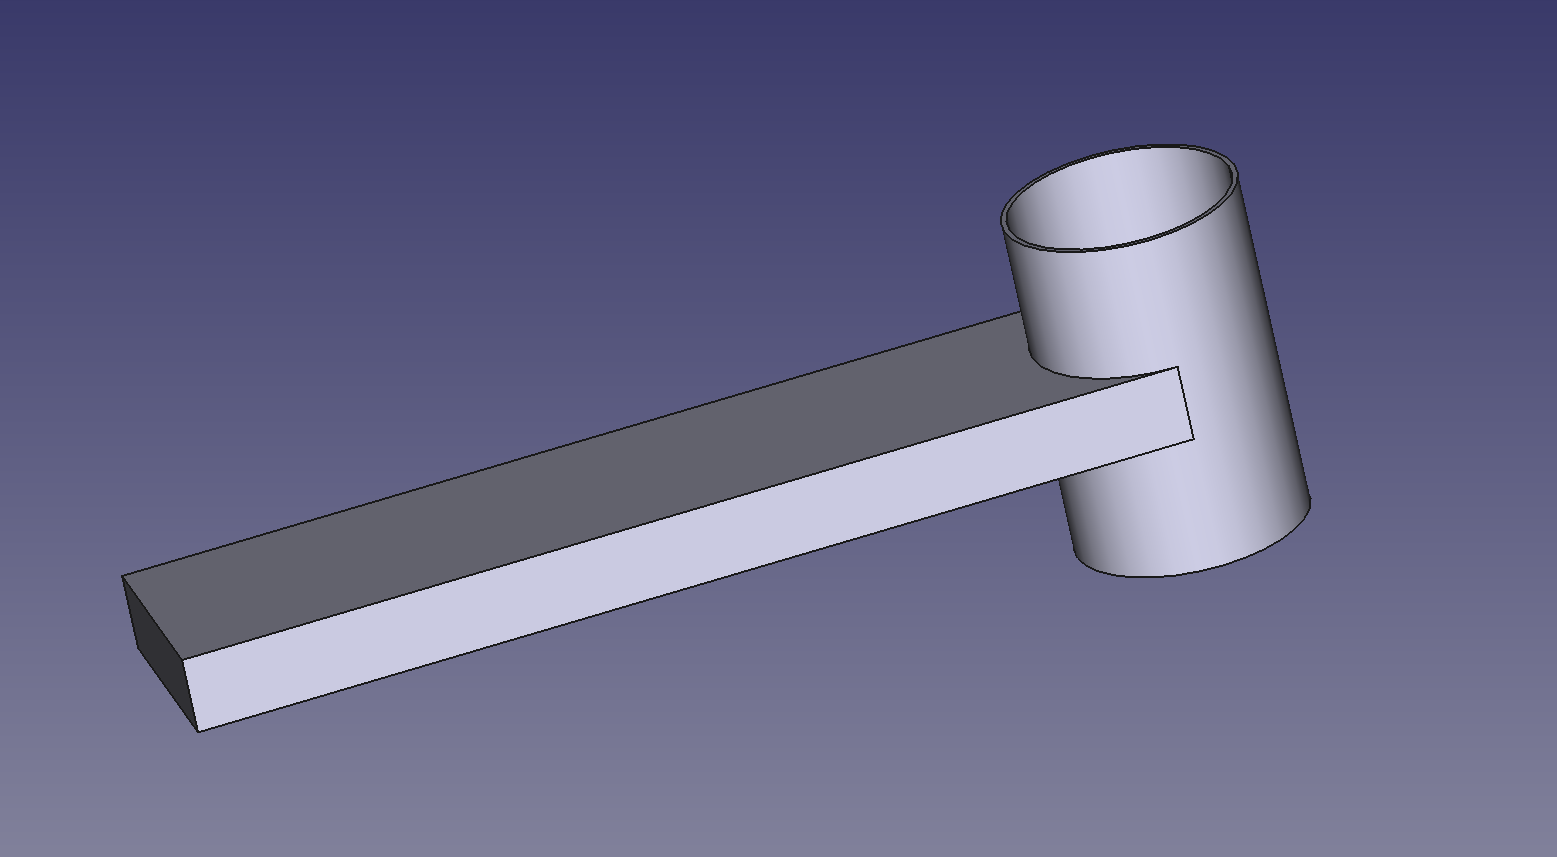
To test how strong this thing was I first had to model a stem and headset that it would mount to. The stem I came up with was a simple plank and sleeve as shown:
and the headset I modeled as just a fixed cylinder. Putting everything together the model looked like this:
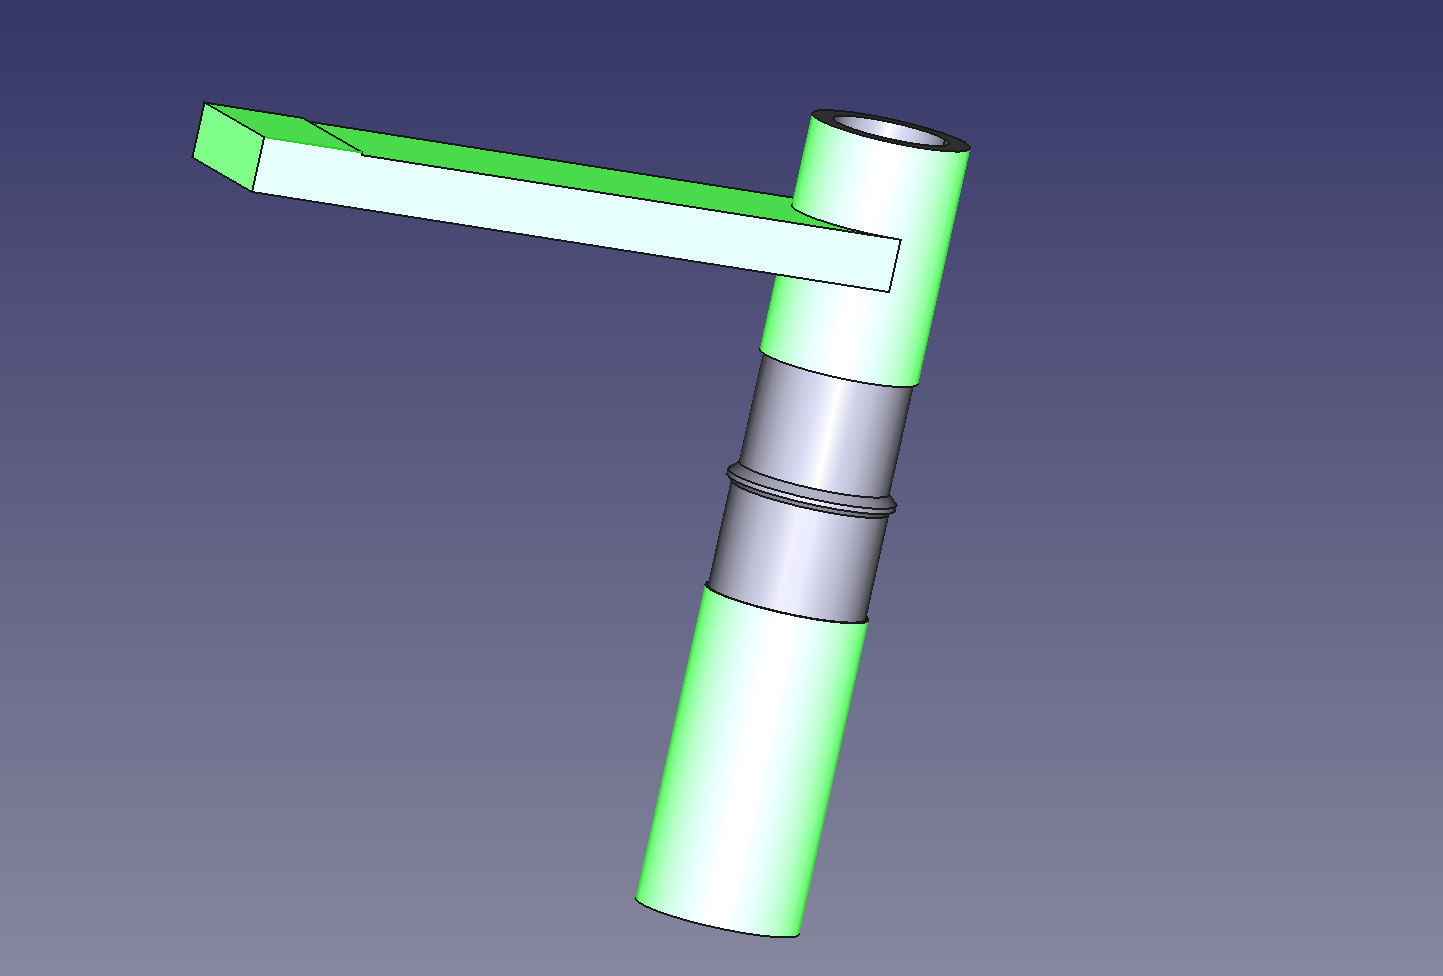
with the stem and headset highlighted here in green and the free-to-flex FSD in between. The final bit is to set test conditions. In this case I held the headset fixed. Allowed to the stem to move, but only as a rigid body and applied a force of 400lb 120mm from the center axis of the FSD. Why 400lb and 120mm? They're both a lot more than the FSD will see in real life and most importantly, they were the test conditions that the Bike Sauce used, so at least it would give me a semi-valid point of comparison.
Anyway, with all these boundary conditions set it's pretty straightforward to get FreeCad to spit out a map of the stresses on the part. This ends up looking like:
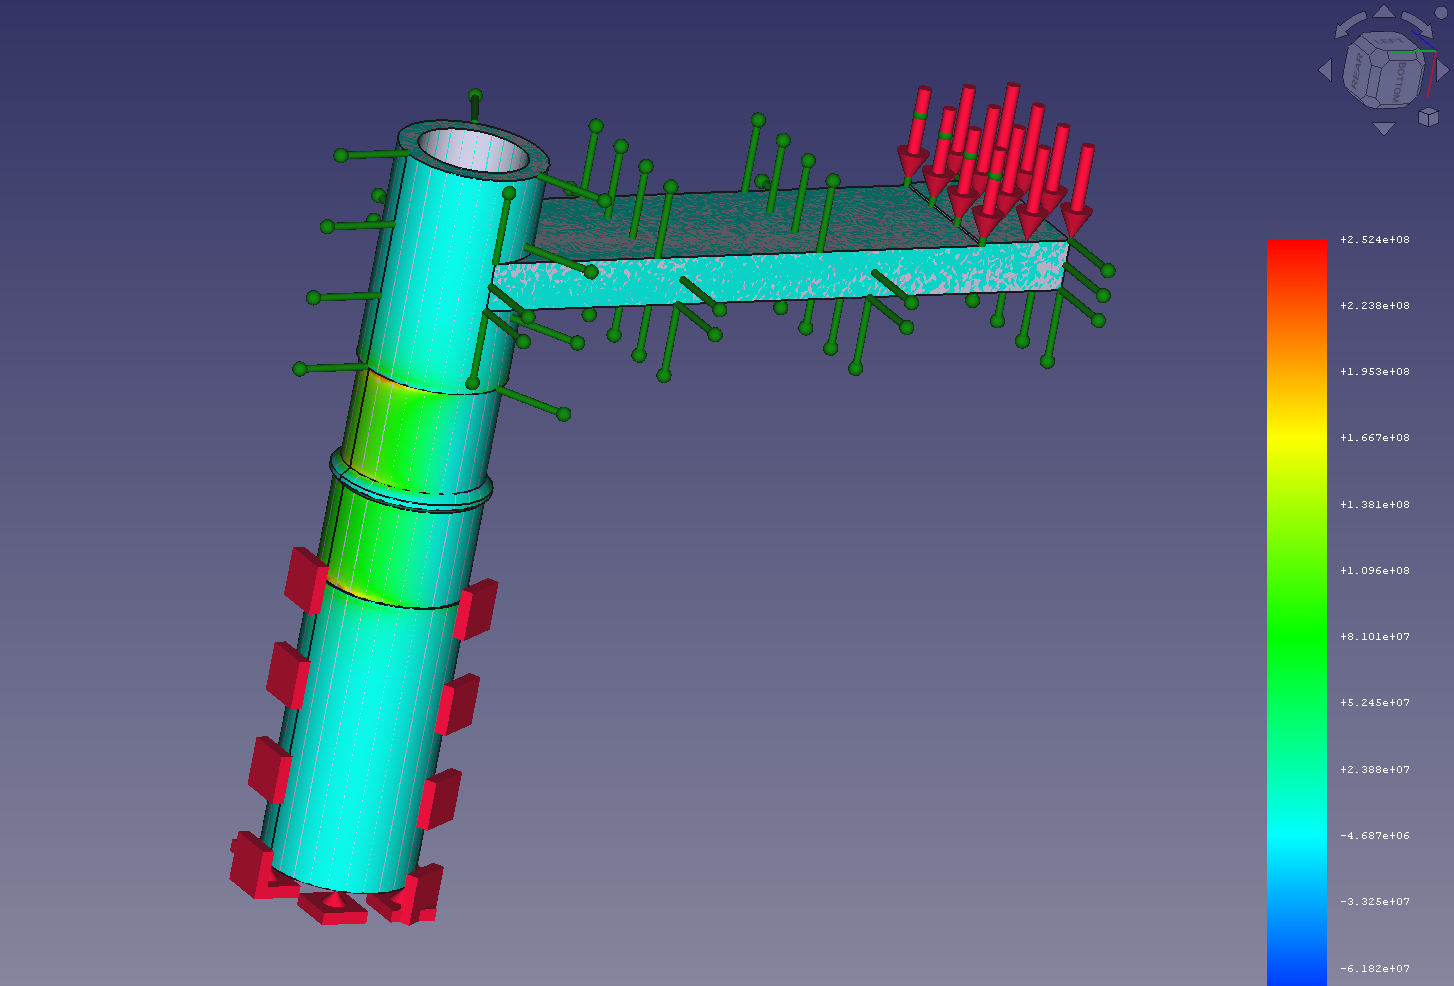
with all the squares, arrows and rods representing the boundary conditions on the headset and stem described above.
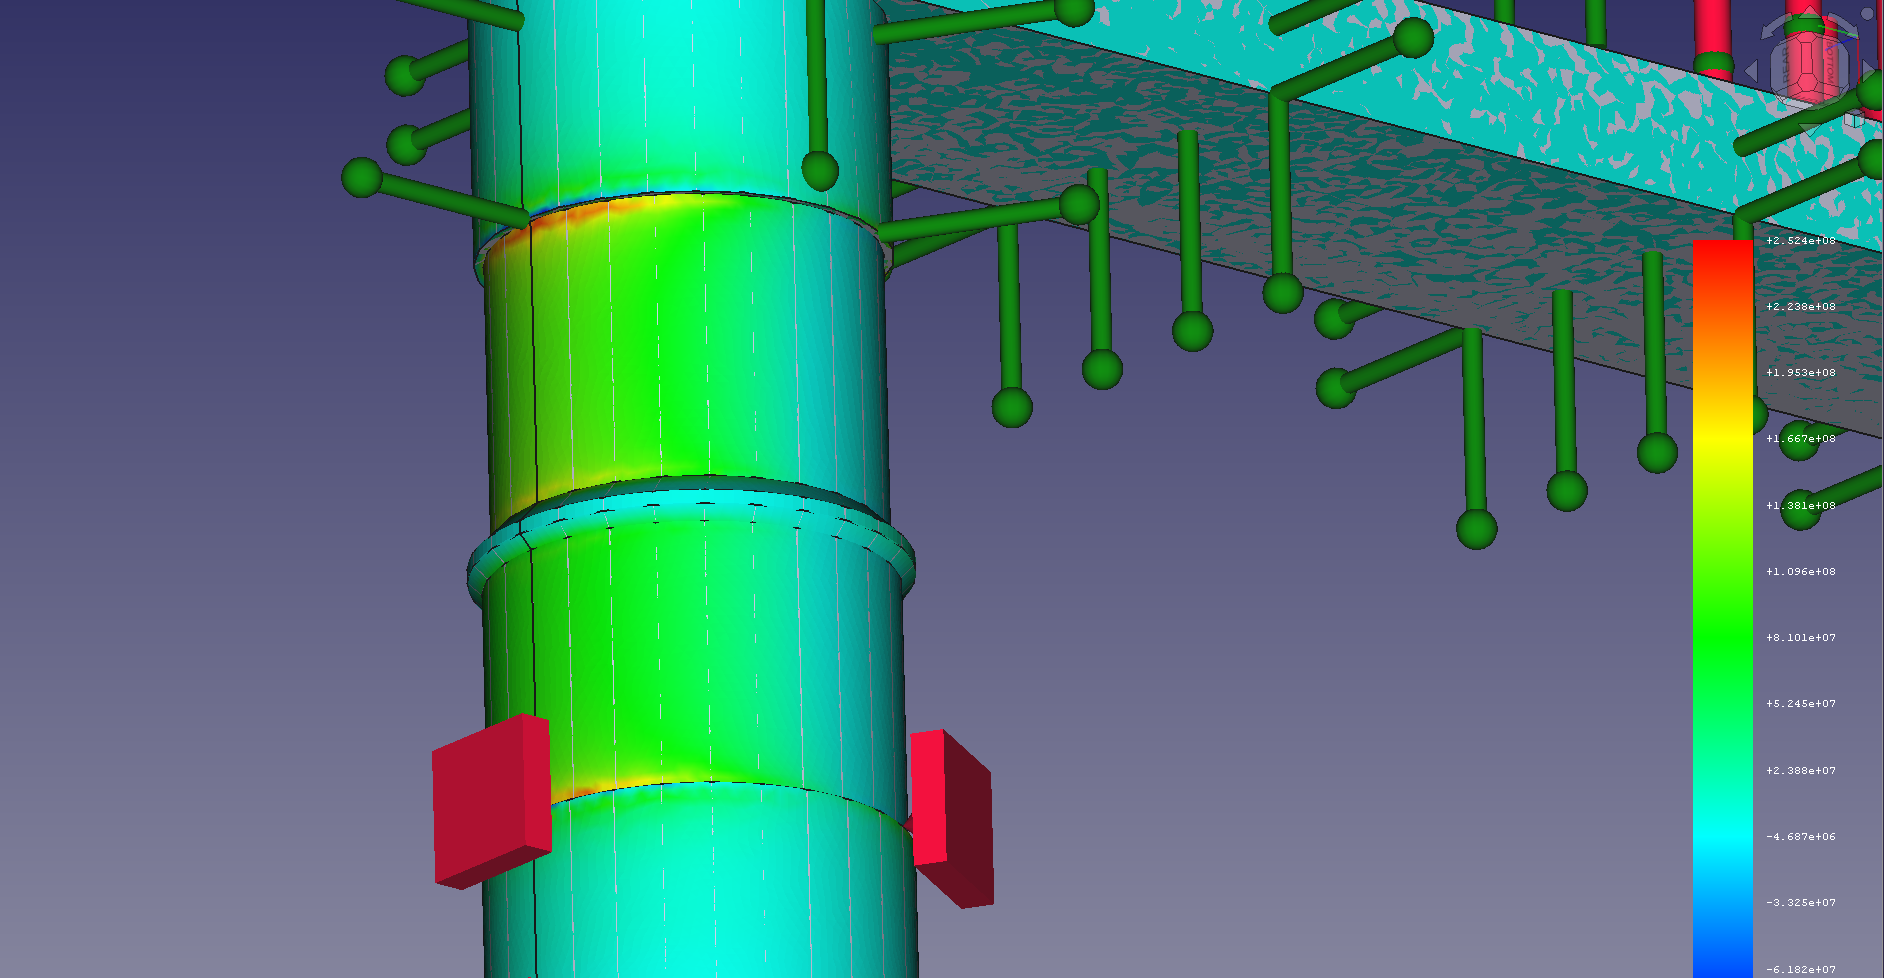
Now the key feature - where is the stress highest? Looking closely we see (perhaps unsurprisingly) that stress is maximized right at the sharp edges where the FSD is clamped. Here's a closeup - those red rings are the likely failure points if the load limits are exceeded.
Well this is getting long winded. The next step is varying the design to see how the stresses change, choosing an optimum and then actually building the thing in my shop. Save that for the next post.
The problem was that not only am I not a mechanical engineer, but I've never done a Finite Element Analysis in my life. But fortunately we live in the age of free Open Source software packages and abundant YouTube tutorials. Who needs a fancy degree when you can watch videos for a week and fake it. So I downloaded FreeCad and taught myself just enough to design parts and model stresses. Here are some results:
My initial design was basically a 150mm cylinder of 7075 Aluminum, 28.6mm in diameter on the upper 45mm where the stem mounts and 30mm in diameter on the lower 80mm where it mounts in the Future Shock compatible head set. Finally, and rather arbitrarily I bored a 3/4" hole down the center as shown:
To test how strong this thing was I first had to model a stem and headset that it would mount to. The stem I came up with was a simple plank and sleeve as shown:
and the headset I modeled as just a fixed cylinder. Putting everything together the model looked like this:
with the stem and headset highlighted here in green and the free-to-flex FSD in between. The final bit is to set test conditions. In this case I held the headset fixed. Allowed to the stem to move, but only as a rigid body and applied a force of 400lb 120mm from the center axis of the FSD. Why 400lb and 120mm? They're both a lot more than the FSD will see in real life and most importantly, they were the test conditions that the Bike Sauce used, so at least it would give me a semi-valid point of comparison.
Anyway, with all these boundary conditions set it's pretty straightforward to get FreeCad to spit out a map of the stresses on the part. This ends up looking like:
with all the squares, arrows and rods representing the boundary conditions on the headset and stem described above.
Now the key feature - where is the stress highest? Looking closely we see (perhaps unsurprisingly) that stress is maximized right at the sharp edges where the FSD is clamped. Here's a closeup - those red rings are the likely failure points if the load limits are exceeded.
Well this is getting long winded. The next step is varying the design to see how the stresses change, choosing an optimum and then actually building the thing in my shop. Save that for the next post.
Last edited by wayold; 05-04-25 at 04:41 PM.
