


Restoration of a Raleigh Stowaway 1983 - (Advice will be needed!)
 02-21-19, 05:47 AM
#26

Freewheel Medic

Join Date: Oct 2005
Location: An Island on the Coast of GA!
Posts: 12,901
Bikes: Snazzy* Schwinns, Classy Cannondales & a Super Pro Aero Lotus (* Ed.)
Mentioned: 141 Post(s)
Tagged: 0 Thread(s)
Quoted: 1463 Post(s)
Liked 2,220 Times
in
973 Posts
The challenge with the wipers is that they will not work with the wider and knobby tires you bought. What you will find is that tires/tyres make a big difference in ride quality. This might not be important to you if just using your Twenty for short jaunts and fun rides.
In my case, I use my Dahon on vacation to achieve as much exercise as possible. For this reason I want a fast tire that helps me keep my cadence up and my heart pumping. And depending on where I travel/fly to with the Dahon packed in a suitcase, I also hope to take a few long all day rides so tire/tyre choice is important.
From your comments so far, I've gleaned that you want to do a faithful restoration of this vintage family bike. That's a worthy approach and we admire your tenacity to do so correctly. To my eye those grips look great. They are on a par with the tires which appear to be a near perfect match to the originals.
Any luck in removing the stuck handlebar stem and the crank cotters yet?
__________________
Bob
Enjoying the GA coast all year long!
Thanks for visiting my website: www.freewheelspa.com
Bob
Enjoying the GA coast all year long!
Thanks for visiting my website: www.freewheelspa.com
 02-24-19, 06:29 AM
#27
Member
Thread Starter
I had difficulties with both the cotter crank and the stem. With my tools the pin was impossible to be removed, and the stem is stuck, even the hammer would not do anything. I used a lot of WD40 and vinegar, i even turn the upside down so that i spill lots of oil and let it stay for two nights , and then i tried again. Still would not let go.
So i sent it to a bike shop near me and managed to remove the cotter pin using his big professional press along with his blowtorch:

Main frame ready to visit the paint shop
The stem is a much more difficult job, i am still waiting for the news. I suspect that he will have to cut the stem, so i already ordered a replacement stem.
In the meantime i am revisiting image editing software and my good old wacom. I got the stickers but they need some editing.
The problem with the stickers is that the scan produces an image that is severely distorted by these 3 factors:
1. The sticker itself as it was printed from the factory has lost some detail from the initial source that was used.
2. The decades have put some toll to the sticker, so the colors are distorted, and imperfections on the surface of the sticker are visible.
3. My scanner also distorts the sticker and some detail is lost when i get the TIFF image.

Fixing the colors, and making lines crisper. Right symbol is the initial image acquired by my scanner, left symbol is after my edit.

The lower part of the image is as acquired by my scanner, lines are not crisp, color is not vibrant and noise and random distortion is visible. The upper part is after my first edit.
The plan for this week is to arrange for the date for the paint job and clean more thoroughly some of the parts.
So i sent it to a bike shop near me and managed to remove the cotter pin using his big professional press along with his blowtorch:
Main frame ready to visit the paint shop
The stem is a much more difficult job, i am still waiting for the news. I suspect that he will have to cut the stem, so i already ordered a replacement stem.
In the meantime i am revisiting image editing software and my good old wacom. I got the stickers but they need some editing.
The problem with the stickers is that the scan produces an image that is severely distorted by these 3 factors:
1. The sticker itself as it was printed from the factory has lost some detail from the initial source that was used.
2. The decades have put some toll to the sticker, so the colors are distorted, and imperfections on the surface of the sticker are visible.
3. My scanner also distorts the sticker and some detail is lost when i get the TIFF image.
Fixing the colors, and making lines crisper. Right symbol is the initial image acquired by my scanner, left symbol is after my edit.
The lower part of the image is as acquired by my scanner, lines are not crisp, color is not vibrant and noise and random distortion is visible. The upper part is after my first edit.
The plan for this week is to arrange for the date for the paint job and clean more thoroughly some of the parts.
Last edited by Fmtrx; 02-24-19 at 12:03 PM.
02-24-19, 12:08 PM
#28
Freewheel Medic
Join Date: Oct 2005
Location: An Island on the Coast of GA!
Posts: 12,901
Bikes: Snazzy* Schwinns, Classy Cannondales & a Super Pro Aero Lotus (* Ed.)
Mentioned: 141 Post(s)
Tagged: 0 Thread(s)
Quoted: 1463 Post(s)
Liked 2,220 Times
in
973 Posts
The most important thing is you are making progress and not giving up. Keep up the good work!
__________________
Bob
Enjoying the GA coast all year long!
Thanks for visiting my website: www.freewheelspa.com
Bob
Enjoying the GA coast all year long!
Thanks for visiting my website: www.freewheelspa.com
02-28-19, 01:51 AM
#30
Member
Thread Starter
I had some good news and some bad news.
Good news are that the bike shop managed to dismantle the stuck stem without the need to use a saw.
I waited for 3 days, and decided to visit him to check the progress. I was eager to know what happened cause all he had to do is to use his professional big tools and remove a stem,
So i suspected that he had cut the stem and he had ordered a replacement without telling me.
No i was wrong. What had really happened made me laugh afterwards. He had finished, and told his wife to call me. His wife calls the wrong number, and the person on the other side says "no i have not sent you a bike"
Normally when you call a wrong number either you try again or you ask your husband what is the number if you cannot read his handwriting. No .they just stopped trying to reach me
Anyway the bad news now:
The plastic ring in the fork is seriously damaged and i will have to search for a specialist with a lathe to create a new one from teflon or ertalon

He also told me to change these parts:

But I do not think i will go to this process. I cleaned them, examined the surface with my hand, there are no irregularities, the surface is smooth.
I think i will keep these parts and proceed to change only the bearings.
Which brings me to the next issue.
There are no such bearings in my country. I will have to order from UK even the ...bearings!
I counted 20 small bearings in the fork (specs say 5/32) and 11+11 in the bottom bracket (specs 1/4)
The problem is that after checking ebay, the sellers do not mention sizes only the type of the bike. So i will have to search the tech specs of the bike they say
and if the sizes much with my bike i will order them. I suspect that they sizes should be common for all Raleigh bikes of this era (5/32 front, 1/4 back) , but better be safe than sorry.
Good news are that the bike shop managed to dismantle the stuck stem without the need to use a saw.
I waited for 3 days, and decided to visit him to check the progress. I was eager to know what happened cause all he had to do is to use his professional big tools and remove a stem,
So i suspected that he had cut the stem and he had ordered a replacement without telling me.
No i was wrong. What had really happened made me laugh afterwards. He had finished, and told his wife to call me. His wife calls the wrong number, and the person on the other side says "no i have not sent you a bike"
Normally when you call a wrong number either you try again or you ask your husband what is the number if you cannot read his handwriting. No .they just stopped trying to reach me
Anyway the bad news now:
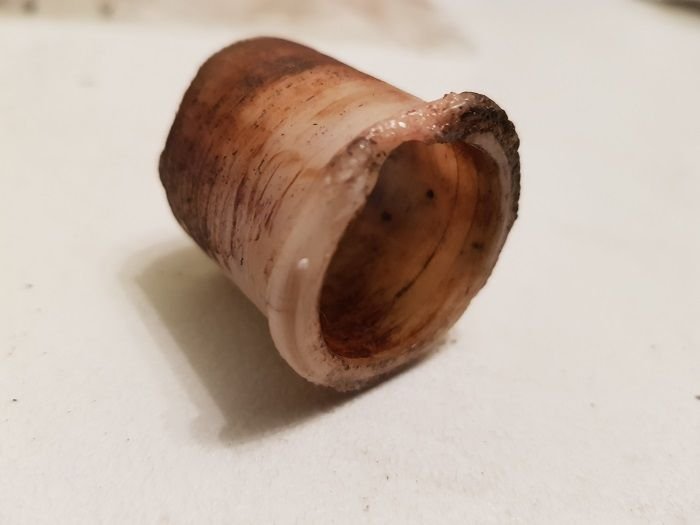
The plastic ring in the fork is seriously damaged and i will have to search for a specialist with a lathe to create a new one from teflon or ertalon
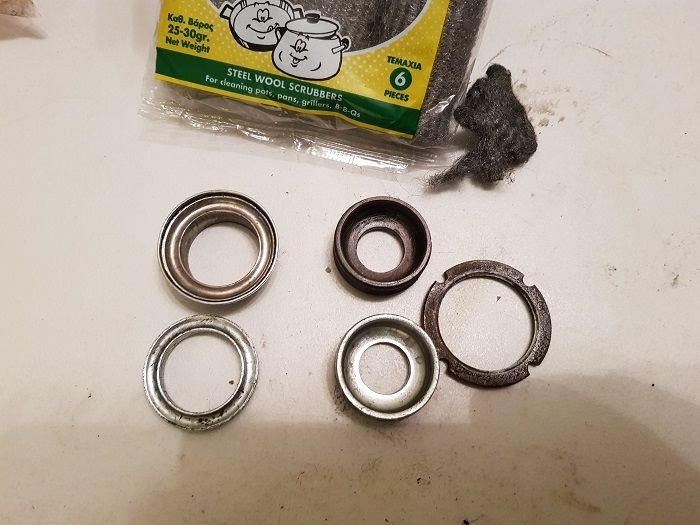
He also told me to change these parts:
But I do not think i will go to this process. I cleaned them, examined the surface with my hand, there are no irregularities, the surface is smooth.
I think i will keep these parts and proceed to change only the bearings.
Which brings me to the next issue.
There are no such bearings in my country. I will have to order from UK even the ...bearings!
I counted 20 small bearings in the fork (specs say 5/32) and 11+11 in the bottom bracket (specs 1/4)
The problem is that after checking ebay, the sellers do not mention sizes only the type of the bike. So i will have to search the tech specs of the bike they say
and if the sizes much with my bike i will order them. I suspect that they sizes should be common for all Raleigh bikes of this era (5/32 front, 1/4 back) , but better be safe than sorry.
02-28-19, 06:47 AM
#31
Freewheel Medic
Join Date: Oct 2005
Location: An Island on the Coast of GA!
Posts: 12,901
Bikes: Snazzy* Schwinns, Classy Cannondales & a Super Pro Aero Lotus (* Ed.)
Mentioned: 141 Post(s)
Tagged: 0 Thread(s)
Quoted: 1463 Post(s)
Liked 2,220 Times
in
973 Posts
@Fmtrx your headset and bottom bracket spindle parts look fine and there is no need to replace them. Please post a picture of your bearings after cleaning. There's a good chance they are fine as well. If they are shinny and show no corrosion or discoloration you can continue to use them.
The damaged plastic piece is a bit of a mystery to me. Where is it installed and what does it do? Possibly @cudak888 can identify it and provide some insight as to its purpose.
That is great news on the LBS mechanic being able to remove the stem.
The damaged plastic piece is a bit of a mystery to me. Where is it installed and what does it do? Possibly @cudak888 can identify it and provide some insight as to its purpose.
That is great news on the LBS mechanic being able to remove the stem.
__________________
Bob
Enjoying the GA coast all year long!
Thanks for visiting my website: www.freewheelspa.com
Bob
Enjoying the GA coast all year long!
Thanks for visiting my website: www.freewheelspa.com
02-28-19, 06:51 AM
#32
www.theheadbadge.com

Join Date: Sep 2005
Location: Southern Florida
Posts: 28,529
Bikes: https://www.theheadbadge.com
Mentioned: 124 Post(s)
Tagged: 0 Thread(s)
Quoted: 2429 Post(s)
Liked 4,426 Times
in
2,101 Posts
The nylon bit is the Twenty's upper headset race (though really a bushing, not a race), believe it or not. Best place to get a replacement - to my knowledge - is from someone who's cut the headtube down on a Twenty to delete this piece in favor of a conventional upper race.
-Kurt
-Kurt
__________________


02-28-19, 07:06 AM
#33
Member
Thread Starter
@pastorbobnlnh yes, it is located at the upper part of the tube where the stem is inserted. I think it was a common practice to do so to reduce costs by avoiding putting extra bearings? I am not sure. Just a hypothesis.
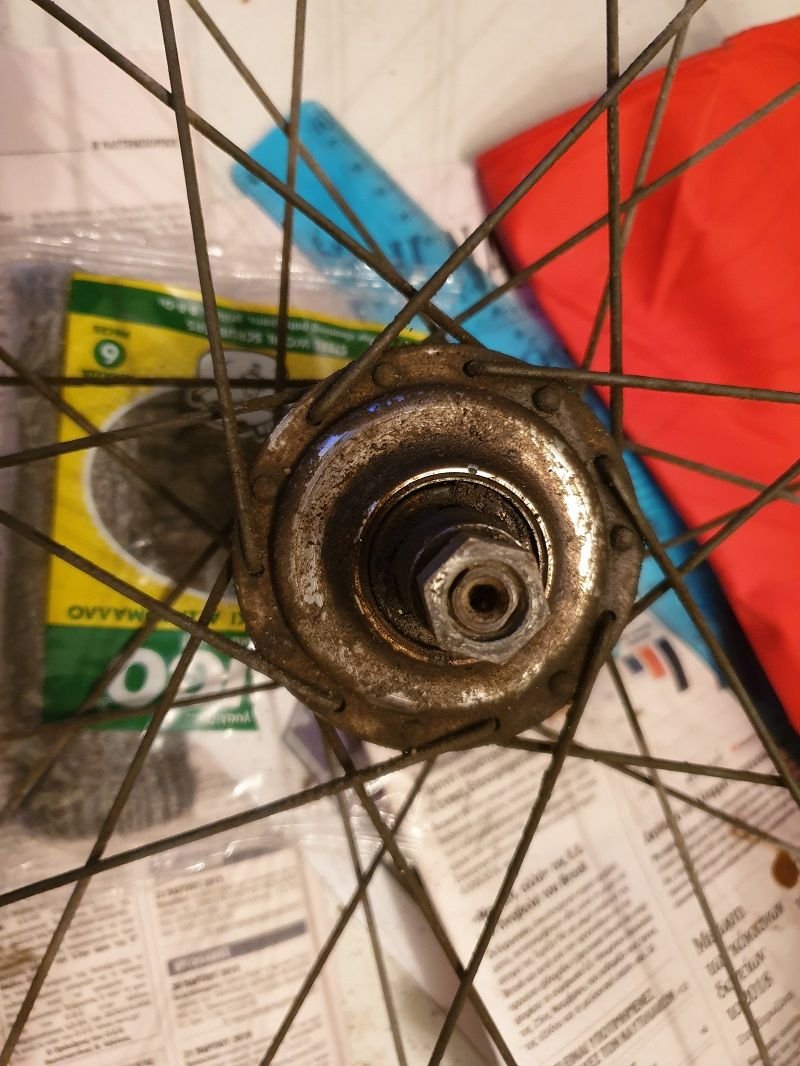
Regarding the bearings i noticed that some of them had cracks on their surface. I have not counted on how many of them did so, but as soon as i clean them i will post a photo.
I believe that i will need some replacements - if not all of them.
Thanks for doing the check of the other parts, now i feel safer.
@cudak888 So it is called a bush, thank you, i am not familiar with the terminology. Perhaps i will do a search and find a used one. Maybe it should be better than a reproduced one.
EDIT : I just did a search for <<bush>> and look what i also found in the list:

Priceless...
Regarding the bearings i noticed that some of them had cracks on their surface. I have not counted on how many of them did so, but as soon as i clean them i will post a photo.
I believe that i will need some replacements - if not all of them.
Thanks for doing the check of the other parts, now i feel safer.
@cudak888 So it is called a bush, thank you, i am not familiar with the terminology. Perhaps i will do a search and find a used one. Maybe it should be better than a reproduced one.
EDIT : I just did a search for <<bush>> and look what i also found in the list:
Priceless...
Last edited by Fmtrx; 02-28-19 at 07:16 AM.
02-28-19, 07:57 AM
#34
Freewheel Medic
Join Date: Oct 2005
Location: An Island on the Coast of GA!
Posts: 12,901
Bikes: Snazzy* Schwinns, Classy Cannondales & a Super Pro Aero Lotus (* Ed.)
Mentioned: 141 Post(s)
Tagged: 0 Thread(s)
Quoted: 1463 Post(s)
Liked 2,220 Times
in
973 Posts
@Fmtrx, it is a "bushing" not a "Bush." Hahaha!
Does the plastic bushing fit in the circled area of your upper headset?

Does the plastic bushing fit in the circled area of your upper headset?
__________________
Bob
Enjoying the GA coast all year long!
Thanks for visiting my website: www.freewheelspa.com
Bob
Enjoying the GA coast all year long!
Thanks for visiting my website: www.freewheelspa.com
03-26-19, 01:05 AM
#36
Member
Thread Starter
Kickstand installation question
I have received a replacement kickstand, and i am not sure which way to use to insert the pin that keeps the stand in its place.
Should I use a hammer and hit it ? Or is there a more gentle way o insert the pin without damaging it?
Update:
It has been a while since i posted here, but i was in the process of waiting for some parts. I will post what i found during the following days.
For starters, my back reflector was missing and the casing seemed to be in a bad state:
back reflector. The outer part is missing for years
Bought a replacement (left) and i thoroughly cleaned the outer casing of my reflector (right)

I got all internals from the replacement and installed them in my rubber casing as it was in much better shape than the casing of the replacement. The result is acceptable.

The mudguard i bought from ebay, was from the same model but with different decals. I removed the decal as i would like to preserve the old decal even if i am not planning to use it.
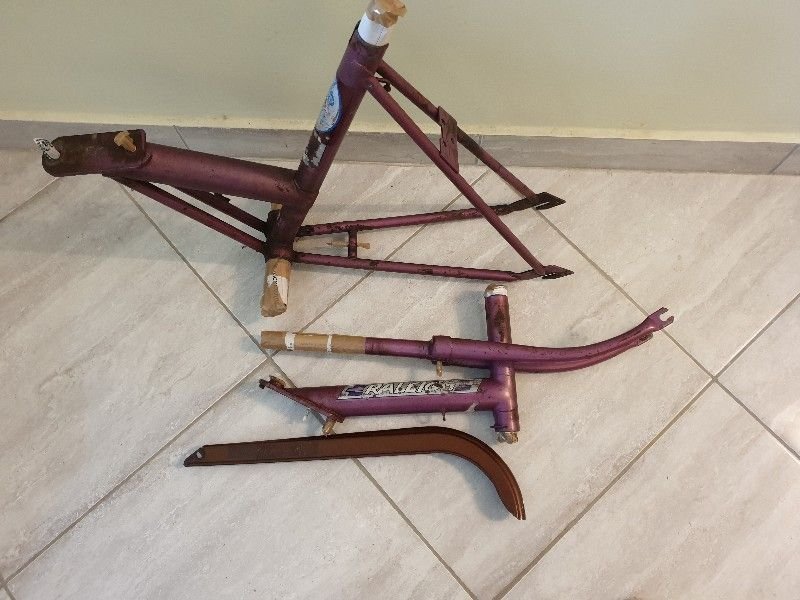
frame is prepared for the paint shop.
More to follow regarding parts i have, the next hours/days
I have received a replacement kickstand, and i am not sure which way to use to insert the pin that keeps the stand in its place.
Should I use a hammer and hit it ? Or is there a more gentle way o insert the pin without damaging it?
Update:
It has been a while since i posted here, but i was in the process of waiting for some parts. I will post what i found during the following days.
For starters, my back reflector was missing and the casing seemed to be in a bad state:
back reflector. The outer part is missing for years
Bought a replacement (left) and i thoroughly cleaned the outer casing of my reflector (right)
I got all internals from the replacement and installed them in my rubber casing as it was in much better shape than the casing of the replacement. The result is acceptable.
The mudguard i bought from ebay, was from the same model but with different decals. I removed the decal as i would like to preserve the old decal even if i am not planning to use it.
frame is prepared for the paint shop.
More to follow regarding parts i have, the next hours/days
Last edited by Fmtrx; 04-07-19 at 12:13 PM.


 04-21-19, 07:21 AM
#38
www.theheadbadge.com
Join Date: Sep 2005
Location: Southern Florida
Posts: 28,529
Bikes: https://www.theheadbadge.com
Mentioned: 124 Post(s)
Tagged: 0 Thread(s)
Quoted: 2429 Post(s)
Liked 4,426 Times
in
2,101 Posts
Good stuff!
FYI, I have that upper nylon race out of my blue Twenty, and you're welcome to it for the cost of shipping. The headtube on mine isn't about to be the same ever again, so I won't be needing it.
Send me a DM so I don't forget. Thanks!
-Kurt
FYI, I have that upper nylon race out of my blue Twenty, and you're welcome to it for the cost of shipping. The headtube on mine isn't about to be the same ever again, so I won't be needing it.
Send me a DM so I don't forget. Thanks!
-Kurt
__________________
04-21-19, 01:59 PM
#39
Senior Member

I was quite surprised when a friend of mine in town suddenly announced that he too had one of those when he saw my Twenty. His wife rode this Shopper when she could. Love the Raleigh lilac colour!
You are making great progress!
04-22-19, 01:48 AM
#40
Member
Thread Starter
Thanks for the offer @cudak888 , i had one replacement, but i a interested in a second one I will PM you about this.
@3speedslow i always liked the purple of raleigh, here some people have some prejudices and say that it is not a manly color.
But I could not care less. I wanted to maintain its original color, as i used it since my childhood.
If it was a new project i would have added two other options as well : electric blue and dark green (British racing green anyone? )
)
Updates:
I have some photos of my repainted frame. The frame was painted with lilac code RAL4001.


aaah! at last! no rust!

Kickstand Installation:
I tried and successfully installed the kickstand with minimum effort and tools.
No tappered punch is needed to install the pin.
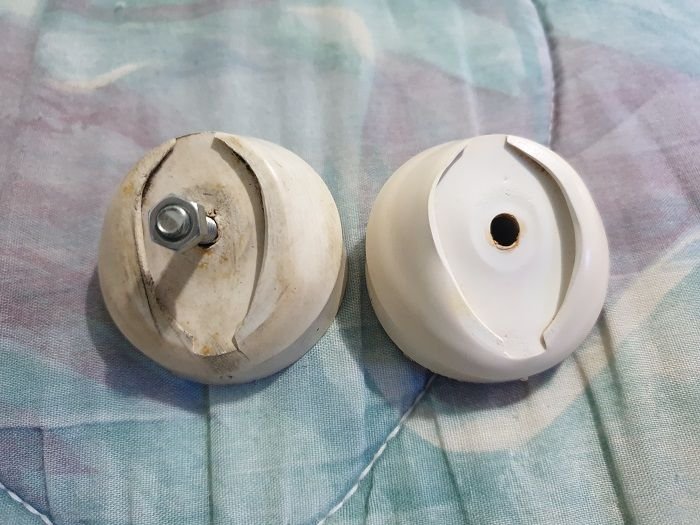
All i used was a hammer, and the 4 mm screw driver head piece below :


I placed the head on the pin and gently hit the head with the hammer and pushed the pin inside the hole.
Fender cleaning:
Who said that we should clean only what we can see? I removed most of the rust of the internal side of fenders:


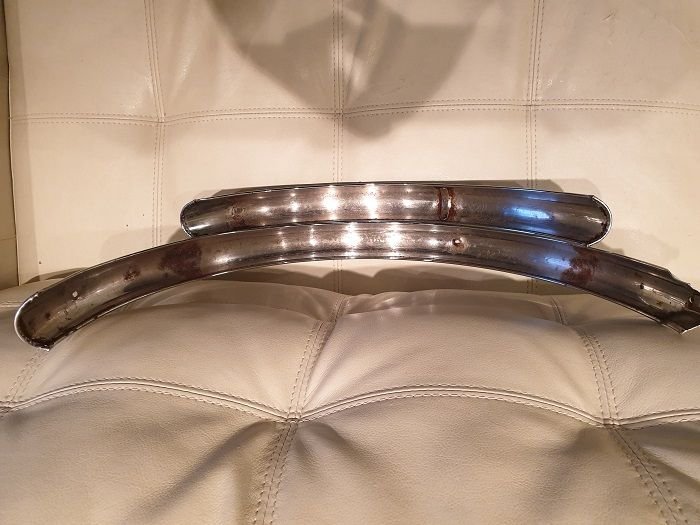
Fenders after cleaning. Rust is mostly removed.
@3speedslow i always liked the purple of raleigh, here some people have some prejudices and say that it is not a manly color.
But I could not care less. I wanted to maintain its original color, as i used it since my childhood.
If it was a new project i would have added two other options as well : electric blue and dark green (British racing green anyone?
)Updates:
I have some photos of my repainted frame. The frame was painted with lilac code RAL4001.
aaah! at last! no rust!
Kickstand Installation:
I tried and successfully installed the kickstand with minimum effort and tools.
No tappered punch is needed to install the pin.
All i used was a hammer, and the 4 mm screw driver head piece below :
I placed the head on the pin and gently hit the head with the hammer and pushed the pin inside the hole.
Fender cleaning:
Who said that we should clean only what we can see? I removed most of the rust of the internal side of fenders:
Fenders after cleaning. Rust is mostly removed.
Last edited by Fmtrx; 04-24-19 at 12:57 AM.
04-22-19, 05:31 AM
#41
www.theheadbadge.com
Join Date: Sep 2005
Location: Southern Florida
Posts: 28,529
Bikes: https://www.theheadbadge.com
Mentioned: 124 Post(s)
Tagged: 0 Thread(s)
Quoted: 2429 Post(s)
Liked 4,426 Times
in
2,101 Posts
Really nicely done.
And pooh to those who can't say anything nice about the color.
-Kurt
And pooh to those who can't say anything nice about the color.
-Kurt
__________________
04-22-19, 08:36 AM
#42
Senior Member
Bravo on you! Lilac is a very good colour for the Twenty model. Are you going to treat the underside of mudguards before reinstalling them?
BRG( British Racing Green) would be another smashing choice as well. Wild thoughts of the BRG/Black Brompton have recently been circling in my brain. That would take aHail Mary or a massive sell off of all my other bikes!
Keep the build going!
BRG( British Racing Green) would be another smashing choice as well. Wild thoughts of the BRG/Black Brompton have recently been circling in my brain. That would take aHail Mary or a massive sell off of all my other bikes!
Keep the build going!
04-22-19, 02:02 PM
#43
Member
Thread Starter
Thanks @cudak888
@3speedslow : i did not do anything more than removing the rust by sand blasting. Do you think i could do anything more? ( application of rust converter perhaps ?)
These BRG/Black Brompton bikes must be quite expensive, aren't they? They are quite long bikes for their wheel diameter.
Current status:
I have installed wheels, fenders and the stem - with the handlebar on the skeleton, and it is now standing on its wheels and on its stand.
At last, i have something now that resembles to a bike!
(though the experience of driving this bike in its current status will be traumatizing:
a) it has the moving power of a roller skate (no bottom bracket installed )
b) it has no brakes
c) it does not have saddle installed
Imagine rolling with this bike on a downhill without stopping power and ... sitting on it . . .(ouch!)
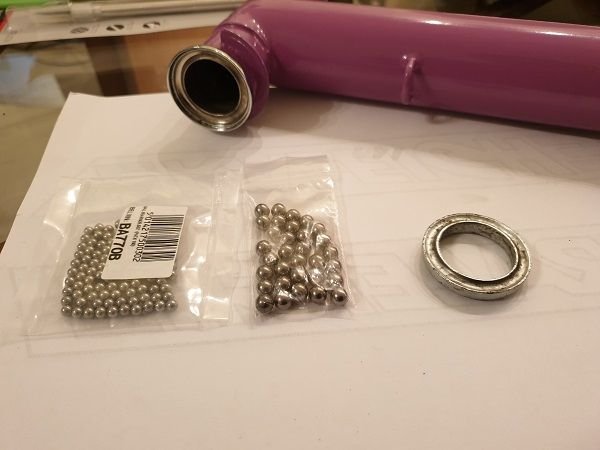
new ball bearings for the stem and bottom bracket.
Changed ball bearings with brand new. Notice that the grease is minimum here. Later, i changed my mind, reopened and put extra grease.

dismantled a second gear grip i bought in order to source the metal ring. My ring was broken and the replacement grip was generally in worse condition than mine. So i got only its ring.
@3speedslow : i did not do anything more than removing the rust by sand blasting. Do you think i could do anything more? ( application of rust converter perhaps ?)
These BRG/Black Brompton bikes must be quite expensive, aren't they? They are quite long bikes for their wheel diameter.
Current status:
I have installed wheels, fenders and the stem - with the handlebar on the skeleton, and it is now standing on its wheels and on its stand.
At last, i have something now that resembles to a bike!
(though the experience of driving this bike in its current status will be traumatizing:
a) it has the moving power of a roller skate (no bottom bracket installed )
b) it has no brakes
c) it does not have saddle installed
Imagine rolling with this bike on a downhill without stopping power and ... sitting on it . . .(ouch!)
new ball bearings for the stem and bottom bracket.
Changed ball bearings with brand new. Notice that the grease is minimum here. Later, i changed my mind, reopened and put extra grease.
dismantled a second gear grip i bought in order to source the metal ring. My ring was broken and the replacement grip was generally in worse condition than mine. So i got only its ring.
Last edited by Fmtrx; 04-25-19 at 03:56 AM.
04-22-19, 10:56 PM
#45
Member
Thread Starter
A clear coat of paint would be nice. I will buy a spray can of a good quality paint.
This, and also adding the fact that the bike will be stored in a dry place will help avoiding new rust.
by the way what model, year and color is your 3 speed? - or at least your favorite cause you said that you have several bikes
This, and also adding the fact that the bike will be stored in a dry place will help avoiding new rust.
by the way what model, year and color is your 3 speed? - or at least your favorite cause you said that you have several bikes
04-23-19, 05:57 AM
#46
Freewheel Medic
Join Date: Oct 2005
Location: An Island on the Coast of GA!
Posts: 12,901
Bikes: Snazzy* Schwinns, Classy Cannondales & a Super Pro Aero Lotus (* Ed.)
Mentioned: 141 Post(s)
Tagged: 0 Thread(s)
Quoted: 1463 Post(s)
Liked 2,220 Times
in
973 Posts
@Fmtrx, I am late in commenting on your latest update due to it being Easter (this past Sunday) here for us westerners and now I am traveling on holiday!
Great work and your progress is marching along incredibly well. Your work on your first C&V rehab is first class. You should feel very positive about your accomplishments. I'm so glad you created a thread here after your original post in Folding Bikes. I knew you would receive great advice and encouragement here.
Can't wait to see it complete and ready to ride!
Great work and your progress is marching along incredibly well.
Your work on your first C&V rehab is first class. You should feel very positive about your accomplishments. I'm so glad you created a thread here after your original post in Folding Bikes. I knew you would receive great advice and encouragement here. Can't wait to see it complete and ready to ride!
__________________
Bob
Enjoying the GA coast all year long!
Thanks for visiting my website: www.freewheelspa.com
Bob
Enjoying the GA coast all year long!
Thanks for visiting my website: www.freewheelspa.com
04-23-19, 09:35 AM
#47
Senior Member
A clear coat of paint would be nice. I will buy a spray can of a good quality paint.
This, and also adding the fact that the bike will be stored in a dry place will help avoiding new rust.
by the way what model, year and color is your 3 speed? - or at least your favorite cause you said that you have several bikes
This, and also adding the fact that the bike will be stored in a dry place will help avoiding new rust.
by the way what model, year and color is your 3 speed? - or at least your favorite cause you said that you have several bikes

This morning it got another Brooks to try out. A 1979 reissue Colt. Very comfortable like the B17.
04-24-19, 01:31 AM
#48
Member
Thread Starter
@pastorbobnlnh Thank you for your kind words. I hope you had good time during your vacations. All the support i received here from people that share the same passion definitely plays major role in keeping up with the work. I am very happy that these bikes have even today many supporters, they were of excellent build quality, sophisticated durable matched with a classy appearance. My Raleigh Mustang I got in 1989 is a very good bike, it is fast, i has more speeds, but somehow the twenty is more elegant in my eyes. Not only this but i always thought that the sturmey archer seems more technologically advanced than the later derailleur shifter in my eyes - even if the compromise is that you get only three speeds.
Everything that could go wrong with this bike, well.. it went!
a) the stem was stuck and needed professional help and tools
b) cotter pins the same as a)
c) even the internal ring of the shifter grip was broken
d) cannot source gear cable here, i had to order from ebay
e) after the painting of the frame, i noticed something yesterday...
I will say this with a picture....

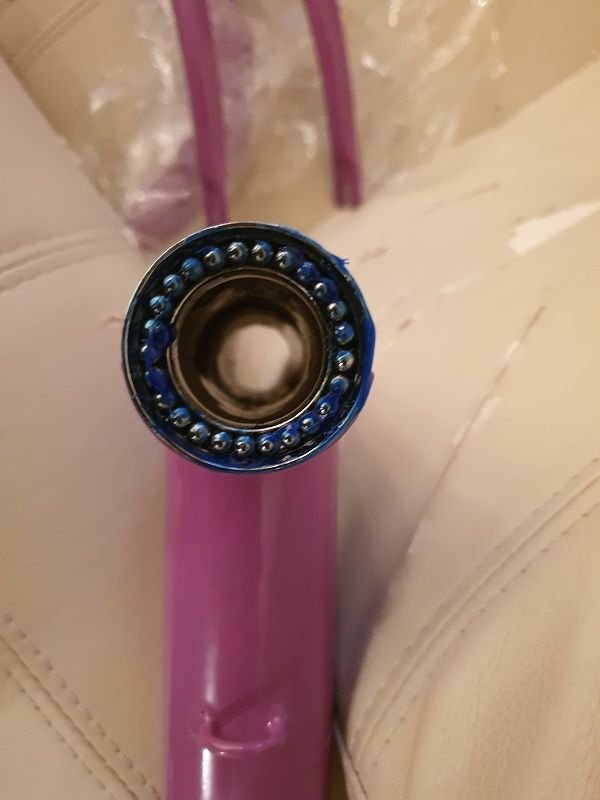
It took me a couple of hours to manage to screw the caps which contain the ball bearings.
It was like hell.
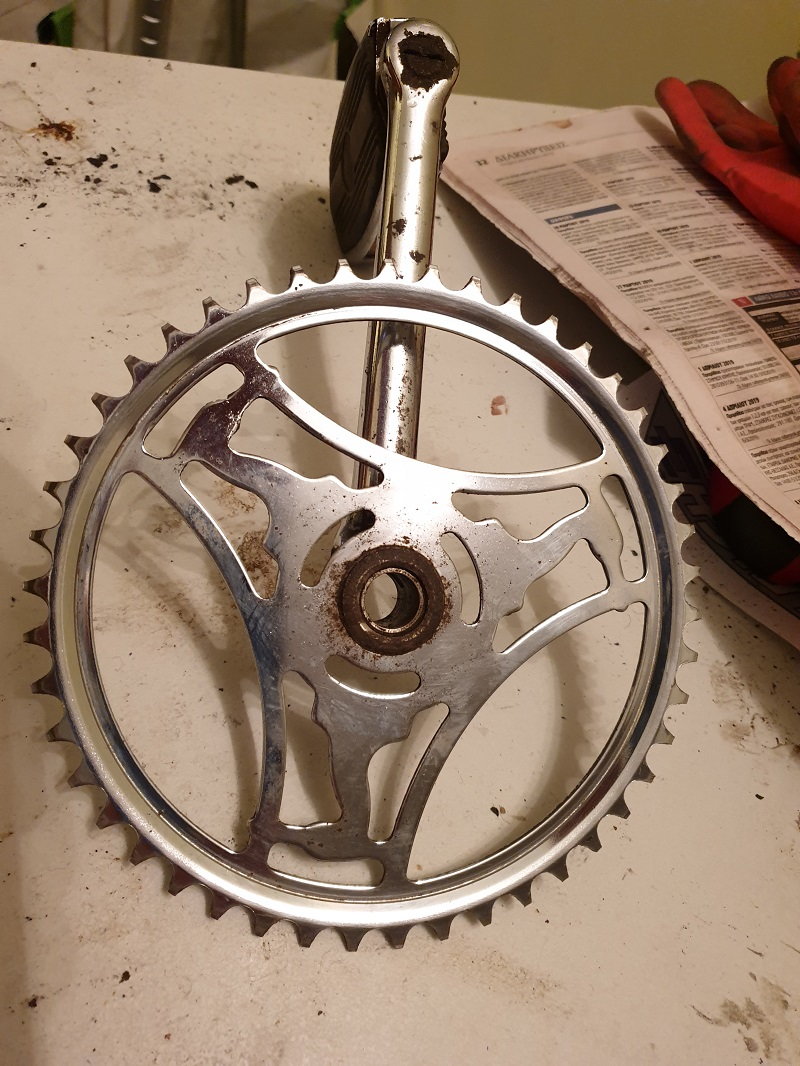
I used a paint thinner and metal wool, it was very difficult to remove the paint, i am not sure if this has to do with
the type of paint. It is electrostatic paint. I applied WD40 to clean the inside. Then again paint thinner and rubbing again.
Then i had the issue that there were remains of paint that covered the inside of the lower ports of the selvage. For this case I used the point of a box cutter cycling on the selvage to remove the paint.
The i applied grease and the cap was stuck while trying to screw. I had to hit it gently with a hammer to provide enough screwing torque power.
Then unscrew and screw multiple times again and again until i could screw this with my hand only. This was a nightmare!
Anyway, here are the results:

Find the differences: yes the left one seems that is missing a ball, but it is actually covered with grease.

After this nightmare i stll cannot believe that i see the caps screwed! It seems to me like i built the Parthenon again!
Everything that could go wrong with this bike, well.. it went! ---> CONTINUED:
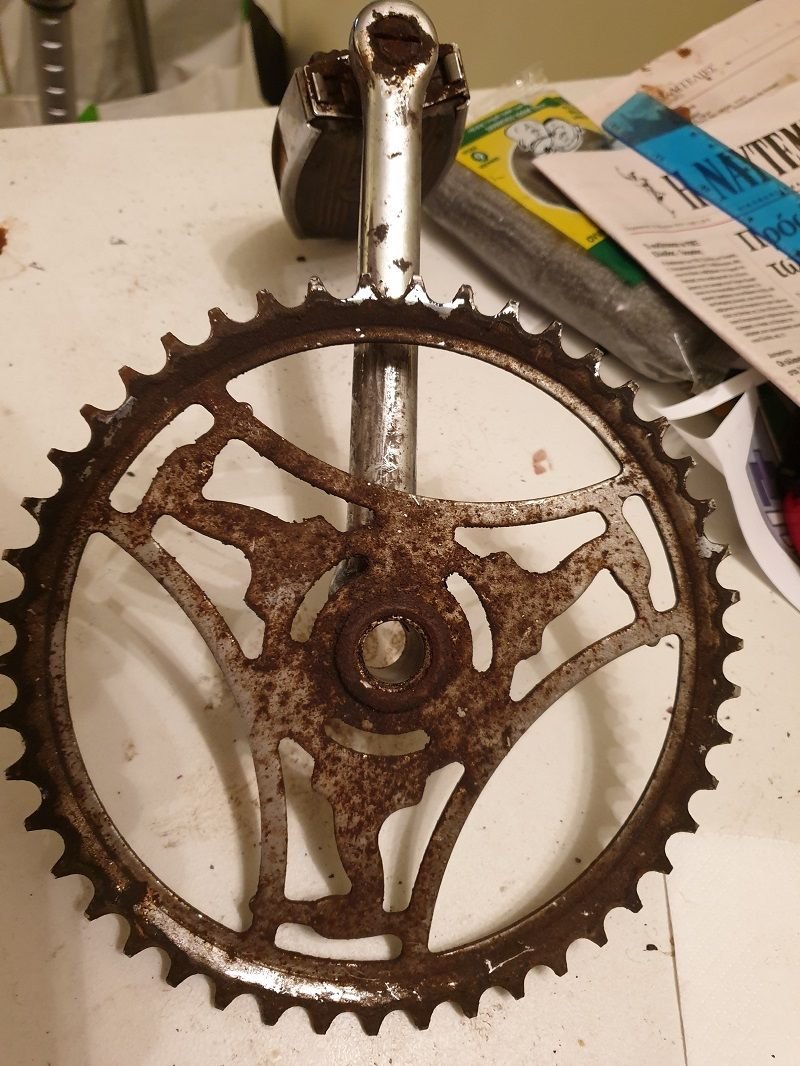
f) The crank arms are bent, which means that the left pedal hits on the stand, and the right pedal hits on the chainguard.
I will try to make them straight, not sure what is the best way though...If anyone knows just drop me a line here :/
@3speedslow : nice bike, i liked the two tone color on the fenders. Brown color was a favorite choice back in the 70s. I noticed you changed the saddle. I am planning to change mine too with a new brooks one.
Your twenty was the 1st generation which had a good quality saddle with two big springs. Mine is 2nd gen and did not have these. I am thinking of buying this:

B67
Everything that could go wrong with this bike, well.. it went!
a) the stem was stuck and needed professional help and tools
b) cotter pins the same as a)
c) even the internal ring of the shifter grip was broken
d) cannot source gear cable here, i had to order from ebay
e) after the painting of the frame, i noticed something yesterday...
I will say this with a picture....
It took me a couple of hours to manage to screw the caps which contain the ball bearings.
It was like hell.
I used a paint thinner and metal wool, it was very difficult to remove the paint, i am not sure if this has to do with
the type of paint. It is electrostatic paint. I applied WD40 to clean the inside. Then again paint thinner and rubbing again.
Then i had the issue that there were remains of paint that covered the inside of the lower ports of the selvage. For this case I used the point of a box cutter cycling on the selvage to remove the paint.
The i applied grease and the cap was stuck while trying to screw. I had to hit it gently with a hammer to provide enough screwing torque power.
Then unscrew and screw multiple times again and again until i could screw this with my hand only. This was a nightmare!
Anyway, here are the results:
Find the differences: yes the left one seems that is missing a ball, but it is actually covered with grease.
After this nightmare i stll cannot believe that i see the caps screwed! It seems to me like i built the Parthenon again!
Everything that could go wrong with this bike, well.. it went! ---> CONTINUED:
f) The crank arms are bent, which means that the left pedal hits on the stand, and the right pedal hits on the chainguard.
I will try to make them straight, not sure what is the best way though...If anyone knows just drop me a line here :/
@3speedslow : nice bike, i liked the two tone color on the fenders. Brown color was a favorite choice back in the 70s. I noticed you changed the saddle. I am planning to change mine too with a new brooks one.
Your twenty was the 1st generation which had a good quality saddle with two big springs. Mine is 2nd gen and did not have these. I am thinking of buying this:
B67
Last edited by Fmtrx; 04-24-19 at 01:41 AM.
04-24-19, 05:48 AM
#49
Freewheel Medic
Join Date: Oct 2005
Location: An Island on the Coast of GA!
Posts: 12,901
Bikes: Snazzy* Schwinns, Classy Cannondales & a Super Pro Aero Lotus (* Ed.)
Mentioned: 141 Post(s)
Tagged: 0 Thread(s)
Quoted: 1463 Post(s)
Liked 2,220 Times
in
973 Posts
The electrostatic paint is called Powder Coat here in the US. It's too bad the shop that did this work for you were not more careful. It is a very hard and durable coating which is difficult to remove. It is amazing you were able to install the cups.
As far as the bent crank arms. Possibly a machine shop might have a press that you can squeeze them between to straighten, but I have no idea other than that one. The other possibility is one from another Raleigh such as a Sports, etc..
Your choice for the Brooks saddle is perfect, in my opinion.
As far as the bent crank arms. Possibly a machine shop might have a press that you can squeeze them between to straighten, but I have no idea other than that one.
The other possibility is one from another Raleigh such as a Sports, etc.. Your choice for the Brooks saddle is perfect, in my opinion.
__________________
Bob
Enjoying the GA coast all year long!
Thanks for visiting my website: www.freewheelspa.com
Bob
Enjoying the GA coast all year long!
Thanks for visiting my website: www.freewheelspa.com
04-24-19, 06:02 AM
#50
Member
Thread Starter
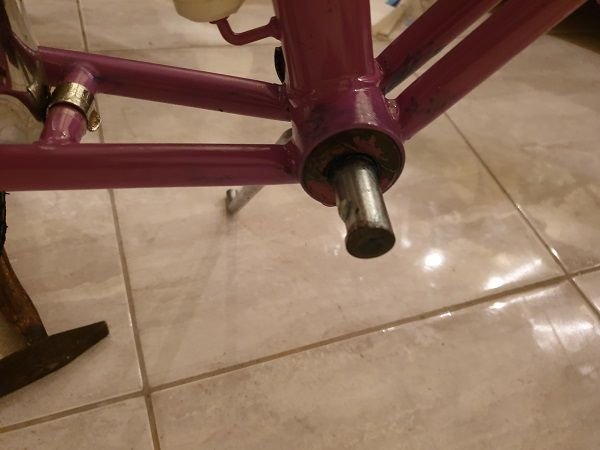
This sounds a good idea : a machine shop. Hopefully they will be able to do it as it is steel and not aluminum (i think).
The fact that they did not cover the bottom bracket, the stem and the saddle tube is a mystery to me, because they cared covering the 'exhaust' holes of the frame by inserting pins and also the selvages of the base tube where the folding mechanism is located.
The fact that they did not cover the bottom bracket, the stem and the saddle tube is a mystery to me, because they cared covering the 'exhaust' holes of the frame by inserting pins and also the selvages of the base tube where the folding mechanism is located.