


How to access cone nut to remove axle?
 04-22-21, 07:28 AM
#26

I'm good to go!
Join Date: Jul 2017
Location: Mississippi
Posts: 14,992
Bikes: Tarmac Disc Comp Di2 - 2020
Mentioned: 51 Post(s)
Tagged: 0 Thread(s)
Quoted: 6196 Post(s)
Liked 4,811 Times
in
3,319 Posts
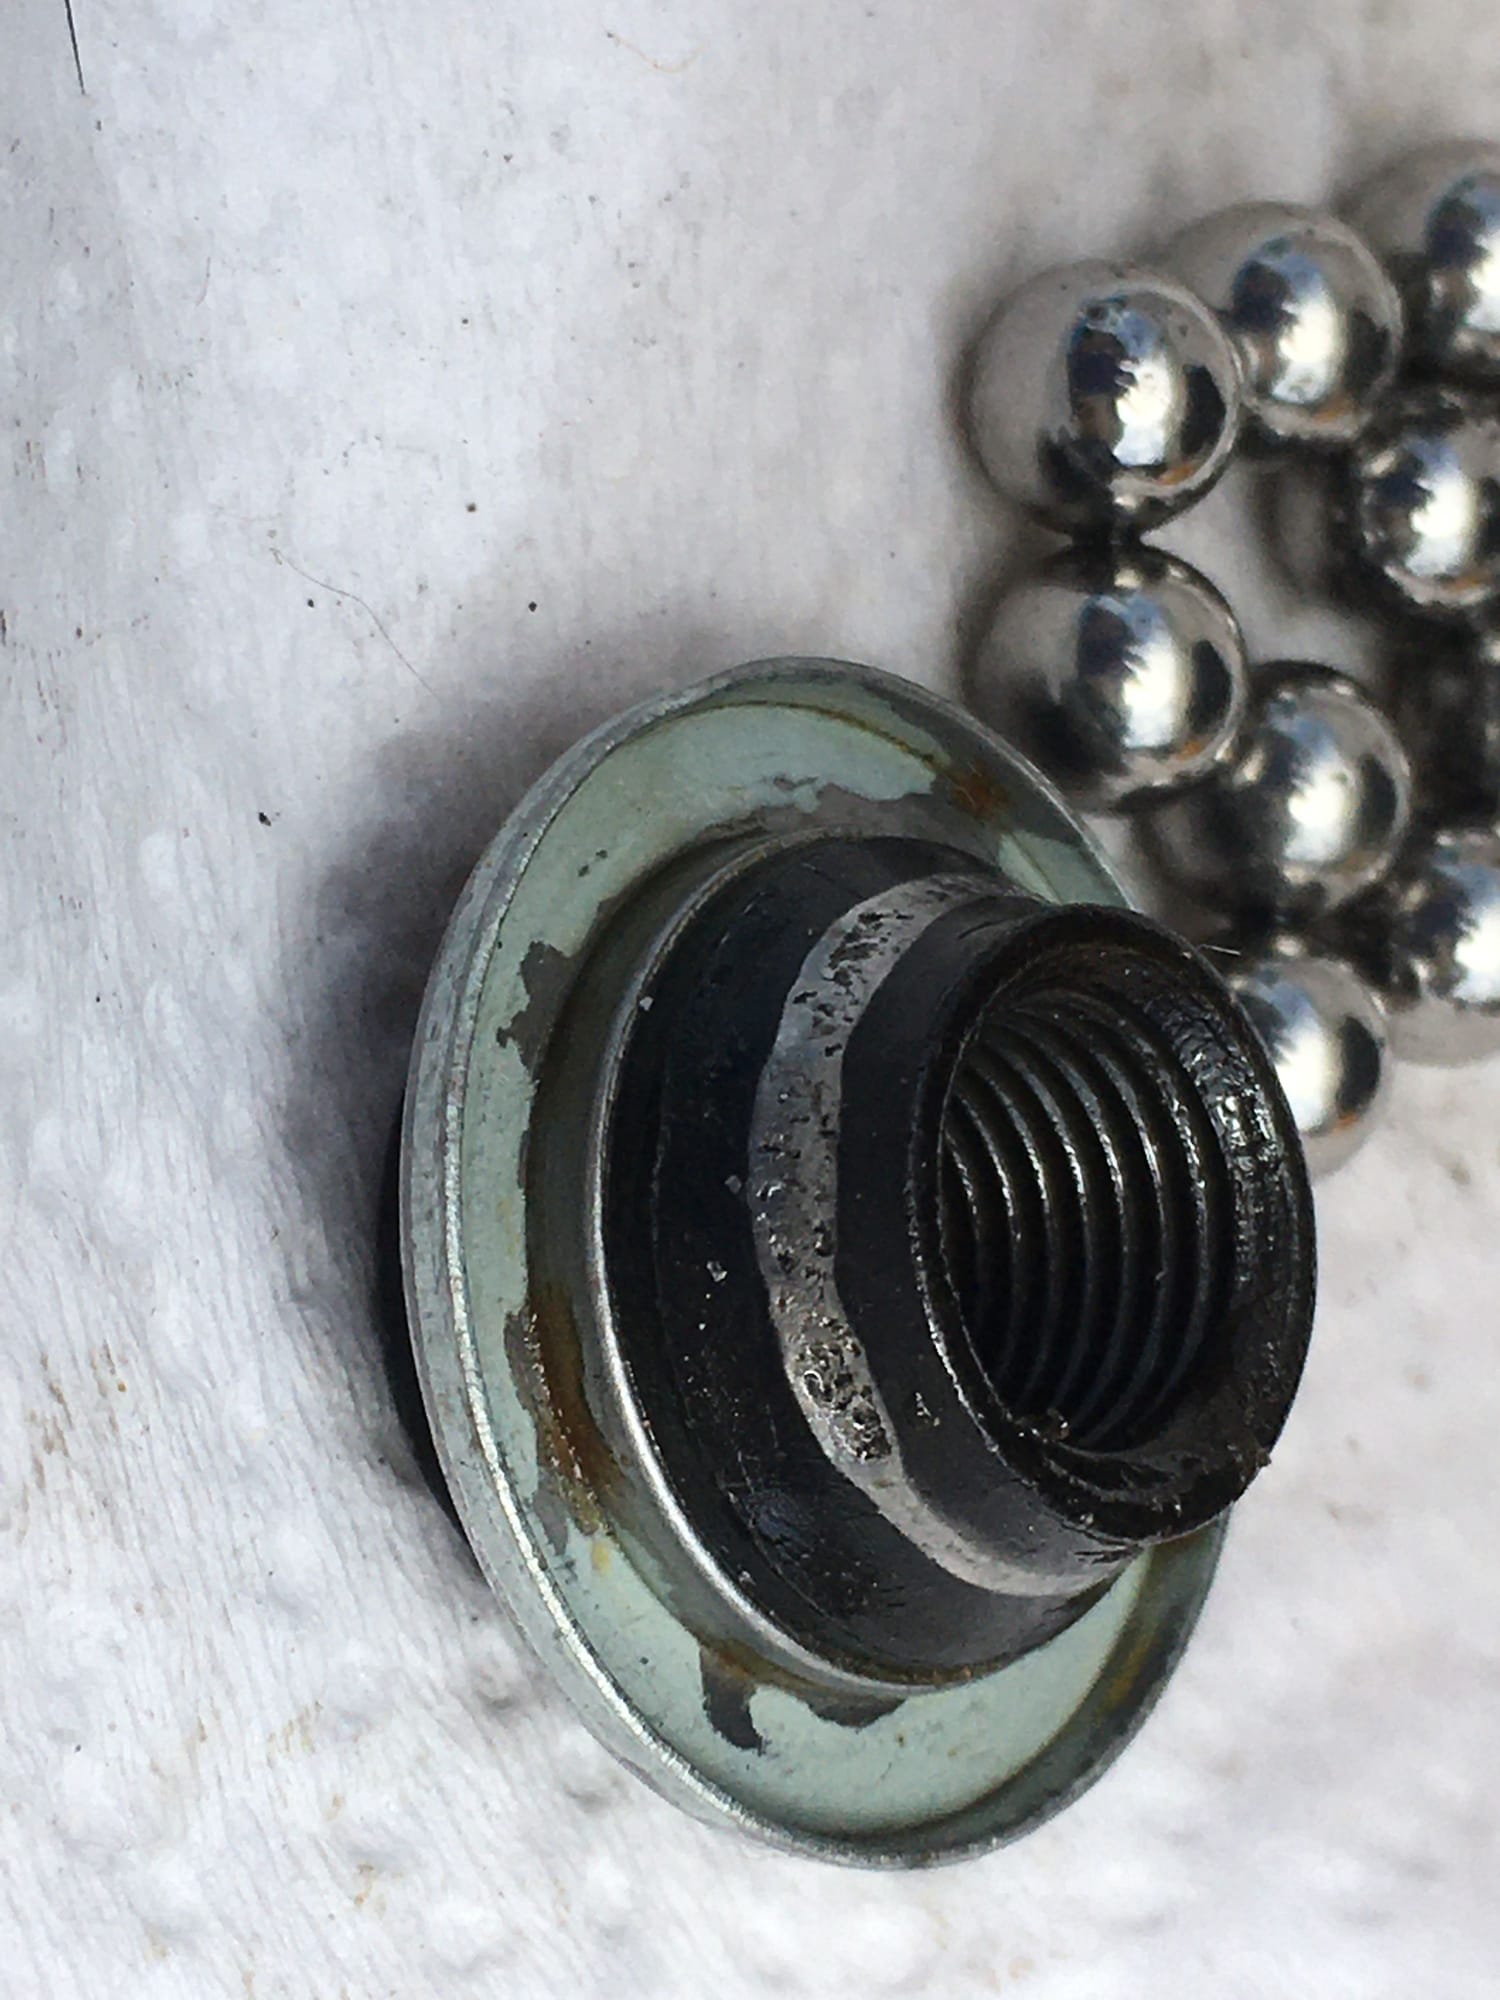
On the bearing races, the shiny normally narrow ring is where the bearings actually touch the race. Since those are a much wider shiny ring and severely pitted. They are toast. The only way I would use them is if I had to use the bike and had nothing else I could obtain quick enough to replace them with.
The pits are just probably more from times the bike sits and the grease is old and contaminated with acidic or corrosive stuff. Water being one possibility.
Freewheels are generally inexpensive. However in general, as freewheels aren't common any more but on low end bikes, your choices are fewer and you may not find the exact freewheel brand you have on a very old bike.
If those freewheels you were given are the same number of gears as yours, then you should be able to use them. Once the old one is off the wheel hub, just put the other on and tighten by hand. Pedaling will tighten it the rest of the way.
You should replace those eat up cones on the axle too if that is what I'm looking at in one picture. Though if you don't find one the same length, you'll need to add or subtract spacers to fit between your dropouts properly.

Likes For Iride01:
04-22-21, 10:40 AM
#27
Member
Thread Starter
thx
04-22-21, 10:52 AM
#28
Member
Thread Starter
On the bearing races, the shiny normally narrow ring is where the bearings actually touch the race. Since those are a much wider shiny ring and severely pitted. They are toast. The only way I would use them is if I had to use the bike and had nothing else I could obtain quick enough to replace them with.
The pits are just probably more from times the bike sits and the grease is old and contaminated with acidic or corrosive stuff. Water being one possibility.
Freewheels are generally inexpensive. However in general, as freewheels aren't common any more but on low end bikes, your choices are fewer and you may not find the exact freewheel brand you have on a very old bike.
If those freewheels you were given are the same number of gears as yours, then you should be able to use them. Once the old one is off the wheel hub, just put the other on and tighten by hand. Pedaling will tighten it the rest of the way.
You should replace those eat up cones on the axle too if that is what I'm looking at in one picture. Though if you don't find one the same length, you'll need to add or subtract spacers to fit between your dropouts properly.
The pits are just probably more from times the bike sits and the grease is old and contaminated with acidic or corrosive stuff. Water being one possibility.
Freewheels are generally inexpensive. However in general, as freewheels aren't common any more but on low end bikes, your choices are fewer and you may not find the exact freewheel brand you have on a very old bike.
If those freewheels you were given are the same number of gears as yours, then you should be able to use them. Once the old one is off the wheel hub, just put the other on and tighten by hand. Pedaling will tighten it the rest of the way.
You should replace those eat up cones on the axle too if that is what I'm looking at in one picture. Though if you don't find one the same length, you'll need to add or subtract spacers to fit between your dropouts properly.
when I cleaned out the first cone it reminded me of Godzilla's ear wax!!! the left side cone despite godzilla's ear wax was actually in pretty good shape.. unlike the one you see in the image from the freewheel side. I am thinking of using a quick release axel.. I maybe can get a whole set with cones and all from the community bike shop. I did screw on the free freewheel.. it all seems fine but i didnt quite get the spacing right on the cone/nuts so i have just enough axel to fit into frame on one side and a little bit too much on the other. also I read your post about making sure to screw that freewheel on straight so i dont strip the fine threads.. I need to double check that.
I looked up some bike shop prices on new axels and cones and they seem so expensive.. (just trying to save $ before investing alot incase my body can't keep up) not really that expensive but expensive consider most of the bike is cheap.

I think I can get a new freewheel for about $15. but might as well use what was given since it seems to be a good fit.
here's a question..is there any small wrenchs for 17mm that i can toss in a pocket ? wont need that though if i do the quick release set up. more learning
thanks for your help!
04-22-21, 11:05 AM
#29
Member
Thread Starter
One trick that helps to start such threads is to turn the part you want to screw in anticlockwise till you hear or feel a small click, then you can gingerly try to screw clockwise in but do not force it. Sometimes it takes number of tries.
Also, once it catches the thread a little, stop and look from several sides if the part you are trying to screw in is horizontally aligned with the other one. Large diameter threads are finicky.
.
Also, once it catches the thread a little, stop and look from several sides if the part you are trying to screw in is horizontally aligned with the other one. Large diameter threads are finicky.
.
04-22-21, 11:26 AM
#30
I'm good to go!
Join Date: Jul 2017
Location: Mississippi
Posts: 14,992
Bikes: Tarmac Disc Comp Di2 - 2020
Mentioned: 51 Post(s)
Tagged: 0 Thread(s)
Quoted: 6196 Post(s)
Liked 4,811 Times
in
3,319 Posts
Personally I wouldn't be in a big hurry to convert it to a quick release axle if it doesn't have them already. Small wrenches, you just have to hunt where tools are sold or online. Or if you have an old wrench the correct size, get an angle grinder with a cut off wheel and cut off one end to make it short enough.
You might can come up with used cones and axles at a bike co-op or go to a bike shop and talk up the mechanic or owner and maybe get a sad face when you tell them how hard a time you've had finding a replacement. <grin>
Few people every re-build a freewheel. Too inexpensive to get new or just find another used. They don't wear out quick. For their service, just every blue moon or so spray some light lubricant into the crack between the part that rotates (backwards) and the part that doesn't.
For wheel hub bearings, if you only ride once in a blue moon, you might need to do it every year. If you ride regularly every week, then maybe you can go a couple years if you don't constantly encounter really dirty road conditions or ride in the wet all the time. If you ride six days a week, then you might be back to every 9 months to a year for clean and lube..... mind you this is my opinion. Others will do it more frequently and some less frequent.
Has anyone pointed you to this site yet?
https://www.sheldonbrown.com/freewheels.html
https://www.sheldonbrown.com/cone-adjustment.html
The site is pretty eclectic in it's arrangement. It's gotten a little chopped up and harder to find some stuff since Sheldon passed on many years ago. But hunting and wise selection of links at bottom of pages and links in the articles themselves sometimes is a gold mine of info.
Between Park Tool's site and Sheldon Brown's site you can usually find info that helps. If not you at least get enough to realize what other search terms you should use in a google search.
Likes For Iride01:
04-22-21, 11:47 AM
#31

BMX Connoisseur

Join Date: Jun 2016
Location: Canada
Posts: 774
Bikes: 1988 Kuwahara Newport, 1983 Nishiki, 1984 Diamond Back Viper, 1991 Dyno Compe
Mentioned: 1 Post(s)
Tagged: 0 Thread(s)
Quoted: 399 Post(s)
Liked 108 Times
in
69 Posts
The cone and likely the bearings are shot and need to be replaced. Personally if the guy gave you a new freewheel I would use that and save yourself the headache. Just remember to grease the threads on the hub before replacing.
Likes For cbrstar:
04-24-21, 10:49 AM
#32
Senior Member

Join Date: Jul 2005
Location: Boulder County, CO
Posts: 4,398
Bikes: '80 Masi Gran Criterium, '12 Trek Madone, early '60s Frejus track
Mentioned: 6 Post(s)
Tagged: 0 Thread(s)
Quoted: 514 Post(s)
Liked 450 Times
in
338 Posts
Go at it from the other side. Remove the non-drive-side nut and cone and pull it out from the drive side.
Likes For oldbobcat:
04-24-21, 08:15 PM
#33
Member
Thread Starter
One trick that helps to start such threads is to turn the part you want to screw in anticlockwise till you hear or feel a small click, then you can gingerly try to screw clockwise in but do not force it. Sometimes it takes number of tries.
Also, once it catches the thread a little, stop and look from several sides if the part you are trying to screw in is horizontally aligned with the other one. Large diameter threads are finicky.
BTW the way this or any similar forum get new people on board is many time they look for advice and land here but find they can't post pictures and can't describe the problem in words. Well, sometimes they get the advice and leave never to be heard from again, but that is the risk that bike shops or forums have to live with.
I myself came here last fall when I bought a 'modern' bike and needed advice how to take apart BB (more exactly, how to remove pedal arms to begin with) and also had problem with posting pictures not having ten posts and was impatient to get advice from here. I am OK when working on older style bikes from last century but these finicky carbon frames and nuts and what not that I have only seen from afar on other people's bikes are a whole different league.
However everybody has access to a free, third party pic uploading sites.
Personally I wouldn't be in a big hurry to convert it to a quick release axle if it doesn't have them already. Small wrenches, you just have to hunt where tools are sold or online. Or if you have an old wrench the correct size, get an angle grinder with a cut off wheel and cut off one end to make it short enough.
You might can come up with used cones and axles at a bike co-op or go to a bike shop and talk up the mechanic or owner and maybe get a sad face when you tell them how hard a time you've had finding a replacement. <grin>
Few people every re-build a freewheel. Too inexpensive to get new or just find another used. They don't wear out quick. For their service, just every blue moon or so spray some light lubricant into the crack between the part that rotates (backwards) and the part that doesn't.
For wheel hub bearings, if you only ride once in a blue moon, you might need to do it every year. If you ride regularly every week, then maybe you can go a couple years if you don't constantly encounter really dirty road conditions or ride in the wet all the time. If you ride six days a week, then you might be back to every 9 months to a year for clean and lube..... mind you this is my opinion. Others will do it more frequently and some less frequent.
Has anyone pointed you to this site yet?
https://www.sheldonbrown.com/freewheels.html
https://www.sheldonbrown.com/cone-adjustment.html
The site is pretty eclectic in it's arrangement. It's gotten a little chopped up and harder to find some stuff since Sheldon passed on many years ago. But hunting and wise selection of links at bottom of pages and links in the articles themselves sometimes is a gold mine of info.
Between Park Tool's site and Sheldon Brown's site you can usually find info that helps. If not you at least get enough to realize what other search terms you should use in a google search.
You might can come up with used cones and axles at a bike co-op or go to a bike shop and talk up the mechanic or owner and maybe get a sad face when you tell them how hard a time you've had finding a replacement. <grin>
Few people every re-build a freewheel. Too inexpensive to get new or just find another used. They don't wear out quick. For their service, just every blue moon or so spray some light lubricant into the crack between the part that rotates (backwards) and the part that doesn't.
For wheel hub bearings, if you only ride once in a blue moon, you might need to do it every year. If you ride regularly every week, then maybe you can go a couple years if you don't constantly encounter really dirty road conditions or ride in the wet all the time. If you ride six days a week, then you might be back to every 9 months to a year for clean and lube..... mind you this is my opinion. Others will do it more frequently and some less frequent.
Has anyone pointed you to this site yet?
https://www.sheldonbrown.com/freewheels.html
https://www.sheldonbrown.com/cone-adjustment.html
The site is pretty eclectic in it's arrangement. It's gotten a little chopped up and harder to find some stuff since Sheldon passed on many years ago. But hunting and wise selection of links at bottom of pages and links in the articles themselves sometimes is a gold mine of info.
Between Park Tool's site and Sheldon Brown's site you can usually find info that helps. If not you at least get enough to realize what other search terms you should use in a google search.
and info about: schedlule for regrease and cleaning the hub bearings . Ok I felt determined after i read your msg and went to 3 bike shops.. none of them had the cone.. i had a great mocha cupcake though~ ! I made it back to the community bike shop and he found a cone to fit it was about 2 mm wider but i managed. it was .50
I picked up a couple extra bearings ..
put all back together and took for test ride.. the hub feels as smooth as silk!! I do need to work on the derailuer though. either that or i accidently left out a bearing. i counted twice! but it doesn't mean my eyes / brain didnt fool me.
been having some pretty heavy distractions as of latly here. I hope i didnt .
it was fun taking it for a spin around the block ..there is a very very small hill and i really need to get the derailier tuned up.
I love that it has 24" instead of 26" wheels!
thanks for the idea on the angel grinder too.. i dont have one..but have often thought one would be really handy to have. although cutting metal can be tricky since the earth is so dry here i dont want to start a fire. i know those things make sparks when i borrowed from the tool library.
are you getting any good rides in this weekend?
04-24-21, 08:18 PM
#34
Member
Thread Starter
thanks.. it's done.. the issue initially was the thing had never been serviced and we all tried 3 of us at the bike community clinic.. even with a cheat bar those nuts were married to each other. PB Blast over nite got it loosened up ..
all greased and put back together.. and crossing my fingers that i didnt leave a bearing out! i wonder if anyone has ever done that?
on to learning about derailuer adjusting .
you getting any good riding in this weekend?
thanks !!
04-24-21, 08:20 PM
#35
Member
Thread Starter
smooth as a spring breeze!
