


Stuck steel seatpost in Trek Aluminum Frame
 03-29-21, 02:27 PM
#26

Senior Member

Join Date: Jul 2006
Location: San Jose (Willow Glen) Ca
Posts: 9,849
Bikes: Kirk Custom JK Special, '84 Team Miyata,(dura ace old school) 80?? SR Semi-Pro 600 Arabesque
Mentioned: 107 Post(s)
Tagged: 0 Thread(s)
Quoted: 2340 Post(s)
Liked 2,833 Times
in
1,545 Posts
brilliant
__________________
Life is too short not to ride the best bike you have, as much as you can
(looking for Torpado Super light frame/fork or for Raleigh International frame fork 58cm)
Life is too short not to ride the best bike you have, as much as you can
(looking for Torpado Super light frame/fork or for Raleigh International frame fork 58cm)
 03-29-21, 02:32 PM
#27
Senior Member
Join Date: Jul 2006
Location: San Jose (Willow Glen) Ca
Posts: 9,849
Bikes: Kirk Custom JK Special, '84 Team Miyata,(dura ace old school) 80?? SR Semi-Pro 600 Arabesque
Mentioned: 107 Post(s)
Tagged: 0 Thread(s)
Quoted: 2340 Post(s)
Liked 2,833 Times
in
1,545 Posts
couple of options.....
soak it in industrial grade ammonia
other option is Freeze-off this is like PM blaster on steroids....it has pb blaster type penetrating oil and combines with super cold temps (cooling as liquid goes to gas for physics type) try multiple cycles with some tapping, the super cold can often break loose things beyond what just penetrating oil can do
__________________
Life is too short not to ride the best bike you have, as much as you can
(looking for Torpado Super light frame/fork or for Raleigh International frame fork 58cm)
Life is too short not to ride the best bike you have, as much as you can
(looking for Torpado Super light frame/fork or for Raleigh International frame fork 58cm)
Likes For squirtdad:
03-31-21, 09:53 AM
#28
Senior Member

 03-31-21, 10:15 AM
#29

Senior Member
Join Date: May 2008
Location: Fredericksburg, Va
Posts: 9,579
Bikes: '65 Frejus TDF, '73 Bottecchia Giro d'Italia, '83 Colnago Superissimo, '84 Trek 610, '84 Trek 760, '88 Pinarello Veneto, '88 De Rosa Pro, '89 Pinarello Montello, '94 Burley Duet, 97 Specialized RockHopper, 2010 Langster, Tern Link D8
Mentioned: 73 Post(s)
Tagged: 0 Thread(s)
Quoted: 1609 Post(s)
Liked 2,216 Times
in
1,103 Posts
When I commuted to work, I parked next to a guy with a Langster. He was tall and his post was short. Frozen in place. The post head had come loose and rotated so he had to make sure the saddle nose point straight ahead!
I brought a can of KROIL and would apply every couple of days for, idk, a month or more. Never came loose.
He parked it, locked to his railing one weekend, forgetting to bring it into his apartment (Washington DC). Sunday morning the cockpit was gone and the wheels. He was really upset with the whole thing and mentioned that he was going to sell it on CL. I said " let me know before you post, I might be interested." Two weeks later he offerred the remains for $100 but wanted to keep the brake calipers. I countered with $50 because of the stuck post. He agreed.
Many hours after attempting many of the mechanical solutions mentioned above, I resorted to lye. I know this is Al with steel post. There wasn't much post left at the end. There was about 12" of stuck post.
__________________
Bikes don't stand alone. They are two tired.
Bikes don't stand alone. They are two tired.
03-31-21, 11:06 AM
#31
Ride, Wrench, Swap, Race

Join Date: Jan 2010
Location: Northern California
Posts: 9,194
Bikes: Cheltenham-Pedersen racer, Boulder F/S Paris-Roubaix, Varsity racer, '52 Christophe, '62 Continental, '92 Merckx, '75 Limongi, '76 Presto, '72 Gitane SC, '71 Schwinn SS, etc.
Mentioned: 132 Post(s)
Tagged: 0 Thread(s)
Quoted: 1565 Post(s)
Liked 1,296 Times
in
866 Posts
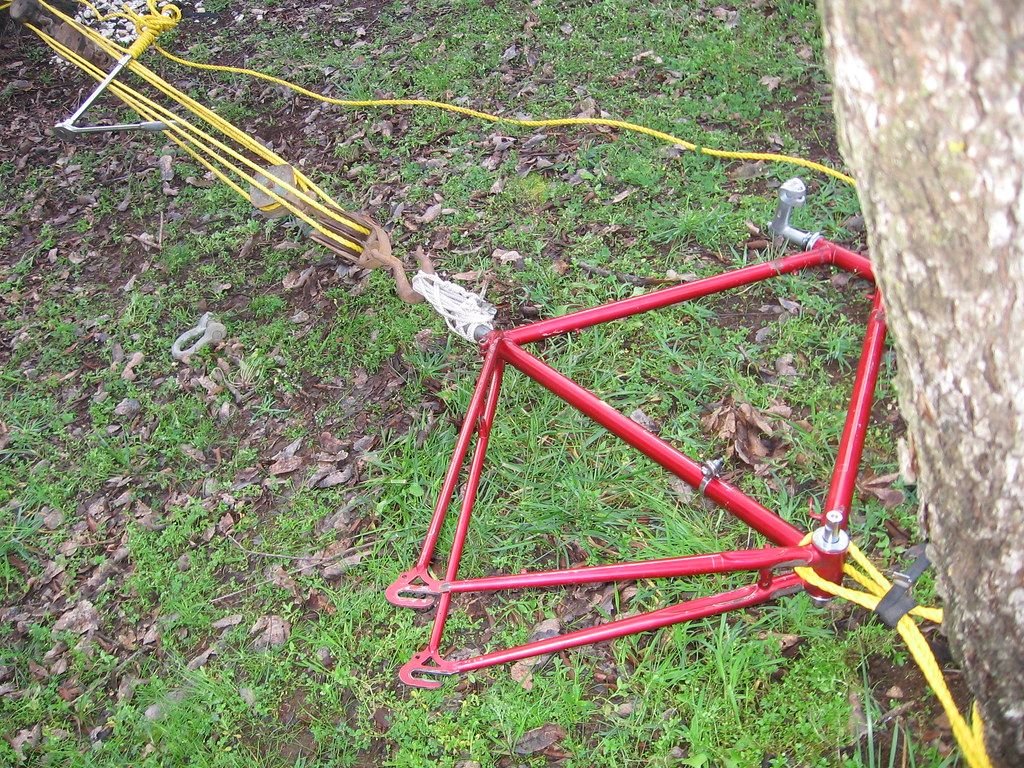
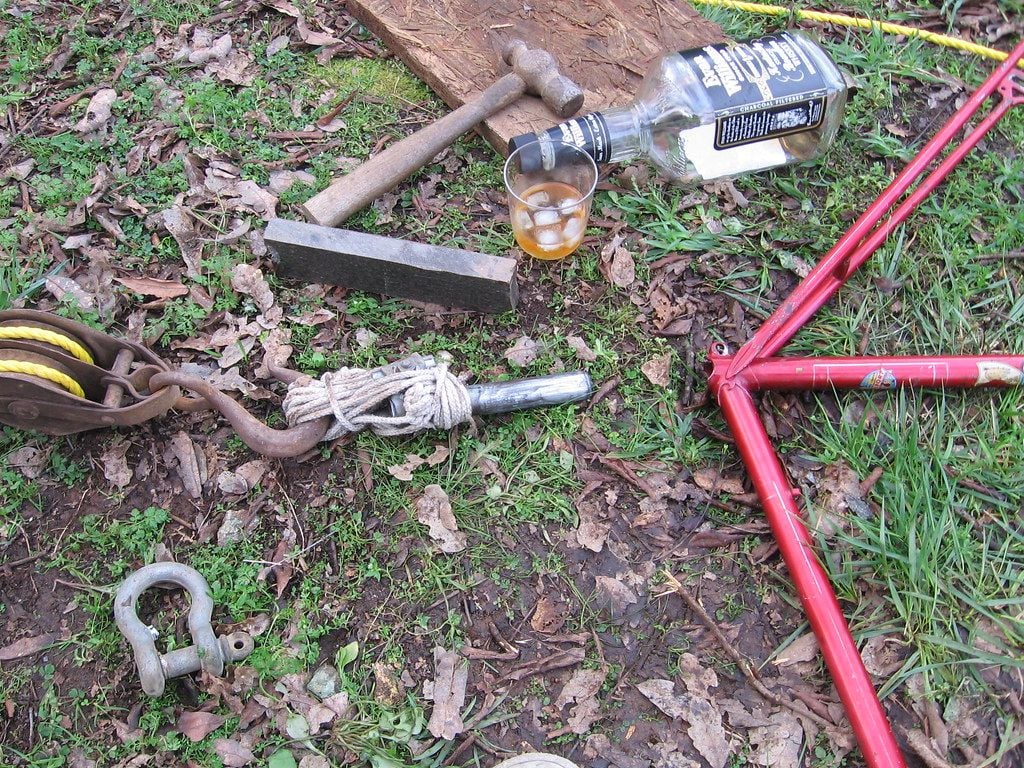
What finally brought out my stuck/oversized steel post (after ~2 tons of pulling force alone wouldn't do it) was my beating on the seat tube while pulling.
I used the hammer shown and beat hard and repeatedly on the seatpost engagement zone, while pulling and using the block of softer TREX material as a buffer.
The seat tube and paint were unscathed and the post very slowly emerged from the seat tube as perhaps hundreds of blows inched it out.
Perhaps with a static twisting force applied (and held), and while beating on the seat tube, your post will break free(?).
I'm definitely going to try this myself the next time I am dealing with a stuck post!
03-31-21, 11:27 AM
#32
Senior Member
There are going to be times when a seatpost is just hopelessly stuck, I had the typical steel bike/aluminum post situation where they ha been galvanically welding together for 35 years, and the seatpost was so thick that even a week's worth of lye treatments failed to make any real progress. As much as nobody wants to go this route, the least maddening thing to do and the safest for your frame overall is to take the advice of Lennard Zinn:
I went this route, cost me maybe $100? Worth it.
If step 4 does not work, you need to go to a machine shop and get the post reamed out of the seat tube. If you still insist on getting it out yourself, you should really sit down and think about it for a while. Will the guy at the machine shop really charge you so much money that it is now worth the risk of completely trashing your frame?
03-31-21, 11:44 AM
#33
se�or miembro

Join Date: Dec 2018
Location: Pac NW
Posts: 6,635
Bikes: '70s - '80s Campagnolo
Mentioned: 92 Post(s)
Tagged: 0 Thread(s)
Quoted: 3893 Post(s)
Liked 6,491 Times
in
3,213 Posts
.
.
.
03-31-21, 11:51 AM
#34
Ride, Wrench, Swap, Race
Join Date: Jan 2010
Location: Northern California
Posts: 9,194
Bikes: Cheltenham-Pedersen racer, Boulder F/S Paris-Roubaix, Varsity racer, '52 Christophe, '62 Continental, '92 Merckx, '75 Limongi, '76 Presto, '72 Gitane SC, '71 Schwinn SS, etc.
Mentioned: 132 Post(s)
Tagged: 0 Thread(s)
Quoted: 1565 Post(s)
Liked 1,296 Times
in
866 Posts
Unless you know the machinist or they've got good references from trusted sources, it will be a crap-shoot as to whether or not the work gets done as you hope it will.
It's the same any time you hire someone to do anything, especially outside of what could be considered their most familiar tasks.
It's why I became such a staunch do-it-yourselfer and I've taught myself to always try to take the time needed for thinking through and completing the task at hand.
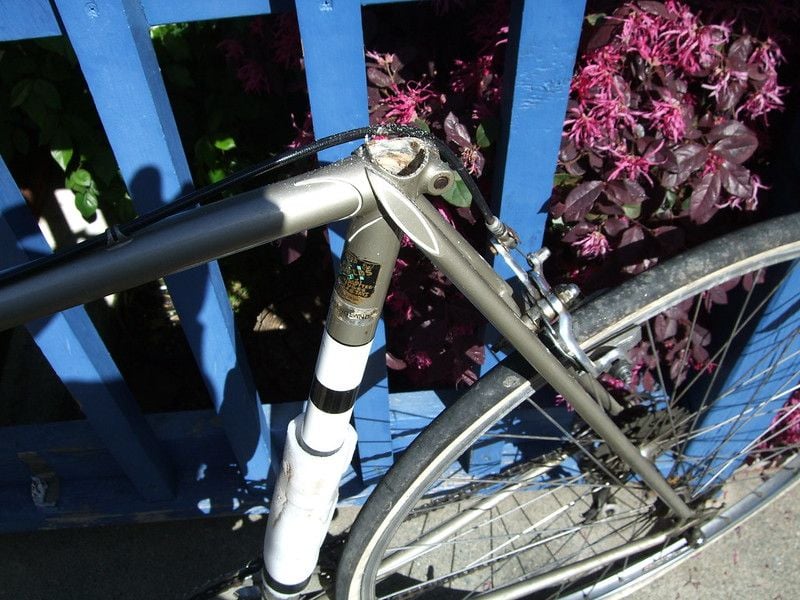
I'm about to test my idea (twisting while pounding) on a very stubbornly-stuck post in a Bob Jackson frame. Wish me well. It has resisted twisting (even after years of soaking) even with dry ice applied to the point of heavy white frost everywhere, so to me represents a near worst-case of stuck alloy post in steel frame.
Stay tuned!
It's the same any time you hire someone to do anything, especially outside of what could be considered their most familiar tasks.
It's why I became such a staunch do-it-yourselfer and I've taught myself to always try to take the time needed for thinking through and completing the task at hand.
I'm about to test my idea (twisting while pounding) on a very stubbornly-stuck post in a Bob Jackson frame. Wish me well. It has resisted twisting (even after years of soaking) even with dry ice applied to the point of heavy white frost everywhere, so to me represents a near worst-case of stuck alloy post in steel frame.
Stay tuned!
03-31-21, 04:58 PM
#35
Ride, Wrench, Swap, Race
Join Date: Jan 2010
Location: Northern California
Posts: 9,194
Bikes: Cheltenham-Pedersen racer, Boulder F/S Paris-Roubaix, Varsity racer, '52 Christophe, '62 Continental, '92 Merckx, '75 Limongi, '76 Presto, '72 Gitane SC, '71 Schwinn SS, etc.
Mentioned: 132 Post(s)
Tagged: 0 Thread(s)
Quoted: 1565 Post(s)
Liked 1,296 Times
in
866 Posts
Well I gave it a go, first suspending the bike by the wrench and then pushing down on the tt with my foot while beating on the seat tube along the seatpost engagement area.
I gave this method a fair chance, repeating the process from one side then another to reverse the wrench torque, but saw no evidence of movement. At least the seat tube wasn't marred.
Seems that what works with a steel post and 4000lbs pulling force doesn't necessarily translate to a stuck alloy post "welded" in with old Campy grease and corrosion!
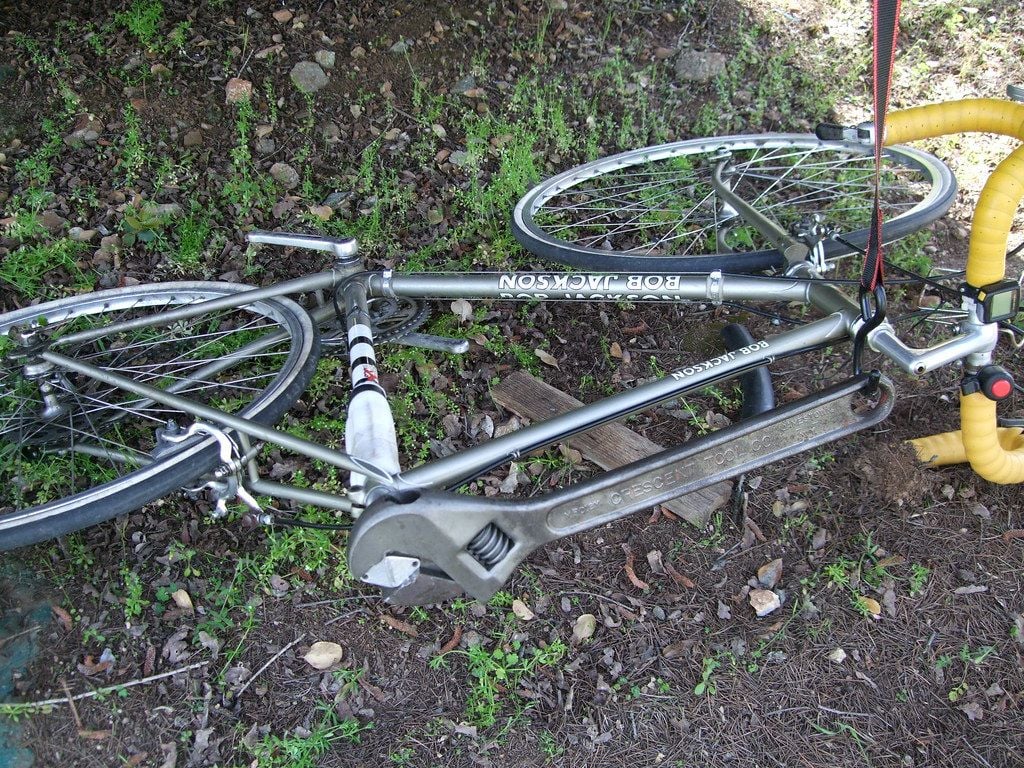
Last edited by dddd; 03-31-21 at 05:13 PM.
03-31-21, 05:18 PM
#36
Passista
Join Date: Jul 2005
Posts: 7,602
Bikes: 1998 Pinarello Asolo, 1992 KHS Monta�a pro, 1980 Raleigh DL-1, IGH Hybrid, IGH Utility
Mentioned: 5 Post(s)
Tagged: 0 Thread(s)
Quoted: 870 Post(s)
Liked 721 Times
in
396 Posts
Noone tried tapping the seatpost sideways/back and forth? I had good results loosening broken threaded studs in engine blocks using this method.
03-31-21, 05:20 PM
#37
Ride, Wrench, Swap, Race
Join Date: Jan 2010
Location: Northern California
Posts: 9,194
Bikes: Cheltenham-Pedersen racer, Boulder F/S Paris-Roubaix, Varsity racer, '52 Christophe, '62 Continental, '92 Merckx, '75 Limongi, '76 Presto, '72 Gitane SC, '71 Schwinn SS, etc.
Mentioned: 132 Post(s)
Tagged: 0 Thread(s)
Quoted: 1565 Post(s)
Liked 1,296 Times
in
866 Posts
I followed up with my tried-and-true Sawsall method after narrowing the height of my long Diablo demolition blade on the bench grinder to fit inside of the seatpost ID.
Trick here is to probe the slot with a sharp pointer of some sort to check for any remaining aluminum bridges along the cut slot in the seatpost. Even the tiniest of bridges will prevent easy turning of the seatpost stub!
The blade totally glances off of the relatively hard Reynolds 531 seat tube, so no danger of cutting into the seat tube.
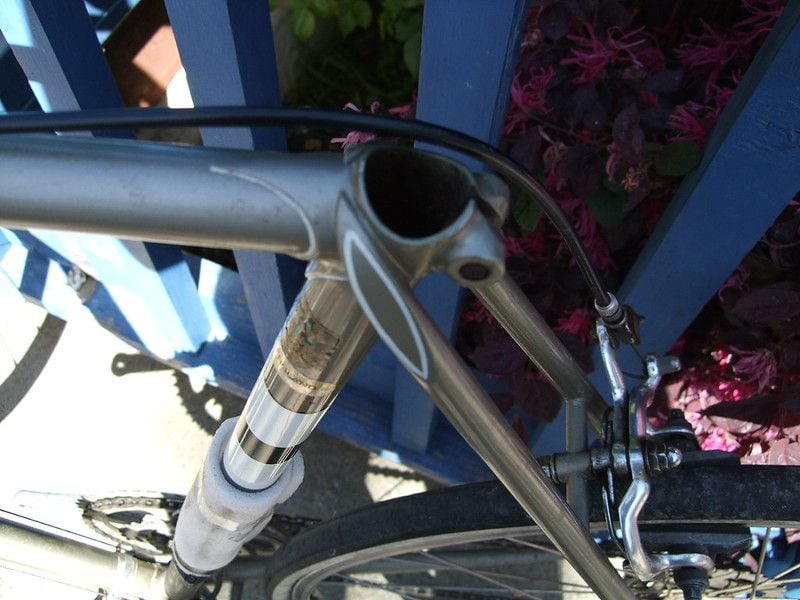
Last edited by dddd; 03-31-21 at 05:28 PM.
03-31-21, 06:39 PM
#38
Junior Member
Join Date: Sep 2016
Location: Gulf Coast
Posts: 183
Bikes: '93 Cannondale R500; '88 Centurion Ironman Expert, '97 Cannondale R900, '95 Serotta CSI, '83 Trek 700, '97 Lemond Zurich, '89 Bianchi Giro, '87 Schwinn Prologue, '83 Fuji TSIV + one perturbed wife
Mentioned: 1 Post(s)
Tagged: 0 Thread(s)
Quoted: 71 Post(s)
Liked 154 Times
in
58 Posts
03-31-21, 07:00 PM
#39
Senior Member
Join Date: Feb 2020
Posts: 2,822
Mentioned: 49 Post(s)
Tagged: 0 Thread(s)
Quoted: 1106 Post(s)
Likes: 0
Liked 1,328 Times
in
784 Posts
I'd be having a really good look down the bore of that tube.
03-31-21, 08:10 PM
#40
Senior Member
I've got a stuck post in cargo bike that I have a shot at about once year before deciding I can live with the height after all--it's just a little low.
RJ the Bike Guy recommends a wood blade for the sawzall to make cutting into the steel a little harder.
RJ the Bike Guy recommends a wood blade for the sawzall to make cutting into the steel a little harder.
03-31-21, 09:23 PM
#41
Ride, Wrench, Swap, Race
Join Date: Jan 2010
Location: Northern California
Posts: 9,194
Bikes: Cheltenham-Pedersen racer, Boulder F/S Paris-Roubaix, Varsity racer, '52 Christophe, '62 Continental, '92 Merckx, '75 Limongi, '76 Presto, '72 Gitane SC, '71 Schwinn SS, etc.
Mentioned: 132 Post(s)
Tagged: 0 Thread(s)
Quoted: 1565 Post(s)
Liked 1,296 Times
in
866 Posts
This sounded odd to me; 531 cuts easily with a file, and Diablo claims a tooth hardness of 62 (Rockwell C). Reynolds 531 has a UTS of about 130 ksi unbrazed, which equates to less than 30 Rockwell C. This makes sense to me, files are usually 50 Rockwell C or harder.
I'd be having a really good look down the bore of that tube.
I'd be having a really good look down the bore of that tube.
My experience here tells me that these blades tend not to cut into the steel at all, even after my having sharpened a few of the leading teeth near the tip on previous such efforts on frames made from mere Cr-Mo tubing as used on mid-range mountain bikes.
The teeth on a file are configured to cut into a steel surface with little pressure applied, but these blades would require a LOT of force applied for cutting into the inside of a steel tube to occur at all. I did apply significant force of perhaps ten pounds, and yet when I probed the inside of the tube after pulling out the post stub there was no groove or steps cut into the surface!
I do still recommend doing as I did here, periodically running a bottle brush into the tube, inspecting with a bright headlight and probing the groove for aluminum (versus slick steel) with the sharpened spoke that I bent 90-degrees near the tip. The spoke was also helpful initially for determining exactly how far down that the end of the post was.
I also applied oil to the blade every 30-40 seconds of cutting so as not to clog the teeth with aluminum.
Don't use wood blades for this, at least not the pruning blades. Those have teeth with alternating left-right teeth that don't grab the aluminum in such a way as to give you feedback (tending to pull the tool into the seat tube) that the blade is cutting aluminum. Again, even the demolition (wood/metal) blades don't grab the steel that way at all.
So the whole process took about 15-20 minutes.
03-31-21, 09:40 PM
#42
Ride, Wrench, Swap, Race
Join Date: Jan 2010
Location: Northern California
Posts: 9,194
Bikes: Cheltenham-Pedersen racer, Boulder F/S Paris-Roubaix, Varsity racer, '52 Christophe, '62 Continental, '92 Merckx, '75 Limongi, '76 Presto, '72 Gitane SC, '71 Schwinn SS, etc.
Mentioned: 132 Post(s)
Tagged: 0 Thread(s)
Quoted: 1565 Post(s)
Liked 1,296 Times
in
866 Posts
As for the subject of my experiment, I finally got to take a ride on the Bob Jackson after all these years. It's my first bike from Bob Jackson and is a well-kept specimen.
With 73x73-degree angles and57cm top tube, thereach is thankfully mediated by the seat tube angle to give a good fit. I'm not liking the tall and narrow randonneur bars but the bike did get me up the hills to Goodwill before closing, where I bought (and ghost-rode home three miles) a Bianchi hybrid for a mere $30.
The bar-end shifters required a lot of force to operate and the shifting response was vague with huge hysteresis losses between lever and derailer. Things will have to change here but I'm also dealing with 120mm frame spacing to it's time to get creative and perhaps build up another Uniglide "Ultra-six" freewheel for this bike.
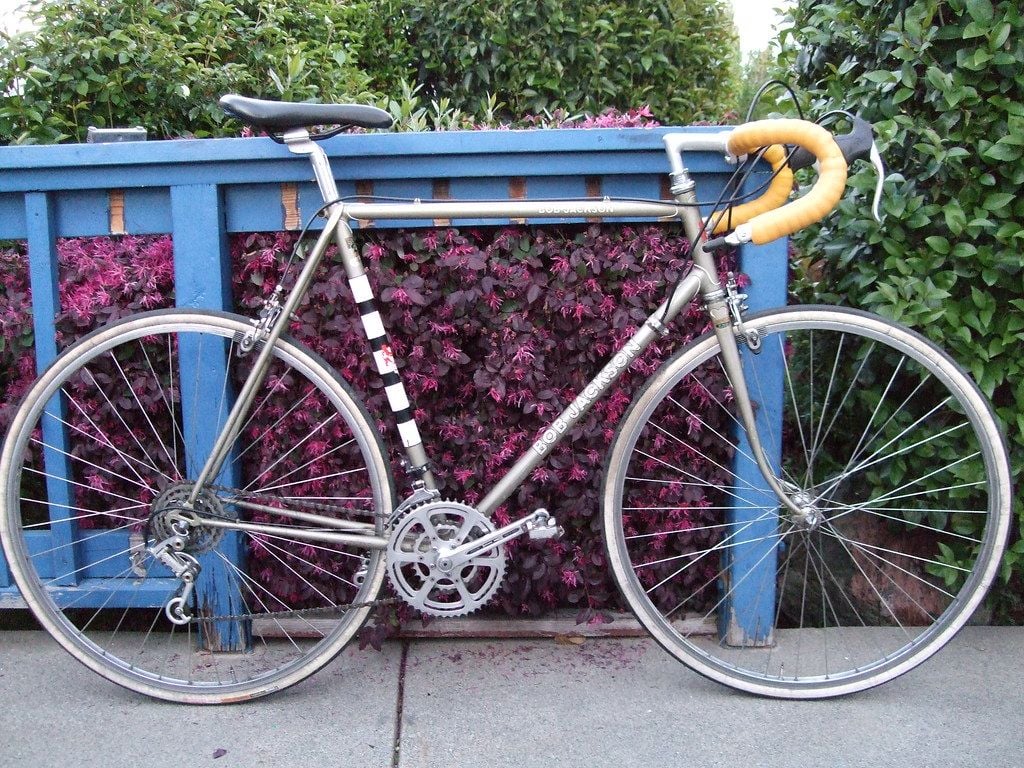
Likes For dddd:
04-01-21, 04:39 AM
#43
Senior Member
Join Date: Sep 2017
Location: Eastern Shore, MD
Posts: 2,107
Bikes: Road ready: 1993 Koga Miyata City Liner Touring Hybrid, 1989 Centurion Sport DLX, "I Blame GP" Bridgestone CB-1. Projects: Yea, I got a problem....
Mentioned: 24 Post(s)
Tagged: 0 Thread(s)
Quoted: 754 Post(s)
Liked 737 Times
in
422 Posts
Plenty of good recipes here. I'm a fan of heat cycles and spraying on pb blaster while everything's hot. That seems to help the monkey piss penetrate. If you want to do some thing dramatic with little risk of damaging the frame, you could heat the frame with boiling water and freeze the post with dry ice or hit it with liquid CO2.
04-01-21, 07:56 AM
#44
Rancho66
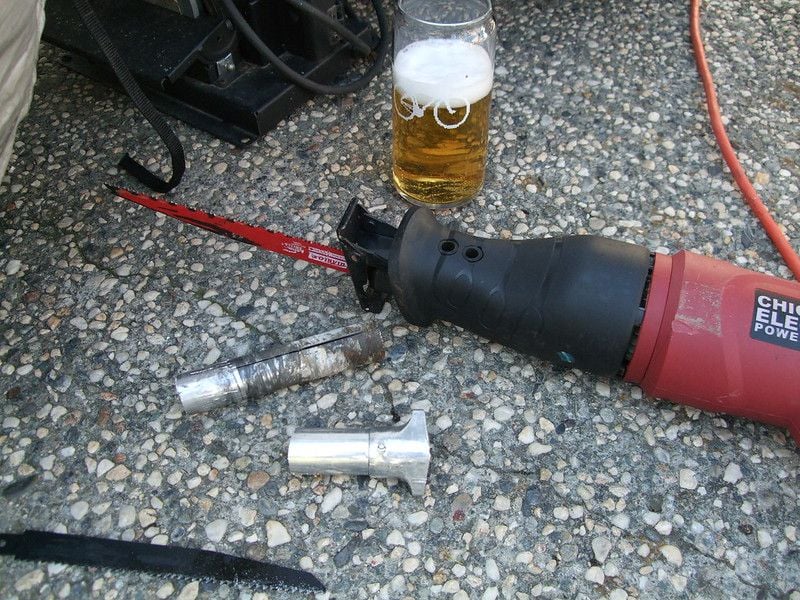
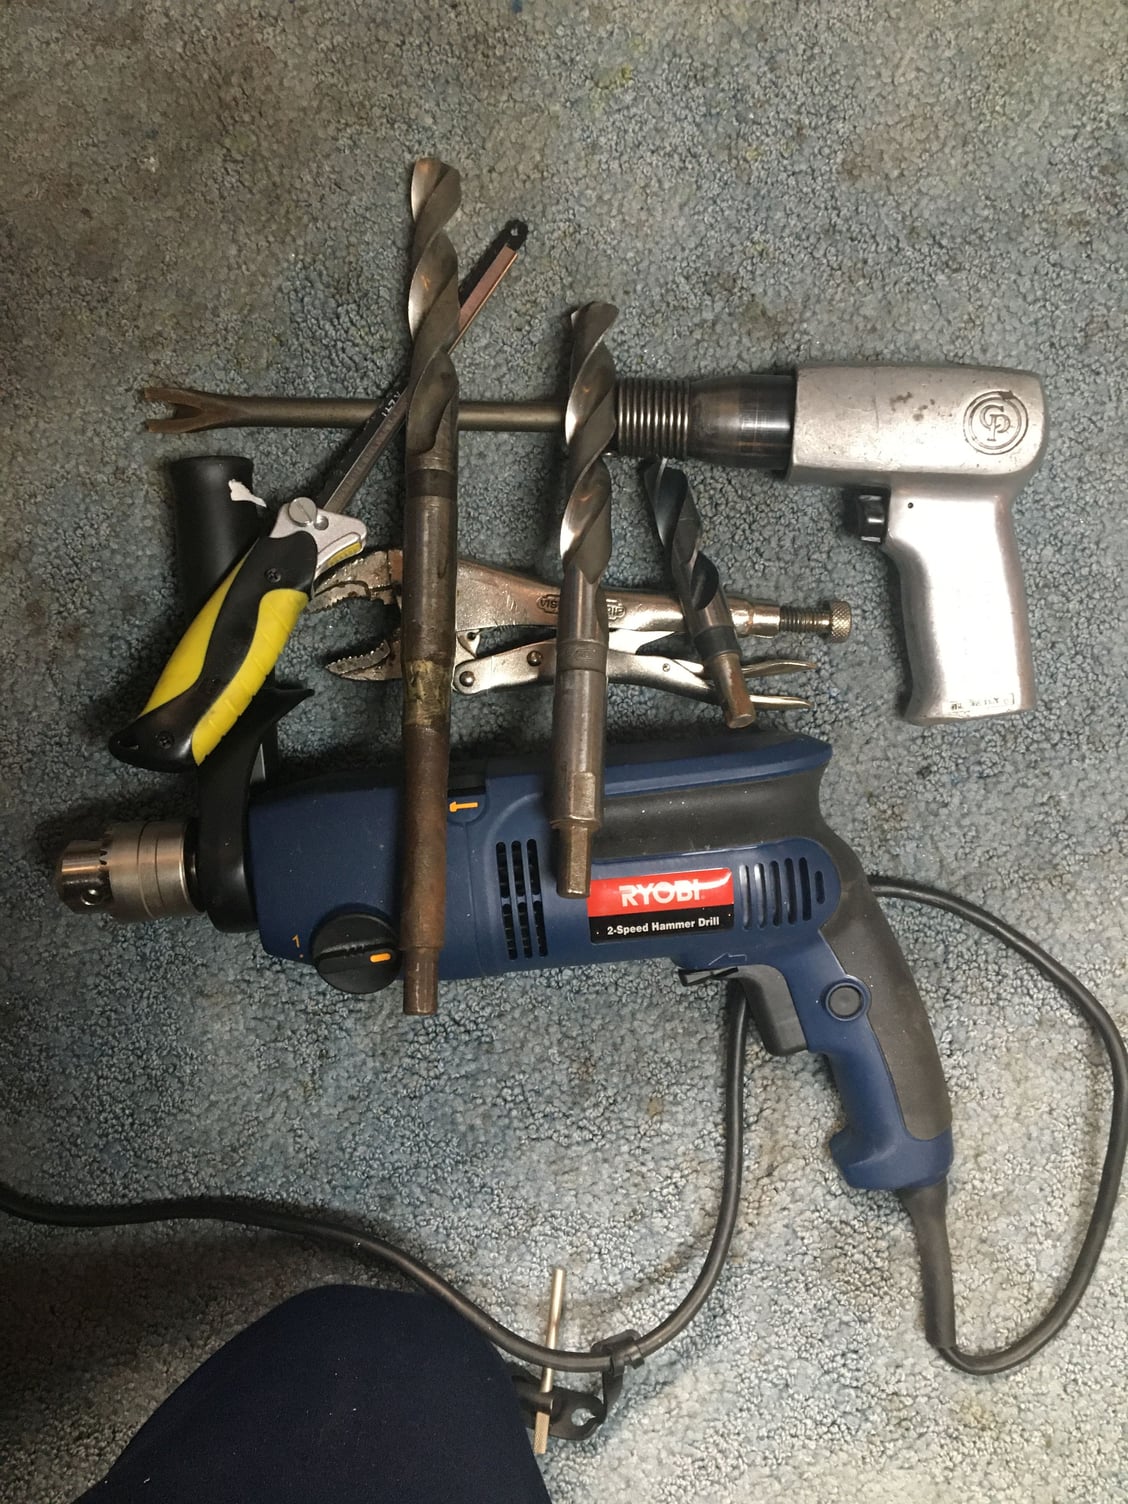
All suggestions here are a valid way to remove a stuck seat post. Try them first. The picture show the tools that I had to resort to once. Drill bits that size are expensive and luckily I had access to them through a retired machinist in small to large diameters. The air hammer and visegrips were the last step as the post still held on after three bits. The things we do to save old frames!
04-03-21, 05:31 AM
#45
Senior Member
Join Date: Feb 2020
Posts: 2,822
Mentioned: 49 Post(s)
Tagged: 0 Thread(s)
Quoted: 1106 Post(s)
Likes: 0
Liked 1,328 Times
in
784 Posts
There is a trick to getting vintage cables to run nicely, and bar ends make this difficult. The trick is to not have S-curves in any outer-cable section. With simple curves all the clearance between the inner and outer is taken up as soon as there is tension, but with S-curves tension gradually takes it up. In a sense it is trying to straighten-out the outer; the degree to which it does so varies with tension - giving that mushy-feel. Unfortunately with bar ends the only way to not have S-curves is to have the cable exit the bar wrap much lower down, just as the lowest section starts to rise - and this never looks as tidy as the wrong way.
