


Motobecane Messenger
 09-17-08 | 11:05 AM
#101

Pants are for suckaz
Joined: Mar 2007
Posts: 2,578
Likes: 1
From: Mt. Airy, MD
Bikes: Hardtail MTB, Fixed gear, and Commuter bike
I purchased some stainless screws to fill the rack mounting holes on the seat stays. Invisible cargo rack. Does that count?
Srsly though, if you want to run a rack and a rear brake (for the kids who were too cool to run the bike as a fixed gear) you'd need to do some MacGyvering because the two items appear to be mutually exclusive on this model.
Srsly though, if you want to run a rack and a rear brake (for the kids who were too cool to run the bike as a fixed gear) you'd need to do some MacGyvering because the two items appear to be mutually exclusive on this model.
 09-18-08 | 07:03 AM
#106
Pants are for suckaz
Joined: Mar 2007
Posts: 2,578
Likes: 1
From: Mt. Airy, MD
Bikes: Hardtail MTB, Fixed gear, and Commuter bike
If you want to remove the tape and you aren't planning on re-wrappign them right away you'll need a bottle of adhesive remover because the tape leaves a sticky residue.

 09-19-08 | 03:04 PM
#115
Senior Member
Joined: Aug 2008
Posts: 107
Likes: 0
got my bike, built it in 30 minutes, my first time ever assembling a bike. Easy as hell.
came back from a very short ride. Here is my intake.
5'11" 32" inseam, the bike is only a bit too small, but I love it. I think I fall right between a 56 and a 54, but no regrets at all for getting the 54cm
Enough about that.
Quality: EXTREMELY impressed. Very nice paint job, shiny and everything
Weight: Equally impressed, haha. When the UPS guy handed me the box. I thought it would weigh around 35 pounds, so I flexed my tiny muscles to pick it up. When I lift the box, the thing was very light. After I assembled the bike, I would say the bike is around 20 pounds or less.
Wheels: They are ridable but doesn't come trued.
My only disappointment, the brakes. The front brakes doesn't touch the rim where it is suppose to. I will post pictures later. The rear brake pads are not parallel. Anyone know how to fix it?
Would i recommend this to a friend? YES~! Thinking of getting the pink one for my gf.
If you have questions, don't hesitate to ask.
Oh yea, very noisy freewheel, but doesn't bother me.
 09-19-08 | 05:34 PM
#118
Senior Member
Joined: Aug 2008
Posts: 107
Likes: 0
yea, i did the same, i think that is the way to do it. I squeezed it so that it touches the rim, and when i tighten the cable and release my squeeze, its perfect. enough space for the wheel to spin and I can stop the wheels with the brakes in case of emergencies.
09-20-08 | 08:40 PM
#119
Senior Member
Joined: Aug 2008
Posts: 107
Likes: 0
Here are the pictures of my bike as promised:
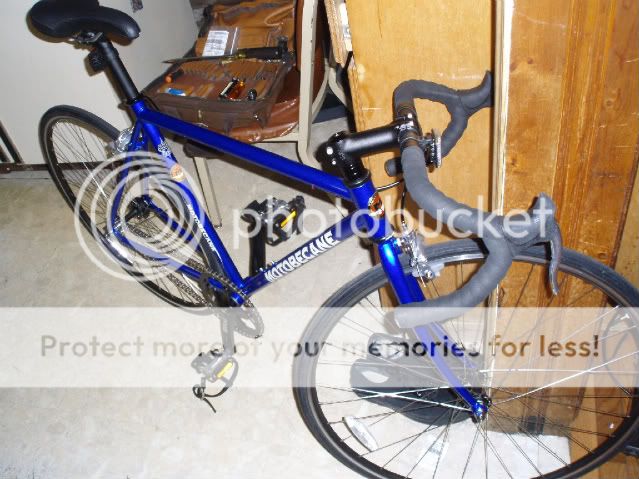
My Bike:

In my last post, I've mentioned that my rear brake pads are not parallel. Here is the picture:
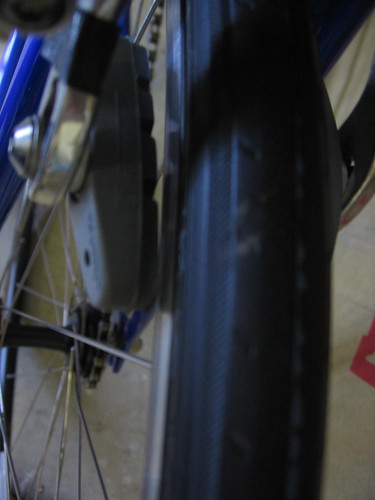
Any suggestions on how to fix that?
Also in my last post, I have mentioned that the front brakes do not contact the rim at the right point:
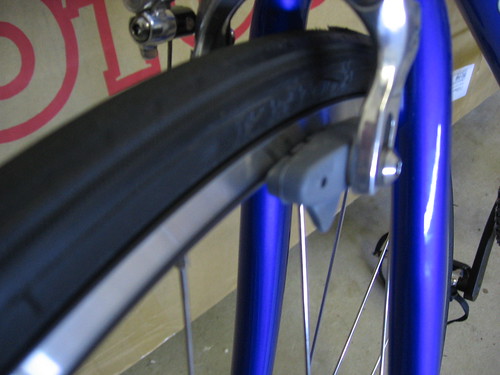
As you can see, the brake pads strikes the lower portion of the rim. Any ideas on how to fix this?
Thank you.
My Bike:
In my last post, I've mentioned that my rear brake pads are not parallel. Here is the picture:
Any suggestions on how to fix that?
Also in my last post, I have mentioned that the front brakes do not contact the rim at the right point:
As you can see, the brake pads strikes the lower portion of the rim. Any ideas on how to fix this?
Thank you.
 09-20-08 | 08:56 PM
#123
Member
Joined: Jul 2008
Posts: 32
Likes: 0
When you say your rear brake pads aren't parallel, do you mean to each other or to the rim? From your picture, it looks like you're talking about the toe-in of the pad to the rim, which is supposed to be there. It might a little too 'toed-in' from looking at your picture, but it is supposed to be there none-the-less.
From sheldon:
Good practice in installing brake shoes is to "toe them in", so that the front part of the shoe hits the rim first. As the brake arm flexes under real braking, it will permit the whole surface of the brake shoe to engage the rim.
Toeing in of brake shoes can also reduce the annoying squeal some brakes make when in use.
 09-20-08 | 09:13 PM
#125
Senior Member
Joined: Aug 2008
Posts: 107
Likes: 0
Hey, I I just fixe the front brakes. But the rear brakes, thanks for the information on toeing in, but i think it is toed in too much. I loosened the bolt in the rear and tightened it again, how do I adjust the pads?
Hey Understanding, thanks for sharing your pics. From your first pic, you see the Motobecan Decal, I took that off by heating the decal up with a blowdryer and then I used flossing and took it off.
Hey Understanding, thanks for sharing your pics. From your first pic, you see the Motobecan Decal, I took that off by heating the decal up with a blowdryer and then I used flossing and took it off.