


Play in external bearing bottom bracket, only when crank is in one orientation
 04-10-18, 01:57 PM
#1
Senior Member
Thread Starter
Join Date: Jan 2017
Posts: 1,064
Mentioned: 6 Post(s)
Tagged: 0 Thread(s)
Quoted: 350 Post(s)
Likes: 0
Liked 122 Times
in
90 Posts
Play in external bearing bottom bracket, only when crank is in one orientation
I installed a new Sugino bottom bracket and crankset, with external bearings, 24mm integrated spindle, similar to Shimano Hollowtech BB.
There is play only when the cranks are in one specific orientation, when the left arm is vertically up and right arm is vertically down. The play is not lateral, but rotational (transverse?) in the clockwise direction when facing forward in the direction of bike travel. So pulling/pushing at the spindle does not move, but pushing inward on the cranks at the pedals will cause the play, but not by pulling outward. Or described in another way, pulling the left crank upward or right crank downward. Hence the clockwise direction.
The play is not easily visible, but there is a clicking sound and I can feel it in my hands as it clicks.
Any idea why this would happen?
I had the BB shell faced just before installation, and I torqued the clamping bolts on the left arm to 15 Nm. Instructions says 14-16 Nm. I adjusted the compression bolt so that there was almost none/minimal preload and cranks spin freely.
Although on my first 30 min test ride yesterday off the workstand, there was creaking when pedaling down with the left foot starting from 20 min into the test ride. I attached the left crank by hand without checking the torque, which was not tight enough so the compression bolt loosened and the left crank moved out by 1mm.
 04-10-18, 05:33 PM
#2

Senior Member
Join Date: Feb 2012
Location: Rochester, NY
Posts: 18,106
Bikes: Stewart S&S coupled sport tourer, Stewart Sunday light, Stewart Commuting, Stewart Touring, Co Motion Tandem, Stewart 3-Spd, Stewart Track, Fuji Finest, Mongoose Tomac ATB, GT Bravado ATB, JCP Folder, Stewart 650B ATB
Mentioned: 0 Post(s)
Tagged: 0 Thread(s)
Quoted: 4214 Post(s)
Liked 3,891 Times
in
2,322 Posts
Sounds like someone who is motivated and skilled should take apart and reassemble the crank/BB and then after a few rides follow up with external hardware checks. During this all contact surfaces should be treated by grease/anti seize as needed. Andy
04-10-18, 06:01 PM
#3
Senior Member
Join Date: Apr 2011
Posts: 7,134
Mentioned: 41 Post(s)
Tagged: 0 Thread(s)
Quoted: 4448 Post(s)
Liked 1,585 Times
in
1,045 Posts
I installed a new Sugino bottom bracket and crankset, with external bearings, 24mm integrated spindle, similar to Shimano Hollowtech BB.
There is play only when the cranks are in one specific orientation, when the left arm is vertically up and right arm is vertically down. The play is not lateral, but rotational (transverse?) in the clockwise direction when facing forward in the direction of bike travel. So pulling/pushing at the spindle does not move, but pushing inward on the cranks at the pedals will cause the play, but not by pulling outward. Or described in another way, pulling the left crank upward or right crank downward. Hence the clockwise direction.
The play is not easily visible, but there is a clicking sound and I can feel it in my hands as it clicks.
Any idea why this would happen?
I had the BB shell faced just before installation, and I torqued the clamping bolts on the left arm to 15 Nm. Instructions says 14-16 Nm. I adjusted the compression bolt so that there was almost none/minimal preload and cranks spin freely.
Although on my first 30 min test ride yesterday off the workstand, there was creaking when pedaling down with the left foot starting from 20 min into the test ride. I attached the left crank by hand without checking the torque, which was not tight enough so the compression bolt loosened and the left crank moved out by 1mm.
There is play only when the cranks are in one specific orientation, when the left arm is vertically up and right arm is vertically down. The play is not lateral, but rotational (transverse?) in the clockwise direction when facing forward in the direction of bike travel. So pulling/pushing at the spindle does not move, but pushing inward on the cranks at the pedals will cause the play, but not by pulling outward. Or described in another way, pulling the left crank upward or right crank downward. Hence the clockwise direction.
The play is not easily visible, but there is a clicking sound and I can feel it in my hands as it clicks.
Any idea why this would happen?
I had the BB shell faced just before installation, and I torqued the clamping bolts on the left arm to 15 Nm. Instructions says 14-16 Nm. I adjusted the compression bolt so that there was almost none/minimal preload and cranks spin freely.
Although on my first 30 min test ride yesterday off the workstand, there was creaking when pedaling down with the left foot starting from 20 min into the test ride. I attached the left crank by hand without checking the torque, which was not tight enough so the compression bolt loosened and the left crank moved out by 1mm.
What are the preload instructions for the left arm? It would be easy to check if that's the cause by simply putting more preload on before torquing the clamping bolts.
On the clamping bolts, make sure you tighten them in alternation rather than all one then the other.
But I think your cup installation might be where the problem lies. How much did you torque them down? They are supposed to be pretty tight. I would also recommend teflon tape on the threads as well as grease - this helps with many external BB squeaks.
If you do all that still have the problem, it might just be a bad BB. It might be diagnostic to mount the crank on the left to see if the problem remains "clockwise" or follows the crank.
04-10-18, 07:30 PM
#4
Senior Member
Thread Starter
Join Date: Jan 2017
Posts: 1,064
Mentioned: 6 Post(s)
Tagged: 0 Thread(s)
Quoted: 350 Post(s)
Likes: 0
Liked 122 Times
in
90 Posts
(edited after more experimentation)
Instructions have no exact specification on how much to preload the bearings or how much torque to put on the compression bolt. How "free" should the cranks turn?
Manual, not the same crank, but similar BB and text that came with mine:
https://www.suginoltd.co.jp/us/produ...N)20150501.pdf
I tightened it, to the point where the cranks are just touching the BB surface and the cranks would swing very freely. A tiny amount of turn of the bolt will affect the amount of resistance and how far the cranks will continue to swing after releasing while spinning. When I tighten another 1/20 turn it will continue to make 1.5 turns when releasing at 60 rpm. Tightening another 1/20 turn and it will only swing 1 turn. Another 1/20 turn and it will only swing 1/2 turn.
The instructions say that after the 2 clamping bolts are tightened to 14-16Nm, the last step is to tighten the compression bolt again (doesn't say how much, but I assume very tight). Before my first test ride when I did not use a torque wrench, the last step actually added more preload to the bearings, which meant the clamping bolts weren't tight enough. I didn't pay attention to this effect until during the ride when I noticed the crank had come loose. Afterward when I used a torque wrench, the last step added a very small (much less) amount of preload.
I installed the BB cups very tight with a 30cm wrench (probably loaded at 25cm) using a little more than 1/3rd of my body weight. Instructions says 40-50Nm or 400-500 kg*cm. So 25cm should be around 20kg. I probably put down 25-30kg. I used anti-seize paste. The BB had blue thread tape but it would shred to pieces and get stuck between the BB shell and the cup. I was worried this would cause the cup to not sit flush against the BB shell so I removed the shredded pieces. When I installed the left side, the tape rolled off, stuck together, and fell off by itself.
The 24mm spindle slips into the cups very easily, no rubber mallet required. Videos on Youtube seem to show people having to bop it a few times.
Last edited by tomtomtom123; 04-11-18 at 07:46 AM.
04-11-18, 06:24 AM
#5
Senior Member
Thread Starter
Join Date: Jan 2017
Posts: 1,064
Mentioned: 6 Post(s)
Tagged: 0 Thread(s)
Quoted: 350 Post(s)
Likes: 0
Liked 122 Times
in
90 Posts
(edited after more experimentation)
I looked again this morning. I tried pressing/pulling with more force at the other crank positions and I can feel some play, just not as much as the vertical position.
After tightening the compression bolt further about 4/20 to 5/20 of a turn, the play has been removed all the way around. This has added more friction to the bearings so when releasing the arms while spinning at 60 rpm it will continue to spin for 1/2 turn. This is without the pedals attached.
When tightening only 2/20 of a turn further from yesterday, there was play when the left arm was in vertical up position, and just a tiny bit when in horizontal right position. When tightening 3/20 of a turn further from yesterday, the play from the horizontal right position was gone, only a little bit of play remained when pressing hard at vertical up position.
4/20 and all the play is gone. 5/20 because the last step of tightening the compression bolt seems to still add more preload, even after the clamping bolts have been torqued to 16 Nm.
The maximum play was always when whichever arm was mounted on the left side was at the vertical up position. It did not matter which arm was mounted on the left side, NDS or DS. It also did not matter if the arms were mounted in the opposite or same direction to each other. Always pressing clockwise with left arm up.
So then I assume the extra play in this specific orientation has to do with the BB cups and not the crank arms. Maybe they're not parallel and angled slightly inwards at the top? Although I can't come up with a theory why the play is always in the clockwise direction. Maybe the left cup is slightly vertically ovoid?
The amount of preload that I applied to remove all the play is fine? Ride it like this?
Do other external bearings similar to the Sugino's, like the Hollowtech, experience this kind of directional specific play?
At the shop where I went to get the facing done where the guy ran the tool a few turns, once on each side, the right side seemed to have been faced fine, but with the tool on the left side, it was making squeaking noise. The guy tightened the knob a half turn to add more spring force and gave the tool another turn, still making noise but lessened. Afterward I could see the indentation lines marking where the 6 teeth of the cutting tool stopped on the left side surface of the BB shell, slightly more visible (deeper? probably less than 0.05mm) towards the left, which I scratched away lightly with a knife. Right side only had indentation from 1 tooth.
Don't know if facing again will make much difference or would that possibly help? I can't imagine these tools to be extremely accurate, and the BB should have some tolerances built into them.
I think I'll give it another test ride and see if the crank loosens itself again after having the correct torque on the clamping bolts. If it develops play again, I would probably switch out the BB with a Hollowtech to see if that removes the directional play. If it does not, then probably face the BB shell again.
Last edited by tomtomtom123; 04-11-18 at 07:52 AM.
04-11-18, 04:21 PM
#7
Senior Member
Join Date: Apr 2011
Posts: 7,134
Mentioned: 41 Post(s)
Tagged: 0 Thread(s)
Quoted: 4448 Post(s)
Liked 1,585 Times
in
1,045 Posts
(edited after more experimentation)
I looked again this morning. I tried pressing/pulling with more force at the other crank positions and I can feel some play, just not as much as the vertical position.
After tightening the compression bolt further about 4/20 to 5/20 of a turn, the play has been removed all the way around. This has added more friction to the bearings so when releasing the arms while spinning at 60 rpm it will continue to spin for 1/2 turn. This is without the pedals attached.
When tightening only 2/20 of a turn further from yesterday, there was play when the left arm was in vertical up position, and just a tiny bit when in horizontal right position. When tightening 3/20 of a turn further from yesterday, the play from the horizontal right position was gone, only a little bit of play remained when pressing hard at vertical up position.
4/20 and all the play is gone. 5/20 because the last step of tightening the compression bolt seems to still add more preload, even after the clamping bolts have been torqued to 16 Nm.
The maximum play was always when whichever arm was mounted on the left side was at the vertical up position. It did not matter which arm was mounted on the left side, NDS or DS. It also did not matter if the arms were mounted in the opposite or same direction to each other. Always pressing clockwise with left arm up.
So then I assume the extra play in this specific orientation has to do with the BB cups and not the crank arms. Maybe they're not parallel and angled slightly inwards at the top? Although I can't come up with a theory why the play is always in the clockwise direction. Maybe the left cup is slightly vertically ovoid?
The amount of preload that I applied to remove all the play is fine? Ride it like this?
Do other external bearings similar to the Sugino's, like the Hollowtech, experience this kind of directional specific play?
At the shop where I went to get the facing done where the guy ran the tool a few turns, once on each side, the right side seemed to have been faced fine, but with the tool on the left side, it was making squeaking noise. The guy tightened the knob a half turn to add more spring force and gave the tool another turn, still making noise but lessened. Afterward I could see the indentation lines marking where the 6 teeth of the cutting tool stopped on the left side surface of the BB shell, slightly more visible (deeper? probably less than 0.05mm) towards the left, which I scratched away lightly with a knife. Right side only had indentation from 1 tooth.
Don't know if facing again will make much difference or would that possibly help? I can't imagine these tools to be extremely accurate, and the BB should have some tolerances built into them.
I think I'll give it another test ride and see if the crank loosens itself again after having the correct torque on the clamping bolts. If it develops play again, I would probably switch out the BB with a Hollowtech to see if that removes the directional play. If it does not, then probably face the BB shell again.
I looked again this morning. I tried pressing/pulling with more force at the other crank positions and I can feel some play, just not as much as the vertical position.
After tightening the compression bolt further about 4/20 to 5/20 of a turn, the play has been removed all the way around. This has added more friction to the bearings so when releasing the arms while spinning at 60 rpm it will continue to spin for 1/2 turn. This is without the pedals attached.
When tightening only 2/20 of a turn further from yesterday, there was play when the left arm was in vertical up position, and just a tiny bit when in horizontal right position. When tightening 3/20 of a turn further from yesterday, the play from the horizontal right position was gone, only a little bit of play remained when pressing hard at vertical up position.
4/20 and all the play is gone. 5/20 because the last step of tightening the compression bolt seems to still add more preload, even after the clamping bolts have been torqued to 16 Nm.
The maximum play was always when whichever arm was mounted on the left side was at the vertical up position. It did not matter which arm was mounted on the left side, NDS or DS. It also did not matter if the arms were mounted in the opposite or same direction to each other. Always pressing clockwise with left arm up.
So then I assume the extra play in this specific orientation has to do with the BB cups and not the crank arms. Maybe they're not parallel and angled slightly inwards at the top? Although I can't come up with a theory why the play is always in the clockwise direction. Maybe the left cup is slightly vertically ovoid?
The amount of preload that I applied to remove all the play is fine? Ride it like this?
Do other external bearings similar to the Sugino's, like the Hollowtech, experience this kind of directional specific play?
At the shop where I went to get the facing done where the guy ran the tool a few turns, once on each side, the right side seemed to have been faced fine, but with the tool on the left side, it was making squeaking noise. The guy tightened the knob a half turn to add more spring force and gave the tool another turn, still making noise but lessened. Afterward I could see the indentation lines marking where the 6 teeth of the cutting tool stopped on the left side surface of the BB shell, slightly more visible (deeper? probably less than 0.05mm) towards the left, which I scratched away lightly with a knife. Right side only had indentation from 1 tooth.
Don't know if facing again will make much difference or would that possibly help? I can't imagine these tools to be extremely accurate, and the BB should have some tolerances built into them.
I think I'll give it another test ride and see if the crank loosens itself again after having the correct torque on the clamping bolts. If it develops play again, I would probably switch out the BB with a Hollowtech to see if that removes the directional play. If it does not, then probably face the BB shell again.
These external BBs all have external seals - they will not spin perfect when properly loaded because of the seal friction.
Some kinds of play just cause damaging wear. BBs see a lot side load.
04-11-18, 06:02 PM
#9
Senior Member
Join Date: Apr 2011
Posts: 7,134
Mentioned: 41 Post(s)
Tagged: 0 Thread(s)
Quoted: 4448 Post(s)
Liked 1,585 Times
in
1,045 Posts
I'm not sure which "bind" you're referring to. I don't think the OPs zero-play adjustment is "bind". But running bearings loose does damage the bearing surfaces and stresses the components that are sliding around when they shouldn't be. That's what creates elongation and wear grooves.
04-12-18, 11:36 AM
#10
Senior Member
Thread Starter
Join Date: Jan 2017
Posts: 1,064
Mentioned: 6 Post(s)
Tagged: 0 Thread(s)
Quoted: 350 Post(s)
Likes: 0
Liked 122 Times
in
90 Posts
I took another 30 min test ride, and the compression bolt loosened itself again. It moved approximately 4/20 turn counterclockwise to the point where the cranks touch the BB cups with no preload. The left crank arm moved outward a little bit, since there was a little bit of play, but not as much as during the 1st ride.
The torque on the clamping bolts on the left crank was still 16 Nm like I set it to. I had the compression bolt torqued against the left crank arm to around 6-8 Nm.
After the ride, the compression bolt loosened itself to the point of zero torque. If I tightened it again, the left crank does not move inwards enough to its original position so there is still too much play.
I had to loosen the left crank and start the installation procedure again.
The compression bolt has no thread tape or compound. The instructions don't mention to use them. Perhaps I will have to?
It's the first time I'm using an integrated axle with external BB. I've only used JIS square taper BB's before this one.
Last edited by tomtomtom123; 04-12-18 at 11:44 AM.
04-12-18, 12:14 PM
#11
Senior Member
Join Date: Apr 2011
Posts: 7,134
Mentioned: 41 Post(s)
Tagged: 0 Thread(s)
Quoted: 4448 Post(s)
Liked 1,585 Times
in
1,045 Posts
I took another 30 min test ride, and the compression bolt loosened itself again. It moved approximately 4/20 turn counterclockwise to the point where the cranks touch the BB cups with no preload. The left crank arm moved outward a little bit, since there was a little bit of play, but not as much as during the 1st ride.
The torque on the clamping bolts on the left crank was still 16 Nm like I set it to. I had the compression bolt torqued against the left crank arm to around 6-8 Nm.
After the ride, the compression bolt loosened itself to the point of zero torque. If I tightened it again, the left crank does not move inwards enough to its original position so there is still too much play.
I had to loosen the left crank and start the installation procedure again.
The compression bolt has no thread tape or compound. The instructions don't mention to use them. Perhaps I will have to?
It's the first time I'm using an integrated axle with external BB. I've only used JIS square taper BB's before this one.
The torque on the clamping bolts on the left crank was still 16 Nm like I set it to. I had the compression bolt torqued against the left crank arm to around 6-8 Nm.
After the ride, the compression bolt loosened itself to the point of zero torque. If I tightened it again, the left crank does not move inwards enough to its original position so there is still too much play.
I had to loosen the left crank and start the installation procedure again.
The compression bolt has no thread tape or compound. The instructions don't mention to use them. Perhaps I will have to?
It's the first time I'm using an integrated axle with external BB. I've only used JIS square taper BB's before this one.
Are you sure it actually moved, or did the seals seat in creating some play?
04-12-18, 02:01 PM
#12
Senior Member
Thread Starter
Join Date: Jan 2017
Posts: 1,064
Mentioned: 6 Post(s)
Tagged: 0 Thread(s)
Quoted: 350 Post(s)
Likes: 0
Liked 122 Times
in
90 Posts
I would have to ride again to check if what you are suggesting is how it was, (seals seating creating play and left arm staying in place).
But afterwards when I tightened the compression bolt back to zero play, the logo printed on it appeared to be in the same position as before. This would imply that the seals did not change, that the left arm moved. But my memory could be wrong, as I did not mark the position of the logo. Maybe I'll take a photo after I install it again, and if play develops again, I'll compare the logo position.
But afterwards when I tightened the compression bolt back to zero play, the logo printed on it appeared to be in the same position as before. This would imply that the seals did not change, that the left arm moved. But my memory could be wrong, as I did not mark the position of the logo. Maybe I'll take a photo after I install it again, and if play develops again, I'll compare the logo position.
Last edited by tomtomtom123; 04-12-18 at 02:07 PM.
04-13-18, 05:36 PM
#13
Senior Member
Thread Starter
Join Date: Jan 2017
Posts: 1,064
Mentioned: 6 Post(s)
Tagged: 0 Thread(s)
Quoted: 350 Post(s)
Likes: 0
Liked 122 Times
in
90 Posts
I haven't had the chance to put the crank back on and test it again.
But the splines are wide and tall, and the left arm slides on loosely. One of the splines fits inside the gap in the left arm between the clamping bolts, so in effect, if this single spline gets "clamped" first, most of the holding force will be applied here, and the gaps around the other splines won't get much pressure. Most of the paint has scratched off on the top and bottom splines while paint remains on the side splines.
As the final step of tightening the compression bolt applies more preload onto the bearings, it means the left arm can slip when enough lateral force is applied, 4-6 Nm. So I would assume the slight "movement" of the left crank during pedaling could release the torque I put on the compression bolt against the left arm, causing the compression bolt to unscrew and allowing the left arm to slip slightly out.
Anyway, I'll try doing another ride this weekend to see if it gets loose again. I'm not sure what else I can do except to add some threadlocker to the compression bolt. I might go and buy some Loctite 248 medium pasty stick instead of the liquid form.
The product photos from Sugino pre-applied threadlocker on their compression bolts, but mine did not have any applied.
04-13-18, 06:16 PM
#14
Senior Member
Join Date: Apr 2011
Posts: 7,134
Mentioned: 41 Post(s)
Tagged: 0 Thread(s)
Quoted: 4448 Post(s)
Liked 1,585 Times
in
1,045 Posts
As the final step of tightening the compression bolt applies more preload onto the bearings, it means the left arm can slip when enough lateral force is applied, 4-6 Nm. So I would assume the slight "movement" of the left crank during pedaling could release the torque I put on the compression bolt against the left arm, causing the compression bolt to unscrew and allowing the left arm to slip slightly out.
You're not trying to change the "preload" after the pinch bolts are tight, right?
Do use some regular blue Loctite.
Last edited by Kontact; 04-13-18 at 06:21 PM.
04-13-18, 08:08 PM
#15
Senior Member
Thread Starter
Join Date: Jan 2017
Posts: 1,064
Mentioned: 6 Post(s)
Tagged: 0 Thread(s)
Quoted: 350 Post(s)
Likes: 0
Liked 122 Times
in
90 Posts
The instructions say that after the position of the left arm is set by screwing in the compression bolt into the end of the spindle until the arm touches the bearing (doesn't mention anything about play or preload, but I've preloaded until zero play), and the 2 clamping bolts on the left arm are tight and torqued to 16 Nm, then the last step is to tighten the compression bolt against the left arm (but doesn't say how much torque), with a warning that if it is not then the left arm may fall off.
So when I do this and tighten the compression bolt to around 6 Nm (about what's reasonable with a short 5mm L-key wrench), the bolt rotates another 1/20 turn, and the bearings appear to have gained more friction and preload. So I assume this implies the left arm has moved inward slightly.
If this is correct and the left arm was able to move ever so slightly, I assume that just a tiny bit of motion could loosen the compression bolt, allowing the left arm to slip out slightly and introduce a little bit of play.
So if the left arm is actually able to slip, if I add some threadlocker to the compression bolt to prevent it from loosening, the left arm should not be able to move outward.
04-17-18, 11:42 AM
#16
Senior Member
Thread Starter
Join Date: Jan 2017
Posts: 1,064
Mentioned: 6 Post(s)
Tagged: 0 Thread(s)
Quoted: 350 Post(s)
Likes: 0
Liked 122 Times
in
90 Posts
After a 15 minute ride, again I get the loosened compression bolt and creaking/play.
The compression bolt loosens 1/8th turn. It has a 1mm pitch so that's about 0.1-0.15mm of introduced movement. The 2 clamping bolts on the left arm still have 16 Nm of torque. The play is caused by the left arm slipping, not by seating of the bearings, because when I remove and reinstall the left arm again, the position of the logo on the compression bolt for zero play is still the same as before, which is 1/8 turn further than the position where the crank arms just touch the BB cups with no preload on the bearings.
If I try tightening the compression bolt again after it's been loosened after a ride, it will not turn back to its original position because the left arm is still clamped at 16 Nm, unless I apply greater than 8 Nm of torque to the compression bolt. So I have to loosen clamping bolts first before setting the compression bolt again.
I added light 6 Nm threadlocker to the compression bolt before the last ride, but the chemical did not appear to react to the metals or it was too weak or too light of a coat, so tonight I applied a different 16 Nm threadlocker with a thicker coat, although I accidentally squeezed out a lot. It's already gotten hard after 5 minutes and I can't turn the bolt by hand with a short hex wrench, so I'll ride tomorrow to see how it works. Loctite is not easily found here so I'm using a local brand.
You mentioned that it is not possible for the left arm to slip if the clamping bolts have been torqued, but I think it is slipping, otherwise I can't explain why there is play being introduced when the compression bolt loosens.
Last edited by tomtomtom123; 04-17-18 at 02:13 PM.
04-18-18, 05:50 PM
#17
Senior Member
Thread Starter
Join Date: Jan 2017
Posts: 1,064
Mentioned: 6 Post(s)
Tagged: 0 Thread(s)
Quoted: 350 Post(s)
Likes: 0
Liked 122 Times
in
90 Posts
I did another test.
After everything is set to zero play, and the left arm bolts are torqued to 16 Nm, I remove the compression bolt. Then wiggle the left arm for 1 minute, and then I start to feel some play. So the left arm is slipping a little bit. The interface between the left arm and the spindle spline is loose. If the gap is too large, I don't think it will be able to stay in place. Paint on the splines have only worn off on 3 of the 10 splines and most of the others are still intact, so I think the clamping force is not evenly applied all the way around.
I applied the stronger "middle" strength threadlocker, specified as 16 Nm break force. Rode 1 hour today and the compression bolt did not come loose. However, I heard creaking when I stand on the pedals, and if I pull hard, I can feel a tiny amount of play. I wanted to remove and reinstall with an additional 1/16 turn of the compression bolt to add a little more preload to the bearings. However when I tried removing the aluminum compression bolt, and got to 16-20 Nm, I was able to turn 1 round, then the hex key hole became a circle.
So I tapped it to M6 and inserted a bolt from behind, but the hex key hole also deformed and gave way before I could turn it any. I will get other screws tomorrow, hopefully with better tolerances in the head. If that doesn't work, I'll tap it with left hand M8 and insert a left hand bolt from the outside.
When I get it off, I'll try cleaning off the dry medium threadlocker and try again with the weaker threadlocker with a thicker coat.
04-23-18, 06:07 PM
#18
Senior Member
Thread Starter
Join Date: Jan 2017
Posts: 1,064
Mentioned: 6 Post(s)
Tagged: 0 Thread(s)
Quoted: 350 Post(s)
Likes: 0
Liked 122 Times
in
90 Posts
I got the compression bolt off by threading the deformed hex key hole with M8 left hand reverse threads, heating the hole with a "turbo windproof" lighter that has a larger faster output, for 20-30 seconds, and turning it with a matching left hand bolt. It seems that either the rubber o-ring at the tip of the compression bolt glued to the threadlocker or was binding into it, in combination with the thick coat, preventing me from getting it out without heating first. The O-ring vaporized, I can't find it anymore (or broke up into little pieces along with the shreaded threadlocker bits).
The left arm still wiggles outwards on the spindle after a short time, even when tightened to 18 Nm. I took out the pinch/clamping bolts and removed the pre-applied threadlocker, and reinstalled to make sure I was getting actual torque readings that wasn't affected by the force of the threadlocker.
The only way I can think of to keep the arm from slipping and introducing play is to apply threadlocker to the compression bolt, which seemed to work last time, except I'll use the weaker threadlocker that I tried before but will attempt to use a thicker coat to see if it reacts, since last time it did nothing when I applied a light coat.
I added another 1/16 turn to the compression bolt and there are no more creaking sounds, although there is more friction on the BB. The crank doesn't continue as far as before when i spin and release. Sugino instruction manual doesn't mention anything about how much preload to apply. It simply says to insert compression bolt until arms are touching BB, however leaving it like this leaves a bit of play and creates a lot of creaking sounds. Shimano BBs mention something like 1.5-3 Nm. I think where I've got it now is about 3 Nm.
Last edited by tomtomtom123; 04-23-18 at 06:16 PM.
05-04-18, 10:16 AM
#19
Senior Member
Thread Starter
Join Date: Jan 2017
Posts: 1,064
Mentioned: 6 Post(s)
Tagged: 0 Thread(s)
Quoted: 350 Post(s)
Likes: 0
Liked 122 Times
in
90 Posts
I went to the local bike shop and the guy thinks that the fit interface is too loose, which causes the left arm to slip. He applied carbon friction paste to the splines, and although it feels stiff when installing, it is a gel and probably migrates over time. I used a marker to draw lines on the clamping bolt heads to record where they were when torqued at 16 Nm. After a couple days, I released the bolts and torqued them again, but the lines did not match up anymore and was a little further clockwise. Also there isn't a way to control the thickness of the suspended fibers in the gel once the gel migrates, so I assume the thickness will no longer be uniform.
I measured the gaps between the splines of the spindle and left arm. The outer diameter has 0.17 - 0.21 mm of tolerance. The inner surfaces do not touch. The sides of the splines have about 0.05 mm to either side (total 0.1mm). The black paint on the splines of the spindle has worn away only on one side. The opposite side still has the black paint intact, so I assume that when the left arm is clamped tight, only some of the splines are in contact. The splines with the paint still intact are on the back facing side when the left pedal is pointed down, the area that I assume experience the least amount of pressure during pedaling.


I read somewhere that Shimano spindles extend 20 mm past the left BB cup. The Sugino spindle is shorter, and in combination with the large chamfer at the end, the surfaces of the splines on the spindle in contact with the left arm only extend approximately 17.5mm from the left BB cup. The center of the outer M6 clamping bolt is 15mm from the BB cup, so the splines only extend 2.5mm past the outer clamping bolt (17.5 - 15 = 2.5 mm). Also, the splines of the left arm stop 3.5 mm short of the BB cup. So the total width of the surfaces in contact between the spindle and left arm is only 14 mm. I have a 1.2 mm spacer on the right side for my chainline, which shortens this further.
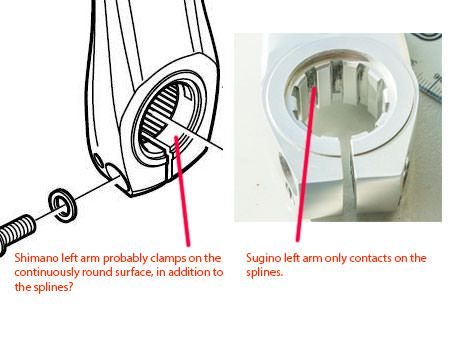
The design of the clamping surfaces are different between Shimano and Sugino. I don't have a Shimano crank in front of me to look at, but from photos, it appears that Shimano possibly has a continuous, round surface in contact between the left arm and spindle, in addition to the splines (is this correct?) which makes it much more stable. The Sugino has no continuous surface in contact, only the discontinuous deep splines with only 14 mm width in contact, which I suspect is susceptible to wiggle and slip with the large 0.2 mm tolerance.
The directional play of my Sugino BB used to be only when the left arm was pointed vertically or to the rear. After adding more preload to the BB, I was able to remove the play, but now it has come back no matter how tight I make the BB and the direction has changed so that it only happens when the left arm is pointing forward. Adding more preload has added more friction to the BB. So instead I will attempt to switch the Sugino BB with Shimano BB.
I read on this blog page that the Shimano road BB is 90 mm wide measured from the outside of the cups when mounted, and is almost the same as the Sugino BB which is around 89.7 - 90mm. The Shimano MTB cups are 1 mm thinner on each side than the road cups, and the water sheaths (inner covers) appear to be interchangeable.
tobias feltus: cr�ateur � bottom bracket interchangeability
So there is a possibility to make the spindle 2mm longer when using MTB cups with the road sheath to lengthen the contact surfaces for my Sugino crankset and hopefully make it more stable. Mixing the spacers on my spindle, I will get a final extension of 1.8mm of the spindle the spindle. The maximum I can extend the spindle before it hits the compression bolt is 2.2mm, so if I extend by 1.8mm I should have 0.4mm remaining. I will also have to readjust my chainring spacing for the FD and thick seat tube clearance. The new position means the double rings will be closer together and instead of being able to run the chain on the inner ring up to 8th of 10 cassette, I will probably only be able to go up to 7th before the chain catches on the outer ring. I have a 46T / 26T double.
On another site I read that the MTB sheaths can be milled down at the ends to fit 66 mm shells, instead of having to buy an additional road BB for its sheath.
FAQLoad - XT M760/761 cranks - Shrinking the Q-Factor
I measured the gaps between the splines of the spindle and left arm. The outer diameter has 0.17 - 0.21 mm of tolerance. The inner surfaces do not touch. The sides of the splines have about 0.05 mm to either side (total 0.1mm). The black paint on the splines of the spindle has worn away only on one side. The opposite side still has the black paint intact, so I assume that when the left arm is clamped tight, only some of the splines are in contact. The splines with the paint still intact are on the back facing side when the left pedal is pointed down, the area that I assume experience the least amount of pressure during pedaling.
I read somewhere that Shimano spindles extend 20 mm past the left BB cup. The Sugino spindle is shorter, and in combination with the large chamfer at the end, the surfaces of the splines on the spindle in contact with the left arm only extend approximately 17.5mm from the left BB cup. The center of the outer M6 clamping bolt is 15mm from the BB cup, so the splines only extend 2.5mm past the outer clamping bolt (17.5 - 15 = 2.5 mm). Also, the splines of the left arm stop 3.5 mm short of the BB cup. So the total width of the surfaces in contact between the spindle and left arm is only 14 mm. I have a 1.2 mm spacer on the right side for my chainline, which shortens this further.
The design of the clamping surfaces are different between Shimano and Sugino. I don't have a Shimano crank in front of me to look at, but from photos, it appears that Shimano possibly has a continuous, round surface in contact between the left arm and spindle, in addition to the splines (is this correct?) which makes it much more stable. The Sugino has no continuous surface in contact, only the discontinuous deep splines with only 14 mm width in contact, which I suspect is susceptible to wiggle and slip with the large 0.2 mm tolerance.
The directional play of my Sugino BB used to be only when the left arm was pointed vertically or to the rear. After adding more preload to the BB, I was able to remove the play, but now it has come back no matter how tight I make the BB and the direction has changed so that it only happens when the left arm is pointing forward. Adding more preload has added more friction to the BB. So instead I will attempt to switch the Sugino BB with Shimano BB.
I read on this blog page that the Shimano road BB is 90 mm wide measured from the outside of the cups when mounted, and is almost the same as the Sugino BB which is around 89.7 - 90mm. The Shimano MTB cups are 1 mm thinner on each side than the road cups, and the water sheaths (inner covers) appear to be interchangeable.
tobias feltus: cr�ateur � bottom bracket interchangeability
So there is a possibility to make the spindle 2mm longer when using MTB cups with the road sheath to lengthen the contact surfaces for my Sugino crankset and hopefully make it more stable. Mixing the spacers on my spindle, I will get a final extension of 1.8mm of the spindle the spindle. The maximum I can extend the spindle before it hits the compression bolt is 2.2mm, so if I extend by 1.8mm I should have 0.4mm remaining. I will also have to readjust my chainring spacing for the FD and thick seat tube clearance. The new position means the double rings will be closer together and instead of being able to run the chain on the inner ring up to 8th of 10 cassette, I will probably only be able to go up to 7th before the chain catches on the outer ring. I have a 46T / 26T double.
On another site I read that the MTB sheaths can be milled down at the ends to fit 66 mm shells, instead of having to buy an additional road BB for its sheath.
FAQLoad - XT M760/761 cranks - Shrinking the Q-Factor
05-06-18, 04:01 AM
#20
Senior Member
Join Date: Dec 2013
Location: South Coast of Western Australia
Posts: 254
Mentioned: 1 Post(s)
Tagged: 0 Thread(s)
Quoted: 150 Post(s)
Likes: 0
Liked 0 Times
in
0 Posts
What I don't understand is why didn't you simply return the cranks to where you bought them instead of trying to fix them yourself. You did say that they are new. I have a OX901D crankset on one of my bikes and the fit and finish is absolutely top notch. If there was any play or misfit I would have sent them back after the first sign of trouble.
05-06-18, 05:46 PM
#21
Senior Member
Thread Starter
Join Date: Jan 2017
Posts: 1,064
Mentioned: 6 Post(s)
Tagged: 0 Thread(s)
Quoted: 350 Post(s)
Likes: 0
Liked 122 Times
in
90 Posts
I didn't return them because the seller did not answer an email or telephone call after the initial sales. I looked at one of their social media pages and there was a post about the business being up for sale.
They did exchange the possibly incorrect chainring model for the crankset, but after that, when I discovered the left arm slipping out and tried to contact them, there was no response.
The outer chainring that came with the crankset was the POE110 which I think is found on the outside position of the Sugino XD and Alpina cranks, with protruding bolt heads which was catching on the chain when mounted on the OX601D, and was too thin resulting in a too large of a gap for upshifting. The product photos for the crankset show the PE110S which is thicker (4.5mm vs 3.0mm with the POE110) with recess counterbore for bolt heads on both sides of the chainring (so it can be mounted on either side of the bolt flanges), and they exchanged that with me. But after that there was no response.
Do you know what the gap / tolerance is on your OX901D between the spline outer diameters? I've got approximately 0.17 to 0.21 mm, between the 23.77 mm left arm and 23.56 - 23.60 mm spindle.
05-06-18, 07:14 PM
#22
Senior Member
Join Date: Dec 2013
Location: South Coast of Western Australia
Posts: 254
Mentioned: 1 Post(s)
Tagged: 0 Thread(s)
Quoted: 150 Post(s)
Likes: 0
Liked 0 Times
in
0 Posts
I didn't return them because the seller did not answer an email or telephone call after the initial sales. I looked at one of their social media pages and there was a post about the business being up for sale.
They did exchange the possibly incorrect chainring model for the crankset, but after that, when I discovered the left arm slipping out and tried to contact them, there was no response.
The outer chainring that came with the crankset was the POE110 which I think is found on the outside position of the Sugino XD and Alpina cranks, with protruding bolt heads which was catching on the chain when mounted on the OX601D, and was too thin resulting in a too large of a gap for upshifting. The product photos for the crankset show the PE110S which is thicker (4.5mm vs 3.0mm with the POE110) with recess counterbore for bolt heads on both sides of the chainring (so it can be mounted on either side of the bolt flanges), and they exchanged that with me. But after that there was no response.
Do you know what the gap / tolerance is on your OX901D between the spline outer diameters? I've got approximately 0.17 to 0.21 mm, between the 23.77 mm left arm and 23.56 - 23.60 mm spindle.
They did exchange the possibly incorrect chainring model for the crankset, but after that, when I discovered the left arm slipping out and tried to contact them, there was no response.
The outer chainring that came with the crankset was the POE110 which I think is found on the outside position of the Sugino XD and Alpina cranks, with protruding bolt heads which was catching on the chain when mounted on the OX601D, and was too thin resulting in a too large of a gap for upshifting. The product photos for the crankset show the PE110S which is thicker (4.5mm vs 3.0mm with the POE110) with recess counterbore for bolt heads on both sides of the chainring (so it can be mounted on either side of the bolt flanges), and they exchanged that with me. But after that there was no response.
Do you know what the gap / tolerance is on your OX901D between the spline outer diameters? I've got approximately 0.17 to 0.21 mm, between the 23.77 mm left arm and 23.56 - 23.60 mm spindle.
If I was in your shoes I would contact Sugino directly or their distributor.
05-10-18, 06:23 PM
#23
Senior Member
Thread Starter
Join Date: Jan 2017
Posts: 1,064
Mentioned: 6 Post(s)
Tagged: 0 Thread(s)
Quoted: 350 Post(s)
Likes: 0
Liked 122 Times
in
90 Posts
I was already in contact with Sugino and the progressive response was 1) follow the manual, 2) torque the left arm, 3) buy a new left arm. The support person would not tell me how much of a gap / tolerance is normal between the splines.
As the new left arm costs 75% of a new complete crankset with chainrings, it's not economical to buy only a left arm, and I won't know if the splines on the spindle instead of the left arm is the problem.
So I'm going to see if using Shimano BB cups will solve the odd directional play, and hopefully the extra 1mm of spindle length from the thinner BB cups will help add a little bit of stability to the left arm. Light threadlocker on the compression bolt to keep it from getting loose and prevent the left arm from slipping outward.
If those don't work then I would give up and go back to square taper. The FSA Adventure Tempo has 80 / 110 BCD and is 147mm Q-factor, but the 80 BCD is only available in 30T and no other brands make 5-arm 80 BCD chainrings. So if I want smaller, I'd have to take something like a TA 74 BCD chainring and use a CNC machine to drill new holes at 80mm, which is limited to 26T. 74 BCD can go down to 24T, but won't have enough clearance at the teeth to drill 80mm holes.
05-10-18, 07:04 PM
#24
Senior Member
Join Date: Dec 2013
Location: South Coast of Western Australia
Posts: 254
Mentioned: 1 Post(s)
Tagged: 0 Thread(s)
Quoted: 150 Post(s)
Likes: 0
Liked 0 Times
in
0 Posts
I was already in contact with Sugino and the progressive response was 1) follow the manual, 2) torque the left arm, 3) buy a new left arm. The support person would not tell me how much of a gap / tolerance is normal between the splines.
As the new left arm costs 75% of a new complete crankset with chainrings, it's not economical to buy only a left arm, and I won't know if the splines on the spindle instead of the left arm is the problem.
So I'm going to see if using Shimano BB cups will solve the odd directional play, and hopefully the extra 1mm of spindle length from the thinner BB cups will help add a little bit of stability to the left arm. Light threadlocker on the compression bolt to keep it from getting loose and prevent the left arm from slipping outward.
If those don't work then I would give up and go back to square taper. The FSA Adventure Tempo has 80 / 110 BCD and is 147mm Q-factor, but the 80 BCD is only available in 30T and no other brands make 5-arm 80 BCD chainrings. So if I want smaller, I'd have to take something like a TA 74 BCD chainring and use a CNC machine to drill new holes at 80mm, which is limited to 26T. 74 BCD can go down to 24T, but won't have enough clearance at the teeth to drill 80mm holes.
As the new left arm costs 75% of a new complete crankset with chainrings, it's not economical to buy only a left arm, and I won't know if the splines on the spindle instead of the left arm is the problem.
So I'm going to see if using Shimano BB cups will solve the odd directional play, and hopefully the extra 1mm of spindle length from the thinner BB cups will help add a little bit of stability to the left arm. Light threadlocker on the compression bolt to keep it from getting loose and prevent the left arm from slipping outward.
If those don't work then I would give up and go back to square taper. The FSA Adventure Tempo has 80 / 110 BCD and is 147mm Q-factor, but the 80 BCD is only available in 30T and no other brands make 5-arm 80 BCD chainrings. So if I want smaller, I'd have to take something like a TA 74 BCD chainring and use a CNC machine to drill new holes at 80mm, which is limited to 26T. 74 BCD can go down to 24T, but won't have enough clearance at the teeth to drill 80mm holes.
I contacted Sugino last year and they no longer offer a chainring smaller than 30 tooth.