


Fork with stripped thread
 05-28-15 | 06:39 PM
#1
Thread Starter
longi
Joined: Aug 2014
Posts: 51
Likes: 0
Fork with stripped thread
Hi there!
I'm having a situation with a fork thread.
It's stripped in the zone of the lower cup, so that cup cannot be tightened. The thing is that the adjustable cup zone is not stripped, so the headset can, eventually and totally, be tightened. I mean, it's smooth and adjusted.
So, my question is: will this damaged part of the thread bring me any problems while riding the bike? Can it damage the whole fork, and even the headset?
Thanks for the future advices!
(If it's difficult to understand, I can post pictures tomorrow!)
Cheers!
 05-28-15 | 07:37 PM
#2
Senior Member


Joined: Apr 2009
Posts: 39,897
Likes: 3,865
From: New Rochelle, NY
Bikes: too many bikes from 1967 10s (5x2)Frejus to a Sumitomo Ti/Chorus aluminum 10s (10x2), plus one non-susp mtn bike I use as my commuter
Take a look at the photo below so we can all be working from the same playbook.

I suspect that you mean that the fork is stripped where the top race (aka top cup) goes, and you're trying to hold it together using the locknut only. That can work, but there's no way to lock the adjustment.
You do have a few workarounds if there's no other option. One would be to use a Loctite product to keep the locknut from unscrewing. Or you might try putting a hose clamp around the stem, pushed down against the locknut so it can't spin back up and unscrew. Those are just ideas for salvaging a fork that otherwise would go to the scrap man, but the "right" option is to do just that.
__________________
FB
Chain-L site
An ounce of diagnosis is worth a pound of cure.
Just because I'm tired of arguing, doesn't mean you're right.
�One accurate measurement is worth a thousand expert opinions� - Adm Grace Murray Hopper - USN
WARNING, I'm from New York. Thin skinned people should maintain safe distance.
FB
Chain-L site
An ounce of diagnosis is worth a pound of cure.
Just because I'm tired of arguing, doesn't mean you're right.
�One accurate measurement is worth a thousand expert opinions� - Adm Grace Murray Hopper - USN
WARNING, I'm from New York. Thin skinned people should maintain safe distance.
05-28-15 | 08:31 PM
#3

Old fart


Joined: Nov 2004
Posts: 26,348
Likes: 5,258
From: Appleton WI
Bikes: Several, mostly not name brands.
Thread damage where the upper threaded cup engages is a result of riding with a poorly adjusted headset. This allows the upper cup to rock on the threads and eventually erode them away. The solution is either a replacement fork, a kludge such as FBinNY suggests, or melting brass into the damaged threads and cutting new threads in the brass. I have done this final method with good success.
05-29-15 | 03:30 AM
#4
Thread Starter
longi
Joined: Aug 2014
Posts: 51
Likes: 0
Take a look at the photo below so we can all be working from the same playbook.
I suspect that you mean that the fork is stripped where the top race (aka top cup) goes, and you're trying to hold it together using the locknut only. That can work, but there's no way to lock the adjustment.
You do have a few workarounds if there's no other option. One would be to use a Loctite product to keep the locknut from unscrewing. Or you might try putting a hose clamp around the stem, pushed down against the locknut so it can't spin back up and unscrew. Those are just ideas for salvaging a fork that otherwise would go to the scrap man, but the "right" option is to do just that.
Thread damage where the upper threaded cup engages is a result of riding with a poorly adjusted headset. This allows the upper cup to rock on the threads and eventually erode them away. The solution is either a replacement fork, a kludge such as FBinNY suggests, or melting brass into the damaged threads and cutting new threads in the brass. I have done this final method with good success.
Yes, FBinNY, you got it absolutely right. Sorry for my lack of technical names.
I have an adapter, which is wider than the locknut... Is the same one I asked about a few weeks ago in the forum!
Really tightened, it will work as a lock, so the locknut won't be able to unscrew, right?
Will this be dangerous in any way? It's a temporary solution, as I will buy another fork in the next few months...
05-29-15 | 05:50 AM
#5
Senior Member
Joined: Apr 2009
Posts: 39,897
Likes: 3,865
From: New Rochelle, NY
Bikes: too many bikes from 1967 10s (5x2)Frejus to a Sumitomo Ti/Chorus aluminum 10s (10x2), plus one non-susp mtn bike I use as my commuter
The stem adapter will work to hold it together if pushed down all the way. The beat way to do this is to slightly overtighten the headset and locknut, push the stem adaper down all the way & tighten, then back the locknut against the adapter to take out the slack and correct the headset adjustment. If you can't loosen the headset enough this way, loosen the adapter a bit, then use the locknut to jack it up a hair.
Done this way, it should all hold together fine until you find a new fork.
BTW- this won't in any way be dangerous, the worst thing that will happen is that the headset loosens, and it's a PIA to adjust it this way.
Done this way, it should all hold together fine until you find a new fork.
BTW- this won't in any way be dangerous, the worst thing that will happen is that the headset loosens, and it's a PIA to adjust it this way.
__________________
FB
Chain-L site
An ounce of diagnosis is worth a pound of cure.
Just because I'm tired of arguing, doesn't mean you're right.
�One accurate measurement is worth a thousand expert opinions� - Adm Grace Murray Hopper - USN
WARNING, I'm from New York. Thin skinned people should maintain safe distance.
FB
Chain-L site
An ounce of diagnosis is worth a pound of cure.
Just because I'm tired of arguing, doesn't mean you're right.
�One accurate measurement is worth a thousand expert opinions� - Adm Grace Murray Hopper - USN
WARNING, I'm from New York. Thin skinned people should maintain safe distance.
05-29-15 | 07:56 AM
#6
Thread Starter
longi
Joined: Aug 2014
Posts: 51
Likes: 0
The stem adapter will work to hold it together if pushed down all the way. The beat way to do this is to slightly overtighten the headset and locknut, push the stem adaper down all the way & tighten, then back the locknut against the adapter to take out the slack and correct the headset adjustment. If you can't loosen the headset enough this way, loosen the adapter a bit, then use the locknut to jack it up a hair.
Done this way, it should all hold together fine until you find a new fork.
BTW- this won't in any way be dangerous, the worst thing that will happen is that the headset loosens, and it's a PIA to adjust it this way.
Done this way, it should all hold together fine until you find a new fork.
BTW- this won't in any way be dangerous, the worst thing that will happen is that the headset loosens, and it's a PIA to adjust it this way.
Thanks a lot FBinNY. I'll do it that way then!
Cheers!
05-29-15 | 09:29 AM
#7
Banned
Joined: Jun 2010
Posts: 43,586
Likes: 1,380
From: NW,Oregon Coast
Bikes: 8
plan B ( for Better, IMO) adding spacers and the star-nut makes it function like the thread-less type..
BBB BHP 20 IS A 22.2 Quill converter integrating the top cap bolt function with in itself.. gains easy adjustment..
BHP-20 - Headset parts - BBB
BBB BHP 20 IS A 22.2 Quill converter integrating the top cap bolt function with in itself.. gains easy adjustment..
BHP-20 - Headset parts - BBB
05-29-15 | 10:18 AM
#8


Super Moderator
Joined: Jul 2004
Posts: 21,980
Likes: 1,155
From: Ffld Cnty Connecticut
Bikes: Old Steelies I made, Old Cannondales
If this is a temporary "fix", and you have partial threads in the damaged area, you could try wrapping a little teflon tape around the damaged threads to tighten things up a bit. It may not help, but it can't hurt to try.
__________________
Bikes: Old steel race bikes, old Cannondale race bikes, less old Cannondale race bike, crappy old mtn bike.
FYI: https://www.bikeforums.net/forum-sugg...ad-please.html
Bikes: Old steel race bikes, old Cannondale race bikes, less old Cannondale race bike, crappy old mtn bike.
FYI: https://www.bikeforums.net/forum-sugg...ad-please.html
05-29-15 | 10:55 AM
#9
Thread Starter
longi
Joined: Aug 2014
Posts: 51
Likes: 0
plan B ( for Better, IMO) adding spacers and the star-nut makes it function like the thread-less type..
BBB BHP 20 IS A 22.2 Quill converter integrating the top cap bolt function with in itself.. gains easy adjustment..
BHP-20 - Headset parts - BBB
BBB BHP 20 IS A 22.2 Quill converter integrating the top cap bolt function with in itself.. gains easy adjustment..
BHP-20 - Headset parts - BBB
Would that work? Using some spacers and the star-nut inserted in the fork tube?
05-29-15 | 11:08 AM
#10
Banned
Joined: Jun 2010
Posts: 43,586
Likes: 1,380
From: NW,Oregon Coast
Bikes: 8
the Quill stem raiser I linked to has center bolt that you tighten up the wedge at the bottom,
then the hex Head of that bolt is internally threaded, and the top cap bolt that compresses the loosened threadless stem,
and the spacers beneath that stem and pushes down on the top race of the headset setting it's preload, (standard threadless fork~headset practices)
no star nut needed.. it's the special design of that Bolt that does that.
then You tighten the threadless stem Bolts around what is Probably a Shim from 9/8" to 1" .. the BHP 20 as shown has its own stack of Shims
To go down to the 7/8" of the Quill that is the size inside of your Fork ..
I own the next larger one, the BHP21, I use it with my Threadless fork Bike that I got with too Short a Steerer tube cut.
Ive been using that bike for 6 years since..
there is another Kludge, Steel tube stem raiser, then stuff a star nut in the top of it.
Last edited by fietsbob; 05-30-15 at 07:15 AM.
05-29-15 | 12:15 PM
#11


Senior Member
Joined: May 2005
Posts: 6,301
Likes: 14
From: La La Land (We love it!)
Bikes: Gilmour road, Curtlo road; both steel (of course)
the Quill stem raiser I linked to has center bolt that you tighten up the wedge at the bottom,
then the hex Head of that bolt is internally threaded, and the top cap bolt that compresses the loosened threadless stem,
and the spacers beneath that stem and pushes down on the top race of the headset setting it's preload, (standard threadless fork~headset practices)
no star nut needed.. it's the special design of that Bolt that does that.
then You tighten the threadless stem Bolts around what is Probably a Shim from 9/8" to 1" .. the BHP 20 as shown has its own stack of Shims
To go down to the 7/8" of the Quill that is the size inside of your Fork ..
I own the next larger one, the BHP21, I use it with my Threadless fork Bike that I got with too Short a Steerer tube cut.
Ive been using that bike for 6 years since..
there is another Kludge, but I dont have time right now to write it Out.

__________________
Today, I believe my jurisdiction ends here...
Today, I believe my jurisdiction ends here...
05-30-15 | 11:07 AM
#14

Senior Member
Joined: Jan 2012
Posts: 4,852
Likes: 14
From: Ithaca, NY
Bikes: Click on the #YOLO
Back when BMX bikes were still using threaded headsets, there were 'locking' headset locknuts with grub screws to keep the locknut from working loose. No idea if the 24tpi threading of those jibes with what you have, but that's also an option.
Something like this (others had the set screws threading directly into the steerer's threads):

Kor T2 Locking Headset Nut 1 1 8 Black Lock Nut New | eBay
Something like this (others had the set screws threading directly into the steerer's threads):
Kor T2 Locking Headset Nut 1 1 8 Black Lock Nut New | eBay
05-31-15 | 02:06 AM
#16
Senior Member
Joined: Aug 2006
Posts: 7,643
Likes: 68
From: Portland OR
Bikes: 61 Bianchi Specialissima 71 Peugeot G50 7? P'geot PX10 74 Raleigh GranSport 75 P'geot UO8 78? Raleigh Team Pro 82 P'geot PSV 86 P'geot PX 91 Bridgestone MB0 92 B'stone XO1 97 Rans VRex 92 Cannondale R1000 94 B'stone MB5 97 Vitus 997
Use locktite blue (medium strength). Red will be hard to remove when you do replace the fork.
04-04-20 | 10:06 AM
#18
Junior Member
Joined: Apr 2007
Posts: 137
Likes: 141
I too have a fork where the threads are severely stripped. The locknut begins to tighten then because the threads are stripped, the locknut eventually spins and will not tighten down.
I know there are several suggests on a fix already provided, I'll add one more to the conversation. I called my brother who is a 30+ year auto body expert, he owns his own auto body and frame shop. I told him about the damaged threads and sent him a few pictures...thought it can't hurt, given my only other option is to find a replacement fork as I didn't think the other options to fix were going to work for me.
His response..."No problem, should be a straight forward fix". My response was are you going to brazen some copper on the threads and then rethread the fork. Although he said he could do this, he said he had a different solution which will be stronger and safer.
Summary of his solution:
- cut the fork stem (half way between the threaded section and the actual fork)
- find an old fork with the same threading (he has a small inventory of bikes, he thought he could find a fork that would work. I sent him the locknut so he could match the threading)
- cut the threaded section from the old fork to the exact length as the section that was cut from the original fork
- use a 'sleeve' to insert into the inside of the fork stem to be repaired. The sleeve will ensure the fork is perfectly straight before repairing.
- tack weld the replacement fork thread to the original fork stem (being careful to measure the exact same length)
- complete final weld once fork straightness is verified
Just mailed him the fork yesterday. Have yet to see a repair (really of any kind) that he isn't able to fix. Will report back how the repair went, along with before and after pictures.
Last edited by gstein; 04-11-20 at 12:32 PM.


 04-11-20 | 12:06 PM
#20
Junior Member
Joined: Apr 2007
Posts: 137
Likes: 141
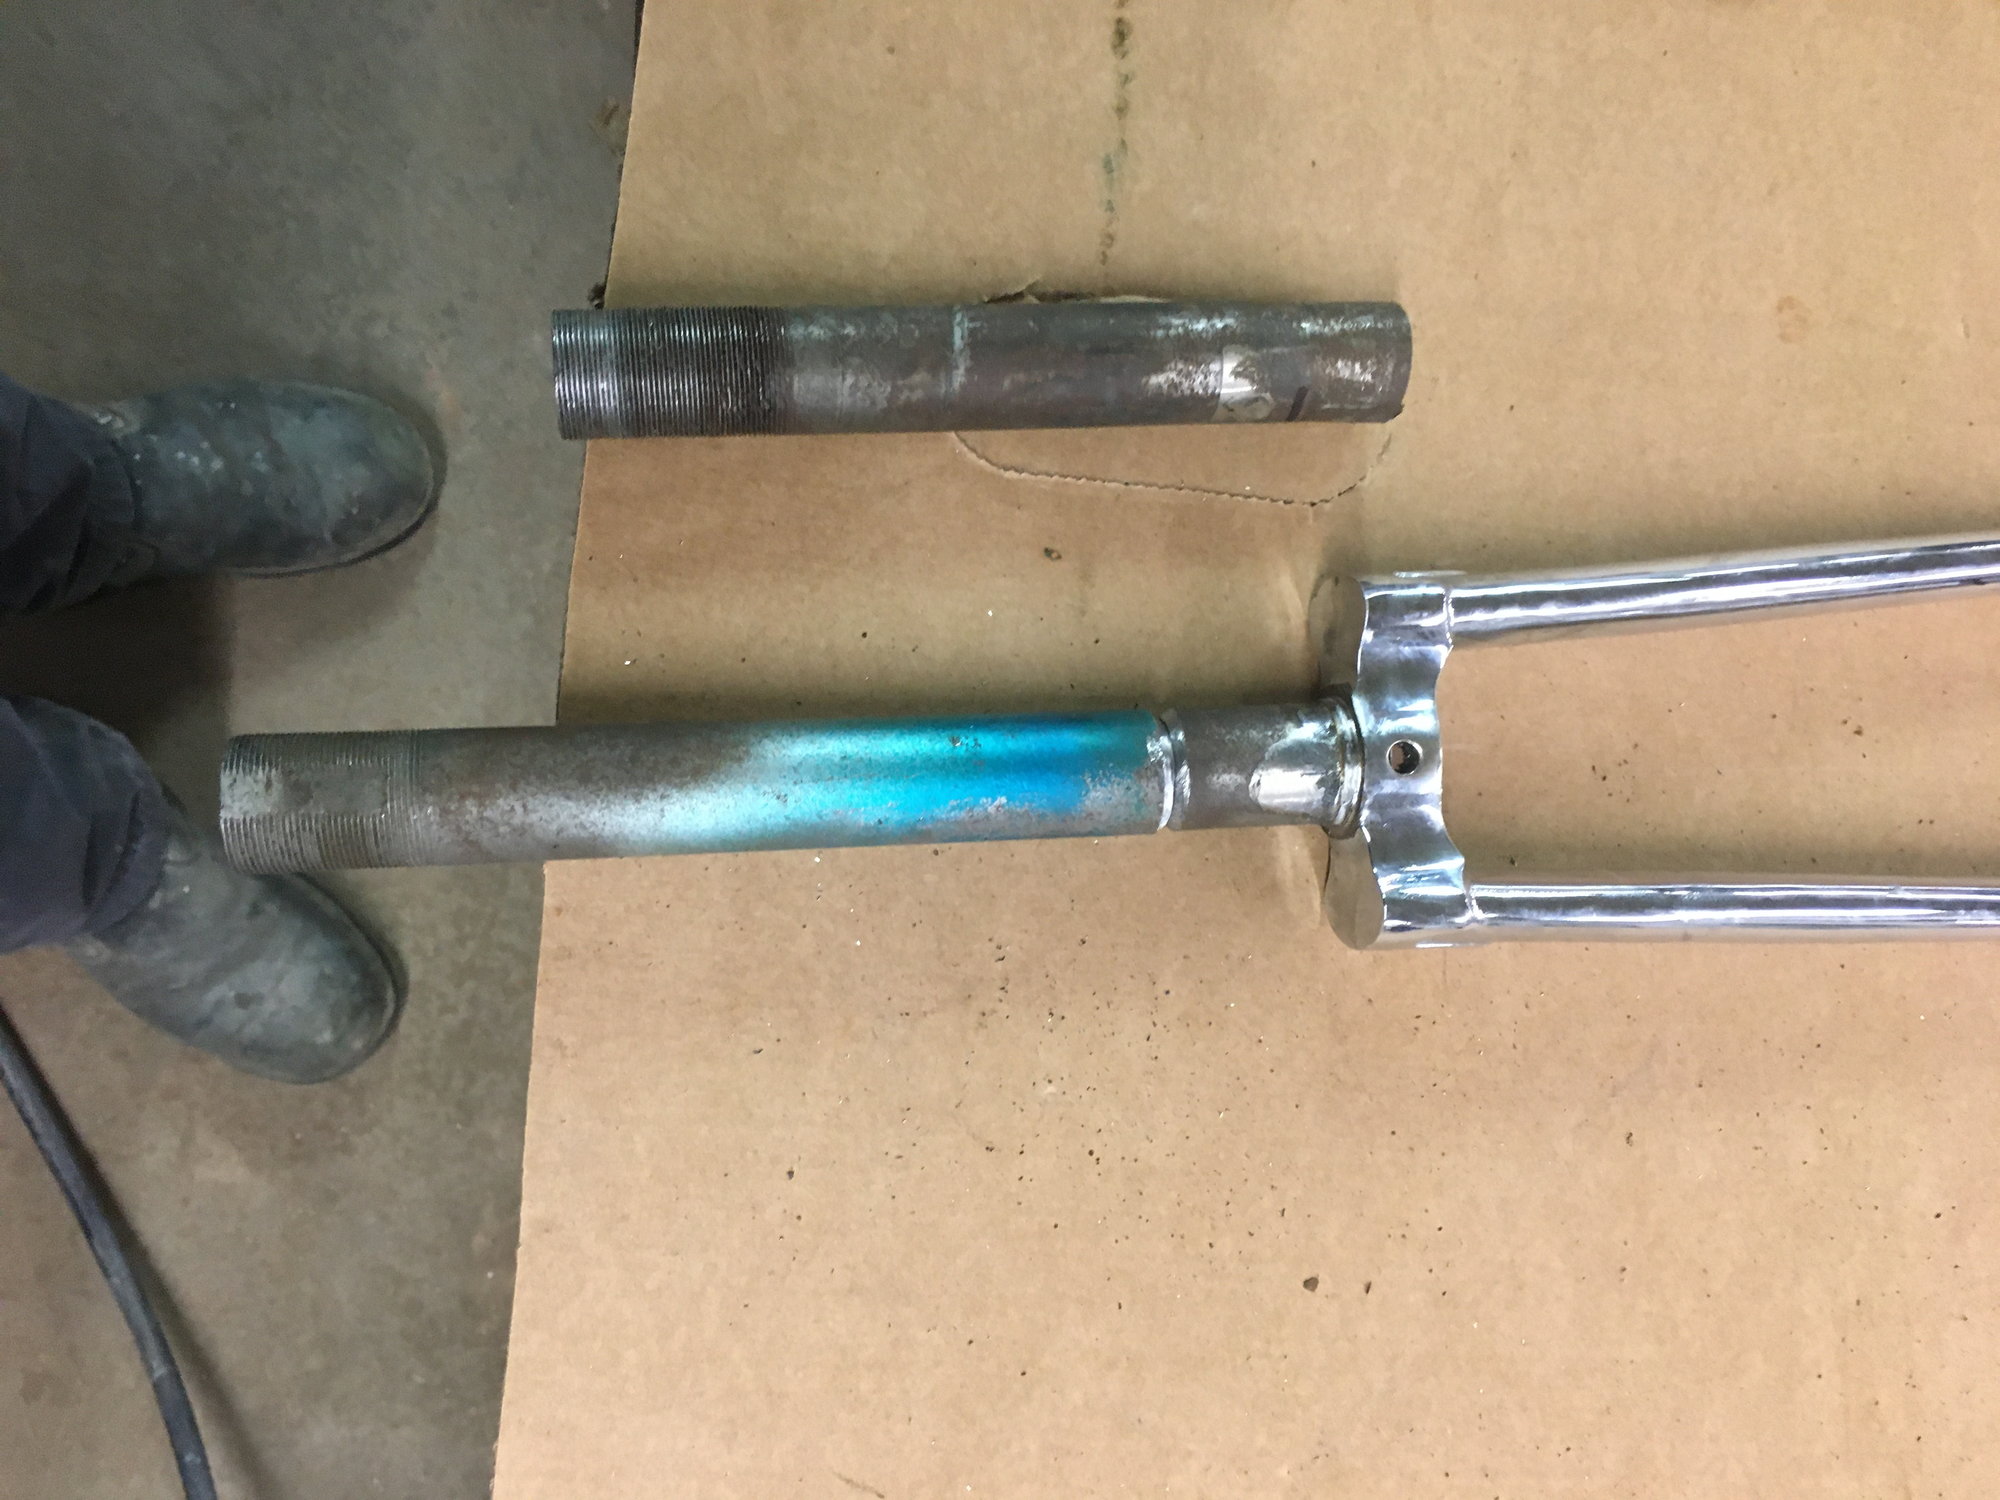
I received the repaired fork back from my brother. Fork now almost better than new!
I�ve attached several pictures for reference.
He used a lathe to shave down a piece of tubing so that it would perfectly fit on the inside where the original fork stem was welded to the replacement threaded stem. The replacement fork stem was blue, but after grinding down the non-threaded section of the fork stem, you can hardly tell a repair was done.
For those that have bent and/or striped out fork, this may be a repair worth considering.
04-11-20 | 03:00 PM
#21
Senior Member

Joined: Feb 2012
Posts: 19,353
Likes: 5,471
From: Rochester, NY
Bikes: Stewart S&S coupled sport tourer, Stewart Sunday light, Stewart Commuting, Stewart Touring, Co Motion Tandem, Stewart 3-Spd, Stewart Track, Fuji Finest, Mongoose Tomac ATB, GT Bravado ATB, JCP Folder, Stewart 650B ATB
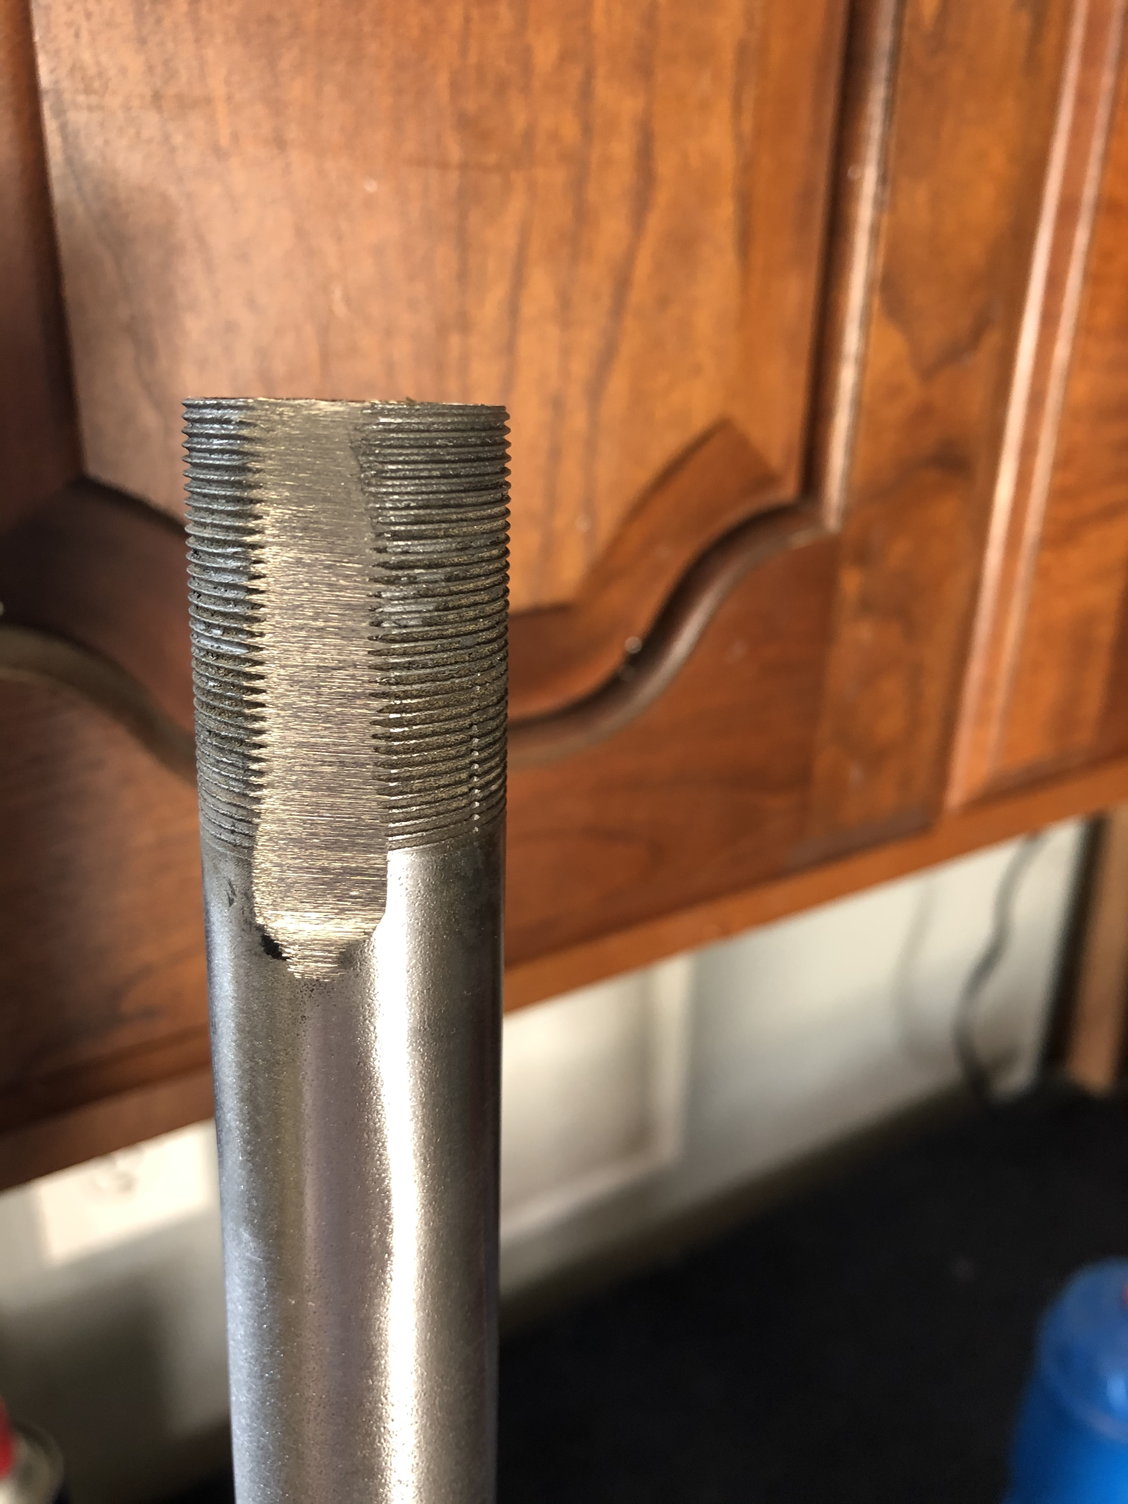
Nice job. The only thing different that I would have suggested was to not file a flat on the new part's threads and instead filed the lock washer's (and/or the cable hanger's) ID to slip over the full threads. Andy
__________________
AndrewRStewart
AndrewRStewart

Thread
Thread Starter
Forum
Replies
Last Post
huggy
Bicycle Mechanics
9
07-25-19 01:13 PM
